1
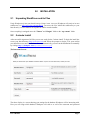
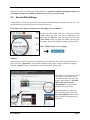
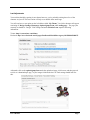
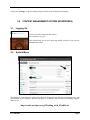
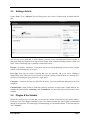
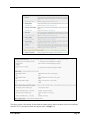
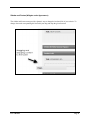
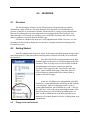
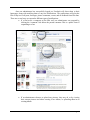
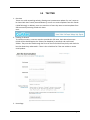
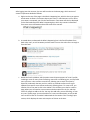
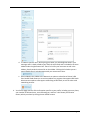
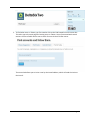
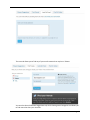
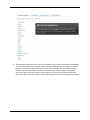
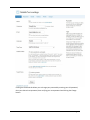
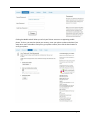
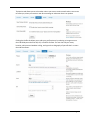
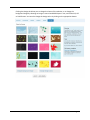
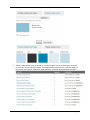
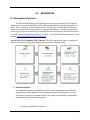
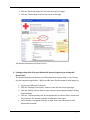
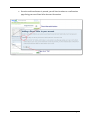
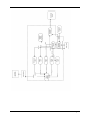
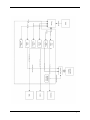
Passwords Twitter UN: IDANRV Twitter PW: idanrv1 Thank You USER'S MANUAL TABLE OF CONTENTS 1.1 1.2 1.3 Page # SYSTEM OVERVIEW................................................................................................................................................... 4 DEFINITIONS & ACRONYMS..................................................................................................................................... 4 REFERENCES .............................................................................................................................................................. 4 2.0 INSTALLATION .......................................................................................................................................... 5 2.1 UNPACKING WORDPRESS AND ITS FILES ............................................................................................................. 5 2.2 5 MINUTE INSTALL.................................................................................................................................................... 5 2.3 GENERAL SITE SETTINGS ......................................................................................................................................... 6 ON THE LEFT HAND SIDEBAR LOOK FOR A OBJECT BOX LABELED “USERS” WHEN YOU CLICK ON THE BOX A SUBDIRECTORY WILL APPEAR AND THE “ALL USERS” PAGE WILL LOAD. IF YOU SELECT THE “YOUR PROFILE” IN THE LIST ON THE LEFT SIDEBAR YOUR USER PAGE WILL APPEAR. SCROLL TO THE BOTTOM TO CHANGE YOUR PASSWORD. ........................................................................................................................ 6 CLICK “UPDATE PROFILE” TO SAVE CHANGES............................................................................................................ 6 3.0 CONTENT MANAGEMENT SYSTEM (WORDPRESS) ....................................................................... 8 3.1 LOGGING ON............................................................................................................................................................... 8 3.2 SYSTEM MENU ........................................................................................................................................................... 8 3.3 ADDING A ARTICLE ................................................................................................................................................... 9 3.4 PLUGINS & THE SIDEBAR ......................................................................................................................................... 9 4.0 FACEBOOK................................................................................................................................................ 12 4.1 OVERVIEW ................................................................................................................................................................ 12 4.2 GETTING STARTED.................................................................................................................................................. 12 4.3 Things to do on Facebook................................................................................................................................... 12 5.0 TWITTER .................................................................................................................................................. 15 6.0 MISSIONFISH ........................................................................................................................................... 28 7.0 ADDITIONAL SYSTEM INFORMATION .................................................................................................. 31 7.1 PROCESS MODEL ............................................................................................................................................................ 31 User’s Manual Page iii 1.0 1.1 GENERAL INFORMATION System Overview A homepage, Facebook, Twitter, and MissionFish account and interlinking their social networking presence. The Twitter and Facebook accounts will allow people who visit these accounts to be informed about upcoming events and updates either sponsored or advocated by our client. The MissionFish account will allow this non-profit organization to receive donations via online transactions supported by eBay. The website will serve as a portal, providing direction to the social networking sites, MissionFish, and will also provide news and upcoming events. 1.2 Definitions & Acronyms HTML: Hyper-Text Markup Language IDA: Intellectual Disabilities Agency IDANRV: Intellectual Disabilities Agency of the New River Valley PS: Photoshop DW: Adobe Dreamweaver CMS: Content Management System PHP: PHP Hypertext Processor W3C: World Wide Web Consortium SQL: Structured Query Language CSS: Cascading Style Sheets API: Application Programming Interface 1.3 References www.radford.edu/softeng18 http://www.idanrv.org/ http://ww.wordpress.org Software Engineering 8th Edition, Sommerville User’s Manual Page 4 2.0 2.1 INSTALLATION Unpacking WordPress and its Files Unzip Wordpress.zip into your host directory (ie http://www. site.com ) Wordpress will unzip as its own subdirectory (ie http:///www.site.com/wordpress), just move the files within this subdirectory to your host directory. All files must be set to public in order to run the installer. Once everything is unzipped move the “Themes” and “Plugins” folder to the “wp-content” folder 2.2 5 minute Install After successful migration of all files you are now ready for the 5 minute install. To begin the install just access your host directory (http://www.site.com) and follow the prompts to begin, if for some reason your install does not start from the host directory automatically you can run the installation file manually by visiting http://example.com/wp-admin/install.php The Important Screen: The above display is a screen showing your settings for the database Wordpress will be interacting with. Here you can assign which database Wordpress will talk to as well as the username and password User’s Manual Page 5 Wordpress will use too log into your mySQL database. Acumen recommends assigning Wordpress its own unique account (not an admin or global user) in case of a security breach 2.3 General Site Settings Congratulations! At this point you have successfully installed Wordpress and have been given a user name and arbitrary password. Proceed to log into the main site. First things First: change your password to something you can remember. On the left hand sidebar look for a object box labeled “Users” When you click on the box a subdirectory will appear and the “All Users” page will load. If you select the “Your Profile” in the list on the left sidebar your user page will appear. Scroll to the bottom to change your password. Click “Update Profile” to save changes. Themes In this segment a user will learn how to change their current theme to the one developed for the IDA. To begin, select the “Appearance” option on the left sidebar again. Once clicked a submenu will appear, select the “Themes” option. You should be on a page that looks similar to this: The theme were looking for is called “Intrepidity”, look for the brown screenshot similar to the one in the picture. Also check the “All of this themes files are located at: /themes/idanrv” to confirm that you have the correct theme. If Intrepidity does not display on this screen then double check the wp_content/themes folder to make sure the transfer of the theme was successful. User’s Manual Page 6 Last Adjustments Your website should be sporting its new theme however; you’re probable noticing that a few of the elements are just off. This last section will help a user disable these small bugs. You will now have a new option on the left sidebar called “My Theme.” On click a submenu will appear consisting of: Design, Settings, Homepage, Option/signup Form, and Landing page. The page your currently on should be “Design” Click settings and under Socialize Icons input the following information: Twitter: http://www.twitter.com/idanrv Facebook: http://www.facebook.com/#!/pages/Intellectual-Disabilities-Agency/10150100630900371 Afterwards click on the option/signup form under the upload an image: click browse and then proceed to click on “donationboxpic.png” in your images folder inside the CD. Final settings should look like this: User’s Manual Page 7 Lastly click “Settings” on the left sidebar and proceed and clear the blog title and tagline. 3.0 3.1 CONTENT MANAGEMENT SYSTEM (WORDPRESS) Logging On The very last line rendered on the website has an option to “Log in” This option brings you to our Log-In page which will then let you into the administration menu 3.2 System Menu The Wordpress Control Panel is a powerful tool that is designed to keep the latest information, news, and developments at your fingertips. Because wordpress is so dynamic and evolving Acumen highly suggests that you visit: http://codex.wordpress.org/Working_with_WordPress User’s Manual Page 8 3.3 Adding a Article Under “Posts” Click “Add new” this will bring up the new Article Creation menu. It should look like this: The site uses a text editor that is fairly common, you have access to buttons that format text (like in Microsoft Word) and a option at the top to insert various forms of media including: Pictures, video, and music. Some of the things you’re probably not too familiar with: Excerpt: are smaller “summaries” of the article that are used in the homepage and in rss feeds. For this website we did not make use of excerpts. Post Tags: Post tags are search keywords that you can manually add to an article. Wordpress automatically index’s the post for local search by using the content presented inside of it and tags are a good way of returning the given article for a vague query. Categories: Categories are how the CMS files the article. Users can search and make queries on given categories. Custom Fields: Custom Fields are fields that a directly associates an article with a widget function. For example the custom fields “articleimg” and “featuredtext” are two fields required for an article to be featured 3.4 Plugins & the Sidebar Plugins are external pieces of code that can increase the amount of interactivity and content within a given blog. One of the Plugins included in your CD is featured content box that is highly recommended (though is not required). The other highly recommend plug in is the branded admin. To activate both just click “Activate” User’s Manual Page 9 The above picture is the settings for the featured content gallery (those not shown can be left at default). Once the FCG is activated its menu will appear in the “settings” bar User’s Manual Page 10 Sidebar and Footers(Widgets under Appearance) The sidebar and footers menu provide a dynamic way to change the look and feel of your website. To change what each corresponding division holds just drag and drop the given function User’s Manual Page 11 4.0 4.1 FACEBOOK Overview The Facebook page will serve as an efficient means of broadcasting any updates, information, events, and news. The main intention of the Facebook is to broaden the web presence of the IDA in an interactive manner. Facebook offers a variety of tools and functions that can be broadcasted to any users interested in interacting with the IDA Facebook. Any individual who is a Facebook user will have access to the IDA Facebook, and will have the ability to publicly or privately interact the IDA page. Facebook is considered by most to be easily adaptable and reliable. However; it is not uncommon for Facebook to change the user interface, resulting in minimal relearning of the Facebook processes. 4.2 Getting Started If an IDA administrator chooses to log on, he/she must enter the homepage and give their email and password. If the password has been forgotten, Facebook will send you an email with the password. Any individual listed as an administrator on the IDA Facebook page has the power to edit information on the IDA Facebook. There is no log in process for the IDA Facebook. An administrator must log on to their own personal Facebook. Once logged on, they can click the “Ads and Pages” option on their home page. From there, there are several options an administrator has to choose from in regards to the IDA fan page. In the case of adding a new administrator to the IDA Facebook, a current administrator would log on and click the “Ads and Pages” option. On that page, there is a list of current administrations, and a link that says “add”. Click on the “add” link. A box will pop up requesting the name of the individual whom you wish to add as an administrator. In order to add an administrator to the IDA page, they must already be a Facebook friend to whoever is adding them as an administrator. 4.3 Things to do on Facebook User’s Manual Page 12 Once an administrator has successfully logged on, Facebook will direct them to their homepage, along with notifying them of any new notifications. The notifications will alert the IDA of any new wall posts, messages, picture comments, events, and all feedback from IDA fans. There are several ways to respond to different types of notifications: If a fan leaves a comment on the IDA wall, an administrator can respond by clicking the “comment” link below the posted comment. This is a public form of responding to a fan. User’s Manual If an administrator chooses to upload any pictures, they may do so by viewing their current pictures and either creating a new album, or uploading them in an existing album. Page 13 User’s Manual If an administrator wishes to send a private message, they may do so by going to an individual’s Facebook page and clicking the “send message” link below the default picture of the person they are trying to message. If an administrator wishes to post an event, they can do so by clicking the events tab on the IDA homepage, and clicking “create new event”. Page 14 5.0 TWITTER 1. Overview Twitter is a social networking website, allowing near-instantaneous update of a user’s status to be shared with their friends (termed followers), as well as to receive updates from their friends (called following). In addition, users can create lists of users they want to receive updates from without actually becoming friends with those users. 2. Creating an Account To create an account, a new user needs to provide their full name, their desired username (which will be checked against the Twitter user database), a password, and a valid email address. They must also read through the Terms of Service and the Privacy Policy and check the box that shows they understand it. There is also a checkbox for if the user wishes to receive email updates. 3. Home Page User’s Manual Page 15 After logging into their account, the user will be taken to the Home page, which consists of several components detailed as follows a. Right near the top of the page is the What’s Happening box, which is where you type an actual tweet. A tweet is a comment about your status, in 140 characters or less. Once your tweet is composed, you click the Tweet button. Your tweet will then be displayed on the feed underneath the What’s Happening box, which also contains information from users you are following and previous posts from yourself. b. As stated above, underneath the What’s Happening box is the feed of updates from both other users, as well as tweets you have made. You can also select users to reply to from this feed c. Beside the feed is a sidebar, which contains several important parts of a user’s profile, including a count of users you are following, users who are following you, and any listed users you have. It also contains a search bar, allowing you to search for topics by keyword. Underneath that are your lists, which are created to allow a user to get updates from specific users without necessarily following them. To create a list, you need to click on the new list link in the sidebar. This will take you to the list creation page, where you will need to create a name and a description for the list, and then search for people to add to the list. You may also add users you are following, or from any users’ profile page. You can also edit a list’s name and description, as well as add users to the list later on if needed. Underneath the list section is the Trending Topics section, which displays the most active topics on Twitter at the time. User’s Manual Page 16 d. To tweet to specific users, while typing your tweet, you include @username in your message, and it is both posted to your feed, the users feed, and is included in the users sidebar under the @username link. There is a link for your username as well in the sidebar, directly under the Home link on the sidebar. Clicking this link takes you to a special feed that only includes tweets with your username in them. e. Also included in the sidebar at the bottom is an option to subscribe to Twitter’s RSS Feed. An RSS Feed allows you to receive updates to a program that supports RSS Feeds. Most internet explorers now support subscribing to RSS Feeds, as well as other social networking services. 4. Your Profile page contains all the information specific to your profile, including your user photo, your number of followed users, users following you, and lists. It also shows your favorite tweets, which you select by clicking the star beside a tweet. User’s Manual Page 17 5. To find other users on Twitter, you first need to click on the Find People link on the menu bar. This takes you to the main page for locating users on Twitter. You are presented with several options, the first of which allows you to search for users by their Twitter names. The second tab allows you to invite a user by their email address, which will send the invite to their email. User’s Manual Page 18 The next tab allows you to find any of your email contacts that may be on Twitter. You can also select the Browse Suggestions tab, which shows general categories and allows you to find users who share your interests. User’s Manual Page 19 6. The Settings section contains most of the information for your profile and account, and is where you can actually edit that information. Upon clicking the Settings link in the menu bar, you will be taken to the Account page, where you can edit your username, your email address, select whether you want other users to be able to find you by your email, change your language, select your time zone, add a location to your tweets, and select if you want only approved users to be able to view your tweets. Clicking the Save button will save and apply your changes. User’s Manual Page 20 Clicking the Password tab allows you to change your password by entering your old password, then your desired new password, then verifying your new password and clicking the Change button. User’s Manual Page 21 Clicking the Mobile tab will allow you to link your Twitter account to a supporting mobile phone. To do so, you need to choose your country, enter your phone number and select if you want other users to be able to find you by your phone number, then click the Start button to verify your phone. User’s Manual Page 22 The Notices tab allows you to select what notices you want to receive emails when a user starts to follow you, when you receive a new direct message or whenever there is an update. Clicking the Profile tab allows you to edit your profile picture, by selecting an image no more than 700 kilobytes and of the JPG, GIF, or PNG file formats. You can also edit your name, location, add a personal website or blog, and type a short biography of yourself that’s no more than 160 characters. User’s Manual Page 23 Clicking the Design tab allows you to change the theme of the website, or to change the background image by selecting an image no more than 800 kilobytes in size, and of the JPG, GIF or PNG formats. You can also change the design colors by clicking on the appropriate button. User’s Manual Page 24 7. Twitter’s Help section gives you access to a variety of topics as well as allowing you to search for a solution to your specific problem. The Getting Started section covers such information as how to edit your account, frequently asked questions, and using advanced search operators. User’s Manual Page 25 The Mobile section contains information specific to setting up a mobile account on Twitter, as well as how to use Twitter on your phone. The Policy section contain Twitter’s various rules and regulations, as well as information on how to file complaints of Terms of Service or Rules violations. User’s Manual Page 26 The Troubleshooting section covers many of the likely problems you may encounter using Twitter, and has solutions both added by Twitter staff and other users, allowing for a dynamic problem solving approach. The Known Issues section contains problems that have been solved by either Twitter’s staff or users. User’s Manual Page 27 6.0 MISSIONFISH 6.1 Description of Service: The Mission Fish program is designed to provide an easy to use interface for nonprofit organizations, giving them the ability to raise funds through donations and auctioning items on eBay. Just by creating your MissionFish account, everyday eBay users will have the option to donate a percentage of their sale toward your nonprofit organization. The following guide will provide a few steps to accomplish some common functions used through a Mission Fish account as well as some brief information about how it works. A more detailed MissionFish guide can be found at www.missionfish.com/help/us_help.html The Lifecycle of a Community Seller donation: The following timeline shows a summarized lifecycle of an eBay Giving Works donation that results from a Selling listing. 1- Donate Now Option Every eBay Giving Works certified Mission Fish account is paired with the feature to automatically receive donations from individuals without having to auction an item. This feature is handy as it provides a link for any Paypal account holder to generously donate at any time. To access this feature: Log into your MissionFish account User’s Manual Page 28 Click the “About My Nonprofit” link near the top of the page Click the “Donate Now” tab near the center of the page All donation information will then be listed. 2- Linking an eBay seller ID to your MissionFish Account (registering as a Nonprofit Direct Seller) This feature provides you the luxury of selling items directly onto eBay to raise money for your nonprofit organization. With your eBay user ID and password, setup begins by: User’s Manual Log into your MissionFish Account Click the “Manage Direct Sellers” button on the left side of the login page Click the “Adding a Direct Seller to your account” button approximately half way down the page Click the “I know the eBay User ID and password of the Direct Seller” button and then Click the “Go” button located at the bottom of the menu. You'll be taken to a special eBay sign-in page. Enter your eBay seller ID and password as directed. Page 29 User’s Manual Once the confirmed button is pressed, you will then be taken to a confirmation page listing your new Direct Seller Account information. Page 30 7.0 ADDITIONAL SYSTEM INFORMATION 7.1 Process Model User’s Manual Page 31 User’s Manual Page 32 User’s Manual Page 33