1
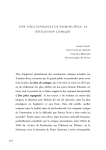
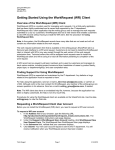
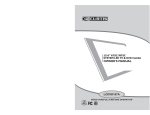
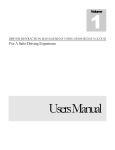
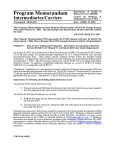
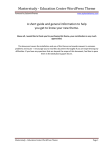
WordPress
User Manual
Alberto Bravo
George Ndede
Christopher Pontes
Brian Washington
Danielle Wegert
i
ii
Table of Contents
Table of Contents
ii
Chapter 1: Let’s Get Started
What is WordPress? 7
Logging In7
Logging Out 7
Dashboard7
5
Chapter 2: Updating Your Information
Updating Personal Information 13
Updating Settings
13
11
Chapter 3: New Creations 15
Creating New Pages17
Creating New Posts 17
Chapter 4: View Your Existing Website
Viewing Pages 21
Viewing Media 21
19
Chapter 5: Uploading Information to the Website
Uploading Media
25
Uploading Documents
25
23
Chapter 6: Editing Previously Posted Information27
Editing a Page 29
Editing a Media File 29
Editing a Post 29
Editing the Theme 30
Chapter 7: Removing Information from Your Website 31
Removing a Page 33
Removing a Media File
33
Removing a Post
33
iii
iv
Chapter 1: Let’s Get Started
In this chapter, you will learn what WordPress is, learn
how to log-in and log-out of your account, and how
to access Dashboard and why. These are crucial
parts of learning how to manage your WordPress
website. You will need to understand this chapter in
order to begin.
55
6
Understanding WordPress
WordPress is a Content Management System (CMS). A CMS is designed to make
managing a website easier for everyday users who are not familiar with
managing a website. WordPress makes changing and updating your website easy
for the everyday worker.
Logging In
The first step to managing your CMS is logging in. You must log-in in order to do
anything to your website. If you want to edit, upload, change, or create, you must
log-in.The log-in process is simple and takes just a few steps.
1. Go to <www.wordpress.com>.
2. In the upper left corner is the log-in.
3. Enter username and password.
4. Click Log In.
Logging Out
Logging Out is a very simple step that is extremely important. You need to log out
every time to ensure that your website and data are secure. You should log-out any
time you step foot away from your computer.
1. In the upper right corner will be a drop down menu with the first name of the person listed in the profile as the title.
2. Hold cursor over the name.
3. At the bottom of the menu will be “Sign Out.” Click.
Dashboard
Understanding Dashboard
Dashboard is the behind the scenes of your website. This is where you
access all of the information posted on the website. You control your
documents, drop down menus, pictures, home screen, personal
information and more from this area. You can edit and adjust everything
from this one location. Only you and the people you assign can access and
view the dashboard.
7
7
Accessing Dashboard
The steps to accessing Dashboard once you have logged in to WordPress are simple.
You will access Dashboard anytime you have a change to make to your website.
1. Hold the cursor over the drop down menu in the upper right corner. The drop down menu is titled with your first name.
2. First link on the drop down is Edit My Profile.
3. Click to access.
Understanding Icons
Once you have accessed Dashboard, on the left side of the screen is a list of links and
drop down menus. Included are more specific details for the links that you will need
to know.
Icons:
•
•
•
•
•
•
•
•
•
•
Store – if you want to purchase premium items
Posts- this menu gives you access to create a new post, view all posts
Media – upload media, view your current media
Links- add links, view links
Pages- add new pages, view all pages(editing the pages)
Comments- add comments
Feedback
Polls
Ratings
Appearance- view different themes, upload a new theme, menus,
background
• Users- view users, add users, profile and settings
• Tools
• Settings- adjust the settings for your media, discussion, writing
8
Image 1
Icons on the Dashboard useful when
editing the website.
9
10
Chapter 2: Updating Your
Information
Updating your information is necessary to the upkeep
of your website. Any time there is a change with an
authorized user, you will need to update their
personal information. You may also want to update
the settings of the website itself. You can update the
title, the caption, and date/time settings.
11
12
Updating Personal Information
When you need to change information about yourself or another authorized user,
start by accessing Dashboard. You will need to update regularly to ensure the most
effective website.
From there:
1. Click the drop down menu titled “Users.”
2. It will put you to a list of users. Click “Edit” under the person whom you need to change information.
3. This will take you to the edit screen. Here you can change
information such as:
• Name
• Display Name
•
•
•
•
Location
Contact Information
Pictures
Links
Updating Settings
To update settings that appear on the viewable website, start at the Dashboard.
Click Settings on the left side. This will take you to the editing page.
Here you can edit:
1. Title
2. Tagline
3. Email
4. Time Zone
5. Date Format
6. Time Format
7. Week Start Day
8. Language
13
14
Chapter 3: New Creations
Even though you are learning to manage an already
existing site, you will need to learn to create new
pages and posts. In managing your site, there will be
new items you must add. The most common
additions are pages and posts because this is how
you add information to the website that any person
can view. Creating pages and posts with WordPress is
much more simple than you would expect.
15
16
Creating New Pages
Creating a page in WordPress is simple and can really add to your website. You
will want to create a new page when you have new
information that is vital to the website. To create a new page, start at the
Dashboard.
1. Hold cursor over “Pages” on left side of page.
2. Drop down menu appears; click on “Add New.”
3. This will take you to the page where you enter
information.
4. Enter the title in the title box.
5. To add information either Copy/Paste the information into the text box or type the information into the text box.
6. You can adjust the format of the text, add bullets, and spell-check the document from that text box.
7. Uploading information is possible using the Upload/
Insert link.
8. When finished creating, hit “Publish” in the upper right corner of the page.
Creating New Posts
A post is a small amount of information that you add to an already existing page.
Creating a new post that will appear on the home page of your website is simple
starting at the Dashboard.
1. Hold cursor over “Posts.”
2. Click “Add New.”
3. Enter the title of your new post.
4. To enter the information you can either Copy/Paste the information to the text box or type the information into the text box.
5. From the text box, you can edit the format, add
bullets, and spell-check the text.
6. Uploading photos and documents is possible using the Upload/Insert link.
7. Click “Publish” in the upper right corner of the page.
17
Image 2
Creating a new page: The drop-down menu from the Pages
icon.
18
Chapter 4: View Your
Existing Website
While you are managing your website, you will want
to view what is already published in order to see
what needs to be updated or created. You will want
to view the website regularly to ensure that the
website is running correctly.
19
20
Viewing Pages
You will want to view a page that is already on the website when you have
information to add in order to visually see where to add the information. You will
also want to view immediately following the publishing or a new page to ensure
that it appears as desired.To view a page that has previously been posted, start at
the Dashboard.
1. Click on “Pages” on left side of page.
2. A list of pages that are currently on your website
appears.
3. Click on the page you wish to view.
Viewing Media
Viewing media is crucial to managing the website. You will want to view the
media to make sure it downloaded appropriately and to make sure the media file is
still good. To view media that has
previously been posted, start at the Dashboard. Media will include any photo,
video, etc. that has been posted anywhere on the site.
1. Click on “Media” on the left side of the screen.
2. A list appears of all media that has been uploaded to the website.
3. Click on the media you wish to view.
21
22
Chapter 5: Uploading
Information to the Website
You will need to upload information when you have
new things to add that are previously produced. If
you have new photographs, documents, or music,
you will have to upload the file in order to put it on
your website.
23
24
Uploading Media
Uploading to a Page/Post
To upload to a page or a post you need to be editing or creating a page/post
and have a media file that you want to add to the page/post. When you are
already in that location, you can click on the Upload/Insert link located above
the text box. From this link, it will take you to an upload box. You can search
the computer for the media and then insert it.
Uploading to the Dashboard
You will need to upload a media file to the Dashboard if you have media that
you want on your website, but are not certain where you want the file to go.
1. Hold cursor over “Media” on the left side of the page.
2. Click “Add New.”
3. Click the link “Select Files.”
4. Search computer for the media file.
5. Select the media file and click “Open.”
6. Enter information such as title, caption, and
description.
7. Click “Save all changes.”
Uploading Documents
To upload a document to a page or a post, you must be creating or editing a page/
post. When you are creating/editing a page/post, there will be an Upload/Insert link
above the text box. Click on the link and then search the computer for the
document.
25
Image 3
When creating a new page, upload media using the circled icons.
26
Chapter 6: Editing Previously
Posted Information
One of the most important aspects of managing your
website is editing information. Anytime that
information changes, you need to update it in your
system. You have to keep your information current in
order to keep your website credible. Editing
information is simple and helps keep your website
running smoothly.
27
28
Editing a Page
You will need to edit a page any time there is a significant change to the
information posted. To edit a page, start at the Dashboard.
1. Click “Pages.”
2. List appears of all current pages on the website.
3. Hold cursor over the page you wish to edit.
4. Links appear. Click “Edit.”
5. Takes you to the edit page where you can edit the title and the text in the page.
6. You can also upload documents and media by clicking the Upload/Insert link.
7. Click “Update” to finish.
Editing a Media File
You will need to edit a media file anytime that you need to adjust the information.
To edit a media file, start at the Dashboard.
1. Click “Media” on the left side of the page.
2. List appears of all media currently on the website.
3. Hold cursor over the media file you wish to edit.
4. Links appear.
5. Click on “Edit.”
6. From here you can change the title, caption, and
description.
7. When you are finished updating, click “Update
Media.”
Editing a Post
If there is a small change to the information posted, you will need to edit your
posts.To edit a post, start at the Dashboard.
29
1. Click “Posts” on the left side of the page.
2. List appears of all posts currently on the webpage.
3. Hold cursor over the post you wish to edit.
4. Links appear. Click “Edit.”
5. From here you can edit the title and the text in the post.
6. Uploading is also possible by clicking on the Upload/Insert link.
7. When finished editing, click “Update” in the upper right corner of
the page.
Editing the Theme
Your theme will be already chosen when you begin managing your website. If you
need to edit the theme, you will need to get help from a computer specialist.To edit
your theme, start at Dashboard.
1. Hold cursor over “Appearance” on left side of screen.
2. Menu appears, click “Themes.”
3. All themes appear.
4. Click “Preview” to view before changing your settings.
5. Click “Activate” to finalize.
30
Chapter 7: Removing
Information from Your
Website
When there is information that you no longer want or
need on the website, you need to remove the
information. Removing any amount of information is
simple. In most cases, once you remove information,
it is gone from the website for good.
31
32
Removing a Page
When there is a significant change that you need to make to the
website, you might need to remove an entire page. Removing an
entire page will take a large chunk of information out at one time. To
remove an entire page, start at the Dashboard.
1. Click “Pages.”
2. Hold cursor over the page you wish to remove.
3. Links appear.
4. Click “Trash.”
Removing a Media File
When you need to completely remove a picture, video, or any media file you will
need to follow a few simple steps. To remove a media file, start at the Dashboard.
1. Click “Media” on the left side of the page.
2. List appears of all media.
3. Hold cursor over media file you wish to remove.
4. Links appear.
5. Click “Delete Permanently.”
Removing a Post
When you need to remove a quick post that you published to the website, it is
simple by following a few simple steps. To remove a post, start at the Dashboard.
1. Click “Posts” on the left side of the page.
2. List appears with all current posts.
3. Hold cursor over post you wish to remove.
4. Links appear.
5. Click “Trash.”
33
34
Index
C
Content Management System 7
Creating 17
D
Dashboard 29
E
Editing 29
I
Icons 8
L
Log-in 7
Log-out 7
M
Media file 33
P
Page 33
Personal Information 13
post 33
R
Removing 33
S
Settings 13
T
Themes 30
U
Updating 13
Uploading 25
V
Viewing 21
36