1
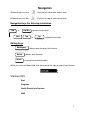
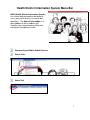
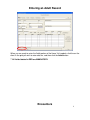
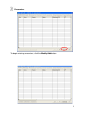
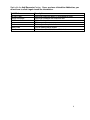
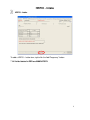
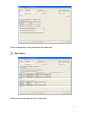
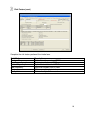
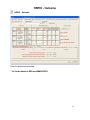
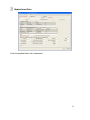
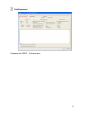
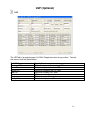
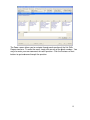
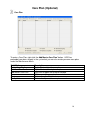
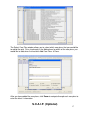
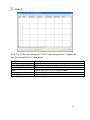
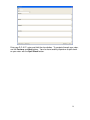
Home Visits – Adult User’s Manual Home Visits – Adult Health District Information System HDIS (Windows Ver. 5.3) Copyright 1998 by CHC Software, Inc All Rights Reserved CHC Software, Inc. Health District Information Systems [email protected] Table of Contents Introduction ................................................................................. 1 About This Manual ...................................................................... 1 Navigation .................................................................................... 2 Entering an Adult Record ........................................................... 4 Encounters .................................................................................. 4 HRPIO - Intake ............................................................................. 8 HRPIO - Outcome ...................................................................... 11 LSP (Optional) ........................................................................... 14 Care Plan (Optional).................................................................. 16 S.O.A.I.P. (Optional) .................................................................. 17 Assessment Tools .................................................................... 20 Progress Notes (Narrative) (Optional)..................................... 21 Progress Notes (Checklist) ...................................................... 23 Print Button ............................................................................... 25 Reports....................................................................................... 26 Maintenance - Add/Delete/Modify Tables ............................... 27 Introduction This program is designed to assist you in organizing a systematic approach to entering your High Risk Pregnancy visits and provides accurate up-to-date records within your health district. Please review the manual carefully to obtain the maximum benefits. Little or no prior computer experience is necessary to operate this program. About This Manual The Home Visit Module is simple to use. The maximum benefit with the least time spent will be obtained if you start at the first page of this manual and follow the directions exactly as you enter the first record in your computer. Square boxes in this manual surround the key that you are to press on your keyboard. As an example, when you read , press the enter key on your keyboard. ENTER The word TYPE is followed by bracketed [ ] instructions of what to type into a field. Note: For Technical Support, email: [email protected] 1 Navigation Whenever you see one click the left side of your mouse once. Whenever you see two click the left side of your mouse twice. Navigation Keys For Entering Information Tab ENTER or Shift Tab to move to next field or Up Arrow to go back one field Editing Keys Backspace Delete Insert deletes one character left of cursor deletes one character inserting & overwriting modes When you see a pull-down field, click the arrow to the right to view all your choices. Starting HDIS Start Programs Health District Info Systems HDIS 2 Health District Information System Menu Bar HDIS (Health District Information System) has several different modules designed to assist your health district in its day-to-day operations. The Home Visits module is a great addition to these modules and simplifies your record keeping, billing and information management needs. Community and Public Health Services Home Visits Home Visit 3 Entering an Adult Record When you are ready to enter the Adult portion of the Home Visit module, click the on the client in the grid you wish to enter data for, and then click the Adult button. ** All fields labeled in RED are MANDATORY. Encounters 4 Encounters To begin entering encounters, click the Modify/Add button. 5 Right-click the Add Encounter* button. Once, you have clicked the Add button, you do not have to click it again to add the information. Field/Button Re-Sort Dates* Delete Encounter* Add Encounter* Zoom Print Modify/Add Close Description Right-click to put the dates in chronological order. Right-click to delete the encounter row. Right-click to add an encounter. Click to open the zoom screen. Click to open the print window. Click to modify/add a record. Click to close the Adult Home Visit windows. 6 When the Add Encounter button is clicked, the above Zoom screen appears for you to enter the encounter. Field/Button Date of Entry Date of Service Nurse/Outreach Worker Program Setting/Activity Billable Time ICD9 CPT Code Non-Billable Time Location of PHHV Face to Face Visits Travel Time Vehicle Mileage Total Time Return Visit Previous Encounter Next Encounter Add to Dailies* Close Description Automatically filled out by the computer. Enter the date of service. Choose the nurse/outreach worker. Choose the program. Choose the setting/activity. Enter your billable time. Choose the ICD9 code. Choose the CPT code. Enter your non-billable time. Choose the location of the face to face visit (mandatory). Enter your travel time. Enter your vehicle number. Enter your mileage traveled. Automatically filled out by the computer. Enter the return visit date (optional) Click to view the previous encounter. Click to view the next encounter. Right click to add the encounter to your daily worksheets. Click to close the zoom screen. 7 HRPIO - Intake HRPIO - Intake To add a HRPIO – Intake form, right-click the Add Pregnancy* button. ** All fields labeled in RED are MANDATORY. 8 Enter the pregnancy history portion of the intake form. Risk Factors Enter the risk factors portion of the intake form. 9 Risk Factors (cont) Complete the risk factors portion of the intake form. Field/Button Previous Pregnancy Next Pregnancy Delete Pregnancy* Add Pregnancy* Print Modify/Add Description Click to view the previous HRPIO. Click to view the next HRPIO. Right-click to delete the HRPIO form. Right-click to add a HRPIO form. Click to open the print window. Click to modify/add the record. 10 HRPIO - Outcome HRPIO - Outcome Enter the outcome information. ** All fields labeled in RED are MANDATORY. 11 Medical/Infant Risks Enter the medical/infant risks information. 12 Exit/Comments Complete the HRPIO – Outcome form. 13 LSP (Optional) LSP The LSP tab is for entering your Life Skills Progression form for your client. To enter the scores, click the Zoom button. Field/Button Previous LSP Next LSP Delete LSP* Add LSP* Zoom Print Modify/Add Description Click to navigate to the previous LSP. Click to navigate to the next LSP. Right-click to delete the LSP form. Right-click to add a LSP form. Click to open the Zoom screen. Click to open the Print window. Click to modify/add a LSP record. 14 The Zoom screen allows you to navigate through each question of the Life Skills Progression form. To enter the score, simply click on one of the black numbers. You may also enter your own comments for each question. Click the Previous or Next buttons to go to advance through the question. 15 Care Plan (Optional) Care Plan To enter a Care Plan, right-click the Add Master Care Plan* button. HDIS has preloaded care plans already in the system but you can also create your own care plans under the Maintenance Menu. Field/Button Delete Care Plan* Add Care Plan Row* Add Master Care Plan* Zoom Print Modify/Add Description Right-click to delete the care plan. Right-click to add a single care plan row. Right click to open the care plan window. Click to open the care plan zoom window. Click to open the Print window. Click to modify or add a care plan record. 16 The Select Care Plan window allows you to select which care plans that you would like to add to the grid. Put a checkmark in the Add column for which of the care plans you would like to add, when finished click Add Care Plans & Close. After you have added the care plans, click Zoom to navigate through each care plan to enter the client’s information. S.O.A.I.P. (Optional) 17 S.O.A.I.P. The S.O.A.I.P. tab is for entering your S.O.A.I.P. notes for your client. To add a row, right-click the Add S.O.A.I.P. Row* button. Field/Button Re-Sort Dates* Delete Blank S.O.A.I.P. Row* Add S.O.A.I.P. Row* Zoom Print Modify/Add Description Right-click to put the dates in chronological order. Right-click to delete any blank rows in the grid. Right-click to add a S.O.A.I.P. note. Click to open the S.O.A.I.P. zoom window. Click to open the print window. Click to modify or add a S.O.A.I.P. record. 18 Enter your S.O.A.I.P. notes and click the close button. To navigate through your notes, use the Previous and Next buttons. You also have to ability to perform a spell check on your notes with the Spell Check button. 19 Assessment Tools Assessment Tools To add an assessment tool, enter the data in the fields above the grid and right-click the Add Test* button. Once a test has been entered into the grid, click on the Zoom button to enter additional information for that specific test. Field/Button Delete* Add Test* Print Modify/Add Description Right-click to delete a row. Right-click to add a test to the grid. Click to open the print window. Click to modify or add an assessment tool record. 20 Progress Notes (Narrative) (Optional) Progress Notes (Narrative) To enter your narrative progress notes on the client, right-click the Add Progress Note* button. Field/Button Re-Sort Dates* Delete Blank Progress Note* Add Progress Note* Zoom Print Modify/Add Description Right-click to put the dates in chronological order. Right click to delete any blank progress notes. Right-click to add a progress note. Click to open the progress note zoom window. Click to open the print window. Click to modify a progress note record. 21 Click the Zoom button to navigate and enter your progress notes. 22 Progress Notes (Checklist) Progress Notes (Checklist) The Progress Notes (Checklist) allows you to enter pre-created forms for the clients. To add on of these forms, enter the screening date and click the Add Form button. Select the form that you wish to add to the grid and click the Add & Close button. 23 After the selected form has been added to the grid, you can scroll through each issue by using the Zoom button. 24 Print Button Print Print: The print button is available on all the tabs Field/Button Assessment Tools Care Plan Intake Form Outcome Form LSP Form LSP Cumulative Scores Progress Notes Specific Progress Notes Specific Staff Progress Notes S.O.A.I.P. Specific S.O.A.I.P. T-ACE Form ACOG Form Encounters Preview Print OK Close Description Prints a list of assessment tool tests and scores for the client. Prints the care plan. Prints the intake form. Prints the outcome form. Prints the LSP form. Prints the cumulative scores LSP form. Prints the progress notes. Prints only the Progress Note you have positioned to Prints only the Progress Notes for the staff member for the Note you have positioned to Prints the S.O.A.I.P. notes. Prints a specific S.O.A.I.P. note. Prints the T-ACE form. Prints the ACOG form. Prints a list of encounters for the dates specified. Previews the printout. Prints the form. Prints/previews the form. Closes the print menu. 25 Reports Reports The Home Visits program has a set of pre-defined reports to choose from. Each reported will ask for From date and To date. You may also preview the report before printing. Also, you have the ability to use filters to build a query. 26 Reports Report Adult – By Nurse By Setting Billable/Non-Billable/Travel Time Adult – List HRPIO Clients Adult – By LSP Date – List LSP Clients Adult – By Next LSP Date – List LSP Clients HRPIO – Outcome Vs. Intake Caseload Community Service Involvement Export LSP/HRPIO/HRIIO Data HRPIO Intake HRPIO Outcome LSP Improvement Score Sheet Mailing Labels to Household – By Encounters Referred By Return Visit Reports State Reports – MCH Block Grant 2006 State Reports – MCH Block Grant 2007 Public Health Home Visit Quarterly Report To Be Billed – Adult – By Date of Entry To Be Billed – Adult – By Date of Service Description Generates a List of Clients and their Billable/NonBillable/Travel times. Generates a list of HRPIO clients. Generates a list of HRPIO clients by date of LSP. Generates List of LSP Clients by Next LSP due date Measures outcomes for HRPIO risk factors Generates a caseload of clients by employee and program. Counts Community Service being used Used by Gallatin County for research purposes Generates your HRPIO Intake forms in bulk. Generates your HRPIO Outcome forms in bulk. Generates the LSP Improvement Score Sheet. Generates mailing labels by encounters. Generates a count report of referrals. Generates a return visit report for your clients. Generates the 2006 MCH Block Grant reports. Generates the 2007 MCH Block Grant reports. Generates your Quarterly report for Public Health Home Visits. Generates a “to be billed” report for your adult clients by date of entry. Generates “a to be billed” report for your adult clients by date of entry. Maintenance - Add/Delete/Modify Tables 27 Maintenance The maintenance menu contains a list of the tables that you can modify for your program. For client demographics, there are two selections under the Maintenance Menu where you can add or modify your dropdown selections. 28 The above is an example of what the Maintenance tables will look like. Field/Button Name Close Add Delete Print Description Enter the name. Closes the table. Adds a row to the table. Deletes the row. Prints the table. 29 CHC Software, Inc. Health District Information Systems [email protected] CHC Software, Inc. Health District Information Systems [email protected]