1
Valtek Mark One and Mark Two Control Valves FCD VLENIM001-02-AQ - 8/15
a WARNING: Keep hands, hair and clothing away from all
moving parts when operating the valve. Failure to do so can
cause serious injury.
5.7 Make sure positioner linkage and stem clamp are securely
fastened. If the stem clamp is loose, check plug thread engagement (refer to the “Reassembly and Installation” section for the correct procedure on aligning the plug with
the seat). Tighten stem clamp nut.
NOTE: Refer to the appropriate User Manuals when adjusting
positioners and providing maintenance to actuators.
Current User Manuals are available at www.flowserve.com.
5.8 Verify that the takeoff arm and follower arm are not binding
at either end of the stroke. The follower arm attached to the
positioner should be free to move slightly when the valve is
at both ends of the stroke.
5.9 Ensure all accessories, brackets and bolting are securely
fastened.
6 Valve Disassembly
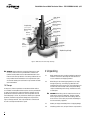
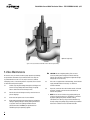
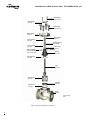
6.1 To disassemble the valve body, refer to Figures 1, 2 and 3
then proceed as follows:
a WARNING: Depressurize line to atmospheric pressure and
drain all fluids before working on the valve. Failure to do so
can cause serious injury.
6.2 If valve is air-to-open, apply air under the piston to lift the
plug off the seat before taking the valve apart. If valve is air-to-close, proceed to step 6.3.
6.3 Remove the bonnet flange bolting and lift actuator, bonnet
and plug out of the valve. Once removed, the actuator,
bonnet and plug assembly (called the top works) should
be lowered and blocked to prevent rolling during the disassembly of the top works.
a WARNING: Danger exists in removing the actuator, bonnet
and plug, especially if a pressure balanced plug is used. The
pressure balanced sleeve may stick to the plug and fall during
disassembly, causing possible serious injury and damage to
the valve or nearby equipment. If sleeve is observed sticking
to the plug, steps 6.3.1 to 6.3.4 should be consulted.
5.10 If possible, remove air supply and observe actuator for
correct fail-safe action.
5.11 Check rubber actuator bellows for splits, cuts or wear.
5.12 Spray a soap solution around the actuator cylinder retaining
ring and actuator stem guide to check for air leaks through
the O-rings.
5.13 Clean any dirt and other foreign material from the plug stem.
5.14 If an air filter is supplied, check and replace cartridge if
necessary. Drain any moisture accumulated in the air filter.
a CAUTION: Heavy actuators may require a hoist. Lift the valve
with the yoke legs using a lifting strap and a hoist. Great care
should be taken to lift the actuator and plug straight out of
the body to avoid damage to the plug and seat.
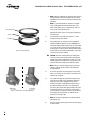
6.3.1 If the sleeve is observed sticking to the plug during removal,
fully extend the plug by applying air above the piston, allowing the sleeve to remain in the body and the bonnet to
rise above the body.
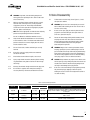
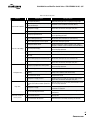
Table I: Common Packing Lubricants
Lubricant
Manufacturer
Krytox®
Temperature Range
Application Description
°F
°C
E.I DuPont
-5 to 550
-20 to 285
Fluorinated general purpose grease; handles common liquids and gasses; good
lubricity in harsh mediums; nonflammable, chemically inert; will not harm plastic
or metal parts
GP 460
Acheson Colloids
Company
32 to 1000
0 to 540
Graphite in petrolatum; high pressure; anti-galling; graphite remains above
600°F / 316°C
725
Chesterton
32 to 2600
0 to 1425
Nickel, Aluminum and graphite in oil suspension; provides protection with an
ultra-thin coating of nickel particles
7
flowserve.com