1
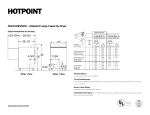
INDUSTRIAL FAN FORCED HEATER
OWNER’S MANUAL
MODEL: DR-988
IMPORTANT INSTRUCTIONS
READ & SAVE
WARNING
NOT FOR HOUSEHOLD USE
THIS IS A FLOOR HEATER ONLY
1
TABLE OF CONTENTS
Important Instructions. 2
Parts of the heater . 4
Operating Instructions 4
Specifications . 5
Cleaning and Maintenance... 5
Storage
6
Troubleshooting.
6
2
IMPORTANT INSTRUCTIONS
PLEASE READ ALL INSTRUCTIONS BEFORE USING THIS HEATER
NOTE: There may be a trace of smoke or odor when unit is first operated. Do not be alarmed. This
indicates that a drop of oil fell on the heating coil during the manufacturing process. It will quickly
evaporate and should not re-occur.
Make sure that the room in which the appliance is located is well ventilated during this operation. It
is normal for the appliance to emit small cracking sounds when you turn it on for the first time. Do
not be alarmed.
WHEN USING ELECTRICAL APPLIANCES, BASIC PRECAUTIONS SHOULD ALWAYS BE FOLLOWED TO
REDUCE RISK OF FIRE, ELECTRICAL SHOCK AND INJURY TO PERSONS OR PROPERTY, INCLUDING
THE FOLLOWING:
1. Read all instructions before using this heater.
2. This heater is hot when in use. To avoid burns, do not let bare skin touch hot surfaces. Keep combustible
materials, such as furniture, pillows, bedding, papers, clothes and curtains at least 3 ft. (0.9 meters) from the
front and top of the heater and keep them away from the sides and rear. Ensure a minimum clearance of
5.5 inches (14 cm) from both sides and rear of heater to adjacent walls. Keep the rear grille away from walls
or drapes so as not to block the air intake.
3. Extreme caution and reasonable supervision is necessary when any heater is used by or near children,
invalids or pets and whenever the heater is left operating and unattended.
4. Always unplug heater when not in use. To disconnect, grip plug and pull from wall outlet. Never yank on
cord.
5. To disconnect the heater, turn controls to “OFF”, then remove the plug from outlet.
6. Do not operate any heater with a damaged cord or plug or after the heater malfunctions or has been
dropped or damaged in any manner. Return heater to an authorized service facility for examination,
electrical or mechanical adjustment or repair.
7. Do not use outdoors.
8. This heater is not intended for use in bathrooms, laundry areas and similar indoor locations. Never locate
heater where it may fall into a bathtub or other water container.
9. Do not run cord under carpeting. Do not cover cord with throw rugs, runners or the like. Arrange cord away
from traffic area where it will not be tripped over. Route the cord so that it will not be walked on, or pinched
by furniture.
10. Connect to properly polarized outlets only. Check heater voltage and amperage on the back of the heater to
make sure it agrees with the electric service supplied.
11. Do not insert or allow foreign objects to enter any ventilation or exhaust opening as this may cause an
electric shock, fire or damage to the heater.
12. To prevent a possible fire, do not block air intakes or exhaust in any manner.
13. Use this heater only as described in this manual. Any other use not recommended by the manufacturer may
cause fire, electric shock, injury to persons or other damage to property.
14. This heater draws 20 Amps during operation. Be sure to use a dedicated 240VAC, 30A circuit for the heater.
15. It is normal for the heater’s plug and cord to feel warm to the touch. A plug or cord which becomes hot to the
touch or becomes distorted in shape may be a result of a worn electrical outlet. Worn outlets or receptacles
should be replaced prior to further use of the heater. Plugging heater into a worn outlet/ receptacle may
result in overheating of the power cord or fire.
16. Ensure the heater is on a stable, secure floor surface to eliminate the potential of tipping it over.
3
17. Be sure that the plug is fully inserted into appropriate receptacle. Please remember that receptacles also
deteriorate due to aging and continuous use: check periodically for signs of overheating or deformations
evidenced by the plug. Should this occur, do not use the receptacle if deteriorated. CALL your electrician.
18. Check that neither the appliance nor the power cable has been damaged in any way during transportation.
19. Make sure that no pieces of polystyrene or other packaging material have been left between one element of
the appliance and another. It may be necessary to pass over the appliance with a vacuum cleaner.
20. When switching on the appliance for the first time, you may notice a slight odor which is normal with new
electrical appliances. Allow odor to dissipate by running appliance at full power for about ten minutes. Make
sure that the room in which the appliance is located is well ventilated during this operation. This heater
draws 20 Amps during operation. To prevent overloading a circuit, do not plug the heater into a circuit that
already has other appliances working.
21. Do not run in locations when the heater will be left unattended for long periods of time. (For example - in an
unoccupied summer cottage).
22. Do not use attachments or filters. They are not recommended.
23. This appliance is not intended for use by persons (including children) with reduced physical,
sensory or mental capabilities, or lack of experience and knowledge, unless they have been
given supervision or instruction concerning use of the appliance by a person responsible for
their safety.
SAVE THESE INSTRUCTIONS
NOT FOR HOUSEHOLD USE
4
PARTS OF THE HEATER
1.
2.
3.
4.
5.
6.
Carry handle
Housing
Safety grille
Heating element
Thermostat control
Plug (NEMA #6-30P)
OPERATING INSTRUCTIONS
!! IMPORTANT
THIS HEATER IS FOR USE ON THE FLOOR ONLY.
Prior to operating the heater, ensure the electrical receptacle is of the configuration and capacity appropriate
for the heater. See receptacle configuration in OPERATING INSTRUCTIONS. This heater is for use on 240
volts. The cord has a plug as shown in #6. No adapter is available for this blade configuration, and none
should be used. The type of receptacle is a 240 volt grounding receptacle (NEMA 6-30R). When properly
installed, it provides a ground connection through the cord to the heater to protect the operator from electric
shock.
Receptacle: NEMA #60-30R 250V 30 Amps
Plug: NEMA #6-30P 250V 30 Amps
5
YOUR HEATER IS EQUIPPED WITH A THERMOSTAT:
1. Turn the unit on by turning the thermostat dial away from the OFF position.
2. For faster heat up or to increase the heat output, turn the Thermostat Control knob all the way to the right [MAX].
The thermostat function controls the temperature output. To decrease the heat output, turn the knob counter
clockwise.
3. Once the room reaches the desired temperature, slowly turn the Thermostat Control knob counter clockwise until
you hear a “click”. This sets the heater to cycle ON/OFF to maintain the desired heating temperature for energy
efficiency.
4. To completely shut unit OFF, turn the thermostat dial to the OFF position and unplug the heater.
SPECIFICATIONS
Model Number
Power Supply
Power Consumption
DR-988
240 volts AC, 60Hz
5600W
CLEANING AND MAINTENANCE
Before any cleaning, make sure that:
1. The heater is turned OFF.
2. Disconnect power supply at source by removing plug from power outlet.
3. Your heater is now ready for cleaning.
Regular Cleaning:
1. Do not use cleaning liquid or other chemicals to spray on the unit.
2. Interior dust can often be removed by using a vacuum cleaner with a crevice tool attachment.
3. To clean enclosure, use a clean, soft and lightly damp cloth to gently wipe off the dirt from the surface of the unit.
Be sure not to wet the heating element and the switches. Allow the unit to dry completely before using it.
CAUTION: DO NOT ALLOW WATER TO RUN INTO THE INTERIOR OF THE HEATER AS THIS COULD CREATE
A FIRE OR ELECTRIC SHOCK HAZARD, DAMAGING THE UNIT.
STORAGE
1. Perform the cleaning procedures described in “Cleaning/Maintenance”.
2. Wipe all parts to dry.
3. Pack the heater in a plastic bag and store it in a cool, dry place.
6
TROUBLESHOOTING
If your heater fails to operate, please follow these procedures before contacting customer services:
Problem
Probable Cause
Solution
Overheat protection has temporarily
deactivated the heater.
Turn the heater OFF; unplug it and ALLOW IT
TO COOL. Inspect and remove any objects on
or adjacent to the heater. Wait 30 minutes
before plugging unit back in.
Room temperature has been warmed up
to thermostat setting.
Unit is not heating.
Heater is not plugged into a 240V
polarized outlet/receptacle.
Breaker/Fuse has been tripped.
The heater is
creating a burning
smell.
A drop of oil fell on the heating coil
during the manufacturing process. It will
quickly evaporate and should not occur
again.
Check & ensure there are no
combustible materials within 0.9 meters
(3 feet) surrounding the heater.
Ensure a minimum clearance of 5.5
inches (14 cm) from both sides and
rear of heater to adjacent walls.
To increase the room temperature, adjust
thermostat control knob to a higher setting by
turning clockwise.
Ensure unit is in OFF position. Plug in unit and
attempt to turn on again.
Check your electrical box to confirm the
breaker has not been blown. This may
occur if the receptacle is shared between
other high consumption appliances.
Ensure unit is in the OFF position. Plug in
unit and attempt to turn on again.
Ensure room in which heater is situated is well
ventilated.
Remove any combustible items from the heater.
Reposition the heater so there is enough space
around the heater to the adjacent walls.
PLEASE DO NOT ATTEMPT TO OPEN OR REPAIR THE HEATER YOURSELF. DOING SO
COULD CAUSE DAMAGE OR PERSONAL INJURY.
7