1
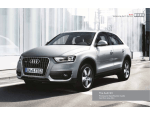
Quick Questions & Answers
Q5 SQ5
Getting to know your
The information within this guide must be used in conjunction with the information in the Audi Owner’s Manuals. Refer to your vehicle’s Owner’s Manual for all information and warnings.
By using this guide, you acknowledge that you are aware of and have read the warnings and information provided in the Owner’s Manual on the topics in this guide and will use this
information to augment that material.
To learn more about your features,
call your Audi Technologist.
1.855.750.TECH (8324)
Audi Brand Specialist
(Business Card Placeholder)
auditechnology.com
Welcome
Your new Q5 is equipped with many features designed to accentuate
your driving experience and create an environment that is refined,
elegant and supremely functional. This guide will assist you in better
understanding some of the features of your Q5 and provide you with
the knowledge needed to enjoy your new Audi to its fullest.
LEARN MORE AT
auditechnology.com
Audi Explore
When you see this symbol, you can
discover more with your smart phone
by texting the letter keys to the code
provided. A video tutorial will be sent
to further explain the topic.
Standard messaging and data rates charged by your phone
service provider will apply.
Table of Contents
MMI® Controls
1
BLUETOOTH® Pairing
7
Audi connect®
15
Navigation
19
Automatic Climate Control
23
Memory Seats
27
Windshield Wipers
29
Cruise Control
31
Start-Stop System
33
Sunroof
35
Clock Setting
37
Rear Hatch
39
1
®
MMI Controls
Audio & Navigation
The MMI® system consists of the MMI® display screen
and the MMI® control panel. This panel is composed of a
control knob with joystick, control buttons and function
buttons.
Pressing one of the six function buttons such as RADIO
or NAV displays that features options in each corner of
the MMI® screen.
TEXT Q5AUDIO to 38981
Do not text and drive. Message and data rates may apply.
The four control buttons surrounding the control knob
correspond to the four corners of the MMI® display.
Selecting the desired button will access sub menus.
While operating the menus and functions, you can return
to a previous screen by pressing the BACK
button.
To make a selection or confirm a request, simply turn the
control knob and press the center of the joystick to select.
To move to a specific location within the Navigation Map or
control the main menu of a DVD, move the joystick
located on top of the control knob.
2
MMI® Controls
3
®
MMI Controls
cont.
TEXT Q5AMI to 38981
Do not text and drive. Message and data rates may apply.
Volume/Track Advance Button
Tipping the knob right or left allows you to move through
audio tracks and radio stations. Pressing will mute audio when in
Radio mode and pause when playing media. Holding the button
down will turn the system off.
Media Function Button
• Access available media from connected sources
• BLUETOOTH® Audio, SD card, DVD, Jukebox, and
Audi Media Interface (AMI).
• The iPod AMI cable comes standard with MMI®
Navigation plus.
• The AMI connection can be found in your glove box.
NOTE: iPod® AMI cable is standard on Audi Vehicles with concert radio and convenience package.
Steering Wheel Controls
In addition to the MMI®
control panel, you can use
the multifunction steering
wheel controls to display
specific MMI® features
in the Driver Information
System.
Simply press the MODE
button until you reach your
desired function, including
Radio functions.
The thumbwheel can be used to
scroll through the options. Press it
to make a selection. Steering wheel
controls allow you to select Phone
functions.
The
button is used to activate
Voice Recognition. The volume
thumbwheel is used to adjust the
volume, pressing it will mute audio
or pause media.
Pressing the NAV button* will repeat
the last Navigation announcement
when navigation is active.
* Available with optional MMI® navigation only.
4
MMI® Controls
5
®
MMI Controls
cont.
TEXT Q5SOUND to 38981
Do not text and drive. Message and data rates may apply.
Setting Station Presets
You can set any mix of up to 50 Presets from FM, AM or Sirius options.
1. Press the RADIO function button
multiple times to toggle between FM,
AM or SIRIUS.
2. Tune to the desired station using the
control knob and pressing to select.
3. Press and hold the center control knob
until the Presets screen shows the
Preset list.
To access your Presets:
• Press the RADIO function button
then the Presets control button.
• Use the MMI® control knob to scroll
through your Presets.
• Press the center button of the control
knob to select a Preset.
4. Scroll to the numbered list position
where you want to save your selection.
5. Press the center control knob again;
the station is saved to this position.
• Using Voice Recognition, press
after the beep, say “Presets”.
,
NOTE: Occasionally, tall buildings and tunnels may interrupt the satellite signal. For more information, please refer to the SiriusXM® brochure in your glove box.
6
MMI® Controls
®
®
BLUETOOTH Pairing: MMI
7
Initial Setup
BLUETOOTH® pairing is a one-time procedure. Once paired via BLUETOOTH®, your phone will
automatically connect when you start your vehicle and your phone’s contacts automatically
synchronize, allowing you to retrieve contacts and make and receive calls through the
infotainment system. For more information regarding phone compatibility visit audiusa.com/bluetooth.
TEXT Q5PAIR1 to 38981
Do not text and drive. Message and data rates may apply.
To pair a phone:
1. Switch ignition to accessories mode.
2. Activate your phone’s BLUETOOTH® function
and set to Pairing or Search mode.
3. Select Audi MMI® when it
appears on the phone’s
screen.
NOTE: See your phone’s owner manual for specific BLUETOOTH® activation instructions.
Vehicle should be stationary with the parking brake engaged while performing this operation.
4. Use the MMI® control knob
to select Yes.
5. Confirm the six-digit PIN
displayed matches the PIN
displayed on your phone,
and select Yes.
6. Select Pair on your phone
to complete the pairing
process.
7. • Contacts synchronizing.
• BLUETOOTH® active and
network strength bars.
NOTE: Once paired, the BLUETOOTH® symbol appears in the MMI® screen along with network strength bars, and it will be displayed whenever a paired phone is connected to the infotainment system.
Important Safety Instructions and Warnings which you must read, are listed on the last panel under BLUETOOTH® Pairing.
BLUETOOTH®
Pairing
8
9
®
Voice Recognition: MMI
Call By Name
TEXT Q5VOICE1 to 38981
Do not text and drive. Message and data rates may apply.
3. To confirm the request, say “Yes”. The number
will be dialed.
1. Press the
button.
A beep will sound.
2. Say, “Call” <Name from directory>
(e.g., “Call John Smith”).
NOTE: If multiple numbers are stored for a given contact, the system will ask
which number you wish to dial. When calling by name using voice recognition,
you must say the name as it is stored in your phone book.
Natural Language Commands
You may also speak natural language commands using the
button.
Once your requested function is active, you can continue
with commands for that mode.
Verbal destination commands can be given while in any screen.
For example:
Your Audi MMI® Navigation system has many Global Voice
Recognition commands available. This means that you can access
any function while another function or mode is active.
Commands such as:
•
•
•
•
Enter Number
Enter Destination
Presets
Media
• Redial
• Online Destination
• FM, AM
You can begin your request from any screen.
Important Safety Instructions and Warnings which you must read, are listed on the last panel under Voice Recognition.
BLUETOOTH®
Pairing
•
•
•
•
Enter Number
Dial
Repeat
Correction
To cancel Voice Recognition while active, say “Cancel” after
the beep or press the
button until system responds
with cancelled.
Refer to your owner’s manual for further commands.
10
11
®
BLUETOOTH Pairing:
Audi concert radio
Initial Setup
BLUETOOTH® pairing is a one-time procedure. Once paired via BLUETOOTH®,
your phone will automatically connect when you start your vehicle and your
phone’s contacts automatically synchronize, allowing you to retrieve
contacts and make and receive calls through the infotainment system.
For more information regarding phone compatibility visit audiusa.com/bluetooth.
TEXT Q5PAIR2 to 38981
Do not text and drive. Message and data rates may apply.
To pair a phone:
1. Switch ignition to accessories mode and turn on the Audi concert radio.
2. Activate your phone’s BLUETOOTH® function and set to Pairing or Search mode.
3. Select Audi UHV when it
appears on the phone’s
screen.
4. Enter default PIN 1-2-3-4
and press Pair.
5. The phone is now paired
and your contacts will be
synchronized.
NOTE: See your phone’s owner manual for
specific BLUETOOTH® activation instructions.
12
Important Safety Instructions and Warnings which you must read, are listed on the last panel under BLUETOOTH® Pairing.
BLUETOOTH®
Pairing
13
Voice Recognition:
concert radio
Name Tag Creation
A name tag is required to operate the voice recognition system.
TEXT Q5VOICE3 to 38981
Do not text and drive. Message and data rates may apply.
To create a name tag:
1. Press the
button.
2. After the beep, say “Store Name”.
3. When prompted say the
<name>. A second
prompt will ask you to
repeat the <name>,
(e.g. John Smith).
4. The system will ask for the
phone number. Speak the
<numbers>, (e.g., 8-0-0,
5-5-5-, 1-2-3-4.)
NOTE: To confirm or play back the saved name tags, press the
5. If incorrect, say “Back” to
remove the last set of
numbers.
6. If correct, say “Store
Number”, and the system
will confirm that <name>
is saved.
3. When prompted,
say the <name>.
4. After name confirmation,
say “Dial”, and the number
will be dialed.
button. After the beep, say “Play Phone Book”.
Call by name
1. Press the
button.
2. Say “Select Name”.
Important Safety Instructions and Warnings which you must read, are listed on the last panel under Voice Recognition.
BLUETOOTH®
Pairing
14
15
Audi connect®
Initial Setup
Audi connect® can provide you with Google Earth™, Google Voice™
Local Search, Wi-Fi Hotspot, Online Services (fuel prices, weather
information, travel information, news feeds) and myAudi
Destinations.
Audi connect®
Configuration:
1. Ensure SIM card (provided by dealer)
is present in the SIM slot.
2. Press the TEL function button.
TEXT Q5CONNECT to 38981
3. Press the Settings control button.
Do not text and drive. Message and data rates may apply.
Vehicle should be stationary with the parking brake engaged while performing this operation.
16
Audi connect®
17
®
Audi connect
cont.
Wi-Fi Configuration
4. Select Wi-Fi settings.
5. Then select Wi-Fi active
and choose Visible.
6. Select a password that is at least eight characters long.
The default password can be used. Or a new password can
be entered.
NOTE: Most devices use Encryption type WPA2 as the default.
Data Configuration
7. Select Apply settings to
save your password.
8. On your device, search for
Wi-Fi networks, select SSID
and enter your password to
establish a connection.
9. Press the Back button,
scroll to Data connection
and select.
10. Select Without request.
Press the back button to
exit.
NOTE: You may connect up to eight wireless
devices at one time.
Always pay careful attention to the road, and do not drive while distracted. The features and technologies discussed are optional, may require an additional subscription with separate terms and conditions, and should be used only
when it is safe and appropriate. The Wi-Fi hotspot feature is intended for passenger use only.
Audi connect® services are only available where there is mobile network coverage. You can obtain more information from your current service provider.
Important Safety Instructions and Warnings which you must read, are listed on the last panel under Audi connect®.
Audi connect®
18
19
Audi Navigation
Setting a Destination
Your MMI® Navigation system has extraordinary capabilities
to enhance your drive with user-definable views, routing
selections and more. Get started with setting destinations
and discover more as you become familiar with the interface.
To set a destination:
1. Press the NAV function button.
2. Select the Destination control button.
TEXT Q5NAV7 to 38981
Do not text and drive. Message and data rates may apply.
3. Select Address from the
Navigation Menu.
4. Select City/Zip code field
and enter information.
5. Continue by entering the
Street and House number.
6. When complete, select
Start route guidance.
Please drive safely. Enter destinations while vehicle is stationary away from traffic. Always pay careful attention to the road, and do not drive while distracted.
Important Safety Instructions and Warnings which you must read, are listed on the last panel under Navigation & Infotainment.
Navigation
20
21
Audi Navigation
cont.
Setting a Destination (Voice Recognition)
To set a Destination with voice commands:
1. Press the
button.
2. Say “Enter Address.”(Other commands are available on screen.)
See Owner’s Manual for complete list of commands.
3. After the beep, speak the address; for example “2024 Main St, Los Angeles, California.”
(Speak street number as single digits.) The system will respond with repeating the
address for confirmation.
4. System will respond, “The list is being loaded,” it will repeat the address, and then ask if
you would like to start route guidance; after the beep say, “Yes” and guidance will begin.
NOTE: The MMI® will display the most frequently used voice commands while waiting for your response. When pressing the NAV button, the last navigation announcement will be repeated.
Google Voice™ Local Search (Online Destinations)*:
1. Press the
button.
2. Say “Online Destinations” followed
by a keyword such as “Coffee Shop”,
(e.g., bookstore, museum, pizza, etc.)
3. Make your selection from the list
displayed by speaking the line
number, (for example 1, 2, 3, or 4).
The system will confirm your selection.
4. Say “Start route guidance” to start
the navigation to your destination.
The system will respond with “retrieving
requested information” and display a list.
Cellular connectivity is dependent on available cellular signal.
TEXT Q5NAV8 to 38981
Do not text and drive. Message and data rates may apply.
Navigation
*Google Voice™ Local Search requires Audi connect®, and may require an additional subscription with separate terms and conditions.
The features and technologies discussed are optional, and should be used only when it is safe and appropriate.
Important Safety Instructions and Warnings which you must read,
are listed on the last panel under Voice Recognition.
22
Automatic Climate Control
AUTO Setting
Synchronize Zones
The AUTO setting of your Climate Control System maintains
the cabin temperature to your selected temperature by regulating
the temperature, fan speed and airflow. Once activated, there is
no need to alter the settings. When AUTO is selected, AC will
come on automatically to condition the air.
Press and hold the driver’s side temperature
control knob to synchronize both sides to the
same temperature and airflow.
23
NOTE: AC is used to dehumidify the air.
Dual Temperature Settings
Temperature and airflow can be operated independently for each
side of the cabin using the temperature control knobs. AUTO will
maintain separate temperatures for the driver and front passenger.
TEXT Q5CLIMATE to 38981
Do not text and drive. Message and data rates may apply.
Important Safety Instructions and Warnings which you must read, are listed on the last panel under Automatic Climate Control.
Automatic
Climate Control
24
25
Automatic Climate Control
cont.
Fan Speed
Fan speed is the same for both zones. Fan speed can
be adjusted by first pressing the
button and then
adjusting the fan speed with either the driver or
passenger control knob.
Recirculation
The recirculation function
prevents outside air
and odors from entering the cabin. It may also be used
in conjunction with AC to cool the cabin more quickly.
Airflow
The airflow selector
directs air to the floor,
panel or defrost vents, or a combination.
MMI® Display
Your climate control adjustments such as Temperature, Fan speed and Airflow can be seen on your display for convenience.
Temperature
Fan speed
NOTE: Temperature display only shown with MMI® Navigation system. The ideal fan speed to heat or cool your interior will be displayed with a
Airflow directions
on the fan speed level.
26
Automatic
Climate Control
27
Memory Seats
Setting Your Memory Seats and Mirrors
1. Adjust the seat and mirrors to your desired positions.
2. Press the SET button located on the driver’s door.
3. Press on of the numbered memory buttons until you
hear a tone; the memory position is saved.
The side mirrors are programmed along with the seat position. When you press and hold your numbered memory button, they will adjust
automatically.
Recalling Memory Seat Settings
TEXT Q5SEATS to 38981
Do not text and drive. Message and data rates may apply.
Press the desired memory button while the door is open
or with the door closed, press and hold the desired
memory button until the memory position is reached.
Important Safety Instructions and Warnings which you must read, are listed on the last panel under Memory Seats.
Memory Seats
28
29
Windshield Wipers
TEXT Q5WIPERS to 38981
Do not text and drive. Message and data rates may apply.
Rain Sensing Wipers
To activate rain-sensing wipers:
1. From the “OFF” position, move the wiper stalk up one click.
2. The rain sensor will automatically turn the wipers on when it begins
to rain, adjusting wipe frequency with rainfall intensity.
3. The lever on the top of the stalk controls the sensitivity.
Move it left for less sensitivity and right for more sensitivity.
NOTE: Turn off rain-sensing wipers before going through a car wash.
Rear Wiper Operation
To activate the rear wipers, push the lever one click away from you.
Also, anytime you have the front wipers on and you put the car into
reverse, the rear wipers activate automatically.
To wash the rear glass, push the lever two clicks away from you.
Continuous Wipe
• “LOW”: From the “OFF” position, move the wiper stalk
up two clicks.
• “HIGH”: From the “OFF” position, move the wiper stalk
up three clicks.
Single/Quick Wipes
• Single/quick wipe: From the “OFF” position,
press the wiper stalk down once briefly.
NOTE: For faster wiping, press the wiper stalk down once and hold for two seconds.
Important Safety Instructions and Warnings which you must read, are listed on the last panel under Windshield Wipers.
Windshield
Wipers
30
31
Cruise Control
Activate
TEXT Q5CRUISE to 38981
To activate, pull the control stalk toward you.
Do not text and drive. Message and data rates may apply.
Set Cruising Speed
At your desired speed, press the SET button
at the end of the stalk. The set speed and the
illuminated CRUISE icon are shown in the
Driver Information Display.
Changing Speed
Cancel/Resume
There are three ways to change your speed:
To cancel and resume cruise control:
1. Accelerate or decelerate, then press
SET again.
1. Press the brake pedal or push the stalk
slightly away from you.
2. To increase/decrease speed in 1 mph
increments, tap the stalk up or down.
2. The
3. Hold the stalk up or down to
increase/decrease speed in 5 mph
increments; release when desired
speed is reached.
CRUISE light will go off.
3. To resume, pull the stalk towards you;
you will return to your set speed.
Your most recently set speed appears as a
small icon in the Driver Information Display.
It remains in memory until you turn your
Audi off.
32
Important Safety Instructions and Warnings which you must read, are listed on the last panel under cruise control.
Cruise Control
33
Start-Stop System
This advanced Audi technology is designed to help save fuel and
reduce CO2 emissions at the same time. It shuts off the engine when
you stop at traffic signals or during certain stop-and-go driving.
When the system shuts off the engine, the Start-Stop System light
appears in the Driver Information Display in the instrument cluster.
Releasing the brake pedal instantly restarts the engine and makes
power available before your foot even reaches the accelerator.
Simply drive as you normally would and it works seamlessly.
TEXT Q5START to 38981
Do not text and drive. Message and data rates may apply.
Start-Stop ON or OFF?
The choice is yours.
If you wish to turn off the Start-Stop System, simply press
A
the OFF
button located below the Audi multimedia panel
or MMI® display. The button will illuminate to tell you the
Start-Stop is off. The engine will continue to run when the
vehicle is stopped at traffic signals or during stop-and-go
driving. Of course, you will not receive the potential fuel
savings or CO2 reduction benefit. Once you have turned off
A
Start-Stop, it will remain off until you press the OFF
button to turn it back on.
NOTE: This feature is available on the Q5 3.0T and Q5 3.0 TDI vehicles only.
34
Important Safety Instructions and Warnings which you must read, are listed on the last panel under Start-Stop System.
Start-Stop
System
35
Optional Panoramic Sunroof
TEXT Q5ROOF to 38981
Do not text and drive. Message and data rates may apply.
Comfort Position
Opening the sunroof to the Comfort position will help minimize variations in
cabin pressure and wind noise.
To open to the Comfort position, simply turn the dial to the last dark rectangle.
When the sunroof opens, the wind screen will automatically rise. This will help
reduce wind noise.
Open
Turn the dial clockwise to any of the differently sized rectangles.
To open the sunroof completely, twist the dial clockwise, as far as it will go and hold.
Close
Turn the dial counterclockwise to the closed position.
Tilt
For the sunroof to tilt up, gently press up on the lip of the sunroof dial.
To tilt down, pull down on the dial lip.
Sunshade
To move the sunshade forward or back, use the respective arrow buttons.
One touch of the button opens or closes the sunshade all the way.
To stop the sunshade while it is moving, press the button again.
36
Important Safety Instructions and Warnings which you must read, are listed on the last panel under Sunroof.
Sunroof
37
®
Clock Setting: MMI
TEXT Q5CLOCK1 to 38981
Do not text and drive. Message and data rates may apply.
To set time with GPS:
To manually adjust the time:
1. Press the MENU function button.
1. Rotate the control knob to Manual and select.
2. Press the Time control button.
2. Turn the knob until you reach Time; select to activate.
3. Using the control knob, scroll to Time source.
3. Turn the knob to the desired hour and press set.
4. Make sure the Time source is set to GPS.
4. The minute display is now highlighted; repeat the selection process.
5. Ensure your time zone is accurate for your location.
5. Save the time by pressing the control knob.
NOTE: Turn on Daylight Savings time to allow the clock to change automatically.
Clock Setting:
Audi concert radio
To adjust the time:
1. Press the SETUP function button.
2. Press the Time/Date control button to enter the Time Setup menu.
3. Rotate the control knob to time, select to highlight the hour.
4. Turn the knob to the desired hour and press to set.
5. The minute display is now highlighted; repeat the selection process.
6. Save the time by pressing the control knob.
NOTE: Vehicle should be stationary with the parking brake engaged before performing these operations.
TEXT Q5CLOCK2 to 38981
Do not text and drive. Message and data rates may apply.
ClockSetting
Setting
Clock
38
Optional Power Rear Hatch
39
TEXT Q5HATCH to 38981
Do not text and drive. Message and data rates may apply.
Open the Hatch
• The rear hatch can be opened and closed automatically.
There are three ways to open the power rear hatch.
Important Safety Instructions and Warnings which you must read, are listed on the last panel under Rear Hatch.
Option 1
• Press and hold the rear hatch
button on the key fob for at
least one second.
Option 2
• Pull the switch on the
driver’s door.
NOTE: Photo may not represent actual vehicle.
Option 3
• Press the micro-switch
located above the license plate.
40
Rear Hatch
Optional Power Rear Hatch
41
cont.
Closing the Hatch
• Press the button on the rear hatch edge; the hatch moves to
the closed position and the soft close mechanism locks.
Setting the Open Position
The opening height of the rear hatch can be adjusted.
1. While the rear hatch is opening, press the rear hatch button on the
remote key fob to stop it at the desired height. You may also stop it by
pressing the button on the rear hatch.
2. Press and hold the button on the rear hatch edge for at least four
seconds to store the new open position. The lights will flash
indicating the setting has been stored.
3. The opening height of the rear hatch can be readjusted to the
maximum height by pushing upwards on the rear hatch and then
repeat step 2.
42
Rear Hatch
Automatic Climate Control
and possibly in tunnels, garages and subways, phone
• Reduced visibility is dangerous and can cause accidents.
conversations may be interrupted, and it may be impossible
Audi connect®
• For safe driving it is very important that all windows be
to make phone calls, even emergency calls!
• Only use Audi connect® services when road and traffic
free of ice, snow and condensation.
• In some countries, emergency calls may only be supported
conditions permit. Using these services could increase the
• Completely familiarize yourself with the proper use
when the mobile phone is connected to a mobile phone
risk of an accident. Some Audi connect® services are only
and function of the heating and ventilation system and
package which has a SIM card that is “not blocked” and/or
available when the vehicle is stationary to reduce the risk of
especially how to defog and defrost the windows.
has sufficient credit on it.
distracting the driver.
• Never use the windshield wiper/washer system in freezing
• Unmounted or improperly mounted mobile phones can fly
• To reduce the risk of a collision, use the Audi connect®
weather until you have warmed the windshield first, using
around in the event of a sudden driving or braking maneuver
services with a Wi-Fi hotspot in the rear seat only if the
the heating and ventilation system. The washer solution
or a collision. This may cause injury.
vehicle is in motion or only when the vehicle is stationary.
may freeze on the windshield and reduce visibility.
• Never place or mount a mobile phone on doors, on
• As the driver, do not allow usage of the Wi-Fi hotspots to
• Do not use the recirculation for extended periods of time.
the windshield or on or near the area on the steering
distract you from driving, as it could increase the risk of an
The windows could fog up since no fresh air can enter the
wheel marked “AIRBAG,” the instrument panel, the seat
accident.
vehicle. If the windows fog up, press the air recirculation
backrests or the areas between these points and the driver/
• It is only safe to use laptops and similar mobile devices
button again immediately to switch off the air recirculation
passengers. Mobile phones can lead to serious injuries in
when the vehicle is stationary because, like all loose objects,
function or select defrost.
cases of collisions, especially when the airbags are inflated.
Important Safety Instructions and Warnings
they could be thrown around the inside of the vehicle in a
• Always switch off your mobile telephone at gas
crash and cause serious injuries. Store these types of devices
BLUETOOTH® Pairing
stations or wherever there is a fire or explosion hazard.
securely while driving.
• Collisions and injuries can occur if the driver is distracted.
Electromagnetic radiation can cause sparks which can start
• Do not use any Wi-Fi devices in the front seats within
Speaking on or using a phone while driving can distract the
fires.
range of the airbags. Read and follow the safety precautions
driver from traffic.
• The mobile phone will automatically connect to the
in the separate vehicle owner’s manual in the “Airbag
• Select the volume settings so that the acoustic signals
mobile network when the Bluetooth connection to the
System” chapter under “Important information about the
from the outside are still audible (e.g., the sirens of
mobile phone package is disconnected.
front airbag system”.
emergency rescue vehicles.) Observe legal regulations.
• Using a radio device in the vehicle without a connection
• In areas with no or poor mobile network coverage
to an external antenna might exceed electromagnetic
radiation thresholds. This also applies if the external
accelerator pedal causes the cruise control not to brake. This
only offer maximum protection when the backrest is upright
antenna is not installed properly.
is because the cruise control is overridden by the driver’s
and the safety belts are properly positioned on the body. The
• Keep a distance of at least eight inches between the
acceleration.
more the backrest is reclined, the greater the risk of personal
antennas of the mobile phone and a pacemaker, since
• If a brake system malfunction such as overheating occurs
injury from an incorrect seating position and improperly
mobile phones can affect the functionality of a pacemaker.
when the cruise control system is switched on, the braking
positioned safety belts.
• Do not carry a mobile phone on standby mode in the
function in the system may be switched off. The other cruise
• Occupants in the front and rear seats must always be properly
breast pocket directly on top of a pacemaker.
control functions remain active as long as the indicator light
restrained.
• If interference is suspected, immediately switch off the
is on.
• Do not let anyone ride in the vehicle without the head
mobile phone.
• You should only return to the saved speed if it is not too fast
restraints provided.Head restraints help to reduce injuries.
• Always keep the armrest closed while driving. The center
for the current traffic conditions - risk of an accident!
• Loose items inside the passenger compartment,can fly
armrest can interfere with the driver’s elbow movement and
thus cause collisions and severe injuries.
forward in a crash or sudden maneuver and injure occupants.
Memory Seats
Always store articles in the luggage compartment and use the
• Never adjust the driver’s or front passenger’s seat while the
fastening eyes, especially when the rear seat backs have been
Cruise Control
vehicle is moving. If you do this while the vehicle is moving,
folded down.
• Always pay attention to the traffic around you when the
you will be out of position. Always adjust the driver’s or front
• For safety reasons, the seat must only be adjusted when the
cruise control is in operation. You are always responsible for
passenger’s seat when the vehicle is not moving.
vehicle is stationary - danger of accident! – Exercise caution
your speed and the distance between your vehicle and other
• Be careful when adjusting the seat height. Check to see that
when adjusting the seat. Adjusting the seat without checking
vehicles.
no one is in the way, or serious injury could result!
or paying attention can pinch fingers or limbs - danger of
• For reasons of safety, cruise control should not be used in
• Because the seats can be electrically adjusted with the
injury!
the city, in stop-and-go traffic, on twisting roads and when
ignition off or with the ignition key removed, never leave
• For safety reasons, the seat setting can only be recalled when
road conditions are poor (such as ice, fog, gravel, heavy rain
children unattended in the vehicle. Unsupervised use of the
the vehicle is stationary - otherwise you risk having an accident.
and hydroplaning) - risk of accident.
electric seat adjustments may cause serious injury.
• In an emergency the recall procedure can be cancelled by
• Turn off the cruise control temporarily when entering turn
• To reduce the risk of injury in the case of sudden braking or
pressing the OFF switch or by tapping of the memory buttons.
lanes, highway exit lanes or in construction zones.
accident, front passengers must never ride in a moving vehicle
• Please note that inadvertently “resting” your foot on the
with the backrest reclined. Safety belts and the airbag system
Navigation & Infotainment
when it is moving, in particular close to the hinges - fingers or
reason, always remove the ignition key when leaving the
• The demands of traffic require your full attention.
hands can be pinched.
vehicle.
• Obey all traffic laws when driving.
• Never close the rear hatch inattentively or without checking
• Never close the windows and the Panoramic sliding sunroof
• The route calculated by the navigation system is a
first. Although the closing force of the rear lid is limited,you
inattentively and without checking - there is risk of injury.
recommendation for reaching your destination. Obey traffic
can still seriously injure yourself or others.
• You must always watch when the windows are being raised
lights, stopping restrictions, one-way streets, lane change
• If there is a luggage rack or bicycle rack mounted on the
so that no one can be trapped. If you release the key, the
restrictions, etc.
rear lid, it may not be able to open completely or an opened
closing action is immediately canceled.
rear lid may close by itself because of the added weight. So
Rear Hatch
the open rear lid must be supported or the weight must be
Voice Recognition
• After closing the rear hatch, always pull up on it to make
removed from the luggage rack first.
• Driving requires your complete and undivided attention. As the
sure that it is properly closed. Otherwise it could open
driver, you have complete responsibility for safety in traffic. Only
suddenly when the vehicle is moving.
Start-Stop System
use the MMI® system when traffic conditions permit and always
• To help prevent poisonous exhaust gas from being drawn
• Never let the vehicle roll with the engine switched off. You
in a way that allows you to maintain complete control over your
into the vehicle, always keep the rear hatch closed while
could lose control over the vehicle. This can lead to a collision
vehicle.
driving. Never transport objects larger than those which fit
and serious injuries.
• Adjust the volume of the audio system so signals from outside
completely into the luggage area, because then the rear hatch
• The brake booster and the steering support do not work
the vehicle such as police and fire sirens can be heard easily at
cannot be fully closed.
while the engine is switched off. More force is required to stop
all times.
• Never leave your vehicle unattended especially with the rear
and to steer the vehicle.
• Always follow the safety precautions when using the Audi
hatch left open. A child could crawl into the car through the
• To reduce the risk of injuries, make sure that the Start-
connect® services when using the wireless hotspot.
luggage compartment and pull the hatch shut, becoming
Stop-System is turned off when working in the engine
• Obey all applicable laws regarding use of telephones in vehicles.
trapped and unable to get out. To reduce the risk of personal
compartment.
• Medical experts warn that cell phones can interfere with the
injury, never let children play in or around your vehicle. Always
function of pacemakers. Always maintain a minimum distance
keep the rear hatch as well as the vehicle doors closed when
Sunroof
of 20 centimeters between the cell phone antenna and the
not in use.
• Pay careful attention when closing the Panoramic sliding
pacemaker.
• Always ensure that no one is within range of the rear hatch
sunroof - otherwise serious injury could result! For this
• Do not carry the cell phone in a pocket directly over the
provide uncompromised visibility. Worn or damaged wiper blades
pacemaker when the phone is switched on.
are a safety hazard.
• Switch the cell phone off immediately if you suspect it may be
• The rain sensor is only designed to assist and support the driver.
interfering with the pacemaker.
It remains entirely the driver’s responsibility to monitor outside
• Do not use voice recognition system in emergencies because
weather conditions and to manually activate the wipers as soon
your voice may change in stressful situations. It may take longer
as rain or drizzle reduces visibility through the windshield.
to dial the number or the system may not be able to dial it at
• Dirty windshield wiper blades can impair your view. This can
all. Dial the emergency number manually.
lead to accidents.
• Switch your cell phone off in areas at risk for an explosion.
• For your safety, you should replace the wiper blades once or
These locations are not always clearly marked. They may
twice a year. See your authorized Audi dealer for replacement
include gas stations, equipment that stores or transports fuel
blades.
or chemicals, or locations where fuel vapors (such as propane
or gasoline vapor in vehicles or buildings), chemicals or large
quantities of dust particles (such as flour, sawdust or metal)
may be present in the air. This also applies to all other locations
where you would normally switch your vehicle off.
• Pay attention to the traffic reports when making a call.
• Please devote your full attention to driving. As the driver,
you have complete responsibility for safety in traffic. Only use
the functions in such a way that you always maintain complete
control over your vehicle in all traffic situations.
Windshield Wipers
• Wiper blades are crucial for safe driving! Only when they are
in good condition are they able to clear the windows properly to
Notes
Notes
Notes
Notes
MY14-Q5-01
Audi of America
auditechnology.com
2014 | Q5 | SQ5
Audi Truth in Engineering
Q5 SQ5
© 2013 Audi of America, Inc. All rights reserved.