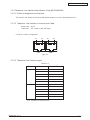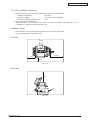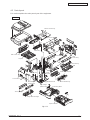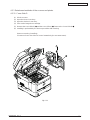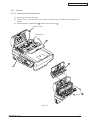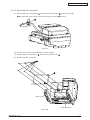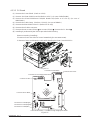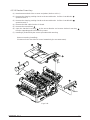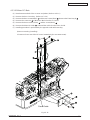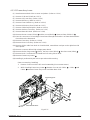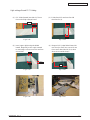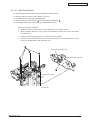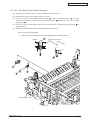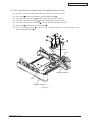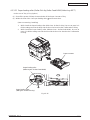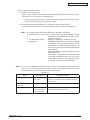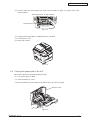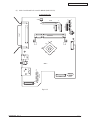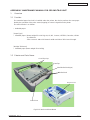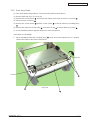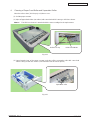
1
MB460/470/480 Maintenance Manual 011409B Oki Data CONFIDENTIAL Oki Data CONFIDENTIAL Document Revision History Corrected items Rev.No. Date No. 1 2009-08-14 2 2009-10-13 44306601TH Rev. 2 Page P70 P125 P177 Description of change Person in charge Issue PED14 M. Yamazaki Change of P70 /P125 /P177 PED25 H. Ishizuka / Oki Data CONFIDENTIAL Preface This manual explains the maintenance methods of MB460/MB470/MB480. This manual is prepared for the maintenance person. In regard to the handling methods of MB460/ MB470/MB480, please refer to the User’s Manual. Note! • Contents of this manual is subject to change without notice. • While all reasonable efforts have been made to make this document as accurate and helpful as possible, we make no warranty of any kind, expressed or implied, as to the accuracy of the information contained herein. Oki Data assumes no responsibility to the damages caused or claimed to have been caused by the user as a result of repair, adjustment and/or change using this manual. • Parts of this product are delicate and can be damaged unless properly handled. We strongly recommend the user to maintain the product at the hand of the registered maintenance person of our company • Before starting the maintenance work, please neutralize the static electricity. 44306601TH Rev. 2 / Oki Data CONFIDENTIAL Table of contents 1. Configuration.................................................................................................7 1.1 1.2 1.3 1.4 1.5 System Configuration . ..........................................................................................................7 Structure of MFP....................................................................................................................9 Offer of Options....................................................................................................................10 Specifications....................................................................................................................... 11 Interface Specification..........................................................................................................13 USB Interface Specification....................................................................................13 1.5.1 1.5.1.1 Outline of USB Interface..........................................................................13 1.5.1.2 USB Interface Connector and Cable.......................................................13 1.5.1.3 UBS Interface Signal...............................................................................13 1.5.2 Network Interface Specification..............................................................................14 1.5.2.1 Outline of Network Interface....................................................................14 1.5.2.2 Network Interface Connector and Cable.................................................14 1.5.2.3 Network Interface Signal.........................................................................14 Telephone Line Interface Specification (Only MB470/MB480) .............................15 1.5.3 1.5.3.1 Outline of telephone Line Interface.........................................................15 1.5.3.2 Telephone Line Interface Connector and Cable......................................15 1.5.3.3 Telephone Line Interface signal..............................................................15 Parallel Interface Specifications ............................................................................16 1.5.4 1.5.4.1 Parallel Interface Overview.....................................................................16 1.5.4.2 Parallel Interface Connector and Cable..................................................16 1.5.4.3 Parallel Interface Level ...........................................................................16 2.Operational explanation.........................................................................17 2.1 2.2 2.3 Electrophotographic process mechanism . ......................................................................... 17 Printing process...................................................................................................................24 Toner entrance detection.....................................................................................................28 3. MFP Installation...........................................................................................30 3.1 3.2 3.3 3.4 3.5 3.6 3.7 3.8 3.9 Precautions and Prohibition.................................................................................................30 MFP Unpacking Procedure..................................................................................................32 MFP Installation Instructions................................................................................................33 Packed Units and Attachments............................................................................................34 Assembly Procedure............................................................................................................35 MFP Main Body......................................................................................................35 3.5.1 3.5.2 Power Cable Connection........................................................................................44 3.5.3 Installation of Optional Components......................................................................46 3.5.4 Confirm the Recognition of Option.........................................................................50 Configuration Page Print......................................................................................................51 Network Information Print.....................................................................................................54 Connection Procedures.......................................................................................................55 Checking of User Paper.......................................................................................................59 4. REPLACEMENT OF PARTS...............................................................................60 4.1 4.2 Precautions on the replacement of parts.............................................................................60 Parts layout..........................................................................................................................62 44306601TH Rev. 2 / Oki Data CONFIDENTIAL 4.3 Parts replacement method...................................................................................................67 4.3.1 Detachment methods of the scanner and printer...................................................68 4.3.1.1 Cover-Side-R...........................................................................................68 4.3.1.2 Cover-Side-L...........................................................................................69 4.3.1.3 FAX Board (In case of MB470/480 ) .....................................................70 4.3.1.4 Detachment methods of the scanner and printer....................................71 4.3.2 Scanner..................................................................................................................73 4.3.2.1 Detachment of the paper tray..................................................................73 4.3.2.2 Detachment of Pad.................................................................................. 74 4.3.2.3 Removing ADF PCBA.............................................................................75 4.3.2.4 Removing operation panel......................................................................76 4.3.2.5 Removing the MPCBA.............................................................................77 4.3.2.6 Removing ADF Assembly.......................................................................79 4.3.2.7 Removing the Window-ADF....................................................................81 4.3.3 Printer.....................................................................................................................82 4.3.3.1 LED Head................................................................................................82 4.3.3.2 Roller-Transfer.........................................................................................83 4.3.3.3 CU Board.................................................................................................84 4.3.3.4 OP Cover Assy........................................................................................85 4.3.3.5 MPT-Assy (In case of MB460, it is Manual-Assy)...................................86 4.3.3.6 Front-Guide-Assy....................................................................................87 4.3.3.7 Roller-Assy-Feed.....................................................................................88 4.3.3.8 Guide-Paper-Duplex................................................................................89 4.3.3.9 Stacker-Cover-Assy.................................................................................90 4.3.3.10 Motor-DC-Main........................................................................................91 4.3.3.11 Fuser-Assy...............................................................................................92 4.3.3.12 Rear-Cover-Assy.....................................................................................94 4.3.3.13 Frame-Assy-Lower..................................................................................95 4.3.3.14 High voltage / Low voltage power board.................................................97 4.3.3.15 Plate-Bracket-Motor................................................................................99 4.3.3.16 Roller-Back up.......................................................................................100 4.3.3.17 Roller-Resist.......................................................................................... 101 4.3.3.18 Lever-In-Sensor.....................................................................................102 4.3.3.19 Lever-Eject-Sensor/Photo-Interrupter...................................................103 4.3.3.20 Lever-End/Lever-Duplex/Lever-Cassette/Gear-Assy-Clatch................104 4.3.3.21 Paper feeding roller (Roller-Pick-Up, Roller-Feed-NOW, Roller-Assy-MPT).........................106 5. MAINTENANCE MENU.....................................................................................108 5.1 5.2 5.3 5.4 5.5 Maintenance Menu.............................................................................................................108 5.1.1 Boot Menu............................................................................................................108 System Maintenance Menu.................................................................................. 111 5.1.2 Fax Maintenance Menu........................................................................................ 115 5.1.3 Print Statistics Menu............................................................................................. 117 5.1.4 Maintenance Utility............................................................................................................. 119 Variou s printing of the MFP unit with controller................................................................. 121 Switch pressing function when power supply is turned on................................................ 121 Settings after Parts Replacement......................................................................................122 5.5.1 Notes when exchanging the main circuit board and EEPROM setting after the exchange of 86M circuit board..................................................................................122 44306601TH Rev. 2 / Oki Data CONFIDENTIAL 6. Periodic Maintenance..............................................................................126 6.1 6.2 6.3 6.4 6.5 6.6 6.7 6.8 Periodic Replacement Parts...............................................................................................126 Cleaning.............................................................................................................................126 Cleaning of LED lens array................................................................................................126 Cleaning the pick-up roller ................................................................................................128 Cleaning the inside of the MFP..........................................................................................129 Cleaning the papaer path in the ADF . ..............................................................................130 Cleaning the underside of the ADF....................................................................................132 Cleaning the Flatbed glass................................................................................................132 7. TROUBLESHOOTING PROCEDURES.............................................................133 7.1 7.2 7.3 7.4 7.5 7.6 Precautions prior to repair..................................................................................................133 Items to be checked prior to taking action on abnormal images........................................133 Precautions when taking action on abnormal images.......................................................133 Preparations for troubleshooting........................................................................................133 Troubleshooting method.....................................................................................................133 LCD Message List................................................................................................134 7.5.1 LCD Message Troubleshooting............................................................................183 7.5.2 Print Troubleshooting............................................................................................199 7.5.3 Response after Flash compulsive initialization.....................................................207 7.5.4 Network Troubleshooting......................................................................................208 7.5.5 7.5.5.1 Connection error occurs with the Web browser....................................209 7.5.5.2 Print operation is not possible............................................................... 215 7.5.5.3 Cannot create Certificate....................................................................... 216 7.5.5.4 Installation of Certificate is not possible................................................ 216 7.5.5.5 Other questionnaires............................................................................. 219 7.5.5.6 Restrictions when using Internet Explore 7...........................................222 Fax Error Code List...............................................................................................223 7.5.6 Fuse Checking...................................................................................................................225 8. CONNECTION DIAGRAMS...............................................................................226 8.1 8.2 Resistance value................................................................................................................226 Component layout..............................................................................................................228 Appendix C Maintenance Manual for Second Tray unit...................234 1 2. 3. 4. Overview............................................................................................................................234 1.1 Function.......................................................................................................................234 1.2 Exterior and Parts Name.............................................................................................234 Description for Operation of Second Tray unit...................................................................235 Part Replacement..............................................................................................................236 3.1 Precautions on replacing parts....................................................................................236 3.2 Arrangement of Parts...................................................................................................237 3.3 How to Replace Parts..................................................................................................238 Roller-Pick-Up, Roller-Feed-Now..........................................................239 3.3.1 Guard-Connector, Connector (9715S-08Z02-G4C)..............................240 3.3.2 Roller-Feed............................................................................................ 241 3.3.3 Board-OT7.............................................................................................242 3.3.4 CONN Cord-AMP8P-AMP8P................................................................243 3.3.5 Gear-Assy-Clatch..................................................................................244 3.3.6 Frame-Assy-Retard, Spring-Retard.......................................................246 3.3.7 Cleaning of Paper Feed Roller and Separation Roller.......................................................247 44306601TH Rev. 2 / 44306601TH Rev. 2 JST10 cover open switch 2 2 EXIT sensor 3 5 3 CN3 CN2 CN1 PCB 3 SOLENOID 3 JST9 High Volt 2nd Tray clutch clutch clutch Temperature sensor Cover open sensor PCB FAN Board-TT1 FUSER UNIT 2 Power Supply 2 duplex DC Motor Assy. 8 2 2 2 2 6 9 JST28 2 28 JST2 JST28 AMP6 6 JST2 AMP8 JST2 JST2 JST2 JST7 JST9 JST24 SON HVIF EXRCO 2NDTRAY MCLT HCLT RCLT THERM PE DM HEAD HEAD IF PUIF 8051 SDRAM DDR64MB LC98500B PU LSI HEAD Clock DDR IF I/F DDR I2C RS232C PCI PCI I2C ROM 64 Kbit 24V 5V UPD7 202 IP100 ALF DP/ DM TXD/ RXD 74LVC IEEE1284 161284 IEEE1284 ພ ROM IF ROM IF DIMM I2C 16C550 UART SPILYTAS 2 Nand Nor CENT PNLUSB Fax IF LAN JST20 Centronics IF 20 CCD UNIT JST20 Scanner Unit LAN IF 5V 24V DP/ DM L629 RS232C SCANNER PCB FB Moter AFD PCB Panel PCB LCD BUS Cable FFC Sensor AFD Moter System Configuration 3 3 24 DP/DM 24V 5V 86M 1.1 AC SW Paper end JST24 USB PW Configuration LED HEAD UNIT USB IF JST10 1. 2 AC Inlet 10 Oki Data CONFIDENTIAL MB460 The system configuration of this product is shown in Figure 1-1-1. Fig 1.1.1 / 44306601TH Rev. 2 FAN cover open switch 2 Board-TT1 FUSER UNIT 2 2 PCB EXIT sensor 3 5 3 DC Motor Assy. CN3 CN2 CN1 PCB 3 SOLENOID 3 JST9 8 2 2 2 2 6 9 USB IF LED HEAD UNIT High Volt 2nd Tray clutch clutch clutch Temperature sensor 3 3 Cover open sensor duplex Paper end JST10 Power Supply 2 AC SW 2 AC Inlet 10 24 JST28 JST24 2 28 JST2 JST28 AMP6 6 JST2 AMP8 JST2 JST2 JST2 JST7 JST9 JST24 JST10 RCLT SON HVIF EXRCO 2NDTRAY MCLT HCLT PUIF 8051 SDRAM DDR64MB LC98500B PU LSI HEAD Clock HEAD IF DP/DM 24V 5V 86M THERM PE DM HEAD USB PW DDR IF I/F DDR I2C RS232C PCI PCI I2C ROM 64 Kbit 24V 5V UPD7 202 IP100 ALF DP/ DM TXD/ RXD 74LVC IEEE1284 161284 IEEE1284 ພ ROM IF ROM IF DIMM I2C 16C550 UART SPILYTAS 2 Nand Nor CENT PNLUSB Fax IF LAN JST20 JST12 20 FAX PCB JST20 Scanner Unit CCD UNIT JST12 Centronics IF 12 LAN IF 5V 24V DP/ DM L629 RS232C SCANNER PCB FB Moter Tel Line Tel Line AFD PCB Panel PCB LCD BUS Cable FFC Sensor AFD Moter Oki Data CONFIDENTIAL MB470/MB480 The system configuration of this product is shown in Figure 1-1-2. Fig 1.1.2 / Oki Data CONFIDENTIAL 1.2 Structure of MFP The insides of MB460/MB470/MB480 printers are composed of the following parts. • • • • • Scanner part Electronic photography process part Paper path Control part (CU part/PU part) Power supply parts (high voltage part/low voltage part) Figure 1-2 shows the composition of the MFP. A A A’ A’ Fig 1.2.1 44306601TH Rev. 2 / Oki Data CONFIDENTIAL 1.3 Offer of Options This product can be installed with the following option. (1) Additional memory board 64MB/256MB Fig 1.3.1 (2) Option Tray Fig 1.3.2 44306601TH Rev. 2 10 / Oki Data CONFIDENTIAL 1.4 Specifications Table 1.4.1 Category Exterior Dimensions Weight printer Engine Fast print time (A4) Resolution CPU RAM ROM Power Consumption Operation Environment (temperature) Operation Environment (humidity) Duty Cycle Life Item MB470 447mm 432mm 500mm 17Kg Engine speed (A4/Letter) Auto Duplex First Print Out Time Warm-up Time from Power On from Power Save Low noise mode LED Head Maximum input resolution Output resolution step Economic mode Core I-Cache D-Cache Clock Bus width Standard Option Program Max. Normal Operation Stand-by Power Saver Mode Energy Star Application In operation At stand-by In storage (1 year max.) At transport (1 month max.) At transport (1 month max.) In operation At stand-by In storage At transport Maximum Printer Scanner Duty cycle (M=L/12, A=L/12/5) MTBF (2.3% duty) MPBF MTTR Toner consumption life@ISO19752 Starter 44306601TH Rev. 2 MB460 Width Depth Height MB480 447mm 432mm 529mm 19Kg 18.5Kg 28/30 PPM Standard Less than 5.5 seconds 60 seconds 25 seconds Unavailable 600dpi 1200dpi F/B:1200 x 600dpi / ADF:1200 x 300dpi 1200x1200dpi 600x600dpi 600x600dpi 1200x600dpi 2400x600dpi(half speed) 4 step 600 x 600dpi toner saving by lowering light PowerPC405 16KB 16KB 297MHz 32bit 64MB 64MB/256MB available (SO-DIMMx1) NOR-Flash 2MB + NAND-Flash 64MB 800W 500W 100W 10W or less Yes 10 - 32 , 17 - 27 0 - 43 , power off -10 - 43 , with drum and toner -29 - 50 , with drum and without toner -29 - 50 , with drum and toner 20%-80%, 50%-70% Max. wet bulb temperature : 25 10%-90%, Max. wet bulb temperature : 26.8 with power off 10%-90%, Max. wet bulb temperature : 35 10%-90%, Max. wet bulb temperature : 40 50,000 pages per month 70,000 pages per month 180,000 pages or 5 years Flatbed:50,000pages or 5years / ADF:240,000 pages or 5years 35,000 pages per month max. 5,000 pages per month average 6,000 hours 24,000 pages 30 minutes 3,500 3,500 7,000 7,000 12,000 1500 11 / Oki Data CONFIDENTIAL Category Item MB460 MB470 MB480 Life Image drum life Continuous (w/o power save) 3 pages per job 1 page per job Operation noise Operating Standby Power save mode Paper handling Paper Input 1st Tray Capacity 25,000 pages (at simplex) 20,000 pages (at simplex) 12,000 pages (at simplex) 56dB 32dB Back ground level Legal/universal cassette Legal/universal 250 sheets cassette 530 sheets 2nd Tray (optional) Legal/universal cassette 530 sheets MP Tray Single sheet 50 sheets Multi Purpose Tray manual feed slot Paper Output Face up N/A Capacity Face down 150 sheets Paper Size Legal/universal or A4 cassette/ 13,13.5,14Legal,Letter,Executive,A4,A5,B5 Universal cassette statement(first cassette only) Free MP Tray 13,13.5,14Legal,Letter,Executive,A4,A5,B5,A6,C5,C6,DL ,Com-9,Com-10,Monarch,statement,Free Duplex Letter,A4,up to Legal14" Minimum paper 1st Tray 3.94"x8.3" (210mm) size 2nd Tray 5.8"x8.3"(210mm,A5) MP Tray 3.4"x5.5"(140mm) Duplex Auto Duplex Letter,A4;Manual Duplex 3.4"x5.5" Paper Weight 1st Tray 16~32 lb. (60.16~120.32gsm) 2nd Tray 16~32 lb. (60.16~120.32gsm) MP Tray 16~43 lb. (60~160gsm) (Enve. : N/A) Duplex Print 16~28 lb. (60.16~105.28gsm) Status switch/ Paper tray empty Available Sensor Paper low N/A Toner Empty Available Cover open Available Fuser temp Available Paper size N/A Stacker full N/A Communication USB Host IF N/A Interface USB Device IF USB connector Type B (2.0 Hi-Speed) Ethernet I/F RJ-45 (10/100 Base TX) Tel/Line I/F N/A RJ-11x2 (PSTN/PBX , Ext-TEL) Parallel I/F CEN36 (IEEE1284) Wireless LAN N/A Card Slots N/A Emulation Standard PCL6/5e , SIDM PCL6/5e , SIDM , PS3 Option N/A Option RAM RAM DIMM 1slot (64MB or 256MB) 2nd tray 530 sheet tray Emulation N/A Others USB-IF logo Available Windows logo Available Operation by UPS Operation by UPS (outage free power supply) is not guaranteed. (Do not use UPS) 44306601TH Rev. 2 12 / Oki Data CONFIDENTIAL 1.5 Interface Specification 1.5.1 USB Interface Specification 1.5.1.1 Outline of USB Interface (1) Basic Specification USB (2) Transmission Mode Hi speed (480Mbps±0.05% max.) (3) Power Control Self power device 1.5.1.2 USB Interface Connector and Cable (1) Connector • Printer side: B receptacle Upstream port Equivalent of UBR24-4K5C00 (made by ACON) 2 1 3 4 Connector pin arrangement Fig 1.5.1 • Cable side: B plug (off) (2) Cable Cable length: Specification Cable of USB2.0 spec. of less than 5m.(less than 2m is recommended) (Shielded cable is used here.) 1.5.1.3 UBS Interface Signal Table 1.5.1 44306601TH Rev. 2 Name of Single Function 1 Vbus Power Supply (+5V)(red) 2 D- Data transmission (white) 3 D+ Data transmission (green) 4 GND Single ground (black) Shell Shield 13 / Oki Data CONFIDENTIAL 1.5.2 Network Interface Specification 1.5.2.1 Outline of Network Interface Table 1.5.2 Basic Specification of Network Interface Protocol Family Network Protocol Application TCP/IP ARP,IP,ICMP,IPv6,TCP,UDP LPR,Port9100,FTP,HTTP,HTTPS,IPP, SNMPv1/v3,TELNET,DHCP/BOOTP,DNS, DDNS,WINS,UPnP,Bonjour,SNTP,SMTP, POP3,Windows Rally(WSD Print,LLTD), ODNSP,SSL/TLS,LDAP,Kerberos NBT/NetBEUI SMB,NetBIOS,NetBIOS over TCP EtherTalk ELAP,AARP,DDP,AEP,NBP,ZIP,R TMP,ATP,PAP IEEE802.1X EAP-TLS,PEAP 1.5.2.2 Network Interface Connector and Cable (1) Connector 100 BASE-TX/10 BASE-T (automatic switch, no simultaneous use) 1 8 Connector pin arrangement Fig 1.5.2 (2) Cable Unshielded twist pair cable with RJ-45 connector (Category 5 is recommended.) 1.5.2.3 Network Interface Signal Table 1.5.3 44306601TH Rev. 2 Pin No. Singles Single Direction Functions 1 TXD+ FROM PRINTER Send Data + 2 TXD- FROM PRINTER Send Data - 3 RXD+ TO PRINTER Received Data + 4 - - Unassigned 5 - - Unassigned 6 RXD- TO PRINTER Received Data - 7 - - Unassigned 8 - - Unassigned 14 / Oki Data CONFIDENTIAL 1.5.3 Telephone Line Interface Specification (Only MB470/MB480) 1.5.3.1 Outline of telephone Line Interface The machine will reliably communicate with distant stations over voice-level telephone line. 1.5.3.2 Telephone Line Interface Connector and Cable Printer side : RJ-11 Cable side : TEL Cable (Cable with plug) Connector contact arrengement A1 A6 B1 TEL B6 LINE Fig 1.5.3 1.5.3.3 Telephone Line Interface signal Tabel 1.5.4 TEL LINE 44306601TH Rev. 2 Contact No. Functions A1 Unspecified A2 Unspecified A3 TCP A4 TCP A5 Unspecified A6 Unspecified B1 Unspecified B2 Unspecified B3 TCP B4 TCP B5 Unspecified B6 Unspecified TCP : Terminal Connection Point 15 / Oki Data CONFIDENTIAL 1.5.4 Parallel Interface Specifications 1.5.4.1 Parallel Interface Overview Table 1.5.5 Item Details Corresponding mode Comatible mode, nibble mode, ECP mode Data bit length Compatible: 8, Nibble: 4, ECP: 9 bit 1.5.4.2 Parallel Interface Connector and Cable (1) Connector Printer: Cable: 36pConnector (Female) 57LE-40360-12 (D56) (DDK Ltd.) equivalent product 36pConnector (Male) 57FE-30360-20N (D8) (DDK Ltd.) equivalent product 18 1 36 19 Pin arrangement from interface cable side Fig 1.5.4 (2) Cable Use a cable shorter than 1.8m. (Use a cable with a shielded twisted-pair wire for to prevent noise interference.) 1.5.4.3 Parallel Interface Level Low Level : 0.0V to +0.8V High Level : +2.4V to +5.0V 44306601TH Rev. 2 16 / Oki Data CONFIDENTIAL 2. Operational explanation 2.1 Electrophotographic process mechanism (1) Electrophotographic process The following describes the overview of electrophotographic process. 1. Charging Equally charge the surface of image drum by implying negative voltage to the charged roller due to negative charge. 2. Exposure The light from LED Head is exposed on the negative-charged surface of image drum. The surface electrical potential of the exposed part of image drum surface becomes lower. Then forms electrostatic latent image. 3. Development Negative-charged toner is attracted to the electrostatic latent image due to electrostatic while touching the image drum. Then forms viewable image. 4. Transfer Overlap paper on the surface of OPC drum, from the backside of paper transfer toner image to the paper by applying electrical charge by transfer roller. 5. Drum cleaning The remaining toner on the image drum that is not transferred is made to be equable by cleaning roller. And is temporarily attracted to the cleaning roller due to electrostatic. 6. Fusing The toner image that is transferred to paper is fused on paper by heat and pressure. 44306601TH Rev. 2 17 / Oki Data CONFIDENTIAL 1. Charging Charge the image drum surface by implying voltage to the charged roller that contacts the image drum surface. Charged roller Power Image drum Fig 2.1.1 2. Exposure The light emitting from the LED Head will be exposed to the negative charged image drum. When the surface electric potential of exposed part of the image drum goes to decrease, the electrostatic latent image complying with image signal is formed. Image drum is coated by basic layer (UL), charge generating layer (CGL), charge transferring layer (CTL) on the basic material aluminum. The thickness of the organic light sensor (OPC) that is consisted by CTL and CGL is approximate 20µm. LED head LED head Power Charged roller Paper Image drum Image drum Fig 2.1.2 44306601TH Rev. 2 18 / Oki Data CONFIDENTIAL 3. Image development Toner is attracted to the electrostatic latent image on the image drum surface, then the electrostatic latent image changes to toner image. 1 As the roller on the supply spot of toner rotates while scrubbing the image-developing roller, fiction electricity occurs between the image developing roller and toner; toner is attracted to the image-developing roller. 2. The toner that has been attracted to the image-developing roller is dropped down to the developing plate to make a thin toner film on the image developing roller side. Image developing plate Charged roller Image developing roller Toner supply roller Image drum Fig 2.1.3 3 The toner is attracted by the exposed part (Low electrical potential part) of the image drum when the image drum contact the image developing roller, so as to see the electrostatic latent image. 44306601TH Rev. 2 19 / Oki Data CONFIDENTIAL Note! The necessary bypass voltage in image processing is impressed on the toner feeding roller and image developing roller as show below. While the cover is closed it will be connected and bias will be applied. Toner feeding roller Image developing roller Basic material Image drum Fig 2.1.4 44306601TH Rev. 2 20 / Oki Data CONFIDENTIAL 4. Transfer The transfer roller, which is from conductive sponge material, is created to meet intimate attachment of image drum roller surface and feeding paper. The feeding paper is set up on the surface of image drum. Plus charge, which is the converse polarity with toner polarity, is applied from the backside of the paper. As high plus voltage is applied to transfer roller from the power supply, the plus charge on the transfer roller surface is induced and transferred to the paper while the paper contact the transfer roller. The negative charged toner, which has been attracted to the image drum surface, is transferred to the surface of feeding paper by the plus charge of the backside of the paper. Image drum Paper Transfer roller Power Fig 2.1.5 44306601TH Rev. 2 21 / Oki Data CONFIDENTIAL 5. Drum cleaning 1 Cleaning After the completion of transferring, the remaining toner on the image drum is temporarily attracted by the electrostatic and the image drum surface is cleaned. Image drum Cleaning roller Power supply Transferring roller Fig 2.1.6 2 Roller cleaning In the following case, there is a need of cleaning the charged roller, transfer roller, and cleaning roller. • Warming up as switching on the power supply • Warming up after open-close of the cover • In case of termination of printing operation • By periodically change the bias voltage that is implied to each roller during continuous printing, transfer the attached toner from roller to image drum and then return it to developing device. 44306601TH Rev. 2 22 / Oki Data CONFIDENTIAL 6. Fusing After the termination of transfer the unsettled toner image is settled to paper by heat and pressure while passing between Heat roller and Back up roller. Heat roller is Teflon coated and is mounted by heater that can generate heat (Halogen lamp). The thermistor that contacts the Heat roller adjusts the Heat roller temperature to the temperature specified by the menu complying with the paper width. For safety the thermostat shuts off the voltage supply to the Heater by opening the thermostat in the case of abnormally temperature increasing. The back up roller is held by the pressure springs on each terminal due to the pressure applied. Thermostat Heat roller Separating clutch Heater Thermistor Feeding paper Backup roller Pressuring spring Fig 2.1.7 44306601TH Rev. 2 23 / Oki Data CONFIDENTIAL 2.2 Printing process The paper fed from Tray 1 and Tray 2 is conveyed by feeding roller, conveying roller, and resist roller. When feeding paper is from MPT, it is conveyed by MPT, feeding roller, and resist roller. After that the feeding paper that is conveyed by image drum and the nip part of transfer roller forms toner image on the paper through electrophotographic process. And then, the toner on the paper is fused by the heat and pressure as the fuser unit passing through. The paper that fused the toner image is ejected from the face down stacker of the ejecting roller. In the case of face up ejecting, it needs to open the backside cover and install face up stacker. (It is unavailable for duplex printing while it is face up ejecting.) The above is about the operations at simplex printing, yet the below explains the operations at duplex printing. While duplex printing, the paper, which firstly passed through the fuser unit after the backside printing, is conveyed to the inward of Duplex Unit, by the reverse operation of the second ejecting roller that is a certain time after removing the first ejecting roller of the paper rear side. Paper, is conveyed by conveying roller of Duplex Unit, and then merges to the same route with the feeding paper that is from the tray. Onwards, it is the same with the simplex printing operation by the feeding paper from tray. Resist roller Face down stacker Image drum Entrance MPT feeding roller The 2nd ejecting roller Ejecting Writing out sensor lever sensor lever Multipurpose tray sensor lever Face up stacker Heat roller The 1st ejecting roller Backup roller Conveying roller DC motor Transferring roller Pick up roller Duplex unit Feeding roller Conveying roller Tray 1 Conveying roller Pulse motor Pick up roller Feeding roller Tray 2 2nd tray unit (option) Paper conveying route :Driving roller (Continuous rotation) :Driving roller (Control rotation) :Driving roller :Paper level indicator lever :Indicating lever :Photo sensor :Micro switch :Magnetic clutch :Solenoid Fig 2.2.1 44306601TH Rev. 2 24 / Oki Data CONFIDENTIAL (1) Paper feeding from Tray 1 1. As DC motor rotating (Counterclockwise rotation), if set the paper feeding clutch as ON, as the paper feeding roller and pick up roller rotating, the paper that is inside the tray is conveyed. 2. The paper is conveyed by the conveying roller. After the entrance sensor level set to be ON, it bumps into the stopping resist roller, a certain more amount of paper is conveyed. (This corrects the paper skew.) 3. If set the resist clutch as ON, the paper is conveyed by resist roller. Resist roller Resist clutch Writing out sensor lever Entrance sensor lever Conveying roller DC motor (Counterclockwise rotation) Pick up roller Paper feeding roller Paper Paper feeding clutch Fig 2.2.2 (2) Paper feeding from Multipurpose tray (MPT)(MB470,MB480) 1. As DC motor rotating (Counterclockwise rotation), if set paper feeding clutch as ON the MPT paper feeding roller starts to rotate, the paper in the tray is conveyed. 2. After setting the entrance sensor lever as ON, the paper bumps into the stopping resist roller, a certain more amount of paper is conveyed. (This corrects the skew of paper.) 3. If set the resist clutch as ON, the paper is conveyed by resist roller. Entrance sensor lever Paper feeding clutch Resist clutch Resist roller MPT paper feeding roller Writing out sensor lever Paper DV motor (Counterclockwise rotation) Fig 2.2.3 44306601TH Rev. 2 25 / Oki Data CONFIDENTIAL (3) Fuser unit and paper ejecting 1. The fuser unit and eject roller is 2. Simultaneously the eject roller rotates, and then the paper is ejected. Eject roller Planet gear Fuser unit Heat roller Paper route Solenoid Eject roller DC motor (Counterclockwise rotation) Fig 2.2.4 44306601TH Rev. 2 26 / Oki Data CONFIDENTIAL (4) Paper reversing and paper multi-feeding 1. TRemoving the first eject roller at the rear part of paper and set the solenoid as ON for a while, then the planet gear starts to move, the second eject roller starts inverse rotating (Counterclockwise rotation). 2. By the inverse rotation of the second eject roller the paper is inversely rotated and conveyed to Duplex. 3. Paper is conveyed by Duplex conveying roller. 4. After setting the entrance sensor lever as ON, paper bumps into the stopped resist roller, still a certain more amount of paper is conveyed. (This corrects the skew of paper.). 5. If set the Resist clutch as ON, paper is conveyed by Resist roller. [ Normal rotation ] The 2nd ejecting roller Planet gear DC motor Fuser unit (Counterclockwise rotation) Heat roller Resist roller Writing out sensor lever Solenoid (OFF) Resist clutch Resist Entrance sensor lever The 1st ejecting roller Duplex conveying roller Belt Fig 2.2.5 Duplex conveying roller [ Inverse rotation ] The 2nd ejecting roller Planet gear Fuser unit DC motor (Counterclockwise rotation) Heat roller Solenoid (ON) Writing out sensor lever Resist roller Resist clutch Resist Entrance sensor lever The 1st ejecting roller Duplex conveying roller Belt Fig 2.2.6 44306601TH Rev. 2 Duplex conveying roller 27 / Oki Data CONFIDENTIAL 2.3 Toner entrance detection • Equipment Toner entrance detecting equipment consists the agitating gear that agitating the agitating bar at a certain speed and magnet that is on the agitating bar. Crack part Magnet Agitating bar Agitating gear Fig 2.3.1 • Operation Detecting the toner low by monitoring the congruous time intervals between the magnet that is set on the sensor plate and the magnet attached on the agitating bar, Operation in toner full status • • The crack part of agitating gear meshing with the projection portion of agitating bar, the agitating bar rotates in accordance with the rotating of gear. Agitating gear Agitating bar Even after the magnet part of the agitating Bar reaches the highest position, it still rotates at the same speed by the pressure of the agitating gear due to the toner resistance. Sensor plate Toner sensor Fig 2.3.2 Operation in toner low status When the magnet part of the agitating bar reaches the highest position, because there is no resistance from toner, the agitating bar drops earlier than the gear by the gravity itself, and stops by that status. For this reason, the time that the magnet of agitating Bar magnetic attracts the magnet of sensor plate becomes longer. The toner low status can be inspected by monitoring this time. • 44306601TH Rev. 2 Agitating bar Sensor plate Fig 2.3.3 28 / Oki Data CONFIDENTIAL Toner full status Fig 2.3.4 Toner low status t1 t2 t1,t2: Magnet attracting time Fig 2.3.5 • Toner sensor alarm actuates if there is not any change on toner sensor. • Toner sensor is not monitored while main (drum) motor is stopping. 44306601TH Rev. 2 29 / Oki Data CONFIDENTIAL 3. MFP Installation 3.1 Precautions and Prohibition Table 3.1.1 • Do not install the MFP in the vicinity of high temperature or fire. • Do not install the MFP at the place where a chemical reaction may take place (laboratory, etc.). • Do not install the MFP near flammable solution like alcohol, thinner, etc. • Do not install the MFP at the place where a small child can reach. • Do not install the MFP at an unstable place (unsteady frame, tilted place, etc.). • Do not install the MFP at a highly humid or dusty place or under the direct sunshine. • Do not install the MFP under the environment of sea breeze or caustic gas. • Do not install the MFP at a highly vibrating place. • When you drop the MFP or damage the cover, remove the power plug from the outlet and contact the Customers’ Service Center. Electric shock, fire or injury may occur. • Do not connect the power cord, printer cable and earth wire as otherwise directed by the Manual. A fire may break out. • Do not insert a thing in the vent hole. Electric shock, fire or injury may occur. • Do not place a cup with water on the MFP. Electric shock or fire may occur. • Do not touch the fuser unit when you open the printer cover. Burn may occur. • Do not throw the toner cartridge or image drum cartridge into fire. Burn may occur by the dust explosion. • Do not use a highly flammable spray near the MFP. Fire may break out as there are high temperature parts inside the printer. • When the cover becomes abnormally hot, a smoke arises or a strange odor comes out, remove the power plug from the outlet and contact the Customers’ Service Center. Fire may break out. • When liquid like water drops inside the MFP, remove the power plug from the outlet and contact the Customers’ Service Center. Fire may break out. • When a thing like a clip drops inside the MFP, remove the power plug from the outlet and take out that thing. • Do not operate or disassemble the MFP as otherwise directed in the Manual. Electric shock, fire or injury may occur. 44306601TH Rev. 2 30 / Oki Data CONFIDENTIAL Table 3.1.2 • Do not install the MFP at the place where the vent hole is blocked. • Do not install the MFP on the shaggy carpet. • Do not install the MFP at the place with little draught or without ventilation like a room with no window. • Install the MFP away from the monitor TV. • When the MFP is to be moved, hold both ends of the printer. • This MFP weighs about 19kg (MB480). • When to switch the power on or while printing, do not come near the paper exit of the MFP. Injury may occur. As regards the items of caution, explain to the customer showing the items of caution of the User’s Manual. Particularly, explain fully about the power supply cord and earth cable. 44306601TH Rev. 2 31 / Oki Data CONFIDENTIAL 3.2 MFP Unpacking Procedure Personal injuries may occur. This MFP weighs about 19kg (MB480). • • • • Open the upper lid. Take out the accessory box. Remove the upper buffer material. Take out the equipment Fig 3.2.1 44306601TH Rev. 2 32 / Oki Data CONFIDENTIAL 3.3 MFP Installation Instructions • Install the MFP at a place under the following temperature and humidity: : 10 to 32°C Ambient Temperature Ambient Humidity : 20 to 80% relative humidity Maximum Wet-Bulb Temperature : 25°C • Be careful not to be bedewed. • When the MFP is to be installed at a place where the humidity is less than 30%, use a humidifier or a static electricity prevention mat. Installation Space • Place the MFP on a flat desk with enough space for the legs of the MFP. • Secure enough space around the MFP. Top View 20cm 100cm 30cm 20cm Fig 3.3.1 Side View 50cm Fig 3.3.2 44306601TH Rev. 2 33 / Oki Data CONFIDENTIAL 3.4 Packed Units and Attachments • Confirm whether there are scratches, stains, etc. on the exterior of the machine. • Confirm whether there are lacking items, damages, etc. among the accessories. • If anything unusual is found, contact the user’s section in charge and follow its instruction. Personal injuries may occur. This MFP weighs about 19kg (MB480). MFP (main body) Fig 3.4.1 Starter Toner Cartridges Fig 3.4.2 Explain to customers that the toner cartridge and the image drum cartridge are separable. MFP Software CD-ROM Power Cord Warranty and Registration Card Users Manuals Note! 44306601TH Rev. 2 The printer cable is not included in the accessories. 34 / Oki Data CONFIDENTIAL 3.5 Assembly Procedure 3.5.1MFP Main Body Remove Protective Equipment (1) Lift the scanner. (2) Remove the Pad-Middle. (3) Remove the Film with two Silica-Gel packs. Silica-Gel pack Pad-Middle Film Fig 3.5.1 (4) Remove the eight adhesive tapes on the outside of MFP. Fig 3.5.2 (5) Open the document cover. Then remove the four adhesive tapes and two protection pads. protection pad protection pad Fig 3.5.3 44306601TH Rev. 2 35 / Oki Data CONFIDENTIAL (6) Pull out the paper cassete. (7) Remove the Retainer and the A6 size paper. (In case of MB480 ) MB480 A6 size paper Retainer Paper Cassette Open Button Fig 3.5.4 (8) Open Multi-purpose Tray. Remove the A6 size paper. (In case of MB470/MB480 ) A6 paper Fig 3.5.5 44306601TH Rev. 2 36 / Oki Data CONFIDENTIAL Install Image Drum Cartridges (1) Pull out the image drum cartridge gently. Note! • Handle the image drum very carefully as it is quite easily injured. • Do not expose the image drum car tridge to direct sunshine or bright light (approximately 1,500 lux or more) . Do not leave it more than 5 minutes under the room light. Image Drum Cartridge Fig 3.5.6 (2) Place the image drum cartridge on a flat desk, remove the tape which fastens the protection sheet and pull it out in the direction of the arrow. Note! Do not work on the image drum off the desk top. Protection sheet Fig 3.5.7 (3) Holding the image drum by its top center , lower it into place in the printer locating the pegs (A & B) at each end into their slots in the sides of the printer cavity (C) . B A C Fig 3.5.8 44306601TH Rev. 2 37 / Oki Data CONFIDENTIAL (4) Release the lock by pushing the knob of the toner cover in the direction of the arrow and remove the toner cover. Fig 3.5.9 (5) Gently shake the cartridge from end to end several times to loosen and distribute the toner evenly inside the cartridge. (6) Remove the wrapping material and peel off the adhesive tape from the underside of the cartridge. Fig 3.5.10 44306601TH Rev. 2 38 / Oki Data CONFIDENTIAL (7) Holding the cartridge by its top center with the coloured lever to the right , lower it into the printer over the image drum unit from which the toner cover was removed. Insert the left end of the cartridge into the top of the image drum unit first , push it against the pins on the drum unit then lower the right end of the cartridge down onto the image drum unit. Fig 3.5.11 (8) Pressing gentry down on the cartridge to ensure that it is firmly seated , push the coloured lever towards the rear of the printer. This will lock the cartridge into place and release toner into the image drum unit. Fig 3.5.12 Note! • The starter toner (the toner cartridge attached to the product at the time of(purchase) can print approximately 1,000 sheets of A4 paper in case of 5% coverage. (1,500 sheets of A4 paper in case of ISO-pattern.) • Confirm whether the lever of the toner cartridge is turned fully in the direction of the arrow when Toner Empty Messages are displayed in the LCD. 44306601TH Rev. 2 39 / Oki Data CONFIDENTIAL Unlocking Scanning head The scan unit is locked during transport to protect the scanning mechanism from being damaged. Be sure to unlock the scan unit before using the machine. (1) Open the ADF Doc Lid. (2) Move the lock switch to the “Unlocked position”. (The lock switch is located on the left corner on the flat bed.) (3) Close the ADF Doc Lid. Unlock Lock Fig 3.5.13 Note: If you need to move your MFP or Scanner unit for repair or any other reason, be sure to lock your Scanner before moving. To lock your Scanner, please do the following, 1. Turn off your MFP. 2.If the scanning head is not located at the left end, turn the MFP on to return the scanning head to the left end. After the scanning head is returned to the left end, turn the power supply off. 3.Move the lock switch to the “Locked Position”. Lamp Scanning head Scanning head OK NG Fig 3.5.14 44306601TH Rev. 2 40 / Oki Data CONFIDENTIAL Load Paper in Paper Cassette (1) Pull out the paper cassette. Note! Do not remove the cork on the plate. (2) Conform the paper guide to the paper size and fix it firmly. Cork Paper Guide Fig 3.5.15 Plate (3) Shuffle the sheets of paper and arrange up, down, left and right properly. Fig 3.5.16 (4) Make the printable side down and set the paper. Note! • Place the paper in front of the paper cartridge. • Set the paper not to exceed “▼”mark of the paper guide. (250 sheets weighing 70kg) (5) Fix the paper by the paper stopper. (6) Return the paper cassette to the MFP. Paper Stopper Printing face down Paper life display Fig 3.5.17 44306601TH Rev. 2 41 / Oki Data CONFIDENTIAL Load Paper in the Manual Feed Opening (1) Put a finger in the dent at the center of the manual feed opening and pull forward. Manual Feed Opening Fig 3.5.18 (2) Conform the manual feeding guide to the size of the paper. (3) Arrange the left and right of the paper. (MB460) (MB470/MB480) Manual Feeding Guide Manual Feeding Guide Manual feeding opening Manual feeding opening Manual Feeding Guide Manual Feeding Guide Fig 3.5.19 (4) Make the printing side up and insert the paper straight to the rear end along the manual feed guide. (MB460) (MB470/MB480) Fig 3.5.20 44306601TH Rev. 2 42 / Oki Data CONFIDENTIAL Placing the Original In the Auto Document Feeder (1) Make sure your document is free of staples, paper clips and is not tore out. (2) If you have multiple pages, fan your document(s) to avoid occasional paper jam. The ADF holds up to 50 pages at one time. Fig 3.5.21 (3) Place your document(s) with the text FACE UP in the ADF. Setup orientation of papers ABC Face Up Paper Guide Fig 3.5.22 (4) Adjust the Paper Guides to center the document(s) in the ADF. On the Document Glass (1) Place your original with the text face down on the document glass. Setup orientation of papers Face Down Align in the upper-left corner Fig 3.5.23 44306601TH Rev. 2 43 / Oki Data CONFIDENTIAL 3.5.2 Power Cable Connection Conditions for Power Supplies • Observe the following conditions: : 110 ~127VAC(Range 99~140VAC)/220 ~240VAC(Range Alternate Current (AC) 198~264VAC) Power Supply Frequency : 50Hz or 60Hz±2% • Use a voltage regulator when the power supply is not stable. • The maximum power consumption of this MFP is 800W. Confirm that the power supply has sufficient extra capacity. Table 3.5.1 It may expose you to electric shocks or cause a fire. • Never fail to switch off the power supply at the time of connection or removal of the electric cord and earth cable. • Always connect the earth cable to the earth terminal equipped only for that purpose. Never connect the earth cable with water pipe, gas pipe, telephone cable earth terminal, lightening rod, etc. • Always grasp the power plug at the time of connection and removal of the electric cord. • Always make sure that the electric plug is inserted fully into the outlet. • Do not connect or disconnect the electric plug with the wet hand. • Do not install the electric cord at the place liable to be stepped on and do not put things on the electric cord. • Do not bundle up or tie up the electric cord • Do not use the damaged electric cord. • Do not put many loads on one electric outlet. • Do not connect this MFP to the same outlet with other electric machines. Particularly, erroneous operation may occur by electric noise when the same outlet is shared by the air conditioner, duplicator, shredder, etc. at the same time. When the same outlet had to be used, use a noise filter or noise cut transformer on the market. • Use the attached electric cord only. • Do not use an extension cord. Use the cord of over rating 15A if you had to use one. • When you use the extension cord, the MFP may not operate normally due to the drop of AC voltage. • Do not shut down the power supply or remove the power plug while printing. • Disconnect the power cord when the MFP would not be used for some long while due to consecutive holidays or journey. As to the connection of the electric cord and earth cable, explain fully to the customer showing the User’s Manual. 44306601TH Rev. 2 44 / Oki Data CONFIDENTIAL Connect Power Supply Cord Note! Be certain the power switch is placed in the OFF (O) position. (1) Insert the electric cord in the MFP. (2) Connect the earth wire to the earth terminal of the AC power source outlet. (3) Connect the AC power cord insertion plug to the AC power source outlet. Earth Terminal Earth Cable Fig 3.5.24 Press ON (I) of Power Switch Fig 3.5.25 44306601TH Rev. 2 45 / Oki Data CONFIDENTIAL 3.5.3 Installation of Optional Components (1) Extension Memory Installation Fig 3.5.26 Table 3.5.2 Type On-board Memory slot Total N/A (Standard) 64MB - 64MB 64MB 64MB 128MB 64MB 256MB 320MB 64MB option DIMM MEM64D 256MB option DIMM MEM256D Note! • You must use genuine Oki Original. Otherwise, the memory will not work. • A 64MB memory is installed as standard in the memory slot. If you use a 256MB memory, remove the 64MB memory before use. Switch the power supply of the MFP off and pull out the electric cord. Note! If installed with the switch on, an electric shock or a trouble to the MFP may occur. I O Fig 3.5.27 Open the memory cover. 1) Release the lock by pushing the knob of the memory cover in the direction of the arrow and open the memory cover. Knob Memory Cover Fig 3.5.28 44306601TH Rev. 2 46 / Oki Data CONFIDENTIAL Install the memory. Note! Do not touch electronic parts and connector terminal. 1) Neutralize static electricity by letting the bag touch the metal part before taking out the memory from the bag. 2) Pay attention to the direction of the memory. There is a cut on the terminal part of the memory to fit it into the connector of the slot. 3) Insert the memory in the empty slot and bring it down to the circuit board side. Fig 3.5.29 Close the memory cover. 1) Close the memory cover. Confirm that it is firmly locked. Memory Cover Fig 3.5.30 44306601TH Rev. 2 47 / Oki Data CONFIDENTIAL (2) Installation of second tray unit This tray is intended to increase the amount of paper that can be loaded in the MFP. It holds 530 sheets of 70kg ream weight paper, allowing to print 1110(MB480) sheets continuously when combined with the standard paper cassette and multi-purpose tray. Fig 3.5.31 Turning OFF the MFP power and disconnecting the power cord Note! If an expansion memory is installed with the power switched ON, the MFP may be broken. O I Fig 3.5.32 Placing the MFP on the second tray unit. Note! The MFP weighs Approx. 19kg (MB480). 1) Align the holes in the bottom of the MFP to the protrusions of the second tray unit. 2) Place the MFP gently on the second tray unit. Holes in the printer bottom Protrusions Fig 3.5.33 44306601TH Rev. 2 48 / Oki Data CONFIDENTIAL 3) Remove the four Cover-pieces in the direction of the arrow. Do not put or drop the Cover-pieces inside the MFP. Cover-piece Cover-piece Fig 3.5.34 4) Attach the two 2nd-pieces as shown in Fig. 3.5.35. To detach the second tray unit, follow the same procedure inversely. B460/B470 B480 2nd-piece 2nd-piece Fig 3.5.35 44306601TH Rev. 2 49 / Oki Data CONFIDENTIAL 3.5.4 Confirm the Recognition of Option In order to confirm that the items of option are correctly installed, conduct the menu map printing referring to “3.6 Configuration Page Print”. (1) Confirm Recognition of Additional Memory Confirm the contents of the configuration pages. Confirm the total memory size displayed as “TOTAL MEMORY SIZE” in the header portion. Fig 3.5.36 (2) Confirm Recognition of second tray Confirm the contents of the configuration pages. Confirm the displayed as "Tray 2" in the header portion. Fig 3.5.37 44306601TH Rev. 2 50 / Oki Data CONFIDENTIAL 3.6 Configuration Page Print Make sure that the MFP operates normally. (1) Set sheets of A4 paper in the tray. (2) From the panel menu, select "Menu". (Press the down button to go to "Menu" and then press the enter button.) (3) Select "Print Information". (Press the down button to go to "Print Information" and then press the enter button.) (4) Select "Configuration". (5) Select "Execute". (Sample) MB460 Fig 3.6.1 44306601TH Rev. 2 51 / Oki Data CONFIDENTIAL (Sample) MB470 Fig 3.6.2 44306601TH Rev. 2 52 / Oki Data CONFIDENTIAL (Sample) MB480 Fig 3.6.3 44306601TH Rev. 2 53 / Oki Data CONFIDENTIAL 3.7 Network Information Print Confirm the network information print. (1) Push the TEST switch beside the network connector on the back of the MFP for 5 seconds and release. Then the network information will be printed. (Sample) In case of MB460 Fig 3.7.1 44306601TH Rev. 2 54 / Oki Data CONFIDENTIAL 3.8 Connection Procedures <USB Connection> Prepare a USB Cable. Note! • The cable of the MFP is not attached. Users should buy seperately. • Obtain the cable of USB specification by yourself. • Use the USB cable of Hi-Speed specification in case the connection is to be made using “HI-Speed” mode of USB2.0. Fig 3.8.1 Switch off the power of the MFP and computer. Memo Although the USB cable can be connected or removed with the switch of the computer and printer on, switch off the power of the MFP at this step in order to ensure installation of the MFP driver and USB driver later. Connect the MFP with the computer. (1) Plug the USB cable into the USB interface connector of the MFP. (2) Plug the USB cable into the USB interface connector of the computer. Note! Be careful not to insert the USB cable into the network interface connector. Or else it may cause troubles. UBS Interface Connector Fig 3.8.2 44306601TH Rev. 2 55 / Oki Data CONFIDENTIAL <LAN Cable Connection> Prepare the LAN cable. Switch off the power of the MFP and computer. Connect the computer and MFP. (1) Plug the Ethernet cable into the network interface connector of the MFP. (2) Plug the Ethernet cable into the hub. Network Interface Connector Fig 3.8.3 44306601TH Rev. 2 56 / Oki Data CONFIDENTIAL <TEL cable. Line Cable Connection>Note! only MB470/MB480 Prepare the TEL cable and Line cable. Preparing cores Memo Use two longer ones of two kinds cores packed with MFP. How to attach a cores Memo Wind the TEL cable and Line cable on each core 1 time and then close the core cases to fix them. The cores must be about 80~100mm away from the each connector. Fig 3.8.4 The places for connecting each cables LINE Connector TEL Connector LINE TEL Fig 3.8.5 44306601TH Rev. 2 57 / Oki Data CONFIDENTIAL The state after connecting Use for Fax. (Only MB470/MB480) for LINE for LAN for TEL for USB Fig 3.8.6 Table 3.8.1 Cable Core Name Part No. Core shape Winding count MB460 for TEL SFT-59SN 1051007C0001 Long Type 1 X for LINE SFT-59SN 1051007C0001 Long Type 1 X MB470 MB480 ※ Do not also connect to switchboard directly or exclusive use line without any conversion equipment. 44306601TH Rev. 2 58 / Oki Data CONFIDENTIAL 3.9 Checking of User Paper Set the medium the user uses, set up media type/weight, conduct menu map/demo print and confirm that the toner does not peel off. Table 3.9.1 Types Weight 55kg(64g/m2) Light 55-64kg(64-74g/m2) Medium Light 65-75kg(75-87g/m2) Medium 76-89kg(88-104g/m2) Medium Heavy 90-105kg(105-120g/m2) Heavy Heavy Regular paper*3 Postcard*4 Envelope*4 Label paper *1 : *2 : *3 : *4 : Setting values of the MFP Media weight Media type*1 Plain Labels Setting*2 for [Media weight] of the printer driver Light Medium Light Medium Medium Heavy Heavy Labels The set-up of the media type at the time of shipment from the factory is “Plain”. Thickness and type of paper can be set up by the printer driver. When they are set up by the printer driver, the printer driver set-up has priority. When “Automatic Selection” is selected by “Paper Feed Method” of the printer driver or when “Printer Set-up” is selected by “Paper Thickness”, printing is made by the set-up of the MFP. Thickness of paper for both side printing is 55~90kg in weight (64~105g/m2). Set-up of media weight and media type is not necessary for postcards and envelopes. 44306601TH Rev. 2 59 / Oki Data CONFIDENTIAL 4. REPLACEMENT OF PARTS This section explains the field replacement procedures for parts, assemblies and component units. While those replacement procedures refer to the disassembling of parts, follow the same procedures inversely for reassembling them. The part numbers (1, 2, etc.) employed in this manual are different from those assigned in the corresponding configuration diagrams of Disassembly for Maintenance (44306601TL) and RSPL (44306601TR/44306621TR/44306641TR). 4.1 Precautions on the replacement of parts (1) Prior to replacing a part, be sure to disconnect the AC cord and interface cable. (a) To disconnect the AC cord, always follow the procedure described below: Switch the power switch of printer off “O”. Disconnect the AC insertion plug of the AC power cord from the AC power source. Disconnect the earth wire from the earth terminal of the AC power source outlet. Disconnect the AC cord and the interface cable with the printer. Warning Risk of Electric Shock There is a risk of electric shock during replacement of the low voltage power supply. Use insulating gloves or avoid direct contact with any conducting part of the power supply, and caution should be exercised during replacement. The capacitor may take one minute to complete discharge after the AC cord is unplugged. Also, there is a possibility that the capacitor doesn’t discharge because of a breakage of the PCB, etc., so remember the possibility of electric shock to avoid electric shock. (b) To reconnect the printer, always follow the procedure described below: Connect the AC cord and the interface cable with the printer. Connect the earth wire to the earth terminal of the AC power source outlet. Connect the AC power cord insertion plug to the AC power source outlet. Switch the power switch of printer on “I”. Shutting off Earth terminal OFF Reconnecting Earth cable ON Fig 4.1.1 (2) Do not disassemble the MFP as long as it is operating normally. (3) Limit disassembly to a necessary minimum. Do not remove other parts than those specified in the part replacement procedure. (4) Use the designated maintenance tools. (5) Conduct disassembly by following the specified sequential order. Failure to observe this order could damage the parts. (6) Screws, collars and other small parts should be attached provisionally to their original positions, since they are liable to be lost. (7) When handling a microprocessor, ROM, RAM and other ICs and circuit boards, do not wear gloves that tend to generate static electricity. (8) Printed-circuit boards should not be placed directly on an equipment or floor. 44306601TH Rev. 2 60 / Oki Data CONFIDENTIAL [Maintenance Tools] Table 4.1.1 indicates the tools necessary to replace printed-circuit boards and component units. Table 4.1.1 No. Service Tools Q' ty 1 No. 2-200 Philips screwdriver, Magnetized 1 2 No. 3-100 screwdriver 1 3 No. 5-200 screwdriver 1 4 Digital multimeter 1 5 Pliers 1 6 Handy cleaner 1 7 E-ring pliers 8 Tweezers Place of use Remarks 3~5 mm screws Refer to the following note. 1 Curved-tip type 1 Note: Use a vacuum cleaner dealing with toner. Using a common vacuum cleaner may cause fire. Table 4.1.2 indicates the tools necessary for using maintenance utilities. Table 4.1.2 No. Service Tools Q' ty 1 Laptop computer Must have maintenance utilities installed 1 2 USB cable 1 44306601TH Rev. 2 Place of use Remarks 61 / Oki Data CONFIDENTIAL 4.2 Parts layout This section explains the main parts layout of the equipment. MB460 Stacker-Cover-Assy CU board Fuser-Assy Rear-Cover-Assy A Cover-Side-R Duplex OPE Cover-Assy A A’ Manual-Assy Motor-Fan Guide-Paper-Duplex GuidePaper-R Cover-Side-L A’ Low voltage power board Plate-Base-PCB High voltage power board Front-Guide-Assy Plate-Assy-Base Toner cartridge Image drum cartridge Paper cassette Fig 4.2.1 44306601TH Rev. 2 62 / Oki Data CONFIDENTIAL MB470 Stacker-Cover-Assy CU board Rear-Cover-Assy Fuser-Assy A OPE Cover-Assy Cover-Side-R A A’ Manual-Assy Motor-Fan Cover-Side-L GuidePaper-R Guide-Paper-Duplex A’ Low voltage power board Plate-Base-PCB High voltage power board Front-Guide-Assy Plate-Assy-Base Toner cartridge Image drum cartridge Paper cassette Fig 4.2.2 44306601TH Rev. 2 63 / Oki Data CONFIDENTIAL MB480 Stacker-Cover-Assy CU board Rear-Cover-Assy Fuser-Assy A OPE Cover-Assy Cover-Side-R Duplex A A’ Manual-Assy Motor-Fan Cover-Side-L GuidePaper-R Guide-Paper-Duplex A’ Low voltage power board Plate-Base-PCB Front-Guide-Assy High voltage power board Plate-Assy-Base Toner cartridge Image drum cartridge Paper cassette Fig 4.2.3 44306601TH Rev. 2 64 / Oki Data CONFIDENTIAL [Base unit] MB460/MB470 Photo Interrupter Gear-Assy-Clutch Roller-Pick-Up Roller-Feed-Now Plate-Base Guide-Cassette-L Guide-Cassette-R Fig 4.2.4 44306601TH Rev. 2 65 / Oki Data CONFIDENTIAL [Base unit] MB480 Photo Interrupter Gear-Assy-Clutch Roller-Pick-Up Roller-Feed-Now Plate-Base Guide-Cassette-L (530sht) Guide-Cassette-R (530sht) Fig 4.2.5 44306601TH Rev. 2 66 / Oki Data CONFIDENTIAL 4.3 Parts replacement method This section explains the replacement method of the parts and assemblies that are shown in the following disassembling diagram. The explaining diagram of parts replacement procedure is MB470. Replace part after performing the following operation. (1) Unplug the AC power cord from the main unit inlet by the disconnected status of power switch. (2) Unplug the interface cable from the main unit. 44306601TH Rev. 2 67 / Oki Data CONFIDENTIAL 4.3.1 Detachment methods of the scanner and printer 4.3.1.1 Cover-Side-R (1) Lift the scanner. (2) Open the Rear-Cover-Assy. (3) Open the Stacker-Cover-Assy. (4) Take out the image drum cartridge. (5) Remove the screw (Black) and the screw (Silver) . Remove the Cover-Side-R . (6) Installing is performed by the inverse procedure with removing. (Note on removing / installing) 1. Beware of not to touch the DC motor inattentively (Do not rotate motor). Fig 4.3.1 44306601TH Rev. 2 68 / Oki Data CONFIDENTIAL 4.3.1.2 Cover-Side-L (1) Lift the scanner. (2) Open the Rear-Cover-Assy. (3) Open the Stacker-Cover-Assy. (4) Take out the image drum cartridge. (5) Remove the screw (Black) . Remove the Cover-Side-L . (6) Installing is performed by the inverse procedure with removing. Note! Attach the Label Motor-Fan on the outside that is obviously to be seen. Fig 4.3.2 44306601TH Rev. 2 69 / Oki Data CONFIDENTIAL 4.3.1.3 FAX Board (In case of MB470/480 ) (1) Remove the Cover-Side-R . (Refer to 4.3.1.1 ) (2) Remove the two screws(silver) (3) Remove the cable connector . Remove the Plate-Shield-Cover-FAX from the Board-FAX (4) Remove the three screws(silver) (5) Remove the Board-FAX . . . . (Note on removing / installing) 1. Beware of not to touch the DC motor inattentively (Do not rotate motor). Note : When replacing the Board-FAX, make sure that there is a marking on the connector. Fig 4.3.3 44306601TH Rev. 2 70 / Oki Data CONFIDENTIAL 4.3.1.4 Detachment methods of the scanner and printer (1) Remove the Cover-Side-R and the Cover-Side-L. (Refer to 4.3.1.1/ 4.3.1.2) (2) Remove the Plate-Shield-Cover-Fax and cable. (Refer to 4.3.1.3 ) (In case of MB470/MB480 ) (3) Remove the screw(silver) case of MB470/MB480 ) . Remove the Plate-Shield-Base-FAX(with Board-FAX) (4) Remove the screw(silver) . Remove the Cable-clamp (5) Remove the six screws(silver) . (In . (In case of MB460 ) . Remove the Plate-Shield-Cover-CU . MB470/MB480 MB460 Fig 4.3.4 44306601TH Rev. 2 71 / Oki Data CONFIDENTIAL (6) Remove the Scanner-cable connector from the Board-CU. (7) Remove the four screws(silver) .(hold the front side of the stay on each side of the printer so as not to allow the scanner to tilt back). Fig 4.3.5 (8) Put the scanner back in its original horizontal position. (9) By holding the scanner by the right and left stays and vertically lifting it up, separate the scanner from the printer. Fig 4.3.6 44306601TH Rev. 2 72 / Oki Data CONFIDENTIAL 4.3.2 Scanner 4.3.2.1 Detachment of the paper tray (1) Gently open the ADF top cover. (2) Turn the lever in the direction of the arrow to put the frame assembly and the paper tray upright. (3) Remove the two screws(black) , and then the paper tray . ADF top cover Frame Assy Lever Fig 4.3.7 44306601TH Rev. 2 73 / Oki Data CONFIDENTIAL 4.3.2.2 Detachment of Pad (1) Open the ADF top cover. (Refer to 4.3.2.1 ) (2) As in the figure under, insert the tip of the small minus driver softly to the dent of the pad case. By this operation, the inner hooks of pad is removed in direction of the arrow (A). Note: In order to cause damage to the surface of roller, please take attention to use the tool when this operation. A Fig 4.3.8 (3) Push another side of pad forward in direction of the arrow (B) with the tool inserted. B B Driver Fig 4.3.9 (4) Exchange to the new pad in the direction of the arrow. Fig 4.3.10 44306601TH Rev. 2 74 / Oki Data CONFIDENTIAL 4.3.2.3 Removing ADF PCBA (1) Gently open the ADF top cover. (2) Remove the two screws(black) to remove the cover-gear (3) Remove the two screws(black) . . (4) Turn the lever in the direction of the arrow to put the frame Assembly upright. (5) Remove the two screws(black) (6) Restore the frame Assembly and the paper tray . and the paper tray in their original positions. (7) Release the frame Assembly from the hook near its supporting point on each side of the scanner to remove the Assembly and the paper tray . (8) Remove the three screws(black) to remove the ground plate (9) Unplug all the connectors and remove the ADF PCBA , and . . ADF top Cover Lever Fig 4.3.11 44306601TH Rev. 2 75 / Oki Data CONFIDENTIAL 4.3.2.4 Removing operation panel (1) By putting nails of each hand in the space at the portion of the fit between the operation panel Assembly and the flatbed on the side of the hand, disengage from the scanner the four upper hooks on the operation panel Assembly in direction of the arrow (A). (2) Pull the FFC cable straight out of the connector on the back of the operation panel. Note: Be careful not to remove or insert the FFC cable at an angle from the connector on the back of the operation panel Assembly their terminals are damaged. Removing operation panel PCBA (1) Pull the FFC cable out of the LCD straight in the direction of the arrow. (2) Remove the two screws(black) (3) Remove the three screws (black) . Remove the Panel-Cover-Frame . .Remove the operation panel PCBA . Note: Removing or inserting the FFC cable at an angle from the connector on the back of the operation panel Assembly damages their terminals. Seven hooks Finger nail placed (A) FFC cable Finger nail placed FFC cable of the LCD Fig 4.3.12 44306601TH Rev. 2 76 / Oki Data CONFIDENTIAL 4.3.2.5 Removing the MPCBA (1) Turn the scanner unit upside down. (2) Pull up the stays L and R at the same time until they stop. (3) Remove the six screws (black) (4) Remove the shield-USB and remove the MPCBA-cover . by turning it in the direction of the arrow. (5) Remove the four screws (black, with washers) and remove the top shield Assembly (6) Disconnect all the connectors and remove the MPCBA board . . Note: Be sure to slowly move the both stays L and R at the same time. If moved separately, they may be broken. To reassemble shield metal plates, position the shield metal plates in a manner so that every projection of each of the shield metal plates contacts the outside surface of the mating part. (See the illustration below.) Paying attention to the fixing position of the core. (See the photo at the bottom of the next page.) Hook the bent end of the shield-USB into the top shield Assembly and turn it in the direction of the arrow to reassemble it. (See the photo at the top left of the next page.) Contacting Projection (on each shield metal plate) Relationship between Projection and Side Stay_L Fig 4.3.13 44306601TH Rev. 2 77 / Oki Data CONFIDENTIAL Insert the bent end into the square FG cable (fixed together) FG cable (fixed together) Shield-USB &FG cable Two FG cables Fig 4.3.14 Fig 4.3.15 To the scanning sensor To the operation panel To the FB motor Core There is no fan To ADF To the printer (USB) Fig 4.3.16 44306601TH Rev. 2 78 / Oki Data CONFIDENTIAL 4.3.2.6 Removing ADF Assembly (1) Remove the two screws(black) to remove the base stopper Note: Unlike the other screws used in the printer, the screws upward at an angle. are long. (Long type) Fig 4.3.17 (2) Reverse the scanner and put the stays L and R upright. (3) Remove the six screws(black) and then the MPCBA cover . (4) Remove the ADF connector. Lower ADF connector Fig 4.3.18 44306601TH Rev. 2 79 / Oki Data CONFIDENTIAL (5) Unthread the cable through its guide groove. (6) Turn over the scanner again and open the document cover (the ADF assembly 5). (7) Slightly lift the ADF assembly . As illustrated, unlock each hinge of the ADF assembly by inserting closed curved-tip tweezers and, in the direction of the arrow, lightly pressing the tweezers. Lift and remove the ADF assembly . Note: For the structure of each hinge joint of the ADF assembly view shown below. Tweezers , see the cross-section Tweezers Cross-Secton Fig 4.3.19 (8) Turn the ADF Assembly upside down. (9) Remove the six screws(black) and then the hinge Assembly . Fig 4.3.20 44306601TH Rev. 2 80 / Oki Data CONFIDENTIAL 4.3.2.7 Removing the Window-ADF (1) Gently open the document cover. (2) Flip the sheet and remove five screws (black) (3) Remove the Window-ADF . . Note: Be careful not to crease the sheet. Be careful not to damage the glass surface with tools. When replacing the Window-ADF with a new Window-ADF protective film from the new Window-ADF to attach. Document cover , remove the white Sheet Fig 4.3.21 44306601TH Rev. 2 81 / Oki Data CONFIDENTIAL 4.3.3 Printer 4.3.3.1 LED Head (1) Lift the scanner. (2) Open the Stacker-Cover-Assy. (3) Remove the Holder-Head . (4) Firstly open Hook A by narrow direction and then remove it. Secondly remove Hook B then remove LED Assy . (At this moment, the two springs can be also removed jointly.) (5) Remove cable from the connector of LED Assy . (6) Installing is performed by the reverse procedure with removing. Note! Beware of not to touch or press the SLA parts of LED Head directly. Stacker-Cover-Assy Hook B Cable SLA (Selfoc Lens Array) Hook A Fig 4.3.22 44306601TH Rev. 2 82 / Oki Data CONFIDENTIAL 4.3.3.2 Roller-Transfer (1) Lift the scanner. (2) Open the Stack-Cover –Assy (3) Remove latches in the 2 places of Gear-TR and Bearing-TR not add any unnecessary pressure while removing the latch.) on the conversing side. (Do (4) Slightly slide the Roller-transfer to the right side and remove the post on the top of gear from the contact of Frame-Assy-Lower. Remove the latches on the 2 places of Gearing-TR of Gear. (5) Hold the Bearing-TR on the both side, and then lift up the Roller-Transfer moment, Gear-TR is also removed.) . (At this (6) Installing is performed by the inverse procedure with removing. (Note on removing / installing) 1. Beware of not to touch the DC motor inattentively (Do not rotate motor). 2. While installing, pay attention to the up-and-down direction of Bearing-TR 3. Operating carefully, not to touch Roller-Transfer . surface. Stacker-Cover-Assy Latch ② Fig 4.3.23 44306601TH Rev. 2 83 / Oki Data CONFIDENTIAL 4.3.3.3 CU Board (1) Remove the Cover-Side-R. (Refer to 4.3.1.1) (2) Remove the Plate-shield-Cover-FAX(Refer to 4.3.1.3 ) (In case of MB470/480 ) (3) Remove the Plate-Shield-Base-FAX(with Board-FAX).(Refer to 4.3.1.4 (3)) (In case of MB470/480 ) (4) Remove the Cable-clamp . (Refer to 4.3.1.4(4)) (In case of MB460 ) (5) Remove the Plate-Shield-Cover-CU.(Refer to 4.3.1.4(5)) (6) Remove the all cable connector. (7) Remove the two screws (Silver) ,two screws (Silver) . Remove the CU board . (8) Installing is performed by the inverse procedure with removing. (Note on removing / installing) 1. Beware of not to touch the DC motor inattentively (Do not rotate motor). 2. Beware of not to tuck down the cable while installing the Plate-Cover-Shield-CU . Fig 4.3.24 Connector for LED HEAD 1 Connector for Low voltage power board 10 1 PW NICSW USB K 1 1 AB 22 IC6 A DM 10 1 42 40 2 CENT 41 39 RAMDIMM 1 36 18 EXRCO 6 PE 7 2 12 12 1 RCLTHCLTMCLT 2NDTRAY 1 8 200 1 THERM Connector for Clutch(MPT) 19 1 10 AB 1 199 Connector for Clutch(Regist) LAN 22 A 10 Connector for Clutch(Hopping) 2 1 1 2 24 86M- Connector for DC Motor Connector for Scanner PNLUSB 7 8 HEAD FAXIF Connector for FAX 20 19 2 1 HVIF 28 27 SON Connector for 2nd Tray Connector for High voltage power board Fig 4.3.25 44306601TH Rev. 2 84 / Oki Data CONFIDENTIAL 4.3.3.4 OP Cover Assy (1) Lift the scanner. (2) Open the Rear-Cover-Assy. (3) Open the Stacker-Cover-Assy. (4) Remove the Cover-Side-R and the Cover-Side-L. (Refer to 4.3.1.1 / 4.3.1.2) (5) Open the Cover-Assy-MPT. (6) Pull Claw A by the arrow direction. Remove the clamp by pushing Claw B as the arrow direction. Remove the OPE Cover Assy . (7) Installing is performed by the reverse procedure with removing. (Note on removing / installing) 1. Beware of not to touch the DC motor inattentively (Do not rotate motor). Claw B Claw A Fig 4.3.26 44306601TH Rev. 2 85 / Oki Data CONFIDENTIAL 4.3.3.5 MPT-Assy (In case of MB460, it is Manual-Assy) (1) Lift the scanner. (2) Open Rear-Cover-Assy. (3) Open Stacker-Cover-Assy. (4) Remove Cover-Side-R and Cover-Side-L. (Refer to 3.3.3/3.3.4) (5) Remove OPE Cover-Assy. (Refer to 3.3.7) (6) Remove the clamp of claw by pushing by arrow A direction, and then remove Cover-LeverLock . (7) Remove the 2 screws (Black) . (8) Open the Frame-Assy-Lower by arrow B direction, and then remove Lever-Lock-Top (9) Holding up MPT-Assy (Manual-Assy . ) and remove it. (10) Installing is performed by the inverse procedure with removing. Note! While removing the Lever-Lock-Top , it is easy to remove it by inserting the driver between the Frame-Assy-Lower and Lever-Lock-Top and press the driver by Arrow C direction. (Note on removing / installing) 1. Beware of not to touch the DC motor inattentively (Do not rotate motor). C Driver A Frame-Assy-Lower A B B Pay attention not to let Separating- Pad- Assy pop out to your front side while installing MPT-Assy. Fig 4.3.27 44306601TH Rev. 2 86 / Oki Data CONFIDENTIAL 4.3.3.6 Front-Guide-Assy (1) Lift the scanner. (2) Open Rear-Cover-Assy. (3) Open Stacker-Cover-Assy. (4) Remove Cover-Side-R and Cover-Side-L. (Refer to 3.3.3/3.3.4) (5) Remove OPE Cover-Assy. (Refer to 3.3.7) (6) Remove MPT-Assy. (Refer to 3.3.9) (7) Remove the clamp of claw by pushing by arrow direction, and then remove Cover-Paper-R (8) Remove the 2 screws (Black) . Remove Front-Guide-Assy . . (9) Installing is performed by the inverse procedure with removing. (Note on removing / installing) 1. Beware of not to touch the DC motor inattentively (Do not rotate motor). Fig 4.3.28 44306601TH Rev. 2 87 / Oki Data CONFIDENTIAL 4.3.3.7 Roller-Assy-Feed (1) Lift the scanner. (2) Open Rear-Cover-Assy. (3) Open Stacker-Cover-Assy. (4) Remove Cover-Side-R and Cover-Side-L. (Refer to 3.3.3/3.3.4) (5) Remove OPE Cover-Assy. (Refer to 3.3.7) (6) Remove MPT-Assy. (Refer to 3.3.9) (7) Remove Guide-Assy-Front. (Refer to 3.3.10) (8) Remove Roller-Assy-Feed by arrow direction. (9) Installing is performed by the inverse procedure with removing. (Note on removing / installing) 1. Beware of not to touch the DC motor inattentively (Do not rotate motor). Fig 4.3.29 44306601TH Rev. 2 88 / Oki Data CONFIDENTIAL 4.3.3.8 Guide-Paper-Duplex (1) Lift the scanner. (2) Open the Rear-Cover-Assy. (3) Open the Stacker-Cover-Assy. (4) Remove Cover-Side-R and Cover-Side-L. (Refer to 3.3.3/3.3.4) (5) Remove OPE Cover-Assy. (Refer to 3.3.7) (6) Remove MPT-Assy. (Refer to 3.3.9) (7) Remove Front-Guide-Assy. (Refer to 3.3.10) (8) Remove Roller-Assy-Feed. (Refer to 3.3.11) (9) Remove Duplex-Assy. (10) Remove the 2 screws (Black) . Remove Guide-Paper-Duplex . (11) Installing is performed by the reverse procedure with removing. (Note on removing / installing) 1. Beware of not to touch the DC motor inattentively (Do not rotate motor). Fig 4.3.30 44306601TH Rev. 2 89 / Oki Data CONFIDENTIAL 4.3.3.9 Stacker-Cover-Assy (1) Detachment methods of the scanner and printer ( Refer to 4.3.1.4 ) (2) Remove the clamp by pushing claw A as the arrow direction . Pull the Cover-Blank-L upward remove it. (3) Remove the clamp by pushing claw B as the arrow direction . Pull the Cover-Blank-R upward remove it. (4) Remove the LED cable from the CU board. (5) Remove the screw(Silver) . (6) Open the Stacker-Cover-Assy by the arrow direction and remove Stacker-Cover-Assy from the supporting point of Frame-Assy-Lower. (7) Installing is performed by the reverse procedure with removing. (Note on removing / installing) 1. Beware of not to touch the DC motor inattentively (Do not rotate motor). Claw A Claw B Fig 4.3.31 44306601TH Rev. 2 90 / Oki Data CONFIDENTIAL 4.3.3.10 Motor-DC-Main (1) Detachment methods of the scanner and printer ( Refer to 4.3.1.4 ) (2) Remove Stacker-Cover-Assy. (Refer to 4.3.3.9) (3) Remove the three screws(black) (4) Remove the connector and the two screws(silver) . Remove the Plate-Stay-R . of Motor-DC-Main from the CU board. (5) Remove the three screws (Silver) (6) Remove the Motor-DC-Main and the screw (Black) . . Unthread the cable from the Piece-Guide . (7) Installing procedure is performed by the opposite order with removing. (Note on removing / installing) 1. Beware of not to touch the DC motor inattentively (Do not rotate motor). Piece-Guide Fig 4.3.32 44306601TH Rev. 2 91 / Oki Data CONFIDENTIAL 4.3.3.11 Fuser-Assy Note! Replace the Fuser-Assy by Assy unit. It is forbidden for disassembling the Fuser-Assy, also, reusing the disassembled Fuser-Assy. (1) Detachment methods of the scanner and printer.( Refer to 4.3.1.4 ) (2) Remove Stacker-Cover-Assy. (Refer to 4.3.3.9) (3) Unplug connector (Motor-Fan) (4) Remove the three screws(black) (5) Remove Motor-Fan and connector (thermistor) . Remove Piece-Guide (6) Unplug the connector from high voltage power board . . Remove the Plate-Stay-L . . of Fuser-Assy, which is at the back side of Piece-Guide (7) Remove the four screws (Silver) left side. . Remove the Fuser-Assy . by bowing down the lock at the (8) Installing is performed by the inverse procedure with removing. Note! Fuser-Assy may be really hot, beware of handling. (Note on removing / installing) 1. Install the screw (Silver) 2. Do not add excessive pressure while tightening the screw (Silver) 3. Beware of not to touch the DC motor inattentively (Do not rotate the motor). 4. Install the Motor-Fan by combining the arrow indicating Fan flowing direction and the arrow direction that is incused on the Fan-Lower. in its original groove. (Do not make new screw tap.) . 5. Beware of not to deform the thermistor while replacing the Fuser-Assy. 6. While removing or installing FAN, do not press impeller of the FAN as shown by the following photo. In case of the impeller unfastened by mistake, do not reuse it and install a new FAN. Impera Fig 4.3.33 44306601TH Rev. 2 92 / Oki Data CONFIDENTIAL Fig 4.3.34 Thermistor A A Connector for Thermistor Connector for FAN Fig 4.3.35 44306601TH Rev. 2 93 / Oki Data CONFIDENTIAL 4.3.3.12 Rear-Cover-Assy (1) Lift the scanner. (2) Open the Rear-Cover-Assy. (3) Open the Stacker-Cover-Assy. (4) Remove the Cover-Side-R and the Cover-Side-L. (Refer to 4.3.1.1/ 4.3.1.2) (5) Remove Cover-Face Up-A from the supporting point with opening the right side supporting point part of Rear-Cover-Assy. (6) Remove the two screws (Black) . Remove Plate-Solenoid . (7) Remove Solenoid from Rear-Cover-Assy . Because the plunger is not fixed, beware of not to drop or lose it. (8) Remove Rear-Cover-Assy to the inner side. by bowing down the supporting point part of Rear-Cover-Assy (9) Installing is performed by the inverse procedure with removing. (Note on removing / installing) 1. Beware of not to touch the DC motor inattentively (Do not rotate motor). 2. About the installing of Rear-Cover-Assy , remove Cover-Face Up-A supporting point part to a bowed situation and then perform installing. , make the Fig 4.3.36 44306601TH Rev. 2 94 / Oki Data CONFIDENTIAL 4.3.3.13 Frame-Assy-Lower (1) Detachment methods of the scanner and printer. ( Refer to 4.3.1.4 ) (2) Remove CU Board. (Refer to 4.3.3.3) (3) Remove OP Cover-Assy. (Refer 4.3.3.4) (4) Remove MPT-Assy. (Refer to 4.3.3.5) (5) Remove Front-Guide-Assy. (Refer to 4.3.3.6) (6) Remove Roller-Assy-Feed. (Refer to 4.3.3.7) (7) Remove Guide-Paper-Duplex. (Refer to 4.3.3.8) (8) Remove Stacker-Cover-Assy. (Refer to 4.3.3.9) (9) Remove Motor-DC-Main. (Refer to 4.3.3.10) (10) Remove the two screws (Silver) and the screw (Black) . Remove Plate-Shield-CU . (11) Pass the connector of Low Voltage Power Board through the Portion A of Plate-Bracket-Motor from above to the downward. (12) Remove Fuser-Assy. (Refer to 4.3.3.11) (13) Remove Rear-Cover-Assy. (Refer to 4.3.3.12) (14) Remove all the cable from Hook A of Holder-SNS, extend them and put on the right front side of the printer. (15) Remove connector B from high voltage power board. (16) Remove the four long screws (Silver) , the four screws (Black) , the short screw (Silver) . (17) Remove Hook C and Hook D of Plate-Base-PCB using minus driver. (18) Remove Frame-Assy-Lower . (19) Installing is performed by the inverse procedure with removing. (Note on removing / installing) 1. Beware of not to touch the DC motor inattentively (Do not rotate motor). 2. While installing Frame-Assy-Lower , beware of not to tuck CableCablebetween Frame-Assy-Lower and Plate-Base-PCB. , Cable- and Supporting point A Plate-Bracket-Motor Fig 4.3.37 44306601TH Rev. 2 95 / Oki Data CONFIDENTIAL Connector Ⓑ Cable Ⓕ Cable G Attention to wire interwining Plate-Base-PCB Hook Ⓓ Attention to wire interwining Hook Ⓐ Cable Ⓔ High voltage power board Hook Ⓒ Fig 4.3.38 Hook C 44306601TH Rev. 2 Fig 4.3.39 Hook D Fig 4.3.40 96 / Oki Data CONFIDENTIAL 4.3.3.14 High voltage / Low voltage power board Warning Risk of Electric Shock There is a risk of electric shock during replacement of the low voltage power supply. Use insulating gloves or avoid direct contact with any conducting part of the power supply, and caution should be exercised during replacement. The capacitor may take one minute to complete discharge after the AC cord is unplugged. Also, there is a possibility that the capacitor doesn’t discharge because of a breakage of the PCB, etc., so remember the possibility of electric shock to avoid electric shock. (1) Detachment methods of the scanner and printer ( Refer to 4.3.1.4 ) (2) Remove the Frame-Assy-Lower ( Refer to 4.3.3.13 ) (3) Remove the big screw (Silver) (4) Remove the AC socket . Remove the earth wire. and power switch (5) Remove the three small screws (Silver) (6) Remove the four small screws (Silver) . Remove Guide-Cassette-L. . Remove Low voltage power board . Remove High voltage power board . . (7) Installing is performed by the inverse procedure with removing. (Note on removing / installing) 1. 2. 3. 4. Beware of not to touch the DC motor inattentively (Do not rotate motor). Do not apply excessive pressure to the power switch . While installing High voltage / Low voltage power board to the Plate-Base-PCB, do not deform the Plate-Base-PCB. See Fig 4.3.42-47 for the routing of the FFC for the high-voltage board, and Fig 4.3.42-47 for folding the FFC. Short plug connector 100/120V Printer : Installation 230V Printer : De-installation rejection PCB-Assy Plate-Base-PCB Earth wire Guide-Cassette-L Fig 4.3.41 44306601TH Rev. 2 97 / Oki Data CONFIDENTIAL High-voltage Board FFC Folding (1) FFC folded inward (text side in) 73 mm from end of high-voltage board. (2) Folded back 25 mm from first fold described in (1). 73mm 30mm 25mm 25mm Fig 4.3.42 (3) Inner (upper right) end point folded inward, diagonally at 45° angle outward to outer edge, to form corner 30 mm from second fold 13mm Fig 4.3.43 (4) Diagonal (45°) edge folded inward 20 mm of way to form new corner 13 mm from corner described in (3) (to form about 10-mm wide shape) 10mm 13mm 30mm 75mm Fig 4.3.44 Fig 4.3.45 Fig 4.3.46 Fig 4.3.47 44306601TH Rev. 2 98 / Oki Data CONFIDENTIAL 4.3.3.15 Plate-Bracket-Motor (1) Detachment methods of the scanner and printer ( Refer to 4.3.1.4 ) (2) Remove the Frame-Assy-Lower ( Refer to 4.3.3.13 ) (3) Assemble Frame-Assy-Lower as the diagram. (4) Remove the four screws (Black) . Remove Plate-Bracket-Motor . (5) Installing is performed by the inverse procedure with removing. (Note on removing / installing) 1. Beware of not to touch the DC motor inattentively (Do not rotate motor). 2. While installing beware of not to tuck Cable between Frame-Assy-Lower and PlateBracket-Motor. 3. Beware of not to drop the gear or scratch the surface of gear. 4. Because Gear-Idle-Drum-Z24-48 and Gear-Idle-Drum-Z27-82 are high precision gear, beware of handling them with particular care. Gear-Idle-Drum-Z27-82 Gear-Idle-Drum-Z24-48 Frame-Assy-Lower Fig 4.3.48 44306601TH Rev. 2 99 / Oki Data CONFIDENTIAL 4.3.3.16 Roller-Back up (1) Detachment methods of the scanner and printer. ( Refer to 4.3.1.4 ) (2) Remove the Frame-Assy-Lower. ( Refer to 4.3.3.13 ) (3) Remove the Plate-Bracket-Motor. (Refer to 4.3.3.15) (4) Remove the screw (Black) (5) Remove Lever-Reset-R . Remove the collar and Lever-Reset-L . (6) Lift up Roller-Back up and remove it. (At this moment, two of Holder-BU up) , Bearing-Ball , and Washer-C are also removed.) (7) Remove the collar . , Spring-Bias (Back that are attached on both tops of the shaft of Roller-Back up . (Note on removing / installing) 1. Beware of not to touch the DC motor inattentively (Do not rotate motor). 2. While installing Washer-C (Refer to View A) , confirm it existing between contact and Holder-BU . View A Contact View A Fig 4.3.49 44306601TH Rev. 2 100 / Oki Data CONFIDENTIAL 4.3.3.17 Roller-Resist (1) Detachment methods of the scanner and printer. ( Refer to 4.3.1.4 ) (2) Remove the Frame-Assy-Lower. ( Refer to 4.3.3.13 ) (3) Remove the Plate-Bracket-Motor. (Refer to 4.3.3.15) (4) Remove the E ring . Remove the Gear-Assy-Clutch (5) Remove the lock of Gear-Resist . Remove Gear-Resist (6) Lift up the left side of Roller-Resist-Assy (7) Remove the lock of Gear-Pressure (8) Remove Plate-Contact-PA Remove Holder-Resist , Spacer-Clutch and Bearing-R , Bearing-Resist-Assy . . and remove it at the arrow direction. . Remove Gear-Pressure from Roller-Pressure and Holder-Resist from Roller-Resist . . . (9) Installing is performed by the inverse procedure with removing. (Note on removing / installing) 1. Beware of not to touch the DC motor inattentively (Do not rotate motor). Fig 4.3.50 44306601TH Rev. 2 101 / Oki Data CONFIDENTIAL 4.3.3.18 Lever-In-Sensor (1) Detachment methods of the scanner and printer. ( Refer to 4.3.1.4 ) (2) Remove the Frame-Assy-Lower. ( Refer to 4.3.3.13 ) (3) Remove the Plate-Bracket-Motor. (Refer to 4.3.3.15) (4) Remove the two Lever-In-Sensor (Entrance and Paper). Press the Clamp of , press LeverIn-Sensor as up direction and then remove them. While remove Lever-In-Sensor , beware of not to loss or break Spring-Sensor-In , Spring-Write-Sensor . (5) Installing is performed by the inverse procedure with removing. (Note on removing / installing) 1. Beware of not to touch the DC motor inattentively (Do not rotate motor). Clamp (Paper) (Entrance) Fig 4.3.51 44306601TH Rev. 2 102 / Oki Data CONFIDENTIAL 4.3.3.19 Lever-Eject-Sensor/Photo-Interrupter (1) Detachment methods of the scanner and printer ( Refer to 4.3.1.4 ) (2) Remove the Frame-Assy-Lower ( Refer to 4.3.3.13 ) (3) Press the clamp of Lever-Eject-Sensor (Exit) . Press Lever-Eject-Sensor as down direction and remove it. While remove Lever-Eject-Sensor , beware of not to loss or break Spring-SNS . (4) Press the claw of Frame-Assy-Lower as the arrow direction. Remove Photo-Interrupter down direction. by (5) Installing is performed by the inverse procedure with removing. (Note on removing / installing) 1. Beware of not to touch the DC motor inattentively (Do not rotate motor). Clamp Frame-Assy-Lower Frame-Assy-Lower Fig 4.3.52 44306601TH Rev. 2 103 / Oki Data CONFIDENTIAL 4.3.3.20 Lever-End/Lever-Duplex/Lever-Cassette/Gear-Assy-Clatch (1) Remove Frame-Assy-Lower and PCB-Assy. ( Refer to 4.3.3.13 / 4.3.3.14) (2) Press claw by the arrow direction. Remove Holder-SNS (3) Press the clamp of Lever-End by the up direction and then remove it. (4) Press the clamp of Lever-Duplex (5) Press the clamp of Lever-Cassette (6) Open claw by the up direction and then remove it. by the up direction and then remove it. and remove Photo-Interrupter (7) Hold up Plate-Base-Assy remove Plate-Base-Assy . . . from the claw of Guide-Cassette-L, Guide-Cassette-R and Claw A Claw B Claw Guide-Cassette-R Claw Guide-Cassette-L Fig 4.3.53 44306601TH Rev. 2 104 / Oki Data CONFIDENTIAL • Remove Feed-Roller / Clutch. (8) Press the Claw D by the arrow direction and remove Feed-Roller-NO . Plate-Base-Assy Claw D Fig 4.3.54 (9) Remove the 2 of E ring Clutch . , Slide Hopping-shaft by the arrow direction and remove Gear-Assy- (10) Installing is performed by the inverse procedure with removing. (Note on removing / installing) 1. Beware of not to touch the DC motor inattentively (Do not rotate motor). Hopping-shaft Fig 4.3.55 44306601TH Rev. 2 105 / Oki Data CONFIDENTIAL 4.3.3.21 Paper feeding roller (Roller-Pick-Up,Roller-Feed-NOW,Roller-Assy-MPT) • In the case of Tray 1, Tray (Option) (1) Shut off the power of Printer. Draw and take off the Paper Cassette of Tray. (2) Widen the claw of the 2 of Paper feeding roller and remove them. (Note on removing / installing) 1. While install the Paper feeding roller (With Gear : Roller-Pick-Up), be sure to press in it till the setting sound at the deep side shaft can be heard as the confirmation of fixing. 2. While install the Paper feeding roller (Without Gear : Roller-Feed-NOW), be sure to press in it till the setting sound at the front side shaft can be heard as the confirmation of fixing. Paper cassette Paper feeding roller (Without gear : Roller-Feed-NOW) Paper feeding roller (With gear : Roller-Pick-Up) Fig 4.3.56 44306601TH Rev. 2 106 / Oki Data CONFIDENTIAL • In the case of Multi-purpose Tray (MB470,MB480) (1) Shut off the power of Printer. (2) Open Multi-purpose Tray, widen paper supporter. (3) Open the cover of Paper feeding roller of Multi-purpose Tray by up direction. Remove RollerAssy-MPT by rolling it to the near side. (Note on removing / installing) 1. While install the Paper feeding roller (Roller-Assy-MPT) depths of the shaft and confirm whether it is fixed. , be sure to press it into the Paper feeding roller cover Multipurpose tray Fig 4.3.57 44306601TH Rev. 2 107 / Oki Data CONFIDENTIAL 5. MAINTENANCE MENU 5.1 Maintenance Menu 5.1.1 Boot Menu To go to Boot Menu, turn on the power while holding down the Right key. Pressing the Enter key or Left key with the Boot Menu screen displayed opens the password entry screen. After a password is entered, descending menu items appear. (The factory default password for Boot Menu is ""aaaaaa"".) Operating the Up key, Down key, Enter key, Left key, or Right key scrolls the menu item screen. To exit Boot Menu, press the Left key when the Boot Menu screen is displayed. Table 5.1.1 Item1 Boot Menu Item2 Parallel Setup *Need to enter the password. Default password is "aaaaaa". Item3 Default Function Enable Disable * Sets Centronics I/F to Enable or Disable. Bi-Direction Enable Disable Enable Disable Narrow Medium Wide * Ack in Busy Ack while Busy * Sets bidirectional Centronics to Enable or Disable. Sets the ECP mode to Enable or Disable. Sets the ACK width when receiving compatible data. NARROW = 0.5μs MEDIUM = 1.0μs WIDE= 3.0μs Sets the output order of the BUSY signal and ACK signal when receiving compatible data. ECP Ack Width Ack/Busy Timing I-Prime 44306601TH Rev. 2 Value Parallel 3 microseconds 50 microseconds Disable * * * ACK IN BUSY: The timing of BUSY=LOW is the same as the end of the ACK pulse. ACK WHILE BUSY: The timing of BUSY=LOW is the center of the ACK pulse. Sets the ENABLE time/ DISABLE time of I-PRIME signal. 3 microseconds: Enables by nInit signal of 3μs 50 microseconds: Enables by nInit signal of 50μs Only Centro driver is initialized when receiving I-Prime in setting to ENABLE. 108 / Oki Data CONFIDENTIAL Item1 Boot Menu Item2 Item3 Value Parallel Setup Offline Receive Enable Disable USB Setup USB Enable Disable Enable Disable Default * *Need to enter the password. Default password is "aaaaaa". Soft Reset 44306601TH Rev. 2 * * Speed 480 Mbps 12 Mbps * Serial Number Enable Disable * Offline Receive Enable Disable * Function Sets Enable / Disable of a function keeping the "Ready to Receive" status without changing I/F signal when an alarm occurs. When this setting is enabled, I/F keeps the "Ready to Receive" status when transferring to the offline status by pressing on the operation panel. I/F outputs the BUSY signal only when the receive buffer is full or service calls occur. This menu is not displayed in Non-PS device. (Disable is fixed in Non-PS device.) Sets USB I/F to Enable/ Disable. Sets the Soft Reset command to Enable / Disable. After changing the setting, the printer restarts after exiting the menu. Sets the maximum transfer speed of USB I/F. After changing the setting, the printer restarts after exiting the menu. Specifies Enable/ Disable of the USB serial number. The USB serial number is used to identify a USB device connected to PC. After changing the setting, the printer restarts after exiting the menu. Sets Enable / Disable of a function keeping the "Ready to Receive" status without changing I/F signal when an alarm occurs. When this setting is enabled, I/F keeps the "Ready to Receive" status when transferring to the offline status by pressing on the operation panel. I/F outputs the BUSY signal only when the receive buffer is full or service calls occur. This menu is not displayed in Non-PS device. (Disable is fixed in Non-PS device.) 109 / Oki Data CONFIDENTIAL Item1 Boot Menu Item2 File System Setup Item3 Flash Initialize Value Execute Default - *Need to enter the password. Default password is "aaaaaa". Language Setup Initial Lock Yes No * Lang Initialize Execute - On Off * Power Setup Power Save SIDM Setup SIDM Manual 0 ID# 2 9 SIDM 0 Manual2 ID# 3 SIDM MP Tray ID# *J *E * 9 0 4 * Function Initializes the resident FLASH. The following message is displayed by pressing the Enter switch. Are You Sure? Yes/No When No is selected, the display returns to the original menu. When Yes is selected, the menu is immediately exited, and initialization of the flash is executed after rebooting. Conditions for display "Boot Menu -File System Setup Initial Lock" is "No" Sets so as not to change the setting in accordance with the initialization of FLASH. When "Print Statistics->MFP Usage Report" is "Disable", "No" can be set. Initializes a message file loaded in Flash. The following confirmation message is displayed by the pressing the Enter switch. Are You Sure? Yes/No When No is selected, the display returns to the original menu. When Yes is selected, the menu is immediately exited, and the message is deleted after rebooting. Sets the power save mode to Enable/ Disable. Transfer time to the power saving mode in Enable is changed by "Menu" - "Admin Setup" - "System Setup" - "Power Save Time". Sets Pn of MNUAL specification by the CSF control command (ESC EM Pn) in MANUAL-1 ID No.FX/ PPR/ESCP Emu. Sets Pn of MANUAL specification by the CSF control command (ESC EM Pn) in MANUAL-2 ID No.FX/ PPR Emu Sets Pn of TRAY0 (MP Tray) by the CSF control command (ESC EM Pn) in MP Tray ID No.FX/ PPR/ESCP Emu. 9 44306601TH Rev. 2 110 / Oki Data CONFIDENTIAL Item1 Boot Menu Item2 SIDM Setup *Need to enter the password. Default password is "aaaaaa". Item3 SIDM Tray1 ID# SIDM Tray2 ID# Value 0 1 Default Function * Sets Pn of TRAY1 by the CSF control command (ESC EM Pn) in Tray 1 ID No.FX/PPR/ESCP Emu. 9 0 2 *J 5 *E Sets Pn of TRAY2 by the CSF control command (ESC EM Pn) in Tray 2 ID No.FX/PPR/ESCP Emu. Conditions for display Tray 2 is installed. 9 5.1.2 System Maintenance Menu To go to System Maintenance Menu, turn on the power while holding down the asterisk (*) key and the Right key simultaneously. Pressing the Enter key or Left key with the System Maintenance screen displayed opens the password entry screen. After a password is entered, descending menu items appear. (The factory default password for System Maintenance Menu is ""000000"".) Operating the Up key, Down key, Enter key, Left key, or Right key scrolls the menu item screen. To exit System Maintenance Menu, press the Left key when the System Maintenance screen is displayed. Table 5.1.2 Item1 Item2 Item3 OKIUSER System Maintenance Value ODA OEL APS JP1 JPOEM1 OEMA OEML *Need to enter the password. Default password is "000000". Maintenance Format Flash Execute Menu ROM Reset EEPROM 44306601TH Rev. 2 Execute Default Function * Sets a destination. JPOEM1: OEM for Japan OEMA: Overseas OEM for A4 default OEML: Overseas OEM for Letter default The device is automatically rebooted after exiting the menu. When there are Japanese fonts, JP1is set as the default.. Formats Flash ROM. By executing the format, menu is exited, and the format of the flash device installed in the resident (on board) is started. (CAUTION! NIC F/W and Fax F/W will be erazed. See section 7.5.4) Returns the settings of EEPROM to the factory default. The device is automatically rebooted after the setting change. * Some special items are not initialized. - - 111 / Oki Data CONFIDENTIAL Item1 Item2 Item3 Value Printer Maintenance Enable System Disable Maintenance Maintenance Print Menu *Need to enter the password. Default password is "000000". Fuse Keep Mode Personality IBM PPR Execute Enable Disable EPSON FX Enable Disable ESC/P Enable Disable 44306601TH Rev. 2 Default * - *E *J *E *J *J *E Function Sets whether to display "Print Information"-"Print System Status". If this setting is "Disable", "Engine Status" is not displayed. After changing the setting, the printer restarts after exiting the menu. By pressing the Enter key, a command is issued from CU to PU, and the device becomes Online. Checks the operation after replacing consumables with the power ON. (At this time, since the fuse of new consumables is not cut, the operation count is not added to the old consumables.) The check mode is finished by the power off, and it becomes invalid by the power on next time. Changes the default of supported PDL language for each destination. PDL language disabled by the menu is not displayed in EMULATE of the user menu. (Since PCL XL does not have the special menu, the display remains unchanged if setting to DISABLE.) When receiving the print data of the PDL language of DISABLE, INVALID DATA is displayed and received data is discarded. When IBM PPR and EPSON FX are set to ENABLE for Japanese models, its operation is not guaranteed. When ESC/P is set to ENABLE for overseas models, its operation is not guaranteed. PS3 EMU is displayed only when PSE is installed. PCL is not disabled (Always use in ENABLE. Received data processing is performed even when setting to DISABLE). Read only. (T.B.D) 112 / Oki Data CONFIDENTIAL Item1 Item2 System Dotshift Maintenance Item3 Tray1 Value -4.0 mm -1.5 mm -1.0 mm -0.5 mm 0.0 mm +0.5 mm *Need to enter the password. Default password is "000000". Tray2 Default * +3.5 mm -4.0 mm -1.5 mm -1.0 mm -0.5 mm 0.0 mm +0.5 mm Function Sets the horizontal dot shift in printing from Tray1. This area is not initialized in EEPROm RESET of ROM Ver. UP, etc. * Sets the horizontal dot shift in printing from Tray2. This item is displayed when Tray2 is not installed. This area is not initialized in EEPROm RESET of ROM Ver. UP, etc. * Sets the horizontal dot shift in printing from Manual Slot. This area is not initialized in EEPROm RESET of ROM Ver. UP, etc. It is displayed only when Manual Feed is installed. * Sets the horizontal dot shift in printing from MPT. This area is not initialized in EEPROm RESET of ROM Ver. UP, etc. It is displayed only when MPT is installed. +3.5 mm Manual Feeder -4.0 mm -1.5 mm -1.0 mm -0.5 mm 0.0 mm +0.5 mm MP Tray +3.5 mm -4.0 mm -1.5 mm -1.0 mm -0.5 mm 0.0 mm +0.5 mm +3.5 mm 44306601TH Rev. 2 113 / Oki Data CONFIDENTIAL Item1 Item2 Item3 System Rolling Maintenance ASCII Value Execute *Need to enter the password. Default password is "000000". Change Password New Password ****** Verify Pass- ****** word 44306601TH Rev. 2 Default Function PRINTING Rolling ASCII continuous printing Continuous printing of the Rolling ASCII pattern is performed for various continuous test (noise test and engine test) in the maker side. "EXECUTE" is displayed on the lower line by pressing "ENTER" switch while the menu is displayed. Then, the execution is determined by the pressing the "ENTER" switch. By pressing the "Start" switch, ASCII continuous printing is started after the initialization. To exit this mode, press the "Start" switch to stop printing, and turn off the power, or press the "CANCEL" switch. After this operation, you can not return to the other maintenance mode. Sets a new password to enter the System Maintenance menu. The input range is 6 digits to 12 digits of lower-case alphanumeric characters. Enter the new password for confirmation to enter the System maintenance menu set in "New Password". The input range is 6 digits to 12 digits of lower-case alphanumeric characters. 114 / Oki Data CONFIDENTIAL 5.1.3 Fax Maintenance Menu To go to Fax Maintenance Menu, turn on the power while holding down the pound (#) key and the Right key simultaneously. Operating the Up key, Down key, Enter key, Left key, or Right key scrolls the menu item screen. To exit Fax Maintenance Menu, press the Left key when the Fax Maintenance screen is displayed. Table 5.1.3 Item1 Item2 Service Bit Fax Maintenance Country Code Tone Send Test 44306601TH Rev. 2 Item3 Value Default Function * Setting to enable the setting for a service person. The user can not access to it depending on a setting item when this setting is OFF. On Off U.S.A. International United Kingdom Ireland Norway Sweden Finland Denmark Germany Hungary Czech/Slovakia Poland Switzerland Austria Belgium Netherlands France Portugal Spain Italy Greece Australia New Zealand Singapore Hong Kong Latin America Mexico China Russia Taiwan Japan 2100 Hz 1850 Hz 1650 Hz 1100 Hz - Selects a country where the printer is installed. The Default is different depending on a destination. - Performs the tone transmission test. Tone is continuously transmitted by selecting each value (pressing Right/Enter key). The tone transmission is stopped by pressing the Left key. 115 / Oki Data CONFIDENTIAL Default Function DP Send Fax Maintenance Test Item1 Item2 0~9 ( press the key ) - MF Send Test 0 ~ 9, #, * ( press the key ) - Modem Signal Send Test V.34 (33.6Kbps) V.34 (28.8Kbps) V.17 (14.4Kbps) V.17 (12.0Kbps) V.17 (9.6Kbps) V.17 (7.2Kbps) V.29 (9.6Kbps) V.29 (7.2Kbps) V.27 (4.8Kbps) V.27 (2.4Kbps) V.21 (0.3Kbps) - Performs DP transmission test. By selecting "MF Send Test"(pressing Right/Enter key), the device is in the wait state by pressing the 0 to 9 key. Each pulse is transmitted by pressing the numeric key. The test is finished by pressing the Left key. Performs the MF transmission test. By selecting "MF Send Test"(pressing Right/Enter key), the device is in the wait state by pressing the 0 to 9, #, and * key. Each pulse is continuously transmitted by pressing the numeric key. The test is finished by pressing the Left key. Performs the modem signal transmission test. By selecting each value (pressing the Right/Enter key), the modem signal is continuously transmitted. The transmission of the modem signal is stopped by pressing the Left key. Ring Signal Test Item3 Value Performs the ring signal transmission test (Ringing an external phone). There are FX2 (For Japan) and FX3 (For Overseas) for FAX Board. For FX2, Ring Signal Test is required. For FX3, Ring Signal Test is not required. 44306601TH Rev. 2 116 / Oki Data CONFIDENTIAL 5.1.4 Print Statistics Menu To go to Print Statistics Menu, turn on the power while holding down the Up key. Pressing the Enter key or Left key with the Print Statistics screen displayed opens the password entry screen. After a password is entered, descending menu items appear. (The factory default password for Print Statistics Menu is ""0000"".) Operating the Up key, Down key, Enter key, Left key, or Right key scrolls the menu item screen. To exit Print Statistics Menu, press the left key when the Print Statistics screen is displayed. Table 5.1.4 Item1 Item2 Item3 Value Default Function * Sets MFP Usage Report to Enable/ Disable. When switching, the menu is exited. Inputs a password to enter the print statistics menu. The default is "0000". Sets whether to display the group counter in MFP Usage Report Print. Enable: Displayed, Disable:Not displayed Conditions for display "Print Statistics"-"MFP Usage Report" is "Enable". Sets Display/ Not display of the number of replaces of consumables. When setting to Enable, the maintenance counter is also displayed. Conditions for display "Print Statistics"-"MFP Usage Report" is "Enable". Resets the main counter. The following screen is displayed. Are You Sure? Yes No If No is selected, the display returns to the original menu. If Yes is selected, the group counter is cleared, and the menu is exited. Conditions for display "Print Statistics"-"MFP Usage Report" is "Enable". Print Statistics MFP Usage Report Enable Disable *Need to enter the password. Default password is "0000". Group Counter Enable Disable * Supplies Report Enable Disable * Reset Main Counter Execute * 44306601TH Rev. 2 117 / Oki Data CONFIDENTIAL Item1 Print Statistics Default Function Reset Group Counter Item2 Item3 Execute Value * Reset Supplies Counter Execute * New Password **** - Verify Password **** - Resets the group counter. The following screen is displayed. Are You Sure? Yes No If No is selected, the display returns to the original menu. If Yes is selected, the group counter is cleared, and the menu is exited. Conditions for display "Print Statistics"-"MFP Usage Report" is "Enable". "Print Statistics"-"Group Counter" is "Enable". Reset the number of replaces of consumables. (Maintenance counter is not reset.) Are You Sure? Yes No If No is selected, the display returns to the original menu. If Yes is selected, the number of replaces of consumables is cleared, and the menu is exited. Conditions for display "Print Statistics"-"MFP Usage Report" is "Enable". "Print Statistics"-"Supplies Report" is "Enable" Sets a new password to enter the "Print Statistics" menu. Conditions for display "Print Statistics"-"MFP Usage Report" is "Enable". Enters the new password for confirmation to enter the "Print Statistics" menu set in "New Password". *Need to enter the password. Default password is "0000". Change Password 44306601TH Rev. 2 118 / Oki Data CONFIDENTIAL 5.2 Maintenance Utility By using the maintenance utility you can adjust this machine. Based on the maintenance utility, users can make adjustments listed in Table 5.2.1. The details of maintenance utility are as follows. 1) Maintenance utility operating manual : 42678801FU01 Rev.25 or later(Japanese version) : 42678801FU02 Rev.25 or later(English version) 2) Program of the maintenance utility is as below. * It is possible to download a program of the maintenance utility. (Person in charge of the manual, Window Person is available to access.) Applicable Operating System Win2000/XP/Vista File Name MuWin.zip Part Number 42678801FW01 Rev.25 or later Table 5.2.1 Maintenance Utility Adjustment Items Item Adjustment Section No. of the Maintenance Utility Operation 1 Change the main (86M) circuit board Rewrite the set value of the EEPROM used of the main Section 2.4.1.1.5 circuit board. Purpose of adjustment: if it’s necessary to change to other main circuit board in order to change maintenance, users should rewrite the EEPROM data to other main circuit board. 2 Set the information ofthe serial number Choose the recorded printer serial number in the EEPROM and change the output mode and serial number of device. Section 2.4.1.1.6.3 3 Factory/Shipping mode Switch between factory mode and shipping mode. Purpose of adjustment: if it is impossible to copy the EEPROM (I/F error, etc.), users can make settings of the circuit board changed for maintenance. The default of circuit boards for maintenance is usually set to factory mode, so by this function, setting to shipping mode is necessary. Section 2.4.1.1.6.4 4 Setting information ofcircuit board items Confirm the information of serial number and the Factory/Shipping mode. Section 2.4.1.1.7 5 USB software update Update the USB software Section 2.4.2.2.1 6 NIC software update Update the NIC software Section 2.4.2.2.2 7 Set the Mac address Set the Mac address Section 2.4.2.2.5 8 Scanner software update Update the scanner software Section 2.4.1.2.10 9 Fax software update Update the Fax software Section 2.4.1.2.11 10 System maintenance Rewriting set values for the system maintenance. Section 2.4.1.2.6 11 Engine maintenance Rewriting set values for the engine maintenance. Section 2.4.1.2.7 12 Set the information of desired market/PnP Set and confirm the printer(CU) s desired market, device ID and USB ID. Section 2.4.1.2.9 13 Engine Test item setting Setting set values for engine test items. Section 2.4.2.2.7 44306601TH Rev. 2 119 / Oki Data CONFIDENTIAL Item Adjustment Section No. of the Maintenance Utility Operation 14 FUSE KEEP Mode Switching to the FUSE KEEP Mode. Section 2.4.2.2.12 15 Password initialize Initializing the Administrator menu password. Section 2.4.2.2.13 16 The function of saving net Save the log files of net work work log Section 2.4.2.2.14 17 Send to file Send the specify files. Section 2.4.1.2.12 18 Display the consumable counter Confirm the current value of consumable counter Section 2.4.1.3.1 19 Confirm the setting value of menus Display the setting values set in the printer (CU) Section 2.4.1.3.2 20 Confirm the information of printer Confirm the Mac address and various Firmware versions of the printer Section 2.4.1.3.3 21 Confirm the memory value Confirm the information of memory in the printer(CU) Section 2.4.1.3.4 22 Test printing Execute the local printing function and the transmission Section 2.4.1.4.1 of specified files.Purpose of adjustment: to confirm the operation of printer unit and the transmission of downloaded files. 44306601TH Rev. 2 120 / Oki Data CONFIDENTIAL 5.3 Variou s printing of the MFP unit with controller Configuration print Print the information of program version and composition of the controlling parts. Operation: From the panel menu, select "Menu". (Press the Down key to go to "Menu" and then press the Right key (or Enter key)) Select "Print Information". (Press the Down key to go to "Print Information" and then press the Right key (or Enter key)) Select "Configuration". (Press the Down key to go to "Configuration" and then press the Right key (or Enter key)) Be sure that "Execute" is display. Press the Enter key. Network Information printing Operation: From the panel menu, select "Menu". (Press the Down key to go to "Menu" and then press the Right key (or Enter key)) Select "Print Information". (Press the Down key to go to "Print Information" and then press the Right key (or Enter key)) Select "Network Information". (Press the Down key to go to "Network Information" and then press the Right key (or Enter key)) Be sure that "Execute" is display. Press the Enter key. Demo printing Print the inside demo pattern in the ROM. Operation: From the panel menu, select "Menu". (Press the Down key to go to "Menu" and then press the Right key (or Enter key)) Select "Print Information". (Press the Down key to go to "Print Information" and then press the Right key (or Enter key)) Select "Demo Page". (Press the Down key to go to "Demo Page" and then press the Right key (or Enter key)) Select "DEMO1". (Press the Down key to go to "DEMO1" and then press the Right key (or Enter key)) Be sure that "Execute" is display. Press the Enter key. 5.4 Switch pressing function when power supply is turned on When power supply of printer is turned on, the functions of usable switches are as follows. (1) key and Right key Despite of warning/error, always start by online mode (factory support function). (2) Left key and Stop key Completely initialize FLASH(resident). This mode becomes enabled only when a fatal error occurs in the flash file system. (3) Up key and Stop key Initialize EEPROM. This mode becomes enabled only when on error occurs in the EEPROM. 44306601TH Rev. 2 121 / Oki Data CONFIDENTIAL 5.5 Settings after Parts Replacement The necessary adjustments after the parts exchange are explained as follows. Table 5.5.1 Replaced Part Adjustment LED Head Not required. Image Drum Cartridge Not required. Main (86M Board) Copy the EEPROM information; utility is required 5.5.1Notes when exchanging the main circuit board and EEPROM setting after the exchange of 86M circuit board 1. When it is possible to access to the EEPROM of the circuit board to be removed (When neither SERVICE CALL 40 [CU EEPROM Error] nor SERVICE CALL 105 [Engine EEPROM Error] is displayed.) (1) By using the Board replacement function of the maintenance utility (maintenance utility operation manual, Section 2.4.1.1.5 Board replacement function), retrieve information about the EEPROM from the circuit board that is to be removed, and store the information temporarily in the HDD of PC. (2) By using the Board replacement function of the maintenance utility (maintenance utility operation manual, Section 2.4.1.1.5 Board replacement function), copy the information about the EEPROM information stored in the HDD of PC by (1) to the EEPROM of a new circuit board to be installed. Note: When using the maintenance utility to get the EEPROM information or writing the information, please set the printer to “forcible ONLINE mode” following the procedures in 5.3.(1), then EEPROM can be accessed. 2. When it is impossible to access to the EEPROM of the circuit board to be removed When SERVICE CALL 40 [CU EEPROM Error] or SERVICE CALL 105 [Engine EEPROM Error] is displayed on the status monitor by handling the circuit board to be removed, or when the EEPROM data cannot be read out, perform maintenance with the maintenance utility according to the following procedure after replacing with a new circuit board. (1) [When facing OEL] (1-1)Set the PU serial number (Maintenance utility operation manual, Section 2.4.1.1.6 Board setting) SAP serial number can be applied to the device. The SAP serial number is displayed in the highest rung of the serial number label. It is a 12-digit number including production place (2 digits), production year (2 digits), sequence number (6 digits) and revision number (2 digits). • PU serial number is a 10-digit number which is basically the same as SAP serial number except that it has no the 2-digit revision number. • Set on the menu of [Section 2.4.1.1.6.3 Set the information of the serial number] of [Section 2.4.1.1.6 Board setting ]. 44306601TH Rev. 2 122 / Oki Data CONFIDENTIAL • If you want to specify the PU serial number, please add a “0” (a normal-width zero) then input the 11-digit number. (Please notice that when read out, the number will be 10 digits.) As shown in the following image, on the menu of [PU serial number setting], eliminate the 2-digit revision number then add a normal-width zero to the 10-digit number and input it. Ser.NO. 4AEL4011702K Lot.NO. AE47027880 A0 Made in Thailand Configured in UK Revision Add one-byte 0 to the top of 10-digit figure of Lot.NO. Set "0AE47027880" in the setting screen. Figure of Serial No. label image (labeled in UK Factory) Fig 5.5.1 • PU serial number will be output to the Printer Serial Number column in the header of Status Page. For this reason, check of PU serial number is performed by printing Status Page. • After the configuration in the UK factory, when facing OEL, the PU serial number is taken as Lot Number and shown in the Lot Number: column of the last line which is in the header of the Status Page. (1-2) Set the CU serial number SAP serial number can be applied to the device. The SAP serial number is displayed in the highest rung of the serial number label. It is a 12-digit number including production place (2 digits), production year (2 digits), sequence number (6 digits) and revision number (2 digits). • CU serial number is given an original number which is within 12 digits in the UK factory. • Please notice that if you set the CU serial number, the menu setting in CU will be reset (back to the default setting). (For reference, Maintenance utility operation manual) • On the menu of 2.4.1.1.6.3 Set the information of the serial number] of [Section 2.4.1.1.6 Board setting ] , set the [Choose printer serial number] to [CU serial number] and [Output mode] to [Show both]. • If you want to specify the CU serial number, please input the 12-digit number. (When read out, it will be 12 digits, too.) Input 12 digits for Ser. NO. Input "4AEL4011702K". Ser.NO. 4AEL4011702K Lot.NO. AE47027880 A0 Made in Thailand Configured in UK Figure of Serial No. label image (labeled in UK Factory) Fig 5.5.2 44306601TH Rev. 2 123 / Oki Data CONFIDENTIAL • CU serial number is shown in the Printer Serial Number Column in the header of Status Page. Therefore, the confirmation of the CU serial number after the change can be done by printing the Status Page. • The PU serial number is shown in the Lot Number: column of the last line which is in the header of the MenuMap. (2) [When not facing OEL] (2-1) Set the PU serial number (Maintenance utility operation manual, Section 2.4.1.1.6 Board setting) SAP serial number can be applied to the device. The SAP serial number is displayed in the highest rung of the serial number label. It is a 12-digit number including production place (2 digits), production year (2 digits), sequence number (6 digits) and revision number (2 digits). • PU serial number is a 10-digit number which is basically the same as SAP serial number except that it has no the 2-digit revision number. • Set on the menu of [Section 2.4.1.1.6.3 Set the information of the serial number] of [Section 2.4.1.1.6 Board setting ]. • If you want to specify the PU serial number, please add a “0” (a normal-width zero) then input the 11-digit number. (Please notice that when read out, the number will be 10 digits.) As shown in the following image, on the menu of [PU serial number setting], eliminate the 2-digit revision number then add a normal-width zero to the 10-digit number and input it. Add one-byte 0 to the top of 10-digit figure of 12-digit SAP serial number to set. Set "0AE01234567" in the setting screen of PU serial number. Revision AF85123456A0 A Made in B Figure of Serial No. label image Fig 5.5.3 • PU serial number will be output to the Printer Serial Number column in the header of Status Page. For this reason, check of PU serial number is performed by printing Status Page. • After the configuration in the UK factory, when facing OEL, the PU serial number is taken as Lot Number and shown in the Lot Number: column of the last line which is in the header of the Status Page. (2-2) Set the CU serial number CU serial numbe setting is unnecessary When not facing OEL. 44306601TH Rev. 2 124 / Oki Data CONFIDENTIAL (3) To be applied for every model. (3-1) Switch to shipping mode When engine control circuit board has been exchanged, it will become factory mode. Therefore you can change it to Shipping Mode. • Change to the menu of [Section 2.4.1.1.6.4 Factory/Shipping mode] in the [Section 2.4.1.1.6 Board setting] of the maintenance utility. (3-2) Set the desired market [Method of Confirmation: Status Page printing] Because the default setting is ODA, the desired market must be set at shipment. Note! Note! This setting will be stored in the EEPROM of the 86M circuit board. 1. Maintenance circuit board:For international sales/ODA/OEL/APS facing maintenance circuit board, this setting is left as default at shipment. 2. Set the desired market :Set by PJL command or maintenance utility. 3. Explanation :PN286MFP/PN287MFP is a common ROM both for domestic and international markets. When used in devices of different desired markets, it is necessary to set the desired market (the default is ODA facing) This setting will be stored in the EEPROM of the 86M circuit board. This setting in maintenance circuit board is left as default at shipment, when put in use, this setting will be executed. If the program version is changed, it will return to the initial value. Because of the EEPROM exchange (engine control circuit board), the life information of ID, etc. has been cleared. Please notice that there may appear some errors in the life management until the following unit exchange is done. Table 5.5.2 Item Description Count Description Image drum unit Life counts of image drum units Values converted on a A4-size-paper basis from numbers of revolutions after installation of new image drum units. Total number of sheets fed Printer life count Total number of sheets fed sheets fed. Pages Numbers of pages impressed (images) with image drums Numbers of pages impressed (images) from installation of new image drum units. 44306601TH Rev. 2 125 / Oki Data CONFIDENTIAL 6. Periodic Maintenance 6.1 Periodic Replacement Parts The following parts should be replaced at a specified cycle. The above mentioned regular parts exchange should be done by users. Table 6.1.1 Name Conditions Cleaning Remarks • Toner Cartridge After printing approx. 3,500 pages • LED head Consumables • Image Drum Cartridge After printing approx. 25,000 pages See 1.4 (15). Note! Consumables After using a normal cartridge, the starter toner cartridge (attached at the printer purchase) can not be used. Use the starter toner cartridge first, and then, use the normal toner after [LOW TONER] is displayed. 6.2 Cleaning Remove toner powder and dust in the printer inner section. Clean the inside of and the periphery of the printer with the cloth as needed. Clean the printer inner section with the handy cleaner (maintenance tool). Note! Do not touch the image drum, LED lens array, and LED head terminal. 6.2.1 Cleaning Page Function The printer has the charging roller cleaning function implemented by the user. The following shows the procedure in the printer operation panel. (1) From the panel menu , Select the [Menu] - [Printer Menu] - [Printer Adjust] - [Cleaning] [Execute] . (2) Feed a piece of A4 paper in the multi-purpose tray or the manual feeder slot. (3) Press the "start" Button. (In case of MB470/MB480 ) (4) The toner attached with the image drum is transferred on the paper fed, and paper is fed under the condition where the remaining toner is printed. While this processing is in progress, LCD shows the [Print Cleaning Page] message is displayed. (5) The display on LCD is returned to [Function]. 6.3 Cleaning of LED lens array If the vertical white lines, and white belt (white spot, pale printing) occur in printing as shown below, the LED lens array should be cleaned or the toner cartridge should be replaced. Note! As for the LED lens array, clean it with soft tissues or soft cloth after eliminating static electricity of a maintenance tool. While lines or White belt (White spot, pale printing) Fig 6.3.1 44306601TH Rev. 2 126 / Oki Data CONFIDENTIAL Cleaning LED head If there appear line breaks or white lines, or the letters and characters are blurred, please clean your LED head. (1) Switch off the power supply. I O Fig 6.3.2 (2) Lift the scanner. (3) Press OPEN button and open the top cover. Personal injuries may occur. The fuser unit is extremely hot. Do not touch it. OPEN button Fig 6.3.3 (4) Lightly wipe the lens (4 points) of the LED head with soft tissues. Note!Do not use solvents as methyl alcohol or thinner, as they might cause damage to the LED head. LED head Fig 6.3.4 (5) Close the top cover. (6) Lower the scanner. Fig 6.3.5 44306601TH Rev. 2 127 / Oki Data CONFIDENTIAL 6.4 Cleaning the pick-up roller If there appear vertical lines on the printing side, please clean the pick-up roller. Note! In order not to cause damage to the surface of roller, please use soft cloths to clean it. Cleaning paper feeding roller and pad If [391: paper jam] happens frequently, please clean your paper feeding roller and pad. (1) Draw out the paper cassette. (2) Get the cloths wet and wring it out. Then use the cloths to wipe paper feeding roller (large) and paper feeding roller (small). Feed roller (large) Feed roller (small) Fig 6.4.1 (3) Get the cloths wet and wring it out. Then use the cloths to wipe the pad part of paper cassette. Pad Fig 6.4.2 44306601TH Rev. 2 128 / Oki Data CONFIDENTIAL 6.5 Cleaning the inside of the MFP Cleaning the inside of the MFP (1) Switch off the power supply. I O Fig 6.5.1 (2) Lift the scanner. (3) Press OPEN button and open the top cover. Personal injuries may occur. The fuser unit is extremely hot. Do not touch it. OPEN button Fig 6.5.2 (4) Take out the image drum cartridge. 1. Take out the image drum cartridge and put them on a flat surface. 2. Cover the image drum cartridge with black paper. Note! • The image drum (the green cylinder) is very easy to be damaged, please be careful when handling it. • Don’t put the image drum cartridges in direct sunlight or strong light (above1500 lux). And don’t put them in indoor lighting condition for more than 5 minutes. Fig 6.5.3 44306601TH Rev. 2 129 / Oki Data CONFIDENTIAL (5) Get the cloths wet and wring it out. Then use the cloths to wipe any paper dust of the Guide-Paper-R Film-Paper-Dust Roller-Transfer Guide-Paper-R Fig 6.5.4 (6) Gently put the image drum cartridge back into your MFP. (7) Close the top cover. (8) Lower the scanner. Fig 6.5.5 6.6 Cleaning the papaer path in the ADF When dirt is found on an image read by the ADF. (1) Thrn off the power of MFP. (2) Open the ADF Top cover. (3) Pinch the ADF lock lever and turn the Kernel Assy up until it is locked. ADF Top Cover Fig 6.6.1 44306601TH Rev. 2 130 / Oki Data CONFIDENTIAL (4) Using a soft cloth, remove dirt with a sweeping action to the direction of the arrow. Caution! Do not use benzin, thinner and alcohol. Fig 6.6.2 (5) Get back the Kernel Assy to the initial position. (6) Close the ADF Top Cover. 44306601TH Rev. 2 131 / Oki Data CONFIDENTIAL 6.7 Cleaning the underside of the ADF When dirt is found on an image read by the ADF. (1) Open the ADF Doc Lid. (2) Wipe the A part (transparent) to remove dirt with a soft cloth. Caution!Do not use benzin, thinner and alcohol. A Fig 6.7.1 (3) Close the ADF Doc Lid. 6.8 Cleaning the Flatbed glass. When dirt is found on an image read by the Flatbed glass. (1) Open the ADF Doc Lid. (2) Wipe the Flatbed glass to remove dirt with a soft cloth. Caution! Do not use benzin, thinner and alcohol. Fig 6.8.1 (3) Close the ADF Doc Lid. 44306601TH Rev. 2 132 / Oki Data CONFIDENTIAL 7. TROUBLESHOOTING PROCEDURES 7.1 Precautions prior to repair (1) Confirm the basic check items indicated in the User's Manual. (2) Through hearing from the user, obtain information, as far in detail as possible, on the situation concerning the fault. (3) Inspect the printer in a condition close to the actual situation in which the fault occurred. 7.2 Items to be checked prior to taking action on abnormal images (1) Check to see if the printer is operated in an adequate environment. (2) Check to see if the consumables (toner, drum cartridges) are replaced properly. (3) Check to see if the right paper is used. See the paper specifications. (4) Check to see if the drum cartridges are installed properly. 7.3 Precautions when taking action on abnormal images (1) Do not bring your hand or any object in contact with the surface of the OPC drum. (2) Do not expose the OPC drum to direct sun. (3) Do not touch the fuser unit, which can be very hot. (4) Do not expose the image drums to light for over five minutes at the room temperature. 7.4 Preparations for troubleshooting (1) Display of LCD The breakdown situation of this machine is display in LCD. Do an appropriate trouble repair based on information displayed in LCD. 7.5 Troubleshooting method If a trouble occurs in the printer, search for it by the following procedure: Problem generated Problem is displayed in LCD. Repair using the “LCD message list” (see 7.5.1). Abnormal image (or problems that are not displayed in the LCD) Repair in detail using troubleshooting flow (see 7.5.2). Repair in detail using troubleshooting flow (see 7.5.3). Fig 7.5.1 44306601TH Rev. 2 133 / Oki Data CONFIDENTIAL 7.5.1 LCD Message List (1) Status. Warning. Alarm (1)-(a) Status during idle mode The Staus Warning Alarm list is recorded in Table 7.5.1. Table 7.5.1 Staus Warning Alarm list No. Level 1 Initializing 2 Initializing 3 Initializing 4 Initializing 5 Initializing 6 Initializing 44306601TH Rev. 2 Function Status Message This message is displayed before Initializing CU F/W booted up after turning on a power supply. The controller side is initializing. "OKI PRINTING "OKI PRINTING SOLUTIONS" Logo SOLUTION" Bitmap Image is displayed in initializing. Indicates that EEPROM of the EEPROM Reset controller side is being reset. The condition that EEPROM is reset includes the followings. ・Changes of CU ROM (when disagreement of CU F/W version is detected) ・Changes of destination channel ・Compulsive initialization of EEPROM (System maintenance menu) ・OEM set of PJL command RAM checking. The rate of checked RAM Check capacity to the total capacity is nnn% displayed on the 2nd line. If RAM checking is completed, it will change to the display of Sys2. Flash Memory Check Displays that the content of Flash memory is being checked. It is displayed it when Resident/ Option Flash memory not fomented are detected, or "Format Flash ROM" of a system maintenance menu is performed. The function mentioned above is secret to users. Therefore, this status does not occur in a user environment. Displays that Flash memory is being Flash Memory Format formatted. It is displayed it when Resident/ Option Flash memory not fomented are detected, or "Format Flash ROM" of a system maintenance menu is performed. The function mentioned above is secret to users. Therefore, this status does not occur in a user environment. PJLStatus Code - - - - - - 134 / Oki Data CONFIDENTIAL No. Level 7 Initializing 8 Initializing 9 Initializing 10 Initializing 11 Initializing 12 Initializing 13 Initializing 14 Initializing 15 Initializing 16 Initializing 44306601TH Rev. 2 Function Status Message Displays that normal Online mode Status Mode starts. Data (Job) from an external portion is processed even though an error takes place after Online (ready) state once this mode starts. Displays Error or Warning on a panel. If a power supply is turned on as pressing ‘1’ key and Right key, it will enter into this mode. This function is secret to users. Therefore, this status does not occur in a user environment. Displays that a printer is a special mode to conduct the update of the Program Update Mode NIC program (Controller firmware) This mode starts by turning on power with pressing Start switch. The network is in initializing. Wait a Moment Network Initializing The network is in initializing. Wait a Moment Network Initializing Displays that a printer is a special Program Update Mode mode to conduct the update of the NIC program (Controller firmware) This mode starts by turning on power with pressing Start switch. The network is in initializing. Wait a Moment Data Receive Displays that the NIC program data to update has been received. Wait a Moment Data Received OK Displays that an error takes place while the NIC program data to update Check Data REC Data Error is being received. <%DLCODE%> %DLCODE% 1:Size Error 2:Check SUM Error 3:Printer Model No. Error 4:Module I/F Version Error 5:FAT Version Error Displays that the NIC program data to update is being written. Wait a Moment Data Writing Displays that the NIC program data to update has been written. Power Off/On Data Written OK PJLStatus Code - - 30993 - - - - - - 135 / Oki Data CONFIDENTIAL Level 17 Initializing Displays that an error takes place while the NIC program data to update Check Data is being written. Data Write Error %DLCODE% <%DLCODE%> 1:Memory alloc Error 2:Download File Error 3:Device Free space acquirement Error 4:Device Free area Shortage Error 5:File Write Error 6:CU-F/W Mismatch Error 18 Normal A MFP is in power save mode. Displayed in a combination of other message in the first line. Power Save 19 Normal Requests to enter PIN ID. Enter PIN 20 Normal Requests to enter Admin Password Enter Password for the moving to Admin Menu. After this message display for 3sec., move to Screen Entry for the entering Password. - 21 Normal Requests to enter Admin Password Enter Password for the moving to Boot Menu. After this message display for 3sec., move to Screen Entry for the entering Password. - 22 Normal 23 Normal 24 Normal Displays that Access Control is enabled. Displays that Access Control is disabled. Displays that the documents on ADF are removing. 25 Warning Function Toner amount is low. In case of MENU”LOW TONER=Continue”, Status Message PJLStatus Code - No. Access Control Enabled Access Control Disabled 10094 - 10843 10844 10848 Wait a Moment Removing Document 10081(K) Toner Low Press Start Button 26 Warning 27 Warning It shows the toner cartridge of authorized 3rd party. (RFID Licensed Non OEM Toner Detected to 3rd party) Press Start Button The Region ID of toner cartridge is not proper to the distribution channel. Toner Regional Mismatch 10924(K) 10954(K) Press Start Button 44306601TH Rev. 2 136 / Oki Data CONFIDENTIAL No. 28 Level Warning Function Status Message The chip of RFID is not compatible. PJLStatus Code 10950(K) Non Genuine Toner Press Start Button 29 30 31 32 Warning Warning Warning Warning 33 Warning 34 Warning 35 Warning The life of the drum (warning). Displayed in a combination of other message in the first line. The printer stops at the point when it reaches the drum life (Shifts to error, ) Notifies the toner is empty. This is a warning only. This appears when the cover was opened and closed just after the toner empty error occurred. Also this occurred instead of the toner empty error, if the "TONER EMPTY PRINT CONTINUE" setting was 'ON'. Notifies the life of the drum. This is a warning only. This appears when the cover was opened and closed just after the drum life error occurred. Also this occurred instead of the drum life error, if the "DRUM LIFE PRINT CONTINUE" setting was 'ON'. This occurs when toner empty error occurs at the same time. %TRAY%: The tray is empty. Treated as Warning until printing to the empty tray is designated. In this case, Leisus I/F : corresponding bits of both LFTERR and LFTERR2 should be '0'. %TRAY% Tray1 Tray2 Display that Address Book have no Email address and Group Address data. Display that Phone Book has no Speed Dial and Group Dial data. Toner cartridge is not installed, or RFID is undetectable although toner cartridge is installed. This is a warning only. 10076(K) Image Drum Near Life Press Start Button 10965(K) Toner Empty Press Start Button 10969(K) Image Drum Life Press Start Button %TRAY% Empty 16012 16013 Press Start Button Address Book Empty 30945 Phone Book Empty 30944 10938 (K) Toner Not Installed Press Start Button 44306601TH Rev. 2 137 / Oki Data CONFIDENTIAL No. Level 36 Warning 37 Warning 38 Warning 39 Warning 40 Warning 41 Error 42 Error 44306601TH Rev. 2 Function Status Message The thing that abnormality is detected in the toner sensor is shown. Toner Sensor Error Operation is possible usually. When the setting of the engine is Factory mode, it is assumed the Press Start Button state of the error. (ERR 163) Notifies the life of the drum. This is a warning only. This appears when the cover was opened and closed just after the drum life error occurred. Also this occurred instead of the drum life error, if the "DRUM LIFE PRINT CONTINUE" setting was 'ON'. Display that the Selected Email Addresse no., Group Address no., Speed Dial no. and Group Dial no. wasn't registered of address data. This message is used common Address Book and Phone Book. Display that the Otkey Selected Speed Dial no.wasn't registered of address data. Display that initialization of fax board is failed. Or fax board is not installed. PJLStatus Code 10071 10060 Image Drum Life Press Start Button Destination Non Entry - Destination Non Entry - Fax Firmware Error Service Call Continue Press Start Button Wait a Moment Rebooting <%CODE%> Rebooting of the controller unit. %CODE% is a decimal value (one digit) and represents the reason to reboot. 0 … Reboot due to a reason other than the followings. 1 … Reboot due to PJLCommand. 2 … Reboot in accordance with a menu change. 3 … Reboot due to quit operator of PostScript Language. 4 … reboot by Network Utility (including Web). Shutting down It is shown that a printer is shutting down. Shutdown processing is started with which press SHUTDOWN/RESTART button 4 seconds or more after the completion of initialization processing of a printer. - - 138 / Oki Data CONFIDENTIAL No. Level 43 Error 44 Error 45 Error 46 Error 47 Error 48 Error 49 Error 50 Error 51 Error 52 Error 44306601TH Rev. 2 Function It is shown that the printer completed shutdown processing. (The backlight of LCD puts out the light) Displays that the entered PIN ID is incorrect. Displays that the entered password is incorrect. Displays that the entered password is incorrect. Displays that CU has the configuration processing (Plug and Play) with scanner unit. If this processing is failed, "Sys36" message is displayed. Displays that scanner unit is disconnected. CU retry to detect scanner unit after Power Off/ On. When a power supply is switched on, it is shown that a reading sensor cannot read the center position of ADF correctly. If equipment is turned on setting a document to Flatbed, this error will occur. The document of Flatbed is removed and it restores by pushing the Start key. That ScannerFW downloads went wrong. An error display does not disappear until it re-switches on a power supply. Memory capacity overflows due to the following reason. Press Start switch so that it continues. Install expansion RAM or decrease the data amount. - Too much print data in a page. - Too much Macro data. - Too much DLL data. - After frame buffer compres Status Message Turn off power Shutdown OK PJLStatus Code - Incorrect ID - Incorrect Password - Incorrect Password - Wait a Moment Checking Scanner 30958 40724 Power Off/On Check Scanner Detection Failed ADF Center Position Error Please remove a document from Flatbed 40760 Press Start Button Power Off/On Scanner FW Download Error 40755 30097 Press Start Button for Restoration Memory Overflow Error:420 Toner ends. Error 413 : Black Install Toner Warning status takes effect at Cover Continue Press Start Button Open/Close. Select function screen is displayed by pressing Start button. 40028(K) 139 / Oki Data CONFIDENTIAL No. 53 54 55 56 57 Level Error Error Error Error Error 44306601TH Rev. 2 Function The signature ID of toner cartridge is not proper to the distribution channel, but the group of signature ID is proper (OKI regional mismatch). As probable missing to measure the amount of toner, the printer notifies error status and stop printing. Error 557: Black The signature ID of toner cartridge is not proper to the distribution channel, and the group of signature ID is not proper (OEM channel mismatch). Error 617: Black The signature ID of toner cartridge is not proper to the distribution channel, and the group of signature ID is protected (OEM mismatch). Error 623: Black The signature ID of toner cartridge can not be recognized (Unauthorized third party). As probable missing to measure the amount of toner, the printer notifies error status and stop printing. Error 553: Black Four following behavior is carried out by mode of operation. 1.Only warning display .(This error is not displayed). 2.Warning status takes effect at Cover Open/Close. 3.With no automatic concentration compensation . 4.This error is displayed and it stops. Toner cartridge is not installed, or RFID is undetectable although toner cartridge is installed. Error 613: Black Four following behavior is carried out by mode of operation. 1.Only warning display .(This error is not displayed). 2.Warning status takes effect at Cover Open/Close. 3.With no automatic concentration compensation . 4.This error is displayed and it stops. Select function screen is displayed by pressing Start button. Status Message PJLStatus Code 40947(K) Toner Regional Mismatch 40910(K) Incompatible Toner 40906(K) Incompatible Toner 40943(K) Non Genuine Toner 40902(K) Toner Not Installed 140 / Oki Data CONFIDENTIAL No. 58 Level Error 59 Error 60 Error 61 62 63 64 65 Error Error Error Error Error 44306601TH Rev. 2 Function One of the following status. -Something is wrong with the toner sensor. -The toner cartridge is not installed. -The toner cartridge lever is not locked. -The image drum is not installed. Status Message Check Toner Cartridge Toner Sensor Error If the engine setting is Shipping mode, error display appears as this. If the engine setting is Factory mode, Service Call(163) error display appears. Error 543: Black Inappropriate size paper was fed from a tray. Check the paper in the tray or Open Upper Cover check for Multiple-feed. Open and Paper Size Error close the cover to perform recovery printing, and continue. In this state, Leisus I/F : OPJAM bit #7 should be '0'. Error:400 Paper jam occurred during paper feeding from Manual Feed Tray. Error 390 : MANUAL * Manual feeder machinery only Paper jam occurred during paper feeding from MP Tray. Error 390 : MP Tray * MPTray machinery only Paper jam occurred during paper feeding from tray. %TRAY% Error 391: Tray1 Error 392 : Tray2 Jam has occurred in paper path. Error 380 : Feed Error 381 : Transport Error 382 : Exit Jam has occurred in paper path. Error 389 : Printing Page Lost Jam has occurred nearby DUPLEX unit. Error 372 : Misfeed from Duplex PJLStatus Code 40959(K) 30034 40077 Check Manual Feeder Paper Jam 40077 Check MP Tray Paper Jam 40077 Open Upper Cover Paper Jam %TRAY% Open Upper Cover Paper Jam 40078 40078 40079 40819 Open Upper Cover Paper Jam 40054 Open Rear Cover Paper Jam To Recover, See User's Manual 141 / Oki Data CONFIDENTIAL No. 66 67 Level Error Error 68 Error 69 Error 70 Error 71 Error 72 Error 73 Error 74 Error 44306601TH Rev. 2 Function The life of the image drum (Alarm) Warning status takes effect at Cover Open/Close. Error 353: Black Select function screen is displayed by pressing Start button. The toner cartridge is not installed. Error 547: Black Status Message PJLStatus Code 40996(K) Install New Image Drum Image Drum Life Press Start Button 40914(K) Check Toner Cartridge Install New Toner Indicates that the black image drum is not set properly. Check Image Drum Error 343: Black Drum Missing The cover is open. %COVER% Close Cover Error 310 : Upper Cover %COVER% Error 587: Rear Cover Indicates that paper feed is unavailable in attempting to print from Install Unit Tray 1 or Tray2 due to removal of the Tray1 or Duplex Unit Open paper cassette of Tray 1 or Duplex Unit . Conditions for display: This occurs at the following random conditions: 1:OKIDUPLEXUNITEXIST=ON and after the page ejection while printing 2:OKIDUPLEXUNITEXIST=ON and under the condition of online Toner amount is low. Displayed in a combination of other message in the Toner Low first line. In case of MENU”LOW Press Start Button TONER=STOP,” ATTENTION LED blinks and the printer shifts to OFF Line. When an Start button is pushed, or when arbitrary errors occur and the error is canceled, an off-line state is canceled, and printing is continued until it is set to Toner Empty. Displays that the document jam occurred during the feeding or Open ADF Cover scanning. ADF Document Jam Displays that CCD Sensor Unit is locked. Power Off/On Check Sensor Lock Switch Scanner Sensor Locked Displays that Scanner sensor home position error is occurred. Power Off/On Home Position Error 40033(K) 40021 40720 40715 10081(K) 40789 40787 40786 142 / Oki Data CONFIDENTIAL No. 75 76 77 78 79 Level Error Function Status Message The invalid command was transmitted to the scanner. Power Off/On %CODE% Scanner Invalid Command 0x01 - 0x0F %TIMING%,%CODE% PJLStatus Code 40774 Error %TIMING% Command Container Data Container Response Container Invalid container length, protocol type, container type and addition Power Off/On data was transmitted to the scanner. Scanner Invalid Value %CODE% %TIMING%,%CODE% 0x01 - 0x0F 40773 Error %TIMING% Command Container Data Container Response Container The invalid parameter was set as the command container and it was transmitted to the scanner. %CODE% 0x01 - 0x0F 40772 Error Error Power Off/On Scanner Invalid Parameter %TIMING%,%CODE% %TIMING% Command Container Data Container Response Container Invalid data was specified in the data Power Off/On container and it was transmitted to Scanner Invalid Data the scanner. %TIMING%,%CODE% %CODE% 0x01 - 0x0F %TIMING% Command Container Data Container Response Container By specification that the value of container length is larger than a command container, or small, it was transmitted to the scanner. %CODE% 0x01 - 0x0F 40771 40770 Power Off/On Scanner Invalid Command Length %TIMING%,%CODE% %TIMING% Command Container Data Container Response Container 44306601TH Rev. 2 143 / Oki Data CONFIDENTIAL No. 80 81 Level Error Error 82 Error 83 Error 84 Error 85 Error 86 Error 87 Error 88 Error 89 Error 44306601TH Rev. 2 Function It was transmitted to the scanner by specification that the value of container length and addition data length is larger than a data container, or small. %CODE% 0x01 - 0x0F %TIMING% Command Container Data Container Response Container Transmission and reception of a container were not performed normally. %CODE% 0x01 - 0x0F Status Message PJLStatus Code 40769 Power Off/On Scanner Invalid Data Length %TIMING%,%CODE% 40768 Power Off/On Scanner Line Error %TIMING%,%CODE% %TIMING% Command Container Data Container Response Container Displays that scanner control error is occurred. Power Off/On Scanner Controller Error Displays that Scanner RAM check error is occurred. Power Off/On Scanner RAM Error Displays that Scanner unit internal error is occurred. Power Off/On Scanner Unit Error Displays that Scanner Sensor error is occurred. Power Off/On Scanner Sensor Error Displays that Scanner home sensor error is occurred. Power Off/On Scanner Home Sensor Error Displays that Scanner Lamp error is occurred. Power Off/On Scanner Lamp Error Displays that Scanner Fan error is occurred. Power Off/On Scanner Fan Error The busy state of scanner unit Power Off/On reached the timeout. %n% of LCD message is Scanner Timeout Error StatusParameter. %n% 'x' of PJLStatusCode is StatusParameter. 40785 40784 40782 40781 40780 40779 40746 4079x 144 / Oki Data CONFIDENTIAL No. Level 90 Error 91 Error Function This appears when the NIC initialization is occurred, as the setting was changed. Status Message PJLStatus Code 30956 Wait a Moment Network Configuration Writing A network error is occurring. 30027 Power Off/On Network Error 92 93 94 95 96 97 Error The printer is receiving the NIC download data. 40967 Wait a Moment Data Receive Error Error Error Error Error 98 Fatal 99 Fatal 100 Fatal 44306601TH Rev. 2 40967 The printer finished receiving the NIC download data. An error has happened while the printer is receive-processing the NIC download data. %DLCODE% 1: File size error 2: Check-sum error 3: Invalid printer model number 4: Invalid module I/F version 5: Invalid FAT version The printer is writing the NIC download data. The printer finished writing the NIC download data. An error has happened while the printer is writing the NIC download data. %DLCODE% 1: Memory allocation error 2: Download file error 3: Device allocation error 4: No device space 5: File writing failure 6: CU-F/W mismatch A dew is formed. (Reserved; T.B.D.) * Fatal Error is not available in national language. A fatal error occurred. * Fatal Error is not available in national language. A fatal error occurred. * Fatal Error is not available in national language. Wait a Moment Data Received OK 40967 Check Data REC Data Error <%DLCODE%> 40967 Wait a Moment Data Writing 40967 Power Off/On Data Written OK 40967 Check Data Data Write Error <%DLCODE%> Power Off and Wait for a while 126:Condensing Error Power Off/On nnn:Fatal Error - Service Call nnn:Fatal Error - - 145 / Oki Data CONFIDENTIAL No. Level 101 Fatal Function A fatal error occurred. '*' specifies the detailed error cause. * Fatal Error is not available in national language. Fatal 096 231 128 168 169 A fatal error occurred. 'nnnnnnnn' specifies the detailed error cause. * Fatal Error is not available in national language. Fatal 002~011 F0C F0D FFE FFF 102 Fatal Status Message Service Call nnn:Fatal Error * Power Off/On nnn:Fatal Error nnnnnnnn nnnnnnnn nnnnnnnn PJLStatus Code - - (1)-(b) Status during execution of functions Table 7.5.2 No. Level Function Status Message 1 Initializing Displays that the content of Flash Flash Memory Erase memory is being deleted. Deletion is not conducted unless an explicit specification is implemented in PJL command. The PJL command which eliminates a flash memory is secret to users. Therefore, this status does not occur in a user environment. 2 Initializing The network is in initializing. 3 Normal 4 Normal The copy is completed. 5 Normal 286MFP is canceling copy job. This message displayed when the copy is canceled by operator. 44306601TH Rev. 2 (function name) Wait a Moment Network Initializing 286MFP is copying. Copy ## is the number of pages scanning. Copying Page: ## Copy Copy OK Copy Canceling PJLStatus Code - 30993 10896 10895 10894 146 / Oki Data CONFIDENTIAL No. Level 6 Normal 7 Normal 8 Normal 9 Normal 10 Normal 11 Normal 12 Normal 13 Normal 14 Normal 15 Normal 16 Normal 17 Normal 18 Normal 19 Normal 20 Normal 21 Normal 22 Normal 23 Normal 24 Normal 44306601TH Rev. 2 Function Status Message 286MFP completed canceling copy Copy job. Canceled Registration of Copy was completed. Copy Activated Display that the operation of ID Card Copy Copy. To Scan Another Side, Press Start button to continue file Set Doc. and Press Start saving of the other side. Button Press Enter Key to complete. To Finish, Press Enter Key Un-printed data remains in Buffer. Print Waiting for data to follow. Data Present A printer is printing. Print Printing Printing Demo Pages Print Print Demo Page Printing Menu Maps Print Print Configuration Printing Font Lists Print * PDL Only Print Font Printing File Lists Print * PDL Only Print File List Printing Cleaning Page Print Print Cleaning Page Printing Error Logs Print * PDL Only Print Error Log Printing ROLLING ASCII Print Continuous Print Print Printing MFP Usage Report. It will be not displayed when printing Print MFP Usage in collate copy mode. Printing Supplies Status Reprt. Print Print Supplies Status Printing Scan to Log Report. Print Print Scan to Log Printing Fax Activity Report. Print Print Fax Activity Report Print It is shown that a network setup is Print Network Config printing. If menu "Print Information"-"Network Information"-"Execute" is chosen, printing of a network setup will be started. Print Collate printing. iii: The number of copy in printing. jjj: the total number of printing. When the total number of printing is 1, it is a normal printing Collate Copy iii/jjj display. Print Copy printing. kkk: The number of pages in printing. lll: The total number of printing. When the number of copy Copy kkk/lll is 1, it is a normal printing display. PJLStatus Code 10893 10774 - 10096 10098 10017 10014 10015 10056 10974 10057 10891 10890 10889 10888 10942 10099 10099 147 / Oki Data CONFIDENTIAL No. Level 25 Normal 26 Normal 27 Normal 28 Normal 29 Normal 30 Normal 31 Normal 32 Normal 33 Normal 34 Normal 35 Normal 44306601TH Rev. 2 Function Status Message Indicates that job cancelation has Print been instructed and data is being Canceling ignored until the job completion. Indicates if JAM occurs when Jam Print Recover is OFF, that job cancelation Canceling has been instructed and data is being ignored until the job completion. Indicates a job being canceled Print due to no print permit. (Related to Canceling JobAccount) 1. A job received from a user who is denied printing. 2. A color job received from a user who is denied color printing. Indiates that a job is being canceled Print because the printer area where the Canceling logs are stored has been used up and also "Cancel job" is specified as an operation at the time of Log Full. (Related to JobAccount) Warming up. Print In this case, Leisus I/F : STSENG bit #0 should be '0'. Adjusting Temp Scanner Firmware Downloading Scanner F/W. Download This function is secret to users. Therefore, this status does not occur in a user environment. Fax Firmware Download Downloading Fax board F/W. This function is secret to users. Therefore, this status does not occur in a user environment. Indicate that a job needs to be canceled because the log storing domain inside 286MFP is drained and "canceling a job" is selected for log full. StatusMessage is not displayed in this state because the status changes to "Canceling" soon. (JobAccount relation) Data receiving, process not started Print Data Arrive yet. Displayed mainly during PJL process without text print data or during job spooling. The status showing FILE SYSTEM Print (HDD/FLASH) is being accessed. File Accessing Printing Fax Protocol Dump Print Print Fax Protocol Dump PJLStatus Code 10007 10007 10007 10007 10003 10881 10880 - 10061 10993 10779 148 / Oki Data CONFIDENTIAL No. Level 36 Normal 37 Normal 38 Normal 39 Normal 40 Normal 41 Normal 42 Normal 43 Normal 44 Normal 45 Normal 46 Normal 47 Normal 48 Normal 49 Normal 44306601TH Rev. 2 Function Display that connecting to mail server. nnnnnnnnnn: mail server name or IP address of mail server. Display that Email sending. ##: The number of scanning pages. nnnnnnnnnn: mail server name or IP address of mail server. Status Message Email Connecting to Server nnnnnnnnnn Email Sending PJLStatus Code 10879 10878 Page: ## nnnnnnnnnn Display that Email sending is Email completed. Sending OK nnnnnnnnnn: mail server name or IP address of mail server. nnnnnnnnnn Display that connecting to mail server Email is canceled. Connection Canceled Display that Email sending is Email canceling. Sending Canceling This message is displayed when the Email sending is canceled by the pressing Stop button. Display that Email sending is Email canceled. Sending Canceled LDAP Display that connecting to LDAP Connecting to LDAP Server server. nnnnnnnnnn: mail server name or IP nnnnnnnnnn address of mail server. Display that searcing addresses by LDAP LDAP server. Searching Addresses Display that searcing addresses LDAP canceled by the pressing Stop button. Canceled Address Search Registration of Email was completed. Email Activated Display that connecting to file server. Network PC nnnnnnnnnn: file server name or IP Connecting to Server address of file server. nnnnnnnnnn Display that file sending. Network PC ##: The number of scanning pages. Sending nnnnnnnnnn: file server name or IP address of file ser Page: ## nnnnnnnnnn Display that file sending is completed. Network PC nnnnnnnnnn: file server name or IP Sending OK address of file server. nnnnnnnnnn Display that connecting to file server Network PC is canceled Connection Canceled 10877 10876 10875 10874 10845 10873 10872 10775 10869 10868 10867 10866 149 / Oki Data CONFIDENTIAL No. Level Function Status Message 50 Normal 51 Normal 52 Normal 53 Normal 54 Normal 55 Normal 56 Normal 57 Normal 58 Normal 59 Normal Display that scanning completed. 60 Normal Display that scanning is canceling. 61 Normal Display that scanning is canceled. Fax Scan Canceled 10860 62 Normal Display that scanner is warming up. The scanning is started after the completion of warming up. (function name) Wait a Moment Warming Up 10892 44306601TH Rev. 2 Display that file sending is canceling. Network PC This message is displayed when Sending Canceling the file sending is canceled by the pressing Stop button. Display that file sending is canceled. Network PC Sending Canceled Display that the operation of Job (function name) Build Scan. To Continue, Press Start button to continue file Set Doc. and Press Start saving of the other pages. Button Press Enter Key to complete. To Complete, Press Enter Key Registration of Server was Network PC completed. Activated Displays that it is in the state which Push Scan is waiting for a user to perform a Set Doc. and Press Start function. Button A push on the Start key will start Push Scan. Displays that connecting to PC Push Scan Connecting to PC Registration of Push Scan was Push Scan completed. Activated Indicate that the job needs to be canceled because the log storing domain inside 286MFP is drained and "canceling a job" is selected for log full. StatusMessage is not displayed in this state because the status changes to "Canceling" soon. (JobAccount relation) (function name) Display that scanning. ##: The number of scanning pages. Scanning PJLStatus Code 10865 Page: ## Fax Scanning OK Fax Scan Canceling 10864 10870 10776 - 10778 - 10863 10857 10861 150 / Oki Data CONFIDENTIAL No. Level 63 Normal 64 Normal 65 Normal 66 Normal 67 Normal 68 Normal 69 Normal 70 Normal 71 Normal 72 Normal 73 Normal 74 Normal 75 Normal 76 Normal 77 78 Normal Normal 44306601TH Rev. 2 Function Display that the calling for next desitination was waited during Broadcast Fax sending. The calling is started to the next destination after this message displayed for 5sec. Processing Fax data sending Status Message Fax Wait a Moment Fax Processing Under execution of the cancellation Fax processing performed in the midst of Canceling having copied reading data to FLASH from RAM. The end of the cancellation Fax processing performed in the midst of Canceled having copied reading data to FLASH from RAM. Registration of Fax transmission was Fax completed. Activated Fax transmission is Manual Fax connecting.(Manual Tx) Manual TX Start Processing Fax data sending Fax Processing Display that start fax receiving. Fax Receiving Start Fax Display that fax receiving. ##: The number of scanning pages. Receiving nnnnnnnnnn is called fax no. Page: ## nnnnnnnnnn Display that fax receiving completed. Fax Receiving OK Page: ## specifies the total pages received. Page: ## nnnnnnnnnn is called fax no. nnnnnnnnnn Telephone Display that deteced Off Hook of external phone during the telephone calling. Manual Fax receiving is stated by the Fax Receiving Press Start Button pressing Start button. This screen is closed by On Hook detection of external phone. Processing Fax data receiving Fax Processing Display that telephone call. Telephone Please Lift Handset Display that response telephone. Telephone Telephone Busy Display that On Hook or Off Hook. Data receiving or output processing (function name) Processing PJLStatus Code 10842 10836 10835 10834 10833 10813 10816 10851 10850 10849 10847 10832 10790 10791 10023 151 / Oki Data CONFIDENTIAL No. 79 80 Level Normal Normal 81 Normal 82 Normal 83 Normal 84 Normal 85 Normal 86 Warning 87 Warning 88 Warning 89 Warning Function Display that calling. nnnnnnnnnn is calling fax no. Display that Fax Modem sending. Page: ## specifies the number of scanning pages. nnnnnnnnnn is sending fax no. Status Message (function name) Calling nnnnnnnnnn (function name) Sending Page: ## nnnnnnnnnn (function name) Sending OK Display that Fax Modem sending completed. Page: ## specifies the total pages sent. Page: ## nnnnnnnnnn is sending fax no. nnnnnnnnnn Display that the calling canceled by (function name) the pressing Stop button. Calling Canceled Display that the Fax Modem sending (function name) canceled. Sending Canceled Indicate that the job needs to be canceled because the log storing domain inside 286MFP is drained and "canceling a job" is selected for log full. StatusMessage is not displayed in this state because the status changes to "Canceling" soon. (JobAccount relation) Since the access restrictions by PinID have no Fax Modem transmitting permission, it notifies the necessity of canceling a job. When this status goes up, job cancellation is performed and the status under job cancellation goes up. Therefore, StatusMessage is not displayed at the time of this status. (JobAccount relation) (function name) Toner amount is low. In case of MENU”LOW TONER=Continue”, Toner Low It shows the toner cartridge of (function name) authorized 3rd party. (RFID Licensed Non OEM Toner Detected to 3rd party) The Region ID of toner cartridge is (function name) not proper to the distribution channel. Toner Regional Mismatch The chip of RFID is not compatible. (function name) PJLStatus Code 10856 10855 10854 10853 10852 - - 10081(K) 10924(K) 10954(K) 10950(K) Non Genuine Toner 44306601TH Rev. 2 152 / Oki Data CONFIDENTIAL No. Level 90 Warning 91 Warning 92 Warning 93 94 95 Warning Warning Warning 44306601TH Rev. 2 Function Status Message The life of the drum (warning). (function name) Displayed in a combination of other message in the first line. The printer Image Drum Near Life stops at the point when it reaches the drum life (Shifts to error, ) Notifies the toner is empty. This is a (function name) warning only. This appears when the cover was Toner Empty opened and closed just after the toner empty error occurred. Also this occurred instead of the toner empty error, if the "TONER EMPTY PRINT CONTINUE" setting was 'ON'. The thing that abnormality is detected (function name) in the toner sensor is shown. Operation is possible usually. Toner Sensor Error When the setting of the engine is Factory mode, it is assumed the state of the error. (ERR 163) Notifies the life of the drum. This is a warning only. This appears when the cover was opened and closed just after the drum life error occurred. Also this occurred instead of the drum life error, if the "DRUM LIFE PRINT CONTINUE" setting was 'ON'. Notifies the life of the drum. This is a warning only. This appears when the cover was opened and closed just after the drum life error occurred. Also this occurred instead of the drum life error, if the "DRUM LIFE PRINT CONTINUE" setting was 'ON'. This occurs when toner empty error occurs at the same time. %TRAY%: The tray is empty. Treated as Warning until printing to the empty tray is designated. In this case, Leisus I/F : corresponding bits of both LFTERR and LFTERR2 should be '0'. %TRAY% Tray1 Tray2 MP Tray (function name) PJLStatus Code 10076(K) 10965(K) 10071 10060 Image Drum Life (function name) 10969(K) Image Drum Life (function name) %TRAY% Empty 16012 16013 16010 153 / Oki Data CONFIDENTIAL No. 96 Level Warning 97 Warning 98 Warning 99 Warning 100 Warning 101 Warning 102 Warning 103 Warning 44306601TH Rev. 2 Function The tray is empty or Duplex Unit open. Occurs only when OKIDUPLEXUNITEXIST=ON and under the condition of printing The function isn't accepted because log buffer is full and also "Cancel job" is specified as an operation at the time of Log Full. (Related to JobAccount). Toner cartridge is not installed, or RFID is undetectable although toner cartridge is installed. This is a warning only. Memory overflow was occurred in the collate copy. Stays displayed until the Start key is pressed. Notifies users that jobs have been canceled because they are not permitted for printing. (Related to JobAccount). Stays displayed until the Start button is pressed. Notifies users that jobs have been canceled because the buffer is full. (Related to JobAccount.)Stays displayed until the Start button is pressed. Status Message (function name) PJLStatus Code 10820 Tray1 or Duplex Open Copy Operation Canceled Log Buffer is Full Job Rejected Copy - 10938 (K) Toner Not Installed Print Collate Fail:Too Many Pages Press Start Button Print Invalid ID. Job Rejected Press Stop Button Print Log Buffer is Full. Job Rejected Press Stop Button Print Invalid data was received. Press Invalid Data the Start switch and eliminate the warning. Displayed when unsupported PDL command is Press Start Button received or a spool command is received without HDD. * Except GDI printer * PDL Only Print Manual paper feed is required. Manually insert the paper shown by Install Paper Manual Feeder %MEDIA_SIZE%. %MEDIA_SIZE% The unit of paper size in Custom: The unit specified for Manual Feeder (menu setting) is used if no unit is specified by the driver. When the driver specifies a unit, the unit is used for display. Paper size displays in Custom mode: "<width>x<length><unit>" ex.) 210x297mm 8.5x11.0inch * Manual feeder machinery only 40994 10982 10982 30114 411XX 154 / Oki Data CONFIDENTIAL No. Level 104 Warning 105 Warning 106 Warning 107 Warning 108 Warning 109 Warning 110 Warning 44306601TH Rev. 2 Function Manual paper feed is required. Manually insert the paper shown by %MEDIA_SIZE%. The unit of paper size in Custom: The unit specified for MPTray (menu setting) is used if no unit is specified by the driver. When the driver specifies a unit, the unit is used for display. Paper size displays in Custom mode: "<width>x<length><unit>" ex.) 210x297 MM 8.5x11.0 INCH * MPTray machinery only A disk error is occurred, which is other than the file system fill or the disk write protected. Operation that does not involve a disk is available. nnn: An identifier to Error type (For details, see the overview chapter.) Disk-full is occurring. Because this is a temporary warning, it remains until the end of the job and disappears. An attempt to write in a read-only file was done. Because this is a temporary warning, it remains until the end of the job and disappears. Interpreter detects an error due to the following reason. Receive data after this is ignored until the job completion. When the job is completely received, this is automatically cleared. - The job has a grammatical error. - The page is complicated, and VM was used up. * PDL Only The function isn't accepted because log buffer is full. (Related to JobAccount). Display that the address isn't searched by LDAP Server. Status Message Print Install Paper in MP Tray %MEDIA_SIZE% Press Start Button PJLStatus Code 411XX Print File System Operation Failed <nnn> 32000 ~ 32026 Press Start Button Print File System is Full 32002 Press Start Button Print File System is Write Protected Print Error Postscript Email Operation Canceled Log Buffer is Full Job Rejected LDAP Retry with other words Address isn't found 32026 40090 - 30947 155 / Oki Data CONFIDENTIAL No. Level 111 Warning 112 Warning 113 Warning 114 Warning 115 Warning 116 Warning 117 Warning 118 Warning 119 Warning 120 Warning 121 Warning 122 Warning 44306601TH Rev. 2 Function Status Message Display that the serarch results is LDAP over the limit values (286MFP is max. Search Results Exceeded 100 addresses). the Limit The searched addresses are displayed by the pressing Start Continue button. Press Start Button Display that Address Book have no Address Book Email address and Group Address Empty data. It is shown that the E-mail address Email is registered to the limit into Address Address Book is Full Book. Default From(Admin Setup – Scanner Email Setup – Email Setup) hasn't been Contact Admin. registered. Default From ID is Empty The function isn't accepted because Network PC log buffer is full. (Related to Operation Canceled JobAccount). Log Buffer is Full Job Rejected Display that Profile setting wasn't Profile List entryed. Empty The function isn't accepted because Push Scan log buffer is full. (Related to Operation Canceled JobAccount). Log Buffer is Full Job Rejected PC Notifies users that jobs have been canceled because the buffer is full. Log Buffer is Full. Job Stays displayed until the Stop button Rejected is pressed. (Related to JobAccount.) Press Stop Button The function isn't accepted because Fax Operation Canceled log buffer is full. (Related to Log Buffer is Full JobAccount). Job Rejected Display that the number of Delayed Fax Fax Sending registration was already Operation Canceled Registration is Full. full. Fax stand-by screen displayed after the displaying this message for 3sec. Destination Display that the Selected Email Non Entry Addresse no., Group Address no., Speed Dial no. and Group Dial no. wasn't registered of address data. This message is used common Address Book and Phone Book. Display that Phone Book has no Phone Book Speed Dial and Group Dial data. Empty PJLStatus Code 10871 30945 30942 - - 30943 - 10828 - - - 30944 156 / Oki Data CONFIDENTIAL No. Level 123 Warning 124 Warning 125 Warning 126 Error 127 Error 128 Error 129 Error 130 Error 44306601TH Rev. 2 Function Status Message Notifies users that jobs have been PC Fax canceled because the buffer is full. Log Buffer is Full. Job Stays displayed until the Stop button Rejected is pressed. (Related to JobAccount.) Press Stop Button Notifies users that jobs have been PC Fax canceled because they are not Invalid ID. Job Rejected permitted for Fax Modem Sending. (Related to JobAccount). Stays displayed until the Stop button is Press Stop Button pressed. Invalid data was received. Press Stop PC Fax Button and eliminate the warning. Invalid Data Press Stop Button Copy Contact Admin. Unusable Operation (function name)operation isn't (function name) accepted because 286MFP is doing Device Busy the other functions. The current installed paper size isn't Copy Unsupported Size in supported for copy function. Copy operation can continue by the %TRAY% pressing Start button. Continue %TRAY% Press Start Button Tray1 Tray2 Manual Feeder MP Tray In the state where the paper is not set Copy to %TRAY% , when the Start button Install Paper in %TRAY% Press Start Button to is pushed, it is displayed. Reading of a document is started by Continue pushing the Start button. By pushing the Stop button, it shifts Press Stop Button to Cancel to a Copy standby screen. When the Start button is pushed in the state where the paper is not set, this message is displayed again. %TRAY% Tray1 Tray2 * MPTray doesn't support Displays that the document jam (function name) occurred during the feeding or Open ADF Cover scanning. ADF Document Jam The entered PIN ID isn't accepted Copy operation. PJLStatus Code 10829 10830 10827 - 40729 4080y 406XX 40789 157 / Oki Data CONFIDENTIAL No. Level Function 131 Error Displays that CCD Sensor Unit is locked. 132 Error Displays that Scanner sensor home position error is occurred. 133 Error 134 Error 135 Error 136 Error 137 Error Status Message (function name) Power Off/On Check Sensor Lock Switch Scanner Sensor Locked Press Left Key (function name) Power Off/On Home Position Error Press Left Key Displays that scanner control error is (function name) occurred. Power Off/On Scanner Controller Error Displays that Scanner RAM check error is occurred. Press Left Key (function name) Power Off/On Scanner RAM Error Press Left Key Displays that Scanner calibration (function name) error is occurred during PC Scanning. Power Off/On Scanner Calibration Error Displays that Scanner unit internal error is occurred. Press Left Key (function name) Power Off/On Scanner Unit Error Press Left Key Displays that Scanner Sensor error is (function name) Power Off/On occurred. Scanner Sensor Error 138 Error Displays that Scanner home sensor error is occurred. 139 Error Displays that Scanner Lamp error is occurred. Press Left Key (function name) Power Off/On Scanner Home Sensor Error Press Left Key (function name) Power Off/On Scanner Lamp Error PJLStatus Code 40787 40786 40785 40784 40783 40782 40781 40780 40779 Press Left Key 44306601TH Rev. 2 158 / Oki Data CONFIDENTIAL No. Level 140 Error 141 Error 142 Error 143 Error 144 Error Function Status Message Displays the copy operation from Copy Manual Feeder. Install Paper in Manual The scanning is started by Start Feeder button pressed. The copy is aborted Press Start Button to if Stop button pressed. Continue In ADF copy, this message is displayed after the every pages Press Stop Button to printed out. Cancel * Manual feeder machinery only Displays that the unsupported papers Copy are installed in Trays. Check Paper Size When this error occurred during copy, Paper Size Error the copy is aborted. Press Stop Button Memory overflow was occurred in the Copy collate copy. Stays displayed until the Collate Fail:Too Many Stop key is pressed. Pages Press Stop Button Copy Copying request is issued to an Copy Canceled empty tray. When this error occurred during copy, %TRAY% Paper Empty the copy is aborted. Press Stop Button %TRAY% Error 491: Tray1 Error 492: Tray2 Printing request is issued to an empty Copy Copy Canceled MPTray. When this error occurred during copy, MP Tray Paper Empty the copy is aborted. Press Stop Button Error 490 : MP Tray PJLStatus Code 40810 40776 40775 47xyy 470XX In this state, Leisus I/F : corresponding bits of both LFTERR and LFTERR2 should be '0'. Programmer's note: When the Start button was pressed, the controller (CU) should send MPTPECLR command to the engine (PU). The engine would clear this state after receiving that command. This error is occurred, when the MPTray is in the home position and the sensor "PE SNS2" cannot detect papers. * MPTray machinery only 44306601TH Rev. 2 159 / Oki Data CONFIDENTIAL No. Level 145 Error 146 Error 147 Error 148 Error 149 Error 44306601TH Rev. 2 Function Status Message Toner ends. (function name) Warning status takes effect at Cover Install Toner Open/Close. When this error occurred during copy, the copy is aborted. Error 413: Black The signature ID of toner cartridge is (function name) not proper to the distribution channel, Toner Regional Mismatch but the group of signature ID is proper (OKI regional mismatch). As probable missing to measure the amount of toner, the printer notifies error status and stop printing. Error 557: Black The signature ID of toner cartridge is (function name) not proper to the distribution channel, Incompatible Toner and the group of signature ID is not proper (OEM channel mismatch). Error 617: Black The signature ID of toner cartridge is (function name) not proper to the distribution channel, Incompatible Toner and the group of signature ID is protected (OEM mismatch). Error 623: Black (function name) The signature ID of toner cartridge can not be recognized (Unauthorized Non Genuine Toner third party). As probable missing to measure the amount of toner, the printer notifies error status and stop printing. Four following behavior is carried out by mode of operation. 1.Only warning display .(This error is not displayed). 2.Warning status takes effect at Cover Open/Close. 3.With no automatic concentration compensation . 4.This error is displayed and it stops. Error 553: Black PJLStatus Code 40028(K) 40947(K) 40910(K) 40906(K) 40943(K) 160 / Oki Data CONFIDENTIAL No. Level 150 Error 151 Error 152 Error 153 Error 154 Error 155 Error 44306601TH Rev. 2 Function Status Message Toner cartridge is not installed, or (function name) RFID is undetectable although toner Toner Not Installed cartridge is installed. Four following behavior is carried out by mode of operation. 1.Only warning display .(This error is not displayed). 2.Warning status takes effect at Cover Open/Close. 3.With no automatic concentration compensation . 4.This error is displayed and it stops. Error 613: Black One of the following status. -Something is wrong with the toner sensor. -The toner cartridge is not installed. -The toner cartridge lever is not locked. -The image drum is not installed. (function name) Check Toner Cartridge Toner Sensor Error If the engine setting is Shipping mode, error display appears as this. If the engine setting is Factory mode, Service Call(163) error display appears. Error 543: Black Inappropriate size paper was fed from (function name) a tray. Check the paper in the tray or Open Upper Cover Paper Size Error check for Multiple-feed. In this state, Leisus I/F : OPJAM bit #7 should be '0'. When this error occurred during copy, the copy is aborted. Error:400 Paper jam occurred during paper (function name) feeding from Manual Feed Tray. Check Manual Feeder Error 390 : MANUAL Paper Jam * Manual feeder machinery only (function name) Paper jam occurred during paper Check MP Tray feeding from MP Tray. Paper Jam Error 390 : MP Tray * MPTray machinery only Paper jam occurred during paper (function name) Open Upper Cover feeding from tray. When this error occurred during copy, Paper Jam %TRAY% the copy is aborted. %TRAY% Error 391: Tray1 Error 392 : Tray2 PJLStatus Code 40902(K) 40959(K) 30034 40077 40077 40077 161 / Oki Data CONFIDENTIAL No. Level 156 Error 157 Error 158 Error 159 Error 160 Error 161 Error 162 Error 163 Error 44306601TH Rev. 2 Function Jam has occurred in paper path. Error 380 : Feed Error 381 : Transport Error 382 : Exit Jam has occurred in paper path. Error 389 : Printing Page Lost Status Message (function name) Open Upper Cover Paper Jam (function name) Open Upper Cover Paper Jam The life of the image drum (Alarm) (function name) Warning status takes effect at Cover Install New Image Drum Open/Close. Image Drum Life When this error occurred during copy, the copy is aborted. Error 353: Black The toner cartridge is not installed. (function name) Error 547: Black Check Toner Cartridge Install New Toner Indicates that the black image drum (function name) is not set properly. Check Image Drum Error 343: Black Drum Missing The cover is open. (function name) When this error occurred during copy, Close Cover %COVER% the copy is aborted. %COVER% Error 310 : Upper Cover Error 587: Rear Cover (function name) Indicates that paper feed is unavailable in attempting to print from Install Unit Tray 1 or Tray2 due to removal of the Tray1 or Duplex Unit Open paper cassette of Tray 1 or Duplex Unit . Conditions for display: This occurs at the following random conditions: 1:OKIDUPLEXUNITEXIST=ON and after the page ejection while printing 2:OKIDUPLEXUNITEXIST=ON and under the condition of online When this error occurred during copy, the copy is aborted. (function name) Indicates removal of the paper Copy Canceled cassette of Tray 1 that is a paper path in attempting to print from Tray 2. Tray1 Open Install Paper Cassette (Occurs only when OKIDUPLEXUNITEXIST=OFF) When this error occurred during copy, the copy is aborted. PJLStatus Code 40078 40078 40079 40819 40996(K) 40914(K) 40033(K) 40021 40720 40715 46002 162 / Oki Data CONFIDENTIAL No. Level 164 Error 165 Error 166 Error 167 Error 168 Error 44306601TH Rev. 2 Function Status Message Indicates that paper feed is Copy unavailable in attempting to print from Copy Canceled Tray 1 due to removal of the paper %TRAY% Missing cassette of Tray 1. (Occurs only when Install Paper Cassette OKIDUPLEXUNITEXIST=OFF) When this error occurred during copy, the copy is aborted. %TRAY% Tray1 This message is displayed, when a Copy paper installed in Manual Feeder with Remove Paper Paper Supply setting is %TRAY% . Paper Installed in Manual The message is displayed until Stop Feeder button pressed. Copy Stand-by screen is displayed Press Stop Button after Stop button pressed. %TRAY% Tray1 Tray2 * Manual feeder machinery only Toner amount is low. Displayed in a (function name) combination of other message in the Toner Low first line. In case of MENU”LOW Press Start Button TONER=STOP,” ATTENTION LED blinks and the printer shifts to OFF Line. When an Start button is pushed, or when arbitrary errors occur and the error is canceled, an off-line state is canceled, and printing is continued until it is set to Toner Empty. Copy The error except no-paper occurs while performing the copy. And after Copy Canceled the error is restored, it is waiting for a user to press a key. Press Stop Button If this error occurs during copy execution, the copy under execution is interrupted. Copy No-paper error occurs while Copy Canceled performing the copy. And after the %TRAY% Paper Empty paer is supplied, it is waiting for a user to press a key. Press Stop Button If this error occurs during copy execution, the copy under execution is interrupted. %TRAY% Error 491: Tray1 Error 492: Tray2 Error PJLStatus Code 46012 40749 10081(K) - - 163 / Oki Data CONFIDENTIAL No. Level 169 Error 170 Error 171 Error 172 Error 173 Error 44306601TH Rev. 2 Function Status Message Jam has occurred nearby DUPLEX (function name) unit. Open Rear Cover If this error occurs during copy Paper Jam execution, the copy under execution To Recover, See User's is interrupted. Manual Error 372 : Misfeed from Duplex In the state where the paper is not set Copy to %TRAY% , when the Start button Install Paper in %TRAY% is pushed, it is displayed. Press Start Button to Reading of a document is started by Continue pushing the Start button. By pushing the Stop button, it shifts Press Stop Button to to a Copy standby screen. Cancel When the Start button is pushed in the state where the paper is not set, this message is displayed again. %TRAY% Tray1 Tray2 * MPTray doesn't support Display that the operation of duplex Copy copy can not be started because of Invalid Size for Duplex inappropriate paper size. (function name) This appears during the NIC configuration data is storing into the Wait a Moment Network Configuration flash memory, as the setting was Writing changed. Print Paper feeding is reccomended because the print of back sides(odd Install Paper number pages) is finished during the %TRAY% Duplex Request Manual Duplex print. Paper is feeded from ManualFeeder. PJLStatus Code 40054 45XYY - 30956 40830 164 / Oki Data CONFIDENTIAL No. Level 174 Error 175 Error Function Status Message The media type in the tray and the Print print data do not match. Load paper Change Paper in %TRAY% in tray (It takes a while until the status %MEDIA_SIZE% disappears after you have closed the %MEDIA_TYPE% tray and the lever lifted.) (%TRAY% Press Start Button TrayName,%MEDIA_SIZE%: PaperName.%MEDIA_TYPE%: MediaTypeName) %TRAY% Error 461 : Tray1 Error 462 : Tray2 Paper size displays in Custom mode: "<width>x<length><unit>" ex.) 210x297MM 8.5x11.0INCH The unit of paper size in Custom: The unit specified for measure (menu setting) is used if no unit is specified by the driver. When the driver specifies a unit, the unit is used for display. As a user pressed Start button, the printer could ignore this error at the just printing job. Print The media type in the MPTray and Change Paper in MP Tray the print data do not match. Load paper in MPTray (%MEDIA_SIZE%: %MEDIA_SIZE% %MEDIA_TYPE% PaperName.%MEDIA_TYPE%: Press Start Button MediaTypeName) Paper size displays in Custom mode: "<width>x<length><unit>" ex.) 210x297mm 8.5x11.0inch The unit of paper size in Custom: The unit specified for measure is used if no unit is specified by the driver. When the driver specifies a unit, the unit is used for display. PJLStatus Code 48xyy 480yy Error 460: MP Tray * MPTray machinery only 44306601TH Rev. 2 165 / Oki Data CONFIDENTIAL No. Level 176 Error 177 Error Function Status Message The size of paper or media type in the tray does not match the print data. Load paper in tray (It takes a while until the status disappears after you have closed the tray and the lever lifted.) %TRAY% Error 461: Tray1 Error 462: Tray2 Paper size displays in Custom mode: "<width>x<length><unit>" ex.) 210x297MM 8.5x11.0INCH The unit of paper size in Custom: The unit specified for measure (menu setting) is used if no unit is specified by the driver. When the driver specifies a unit, the unit is used for display. As a user pressed Start button, the printer could ignore this error at the just printing job. The size of paper or media type in the Manual Feeder does not match the print data. Load paper in MP Tray. Paper size displays in Custom mode: "<width>x<length><unit>" ex.) 210x297MM 8.5x11.0INCH The unit of paper size in Custom: The unit specified for measure (menu setting) is used if no unit is specified by the driver. When the driver specifies a unit, the unit is used for display. Print Change Paper in %TRAY% %MEDIA_SIZE% %MEDIA_TYPE% Press Start Button Print Change Paper in MP Tray %MEDIA_SIZE% %MEDIA_TYPE% Press Start Button PJLStatus Code 48xyy 480yy Error 460 : MP Tray * MPTray machinery only 44306601TH Rev. 2 166 / Oki Data CONFIDENTIAL No. Level 178 Error 179 Error Function Status Message Printing request is issued to an empty Print tray. Install Paper Load paper. %TRAY% (It takes a while until the status %MEDIA_SIZE% disappears after you have closed the tray and the lever lifted.) %TRAY% Error 491: Tray1 Error 492: Tray2 The paper size displaying form of the custom mode is the same as above. In this state, Leisus I/F : corresponding bits of both LFTERR and LFTERR2 should be '0' (except MFTray). Printing request is issued to an empty Print Install Paper MPTray. If it goes through a definite period of MP Tray Empty time (PU firmware holds time(3 sec)) %MEDIA_SIZE% Press Start Button after a user places paper, a printer will lift up the multipurpose tray, and will perform re-feeding. If a user pushes the Start button before timeout, the printer perform also re-feeding,. Error 490 : MPTray PJLStatus Code 47xyy 470XX In this state, Leisus I/F : corresponding bits of both LFTERR and LFTERR2 should be '0'. Programmer's note: When the ONLINE button was pressed, the controller (CU) should send MPTPECLR command to the engine (PU). The engine would clear this state after receiving that command. This error is occurred, when the MPTray is in the home position and the sensor "PE SNS2" cannot detect papers. * MPTray machinery only 44306601TH Rev. 2 167 / Oki Data CONFIDENTIAL No. Level 180 Error 181 Error 182 Error 183 Error 184 Error 185 Error 186 Error Function Memory capacity overflows due to the following reason. Press Start Button switch so that it continues.If (Auto Continue) is on, it will automatically continue after 15s. Install expansion RAM or decrease the data amount. - Too much print data in a page. - Too much Macro data. - Too much DLL data. - After frame buffer compress Status Message Print Press Start Button for Restoration Memory Overflow Error:420 Indicates that message data to be Wait a Moment updated is being processed. Message Data Processing Indicates that message data to be Wait a Moment updated is being written. Message Data Writing Indicates that message data to Power Off/On be updated has been written Message Data Received successfully. OK Check Data Indicates that writing of message data to be uploaded has been failed. Message Data Write Error %CODE% %CODE% is a decimal value (one digit) and represents the cause of failure in writing. 1 … Unknown: Cause of failure unknown 2 … DATA_ERROR: Hash check error in data reading/writing, or abnormal FLASH 3 … OVERFLOW: Downloading failure due to FLASH memory full at starting or during writing in a language file 4 … MEMORYFULL: Memory reservation failure 5 … UNSUPPORTED_DATA: Downloading data unsupported on the printer Print Paper feeding is reccomended because the print of back sides(odd Install Paper number pages) is finished during the %TRAY% Duplex Request Manual Duplex print. Press Start Button Paper is feeded from %TRAY%. Display that SMTP server setting isn't Email completed. Check SMTP Address SMTP Address is Empty PJLStatus Code 30097 40825 40826 40827 40828 40832 (Tray1) 40833 (Tray2) 40830 (MP Tray) 40767 Press Stop Button 44306601TH Rev. 2 168 / Oki Data CONFIDENTIAL No. Level 187 Error Function Status Message Display that POP3 server setting isn't Email completed. Check POP3 Address POP3 Address is Empty 188 Error Display that failed to connect with SMTP server. Press Stop Button Email Check SMTP Settings Failed Server Connecton 189 Error Display that failed to connect with POP3 server. Press Stop Button Email Check POP3 Settings Failed Server Connection 190 Error Display that failed to login in SMTP server. 191 Error Display that authentification is unsupported by SMTP server. 192 Error 193 Error 194 Error 195 Error Display that failed to login in POP3 server. Press Stop Button Email Check Login Name or Password SMTP Login Failed Press Stop Button Email Contact Network Admin SMTP Auth. Unsupported Press Stop Button Email Check Login Name or Password POP3 Login Failed Press Stop Button Display that Email sending is failed. Email nnnnnnnnnn: mail server name or IP Sending Failed address of mail server. nnnnnnnnnn Press Stop Button Email Display that memory overflow is occurred during image processing. Sending Canceled Memory Overflow Press Stop Button Display that LDAP Server connection LDAP Check LDAP Settings is failed. Failed LDAP Server Connection PJLStatus Code 40766 40765 40764 40763 40762 40761 40727 40759 40758 Press Stop Button 44306601TH Rev. 2 169 / Oki Data CONFIDENTIAL No. Level 196 Error 197 Error Function Display that failed to login in LDAP Server. Status Message LDAP Check ID or Password LDAP Login Failed Press Stop Button Display that failed to communication LDAP with LDAP Server. Contact Network Admin LDAP Communication Error 198 Error Display that the Serarch Root isn't find out in LDAP Server. Press Stop Button LDAP Check Search Root Setting Search Root Error 199 Error Display that the search is failed by time-out. Press Stop Button LDAP LDAP Server Busy Address Search Time-out 200 Error The entered PIN ID isn't accepted Scan to Email operation. 201 Error 202 Error 203 Error 204 Error 205 Error Press Stop Button Email Contact Admin. Unusable Operation Display that failed to connect with file Network PC Check Server Setting server. Failed Server Connection Press Stop Button Display that failed to login in CIFS or Network PC Check ID or Password FTP server. Server Login Failed Display that file sending is failed. nnnnnnnnnn: file server name or IP address of file server. Display that memory overflow is occurred during image processing. PJLStatus Code 40757 40756 40754 40753 - 40751 40750 Press Stop Button Network PC Sending Failed 40719 nnnnnnnnnn Press Stop Button Network PC Sending Canceled Memory Overflow 40748 Press Stop Button (funtion name) Display that DHCP server isn't find out. Check DHCP Settings Scan to Server operation is unusable. Getting IP Address Failed 40812 Press Left Key 44306601TH Rev. 2 170 / Oki Data CONFIDENTIAL No. Level 206 Error Function Display that failed to connect DNS Server. 207 Error Display that failed to access in directory of FTP server. 208 Error Display that failed to get file list in the directory of FTP server. The file list is used to check that FTP server have the same file name already. Displya that the data transfer type can be changed. (FTP Server) 209 Error 210 Error 211 Error 212 Error Display that the file writing to FTP Server is failed. Status Message (function name) Check DNS Settings Getting Target IP Failed Press Stop Button Network PC Contact Server Admin Entering Directory Failed Press Stop Button Network PC Contact Network Admin Getting File List Failed Press Stop Button Network PC Contact Network Admin Changing Data Transfer Type Failed Press Stop Button Network PC Contact Network Admin File Writing Failed Press Stop Button Display that the file sending is failed Network PC because of FTP Server doesn't have Contact Network Admin enough free space in strage device. Storage Space Full Press Stop Button Display that the file sending is failed Network PC by the wrong file name. (FTP Server) Change File Name File Name Error 213 Error Display that CIFS isn't supported by Server. Press Stop Button Network PC Contact Network Admin CIFS Unsupported 214 Error Display that failed to connect with CIFS Server due to wrong common folder name of network. Press Stop Button Network PC Check Network Share Name Connecting to CIFS Failed 215 Error Press Stop Button Display that failed to make image file Network PC in CIFS server. Contact Network Admin File Writing Failed PJLStatus Code 40752 40718 40745 40744 40743 40742 40741 40740 40739 40737 Press Stop Button 44306601TH Rev. 2 171 / Oki Data CONFIDENTIAL No. Level 216 Error 217 Error 218 Error Function Display that failed file sending to CIFS Server due to unknown reasons. Status Message Network PC Contact Network Admin Connecting to CIFS Failed Press Stop Button The entered PIN ID isn't accepted Network PC Scan to Server operation. Contact Admin. Unusable Operation Displays that failing to connect to PC. Push Scan Stays displayed until the Stop key is Check USB Cable pressed. Connect to PC Failed Press Stop Button Push Scan Contact Admin. Unusable Operation Fax Contact Admin. Unusable Operation (function name) Power Off/On Scanner Memory is Full 219 Error The entered PIN ID isn't accepted Scan to Email operation. 220 Error The entered PIN ID isn't accepted Fax Sending operation. 221 Error While reading a manuscript, it is shown that the buffer in a scanner unit became full. By pushing the Left key, it shifts to a function screen. Press Left Key The invalid command was transmitted (function name) Power Off/On to the scanner. By pushing the Left key, it shifts to a Scanner Invalid Command %TIMING%,%CODE% function screen. Press Left Key %CODE% 0x01 - 0x0F 222 Error 223 Error %TIMING% Command Container Data Container Response Container Invalid container length, protocol type, container type and addition data was transmitted to the scanner. By pushing the Left key, it shifts to a function screen. %CODE% 0x01 - 0x0F (function name) Power Off/On Scanner Invalid Value %TIMING%,%CODE% Press Left Key PJLStatus Code 40736 - 40716 - - 40735 40774 40773 %TIMING% Command Container Data Container Response Container 44306601TH Rev. 2 172 / Oki Data CONFIDENTIAL No. Level 224 Error 225 Error 226 Error 227 Error Function The invalid parameter was set as the command container and it was transmitted to the scanner. By pushing the Left key, it shifts to a function screen. %CODE% 0x01 - 0x0F %TIMING% Command Container Data Container Response Container Invalid data was specified in the data container and it was transmitted to the scanner. By pushing the Left key, it shifts to a function screen. %CODE% 0x01 - 0x0F %TIMING% Command Container Data Container Response Container By specification that the value of container length is larger than a command container, or small, it was transmitted to the scanner. By pushing the Left key, it shifts to a function screen. %CODE% 0x01 - 0x0F %TIMING% Command Container Data Container Response Container It was transmitted to the scanner by specification that the value of container length and addition data length is larger than a data container, or small. By pushing the Left key, it shifts to a function screen. %CODE% 0x01 - 0x0F Status Message (function name) Power Off/On Scanner Invalid Parameter %TIMING%,%CODE% Press Left Key PJLStatus Code 40772 (function name) Power Off/On Scanner Invalid Data %TIMING%,%CODE% Press Left Key 40771 (function name) Power Off/On Scanner Invalid Command Length %TIMING%,%CODE% Press Left Key 40770 (function name) Power Off/On Scanner Invalid Data Length %TIMING%,%CODE% Press Left Key 40769 %TIMING% Command Container Data Container Response Container 44306601TH Rev. 2 173 / Oki Data CONFIDENTIAL No. Level 228 Error 229 Error 230 Error 231 Error 232 Error 233 Error 234 Error Function Transmission and reception of a container were not performed normally. By pushing the Left key, it shifts to a function screen. %CODE% 0x01 - 0x0F %TIMING% Command Container Data Container Response Container Displays that scanner unit is disconnected. CU retry to detect scanner unit after Poer Off/ On. Select function screen is displayed by pressing Left key. Displays that Scanner Fan error is occurred. The busy state of scanner unit reached the timeout. %n% of LCD message is StatusParameter. 'x' of PJLStatusCode is StatusParameter. When a power supply is switched on, it is shown that a reading sensor cannot read the center position of ADF correctly. If equipment is turned on setting a document to Flatbed, this error will occur. The document of Flatbed is removed and it restores by pushing the Start key. Display that failed fax receiving. The message of Fax-R5 is displayed after displaying this message for 3sec. Page: ## specifies the number of scanning pages. nnnnnnnnnn is called fax no. Display that failed fax receiving. This message is displayed until Stop button pressed. Status Message (function name) Power Off/On Scanner Line Error %TIMING%,%CODE% Press Left Key PJLStatus Code 40768 (function name) Power Off/On Check Scanner Detection Failed Press Left Key 40724 Fax Power Off/On Scanner Fan Error 40746 Press Left Key (function name) Power Off/On Scanner Timeout Error %n% Press Left Key (function name) ADF Center Position Error Please remove a document from Flatbed 4079x 40760 Press Left Key Fax Receiving Failed 30954 Page: ## nnnnnnnnnn Fax Receiving Failed 40726 Press Stop Button 44306601TH Rev. 2 174 / Oki Data CONFIDENTIAL No. Level 235 Error 236 Error 237 Error 238 Error 239 Error 240 Error 241 Error 44306601TH Rev. 2 Function Status Message Display that memory overflow is Fax occurred during fax receiving. Receiving Failed The storeed fax received data can be Memory Overflow printed out. Press Stop Button Display that Fax board interface error PC Fax occurred. Power Off/On Fax board I/F Error Display that failed Fax Modem (function name) sending. Sending Failed The message of Fax-S32 is displayed after displaying this message for Page: ## 3sec. nnnnnnnnnn Page: ## specifies the number of scanning pages. nnnnnnnnnn is sending fax no. Display that failed Fax Modem (function name) sending. Sending Failed This message is displayed until Stop button pressed. Page: ## specifies the number of Press Stop Button scanning pages. nnnnnnnnnn is sending fax no. (function name) Display that Fax firmware wasn't downloaded in Fax board. Check Fax Firmware Fax Firmware Error (function name) Display that memory overflow Memory Overflow is occurred during PC Fax Job receiving. Return to Mode Selection screen by Press Stop Button the pressing Stop button. Telephone Display that deteced Off Hook of external phone during Fax stand-by Wait a Moment status. Fax stand-by screen is displayed after On Hook detected. PJLStatus Code 40725 40730 30953 40728 40811 40778 30957 175 / Oki Data CONFIDENTIAL (2) Service Call Error The service call error list is recording in Table 7.5.3. Table 7.5.3 service call error list Display Cause Details of error Method Service call Machine Check 001: Error Exception Is the error message displayed again? Service call CPU Excepption 002: Error 005: Error Is the error message displayed again? Yes No If the RAM DIMM is mounted, remove it and turn the power supply Off/On. Yes Replace 86M board No Remount RAM DIMM Replace RAM DIMM Service call Floating-point 006: Error Unavailable Exception Is the error message displayed again? Service call Instruction 007: Error Address Breakpoint Exception Is the error message displayed again? Service call CU ROM Hash 020: Error Check Error (resident or ROM slot 1) Is the error message displayed again? Yes No Yes No Yes No Service call CU Font ROM 023: Error Hash Check Error (resident) Is the error message displayed again? Yes No Service call CU Font ROM 024: Error Hash Check Error (slot 1) Is the error message displayed again? Service call CU RAM 030: Error Check Error Is the error message displayed again? Service call CU Optical RAM Is RAM DIMM mounted normally? 031: Error Check Error Does it restore by exchanging RAM DIMM? If the RAM DIMM is mounted, remove it and turn the power supply Off/On. Replace 86M board Remount RAM DIMM Replace RAM DIMM Yes No If the RAM DIMM is mounted, remove it and turn the power supply Off/On. Replace 86M board Remount RAM DIMM Replace RAM DIMM If the RAM DIMM is mounted, remove it and turn the power supply Off/On. Replace 86M board Remount RAM DIMM Replace RAM DIMM If the RAM DIMM is mounted, remove it and turn the power supply Off/On. Replace 86M board Remount RAM DIMM Replace RAM DIMM If the RAM DIMM is mounted, remove it and turn the power supply Off/On. Replace 86M board Remount RAM DIMM Replace RAM DIMM If the RAM DIMM is mounted, remove it and turn the power supply Off/On. Replace 86M board Remount RAM DIMM Replace RAM DIMM Power supply Off/On Yes Replace 86M board No Remount RAM DIMM Yes Replace RAM DIMM No Replace 86M board Service call RAM 034: Error Configuration Error 44306601TH Rev. 2 176 / Oki Data CONFIDENTIAL Display Cause Service call CU EEPROM 040: Error Error Details of error Is the error message displayed again? Service call CU Flash Error 041:Error Flash ROM Error Is the error message displayed on the CU board again? Service call Flash File System Error 042: Error Method Power supply Off/On Yes Replace 86M board Power supply Off/On Yes Replace 86M board The compulsive initialization of Flash is done. (Because NICFirmware is deleted, please be careful to it. After initialization, it is necessary to write NIC-Firmware by the maintenance utility).FLASH FORMAT is executed by using the maintenance utility.If the symptom doesn't change, replace the 86M board. It failed to the access to CU Flash ROM that is attached to the 86M board directly. 043: Error Service call Flash File 045: Error System Recovery Failed Is the error message displayed again? Service call PS Protection 048: Error A PS ROM was installed in the Non-PS device. Service call PCI Driver Open 063: Error error Yes Replace 86M board In MB470/MB480, the same error can occur when the LED Head is missing. Is the LED Head connected properly? No Reconnect correctry Yes Replace 86M board Is the error message displayed again? Yes Service call NIC Combination 065: Error Error Service call FAX 066: Error Combination Error Service call PostScript 070: Error Internal Error 44306601TH Rev. 2 Power supply Off/On Replace 86M board Replace 86M board Is FX-5 board used? No use FX-5 board. Is the error message displayed again? Yes Power supply Off/On Replace 86M board Service call Engine I/F Error 072: Error I/F Error between PU and CU Service call Video Error 073: Error When the image data sprads, defect is detected. (Incorrect data receive) Power supply Off/On Replace 86M board Replace 86M board Does the error recur? Change the PC to high spec or lower the resolution, and then print again. Yes Replace 86M board 177 / Oki Data CONFIDENTIAL Display Cause Details of error Method Service call Video Error 074: Error When the image 075: Error data spreads, defect is detected. Replace 86M board Service call Difference 081: Error between version of CU firm and EEPROM Does the error recur? Do EEPROM Initialization. (Turn on the power supply by Cover-open & pressing START key & pressing CANCEL switch). Because the Mac address will disappear with this initialization, lease reset Mac address by using the maintenance utility. Yes Replace 86M board Service call EngineEEPROM 104: Error mounting check Does the error recur? is OK with turning on the power supply, after that, lead/light error is detected Power supply Off/On Yes Replace 86M board Service call Engine 105: Error EEPROM mounting check error when the power supply is turned on. Does the error recur? Power supply Off/On Yes Replace 86M board Does the error recur? Power supply Off/On Yes Replace 86M board Service call The engine 106: Error control logic is abnormal Service call 86M Board Fan 120: Error Motor Error refer to 7.5.2 Service call High-voltage Is the cable between 86M board and No Reconnect correctly. 121: Error power supply I/F the high-voltage power supply unit Yes Check the defective contact point error correctly connected? of high-voltage system. Isn't there defective contact point? No Replace the high voltage power supply. Service call Power Supply 122: Error Fan Motor Error Service call Environmental 123: Error humidity abnormal/ humidity sensor disconnection Service call Environmental 124: Error temperature abnormality 44306601TH Rev. 2 Is the cable between the 86M board and the high-voltage power supply unit correctly connected? No Reconnect correctly. Yes Replace the high-voltage power supply. Does the error recur? Yes Power supply Off/On Check the connector connection of Thermistor. Replace Thermistor or 86M board. 178 / Oki Data CONFIDENTIAL Display Cause Details of error Method Service call The dewy of 126: Error the device is detected Dew condensation occurs easily after the device is carried in from outside. After leaving it at room temperature for 2 hours to half a day, turn on the power again. Does the error recur? Yes Turn on the power again after leaving the device for hours. Replace the high-voltage power supply. Service call LED head 134: Error detection abnormality Is the LED head installed correctly? No Service call Defective fuse 153: Error cutting of ID unit Is the ID unit installed correctly? Does the error recur? Does the error recur? Does LED HEAD FUSE cut? Does the error recur? Service call Defective toner Is the toner cartridge installed? 163: Error sensor detection. Is the lock level of toner set? It does not occur during shipping Does the error recur? setting Does the error recur? Does the error recur? Install the LED head correctly Check LED HEAD FUSE Yes Replace FUSE Yes Turn on the power supply gain No Replace the LED head unit Yes Please refer to chapter 7.6 for replace method of FUSE Replace 86M board No Installed ID unit again Yes Turn on the power supply again Yes Replace 86M board after check the connector connection of high voltage power supply. Replace 86M board. No No Install a toner cartridge. Turn the lock lever of toner cartridge to the fixed position. Yes Remove the right side cover, take measures to prevent the right side of the device from being exposed to ambient light, and confirm that the toner sensor is lighted during initialization of the device. Yes Reconfirm it after replacing the toner sensor Assy. Yes Replace the 86M board. Service call Thermistor 167: Error Slope Error Is the error message displayed? Does the error recur? Yes Turn on the power supply again Yes Turn on the power supply again after storage for 30 minutes. Service call Compensation. 168: Error Thermistor Error Is the error message displayed? Does the error recur? Yes Turn on the power supply again Yes Turn on the power supply again after storage for 30 minutes. Note) Service call Upper Side 169: Error Thermistor Error Is the error message displayed? Does the error recur? Yes Turn on the power supply again Yes Turn on the power supply again after storage for 30 minutes. Service call Thermistor Short 170: Error circuit / Open 171: Error circuit of the fuser is detected refer to 7.5.2 Service call Thermistor 172: Error Temperature 173: Error abnormality (high or low) of the fuser is detected refer to 7.5.2 44306601TH Rev. 2 179 / Oki Data CONFIDENTIAL Display Cause Details of error Method Service call The short circuit 174: Error of the backup roller. Thermistor is detected. (For the high temperature) refer to 7.5.2 Service call The open circuit 175: Error of the backup roller. Thermistor is detected. (For the low temperature) refer to 7.5.2 Service call Temperature 176: Error abnormality (high 177: Error or low) of the backup roller thermistor was detected refer to 7.5.2 Service call Tray2 Unit I/F 182: Error Error refer to 7.5.2 Service call System memory 190: Error overflow Does the error recur? Turn on the power supply again. Yes Install an additional RAM DIMM. Service call PU Firmware 200: Error Download Error 201: Error 202: Error Error occurs when the PU firmware is rewritten After the power supply is turned on again, try to download again. (Because this processing is not performed during usual operation, it does not occur.) Service call Custom Media 209: Type table Down Load download failure Error Failed in downloarding Custom Media Type Table After the power supply is turned on again, try to download again. (Because this processing is not performed during usual operation, it does not occur.) Service call 203: Error 204: Error 207: Error 208: Error 213: Error 214: Error F0C: Error FFE: Error FFF: Error Incorrect processing is performed by the CU program. Does the error recur? Turn on the power supply again. CU program trouble (203~214 are not generated in usual operation) Service call TONER Reader 230: Error not Installed TONER reader Device error. Does the error recur? 44306601TH Rev. 2 Replace 86M board. Yes Check the connector connection of CN3 on the high voltage power supply. Yes Replace the 86M board after check the connector connection of HVIF on the 86M board. 180 / Oki Data CONFIDENTIAL Display Cause Service call TONER Reader 231: Error I/F Error Details of error TONER reader I/F error. Does the error recur? Service call Engine Program. 240: Flash Memory 240: Error Memory Error Hardware Error Method Yes Check the connector connection of CN3 on the high voltage power supply. Yes Replace the 86M board after check the connector connection of HVIF on the 86M board. If the error occurs again after returning on the power supply, replace the board of the unit. Service call Short circuit Does the error recur? 905: Error error of the 906: Error Frame thermistor (thermistor defect) is detected Yes Turn on the power again. Replace the fuser unit. Replace the 86M board. Service call High Does the error recur? 907: Error temperature error of the frame thermistor (over 150)is detected Yes Turn on the power again. Replace the fuser unit.Replace the 86M board. Service call Low temperature Does the error recur? 908: Error error of the Frame thermistor (lower than [environment temperature -10]) is detected Yes Turn on the power again. Replace the fuser unit. Replace the 86M board. Service call Duplex Fan-0 918: Error Alarm Detection 923: Error Image Drum Lock Error The ID motor does not rotate Check if the ID unit is set correctly. correctly. Is the error message displayed when Yes Replace the ID unit. the power is turned on again? Yes Replace the ID motor. Service call Fuser Motor Lock 928: Error Error Service call Media coiling Media is coiled to the fuser 980: Error error to the fuser 44306601TH Rev. 2 Turn Off the power supply. Replace the fuser. 181 / Oki Data CONFIDENTIAL Display Cause Details of error Service call Difference 981: Error between PU Does the error recur? model version detected and CU model version detected High-voltage power supply I/F error when initializing 86M board SRAM error Turn Off/On the power supply. Yes Replace the 86M board. Is the cable between 86M board and No Reconnect correctly.Check the the high-voltage power supply unit Yes defective contact point of highcorrectly connected? voltage system. Isn’t there defective contact point? Replace the high voltage power No supply. Does the error recur? CRC check error After PU data is downloaded (PU of PU download fireware, custom media data, head data correction data), CRC check error is detected. 86M board Flash ROM hash check Does the error recur? error Service call 86M board Flash 981: Error ROM writing error Does the error recur? The communication error with ASIC on the CU board is detected Method Turn Off the power supply again Yes Replace the 86M board After the power supply is turned on again, try to download again. (Because this processing is not performed during usual operation, it does not occur.) Turn on the power supply again Yes Replace the 86M board After the power supply is turned on again, try to download again. (Because this processing is not performed during usual operation, it does not occur.) Replace the 86M board. Note! Because service call 168 error ,171 error and 175 error may occur when the temperature of printer is below zero, please restart the printer after making it warm when the temperature of printer is low. 44306601TH Rev. 2 182 / Oki Data CONFIDENTIAL 7.5.2 LCD Message Troubleshooting If you still have trouble even after using the LCD Status Message/ Trouble List, follow the troubleshooting flowchart displayed below to solve the trouble. Tablez7.5.4 No. Trouble 1. The MFP does not work normally after tuning on the power. 2. Jam Alert Paper feed jam Paper path jam Paper ejection jam 3. Paper size error 4. Fuser unit error 5. SSIO (Synchronized serial input and output) between Printer and Option Tray (Second Tray unit) Error interface time out (No response) 6. Fan error 44306601TH Rev. 2 Flowchart No. 183 / Oki Data CONFIDENTIAL The case where the MFP does not work normally after tuning on the power • Turn off the power and then, turn on the power again. • Is the "OKI" logo displayed? • NO Is the AC cord properly connected? • NO • Yes Connect the AC cord. Fig 7.5.1 Is the cable to connect the main board with the low-voltage power correctly connected? • No Connect the cable. • Yes Is +5V supplied to the main board? (Check with 18 pins and 35 pins of CENT connector) • No Do+5V of the main board and GND short out? (Check with 18 pins and 35 pins of CENT connector) • Yes No • Yes Replace the main board. Replace the low-voltage power. Is the cable to connect the main board with the scanner unit correctiy connected? • No • Yes Connect the scanner cable appropriately. Replace the scanner unit. • Has the problem been solved? • No • Yes • Yes Completed Is the message of "INITIALIZING" displayed on the LCD? • No • Yes 44306601TH Rev. 2 Replace the main board. Is the message of "FUNCTION" is displayed on the LCD? • No • Yes Replace the main board. Fig 7.5.2 Take action according to the LCD status message/ Trouble List. (Refer to the Section 7.5.1 for how to take action.) Completed. 184 / Oki Data CONFIDENTIAL Error number and jam location at paper jam Table 7.5.5 Name Tray1 paper feed jam Tray2 paper feed jam Manual/MPT paper feed jam Paper transport jam Paper transport jam Paper size error Paper transport jam Exit (paper eject jam) Exit (paper eject jam ( operating )) Duplex paper feed jam Scanner ADF jam Reference J1 J2 J3 J4 J5 J6 J7 J8 J9 J10 Corresponding IN IN IN WR WR , OUT WR , IN IN , WR WR , OUT EXIT IN Jam release method Jam release method Jam release method Jam release method Jam release method Jam release method Jam release method Jam release method Jam release method Jam release method Jam release method Jam release method Diagram of jam location J8(paper eject jam) J9(paper eject jam(operating)) Eject Roller J4(Paper transport jam) J6(Paper size error) J5(Paper transport jam) J7(Paper transport jam) Pressure Roller Heat Roller OUT sensor Backup Roller J3(Manual/MPT paper feed jam) Image Drum Transfer Roller WR sensor Resist Roller Duplex IN sensor J10 Tray1 Tray1 Feed Roller J1(Tray1 paper feed jam) Tray2 Tray2 Feed Roller J2(Tray2 paper feed jam) Fig 7.5.3 44306601TH Rev. 2 185 / Oki Data CONFIDENTIAL Jam Release Method Remove the jammed paper. Paper Tray Part [paper feed jam] (1) (2) (3) Remove the paper tray from the printer. Remove any crumpled or folded paper. Remove any paper from the underside of the printer. Fig 7.5.4 Jam Release Method MP Tray Part [ paper feed jam] Note! Even if paper can be seen, when the paper can't be remove smoothly, the paper should be removed inside the printer. The fuser might be damaged if drawing the paper out from behind with too much force. (1) Draw the paper out slowly. Fig 7.5.5 44306601TH Rev. 2 186 / Oki Data CONFIDENTIAL Jam Release Method Printer inside Part [ paper transport jam] Possible to get burned. The fuser unit is extremely hot. Be careful not to touch it. If the fuser unit is hot, do not try yourself to clear paper but wait until the fuser unit becomes cool. (1) Lift the scanner. (2) Open the Stacker-cover-Assy. (3) Touch the screw by hand to remove the static. Screw Fig 7.5.6 (4) Take the image drum out, and put them on a table with flat surface. (5) Cover the taken-out image drum cartridge with black paper. Note! • The image drum surface (green cylinder unit) is very delicate. Please handle with care. • Never expose the image drum cartridge to direct sunlight or very bright light (more than 1500 lux). Do not expose it to normal room light for more than 5 minutes. Image drum cartridge Black paper Fig 7.5.7 44306601TH Rev. 2 187 / Oki Data CONFIDENTIAL (6) Carefully remove the jammed paper. When the front end of the paper can be seen Carefully remove the jammed paper inside the printer. Fig 7.5.8 When the front and back end of paper cannot be seen Carefully remove the jammed paper in the direction of the arrow. Fig 7.5.9 When the back end of paper can be seen Press the release lever in the direction of the arrow, and carefully remove the jammed paper. Fig 7.5.10 (7) Put the image drum cartridge back into position. 44306601TH Rev. 2 188 / Oki Data CONFIDENTIAL Jam Release Method Exit part [paper eject jam] Note! Even if paper can be seen, when the paper can't be remove smoothly, the paper should be removed inside the printer. The fuser might be damaged if drawing the paper out from behind with too much force. If the front end can be seen (1) (2) Lift the scanner. Draw the paper out slowly from the exit. Fig 7.5.11 44306601TH Rev. 2 189 / Oki Data CONFIDENTIAL If the front end can,t be seen (1) (2) Open the Cover-face up. Draw the paper out slowly. Cover-face up Fig 7.5.12 Open the Cover-face up , If the rear end can't be seen. (1) (2) (3) (4) (5) Close the Cover-face up. Lift the scanner. Open the Rear cover. Open the Stacker-cover-Assy. Draw the paper out slowly . Fig 7.5.13 44306601TH Rev. 2 190 / Oki Data CONFIDENTIAL Jam Release Method Duplex Unit Part [ paper feed Jam ] (1) Remove the duplex unit and check for any paper in this area . Remove any paper and replace the duplex unit . (2) If the paper is difficult to remove , push the cover in the arrow direction , raise it and remove the paper. Fig 7.5.14 Jam Release Method Scanner Unit Part [ ADF Jam ] (1) Open the ADF Top Cover. Fig 7.5.15 44306601TH Rev. 2 191 / Oki Data CONFIDENTIAL (2) Pinch the ADF lock lever and turn the Kernel Assy up until it is locked. Fig 7.5.16 (3) Gently pull out the paper to the direction of the arrow. Caution! Be sure not to pull out the paper swiftly, as it might be damaged. Fig 7.5.17 (4) Get back the Kernel Assy to the initial position. (5) Close the ADF Top Cover. (6) Press the stop button to restore the MFP. 44306601TH Rev. 2 192 / Oki Data CONFIDENTIAL [Jam Error] -1 Paper feed jam • Does a jam error occur when turning on the power? • Yes Is there any paper in the entrance sensor? • Yes • No Remove the paper Does the entrance sensor lever work normally? (It moves freely by touching.) • No • Yes Replace the entrance sensor lever. Clean the entrance sensor of the sensor board or high-voltage power, or replace the high-voltage power/ sensor board. A jam error occurs after feeding paper. • No • Yes Is the paper sent to the entrance sensor lever? • Yes Does the entrance sensor lever work normally? (It moves freely by touching.) • No • Yes • No • No Replace the entrance sensor lever. Clean the entrance sensor of the sensor board or high-voltage power, or replace the high-voltage power/ sensor board. Replace the paper feed roller, pick-up roller or paper cassette. Does the paper feed roller rotate? • Yes • No Set the paper cassette appropriately. Does the paper feed clutch work normally? • Yes • No Replace the paper feed roller and shaft. Is HCLT connector of the main board appropriately connected? • No • Yes Connect HCLT connector appropriately. Is the coil resistance of the paper feed clutch (Normal resistance: Pin1, Pin2, and approx. 192 ) normally? Paper ejection roller • No • Yes Replace the paper feed clutch. Ejection sensor Replace the main board. Heat roller The sensors mounted on High voltage power board are Writing sensor, Entrance sensor, and Toner sensor. Paper feed orientation Transfer roller Toner sensor Write sensor Entrance sensor Paper-end sensor Regist roller Feed roller Pick-up roller Fig 7.5.18 44306601TH Rev. 2 193 / Oki Data CONFIDENTIAL [Jam Error] -2 Running jam • Does a jam error occur when turning on the power? • Yes Is there any paper in the write sensor? • Yes • No Does the write sensor lever work normally? (It moves freely by touching.) • No • Yes • No Remove the paper. Replace the paper sensor plate. Replace the high-voltage power/ sensor board. Does the paper reach the write sensor lever? • No Does the paper feed roller rotate? • No • Yes Is the image drum cartridge appropriately set? • No • Yes Replace Paper Feed Roller or Paper Feed Clutch. Set the image drum cartridge appropriately. Does the paper reach the ejection sensor lever? • Yes Does the ejection sensor lever work normally? (It moves freely by touching.) • No • Yes • No Replace the ejection sensor lever. Clean the ejection sensor or replace the parts. Does the main drum motor rotate? • No Is the DM connector of the main board connected appropriately? • No • Yes • Yes Connect DM connector appropriately. Replace the main drum motor. Or Replace the main board. Doe the transfer roller rotate? •No • Yes Check the gear. (Transfer roller gear, drum gear at the left of drum cartridge) Is the fuser unit Assy appropriately installed. • No • Yes Install the fuser unit Assy. The image drum cartridge is appropriately set. • No • Yes 44306601TH Rev. 2 Set the image drum cartridge appropriately. Clean the high-voltage power/ the write sensor of the sensor board, or replace the high-voltage/ sensor board. 194 / Oki Data CONFIDENTIAL [Jam Error] -3 Ejection Jam • Does an ejection jam error occur when turning on the power? • Yes Is there paper in the ejection sensor lever? • Yes • No Does the ejection sensor lever work normally? (It moves freely by touching.) • No • Yes • Yes Remove the paper. Replace the ejection sensor lever. Clean the ejection sensor or replace the parts. Is the paper ejection roller appropriately installed? • No • Yes Install the paper ejection roller appropriately. Is the paper ejection sprint appropriately installed? • No • Yes 44306601TH Rev. 2 Install the paper ejection sprint appropriately. Replace Cover-Assy Rear or fuser unit Assy. 195 / Oki Data CONFIDENTIAL Paper Size Error • Is the paper which is specified size used? • No • Yes Use a specified-size paper. Does the entrance sensor lever work normally? (It moves freely by touching.) • No • Yes Replace the entrance sensor lever, or clean the high-voltage power/ the entrance sensor of the sensor board. Does the write sensor lever work appropriately? (It moves freely by touching.) • No • Yes Replace the write sensor lever, or clean the high-voltage power/ the entrance sensor of the sensor board. Replace the high-voltage power/ the entrance sensor of the sensor board. Paper ejection roller Ejection sensor Heat roller Paper feed orientation Transfer roller Toner sensor Write sensor Entrance sensor Paper-end sensor Regist roller Feed roller Pick-up roller The sensors mounted on High voltage power board are Writing sensor, Entrance sensor, and Toner sensor. Fig 7.5.19 44306601TH Rev. 2 196 / Oki Data CONFIDENTIAL Fuser unit Assy (Error 170) (Error 171) (Error 172) (Error 173) • Is the thermistor connector normally inserted in the CN2 connector of the high-voltage power/ sensor board? • No • Yes Insert the Thermistor connector correctly. Is the heater connector normally inserted in the CN1 connector of the low-voltage power. • No • Yes Insert the heater connector appropriately. Is the heater ON when turning on the power? • No • Yes Replace the fuser unit Assy, low-voltage power or main board. Replace the fuser unti Assy or the main board. Heat connector Thermistor connector Fig 7.5.20 44306601TH Rev. 2 197 / Oki Data CONFIDENTIAL Interface Error (Error 182) • Is the Second Tray unit used? • Yes Is the printer main body appropriately set on the Second Tray unit? • No • Yes Set the printer main body appropriately. Replace the main board. • Has the trouble been solved? • No • Yes • No Check the trouble according to the maintenance manual of the Second Tray unit of the appendix C. Completed. Replace the main board. Fan Error (Error 120) • Does the fan rotate? • Yes • No Replace the main board. Is the fan connector of the high-voltage power/ sensor board connected? • No • Yes Connect the fan connector appropriately. Does F3-fuse of 86M board open? • Yes • Yes 44306601TH Rev. 2 Change the F3-fuse. Replace the fan or main board. 198 / Oki Data CONFIDENTIAL 7.5.3 Print Troubleshooting The troubleshooting procedure of abnormal printing is described as follows. The typical abnormal printing is shown in the following Fig 7.5.21. Table 7.5.6 Trouble Flowchart number Pale printing or the whole printing is faded. (Fig 7.5.21 The white section is dirty. (Fig 7.5.21 White paper is outputted (Fig 7.5.21 ) ) Vertical black belt/ Black line (Fig 7.5.21 Periodic failure (Fig 7.5.21 ) ) ) A part of printing is extracted Inefficient fusing (when touching the printed sheet, printed characters or image is faded or come off.) Vertical white belt/ White line (Fig 7.5.21 ) Pale printing or the whole printing is faded The white section is dirty White paper Vertical black belt/ Black line Periodic failure Vertical white belt/ White line Fig 7.5.21 44306601TH Rev. 2 199 / Oki Data CONFIDENTIAL Pale printing or the whole printing is faded. • Does the printer lack toner? (Is the message of Toner Low displayed?) • Yes • No Supply the toner. LED head cable Is specified paper used. • No • Yes Use specified paper. Is the lens of the LED head dirty? • Yes • No LED head Clean the lens. PC connector Is the LED head appropriately installed? (Check that the HEAD connector of the main board and the PC connector of the LED head are appropriately connected.) • No • Yes HEAD Main board Fig 7.5.22 Install the LED head appropriately. Is the contact plate of the transfer roller appropriately connected to the high-voltage power/ te contact assembly of the sensor board. (See Fig 7.5.25) Adjust the contact plate of the transfer roller so that it can be connected to the transfer roller shaft. • No • Yes Are the contact of the developing roller and toner supply roller of the image drum cartridge appropriately connected to the contact assembly? (See Fig 7.5.23 and ) • No • Yes Adjust so that the contacts of the developing roller and toner supply roller are connected to the contact assembly. Replace the transfer roller. • Has the trouble been solved? • Yes • No Completed Replace the image drum cartridge. • Has the trouble been solved? • Yes • No Completed Are the surface status of the back up roller and the installation of the bias spring of the back-up roller appropriate? • No • Yes 44306601TH Rev. 2 Replace the back-up roller or bias spring. Replace the main board, high-voltage power/ sensor board. 200 / Oki Data CONFIDENTIAL The white section is dirty • Is the image drum exposed by the external light? • Yes • No Install the image drum in the printer and wait 30 minutes. Perform the cleaning page function. (See the section 6.2.1) • Has the trouble been solved? • Yes • No Completed. Is the heat roller of the fuser unit assy dirty? • Yes • No Clean the heat roller. Is the cleaning roller contact of the image drum cartridge appropriately connected to the contact assembly? (See Fig 7.5.23 ) • No • Yes Adjust so that the cleaning roller contact can be properly connected to the contact assembly. Replace the image drum cartridge. • Has the trouble been solved? • Yes • No Completed. Replace the main board, high-voltage power/ sensor board. White paper is outputted • Is the LED head appropriately connected? (Check the HEAD connector of the main board and the PC connector of the LED head.) • No • Yes Connect the LED head appropriately or replace the head cable. Is the image drum cartridge appropriately connected to the earth contact? (See Fig 7.5.23 ) • No • Yes Adjust the earth contact (drum) of the contact assembly. Replace the LED head. • Has the trouble been solved? • Yes • No 44306601TH Rev. 2 Completed. Replace the main board, high-voltage power/ sensor board. 201 / Oki Data CONFIDENTIAL Vertical black belt/ Black line • Perform the Cleaning page function. (See the section 6.2.1) • Has the trouble been solved? • Yes • No Completed. Replace the image drum cartridge. • Has the trouble been solved? • Yes Completed. • Clean the LED lens array of the LED head. • Has the trouble been solved? • Yes • No Completed. Replace the LED head. • Has the trouble been solved? • Yes • No Completed. Replace the main board, high-voltage power/ sensor board. Periodic failure Table 7.5.7 Cycle Handling Image Drum 94.37mm Replace or clean the image drum cartridge. Developing roller 44.70mm Replace the image drum cartridge. Toner supply roller 70.30mm Replace the image drum cartridge. Charging roller 29.84mm Replace the image drum cartridge. Cleaning roller 24.84mm Replace the image drum cartridge. Transfer roller 51.68mm Replace the transfer roller. Heat roller 63.15mm Replace the fuser unit Assy. Back-up roller 69.40mm Replace the back-up roller. 44306601TH Rev. 2 202 / Oki Data CONFIDENTIAL In case of error printing • Does the contact plate of transfer roller contact power/sensor board properly. (See Fig 7.5.25) • No Adjust the contact plate to contact power/sensor board and transfer roller shaft properly. • Yes Replace transfer roller. • Has the problem been solved? • Yes • No Completed Is LED Head installed properly? (Check the HEAD connector of main board and PC connector of LED Head.) • No • Yes Install LED Head properly. Replace LED Head or Head cable. • Has the problem been solved? • Yes • No Completed Replace the Main board or High voltage power/sensor board. In case of inefficient fusing (If touch by hand the character or image that are printed on paper will be faded or unstuck.) • Is the specified paper used? • No Use the specified paper. • Yes Is the tension of Back up roller (7.52kg) and the surface of Back up roller normal? • No • Yes Replace Back up roller or bias spring. Dose the contact point of Fuser Assy contact the contact assembly properly. (See Fig 7.5.24 ) Adjust the contact point of Fuser Assy to contact the contact assembly properly. • No • Yes Replace Fuser Assy. • Has the problem been solved? • Yes • No 44306601TH Rev. 2 Completed Replace Main board or High voltage power/sensor board. 203 / Oki Data CONFIDENTIAL Vertical white belt/ White line • Is the LED lens dirty? • Yes • No Clean the LED lens. Is the contact plate of the transfer roller appropriately connected to the high-voltage power / sensor board? (See Fig 7.5.25) •No • Yes Adjust so that the contact plate can be appropriately connected to the highvoltage power / sensor board. Replace the transfer roller. • Has the trouble been solved? • Yes • No Completed. Are the surface status of the back-up roller and the installation of the bias sprint of the back-up roller appropriate? • No • Yes Replace the back-up roller or the bias spring. Is the LED head appropriately installed? (Check the HEAD connector of the main board and the PC connector of the LED head.) Install the LED head appropriately. • No • Yes Replace the LED head. • Has the trouble been solved? • Yes • Yes Completed. Replace the image drum cartridge. • Has the trouble been solved? • No 44306601TH Rev. 2 Replace the main board, high-voltage power/ sensor board. 204 / Oki Data CONFIDENTIAL r ing arg rolle Ch ) Drum r ( h t Ear rolle r D eaning rolle er l Cl ing rol lop ply C e v p De r su e n B To A Contact E Fig 7.5.23 Earth(Fuser) Fig 7.5.24 Fig 7.5.3 44306601TH Rev. 2 205 / Oki Data CONFIDENTIAL Contact plate for Transfer Contact High-voltage power / sensor board Fig 7.5.25 44306601TH Rev. 2 206 / Oki Data CONFIDENTIAL 7.5.4 Response after Flash compulsive initialization Explain the response after compulsive initialization is performed with trouble occurred in Flash. (1) Flash compulsive initialization If Flash compulsive initialization is performed, the following data would be deleted and the network and fax would not be available. • • • • • • NIC-Firmware WebPage data FAX-Firmware Log data Address data Message data It is necessary to write above Firmware and data into Flash by the maintenance utility. Note! Do not carry it out usually. 44306601TH Rev. 2 207 / Oki Data CONFIDENTIAL 7.5.5 Network Troubleshooting (1) Cannot print from Utility. Table 7.5.8 Confirmation Items Confirmation Tasks Action at NG (1) Checo the LINK iamp. heck whether LINK C lamp(green) is lighted. Check whether HUB and printer are connected normally. (Check the network cable connection.) Reconnect the network cable normally. Check whether straight cable is used. Replace with straight cable. Try to insert the network cable into different HUB port. Try to replace the HUB. Press the Push-SW of NIC card, and then print out the network information. Rewrite the NICFirmware by utility. (2) Check the network information. Check whether network information can be printed normally. (3) Check the content of network information Check IP address, Subnet mask, Gateway address. Print out the network information. Check IP address, Subnet mask, Gateway address. Set the IP address, Subnet mask, Gateway address correctly. (4) Check whether the communication on the network is normal. Send the Ping command from PC to printer to check the Ping command from PC to printer, and check Send whether the response is correct. Set the IP address, Subnet mask, Gateway address correctly. Check the setting items of OKIPR utility. Set the setting items of OKIPR utility correctly. Set windows (NT, 2000,XP) standard LPR port, and check whether print is normal. Set windows (NT, 2000,XP) standard LPR port correctly. (5) Check the utility Check the settings of OKIPR utility. (6) Check the OS standard port. Check windows (NT, 2000,XP) standard LPR port. 44306601TH Rev. 2 208 / Oki Data CONFIDENTIAL 7.5.5.1 Connection error occurs with the Web browser If the printer setting page cannot be displayed by the web browser ”https://<printer IP address>”, check the followings. Establish connection by ”https://<printer IP address>. 1) If the printer setting page is displayed, the followings are probable. Take an appropriate measure by referring to the following items. * * 2) Certificate is not created yet. (Or failed to create certificate.) Refer to section “7.5.5.1.1 Is the certificate created?”. Certificate has been created but the SSL/TLS setting is turned off. Refer to section “7.5.5.1.2 Is the certificate created?”. If the printer setting page is displayed, the followings are probable. * * * Version number of the browser is old. Refer to section “7.5.5.1.3 Check version number of the Web browser”. Encryption strength has been set to Strong. Refer to section “7.5.5.1.4 Confirm encryption strength of a printer”. The key exchange system of a printer is not supported by the browser. (Compatibility problem). Refer to section “7.5.5.1.5 Check the key exchange type of the certificate”. 7.5.5.1.1 Is the certificate created? Log-on in as the administrator, and select “Security” “Encryption (SSL/TLS)”. If the following screen is displayed, certificate of the printer is not created yet. (The same screen is displayed when failed to create certificate.) Solution: Create certificate by referring to the User’s Manual (Advanced edition). Before creating certificate (default state) Fig 7.5.26 44306601TH Rev. 2 209 / Oki Data CONFIDENTIAL 7.5.5.1.2 Is the certificate created? Log-on in as the administrator, and select “Security” “Encryption (SSL/TLS)”. If the following screen is displayed, certificate has already been created, but the SSL/TLS setting is turned [OFF]. Solution: Set the SSL/TLS setting to [ON]. Fig 7.5.27 7.5.5.1.3 Check version number of the Web browser.” Check version number of the Web browser in use. How to check version number. For Internet Explorer Launch the browser and select “HELP” “Version information”. Recommended version is Internet Explorer 5.5 and higher. Solution: Install the newest web browser. Alternately, install the high encryption pack. If any version that is older than the recommended version is used, communication can become possible sometimes when the encryption strength is set to “Weak”. If the encryption strength is set to “Weak”, security level lowers. To change the encryption strength, refer to section “7.5.5.1.4 Confirm encryption strength of a printer.” . Refer to section “7.5.5.1.4 Confirm encryption strength of a printer” to change the encryption strength. Fig 7.5.28 44306601TH Rev. 2 210 / Oki Data CONFIDENTIAL For Netscape Launch the web browser and select “HELP” “Netscape”. Recommended version is Netscape 6 and higher. Solution: Install the newest web browser. If any version that is older than the recommended version is used, communication can become possible sometimes when the encryption strength is set to “Weak”. If the encryption strength is set to “Weak”, security level lowers. To change the encryption strength, refer to section “7.5.5.1.4 Confirm encryption strength of a printer.” .. Refer to section “7.5.5.1.4 Confirm encryption strength of a printer” to change the encryption strength. Fig 7.5.29 7.5.5.1.4 Confirm encryption strength of a printer Version display of the browser that is confirmed by section “7.5.4.1.3 Check version number of the Web browser” has description on encryption strength of the browser. The browser in which the encryption strength is not set to 128 bits, the browser cannot establish communication with the printer in which the encryption strength is not set to “Standard”. Either, upgrade the browser until it supports 128 bits (high encryption) or set the printer encryption strength to “Weak”. Fig 7.5.30 Fig 7.5.31 44306601TH Rev. 2 211 / Oki Data CONFIDENTIAL Change encryption strength with AdminManager 1. Launch AdminManager and select (by highlighting) a desired printer from the printer list. Fig 7.5.32 2. Press the “Oki Device Setup” button, or alternately select “Setup” screen. “Oki Device Setup”, and open the setup Fig 7.5.33 3. Input the administrator password and open the setup screen as an administrator. Fig 7.5.34 4. Select the “SSL/TLS” tab. Fig 7.5.35 5. Check the “Encryption Strength”. Fig 7.5.36 44306601TH Rev. 2 212 / Oki Data CONFIDENTIAL 6. Set the “Encryption Strength” to “Weak” and press the “Apply” button. Fig 7.5.37 7. Check the setup contents, and press “OK”. Fig 7.5.38 8. A message prompting your confirmation will be displayed. Click “Yes”. (NIC reboots to reflect the setting.) Fig 7.5.39 9. If the printer is displayed in the printer list, the setup is complete with success. Fig 7.5.40 44306601TH Rev. 2 213 / Oki Data CONFIDENTIAL Solution: Set the printer encryption strength to “Weak”. How to change encryption strength with Telnet Note! Telnet cannot be used by default. To change the encryption strength, Telnet must be set to Enable. Select the command prompt (DOS prompt) and enter ”Telnet <printer IP address>“, and press Return. Establish connected using administrator user name and password. Fig 7.5.41 Select the menus in this order: [4: Security Config] [5: Cipher (SSL/TLS)] the cipher strength as desired (1: Strong, 2: Standard, 3: Weak). [2: Cipher Strength]. Then, change Fig 7.5.42 44306601TH Rev. 2 214 / Oki Data CONFIDENTIAL 7.5.5.2 Print operation is not possible If print operation is not possible by using the encrypted IPP printer, check the followings. Establish connection by ”https://<printer IP address>. 1) If the printer setting page is displayed, the followings are probable. Take an appropriate measure by referring to the following items. * Certificate is not created yet. (Or failed to create certificate.) Refer to section “7.5.5.1.1 Is the certificate created?”. * Certificate has been created but the SSL/TLS setting is turned off. Refer to section “7.5.5.1.2 Is the certificate created?”. 2) If the printer setting page is displayed, the followings are probable. Take an appropriate measure by referring to the following items. * Version number of the browser is old. Refer to section “7.5.5.1.3 Check version number of the Web browser”. * Encryption strength has been set to Strong. Refer to section “7.5.5.1.4 Confirm encryption strength of a printer”. * The key exchange system of a printer is not supported by the browser. (Compatibility problem). * The OS does not support the IPP (encrypted) printing. Refer to section “7.5.5.2.1 Check OS (Operating System)”. * IPP (encrypted) printer is not created yet. Refer to section “7.5.5.2.2 Is the Printer created?” * IPP setup of the Printer is not Enabled. Refer to section “7.5.5.2.3 Is the IPP setting set to Enabled?”. 7.5.5.2.1 Check OS (Operating System) The IPP print (encryption) function is supported by Windows 2000 and Windows XP only. It is not supported by other operating systems. 7.5.5.2.2 Is the Printer created? Printer may not be created normally. To use the IPP print (encryption) function, the Printer must have been created by setting port to URL” printer IP address>/ipp” when creating the Printer. For more details of Printer creation method, refer to the User’s Manual (Advanced edition). 7.5.5.2.3 Is the IPP setting set to Enabled?” The IPP setup may not be set to Enable. As the default setting of printer, IPP has been set to Disable. To use the IPP print (encryption) function, the IPP setup must have been set to Enable. For the method of changing the IPP setup, refer to the User’s Manual (Advanced edition). 44306601TH Rev. 2 215 / Oki Data CONFIDENTIAL 7.5.5.3 Cannot create Certificate When Certificate cannot be created, the following causes are probable. Take an appropriate measure by referring to the following items. * Required input items are not fully entered Refer to section “7.5.5.3.1 Required input items are not fully entered.” * The printer is printing. Refer to section “7.5.5.3.2 The printer is printing. 7.5.5.3.1 Required input items are not fully entered. Unless all of the required input items are fully entered, Certificate cannot be created. When creating Certificate, entry into the items of Common Name, Organization, Locality, State/ Province, Country/Region is the must item. (Entry into Organizational Unit can be omitted.) Solution: Enter the appropriate value into all of the required input items, and execute creation of Certificate. For more details of the input items, refer to the User’s Manual (Advanced edition). 7.5.5.3.2 The printer is printing. Certificate cannot be created while printing is in progress. (Print operation has priority). Solution: Create Certificate when all other operations are complete. During creation of self-sign certification, during creation of CSR for Certificate of certification authority, and during installation of Certificate, the printer must not perform any other operations (such as printing) until the operation is complete (creation of self-sign certification is complete, creation of CSR is complete, and installation of Certificate is complete). 7.5.5.4 Installation of Certificate is not possible When installation of Certificate fails, the following causes are probable. Take an appropriate measure by referring to the following items. * User has changed the IP address of a printer to other IP address than the “IP address during creation of CSR”. Refer to section “7.5.5.4.1 IP address of the printer has been changed”. * “Network card is initialized” while user is applying issuance of Certification to certification authority (i.e., in the state of Waiting for Installation of Certificate). Refer to section “7.5.5.4.2 “Network card is initialized”. * “Deletion of CSR” was executed while user is applying issuance of Certification to certification authority (i.e., in the state of Waiting for Installation of Certificate). Refer to section “7.5.5.4.3 “Deletion of CSR” is executed”. * Intermediate Certificate is installed. Refer to section “7.5.5.4.4 “Installation of intermediate Certificate” is desired”. 7.5.5.4.1 User has changed the IP address of a printer If IP address of a printer is changed to other IP address than the “IP address during creation of CSR”, error is issued and installation of Certificate become impossible. If the changed setup is only the “IP address of printer”, error will not be issued if the IP address is returned to the original address. Solution: Return the IP address of printer back to the “IP address during creation of CSR”, and then install Certificate. Note! Do not change any setup of printer while creation of Certificate of certification authority is in progress (during the period starting from creation of CSR up until installation of Certificate). If changed, the already issued Certificates become invalid necessitating re-setup starting from the very beginning. If printer setup is changed after Certificate is obtained, the “Security warning” is displayed on the web browser. If IP address of printer is changed, the Certificate becomes invalid. In the case of Certificate of certification authority requiring some charge for issuance, another charge may be required for creating Certificate once again. For details, contact certification authority.). 44306601TH Rev. 2 216 / Oki Data CONFIDENTIAL 7.5.4.4.2 “Network card is initialized” If network card is initialized (to default setup) while creation of Certificate of certification authority is in progress (during the period starting from creation of CSR up until installation of Certificate), the setup information of the Certificate is deleted. If information is deleted once, the information cannot be recovered by any means. (Even when the same information as before is entered, the same Certificate cannot be created.) . Solution: Repeat all the steps from the very beginning. (Certificate under application is already invalid.) 7.5.5.4.3 “CSR is deleted” If network card is initialized (to default setup) while creation of Certificate of certification authority is in progress (during the period starting from creation of CSR up until installation of Certificate), the setup information of the Certificate is deleted. If information is deleted once, the information cannot be recovered by any means. (Even when the same information as before is entered, the same Certificate cannot be created.) .If information is deleted once, the information cannot be recovered by any means. (Even when the same information as before is entered, the same Certificate cannot be created.) . Solution: Repeat all the steps from the very beginning. (Certificate under application is already invalid.). 7.5.5.4.4 “Installation of intermediate Certificate” is desired Some certification authorities use the procedure of installing the SSL server Certificate (printer Certificate) and the intermediate Certificate into printer as the same time. However, printer of this model supports installation of only a single Certificate, intermediate Certificate cannot be installed in printer. Be sure to install the SSL server Certificate in printer. When installation of intermediate Certificate is required, install the intermediate Certificate not in printer, but in client PC (browser). For the method of installing the intermediate Certificate in client PC (browser), refer to the following. Installing the intermediate Certificate (or CA certificate) in client PC (browser) [Procedure] 1. Double-click the intermediate Certificate (or CA certificate) that is issued by certification authority, on a client PC to display the intermediate Certificate (or CA certificate). Example: For an example, the intermediate Certificate of Comodo has the text (PEM) format: ComodoJapanCA.Crt, and the binary format: ComodoJapanCA.cer. Either one of these formats can be opened. (Same result can be obtained.) Open either ComodoJapanCA.crt or ComodoJapanCA.cer. 2. Press the “General” tab of the displayed Certificate information, and press “Install Certificate” button. Fig 7.5.43 44306601TH Rev. 2 217 / Oki Data CONFIDENTIAL 3. The “Certificate Import Wizard” is displayed. Install Certificate in accordance with the displayed procedure. Select “Automatically select the certificate store based on the types of certificate”. Then, the Certificate will be installed automatically. Fig 7.5.44 Fig 7.5.45 44306601TH Rev. 2 218 / Oki Data CONFIDENTIAL 7.5.5.5 Other questionnaires Other probable questionnaires are described below. 7.5.5.5.1 Time required for creation of Certificate Time required for creation of Certificate Time is shown for each key size. (It can change in the range of -30 to +30%.) Table 7.5.9 Certificate creation time (For RSA) Unit is in second. Open key size RSA 512bits 1,024bits 2,048bits 6 8 25 Creation of CSR *1 7 10 23 Installation of certificate 6 6 6 Creation of self-sign certificate Certificate of certifying authority *1: CSR (Certificate Signing Request) 7.5.5.5.2 Communication time when the encryption function is enabled Result of comparison between the communication time using encryption and the normal communication is shown below. Web top page browsing time is shown. Web top page is the web screen for setting printer, and is displayed first. Table 7.5.10 Creation time (For RSA) of web top page Unit is in second. Open key size RSA Strength of encryption 512bits 1,024bits 2,048bits Strong 5 5 7 Standard 5 5 7 Weak 4 5 7 Without encryption 3 Also, communication time for IPP print is shown below. PCL NULL Data (31,464,978 bytes) is used as the print job. (NULL Data is the data that receives process which enables measurement of maximum communication speed of network communication by minimizing the PCL processing.) Table 7.5.11 IPP print (For RSA) Unit is in second. Open key size RSA Strength of encryption 512bits 1,024bits 2,048bits Strong 52 52 52 Standard 53 52 52 Weak 51 52 53 Without encryption 41 7.5.5.5.3 Can the encrypted printing be performed by any printer other than IPP? Answer: Any printer other than IPP cannot encrypt printing. Only the IPP printing can encrypt printing. 44306601TH Rev. 2 219 / Oki Data CONFIDENTIAL 7.5.5.5.4 What will happen if SSL/TLS is turned OFF after Certificate has been created (or installed)? Answer: Certificate will be kept saved as it is. If SSL/TLS is turned ON again, the Certificate becomes usable. 7.5.5.5.5 Want to change the port number Answer: The port number during the SSL/TLS communication is fixed to 443. It cannot be changed. 7.5.5.5.6 The error message “The security certificate was issued by a company you have not chosen to trust. View the certificate to determine whether you want to trust the certifying authority” is displayed. If this error is indicated, it means that the certificate which is installed in a printer is self-sign certificate. In the case of self-sign certificate, error (security warning) will not be displayed if the self-sign certificate of printer is installed in the client PC. In the case of certificate of certifying authority, error (security warning) will not be displayed if the CA certificate of certifying authority is installed in the client PC. Solution: Install certificate in the client PC (browser). [Procedure] 1. Click the “View Certificate” button on the error (security warning) screen. Fig 7.5.46 2. Press the “General” tab of the displayed Certificate information, and press “Install Certificate” button. Fig 7.5.47 44306601TH Rev. 2 220 / Oki Data CONFIDENTIAL 3. The “Certificate Import Wizard” is displayed. Install Certificate in accordance with the displayed procedure. Select “Automatically select the certificate store based on the types of certificate”. Then, the Certificate will be installed automatically. Fig 7.5.48 Fig 7.5.49 7.5.5.5.7 The error message “Name of security certificate is invalid or does not match the site name” is displayed. It means that the IP address of printer is different from the IP address that is described on certificate, or from the IP address when the certificate is created. Solution: Return the IP address of printer back to the address when self-sign certificate is created, or to the address when CSR is created. 44306601TH Rev. 2 221 / Oki Data CONFIDENTIAL 7.5.5.6 Restrictions when using Internet Explore 7 Several restrictions are imposed when using Internet Explore 7. This is because security restriction became more severe in IE7. 7.5.5.6.1 Warning indication when SSL is made valid by self-sign certificate When SSL is made valid by self-sign certificate, the following picture is obtained when web page is accessed, and page will not be displayed. Fig 7.5.50 Web display when SSL is made valid by self-sign certificate Solution: When “Continue browsing this site (not recommended)” is clicked on the warning screen, the web page will be displayed. However, it has no effect on the web page function. It can be used for browsing or to change setting of printer setup. Fig 7.5.51 Web page display when “Continue browsing this site (not recommended)” is clicked. 7.5.5.6.2 E-mail send test function does not work This is the function to perform the E-mail send test from the following page in the web page: [Administrator log-in] – [Network] – [Email] – [Send setup]. In the Internet Explore 7 default setup, this [Send test] cannot be made. Solution: To execute [Send test], IE7 setup should be modified. From the IE7 menu, select the menu: [Tool] – [Security level customize] –[Approving web site to request information input using the scripted window] and make it Enable. 44306601TH Rev. 2 222 / Oki Data CONFIDENTIAL 7.5.6 Fax Error Code List An error code list contained in Fax Activity Report Table 7.5.12 Disconnect codes Meanings Start and termination of a call 0000 Terminated normally 0001 Procedure not established after acceptance of a call (T1 timeout or incoming call timeout) 0002 A call aborted from +FKS or <CAN> Transmission phase A 0011 T1 timeout (or incoming call timeout) 0012 Received a JM signal declaring inability of the V.34 function Transmission phase B 0021 Inability of a machine at the other end to receive or send 0022 Command reception error 0023 Received an invalid command in a statement 0024 Response reception error 0025 No response to DCS sent three times 0026 Received DIS/DTC three times (DCS not recognized) 0027 Training failure at 2400 bps 0028 Received an invalid command in a response 0029 Unspecified DIS (bit 49) on the machine at the other end 002a Unspecified DIS (bit 50) on the machine at the other end 002b Unspecified DCS (bit 50) on the machine at the other end 002c Unspecified DCS (bit 47) on the machine at the other end Transmission phase D 0051 Response reception error 0052 No response to MPS sent three times 0053 Received an invalid response to MPS 0054 No response to EOP sent three times 0055 Received an invalid response to EOP 0059 No response to PPSMPS sent three times 005a Received an invalid response to PPSMPS 005b No response to PPSEOP sent three times 005c Received an invalid response to PPSEOP 005f No response to PPSNULL sent three times 0060 Received an invalid response to PPSNULL 0061 No response to CTC sent three times 0062 Received an invalid response to CTC 0063 No response to EOR (NULL/MPS/EOP) sent three times 0064 Received an invalid response to EOR (NULL/MPS/EOP) 0065 No response to RR sent three times 0066 Received an invalid response to RR 0067 Received RTN to 2400 bps 0068 ECM T5 timeout 0069 Received ERR to EORNULL 44306601TH Rev. 2 223 / Oki Data CONFIDENTIAL Disconnect codes Meanings Reception phase B 0071 Response reception error 0072 Command reception error 0073 T2 timeout without receiving expected pages 0074 T1 timeout after receiving EOM 0091 EOL not detected in 13 seconds (NECM mode) or T1 timeout (ECM mode) without receiving frames Manufacturer definitions 00a1 Received an invalid command in a response 00a2 Received an invalid command in a statement 00a4 NULL EOR received, ERR send after DCN received 00e0 Modem hang-up 00e1 Received V.34 abort 00e2 Timeout for V.34 control channel 00e3 Timeout for V.34 primary channel 00e4 Received ATD and ATA commands without line connection 00e5 Connected to a digital line (not a PSTN line) 00e6 Modem abnormality (CX20493) 00e7 Timeout for modem transmission data 1000 OK (normal) 1001 No carrier 1002 Ring 1003 Error 1004 No dial tone 1005 Busy 44306601TH Rev. 2 224 / Oki Data CONFIDENTIAL 7.6 Fuse Checking If the following errors occur , please check each fuse of the main board(86M PCB) (Please refer to Table 7.6.1) Table 7.6.1 Fuse errors F3 Error Description Cover open 120 FAN ERROR F501 F502 Hopping error FAX PCB does not work Service Call 134 Error Fuse Name F2 Main Board (86M PCB) Insert Point Sensor etc 5V Solenoid,FAN 2nd Tray Fuse cutter 24V FAX PCB 5V LED HEAD 5V Table 7.6.2 Fuse information list and Mounting place Maker name Model name Main Board LITTLE F501 LITTLE F502 LITTLE Rated current Rated voltage Mounting place Please refer to compornent side 0494 002NR 5402212S0202 2A 32V drawing of 86M board parts Please refer to solder side 0494 001NR 5402212S0102 1A 32V drawing of 86M board parts Please refer to solder side 0494 003NR 5402212S0302 3A 32V drawing of 86M board parts 1 (86M PCB) F2,F3 Figure No. 7 8 1 2 PE 2 RCLT F501 1 F2 42 41 RAMDIMM 200 199 THERM 1 1 EXRCO 2NDTRAY HCLT 6 2 1 2 MCLT 1 HVIF F502 F3 Compornent side drawing of 86M board Solder side drawing of 86M board Fig 7.6.1 44306601TH Rev. 2 225 / 44306601TH Rev. 2 Fuser Unit Assy 4 3 2 1 JP6 Cable Cable IP1 C Thermistor Heater : Black (Hopping) : Blue (Regist) : Yellow (MP Tray) Thermostat Cable Color 2 1 9 CN1 1 Circuit Diagram Part Diagram 1Between 1 to 2 pin: 1.6 Between 3 to 4 pin: 360K At the ambient temperature (25ºC) Between 1 to 2 pin 192 Between pin3(contact) of CN1 and JP6:1 or less Resistance Value 8. Clutch (Hopping) (Regist) (MP Tray) Unit Oki Data CONFIDENTIAL CONNECTION DIAGRAMS 8.1 Resistance value Table 8.1.1 226 / 44306601TH Rev. 2 Solenoid FAM Motor Unit 2 1 Black 2 0V 3 FANALM-N Red 1 +24 V Circuit Diagram S M Part Diagram Between 1 to 2 pin: 89 Resistance Value Oki Data CONFIDENTIAL 227 / Oki Data CONFIDENTIAL 8.2 Component layout (1) Main circuit board PCB used for MB470 and MB480 (86M- PCB) 1 1 40 42 39 41 19 1 12 12 200 199 10 RAMDIMM 1 2 PE 2NDTRAY 6 EXRCO 1 36 18 CENT 2 1 THERM 2 28 8 1 HVIF 27 7 RCLT HCLT MCLT SON 1 Component side AB A IC6 1 1 22 AB DM 10 10 K NICSW USB A 22 HEAD 8 7 LAN 24 1 2 86M- PW 10 FAXIF 1 19 20 1 2 1 PNLUSB Fig 8.2.1 44306601TH Rev. 2 228 / Oki Data CONFIDENTIAL (2) Main circuit board PCB used for MB460 (86M-2 PCB) 1 1 40 42 39 41 19 1 12 12 200 199 10 RAMDIMM 1 2 PE 2NDTRAY 6 EXRCO 1 36 18 CENT 2 1 THERM 2 28 8 1 HVIF 27 7 RCLT HCLT MCLT SON 1 Component side AB A IC6 1 1 22 AB DM 10 10 K NICSW USB A 22 HEAD 8 7 LAN 24 1 2 86M-2 PW 10 FAXIF 1 19 20 1 2 1 PNLUSB Fig 8.2.2 44306601TH Rev. 2 229 / Oki Data CONFIDENTIAL Low-voltage power supply PCB 110V CN1 CN2 220V CN3 (3) Fig 8.2.3 44306601TH Rev. 2 230 / Oki Data CONFIDENTIAL (4) High-Voltage Power/Sensor Board PS3 CN4 6 PS2 1 CN1 3 1 CN2 PS1 1 3 Fig 8.2.4 44306601TH Rev. 2 231 / Oki Data CONFIDENTIAL (5) FAX circuit board PCB used for MB470 and MB480 (FX5-PCB) Component side Fig 8.2.5 44306601TH Rev. 2 232 / Oki Data CONFIDENTIAL Solder side Fig 8.2.6 44306601TH Rev. 2 233 / Oki Data CONFIDENTIAL Appendix C Maintenance Manual for Second Tray unit 1 Overview 1.1 Function The extended paper feed unit is installed under the printer. the device performs the auto paper feed by the operation of the pulse motor (hopping) to control a signal from the printer. The main function is as follows: • Available paper: [Paper Type] • Standard paper: (Ream weight 55 to 105 kg) A4, A5, B5, Custom, LETTER, Executive, LEGAL 13, LEGAL14 *Tthe custom is 148 to 215.9mm for width and 210 to 355.6 mm for length. [Weight/ Thickness] • Standard paper (Ream weight 55 to 105kg) 1.2 Exterior and Parts Name Cover-Top-Opt Plate-Top Shaft-Roller-Feed(Opt) Roller-Feed Sheet Receive Cover-Front Fig 1.2.1 Exterior and Parts Name 44306601TH Rev. 2 234 / Oki Data CONFIDENTIAL 2. Description for Operation of Second Tray unit Second Tray unit receives a signal from the printer main body and feeds paper to the printer main body. Paper Feed from the Second Tray unit (Tray2) 1. When a signal is received from the printer main body, the pulse motor is rotated (in a clockwise direction), and by setting the paper feed clutch to ON, the paper feed roller and pick-up roller are rotated. Therefore, paper in a tray is fed. 2. After paper is carried by the transfer roller (Tray 2) and transfer roller (main body) to set the entrance sensor lever to ON, the paper goes into the regist roller, and a certain volume of paper is carried. (the skew is adjusted due to this operation.) 3. By setting the regist clutch to ON, the paper is carried by the regist roller. Regist roller Write sensor lever Regist clutch Entrance sensor lever Carrier roller (Main body) Printer Main Body Tray 1 Carrier roller (Tray 2) Paper feed roller Paper feed clutch Pick-up roller Tray 2 Paper Second Tray unit Clutch (Gear-Assy-Clutch) Pulse motor (clockwise direction) Fig 2.1.1 Pulse Motor(Motor-Pulse (Regist) Fig 2.1.2 44306601TH Rev. 2 235 / Oki Data CONFIDENTIAL 3. Part Replacement This section describes how to disassemble/ assemble/ install in the field. This section describes how to disassemble, however, as for the assembly, take the opposite sequence to the disassembling procedure. 3.1 Precautions on replacing parts (1) Make sure to turn off the printer switch and remove the printer from the device before the part replacement. (2) Do not disassemble the printer while it operates normally. (3) Do not disassemble beyond the range. (Do not remove parts other than parts shown in the part replacement procedure.) (4) Use specified maintenance tools. (5) Disassemble the parts in the specified order. Parts may be damaged if they are not disassembled in proper order. (6) Set small items such as screws and collars in their original position temporarily since they can be lost easily. (7) Do not use gloves that build up static electricity when treating a print circuit board (8) Do not place the print circuit board on the device or floor directly. [Maintenance Tool] The following table shows the tools for the print board/ Assy/ Unit replacement in the field. Table 3.1.1 Maintenance Tools No. 1 2 3 4 5 44306601TH Rev. 2 Maintenance Tool Amount No.2-220 Phillips screwdriver 1 No.3-200 screwdriver 1 Digital multi-meter 1 Pliers 1 E-ring plier 1 Purpose Remarks 3 to 5 mm screw For removing and installing E rings 236 / Oki Data CONFIDENTIAL 3.2 Arrangement of Parts The arrangement of main parts is as shown in the following figure. Connector(9715S-08Z02-G4C) Guard-Connector Gear-Assy-Clatch A A CONN Cord-AMP8P-AHP8P Board-OT7 Roller-Feed Roller-Pick-Up Roller-Feed-Now Frame-Assy-Retard Spring-Retard Cassette-Assy Fig 3.2.1 44306601TH Rev. 2 237 / Oki Data CONFIDENTIAL 3.3 How to Replace Parts This section describes how to replace parts shown in the following disassembling procedure. In the part replacement procedure, parts on which a part number is displayed in white figure in the black circle are RSPL. Second Tray unit Roller-Pick-Up, Roller-Feed-Now (3.3.1) Guard-Connector, Connector(9715S-08Z02-G4C) (3.3.2) Roller-Feed (3.3.3) Board-OT7 (3.3.4) CONN Cord-AMP8P-AMP8P (3.3.5) Gear-Assy-Clatch (3.3.6) Frame-Assy-Retard, Spring-Retard (3.3.7) 44306601TH Rev. 2 238 / Oki Data CONFIDENTIAL 3.3.1 Roller-Pick-Up, Roller-Feed-Now (1)Remove Cassette-Assy. (2)Push the claw in the direction of the arrow to remove Roller-Pick-Up . (3)Push the claw in the direction of the arrow to remove Roller-Feed-NOW . (4)As for reinstalling, take the opposite sequence to removal sequence. (Precautions on reinstalling) 1. When reinstalling Roller-Pick-Up , push it until it clicks. 2. When installing Roller-Feed-Now , push it until it clicks. Claw Fig 3.3.1 Roller-Pick-Up 44306601TH Rev. 2 Roller-Feed-NOW 239 / Oki Data CONFIDENTIAL 3.3.2 Guard-Connector, Connector (9715S-08Z02-G4C) (1) Turn off the printer and pull the AC cord. Remove the printer from the device. (2) Remove two Screw-Shoulders (3) Remove the connector . to remove Guard-Connector , Connector (9715S-08Z02-G4C) . (4) As for reinstalling, take the opposite sequence to removal sequence. Fig 3.3.2 Fig 3.3.1 Fig 3.3.3 44306601TH Rev. 2 240 / Oki Data CONFIDENTIAL 3.3.3 Roller-Feed (1) Turn off the printer and pull the AC cord. Remove the printer from the device. (2) Remove the 4 screws (Black) Front . , Remove the clamp of claw at the 2 places and remove Cover- (3) Slide the left side of Shaft-Roller-Feed to the front, and remove three Roller-Feeds . Claw Claw Fig 3.3.4 Fig 3.3.5 44306601TH Rev. 2 241 / Oki Data CONFIDENTIAL 3.3.4 Board-OT7 (1) Turn off the printer and pull the AC cord. Remove the printer from the device. (2) Remove two Screw-Shoulders . (3) Remove two screws (silver) to remove two Cover-Top-Pot (4) Remove four screws (silver) to remove Plate-Top (5) Disconnect the three connectors . . , and remove three screws to Board-OT7 . (6) As for reinstalling, take the opposite sequence to removal sequence. Fig 3.3.6 Fig 3.3.7 Fig 3.3.8 44306601TH Rev. 2 242 / Oki Data CONFIDENTIAL 3.3.5 CONN Cord-AMP8P-AMP8P (1) Turn off the printer and pull the AC cord. Remove the printer from the device. (2) Remove Plate-Top. (See 3.3.4 (2) to (4)) (3) Remove the screw (Black) that is for fixing the core. (4) Disconnect the connector at the Connector (9715S-08Z02-G4C) and disconnect the connector at Board-OT7 to remove CONN-Cord-AMP8P-AMP8P . (Both Guard-Connector and Connector (9715S-08Z02-G4C) are removed together.) (5) As for reinstalling, take the opposite sequence to removal sequence. Connector(9715S-08Z02-G4C) Guard-Connector Board-OT7 Fig 3.3.9 44306601TH Rev. 2 243 / Oki Data CONFIDENTIAL 3.3.6 Gear-Assy-Clatch (1) Turn off the printer and pull the AC cord. Remove the printer from the device. (2) Remove Plate-Top. (See 3.3.4 (2) to (4)) (3) Remove four screws (black) (4) Disconnect two connectors (5) Remove five screws (black) . , and remove the clamps of two claws to remove Cover-Front . . and two screws (silver) (6) Remove the cable from Clamp-Cable to remove Plate-Hop (Caulking)-Assy , and remove E ring to remove Bear-Assy-Clatch . (7) As for reinstalling, take the opposite sequence to removal sequence. (Precautions on reinstalling) 1. When reinstalling Plate-Hop (Caulking)-Assy , check that Lever-Paper-End is in a position shown in the figure for the sensor of Board-OT7. Claw Claw Fig 3.3.10 44306601TH Rev. 2 244 / Oki Data CONFIDENTIAL Fig 3.3.11 Positions of Lever-Paper-End and Sensor Cable Fig 3.3.12 Sensor Lever-Paper-End The top of the Lever-Paper-End should be in the groove of the sensor. Fig 3.3.13 44306601TH Rev. 2 245 / Oki Data CONFIDENTIAL 3.3.7 Frame-Assy-Retard, Spring-Retard (1) Detach Cassette-Assy. (2) Push two claws in the direction of the arrow to remove Retard-Cover (3) Push Frame-Assy Retard together.) . in the direction of the arrow. (Spring-Retard is also removed (4) As for reinstalling, take the opposite sequence to removal sequence. Claw Fig 3.3.14 Claw Fig 3.3.16 44306601TH Rev. 2 246 / Oki Data CONFIDENTIAL 4. Cleaning of Paper Feed Roller and Separation Roller Clean the rollers when [392: Paper Jam] often occurs. (1) Pull the paper cassette. (2) Wipe off paper-feed rollers (two rollers) with a wet cloth which is wrung or LED lens cleaner. Memo! The LED lens cleaner is attached with the toner cartridge for the replacement. Roller-Pick-Up Roller-Feed-NOW Fig 4.1.1 (3) Open Retard-Cover of the paper cassette, and wipe off the separation roller with a wet cloth which is wring or LED lens cleaner. (See Restard-Cover for how to open it.) Separation roller Fig 4.1.2 44306601TH Rev. 2 247 / 247