1
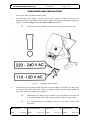
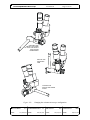
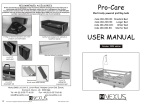
SO-161 Ophthalmic Microscope
Page 1 of 25
User Manual
Page 1 of 25
CONTENTS
PARTS LIST
....................................................................................................................
4
UNPACKING AND INSTALLATION ............................................................................................
5
12 Volt dc supply
............................................................................................
Connecting the power supply to a 12 Volt dc supply (battery)
11
................................
12
........................................................
12
............................................................................................
13
Initial Positioning
............................................................................................
13
Positioning during use
............................................................................................
13
........................................................................................................
14
DISMANTLING AND REPACKING THE MICROSCOPE
USE OF THE MICROSCOPE
Sterilisation
CARE AND MAINTENANCE
............................................................................................
15
Care of the optical head ............................................................................................
15
Fuse change
15
........................................................................................................
Care of the lamp
............................................................................................
16
Lamp replacement
............................................................................................
16
........................................................................................................
17
Power Supply ........................................................................................................
17
Mould Pellet Replacement .......................................................................................
18
Focus friction
BINOCULAR ASSISTANT MICROSCOPE
................................................................................
Mounting the Binocular Assistant Microscope
19
........................................................
20
TROUBLESHOOTING
........................................................................................................
22
SPECIFICATIONS
........................................................................................................
24
Optical head
........................................................................................................
24
Lamphouse
........................................................................................................
24
Power Supply ........................................................................................................
25
Mounting system
..................................................................................................
25
Carton ....................................................................................................................
25
ISSUE NUMBER:
DATE:
5.0
11/04/04
SUPERSEDES ISSUE: 4.1
WRITTEN BY:
DATE:
DATE:
02/01/02
RJK
05/11/97
CHECKED BY:
DATE:
RDW
05/11/97
SO-161 Ophthalmic Microscope
Page 2 of 25
User Manual
Page 2 of 25
LIST OF FIGURES
Figure 1
Scan Optics SO-161 Ophthalmic Microscope
Figure 2
Setting the mains voltage
Figure 3
Attaching the clamp assembly to the mounting surface
Figure 4
Attaching the arm assembly
Figure 5
Attaching the microscope assembly
....................................................
7
Figure 6
Connecting the lamphouse cable ................................................................
8
Figure 7
Connecting the power supply
9
Figure 8
Inserting the eyepieces and rough focusing
Figure 9
Inserting the focus control covers
Figure 10
Mould pellet replacement
Figure 11
Binocular Assistant Microscope
Figure 12a
Changing the assistant microscope configuration
............................
20
Figure 12b
Changing the assistant microscope configuration
............................
20
ISSUE NUMBER:
DATE:
5.0
11/04/04
........................................
3
................................................................
5
............................
6
................................................................
6
................................................................
........................................
10
....................................................
11
................................................................
18
....................................................
19
SUPERSEDES ISSUE: 4.1
WRITTEN BY:
DATE:
DATE:
02/01/02
RJK
05/11/97
CHECKED BY:
DATE:
RDW
05/11/97
SO-161 Ophthalmic Microscope
Page 3 of 25
Figure 1
ISSUE NUMBER:
DATE:
5.0
11/04/04
User Manual
Page 3 of 25
Scan Optics SO-161 Ophthalmic Microscope
SUPERSEDES ISSUE: 4.1
WRITTEN BY:
DATE:
DATE:
02/01/02
RJK
05/11/97
CHECKED BY:
DATE:
RDW
05/11/97
SO-161 Ophthalmic Microscope
Page 4 of 25
User Manual
Page 4 of 25
INSTRUCTIONS AND SPECIFICATIONS
Please read the following information carefully before installing and using the Scan Optics Ophthalmic
microscope. Scan Optics is responsible for the safety, reliability and performance of the equipment
only if it is used in accordance with these instructions.
PARTS LIST
MAIN ASSEMBLIES
Clamp assembly (includes power supply, clamp, pillar and safety clamp)
Arm assembly (includes horizontal arm and adjustable pantograph arm)
Microscope assembly (includes microscope head, lamphouse and tilt adjuster)
CABLES
Lamphouse cable
Mains power cable
12V dc supply (battery) cable
OTHER
Microscope eyepieces (located in the tool box) (2)
Focus control covers (4)
TOOL KIT
Spare lamps (1)
Spare fuses (2)
Socket keys (7)
Lens cloth
OPTIONAL ACCESSORIES
SCAN OPTICS PART NUMBER
Binocular assistant microscope
Auxiliary light source
Table plate
SO-1420
SO-232
SO-291
ISSUE NUMBER:
DATE:
5.0
11/04/04
SUPERSEDES ISSUE: 4.1
WRITTEN BY:
DATE:
DATE:
02/01/02
RJK
05/11/97
CHECKED BY:
DATE:
RDW
05/11/97
SO-161 Ophthalmic Microscope
Page 5 of 25
User Manual
Page 5 of 25
UNPACKING AND INSTALLATION
1.
Remove the clamp assembly from the carton.
2.
Check that the power supply is set to the correct mains voltage (110-120V or 220-240V), by
noting the position of the indicator on the power supply near the mains input plug housing (see
figure 2). Severe damage can occur if the setting is incorrect.
M
If the mains voltage indicator is not correctly set, reposition it using a coin.
Figure 2
3.
Fix the clamp to the operating table about 40 cm from the head of the table. The clamp may
be fixed on either side of the table. Make sure that the clamp is pressed firmly against the
side of the table before tightening (see figure 3).
ISSUE NUMBER:
DATE:
Setting the mains voltage
M
Alternatively, the clamp may be mounted on any horizontal surface that can
be positioned within 60 cm of the working position, such as a mobile trolley.
M
It is important that the mounting surface be free from vibration and
movement.
5.0
11/04/04
SUPERSEDES ISSUE: 4.1
WRITTEN BY:
DATE:
DATE:
02/01/02
RJK
05/11/97
CHECKED BY:
DATE:
RDW
05/11/97
SO-161 Ophthalmic Microscope
Page 6 of 25
4.
Attaching the clamp to the mounting surface
Remove the arm assembly from the carton, and place it on the pillar. Make sure that the arm
assembly rests against the safety clamp (see figure 4).
Figure 4
ISSUE NUMBER:
DATE:
Page 6 of 25
Tighten the safety clamp at a point about midway up the pillar (see figure 3).
Figure 3
5.
User Manual
5.0
11/04/04
Attaching the arm assembly
SUPERSEDES ISSUE: 4.1
WRITTEN BY:
DATE:
DATE:
02/01/02
RJK
05/11/97
CHECKED BY:
DATE:
RDW
05/11/97
SO-161 Ophthalmic Microscope
Page 7 of 25
6.
Page 7 of 25
Remove the microscope assembly from the carton and locate it in the end of the arm
assembly. Tighten the collet knob to secure the microscope (see figure 5).
Figure 5
ISSUE NUMBER:
DATE:
User Manual
5.0
11/04/04
Attaching the microscope assembly
SUPERSEDES ISSUE: 4.1
WRITTEN BY:
DATE:
DATE:
02/01/02
RJK
05/11/97
CHECKED BY:
DATE:
RDW
05/11/97
SO-161 Ophthalmic Microscope
Page 8 of 25
7.
Page 8 of 25
Attach the female socket on the lamphouse cable to the connector on the side of the
lamphouse and plug into the power supply (see figure 6).
Figure 6
ISSUE NUMBER:
DATE:
User Manual
5.0
11/04/04
Connecting the lamphouse cable
SUPERSEDES ISSUE: 4.1
WRITTEN BY:
DATE:
DATE:
02/01/02
RJK
05/11/97
CHECKED BY:
DATE:
RDW
05/11/97
SO-161 Ophthalmic Microscope
Page 9 of 25
8.
The mains power supply must have a protective earth conductor. If
there in no earth conductor, or if the integrity of the earth conductor
arrangement is in doubt, the equipment must be operated from a 12Vdc
power source.
Figure 7
Connecting the Power Supply
Switch on the mains power supply at the wall socket.
M
ISSUE NUMBER:
DATE:
Page 9 of 25
Plug the mains power cable into the power supply and into a mains power socket.
International safety standards do not allow the use of an extension cord (see figure 7).
M
9.
User Manual
When the ON/OFF switch is selected to ON, the Power Supply indicator will
light.
5.0
11/04/04
SUPERSEDES ISSUE: 4.1
WRITTEN BY:
DATE:
DATE:
02/01/02
RJK
05/11/97
CHECKED BY:
DATE:
RDW
05/11/97
SO-161 Ophthalmic Microscope
Page 10 of 25
10.
11.
M
Retain the eyepiece blanks for repacking the microscope. Do not discard the
eyepiece blanks.
M
Take care to protect the lamphouse prism at all times. If placing the
microscope assembly on a bench, lie carefully on one side.
Focus the microscope roughly by moving the arm up or down to the best vertical position (see
figure 8).
Inserting the eyepieces and rough focusing
Check that the eyepieces are located at a comfortable viewing level. If not, rotate the tilt
adjustment knob clockwise to tilt the microscope assembly down, or anticlockwise to tilt the
microscope assembly up..
ISSUE NUMBER:
DATE:
Page 10 of 25
Remove the microscope eyepiece blanks and insert the eyepieces (see figure 8).
Figure 8
12.
User Manual
5.0
11/04/04
SUPERSEDES ISSUE: 4.1
WRITTEN BY:
DATE:
DATE:
02/01/02
RJK
05/11/97
CHECKED BY:
DATE:
RDW
05/11/97
SO-161 Ophthalmic Microscope
Page 11 of 25
13.
Page 11 of 25
Remove two focus control covers from the bag inside the carton. Push them into position on
the focus control knobs (see figure 9).
M
Focus control covers are intended to be sterilised before any operating
procedures.
Figure 9
14.
User Manual
Inserting the focus control covers
Switch on the power supply and observe the light patch produced. The light patch will not
have sharp edges but should be brightest in the centre. If the patch of light is brighter to one
side, it can be easily adjusted. Insert a 3mm socket key in the hole in the lamphouse cover
above the ‘bulb adjust’ label, so that it engages in the socket of the adjusting screw. With the
lamp on, turn the screw a small amount to the left or right until the patch of light is even.
12 VOLT DC SUPPLY
The Scan Optics Ophthalmic Microscope may be connected to either an earthed mains (110-120V or
220-240V) ac supply, or a 12V dc supply, or both. If both supplies are connected, the battery will act
as an emergency backup for mains power. In this case, the microscope will not run from battery
power unless the mains supply fails or falls by more than 20 percent, or is switched off. If mains
power is restored, the microscope will resume using mains power automatically. The mains power
switch on the microscope does not switch the battery off.
There is some reduction in light output when the battery is connected through the Power Supply. If the
12V supply is to be used in isolation, or if the mains power has completely failed, the light output may
be increased by connecting the battery cable directly to the lamphouse cable, bypassing the power
supply.
ISSUE NUMBER:
DATE:
5.0
11/04/04
SUPERSEDES ISSUE: 4.1
WRITTEN BY:
DATE:
DATE:
02/01/02
RJK
05/11/97
CHECKED BY:
DATE:
RDW
05/11/97
SO-161 Ophthalmic Microscope
User Manual
Page 12 of 25
Page 12 of 25
CONNECTING THE POWER SUPPLY TO A 12-VOLT DC SUPPLY (BATTERY)
1.
If the power supply is to be connected to a 12-volt dc supply, remove the battery cable from
the carton.
2.
Connect the cable to the 12-volt connector on the underside of the power supply (see figure
7).
3.
Connect the red battery clip to the positive battery terminal, and the black clip to the negative
battery terminal. The power supply will not operate if the terminals are reversed (see figure
7).
M
Earthing is not required when a 12-volt supply is used alone.
M
The 12-volt supply must be direct current. The power supply will not operate
with 12 volts alternating current.
M
A battery with 7 amp hour capacity, such as a motor cycle or emergency
lighting battery will provide about 3.5 hours life at the maximum brightness
setting.
DISMANTLING AND REPACKING THE MICROSCOPE
1.
Switch off the mains power.
2.
Remove the mains power and 12-volt cables and repack.
3.
Remove the microscope eyepieces and replace them in the toolbox. This will ensure the
eyepieces are not dropped when the microscope assembly is removed.
4.
Insert the eyepiece blanks in the microscope assembly.
5.
Unplug the lamphouse cable from the power supply.
6.
Reset the focus adjustment all the way down.
7.
Remove the focus control covers and repack or sterilise immediately if necessary.
8.
Remove the microscope assembly and carefully repack. Take care to protect the lamphouse
prism.
9.
Remove the arm assembly, and rotate the arm about the elbow until it lies parallel with the
horizontal arm. Push the arm down flat and tighten the arm lock to keep it flat. Repack the
arm assembly in the carton.
10.
Unclamp the remaining assembly from the table and slide the safety clamp down. Replace
the clamp assembly in the carton.
ISSUE NUMBER:
DATE:
5.0
11/04/04
SUPERSEDES ISSUE: 4.1
WRITTEN BY:
DATE:
DATE:
02/01/02
RJK
05/11/97
CHECKED BY:
DATE:
RDW
05/11/97
SO-161 Ophthalmic Microscope
Page 13 of 25
User Manual
Page 13 of 25
USE OF THE MICROSCOPE
The equipment must be located more than 25 cm away from any medical gas system or disinfection or
degreasing system containing flammable vapour. The Power Supply must also be protected from
liquid splashes and spills.
All knobs may be sterilised. However, it may be convenient for the clamp knobs to be set by a
non-sterile person.
INITIAL POSITIONING
1.
Set the instrument approximately in position by swinging the elbow as required.
2.
Set the focus adjustment to the midway position by aligning the focus mid-position marks on
the fixed and moving parts of the focusing system.
3.
Adjust the height of the microscope by moving the arm vertically so that the work area is
approximately in focus. Tighten the arm and elbow knobs.
4.
Check the eyepiece setting to ensure clear vision with each eye separately, and set the
pupillary distance.
5.
The microscope can now be swung aside.
POSITIONING DURING USE
1.
Swing the microscope over the patient
2.
Hold the focus control knobs to move the microscope to the correct position. The most
accurate focusing can be obtained at the highest magnification, as the depth of focus is then
minimised.
3.
Tighten the pillar lock knob until the microscope is prevented from moving freely, but is still
able to be moved when required. The friction of the arm and elbow knobs should be adjusted
so that the movement feels uniform in all directions.
4.
Focus the microscope by moving the optical head or by turning the focus control knobs.
5.
To swing the microscope out of the way, undo the pillar lock knob and swing the microscope
about the pillar. It will remain in focus when returned to the work area.
ISSUE NUMBER:
DATE:
5.0
11/04/04
SUPERSEDES ISSUE: 4.1
WRITTEN BY:
DATE:
DATE:
02/01/02
RJK
05/11/97
CHECKED BY:
DATE:
RDW
05/11/97
SO-161 Ophthalmic Microscope
Page 14 of 25
User Manual
Page 14 of 25
CAUTION:
When the Microscope is in use it is essential that:
M
The collet knob which locks the microscope head to the arm is securely tightened.
M
The safety clamp is positioned directly under the fixed arm and is locked.
Failure to observe these precautions may allow the microscope head to fall,
with risk of harm to the patient
STERILISATION
The detachable focus control covers may be sterilised by:
M
boiling
M
autoclaving
M
chemical sterilisation
M
gas sterilisation.
The anodised and plated metal components can be wiped with any of the normal disinfectants.
The plastic parts and the paintwork of the microscope assembly and the power supply may be
affected by organic solvents. Do not autoclave or wipe with organic solvents such as ether, xylene or
alcohol; to clean use water-based solvents only.
One set of focus control covers can be sterilised while the other is in use.
NOTE: National authorities may require the use of specific sterilisation or disinfection
methods.
ISSUE NUMBER:
DATE:
5.0
11/04/04
SUPERSEDES ISSUE: 4.1
WRITTEN BY:
DATE:
DATE:
02/01/02
RJK
05/11/97
CHECKED BY:
DATE:
RDW
05/11/97
SO-161 Ophthalmic Microscope
Page 15 of 25
User Manual
Page 15 of 25
CARE AND MAINTENANCE
CARE OF THE OPTICAL HEAD
1.
Cleaning the optical components.
The eyepieces should be checked for cleanliness each time the instrument is used. Surface
dust should be removed with a clean, soft brush. Fingerprints or grease may be removed by
lightly wiping with a cotton cloth or lens tissue moistened with a 70:30 mixture of absolute
alcohol (either ethanol or methanol) and ether. Do not use acetone as it may damage the
surface coating.
2.
Cleaning the plastic parts and paintwork.
Use water based cleaners only.
Do not use any organic solvent such as alcohol, ether or xylene.
3.
Protection against mould.
In hot and humid climates it is common for mould to grow on optical surfaces. Cleaning and
repairing the damage can be expensive and inconvenient. To minimise the risk of mould
forming, do not leave the instrument without either eyepieces or eyepiece blanks inserted and
always store the optical head in a sealed bag containing silica gel desiccant. In tropical
climates, routine annual maintenance of the optical head is recommended.
4.
Do not dismantle.
No parts inside the optical head of the instrument can be serviced by the user. Attempts to
dismantle the optical head or prism cover will make any warranty void.
FUSE CHANGE
1.
Turn off the mains power at the switch and remove the mains power cable as a precaution.
2.
Open the fuse housing on the underside of the power supply with a coin or screwdriver.
3.
Remove the old fuse, checking for failure.
4.
Replace the fuse with an M205 (20 x 5mm) anti-surge type fuse, rated at 1 amp and 240 volts.
Do not replace the fuse with a fuse of a higher rating.
5.
Secure the fuse housing with the coin or screwdriver.
6.
Replace the mains power cable and switch on to check operation.
ISSUE NUMBER:
DATE:
5.0
11/04/04
SUPERSEDES ISSUE: 4.1
WRITTEN BY:
DATE:
DATE:
02/01/02
RJK
05/11/97
CHECKED BY:
DATE:
RDW
05/11/97
SO-161 Ophthalmic Microscope
Page 16 of 25
CARE OF THE LAMP
User Manual
Page 16 of 25
The lamp supplied has a rated average life of 2,000 hours.
The actual life of the lamp will depend on the intensity setting normally used. The highest setting is an
over-run setting which increases light output but reduces lamp life to about 350 hours.
It is strongly recommended that the lamp be replaced as a routine maintenance task, to reduce the
possibility of failure during surgery.
The Scan Optics Ophthalmic Microscope uses lamps that are readily available in most countries.
LAMP REPLACEMENT
1.
Ensure that the lamphouse and lamp are cool to the touch.
2.
Remove the lamphouse door by placing both thumbs in the groove and pushing in the direction
of the ‘push to open’ label. Pry the lamp from the lamp holder.
3.
Replace the lamp with a new lamp.
4.
M
The replacement lamp must be rated for 12 volts and not more than 20 watts.
Use of a lamp of higher wattage may cause damage.
M
The lamp must be handled with gloves or a tissue. If touched with bare
fingers, it must be cleaned with alcohol before switching on or the life of the
lamp may be substantially reduced.
There may be some variation in the position of the filament with different lamps.
When the lamp is replaced it may be necessary to adjust the lamp position in the
lamp holder, to ensure that the filament is correctly centred and so produce a
uniform area of illumination.
M
In general, a clearance of about 1mm will be needed between the envelope of
the lamp and the lamp holder.
5.
Replace the lamphouse door by pushing it back into place.
6.
Switch on the power supply and observe the light patch produced. If the patch of light is
brighter to one side, it can be easily adjusted. Insert a 3mm socket key in the hole in the
lamphouse cover above the ‘bulb adjust’ label, so that it engages in the socket of the adjusting
screw. With the lamp on, turn the screw a small amount to the left or right until the patch of
light is even. Small amounts of adjustment should be sufficient. Do not force the screw.
ISSUE NUMBER:
DATE:
5.0
11/04/04
SUPERSEDES ISSUE: 4.1
WRITTEN BY:
DATE:
DATE:
02/01/02
RJK
05/11/97
CHECKED BY:
DATE:
RDW
05/11/97
SO-161 Ophthalmic Microscope
Page 17 of 25
FOCUS FRICTION
User Manual
Page 17 of 25
The focusing system should allow the microscope head to be lowered and raised smoothly and easily,
but should not allow the head to fall under its own weight. The friction of the focusing system may be
adjusted as follows:
M
Simply hold the plain (left) focus control knob and rotate the right focus
control knob (marked “tension”) until the desired friction is achieved. To
increase the friction rotate the knob clockwise, to decrease the friction rotate
the knob anti-clockwise.
POWER SUPPLY
In many countries the mains voltage fluctuates widely. Low voltage can greatly reduce the light
output, and high voltage can greatly reduce lamp life. The Scan Optics power supply provides a
constant voltage to the lamp for a wide range of mains power voltages.
Quartz halogen lamps have very low resistance when cold. The starting current can thus be very high,
and the lamp filament may fail when turned on. The Scan Optics power supply provides a "soft start"
with a ramped initial voltage to increase lamp life.
ISSUE NUMBER:
DATE:
5.0
11/04/04
SUPERSEDES ISSUE: 4.1
WRITTEN BY:
DATE:
DATE:
02/01/02
RJK
05/11/97
CHECKED BY:
DATE:
RDW
05/11/97
SO-161 Ophthalmic Microscope
Page 18 of 25
MOULD PELLET REPLACEMENT
1.
2.
3.
4.
5.
6.
7.
User Manual
Loosen the grubscrews (no. 1 below) holding the head (2) into the bonder arm (4).
Lift the head out of the arm and remove the prism protector (3).
Carefully unscrew the objective lens, taking care not to damage the lamp house prism.
Use a Philips head screwdriver to remove the mould pellet (5). Push the end into the hole and
lever off the surface.
Place the new pellet on the end of the screwdriver, remove the protective cover and fix to the
same location that the old pellet was removed from.
Screw the objective lens back on and replace the prism protector making sure that the prism
slot is over the prism (6).
Replace the head in the bonder arm ensuring that the head is aligned to the front of the arm
and secure by tightening the grubscrews.
Figure 10
ISSUE NUMBER:
DATE:
Page 18 of 25
5.0
11/04/04
Mould pellet replacement
SUPERSEDES ISSUE: 4.1
WRITTEN BY:
DATE:
DATE:
02/01/02
RJK
05/11/97
CHECKED BY:
DATE:
RDW
05/11/97
SO-161 Ophthalmic Microscope
Page 19 of 25
User Manual
Page 19 of 25
BINOCULAR ASSISTANT MICROSCOPE
The optional assistant microscope allows an observer to view procedures under magnification within
close proximity of the operating field. In order to fit the assistant microscope, first attach the mounting
bracket provided to one side of the microscope head using the four M5x10 socket head cap screws
provided. Then insert the mounting arm and secure it with the locking pin. Refer to figure 11.
Sterilisable covers are provided to fit over the focus knobs.
Pupillary distance adjustment is performed manually, but the eyepieces are not geared together. For
the best user comfort, ensure that the eyepieces are equidistant from the central axis of the main
optical path.
The adjustable eyepiece may be used to compensate for any refractive error difference between the
left and right eye of the user. First, rotate the adjustable (left) eyepiece so that there are equal
amounts of adjustment on either side. Then focus the microscope while closing the left eye and
looking only through the right eyepiece. When the microscope is focussed, close the right eye and look
with the left eye through the left eyepiece, and rotate the adjusting ring until the left eye is focussed.
When the microscope is fitted to the side of the main microscope head, a tilt angle of approximately 30
degrees will enable the visual field of the assistant microscope to match that of the main microscope
head. To adjust this angle, loosen the angle lock knob while holding the microscope head, tilt the head
to the appropriate angle and lock it again. Small sideways adjustments of the visual field can be
achieved by loosening the microscope lock knob and rotating the microscope head about its mounting
axis. When the fields are aligned correctly, tighten the microscope lock knob once again.
LOCKING PIN
MICROSCOPE
HEAD
MICROSCOPE
LOCK KNOB
FOCUS
KNOBS
ANGLE
LOCK KNOB
MOUNTING ARM
MICROSCOPE
MOUNT
Figure 11
ISSUE NUMBER:
DATE:
5.0
11/04/04
Binocular Assistant Microscope
SUPERSEDES ISSUE: 4.1
WRITTEN BY:
DATE:
DATE:
02/01/02
RJK
05/11/97
CHECKED BY:
DATE:
RDW
05/11/97
SO-161 Ophthalmic Microscope
Page 20 of 25
User Manual
Page 20 of 25
MOUNTING THE BINOCULAR ASSISTANT MICROSCOPE
The assistant microscope may be configured to mount on either the left or right side of the main
microscope head. Figure 11 shows the head configured to fit on the right hand side of the microscope
head. In order to swap the mounting configuration follow figures 12a and 12b shown.
UNSCREW THE
MICROSCOPE
LOCK KNOB
LIFT THE MICROSCOPE ASSEMBLY
CLEAR OF THE MICROSCOPE MOUNT
TIGHTEN THE
MICROSCOPE
LOCK KNOB
AGAIN
ROTATE THE MICROSCOPE AROUND THE
MOUNTING SHAFT UNTIL IT FACES
THE OPPOSITE DIRECTION
Figure 12a
ISSUE NUMBER:
DATE:
5.0
11/04/04
Changing the assistant microscope configuration
SUPERSEDES ISSUE: 4.1
WRITTEN BY:
DATE:
DATE:
02/01/02
RJK
05/11/97
CHECKED BY:
DATE:
RDW
05/11/97
SO-161 Ophthalmic Microscope
Page 21 of 25
User Manual
Page 21 of 25
UNSCREW THE
ANGLE LOCK KNOB
SO THAT THE SAFETY
PINS CAN BE
DISENGAGED
ROTATE THE
MOUNTING
ARM
TIGHTEN THE
ANGLE LOCK KNOB
AGAIN
Figure 12b
ISSUE NUMBER:
DATE:
5.0
11/04/04
Changing the assistant microscope configuration
SUPERSEDES ISSUE: 4.1
WRITTEN BY:
DATE:
DATE:
02/01/02
RJK
05/11/97
CHECKED BY:
DATE:
RDW
05/11/97
SO-161 Ophthalmic Microscope
Page 22 of 25
User Manual
Page 22 of 25
TROUBLESHOOTING
1.
SYMPTOM
CAUSE
REMEDY
Lamp does not
operate
Blown fuse
Check power indicator light on switch,
(if fuse blown, indicator light will not glow)
check and replace fuses as necessary
Mains power failure
Check power indicator light on switch,
use 12V dc battery
Battery failure
Check battery voltage and replace or
recharge as necessary
Battery terminals
incorrectly wired
Wire terminals correctly
(red (+) positive; black (-) negative)
Lamp failure
Replace lamp
2.
Mains fuse blows
repeatedly
Mains voltage
incorrectly set
Set mains voltage to correct setting
3.
Lamp dim
Battery low
Recharge battery
Lamp filament
not centred
Adjust lamp position to centre filament
Lamp blackened
Replace lamp
Mains voltage
incorrectly set
Set mains voltage to correct setting
Mould on optical
surfaces
If mould is evident, return microscope
to Scan Optics for servicing
Stiff focus knob
Adjust focus friction
Focus system falls
under own weight
Adjust focus friction
Dirty eyepieces
Clean eyepieces
Mould on optical
surfaces
If mould is evident, return microscope
to Scan Optics for servicing
4.
5.
Focusing difficult
Blurred view
ISSUE NUMBER:
DATE:
5.0
11/04/04
SUPERSEDES ISSUE: 4.1
WRITTEN BY:
DATE:
DATE:
02/01/02
RJK
05/11/97
CHECKED BY:
DATE:
RDW
05/11/97
SO-161 Ophthalmic Microscope
Page 23 of 25
SYMPTOM
CAUSE
6.
7.
Microscope unstable
Microscope
uncomfortable to use
ISSUE NUMBER:
DATE:
5.0
11/04/04
User Manual
Page 23 of 25
REMEDY
G-clamp loose
Tighten G-clamp
Mounting surface
unstable
Use more rigid mounting surface
Arm/Elbow will not
lock in place
Check presence of friction (curved)
washers interleaved with flat washers
under Arm/Elbow knob(s)
Microscope head
movement/vibration
Check microscope correctly seated in
collar
Eyepieces too high
Rotate tilt knob to tilt as necessary
SUPERSEDES ISSUE: 4.1
WRITTEN BY:
DATE:
DATE:
02/01/02
RJK
05/11/97
CHECKED BY:
DATE:
RDW
05/11/97
SO-161 Ophthalmic Microscope
Page 24 of 25
User Manual
Page 24 of 25
SPECIFICATIONS
OPTICAL HEAD
VIEWING SYSTEM
Binocular, stereoscopic
(convergence angle 12o )
Eyepiece tube inclination 45o
MAGNIFICATION
Fixed, 6.25 x
Optional 9.4 x eyepieces
WORKING DISTANCE
Lamphouse prism to object distance 180 mm
FIELD OF VIEW
44 mm
REFRACTIVE ERROR
Correction on left eyepiece ± 5o
FOCUSING
Range ± 25 mm
Control knobs removable for sterilisation
INTERPUPILLARY DISTANCE
Adjustable for Distance PD range approximately
52 to 75mm
LAMPHOUSE
ALIGNMENT
Coaxial with viewing system
LAMP
12V 20W quartz-halogen lamp with G4 base and
horizontal filament.
Colour temperature 2,925 degrees K
Example
AVERAGE LAMP LIFE
High Intensity (voltage over-run):
Medium (rated voltage)
LAMP CHANGE
Plug in for fast change, no screws
ILLUMINATION
35,000 Lux approximately at maximum setting.
ISSUE NUMBER:
DATE:
GE M47 12V 20W
Note: this is the only lamp now recommended by
Scan Optics as suitable for use in the microscope
lamphouse.
5.0
11/04/04
SUPERSEDES ISSUE: 4.1
WRITTEN BY:
DATE:
DATE:
02/01/02
RJK
05/11/97
350 hours
2,000 hours
CHECKED BY:
DATE:
RDW
05/11/97
SO-161 Ophthalmic Microscope
Page 25 of 25
POWER SUPPLY
User Manual
Page 25 of 25
MAINS POWER
100-120V or 220-240V ac, selectable by external
switch on each unit
OUTPUT
Regulated output with soft start.
INTENSITY CONTROL
Continuously adjustable
EARTHING
Via earth lead of power cable (green/yellow)
DIRECT CURRENT
12 V dc source optional, automatically selected if
mains voltage falls by 20%
FUSES
M205 (20 x 5mm) 1A at 240 volts rating anti-surge
fuse on primary winding of transformer
CABLES
Mains:
Length 5 metres
Battery:
Length 5 metres
MOUNTING SYSTEM
CLAMP
Opening 75mm, throat 100mm
EXTENSION
Bed surface to focal plane, maximum 270mm
Bed edge to optic axis, maximum 570mm
MOUNT SIDE
Left or right hand
CARTON
DIMENSIONS
710 x 530 x 245 mm
(28.0 x 20.9 x 9.6")
WEIGHT
11.8 kg (26 lbs)
When packed with accessories
ISSUE NUMBER:
DATE:
5.0
11/04/04
SUPERSEDES ISSUE: 4.1
WRITTEN BY:
DATE:
DATE:
02/01/02
RJK
05/11/97
CHECKED BY:
DATE:
RDW
05/11/97