1
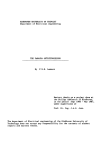
Window To The Stars: A Guide
November 17, 2011
1 Introduction
We present Window To The Stars (WTTS ), a graphical user interface to the popular
TWIN single/binary stellar evolution code, for novices, students and professional astrophysicists. It removes the drudgery associated with the traditional approach to running
the code, while maintaining the power, output quality and flexibility a modern stellar
evolutionist requires. It is currently being used for cutting edge research and interactive
teaching.
This guide is for version 0.16.1 of WTTS.
1.1 What is a stellar evolution code?
A stellar evolution code makes models of stars and evolves them in time.
1.2 What is TWIN?
The stellar evolution code used by WTTS is a modified version of the TWIN stellar
evolution code originally developed by Peter Eggleton [?, ?]. It uses an adaptive nonLagrangian mesh which allows stars to be evolved with only 200 meshpoints in a few
minutes on a normal desktop computer. It is written in FORTRAN.
The code has three modes of operation: one to calculate the evolution of single stars
and two different ways for binaries, TWIN and non-TWIN. In TWIN mode, the two stars
are solved for simultaneously by inverting a single matrix, while in non-TWIN mode the
code evolves both stars individually and alternates between them at regular intervals.
1.3 What is WTTS?
WTTS is a user interface that sits between you and the gory details of what is going
on with the TWIN stellar evolution code and various other system tools. You probably
do not need to know how these work, just how the considerably simpler WTTS works.
WTTS is a Perl script, and so should run on any platform which can run Perl, which
includes Linux, Mac OS X, Windows, HP-UX, . . . the only modern operating system I
1
TWIN
WTTS
Fortran
You
Human?
Perl
Gnuplot
Ghostscript
Imagemagick
(Un)Zip
etc.
Operating System
Figure 1: Structure of the WTTS and TWIN setup. WTTS sits between you and TWIN,
but also isolates you from the details of all the other tools it uses.
have used which has no Perl is my iPod. Detailed and up-to-date instructions for installation can be found at the WTTS website http://www.astro.uni-bonn.de/~izzard/
window.html and below.
The stellar evolution code used by WTTS is Peter Eggleton’s TWIN. This is a separate
executable and must be downloaded or built from source. For each piece of software you
are required to install, you probably have to download it first, so rather than point you
to a specific web page, which is liable to change, I would recommend using your favourite
search engine (Google, Yahoo, etc.). Section 2 details how to include WTTS and TWIN.
The user manual is in section 3. This explains about the various windows and settings
which are in WTTS.
If you use WTTS for work you intend to publish, please cite us – we have a paper
coming out soon in New Astronomy.
2 Installation
I assume you are using a command line interface (“Terminal” on MAC OS X), with a bash
shell (type bash to get into a bash shell), and you are vaguely familiar with how to make
your computer work via this interface. I assume you have Perl installed, which should be
standard on a decent operating system (otherwise you must get it! Try www.perl.com),
and also zip and unzip.
2.1 Automated Installer
The automated installer should install most of WTTS and TWIN, but will not install
standard packages such as Gnuplot, Ghostscript, etc. on your machine. You can get the
installer from our website and try it, with
2
wget http://www.astro.uni-bonn.de/~izzard/code/wtts/installer
perl installer
Please contact us if this does not work. It is difficult to write an installer for every
operating system so it may well go wrong on your machine and it is only through your
feedback that we can improve WTTS. You should now be able to run WTTS with this
command:
wtts
2.2 Pre-built executables
We have started to experiment with pre-built executables which will, in theory, replace
the need for the Perl script. You can get a binary file from http://www.astro.uni-bonn.
de/~izzard/window.html but be warned that these will only work on some systems (e.g.
the systems we have access to). You will need to download both WTTS and TWIN to
the same directory, then just run the WTTS executable. You may need to make a
subdirectory called code and move the TWIN executable into it.
2.3 Build It Yourself
In true Unix-fashion, the best way to use WTTS is to build the TWIN code and install
the Perl modules yourself. In this section we outline the general procedure, which of
course may need to be modified for your system.
2.3.1 Build TWIN
You should download the TWIN code distribution from our website, currently http:
//www.astro.uni-bonn.de/~izzard/code/wtts/TWIN.zip. You must have a Fortran
compiler! We use ifort, from Intel, on Linux, and g95 from GNU on Linux and MAC OS
X. So, make a directory, download TWIN.zip to that directory, and unzip the TWIN file
e.g.
mkdir ∼/wtts
cd ∼/wtts
wget http://www.astro.uni-bonn.de/~izzard/code/wtts/TWIN.zip
unzip TWIN.zip
Build it with
make
(which assumes you have GNU make as your default make - if this fails try gmake
instead). If you are not using ifort, you should change the default Fortran compiler via
the environment variable FORT. E.g., to use g95 instead, type
3
export FORT=g95
make
Wait a little while until the build is finished.
2.3.2 Get required standard Perl modules
Here is where it gets tricky. WTTS requires some (quite standard) Perl modules. You can
either get packages for these modules which are specific for your system (e.g. RPMs for
Redhat/Fedora Linux e.g. www.pbone.net, .deb for Ubuntu/Debian (use apt or synaptic)
etc. or perhaps Fink packages for OS X) or install from downloaded source files from
CPAN at www.cpan.org. You need to install at least the following Perl modules:
• ExtUtils-Depends-0.205
• ExtUtils-PkgConfig-1.07
• File-Tail-0.99.3
• Glib-1.102
• Gtk2-1.102
For Gtk2-perl and Glib-perl you must have the Glib and Gtk2 libraries already installed
on your system. You can get these as packages (e.g. RPM packages) or by going to
www.gtk.org.
2.3.3 Packages?
If you want to try the package route, which you probably should, then you are on your
own because it is different for each system. If you are very lucky then you are using a
system with a proper administrator, and if you are really lucky indeed then he will read
this and install everything for you!
With RPM packages (e.g. on Redhat or Fedora Linux) you should download the
required packages, log in as root (with su) and issue the command
rpm --install <package name>
for each package.
2.3.4 CPAN
CPAN has a search facility, search.cpan.org, where you can simply search for the Perl
modules listed above. For example, to get the Perl Gtk2 module, type gtk2 into the
search box. This gives you the search results – the first one is Gtk2. Click on the “Gtk2”,
which brings you to a description of the module and a link to Download. Click on that,
and save the file Gtk2-xxxx.tar.gz (where xxxx is the module version, which should
not be too important) to a temporary directory, e.g. ~/src, then issue these commands
4
tar -xvzf Gtk2-xxxx.tar.gz
cd Gtk2 (the directory name may differ slightly)
perl Makefile.PL
make
make install
where the final command should be as root. Note: these are quite basic procedures for
anyone experienced with a UNIX operating system. If in doubt get help or email us!
2.3.5 Get Rob’s Perl modules
You need Rob’s custom Perl modules as well. These are similar to those from CPAN but
Rob wrote them himself. In a temporary directory, e.g. ~/src/modules, download the
modules and build them. If you are root:
wget http://www.astro.uni-bonn.de/~izzard/code/wtts/rob_misc_perl_module.zip
wget http://www.astro.uni-bonn.de/~izzard/code/wtts/STARS_perl_module.zip
mkdir rob
cd rob
unzip rob_misc_perl_module.zip
perl Makefile.PL
make
(as root) make install
cd ..
mkdir STARS
cd STARS
unzip STARS_perl_module.zip
perl Makefile.PL
make
(as root) make install
Rob’s Perl modules should now be installed. You can install the modules without being
root, by putting a line in your shell options file (e.g. .bashrc)
export PERL5LIB=$HOME/lib/perl/lib/perl5/site_perl/5.8.5
where the 5.8.5 is your version of Perl (run perl -v to find out). Then, before the perl
Makefile.PL steps above, type
PREFIX=$HOME/lib/perl
and continue as before.
5
2.3.6 Other required software
For plotting, WTTS uses Gnuplot, but also uses ImageMagick (for its convert utility)
and/or Ghostscript, and perhaps the sed utility (preferably GNU sed). These should
be available in package form for your operating system, or are available in source form
for you to build. On any decent distribution these are installed by default. (What a
definition of decent!) Use your favourite search engine to find these (very useful) tools.
You could try the following websites
• www.gnuplot.info
• www.cs.wisc.edu/~ghost/
• www.imagemagick.org
• www.gnu.org/software/sed/
2.3.7 Running WTTS
Now everything should be in place, you can download and run Window To The Stars,
like this
cd ~/wtts
wget http://www.astro.uni-bonn.de/~izzard/code/wtts/stars.perlscript
mv stars.experimental.perlscript wtts
chmod 755 wtts
./wtts
Of course you can change the name from wtts to whatever you like.
If there are any problems, please feel free to email us (see the website for our email
address).
3 Using Window To The Stars
Window To The Stars, is laid out in a logical progression of tabbed windows, starting
with the choice of physics, through the stellar evolution, to analysis of the results. We
shall describe each in turn and corresponding screenshots from the evolution of a 3 M⊙
star can be found in Fig. 2.
In addition to the main tab window, a status bar is visible at all times, informing the
user of the current status (e.g. “Evolving” or “Stopped”) and the physical state of the
primary and secondary star.
All images can be saved as either PNG, suitable for web-based projects, or Postscript
for publications and talks. Animations are saved as animated GIFs, also compatible with
web browsers.
6
The Options tab where physical input is
chosen.
The Evolve tab follows the TWIN log
file.
The HRD tab, labelled by log central
density.
The Structure tab showing surface and
central temperature, and central density.
The Internals tab showing CNO abundances for one in every 500 models.
The Kippenhahn diagram tab showing
temperature as a function of mass coordinate and age.
Figure 2: Example screenshots of the various tabbed windows showing the evolution of
a 3 M⊙ solar metallicity star (a total of 2760 stellar models).
7
3.1 Options Tab
The first steps in creating a series of stellar evolution models are the choices of input
parameters and physics. We provide a selection of initial mass(es) from a library of
zero-age main sequence (ZAMS) stellar models with a range of metallicities (typically
10−4 ≤ Z ≤ 0.03). It is also possible to load pre-calculated models as the starting model
(see Internal below for details on saving models). The physics and initial conditions for
stellar evolution are then selected in a series of tabbed menus. These provide the user
with the original variable name, an input box or menu, and a description of what the
parameter means with a suggested default parameter. In this way every aspect of the
stellar evolution run can be controlled. We have added the ability to load or save a
complete set of WTTS options, and also to import the original init.dat files from the
TWIN code distribution.
3.1.1 Select Starting Model
You must choose whether to start from a zero-age main sequence (ZAMS) model, or one
of your own (previously saved) models. If you are running WTTS for the first time, then
leave this setting at the default ZAMS library. You can, however, chosen a metallicity
Z, and masses for the primary and secondary star. If you are only planning on evolving
a single star, the secondary mass becomes irrelevant.
3.1.2 Option Control
If you press Reset from defaults then all the options will be reset to a default value (which
is usually suitable for basic, single-star evolution). You can also Load and Save a whole
set of options by clicking on Load and Save. You can import a TWIN init.dat file into
your options by selecting Import->init.dat.
The plugins menu is for operations which are in some way special or automated. At
present (version 0.13) there are two plugins:
• Import TWIN init.dat This allows you to import an original TWIN init.dat file into
the current options set. This can be useful for running, say, binaries using Peter’s
init.dat files which come with the TWIN distribution.
• Remesher This plugin takes the selected starting model and changes the number of
mesh points in it. Note that the TWIN code has a maximum number of meshpoints
(usually 5000) which is set in the source file mesh.f.
3.1.3 Display
Here you can choose either star 1 or star 2. This is the (global) control for the later
plotting screens, and enables you to display either star 1 or star 2. This will probably be
removed at a later date.
8
3.1.4 The Options
Most of the screen is taken up by the series of sub-tabs denoting evolution options. They
are grouped logically, e.g. initial conditions are all together. Each option comes with a
short help description. Sometimes you can enter a number in a box, sometimes you have
a limited choice. Remember, the choice is limited for a reason!
Detailed descriptions of what the options do, and how they affect your stellar evolution
runs, can be found in Peter’s writeup file, which is distributed with the TWIN code. On
the other hand, the help given here might be enough for you.
3.2 Evolve Tab
This is where the bulk of the stellar evolution is done. There are buttons to start and stop
the evolutionary sequence. The TWIN log file is also shown and updated automatically
during the evolutionary run.
3.2.1 Evolve
Click on this to start the stellar evolution.
3.2.2 Terminate
Click on this to end the stellar evolution (if it does not end itself).
3.2.3 Clear Log Window
This clears the log window of its contents.
3.2.4 Update Log Window
This updates the log window with the current output from TWIN.
3.2.5 Follow Log
This can be toggled – when it is on the log is continuously updated, and the cursor is
sent to the bottom so you can always see the latest activity. This is annoying if you want
to read something that happened some time ago. . . so you can also turn it off.
3.2.6 Display
You can follow the log of star 1 or star 2, use these buttons to select which one.
9
3.3 HRD Tab
The Hertzsprung-Russell diagram (HRD), which shows log L/L⊙ vs log Teff /K, is the
primary diagnostic tool of stellar evolution. It is displayed for each star individually or
for both stars, and updates as the evolution progresses. The tracks can be labelled with
a third variable, such as central temperature or core mass, and coloured according to the
effective temperature.
3.3.1 X Range and Y Range
Here you can enter the ranges of the X (L) and Y (Teff ) axes, from minimum to maximum.
Enter a * to have WTTS automatically calculate a range for you.
3.3.2 Stellar Colours
Switch this on to label the colours in your HRD with the “true” stellar colours. You can
adjust the colour settings (e.g. hue, contrast) in the Misc tab.
3.3.3 Label with
You can label the curve in the HRD with a third variable, e.g. age or mass. Use this to
select which third variable.
3.3.4 Label spacing
The labels are automatically designed to not overlap, but you can override the spacing
with the menu given here. 0.1 is the default and is usually good enough. On the other
hand, if you zoom in you will need to make the number smaller.
3.3.5 Line width
The width of the line in the HRD
3.3.6 Star 1, Star 2, Stars 1 and 2
You can plot either star 1 or star 2 or both with this menu
3.4 Structure Tab
In this tab structural variables such as age, model number, total mass, core mass, luminosity, radius and abundances, are plotted against one another. The plot automatically
updates throughout the evolution and many variables can be plotted at once, with the
option of logging the axes and choosing data ranges.
3.4.1 Star menu
Here you can choose whether to plot star 1, star 2 or both stars on your graph.
10
3.4.2 x-Variable
Below this is the variable menu, where you choose which variable to plot on the x axis.
3.4.3 Y-axis control
With the three buttons “Linear Y Axis”, “Log Y Axis” and “10^Y Axis” you can plot
either y, log10 y or 10y , where y is the variable in question.
3.4.4 X range and Y range
Here you can choose the range of the x and y axes by selecting a minimum and maximum
value. As usual, a * means WTTS automatically scales the axis.
3.4.5 y-Variable
This is the list of toggle buttons controlling the variables which should be plotted on the
y-axis.
3.5 Internals Tab
It is often desirable to examine the internal details of each stellar model individually or
plot the results from a few models in one graph. Plots are made of a selection of internal
variables vs one other internal variable (usually the mass coordinate) for a selection of
models. It is possible to overlay the results of successive models, or make an animated
sequence. There is also a sphere rendering mode, which shows a spherical star with a
slice removed so the internal details are visible. There are twenty sub-tabs in this tab, so
it is possible to work on multiple images at the same time. There is an option to always
look at the latest model, so internal details are followed during a model sequence run.
Each model can be saved and later used as a starting model for a new evolutionary run
(see the Options tab description).
3.5.1 Y Axis
You can choose to plot many different variables on the y axis, just click on the buttons
3.5.2 Display
As usual, choose to plot either star 1 or star 2.
3.5.3 Still/Animate
You can either plot a series of models as a still image, in which case they will be overlaid,
or as an animation.
11
3.5.4 Frame
This gives the current frame number of the animation.
3.5.5 Speed
This changes the speed of the animation, which is usually limited by your CPU! (This
goes to 11.)
3.5.6 Ranges
You can change the x and y axis ranges here
3.5.7 C 1 2 5 . . .
Each of these buttons affects the model list (see below). C clears the list, 1 selects every
model, 2 every 2nd model, 5 every 5th etc. | (pipe) logical ORs the entire list (so selected
becomes deselected, and vice versa).
3.5.8 Model List
Click on a model number to plot it. You can select as many as you like. If you select a
model, hold shift, then select another, the range will be selected. If you select a model,
hold the control key, then select another, the range will be unselected.
3.5.9 Image Tabs
You can plot 20 different images, each has its own tab.
3.6 Kippenhahn Tab
The traditional Kippenhahn plot shows convective regions as a function of mass coordinate and time. We expand on this idea by plotting a mapped 3D surface of any of the
stellar evolutionary variables, which includes convection, as a function of any two others.
The map is in greyscale or colour, with a selection of palettes. In the case of masscoordinate used as an ordinate, the core mass(es), convective boundaries and nuclear
burning zones can be over-plotted.
3.6.1 Axis, range, resolution
Each axis has its own range selector, much like the other tabs, and can be plotted as a
linear, log or 10y plot. Choose a low resolution (e.g. 10%) to experiment with your plot,
as this will be faster. 100% resolution should be used for publication-quality plots.
12
3.6.2 Palette
Here you can choose from a series of colour palettes. There is one greyscale palette,
suitable for black and white printing.
3.6.3 Boundaries
You can attempt to show the core-mass /surface boundaries, convective boundaries, and
nuclear burning zones.
3.6.4 Replot
You must click on Replot to draw the graph. Drawing is quite time consuming, as the
data must be extracted and then plotted, and there is a lot of data involved.
3.7 Miscellaneous Tab
Other options can be changed here, such as image size, HRD colour contrast, font type
and size, plot type (postscript or PNG) etc.
3.8 Load/Save Tab
Here you can load or save a complete set of models ! The files are zipped, because they
are necessarily quite big.
4 WTTS API
As of version 0.13 WTTS has used a crude application programming interface (API) in
the STARS perl module in an attempt to abstract the details of the stellar evolution code
from WTTS so that at some point in the future WTTS can be used with any stellar
evolution code. This is still experimental but currently the API works with TWIN and
the BINSTAR codes.
4.1 API Implementation
The API in the STARS.pm module is the default TWIN function set. In order to load a
different set of functions then a different module should be loaded instead of STARS.pm.
At present this must be done manually, but there is no reason why it cannot be automated
in the future. (However, right now there is only the STARS.pm module!)
4.2 TWIN specific stuff
Because WTTS was designed to work with TWIN it uses the output files from TWIN
to function properly. I would suggest that the easiest way to adapt WTTS to a different
stellar evolution code is to simply output the same information as TWIN does to similarly
13
named files from the different code. These are the .mdl1, .mdl2, .out1, .out2, .plt1, .plt2
and .mod files.
The following descriptions are taken from the STARS wiki at http://www.astro.ru.
nl/~eglebbeek/ which will contain the most up to date documentation. This is correct
as of WTTS V0.14 and the current TWIN code.
4.2.1 .mdl files
This file contains stellar stucture at different ages written for plotting purposes. Apart
form the first line this file consists of blocks of stellar structure.
First Line
1. number of grid points = number of lines of one block ofstellar structure
2. number of variables = number of columns (may be different fom the number of
variables listed below)
3. Convective overshoot parameter
Blocks of stellar structure
Each block starts with a header containing
1. Model number
2. Model Age (yr)
The the columns with the actual stellar structure follow, one line for each mesh point.
The first line is the interior of the star. The first 21 variabble are described in the IO
manual. Check it for units and please add them to this wiki. The columns 22 and further
are missing in this manual.
1. Mass coordinate, in solar units
2. Radius Coordinate, in solar units
3. Pressure [dyn/cm2 ]
4. Density [g/cm3 ]
5. Temperature [K]
6. Opacity [cm2 /g]
7. Adiabatic Temperature Gradient [-]
8. Radiative - Adiabatic Temperature Gradient [-] !!! Wrong in IO manual
9. XH
10. XHe
14
11. XC
12. XN
13. XO
14. XNe
15. XMg
16. Total Luminosity, in solar units
17. Energy generation by contraction [erg / g / s]
18. Energy generation by nuclear reactions [erg / g / s]
19. Energy generation in neutrinos [erg / g / s]
20. Entropy [erg / g / K]
21. Internal Energy [erg / g]
22. Reaction rate RPP: pp chain: effective 2p -> 1/2 He4
23. Reaction rate RPC: effective C12 + 2 p -> N14
24. Reaction rate RPNG: effective N14 + 2p -> O16
25. Reaction rate RPN: effective N14 + 2p -> C12 + He4
26. Reaction rate RPO: effective O16 + 2p -> N14 + He4
27. Reaction rate RAN: effective N14 + 3/2 He4 - > Ne20
dS
28. Cp dP
29. Mean Molecular Weight, in atomic mass units
30. Mixing coefficient for thermohaline mixing (or unused)
31. Mixing coefficient for convective mixing (convective velocity * mixing length)
32. Actual temperature gradientd log T /d log P
33. homology invariant: d log ρ/d log P (or unused)
34. homology invariant: U_hom: d log R/d log P (or unused)
35. homology invariant: V_hom: d log M/d log P (or unused)
15
4.2.2 .mod files
These are only used for saving models, so you do not need to know the format. You
should, however, know the equivalent format for your stellar evolution code and have an
appropriate extract_model() function.
4.2.3 .plt files
This file contains global properties for the output of the evolution calculation. Each
calculated structure model occupies one line.
First Line
The first line contains the number of columns in the output. This may be less than
what is listed here.
Subsequent lines
1. Model number
2. Age of the model [yr]
3. Mass, in solar units
4. Helium (Hydrogen exhausted) core mass, in solar units
5. Carbon-Oxygen (Helium exhausted) core mass, in solar units
6. Oxygen-Neon (Carbon exhausted) core mass, in solar units
7. log radius, in solar units
8. log luminosity, in solar units
9. log effective temperature [K]
10. log central temperature [K]
11. log maximum temperature [K]
12. log central density [g/cm3 ]
13. log density at maximum temperature [g/cm3 ]
14. Binding energy of envelope [erg / solar mass]
15. Luminosity by Hydrogen burning, in solar units
16. Luminosity by Helium burning, in solar units
17. Luminosity by Carbon burning, in solar units
18. Luminosity carried by neutrinos, in solar units
16
19. Luminosity by release of excess thermal energy, in solar units
20. Rotation period, in days
21. k2 = I/M R2 , basically the axis of gyration or moment of inertia I.
22. Base of the convective envelope, in units of the stellar radius
23. Thickness of the convective envelope, in units of the stellar radius
4.3 Function List
The following is a list of functions which are currently in the API (V0.14). This is liable
to change as the code is cleaned up, added to and trimmed. The names are also likely
to change.
4.3.1 analyse_evcode_log_for_termination_reason
Usage: analyse_evcode_log_for_termination_reason()
Check the stellar evolution code’s log file to determine why it failed and return a string
containing an error message.
4.3.2 check_for_evcode_error
Usage: check_for_evcode_error()
This checks for an error in the evolution code log file, if one is detected sets the status
bar and stops the evolution run.
4.3.3 clear_evcode_caches
Usage: clear_evcode_caches()
Clears up any cached variables and data and close file handles in the API module.
This should be called from clear_global_caches in WTTS.
4.3.4 emergency_exit
Usage: emergency_exit()
In an emergency, e.g. when you use too much memory, try to shut down the evolution
code. This should try to stop the code in a nice way, then kill it.
4.3.5 evcode_colour_log_text
Usage: evcode_colour_log_text(Gtk::textbuffer buffer, int n)
Given the text buffer which contains the log output, colour it. If n is given then only
colour the last n lines. If n is undefined then colour the whole text buffer (this is very
slow).
17
4.3.6 evcode_eval
Usage: evcode_eval(string s)
Evaluates the string s in the context of the API module, rather than in WTTS main
program context.
4.3.7 evcode_plugin_menu
Usage: evcode_plugin_menu(menubar menubar )
Given the widget menubar from WTTS, adds evolution-code specific plugins. Returns
the menubar widget, modified. Copy then STARS.pm version and hack it.
4.3.8 evcode_value_from_hash
Usage: evcode_value_from_hash(string file, string key)
Returns the element key of the hash called file (so-called because the hashes are named
after the files they represent).
4.3.9 evcode_variable_settings
Usage: evcode_variable_settings()
This function is called to set default evolution code settings, and set up (arrays of)
variables used by the evolution code API. Some of the variables it sets are in the main::
context, some are not.
4.3.10 extract_model
Usage: extract_model(string filename, array pointer models)
Alternative model extraction routine. This will be removed in future to make way for
extract_evcode_model but it is currently used with TWIN to get models for a .mod file
(which extract_evcode_model cannot do yet). The .mod file is given in filename, and the
(pointer to an) array \@models contains the numbers of the models for extraction. An
array containing the model data is returned.
4.3.11 extract_evcode_model(int nmod)
Usage: extract_evcode_model(int nmod)
Extracts model nmod and returns the data as a string. In TWIN context this extracts
model nmod from the .mdl file by calling random_extract_model.
4.3.12 get_available_models
Usage: get_available_models()
Returns a list of model numbers which are available for us to play with. In TWIN
context this function calls get_TWIN_model_list on the .mdl files.
18
4.3.13 has_evcode_terminated
Usage: has_evcode_terminated()
Returns 0 if the evolution code is running, 1 if it is not running and 2 if it is running
and/or has crashed. In the TWIN version this first checks if the main::running_pid
variable is set, then checks if a kill 0 can be performed on the pid. How the check is
performed may depend on the specific evolution code.
4.3.14 load_evcode_defaults
Usage: load_evcode_defaults()
Loads and sets the variable hashes with their default values. Redundant???
4.3.15 load_evcode_hashes
Usage: load_evcode_hashes()
Stellar evolution options are stored in hashes where the hash keys are the variable
names and the hash values are the values of the variables. This function loads these
hashes from input files, so is sometimes useful.
4.3.16 load_evcode_options_from_zipfile
Usage: load_evcode_options_from_zipfile(array zip_output )
The array zip_output is the output from the unzip command which simply unzips
a given file as saved with save_evcode_options_to_zipfile. If file names in zip_output
are recognised to be important then they can be acted upon. The usual way to do
this is with a call such as load_evcode_options_from_zipfile(split(/\n/o,‘unzip
-d $cachedir -o $file‘)); where $file is the zipped filename
4.3.17 reset_evcode_options
Usage: reset_evcode_options()
Resets some evolutionary code options. Gets called at the beginning and when the
“Reset Options” button is pressed (unlike evcode_variable_settings which is called only
at the beginning).
4.3.18 reset_evcode_options_to_defaults
Usage: reset_evcode_options_to_defaults
This function sets all options in the Options tab to their default values.
4.3.19 run_evcode
Usage: run_evcode(Boolean nofork, Boolean startfile)
This function calls the evolution code. How it does this will depend very strongly on
the evolution code. In TWIN context this function looks at the widgets (in the main
19
program) to determine parameters. It then sets some default values. In most cases nofork
and startfile should be left undefined.
Usually, this function will call fork to allow it to both run the evolution code and
return control to the user. If nofork is set to 1 then fork is not called and the function
will not return until the evolution code has finished running.
The function checks the main program to see if it should start from an input model
which is not part of the ZAMS library. If so, or if startfile is set to 1, then the evolution
code is started from a user-specified input model.
It is up to this function to update the status bar and log file window as the programmer
of the API function sees fit. See the TWIN API version for such details.
Returns TRUE in the parent fork, the child does not return (it exits with code 0) and
returns 0 in the case where nofork is set.
4.3.20 save_evcode_options
Usage: save_evcode_options()
Saves the currently evolution code options to files, usually in preparation for an evolutionary run.
4.3.21 set_evcode_options_list
Usage: set_evcode_options_list()
Set main::options_list with the layout for the options tab. List items should be in
this format: ’BLOCK.VAR in FILE ’ where BLOCK is the common block (in capitals!),
VAR is the variable (in capitals), FILE is the filename it is stored in. Structure, i.e.
sub-tabs, is introduced with
Label: label text
or
Section: section label
Note: variables with no options are treated as non-editable!
4.3.22 save_evcode_options_to_zipfile
Usage: save_evcode_options_to_zipfile(string filename)
Saves the currently evolution code options to a zip file (the name of which is filename)
so you can load them at a later time.
4.3.23 set_col_labels
Usage: set_col_labels()
Sets the main::plt1cols array. These are the names of the variables in each column of
the plt1 file. Also sets up the main::plt1cols hash.
20
4.3.24 set_evcode_start_model
Usage: set_evcode_start_model(int n, filename f )
Sets the starting model for star n to the file f.
4.3.25 set_evcode_var
Usage: set_evcode_var(string data, string blockname, string varname, string newval)
Sets the evolution code variable varname to newval by some circuitous route. In the
TWIN module the data variable stores the original data file and blockname is the name of
the FORTRAN common block in which the data is stored. The set_evcode_var function
then searches the data for the blockname and varname and sets what it finds to newval.
This function is scheduled to be rewritten to remove the data and blockname as these
are horribly programmed.
4.3.26 stop_evcode
Usage: stop_evcode()
Try to stop the evolutionary code, in a nice way. Should call a kill function (main::pidkill )
just in case it fails.
4.3.27 variable_help_array
Usage: variable_help_array()
When called this function returns an array of strings of the format “VARNAME Help
text. . . ” where VARNAME is the name of the variable and the “Help text. . . ” is whatever
help text you would like to associate with the given variable.
4.3.28 zams_ms
Usage: zams_zs(float z)
Returns a list of masses available in the ZAMS library for a given metallicity z (which
one of the list returned by zams_zs).
4.3.29 zams_zs
Usage: zams_zs()
Returns a list of metallicities available in the ZAMS library.
References
21