1
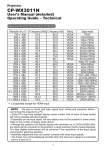
LiveViewer for Mac OS User’s Manual Hitachi Consumer Electronics Co., Ltd. NOTE The manufacturer assumes no responsibility for any errors that may appear in this manual. The reproduction, transfer or copy of all or any part of this document is not permitted without express written consent. Trademark acknowledgement Macintosh, Mac OS X, AirPort are registered trademark of Apple Inc. All other trademarks are the properties of their respective owners. Caution . You agree that the Software will not be shipped, transferred or exported into any country or used in any manner prohibited by the United States Export Administration Act or any other applicable export laws, restrictions or regulations (collectively the "Export Laws"). In addition, if the Software is identified as export controlled items under the Export Laws, you represent and warrant that you are not a citizen, or otherwise located within, an embargoed nation (including without limitation Iran, Iraq, Syria, Sudan, Libya, Cuba, North Korea, and Serbia) and that you are not otherwise prohibited under the Export Laws from receiving the Software. All rights to Use the Software are granted on condition that such rights are forfeited if you fail to comply with the terms of this Agreement. Page 1 10/17/2011 Contents 1 Compatibility ...................................................................................................................................... 3 1.1 Minimum PC hardware and software requirements ..................................................................... 3 1.2 Supported Projector ...................................................................................................................... 3 1.3 Updating Liveviewer .................................................................................................................... 4 2 Starting with “LiveViewer” ................................................................................................................ 5 2.1 Install “LiveViewer” ..................................................................................................................... 5 2.2 Connect to the network ................................................................................................................. 6 2.2.1 Launch “LiveViewer” ......................................................................................................... 6 2.2.2 Configure network parameters ............................................................................................ 7 2.2.3 Select From List .................................................................................................................. 7 2.2.4 Enter Passcode..................................................................................................................... 7 2.2.5 History connection .............................................................................................................. 8 2.2.6 Configure manually ............................................................................................................. 8 2.3 Passcode ........................................................................................................................................ 9 2.3.1 Getting the Passcode ........................................................................................................... 9 2.3.2 Entering the Passcode........................................................................................................ 10 2.4 Configure Network Setting Manually......................................................................................... 10 2.4.1 Wired LAN ........................................................................................................................ 11 2.4.2 Wireless LAN .................................................................................................................... 13 2.5 Select the projector ..................................................................................................................... 14 2.5.1 Connection and transmission............................................................................................. 14 2.5.2 Connection error ................................................................................................................ 14 2.6 Starting the Network Presentation .............................................................................................. 15 2.6.1 Display Mode .................................................................................................................... 15 2.6.2 Presenter mode .................................................................................................................. 15 2.6.3 Display User Name ........................................................................................................... 15 3 Start “LiveViewer” ........................................................................................................................... 16 3.1 Main menus and operating buttons ............................................................................................. 16 3.1.1 Menu Type ........................................................................................................................ 16 3.1.2 Menu button ...................................................................................................................... 16 3.1.3 Indicator ............................................................................................................................ 17 3.1.4 Multi PC display mode ...................................................................................................... 18 3.1.5 Optional settings ................................................................................................................ 19 Page 2 10/17/2011 1 Compatibility 1.1 Minimum PC hardware and software requirements OS CPU Display Available Hard Disk Space Web browser CD-ROM drive Ethernet port Mac OS 10.5(Intel) Mac OS 10.6(Intel) This application software is not available for PowerPC. 1.8GHz or higher Intel Core processor VGA 640x480 or higher 65,536 simultaneous colors or higher 100MB or higher Safari® (4.0 or higher) NOTE Improper OS version or driver software for Network Adaptor on your PC may prevent images from being transmitted correctly. It is highly recommended that you check for OS and driver updates. Depending on the type of wireless network device and PC you are using, the projector may not be able to communicate properly with your PC, even if the PC you are using is equipped with built-in wireless LAN functionality. If communication problems occur, please use a Wi-Fi certified wireless network device. Your PC needs to meet the minimum hardware requirement of your OS. If you use a screen resolution greater than XGA, the projector will shrink it to XGA on screen. The network communication control is disabled while the projector is in standby mode if the STANDBY MODE item is set to SAVING. Please connect the network communication to the projector after setting the STANDBY MODE to NORMAL. You can get the latest version of the "LiveViewer for Mac OS" and the latest information for this product from our website. Depending on the specification of your computer, the computer may slow down due to high CPU usage when the "LiveViewer for Mac OS" is running. If any additional application software having a firewall function is installed into your PC, disable the firewall function (check your software manual for additional instructions). Set your PC resolution to XGA or less. Refer to the user manual for your Macintosh. If it is larger than XGA, the transmission speed will be reduced 1.2 Supported Projector Check and confirm before you install the LiveViewer if its version suits to the projector model you are going to connect to. The correct software version depends upon the projector model that you have. If the version is not matched with the projector, the software may not work properly. If you use the models network functions are available not listed in the table below, check the group of projector models written in the User’s Manual of the projector. Page 3 10/17/2011 Group of Projector Models Group D Group E LiveViewer for Mac Version 1.00 1.01 CP-X2011N ED-X45N CP-X2511N CP-X3011N CP-X4011N CP-WX3011N CP-X4021N CP-WX4021N CP-X5021N CP-AW250N CP-A220N ED-A220N CP-A300N iPJ-AW250N and etc. CP-X2514WN CP-X3014WN CP-X4014WN CP-WX3014WN CP-X2021WN CP-X2521WN CP-X3021WN CPX10WN CPX11WN CPWX12WN and etc. ✓ ✓ ✓ 1.3 Updating Liveviewer Please check and get the latest version from the Hitachi Web site. http://www.hitachi-america.us/digitalmedia http://www.hitachidigitalmedia.com Page 4 10/17/2011 2 Starting with “LiveViewer” This section explains the process of using the “LiveViewer for Mac”. The outline of the process is as follows: 1. Install the “LiveViewer” application ( 5) 2. Connect to the network ( 6) The Quick Connection feature prepares some options for connecting to your network projector. You can select one that meets your requirements. Passcode connection Manual connection History record connection Select projector Fig. 2.a LiveViewer Main menu 3. Select the projector ( 14) In some cases, there are several projectors connected to the same network. Before you send your image, confirm that the right projector is selected. 4. Start Network Presentation ( 15) The “LiveViewer” main menu will be on screen. Now, you can send your images to the projector through the network. 2.1 Install “LiveViewer” In order to use the “LiveViewer”, you first need to install the “LiveViewer” onto all PCs that you want to connect to your network projector. 1. 2. 3. 4. Download the “LiveViewerForMacOS_vxxxxxx.dmg”. “LiveViewerForMacOS” disk image will appear. Double click the “LiveViewerForMacOS_vxxxxxx.pkg” icon inside the “LiveViewerForMacOS” disk image. Installation begins. Follow the instructions on screen and install the software. “x” in the version means 0 or greater. NOTE When a window for inputting a [Name] and [Password] appears, input the [Admin (administrator)]’s name and password. Page 5 10/17/2011 2.2 Connect to the network “LiveViewer” provides several options for connecting to your network projector. You can choose one that best meets your system and user needs. NOTE Up to 30 computers can be simultaneously connected to the projector through a network. 2.2.1 Launch “LiveViewer” To start the “LiveViewer” software on your PC, Double click the “LiveViewer” icon in your PC. Page 6 10/17/2011 2.2.2 Configure network parameters There are several options to configure network parameters on your computer. Select from List Enter Passcode History Configure manually Select the method that best meets your requirements. 2.2.3 Select From List Before selecting this item, your PC and network projectors need to be connected to the same network. If the connection is already established, choose [Select From List]. A list of the projectors connected to the network will appear. Select which projector you would like to send your images to. Proceed to the “2.5 Select the projector”. ( 14) 2.2.4 Enter Passcode Select “Enter PassCode”. Then enter the Passcode and click the [Connect]. Refer to the item “2.3 Passcode”. (9). Page 7 10/17/2011 2.2.5 History connection Select History data to connect to the network projector. It is required to store the History data in advance. Select the projector ‘History’ listed in the window. Click [Connect] Proceed to the item “2.5 Select the projector”. ( 14) NOTE The number of the history record is maximum 10 for each network adapter. When the 11th data is stored, the oldest record among the 10 will be overwritten. The date & time information in each history record is renewed when the network is connected by using the history record. If the DHCP is set on in the projector, the network connection between the projector and computer may not be established since IP address may be varied. 2.2.6 Configure manually Select “Configure manually” and click [Next]. Proceed to the item “2.4 Configure Network Setting Manually”. (10) . Page 8 10/17/2011 2.3 Passcode The unique Passcode system brings you a very quick and simple method for connecting to your network projector. The Passcode is a code that contains the network settings of the projector. When you input the Passcode in the “LiveViewer” on your PC, the network settings of the projector and PC are matched and the connection will be established immediately. The section is intended to explain how to use the Passcode. 2.3.1 Getting the Passcode The Passcode is 12-digit code consisting of alphanumeric characters (“1-9” and “A-Z”). The Passcode is displayed on the projector screen. Example: Passcode 1234-5678-9ABC There are two methods to get the Passcode from the projector Method 1 Turn on the projector, and make sure that the projector image is displayed on screen. Press the source button on the remote control or the INPUT button on the projector to select the LAN as input port. If there is no signal on the LAN port, you can find the Passcode on screen. Method 2 Turn on the projector, and make sure that the projector image is displayed on screen. Press the MENU button on the remote control or the ▲/▼/◄/► buttons on the projector to show the on screen menu. Use the ▲/▼ cursor buttons to select the Advanced Menu, and use the ► cursor button to enter. Use the ▲/▼ cursor buttons to select NETWORK, and use the ► cursor button to enter. Use the ▲/▼ cursor buttons to select the Network Info, and use the ► cursor button to display the Network Info. The Passcode appears at the top right corner in the Network Info window. NOTE The Passcode system does not work under the conditions below. If your system meets one of these conditions, please set the connection manually. Subnet mask is not Class A or B or C. The Passcode system accepts Class A, B and C only. Class A:(255.0.0.0), Class B:(255.255.0.0), Class C:(255.255.255.0) Use Method 2, when you project your computer image by the "LiveViewer for Mac", or when the LAN port is not selected as the input signal. If there is no communication between the network projector and PC in 5 minutes, the Passcode will be changed. Page 9 10/17/2011 2.3.2 Entering the Passcode Simply input the Passcode (12-digits divided by 3 boxes). Example: PASSCODE 1234-5678-9ABC Enter the Passcode Click [Connect] Proceed to the item “2.5 Select the projector”. ( 14) NOTE When entering the Passcode, capital and small letters are not distinguished. 2.4 Configure Network Setting Manually All setting for the network connection between the projector and PC is input manually. Click the [Next]. The information to be input for a manual configuration will vary, depending on how you want to connect the projector and PC. Page 10 10/17/2011 Wired LAN If you use the wired LAN, proceed to the item “2.4.1 Wired LAN”. (11). Wireless LAN The required information depends on how you connect the projector and PC. The projector connected to an access point by a LAN cable. “2.4.2 Wireless LAN”. (13). 2.4.1 Wired LAN Enter the following information for the projector.*1 IP address: 192.168.1.10(example) Subnet mask: 255.255.255.128 (example) Click [Connect] The network connection will be established. Proceed to the item “2.5 Select the projector”. ( 14) NOTE *1 To find the network setting on the projector, refer to the NOTE. (9) Page 11 10/17/2011 Page 12 10/17/2011 2.4.2 Wireless LAN Settings of the access point*1. Enter the following information. SSID: WirelessAccessPoint (example) Encryption: WEP (example) Encryption key*2: ●●●●●●●●●● (example) Mode: INFRASTRUCTURE IP Addess: 192.168.1.10 (example) Subnet mask: 255.255.255.0 (example) Click [Connect]. The wireless connection will be established. Proceed to the item “2.5 Select the projector”. ( 14) NOTE *1 Contact your network administrator for the proper access point settings. *2 If you are using encryption, you need to input the encryption key. Contact your network administrator to find the encryption key that is set in the projector. The encryption key is always shown as “●●●●●●●●●●”. *3 To find the network setting on the projector, refer to the NOTE. ( 9) Page 13 10/17/2011 2.5 Select the projector 2.5.1 Connection and transmission When the network connection is established, the “Connection to Projector successful” screen is displayed. Make sure that the correct projector that you want to send your image to is selected, by checking the projector name and IP address as shown in the screen. To send images to the projector, click [OK]. The transmission will be started. In order to display the transmitted images to the projector, it is first required that you: Select the LAN port as input source on the projector Refer to the item “3 Start “LiveViewer”” ( 16). If you select [Cancel], the “LiveViewer for Mac” main menu is displayed in Stand-by mode. (Stand-by mode is the condition when the wireless connection is established, but or button on the the images are not transmitted.) The transmission can be started by clicking the “LiveViewer for Mac” main menu. 2.5.2 Connection error When connection to the projector can not be established, an error message, “Network Connection not established”, will be displayed. Click [OK], to display the “LiveViewer” main menu.) Page 14 10/17/2011 2.6 Starting the Network Presentation This chapter explains the Network Presentation feature with which you can project computer images transmitted through a network. The “LiveViewer” allows you to project images from one or multiple computers by connecting the projector to an existing network without using computer cables. This Network Presentation feature helps you to smoothly make your presentations and conduct conferences. To start the Network Presentation, select the LAN port as the input source on the projector and click the Starting Capture button on the “LiveViewer for Mac”. 2.6.1 Display Mode There are two display modes, Single PC mode and Multi PC mode. Single PC mode The projector displays images sent by one PC. Multi PC mode The projector screen is divided to 4 zones. The projector displays images of an individual PC in each zone, allowing the projector to displays images of up to 4 PCs at the same time. 2.6.2 Presenter mode In the Single PC mode, the projector can be occupied by one PC and can block access from any other PC (if Presenter mode is set to ON in “LiveViewer for Mac”). While making your presentation, you don’t need to worry that the image on screen will be unexpectedly switched to an image sent by another PC. Presenter mode can be set to ON in the Option menu in the “LiveViewer for Mac” Main menu. 2.6.3 Display User Name A User Name can be set in “LiveViewer for Mac”, which will be displayed on screen while presenting. This makes it easy to keep track of whose image is currently displayed on screen. Page 15 10/17/2011 3 Start “LiveViewer” Once you have established a connection between your network projector and PC, the “LiveViewer for Mac” main menu will be shown on the PC screen. From the main menu you can configure settings and operate the functions needed to send images to the projector. 3.1 Main menus and operating buttons 3.1.1 Menu Type 4) 2) 1) 3) 4) 5) 6) 7) Indicator Fig. 3.b “LiveViewer for Mac” Main Menu 3.1.2 Menu button 1) Start Capture button The transmission to the network projector is started and images will be displayed. The initial Display mode is Single PC mode. 2) Stop Capture button The transmitted image is stopped. NOTE Images may not be displayed on screen, if the Start/Stop buttons are clicked repeatedly. 3) Hold button The image on screen is temporally frozen. The last image before the button is clicked remains on screen. This allows you to change the image data on your PC without showing it on the projector’s screen. 4) Display mode button (18) It allows you to switch between Single PC mode and Multi PC mode. 5) Connect button The screen to select the connection mode is displayed. Go to the item "2.2.2 Configure network parameters"( 7) 6) Option button The option screen is displayed. 7) Web control button Page 16 10/17/2011 Starts the Web browser on your computer and displays Web control screen to control the projector and change various settings for the projector. 3.1.3 Indicator The indicator shows the following status. Indicator Status Note Not connected The network connection to the projector is not established yet. Hold Connected Disconnected The network connection is established, but the image transmission is on hold. The network connection is established and the images on the PC are being sent to the projector. The indicator is blinks while the connection is in progress. The network connection to the projector is disconnected. NOTE The status display is refreshed in every 3 seconds. If status cannot be gotten from the projector, it will not be refreshed. Page 17 10/17/2011 3.1.4 Multi PC display mode “LiveViewer” has both Single PC mode and Multi PC display modes. These modes can be switched from the main menu. Click the button on the main menu. The buttons below are displayed. Select from 1) to 4) buttons, and click it. 1) – 4) Multi PC mode: Your image is displayed on a quarter screens as identified by the icon 5) Single PC mode: Your image is displayed full screen. 1) 2) 3) 4) 5) The projector screen is switched to the mode selected above, and your PC image will be displayed on the screen. The icon on the main menu is replaced by the icon you selected. NOTE Image transmission is stopped when:you click the Single mode button while the projector is in the Single PC mode or you click one of the Multi mode buttons while the projector is in the Multi PC mode When Multi PC mode is selected, the projector screen is automatically divided to 4 zones. When the Presenter mode is enabled in Single PC mode, the button will be ignored if you have not the right to controll Presenter mode (someone is in the Presenter mode). If someone occupied one of quarter screen section and you select that section, the previous occupant will put into the background and switch over the section to you. Page 18 10/17/2011 3.1.5 Optional settings Clicking the Option button displays the option menu on screen. 1) 2) 3) Fig. 3.c Option Menu 1) Optimize Performance “LiveViewer for Mac” captures PC screen in JPEG mode and send the JPEG data to the projector. “LiveViewer for Mac” has two options that have different compression rate of JPEG data. Transmission speed: Speed takes priority over Image quality. JPEG compression rate is higher. The displayed image on the projector is rewritten quicker because the transferred data is more compressed, but the image quality is lessened. Image Quality: Image quality takes priority over Speed. JPEG compression rate is lower. The displayed image on the projector is rewritten slower because the transferred data is larger, but the image quality is better. 2) Presenter Mode In Single PC mode, the projector can be occupied by one PC and can block access from any other PC, if the Presenter mode is set to ‘On’ in “LiveViewer for Mac” While making your presentation, you don’t need to worry that the image on screen will be unexpectedly switched to an image sent by another PC. If you want to use Presenter Mode, put a check mark in the check box. NOTE When Multi PC mode is selected, the setting for the Presenter mode is invalid. When switching from Multi PC mode to Single PC mode, Presenter mode setting of the PC is valid. The default setting is ‘ON’. 3) Display User Name A user name (up to 20 letters) can be input by using alphanumeric characters. The user name can be displayed on the projector screen, so it’s easy to tell whose image is currently on the screen. If the check box is not selected, the information is not sent to the projector. Page 19 10/17/2011 Appendix A Messages Message 1: A network connection was not established This screen is displayed in the case that the projector is not connected with a LAN cable to your PC (when wired LAN is selected). Be sure that the projector is connected with a LAN cable to your PC. Click [OK], and you will be returned to the previous screen (select the network connection mode). The Projector has already reached the maximum number of Network Connections. The projector can connect up to 5 PCs at the same time. Click [OK], the “LiveViewer” main menu is displayed. Please retry after disconnecting one of the connected PC’s Message 2: Incorrect Passcode An incorrect Passcode was input. Click [Back] to return to the “Enter Passcode” screen. Check the Passcode on the projector screen and enter the code again. Message 3: The projector is currently in use with another user. The projector you want to display to is occupied by another computer in the Presenter mode. Click [OK], then the “LiveViewer for Mac” main menu is displayed in stand-by mode. Once the Presenter has finished, retry to send your images. Message 4: A Slideshow is currently running on the projector that you are trying to display to. The projector you want to send your images to is in the Slideshow mode (PC-LESS Presentation mode). Click [Yes], then the projector is switched from the Slideshow mode to the Live mode. Click [No], then the projector remains in the Slideshow mode, and the “LiveViewer for Mac” main menu is displayed (Stand-by mode) on your PC. Page 20 10/17/2011 Message 5: Are you sure you want to change the input channel of the Projector to 'LAN'? The projector is not set to the LAN as an input signal. Click [Yes], and the projector is switched to the LAN. Click [No], and the projector will remain as is, the “LiveViewer for Mac” main menu is displayed in the Stand-by mode on your PC. Page 21 10/17/2011 B Trouble Shooting Problem No image Connection to the Network The projector that you want to connect to is nowhere to be found on the list of available projectors Cannot communicate Likely Cause Things to Check Reference Page Number The projector is not turned on. Is the projector's lamp on? − The projector's input source isn't switched to LAN. Is the projector switched to LAN? − The computer and/or projector's Check both the PC and projector's network settings are network settings. not configured correctly. Firewall software is installed in your computer. - Refer to the firewall software manual and take one of the following actions: - Exclude the “LiveViewer” from blocking item list − - Disable the firewall software while using the “LiveViewer” The computer and/or projector's Check the network configurations of the network settings are computer and projector. not configured correctly. − An access point is used, and your computer is connected to the access point via wireless LAN adaptor. − Use network utilities that may come with your computer or wireless LAN card to establish wireless network connection. For detail, refer to the manual of the computer or the adaptor. Page 22 10/17/2011 Problem The projected image is rather slow compared to that of the PC Likely Cause Things to Check Reference Page Number The projector isn't capable of relaying dynamic images such as PowerPoint® animation at full speed. Switching the priority to ‘Transmission Speed’ under the options menu may help to improve speed. 19 Network Presentation The compression rate being used for transferring the images is too low. Switching the priority to ‘Transmission Speed’ under the options menu may help to improve speed. Can't display the movies correctly. In some combinations of computer's video card and application software, there is a possibility that true image especially movies played by media player - cannot be transferred to the projector with the “LiveViewer for Mac. If there is a video acceleration level adjustment function in your application, Please try to adjust it. Refer your application manual in detail. Images contain lots of interference. The compression rate being used for transferring the images is too high. Try setting the priority to Image Quality in the “LiveViewer for Mac” Option menu. You may experience a drop in speed. 19 No transparency or translucency effects (Glass) Using “LiveViewer for Mac” with Windows Aero mode. “LiveViewer for Mac” does not support these features of Windows Vista Aero. − Page 23 19 10/17/2011 Reference Page Number Problem Likely Cause Things to Check Others - Information from the projector to computer is not correct or completed - The projector does not respond - Image on screen is frozen. Communication between the projector and computer is not working well. NETWORK Functions of the projector is not working well. Try “RESTART” in SERVICE menu under the NETWORK menu. Page 24 - 10/17/2011