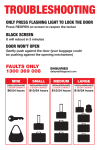
1
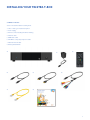
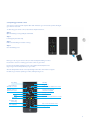
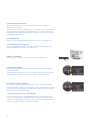
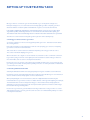
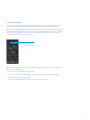
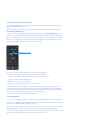
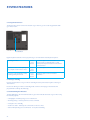
TELSTRA T-BOX™
Entertainment out of the box
USER GUIDE
1
WELCOME TO THE TELSTRA T-BOX
The Telstra T-Box is a new and exciting Internet and TV
experience. There’s dozens of different features to enjoy,
and we have written this guide to help you get the most
out of your T-Box.
2
INDEX
Safety instructions
04
Introduction
06
Installing your T-Box
07
3.1
What’s in the box
07
3.2
Getting to know your T-Box
08
3.3
Preparing your remote control
09
3.4
Selecting the right TV format
10
3.5
Using smartcards
10
3.6
Connecting your T-Box to your TV
10
3.7Connecting your T-Box to your home theatre
10
Setting up your T-Box
11
4.1
Pairing your remote control to your T-Box
11
4.2
Selecting a Parental Control code
11
4.3
Connecting to the Internet
12
4.4
Tuning into Digital free-to-air TV channels
14
4.5Registering your T-Box and joining
BigPond Movies Downloads
14
Using your T-Box
15
5.1
Using the Home Menu
15
5.2
Watching TV
15
5.3
Accessing the Program Guide
15
5.4
Accessing the TV channel Homepage
16
5.5
Recording a program
17
5.6
Playing programs and movies
18
5.7Accessing the Play Menu and
Program Options 18
5.8
Accessing BigPond Movies Downloads
19
5.9
Using My Rentals
19
5.10 Using My Recordings
20
5.11 Understanding Settings
20
System features
22
6.1
Using the Reset button 22
6.2
Setting to standby 22
6.3 Understanding the LED status
22
6.4 Updates
23
Troubleshooting
24
General conditions of use
28
Warranty
28
Legal notifications
28
Technical information
28
3
SAFETY INSTRUCTIONS
Please read and follow safety instructions carefully before you install the equipment and start
to use your Telstra T-Box.
Warranty Warning: Please note you must not repair or replace any part of your T-Box yourself. All
repairs must be carried out by a qualified Telstra technician. Any attempt to open or dismantle your
T-Box in any way, or any modification made to the software will immediately void your warranty.
Installation
• Your T-Box and its accessories are designed to be used in metropolitan Australia.
• Your T-Box and its accessories are designed to be used inside the home.
• K
eep your T-Box, its accessories including any plastic, packaging and batteries that came with the
kit out of reach of children.
• O
nly the cords and accessories provided with, or recommended for, your T-Box should be used
with your T-Box.
• A
space of at least 3cm must be left around and above your T-Box to ensure sufficient
ventilation.
• Y
our T-Box must be placed on a firm and flat surface to avoid any possibility of it falling or
being bumped.
• Avoid situations where your T-Box could fall, be dropped or bumped.
• Do not place your T-Box or its accessories near an electromagnetic source.
• K
eep your T-Box and its accessories sheltered from any heat source, humidity, dust and direct
sun light.
• T o prevent overheating of your T-Box, never obstruct its ventilation openings with items such
as newspapers, tablecloths or curtains.
• Do not place any item on top of your T-Box.
• Never attempt to insert any item inside your T-Box.
• Never place an open flame such, as lit candles, on top of or near your T-Box or its accessories.
• Keep your T-Box and accessories in a moderate temperature range.
• Always use the set-top-box in a temperature range of 0oC – 45oC.
• Your T-Box and its accessories must be protected from water spills and splashes.
• No water filled object such as a vase must be placed on top of your T-Box or its accessories.
• Never spill any liquid on your T-Box or its accessories.
• M
ake sure that all power sources to your T-Box are unplugged before plugging in your audio,
video or network equipment.
4
Electric connection
• A
void connecting too many devices to the same electric power source. This may result in an
overload which could cause a fire or an electric shock.
• T he power supply provided with your T-Box is the only power supply to be used with your T-Box.
The power supply must not be used for other devices.
• Do not connect your T-Box to a non-standard Australian power point.
• P ush the power supply in fully at the power point. A badly connected power supply could cause
an electric arc, shock or fire.
• T o disconnect from the power source, first switch off the power point and then pull the power
supply by the adaptor block, do not pull on the electric wire.
• The power point is used to turn off the T-Box so maintain easy access to the power point switch.
Instructions for use
• Put your T-Box on standby when not in use.
• D
uring storms or when leaving your home for a long period of time, we recommend you disconnect
all electric wires connected to your T-Box.
• M
ake sure all electric wires connected to your T-Box are disconnected before cleaning it.
The surface of your T-Box can be cleaned with a slightly damp soft cloth. No abrasive or alcohol
based products should be used.
Replacement of remote control batteries
• Warning: there is a risk of explosion if the wrong kind of batteries are used. Ask a specialist
for advice if you’re not sure when replacing them.
• Never attempt to recharge your remote control battery.
• Do not dismantle or throw your battery in the fire or incinerate it.
• Do not expose your battery to high temperatures or to direct sun light.
Respect for the environment
• D
o not throw away your batteries in your domestic garbage. Make sure you dispose of them
in places designed for this use.
• The packaging for your T-Box is recyclable. Please dispose of packaging correctly.
• T -Box and its accessories should be disposed of appropriately and in accordance with local
laws. When your T-Box reaches the end of its life please ensure you dispose of correctly.
5
INTRODUCTION
Thanks for choosing Telstra T-Box. Your T-Box is an interactive Internet and TV device, and it is
compatible with a range of free-to-air channels and internet services. These include:
• D
igital TV Channels – all standard definition and high definition free-to-air digital TV channels
which can be tuned locally can be displayed through your T-Box.
• B
igPond® Movies Downloads – rent New Releases and Classic Movies downloaded directly to your
T-Box to view on your TV.
• B
igPond® TV – watch BigPond® TV channels including the Music Channel, Live News Channel and
AFL, NRL and Sport channels.
• P rogram guide – view programs for the next week, including pictures, program details and instant
recording.
• Personal Video Recorder – enables you to watch your recorded programs at a time convenient to you.
We want to help you get the most out of the channels and services available from your T-Box, so
make sure you follow these simple steps:
• U
sing the Getting Started Guide, install your T-Box and make sure that it is connected to the
Internet through BigPond® Broadband.
• Register your T-Box and sign up to BigPond Movies Downloads.
Always keep your T-Box connected to the Internet so that you can receive the full benefits of your
T-Box. This will also ensure you stay informed of new services.
• R
eceive software updates to your T-Box which automatically download and are unmetered when
you’re connected to the Internet through BigPond Broadband.
Even when not connected to the Internet through BigPond®, your T-Box still provides some
great features:
• Enjoy access to all the free-to-air Digital TV channels available in your area.
• Watch one channel while recording another at the same time with twin tuners.
• Pause and rewind live TV programs while you watch them.
• Get additional information about current and upcoming Digital TV programs.
• Manually program recordings to watch later via ‘My Recordings’.
6
INSTALLING YOUR TELSTRA T-BOX
3.1 What’s in the box
Your box should include the following items:
1. T-Box – that’s your Telstra Set Top Box
2. Power supply
3. Remote control including the CR2032 battery
4. Antenna cable
5. HDMI video cable
6 Mini DIN to composite/component cable
7. Ethernet network cable
8. Getting Started Guide
1.
3.
2.
4.
5.
7.
8.
6.
7
3.2 Getting to know your T-Box
Back view
S/PDIF optical
socket
USB
socket
Power supply
connection
Ethernet
socket
HDMI socket
TV connector
(mini-DIN)
TV antenna
outlet
TV antenna
input
Stereo mini-jack
socket
Front view
LED status light
View from below
Reset button
8
USB socket
3.3 Preparing your remote control
Your remote control uses radio signals rather than infrared so you don’t need to point it directly at
your T-Box for it to work.
To start using your remote control, follow these simple instructions:
Step 1
Open the battery cover by sliding it downwards.
Step 2
Pull away the protective strip.
Step 3
Make sure the battery is inserted correctly.
Step 4
Close the battery cover.
Before you can use your remote control, it must first be paired with your T-Box.
Please refer to section 4.1 ‘Pairing your remote control to your T-Box’.
Please note the distance that the remote control will work will depend on the
layout of your home and positioning of your T-Box.
We have designed the remote control specifically for the T-Box. This means it only has
the buttons you need to operate your T-Box, making it easy to use.
Recording
Standby
Fast rewind or
defined on screen
Play/Pause
Fast forward or defined on screen
Activate action or
defined on screen
Access to the vertical
and horizontal EPG
Change channels
Volume
Back
Favourite
Main menu
Colour buttons (defined on-screen)
Numbers and
text entry
Cancel/delete
Full screen interactive menu
Program guide
9
3.4 Selecting the right TV format
All the menus and screens on your T-Box have been optimised for display on
widescreen 16:9 TV screens.
For the best picture, make sure that your T-Box is connected to a screen labelled high
definition (Full HD or HD ready) using an HDMI cable. If you connect your T-Box to a
standard aspect 4:3 screen through the DIN to composite/component connectors the
picture quality will be reduced.
3.5 Using smartcards
There is a slot for a smartcard underneath your T-Box. This is not currently in use.
3.6 Connecting your T-Box to your TV
Your T-Box will work with a range of TVs. Different cables are included in the box,
and these will help you connect in one of three ways.
i) HDMI – recommended
The ideal way to connect your T-Box to your TV is using the HDMI cable.
ii) Component – standard
If you use the MINI DIN to composite/component video cable, this will provide an
adequate connection.
Connect the black round plug to your T-Box, and the coloured leads to your TV Video
and Audio inputs – blue, green and red for Video, and red and white for Audio.
iii) Composite – does not support HD
It’s ok to connect this way, but please note that it does not support high definition.
Using the Mini DIN to composite/component video cable, connect the black round plug
to your T-Box. Connect the yellow video cable to the TV Video input and the red and
white audio cable to the TV Audio inputs.
3.7 Connecting your T-Box to your home theatre
Sound is an important part of your entertainment experience. Connect your T-Box
to your home theatre system using either a mini-Jack stereo or optical cable. These
cables are not supplied with your T-Box. You can purchase these, and any additional
accessories, you want from your local electronics retailer.
10
SETTING UP YOUR TELSTRA T-BOX
Once your T-Box is connected to your TV and switched on, you can begin the setup process.
During the setup process, on-screen instructions will help guide you. Once complete, your T-Box
will check whether a software update is available but only if it is connected to the Internet.
If an update is available, this will take place automatically. Please do not try to use your T-Box during
any software updates, and always follow the on-screen instructions. At the end of the update, your
T-Box will turn itself off and automatically restart. You will then have all the latest features to get started.
The T-Box on-screen instructions will guide you through each of the following steps.
4.1 Pairing your remote control to your T-Box
You need to activate your remote control by pairing it with your T-Box – this will ensure the devices
are correctly linked.
First, make sure that you have prepared your remote control properly, go to section 3.4 ‘Preparing
your remote control’ for more information.
Then, follow the on-screen instructions and enter the pairing code using your remote control.
The code to enter will be displayed on your TV.
When instructed to do so by the on-screen instructions, re-enter the code to confirm the connection.
If you need to pair your remote control again, press the reset button located under your T-Box. For
more information, refer to section 6.1 ‘Using the Reset button’.
Please note: If you use a remote control previously used with another T-Box, or if you have just reset
your T-Box, you must first cancel its previous pairing connection. To do this, press button 1 and button
7 on the remote for 3 seconds.
4.2 Selecting a Parental Control PIN
Selecting a Parental Control PIN is a necessary setup step, even if you do not wish to use it in the future.
Please keep a record of this Parental Control PIN in a safe place as it will allow you to lock and unlock
access to certain channels and programs of various classifications.
When prompted by the on-screen instructions, enter the 4-digit Parental Control PIN using the
numerical buttons on your remote control. You will be asked to confirm your PIN again by re-entering it.
The Parental Control function is designed to help you control what channels and programs are
watched in your home. However, it should never replace adult supervision, and we recommend you
be involved in what your family watch.
Please note: If you have lost your Parental Control PIN you will have to reset your T-Box or contact
Telstra Customer Service. To reset your T-Box, refer to section 5.12 ‘Understanding Settings’ or section
6.1 ‘Using the Reset button’.
11
4.3 Connecting to the Internet
T-Box not only connects you to free-to-air Digital TV, but it also gives you access to BigPond TV live
channels and the BigPond Movies Downloads service. If you would like to take full advantage of these
services, connect your T-Box to the Internet through your BigPond® Home Network Gateway/modem.
One thing to remember is the speed of your T-Box will depend on the speed of your BigPond
connection – the faster the speed, the faster some services will be available to you such as BigPond
Movies Downloads.
There are two ways to connect your T-Box to the Internet:
i) Connect via Ethernet network cable – recommended
Use this type of connection if your BigPond Home Network Gateway/modem is close to your T-Box.
This is the recommended way to connect your T-Box to the Internet as it provides the best
performance. When directed by the on-screen instructions:
• Select ’Connect to the Internet via Ethernet’ on the screen.
• M
ake sure you have connected the provided Ethernet network cable from your T-Box to your
Home Network Gateway/modem.
• Press OK when asked to activate the connection and wait a few seconds.
• Once the connection is confirmed on-screen, select ’next step’ to continue.
ii) Connect via Wi-Fi – wireless
Use this type of connection when your BigPond Home Network Gateway/modem is not close to your
T-Box and a wired connection is not possible.
When connecting wirelessly, a number of factors can vary the speed of your Internet connection
like; the distance between your T-Box and broadband gateway or interference from other electrical
devices. As a result, this may not provide the optimal connection experience.
Before you get started, you will need to check you have the following details ready to hand:
• Name of your Wi-Fi home network, or SSID.
• Wireless security key for your Wi-Fi network (WEP or WPA) if it is a secured network.
12
Wireless Network Name (SSID):
BigPond####
Wireless Security Key (WPA):
##########
Refer to your gateway’s user manual to identify your network name and its password. If you have a
BigPond® ADSL or Cable Home Network Gateway, the Wi-Fi network name and key are often printed
on a sticker on the base or back of the device, or on the Wi-Fi key card supplied with your gateway.
When directed by the on-screen instructions:
• Select the Wi-Fi option on the screen.
• Select your Wi-Fi network name from the list and press OK.
If your network does not appear on the list, select the option to ‘Re-scan the Wi-Fi networks’.
If your Wi-Fi network is masked, select the option for ‘Other network’ among the list of networks
available and input the name and key of your Wi-Fi network manually. Follow these steps:
• I nput the name and security key for your network using the alphanumeric buttons on your remote
control. Be careful to use lower or upper case if your security information is case sensitive and use
the backspace button to correct mistakes.
• Select ‘OK’ to check and establish the connection.
If you are still unsuccessful, please check to make sure Wi-Fi is enabled on your gateway. You will find
that most gateways have lights to indicate if the Wi-Fi is switched on or not.
Once the connection is confirmed, select the option for Next step to continue the setup process.
Please note: Connecting to your Wi-Fi home network between your T-Box and your gateway does not
necessarily mean that your T-Box is correctly connected to the Internet. Even if your gateway loses
its Internet connection, your home network will still function. Refer to chapter 5.12 ‘Understanding
Settings’ for more information on network diagnostics.
The quality of your Wi-Fi connection is likely to vary according to the layout of your home and
position of your T-Box. In some situations your T-Box may not be able to locate your Wi-Fi home
network. If this is the case, connect your T-Box using the Ethernet cable provided.
The broadband speed of your T-Box is likely to vary according to the number of computers sharing
the Internet connection, home network and the type of connection.
Your T-Box is compatible with BigPond Cable and ADSL Home Network Gateways. Visit your local
T-Life, Telstra retailer or call us on 1800 331 402 for advice on compatible modems and plans.
We recommend you connect your T-Box to the Internet when directed by the on-screen instructions
and keep T-Box connected to the Internet at all times. This will ensure you benefit from any
automatic updates and keep you regularly informed of new features available for your T-Box.
13
4.4 Tuning into Digital free-to-air TV channels
You can tune your T-Box into local free-to-air TV channels using the automatic TV channels
search function.
Before you start the automatic tuning, make sure your T-Box is correctly connected to your TV
antenna. This is likely to be through a socket in the wall which connects to an external TV aerial.
Once connected, follow these instructions:
• S tart the automatic channels search, and your T-Box will detect the Digital free-to-air TV channels
available in your area.
• Wait until the automatic search has been completed.
• I f there are multiple versions of the same channel in your area, T-Box will only display the one with
the strongest signal.
• I f you are connected to the Internet through BigPond Broadband, the BigPond TV channels will
also be included automatically in the TV channel guide.
• Confirm you have successfully completed the search, or start a new search if necessary.
Please note: Before you proceed with the installation of your T-Box, please ensure that your external
TV antenna provides good reception for digital television. For best results, you may have to change
or reposition your TV antenna.
Reception of high definition channels and programs is only possible in certain areas and only on
televisions that are labelled high definition such as HD Ready or Full HD and connected to your
T-Box by a HDMI cable. If you need more information, please ask for advice from your TV retailer,
manufacturer or installer.
4.5 Registering your T-Box and joining BigPond Movies Downloads
To register type the following URL into your computer’s browser:
www.telstra.com/tboxsetup and then follow the instructions on screen.
To rent movies through BigPond Movies Downloads on your T-Box, you can register your existing
movies account or sign up for a new account with BigPond Movies Downloads.
Follow the on-screen instructions for joining BigPond Movies Downloads. Once you are registered
for BigPond Movies Downloads, it will take a few minutes to setup your account and become
available to use.
14
USING YOUR TELSTRA T-BOX
We have designed your T-Box to be as simple as possible when it
comes to the navigation, menus and screens you use to access the
various channels like free-to-air TV, BigPond TV and BigPond Movies
Downloads. There is also a range of on-screen instructions and
icons to help familiarise you with the features offered and find
your way around.
5.1 Using the Home Menu
The Home Menu is the main menu for your T-Box. You can access it from any screen with a single
click of the Menu button, and all the features can be accessed from here.
5.2 Watching TV
To watch TV, simply click on the Watch TV option from the Home Menu.
My Recordings
Program guide
Watch TV
BigPond Movies
Watch BigPond TV
Now on BigPond Sport
Fullscreen
Back
OK Select
Mon. 7:30pm
If you would like to access a channel directly, enter the channel number using the 0-9 buttons of your
remote control, or you can use the P+ and P- buttons.
5.3 Accessing the Program Guide
To access the Program Guide, press the Program Guide button on your remote control, or you can
select the option from the Home Menu.
The Program Guide shows you what’s on all the TV or video channels offered such as digital free-toair TV channels, BigPond TV programs, BigPond Movies Downloads.
You can use the navigation buttons on your remote control to move from program to program or
channel to channel in the Program Guide. You can also skip to the day’s primetime, as well as move
between days in 24-hour increments.
24 hours
Skip to primetime/+24 hours
Navigate time-frame
Navigate channels
Navigate time-frame
15
Please note: The Program Guide gives you details of programs for several days in advance.
This includes illustrations, pictures, detailed recaps and viewing suggestions. If your T-Box isn’t
connected to the Internet, only information broadcasted by the Digital free-to-air TV channels
about current and upcoming programs will be presented, if available.
Information contained in the Program Guide is updated regularly but may be incorrect if there
is a last minute change in programming.
5.4 Accessing the TV channel Homepage
You can access a TV channel’s Homepage by pressing the Full Screen button on your remote
control while you are watching the channel. Here, you will be able to find more information about:
•
•
•
•
•
•
The program you are currently watching.
Upcoming program schedule and details.
Prime time programming.
Program synopsis information.
The programming and services of that channel.
Recordings that you have made from that channel.
Full screen button
Use the navigation buttons to select different categories and programs. If you do not have access to
the Program Guide, you will only be able to view information about what program is on now and next.
Please note: Some channels may not offer a TV channel Homepage.
Change category
Play next program
coming up
Change category
16
5.5 Recording a program
You can record a TV program you are watching at any time by pressing the red REC button while
watching the program. If you would like to record a future program, go to the Program Guide.
Once you have highlighted the program from the Program Guide and launched the full screen display
program, press the REC button to access to the recording and programming menu. Here, you can also
use the remote control buttons to amend your recording start or finish time, and you can also set
several programs to record one after the other.
Start or schedule
a recording for the
program in focus
Once you’re happy, confirm your recording choice by pressing the OK button, or you can cancel your
choice using the back button.
If you want to stop or modify a current recording:
• Access the channel or select the program currently being recorded from the Program Guide.
• Press REC to display the recording menu.
• You can then select the option to modify or stop the current recording.
17
If you want to modify or cancel a scheduled recording:
• Select the future program from the Program Guide.
• Press REC to display the recording menu.
• You can then select the option to modify or cancel the recording.
Please refer to section 5.11 ‘Using My Recordings’ to access the complete list of your recordings and
programming.
Please note: Your T-Box has two tuners which lets you record one program at the same time as you
are watching another.
5.6 Playing programs and movies
At any time while watching a TV program, a recording or a downloaded film, you can pause the
action and access the Program Guide.
5.7 Accessing the Play Menu and Program Options
When you are watching a TV program, a recording or a downloaded film, you can access the Play
Menu and Program Options at any time. Here, you will find the following information and options:
• Play counter.
• Subtitles.
• Languages and audio modes.
• Program display format.
OK
While watching a TV program, a recording or a downloaded film, press the OK button to access the
Play Menu and Program Options.
Use the left and right arrow keys to access available options.
Use the up and down arrow keys to adjust the option mode.
18
5.8 Accessing BigPond Movies Downloads
To access BigPond Movies Downloads using your T-Box, it will need to be connected to an eligible
BigPond Broadband Internet service.
Once connected, you will need to sign up to BigPond Movies Downloads. You can do this online at
www.telstra.com/tboxsetup.
If you do not have an eligible BigPond Broadband Internet Service, visit www.bigpond.com to select
a plan to suit your needs. With a BigPond Broadband Internet Service, BigPond content, like BigPond
Movies and BigPond TV and T-Box services are unmetered so it does not affect your download limits.
Once you are ready, simply click on BigPond Movies Downloads from the Home Menu and you can
start browsing a wide selection of movies and TV shows to rent.
Navigate menu items
Here, you can use the right and left arrows to select from a range options:
• Movies – view trailers and purchase downloads for the latest movies.
• TV Shows – view trailers and purchase downloads for the latest TV shows.
• Featured – featured movies and TV shows.
• My Rentals – shows your current rentals.
• My Account – your BigPond Movies account information.
Please note: Rentals are generally valid for a limited time only. This includes the time you have
to start viewing the movie as well as the time you have to finish viewing it. For example depending
on the title you may have up to 30 days to start watching a Movie you have downloaded and then
up to 48 hours to finish watching the Movie once you start watching.
You can monitor your download activity in ‘My Rentals’.
5.9 Using My Rentals
You can access, watch and manage your rental movies by selecting ‘My Rentals’ from the Home Menu.
Here, you can navigate through available, downloading, queued and expired rentals. You can also sort
the order of the rentals by Expiry Date, Title or Type.
When you are downloading several movies at the same time, you can choose the ones you want to
download first. Once downloaded, just select the rental and press ‘Play’ to begin watching.
Some movies may be available to watch before the download to your T-Box is complete. This is called
progressive downloading and it allows you to enjoy your movies sooner.
19
5.10 Using My Recordings
You can view and access all your recorded TV shows by selecting the ‘My Recordings’ option from the
Home Menu.
This option details your recordings as well as your scheduled recordings. It also shows the remaining
storage space.
You can use the right and left arrows on your remote control to browse your recordings, and you can
select the recording you would like to view by clicking ‘OK’.
Clicking ‘OK’ will also provide other options such as exporting the recording to an external USB storage
device. Please remember that you will need to connect a USB storage device to the USB port of your
T-Box for this menu option to be available.
Please note: Make sure you regularly check the remaining space available for your recordings.
This is displayed above the recording list. Alternatively, delete your recordings as you go to free up
space and ensure any future recordings are successful.
5.11 Understanding Settings
You can use this option to view and modify your T-Box account settings.
My Account
• Purchase History – see a history movies and programs purchased from BigPond Movies Downloads.
• Redeem a voucher – enter BigPond Movie Voucher codes to redeem.
System Information
• Y
our T-Box system information – screen listing the main diagnostic and system information
displays for your T-Box.
• Registration code – information needed to register your T-Box to your customer account.
• U
SB information – status of the various USB devices using your T-Box’s USB ports for a range
of services.
• Licensing and copyright – list of legal and credit notations.
• R
eset option – access to various ways to restart your T-Box. Please refer to the instructions
provided on the screen.
Display Settings
• Time Zone – select the appropriate Australian time zone.
• Time Format – choose between 12 and 24 hour clock format.
• Auto-hide display settings – adjust the time before the menu automatically closes.
• A
dvanced power saving management – adjust the time before your T-Box switches to
automatic standby.
• Subtitle preferences – select the default subtitles used.
20
Parental Control
• C lassification restriction – controlling access to programs according to their viewing
audience identification.
• Channel blocking – controlling and/or locking access to specific channels.
• C hanging Parental PIN – changing the code for Parent Control – if you have lost your Parental
Control code, you will have to reset your T-Box or contact customer service (for more information,
refer to the Reset details above or section 6.1 Using the Reset button). Recording Settings
• Change pre-recorded time – set your default recording start time.
• Change post-recorded time – set your default recording end time.
Video Setup
• T V Resolution HDMI – adjust video output adjustments to match your screen when using
HDMI connection.
• T V Resolution (YUV) – adjust video output adjustments to match your screen when using
composite/component connections.
• Display format – adjusting the program display mode to match your TV format.
Audio Setup
• Preferred audio mode – select between stereo and Dolby Digital audio.
• HDMI audio output – select your HDMI audio preferences.
Channel Tuning
• Re-scan Channels – automatic search for channels that are available in your area.
• Manual tuning – manual input search for reception parameters.
• Reception information – check for the various parameters of the reception of each channel.
• E dit my channel list – remove channels you no longer want in your program guide and
channel list.
Internet Connection
• C onnect via Ethernet or Connect via Wi-Fi – adjusting the connection mode via Ethernet or Wi-Fi
– the connection procedure is similar to the one described during the setup of your T-Box (for more
information, refer to section 4.3 Connecting to the Internet).
• Network settings – manage your home network connections manually or automatically.
Program options
• Default language – selecting the default language used.
• Default audio mode – selecting the default audio mode used.
21
SYSTEM FEATURES
6.1 Using the Reset button
The Reset button can be found on the bottom of your T-Box. If you encounter any problems with
your T-Box, reset it.
Reset button
By pressing the Reset button for longer periods, you can activate the following Reset options:
Restarts your T-Box
Press
reset
button
Hold till the light on the front flashes once.
The box powers off immediately. You will
need to press the power button on the remote
to turn it back on
Resets the remote control pairing so
you can pair a new remote control.
Press
reset
button
Hold till the light on the front flashes twice.
Re-run the entire installation setup
including pairing the remote
Press
reset
button
Hold till the light on the front flashes
three times.
6.2 Setting to standby
Press the power button to set your T-Box to standby. Press the power button again to switch your
T-Box back on.
Please note: While your T-Box is in standby, it will continue to manage your downloads and
programmed recordings automatically.
6.3 Understanding the LED status
The Blue LED light on the front left hand side of your T-Box indicates the status of your T-Box using
the following signals:
• Steady light or Flashing every second - switched on.
• Flashing quickly – receiving a remote control command.
• Low light – set to standby.
• Continuous wave – waiting to be connected to a remote control.
• Waves interrupted by a 5 second interval – set to paused standby.
22
6.4 Updates
Always keep your T-Box connected to the Internet to benefit from automatic software updates.
In some instances, you can download updates from a computer connected to the Internet. Once complete, copy
the update onto a USB key and then plug this into a USB port on your T-Box.
For more information on updates available for your T-Box, visit www.telstra.com/tboxsetup.
While your T-Box is updating, automatically or via a USB key, please remember the following:
• Do not switch off your T-Box or press any buttons on your remote control.
• Your T-Box will switch itself off and automatically restart after a few minutes once the last
update is complete.
23
TROUBLESHOOTING
If you’re reading this section, then you must be having some trouble with your T-Box. Hopefully you’ll
find the information you need to get you back on track as quickly as possible.
Whenever you encounter a problem, the best place to start is always a quick reset. Just switch off your
T-Box at the power socket, wait 10 seconds, and then switch it back on again. Alternatively, follow the
instructions in section 6.1 ‘Using the Reset button’.
If you have already reset your T-Box and you’re still having problems, check your setup. This includes
making sure every plug and wire is in the right place, connected in the right way, and switched on.
If you’re having trouble with your BigPond Internet service, it is possible that we may be experiencing
some difficulties. However, service failures are rare events and you should only suspect one if your
service has worked fine in the past, not if you are having trouble with a new connection. If you can
get online using another device, you can always check our Service Status pages at www.bigpond.
com/help/servicestatus for more details.
Connection to the Internet
• I can’t connect to the internet
– Make sure that your Home Network Gateway/modem is switched on.
– Make sure that your Internet connection is working with other equipment like your computer.
– Check your Ethernet connection from the T-Box to your Home Network Gateway/modem.
• I can’t connect to Wi-Fi
– Make sure that the layout of your home allows your T-Box to detect the Wi-Fi network.
– M
ake sure that your Wi-Fi network isn’t masked. If it is, select the option for ‘Other Networks’ in
the list of detected networks.
– Make sure that you have correctly entered your Wireless Security Key, remember it is case sensitive.
– M
ake sure that Wi-Fi is enabled on your Home Network Gateway/modem. Check by looking at the
lights on the gateway or connecting it with other equipment like your computer.
– Try to connect by using an Ethernet cable.
Remote control
• My T-Box no longer responds to prompts from my remote control
Check if the LED on the front of the T-Box flashes when you press the remote. If it does not, then it
seems your remote control is not working as it should. Try the following:
– Make sure that the battery for your remote control is not flat.
– M
ake sure that your remote control is correctly paired to your T-Box. Refer to section 4.1 ‘Pairing
your remote control to your T-Box’.
– Open the battery cover, remove the battery and re-insert. Close the battery cover and try again.
• I can’t pair my remote control with the T-Box.
– P ress button 1 and button 7, keep both pressed for 5 seconds, then try pairing your remote control
with your T-Box again.
• My T-Box is on standby and I don’t have a remote control to switch it on again.
– Press the reset button for 1 second. Refer to section 6.1 ‘Using the Reset button’.
24
Free-to-air channel reception
• I don’t receive all the free-to-air Digital channels, or reception of some free-to-air
channels is poor.
– M
ake sure that your geographical location provides adequate reception to receive
free-to-air channels.
–Make sure your TV aerial is correctly installed and allows you to receive all available
channels correctly.
– Check that your antenna cable is connected to your TV antenna correctly.
– You may need to seek advice from a professional TV installer to assist.
Video display
• I cannot see anything on the TV screen.
–Check your T-Box is powered and working. The light on the front left of your T-Box should be on
when the T-Box is switched on.
– Check your T-Box is connected correctly to the TV.
–Check that you have selected the correct input or source on your TV. Press the button marked Input
or Source on your TV remote and select the same input that you plugged your T-Box into such as
HDMI or AV1.
– Try resetting the T-Box.
• The quality of the TV display or the movie being played is poor
– M
ake sure that you have correctly selected the HDMI video or composite/component Connector
modes. Refer to section 3.3 ‘Making the right connection’.
– P lease note that the HDMI cable display quality is better than the composite/component
connector.
Program information
• The program guide information is missing.
– Make sure your T-Box is connected to the Internet.
– Make sure you have registered your T-Box.
– If you have just restarted your T-Box, wait a few minutes while the reset completes.
– Detailed information on programs may not be available for some programs or channels.
• I have activated a language or subtitles and nothing is happening.
– T hese options, as well as the information about these options, are broadcasted by free-to-air TV
channel, and as a result they may not be available.
25
Recording
• My recordings are not listed.
– Make sure that the recording parameters and programming conditions are correct.
– M
ake sure that your disc has enough free space for your recordings. Refer to section 5.11 ‘Using
my Recordings’.
• I receive a message ‘hard disc full’.
– Free some space by deleting some of your recordings. Refer to section 5.11 ‘Using my Recordings’.
– Export some of your recordings to a USB flashdrive.
– S hould you continually encounter problems, reset your hard disc. Refer to section 6.1 ‘Using the
Reset button’.
Downloading movies
• I can’t play a movie.
– Make sure you have successfully created your BigPond Movies Downloads account.
– Make sure you have registered your T-Box.
–Check if your BigPond Movies Downloads account is still active and there are no outstanding
credit issues.
• My downloads are very slow.
– W
e recommend using BigPond Broadband Ultimate plans. If you are on our higher speed plans,
check if other devices are using the same connection as this can impact download speed.
– I f your T-Box is connected using Wi-Fi, there are a variety of factors that can influence your
speeds between your T-Box and your Home Network Gateway/modem. To get the best out of
your Wi-Fi Broadband connection, consider the following:
– Place your home network gateway/modem up high – use a wall bracket or a wooden shelf.
–Avoid placing large metal objects between your home network gateway or modem and your T-Box.
– Avoid large volumes of water like a fish tank or swimming pool between your gateway and T-Box.
–Try to place your home network gateway or modem away from other electromagnetic devices
like TVs, radios, cordless phones and microwaves. We also suggest changing the channel on your
cordless phone to avoid interference.
– Don’t have too many high-density floors and walls between your gateway and your T-Box.
• I rented a film but its download is always pending.
–Check that no other movie is being downloaded by selecting the My Recordings option from the
Home Menu. Refer to section 5.11 ‘Using My Recordings’.
–Select the My Recordings option from the Home Menu – here you can make the title of your choice
the priority download. Refer to section 5.11 ‘Using My Recordings’.
26
BigPond TV
• I can’t see my BigPond TV channels.
– Make sure that your T-Box is connected to the Internet. Refer to section 4.3 ‘Connecting the Internet’.
• My BigPond TV channels are empty.
– If you have just restarted your T-Box, wait a few minutes while the reset completes.
Customer account
• I have tried to purchase content but it is not being activated on my T-Box.
– M
ake sure that you have registered your T-Box. Refer to section 4.5 ‘Registering your T-Box and
joining BigPond Movies’.
– Restart your T-Box to activate the offer.
• I have swapped my T-Box and my services are no longer available.
– M
ake sure you have registered your new T-Box. Refer to section 4.5 ‘Registering your T-Box and
joining BigPond Movies’.
– Restart your T-Box to activate the offer.
Equipment
• I have lost or broken my remote control.
– visit www.telstra.com/tbox or call us on 1800 331 402.
–Remember to pair your new remote control. Refer to section 4.1 Pairing your remote control to
your T-Box.
For more help visit www.telstra.com/tboxsupport or call us at 1800 331 402.
27
GENERAL CONDITIONS OF USE
The Telstra T-Box, including the various equipment and free or paid services which are available, must
be installed and used exclusively in Australia and in accordance with the instructions for use herein.
The T-Box and the services offered are strictly for private use to the exclusion of any other use. The
user’s
home must have an eligible BigPond Broadband Internet connection to fully benefit from the T-Box.
Warranty
T-Box and its equipment are covered by a manufacturer’s warranty for parts and labour for 24
months from the purchase date. For the warranty to be valid, the T-Box, its components and
equipment must be used strictly in accordance with the instructions herein.
If your have purchased your T-Box through one of our partner distributors, please refer to the after
sale conditions of this trading partner regarding any manufacture warranty claim.
Legal notifications
In using your T-Box, you must not violate any intellectual property rights concerning a brand, design,
photo, licence, software program, audiovisual work or any other form of intellectual property.
Any violation of these intellectual property rights and, in particular, any act of piracy, will be subject
to the penalty applicable within relevant legislation.
List of third party trademarks
All trademarks, designs, photos, licences, software or other items used with the T-Box including
its accessories and/or equipment, as well as those associated with the use of paid or free services
available with the T-Box, are trademarks registered by their respective owner and in that capacity
constitute exclusive property rights.
• T he HDMI logo and High Definition Multimedia Interface are trademarks or registered trademarks
of HDMI Licensing LLC.
• “Dolby” and the double-D symbols are trademarks of Dolby Laboratories.
• T his product contains one or more programs protected under international and U.S. copyright law
as unpublished works. They are confidential and proprietary to Dolby Laboratories. Their
reproduction or disclosure, in whole or in part, or the production of derivative works therefore
without the express permission of Dolby Laboratories is prohibited. Copyright 1993-2002 by Dolby
Laboratories. All rights reserved. Manufactured under license from Dolby Laboratories.
Technical information
Model: Telstra T-Box
Power supply: +12VDC-1.5A power supply (this power supply should not be replaced except
with the same power supply provided by Telstra).
T-Box measurements: 210 x 205 x 60mm (length x width x thickness)
Remote control measurements: 119.6 x 52.7 x 13 mm (length x width x thickness)
Remote control battery reference: CR2032 (battery button of 3V)
T-Box net weight: 0.75Kg
Packaged weight: 1.26Kg
Operating temperature: from 0oC – 45oC
Power usage on paused standby: <1W
Telstra reserves the right to modify the T-Box its accessories, equipment, software etc,
without notice.
Please refer to updates to this notice at www.telstra.com/tbox
28