1
Installing and Administering the
CIFS/9000 Server
HP Documentation Web Site: www.docs.hp.com
Manufacturing Part Number: B8725-90021
E0302
U.S.A.
© Copyright 2002 Hewlett-Packard Company..
Legal Notices
The information in this document is subject to change without notice.
Hewlett-Packard makes no warranty of any kind with regard to this
manual, including, but not limited to, the implied warranties of
merchantability and fitness for a particular purpose. Hewlett-Packard
shall not be held liable for errors contained herein or direct, indirect,
special, incidental or consequential damages in connection with the
furnishing, performance, or use of this material.
Warranty. A copy of the specific warranty terms applicable to your
Hewlett- Packard product and replacement parts can be obtained from
your local Sales and Service Office.
Restricted Rights Legend. Use, duplication or disclosure by the U.S.
Government is subject to restrictions as set forth in subparagraph (c) (1)
(ii) of the Rights in Technical Data and Computer Software clause at
DFARS 252.227-7013 for DOD agencies, and subparagraphs (c) (1) and
(c) (2) of the Commercial Computer Software Restricted Rights clause at
FAR 52.227-19 for other agencies.
HEWLETT-PACKARD COMPANY
3000 Hanover Street
Palo Alto, California 94304 U.S.A.
Use of this manual and flexible disk(s) or tape cartridge(s) supplied for
this pack is restricted to this product only.
CIFS/9000 Server is derived from the Open Source Samba product and is
subject to the GPL license.
Copyright Notices. ©copyright 1983-2002 Hewlett-Packard Company,
all rights reserved.
Reproduction, adaptation, or translation of this document without prior
written permission is prohibited, except as allowed under the copyright
laws.
Trademark Notices. UNIX is a registered trademark of The Open
Group.
2
Contents
1. Introduction to the CIFS/9000 Server
Preface . . . . . . . . . . . . . . . . . . . . . . . . . . . . . . . . . . . . . . . . . . . . . . . . . . . . . . . . . . . . . . . . 9
Introduction to CIFS/9000 . . . . . . . . . . . . . . . . . . . . . . . . . . . . . . . . . . . . . . . . . . . . . . . . 10
What is the CIFS Protocol? . . . . . . . . . . . . . . . . . . . . . . . . . . . . . . . . . . . . . . . . . . . . . 10
The Open Source Software (OSS) Samba Suite . . . . . . . . . . . . . . . . . . . . . . . . . . . . . . . 12
Open Source Software. . . . . . . . . . . . . . . . . . . . . . . . . . . . . . . . . . . . . . . . . . . . . . . . . . 12
Samba Server Description and Features. . . . . . . . . . . . . . . . . . . . . . . . . . . . . . . . . . . 12
Samba Documentation: Printed and Online . . . . . . . . . . . . . . . . . . . . . . . . . . . . . . . . 13
HP CIFS/9000 Enhancements to the Samba Server Source . . . . . . . . . . . . . . . . . . . . . 15
Access Control List (ACL) Mapping Features (version A.01.07) . . . . . . . . . . . . . . . . 15
Access Control List (ACL) Mapping Features (version A.01.08) . . . . . . . . . . . . . . . . 16
NT Printing Support (version A.01.08) . . . . . . . . . . . . . . . . . . . . . . . . . . . . . . . . . . . . 16
Distributed File System (DFS) Server Functionality (version A.01.08) . . . . . . . . . . 17
Primary Domain Controller (PDC) Functionality (version A.01.08) . . . . . . . . . . . . . 17
HP CIFS/9000 Server Documentation: Printed and Online . . . . . . . . . . . . . . . . . . . . . 20
Documentation Availability by Topic. . . . . . . . . . . . . . . . . . . . . . . . . . . . . . . . . . . . . . 20
CIFS/9000 Basics . . . . . . . . . . . . . . . . . . . . . . . . . . . . . . . . . . . . . . . . . . . . . . . . . . . . . 20
CIFS/9000 Documentation Roadmap . . . . . . . . . . . . . . . . . . . . . . . . . . . . . . . . . . . . . 23
CIFS/9000 Server File and Directory Information . . . . . . . . . . . . . . . . . . . . . . . . . . . 26
2. Installing and Configuring the CIFS/9000 Server
CIFS/9000 Server Requirements and Limitations. . . . . . . . . . . . . . . . . . . . . . . . . . . . .
HP-UX 11.0 Memory and Disc Requirements. . . . . . . . . . . . . . . . . . . . . . . . . . . . . . .
CIFS/9000 Server Installation Requirements. . . . . . . . . . . . . . . . . . . . . . . . . . . . . . .
CIFS/9000 Server Memory and Disc Requirements . . . . . . . . . . . . . . . . . . . . . . . . . .
Step 1: Installing HP CIFS/9000 Server Software . . . . . . . . . . . . . . . . . . . . . . . . . . . .
Step 2: Running the Configuration Script . . . . . . . . . . . . . . . . . . . . . . . . . . . . . . . . . . .
Step 3: Modify the Configuration . . . . . . . . . . . . . . . . . . . . . . . . . . . . . . . . . . . . . . . . . .
Configure ACL Support (for version A.01.07) . . . . . . . . . . . . . . . . . . . . . . . . . . . . . . .
Configure ACL Support (for version A.01.08) . . . . . . . . . . . . . . . . . . . . . . . . . . . . . . .
Configure Case Sensitivity . . . . . . . . . . . . . . . . . . . . . . . . . . . . . . . . . . . . . . . . . . . . . .
Configure DOS Attribute Mapping . . . . . . . . . . . . . . . . . . . . . . . . . . . . . . . . . . . . . . .
Configuring Print Services for CIFS/9000 Version A.01.07 . . . . . . . . . . . . . . . . . . . .
Configuring Print Services for CIFS/9000 Version A.01.08 . . . . . . . . . . . . . . . . . . . .
Setting Up Distributed File System (DFS) Support . . . . . . . . . . . . . . . . . . . . . . . . . .
MC/ServiceGuard High Availability Support . . . . . . . . . . . . . . . . . . . . . . . . . . . . . . .
Configure for German Character Support. . . . . . . . . . . . . . . . . . . . . . . . . . . . . . . . . .
Configure for Japanese Character Support . . . . . . . . . . . . . . . . . . . . . . . . . . . . . . . . .
31
31
32
32
33
35
38
38
39
39
40
40
43
46
49
49
50
3
Contents
Step 4: Starting the CIFS/9000 Server . . . . . . . . . . . . . . . . . . . . . . . . . . . . . . . . . . . . . .
Automatically Starting the CIFS/9000 Server . . . . . . . . . . . . . . . . . . . . . . . . . . . . . .
Other Samba Configuration Issues . . . . . . . . . . . . . . . . . . . . . . . . . . . . . . . . . . . . . . . . .
Translate Open-Mode Locks into HP-UX Advisory Locks . . . . . . . . . . . . . . . . . . . . .
Performance Tuning using Change Notify . . . . . . . . . . . . . . . . . . . . . . . . . . . . . . . . .
Internationalization . . . . . . . . . . . . . . . . . . . . . . . . . . . . . . . . . . . . . . . . . . . . . . . . . . . . .
European Character Support . . . . . . . . . . . . . . . . . . . . . . . . . . . . . . . . . . . . . . . . . . . .
Japanese Character Support . . . . . . . . . . . . . . . . . . . . . . . . . . . . . . . . . . . . . . . . . . . .
51
51
52
52
52
54
54
54
3. Managing HP-UX File Access Permissions from Windows NT/XP/2000
Introduction . . . . . . . . . . . . . . . . . . . . . . . . . . . . . . . . . . . . . . . . . . . . . . . . . . . . . . . . . . .
UNIX File Permissions and POSIX ACLs . . . . . . . . . . . . . . . . . . . . . . . . . . . . . . . . . . .
Viewing UNIX Permissions From Windows NT . . . . . . . . . . . . . . . . . . . . . . . . . . . .
The VxFS POSIX ACL File Permissions . . . . . . . . . . . . . . . . . . . . . . . . . . . . . . . . . .
Using the NT Explorer GUI to Create ACLs . . . . . . . . . . . . . . . . . . . . . . . . . . . . . . . . .
POSIX ACLs and Windows 2000 Clients . . . . . . . . . . . . . . . . . . . . . . . . . . . . . . . . . . . .
Viewing Windows 2000 Client Permissions from the CIFS/9000 Server . . . . . . . . .
Setting Windows 2000 Client Permissions . . . . . . . . . . . . . . . . . . . . . . . . . . . . . . . . .
Viewing ACLs from Windows 2000 Clients. . . . . . . . . . . . . . . . . . . . . . . . . . . . . . . . .
Displaying the Owner of a File . . . . . . . . . . . . . . . . . . . . . . . . . . . . . . . . . . . . . . . . . .
Configuring Samba ACL Support . . . . . . . . . . . . . . . . . . . . . . . . . . . . . . . . . . . . . . . . . .
For CIFS/9000 Version A.01.07 . . . . . . . . . . . . . . . . . . . . . . . . . . . . . . . . . . . . . . . . . .
For CIFS/9000 Version A.01.08 . . . . . . . . . . . . . . . . . . . . . . . . . . . . . . . . . . . . . . . . . .
In Conclusion . . . . . . . . . . . . . . . . . . . . . . . . . . . . . . . . . . . . . . . . . . . . . . . . . . . . . . . . . .
58
59
59
64
66
71
71
72
73
74
75
75
77
78
4. Primary Domain Controller (PDC) Support
Introduction . . . . . . . . . . . . . . . . . . . . . . . . . . . . . . . . . . . . . . . . . . . . . . . . . . . . . . . . . . .
Advantages of the Domain Model . . . . . . . . . . . . . . . . . . . . . . . . . . . . . . . . . . . . . . . .
Primary Domain Controllers . . . . . . . . . . . . . . . . . . . . . . . . . . . . . . . . . . . . . . . . . . . .
Domain Members . . . . . . . . . . . . . . . . . . . . . . . . . . . . . . . . . . . . . . . . . . . . . . . . . . . . .
Create the Machine Trust Accounts . . . . . . . . . . . . . . . . . . . . . . . . . . . . . . . . . . . . . . . .
Configure Domain Users . . . . . . . . . . . . . . . . . . . . . . . . . . . . . . . . . . . . . . . . . . . . . . . . .
Configure the CIFS/9000 Server as a PDC. . . . . . . . . . . . . . . . . . . . . . . . . . . . . . . . . . .
Configuration Options . . . . . . . . . . . . . . . . . . . . . . . . . . . . . . . . . . . . . . . . . . . . . . . . .
Join a Windows Client to a Samba Domain . . . . . . . . . . . . . . . . . . . . . . . . . . . . . . . . . .
Roaming Profiles . . . . . . . . . . . . . . . . . . . . . . . . . . . . . . . . . . . . . . . . . . . . . . . . . . . . . . .
4
80
80
81
81
83
85
86
86
88
92
Contents
Configuring Roaming Profiles . . . . . . . . . . . . . . . . . . . . . . . . . . . . . . . . . . . . . . . . . . .
Configuring User Logon Scripts . . . . . . . . . . . . . . . . . . . . . . . . . . . . . . . . . . . . . . . . . . .
Running Logon Scripts When Logging On . . . . . . . . . . . . . . . . . . . . . . . . . . . . . . . . .
Home Drive Mapping Support . . . . . . . . . . . . . . . . . . . . . . . . . . . . . . . . . . . . . . . . . . . .
92
93
93
94
5. Domain Member Server Support
Join a CIFS/9000 Server to a Windows NT, Windows 2000 or Samba Domain . . . . . . 96
Step-by-step Procedure. . . . . . . . . . . . . . . . . . . . . . . . . . . . . . . . . . . . . . . . . . . . . . . . . 96
6. Configuring HA CIFS/9000
Overview of HA CIFS/9000 Server Active-Standby . . . . . . . . . . . . . . . . . . . . . . . . . . .
Recommended Clients . . . . . . . . . . . . . . . . . . . . . . . . . . . . . . . . . . . . . . . . . . . . . . . .
Installing Prerequisites . . . . . . . . . . . . . . . . . . . . . . . . . . . . . . . . . . . . . . . . . . . . . . . . .
Install the HA CIFS/9000 Server . . . . . . . . . . . . . . . . . . . . . . . . . . . . . . . . . . . . . . . . .
Configure a Highly Available CIFS/9000 Server . . . . . . . . . . . . . . . . . . . . . . . . . . . . .
Move Data to the CIFS/9000 Share Volume . . . . . . . . . . . . . . . . . . . . . . . . . . . . . . .
Edit the samba.conf Configuration File. . . . . . . . . . . . . . . . . . . . . . . . . . . . . . . . . . .
Edit the samba.cntl Control Script . . . . . . . . . . . . . . . . . . . . . . . . . . . . . . . . . . . . . .
Create the MC/ServiceGuard Binary Configuration File . . . . . . . . . . . . . . . . . . . . .
Special Notes for HA CIFS/9000 Server . . . . . . . . . . . . . . . . . . . . . . . . . . . . . . . . . . . .
Overview of HA CIFS/9000 Server Active-Active . . . . . . . . . . . . . . . . . . . . . . . . . . . .
Recommended Clients . . . . . . . . . . . . . . . . . . . . . . . . . . . . . . . . . . . . . . . . . . . . . . . .
Installing Highly Available CIFS/9000 Server . . . . . . . . . . . . . . . . . . . . . . . . . . . . .
Configure a Highly Available CIFS/9000 Server . . . . . . . . . . . . . . . . . . . . . . . . . . .
Special Notes for HA CIFS/9000 Server . . . . . . . . . . . . . . . . . . . . . . . . . . . . . . . . . . . .
101
101
102
103
105
105
107
108
110
111
114
114
115
116
128
7. HP-UX Configuration for CIFS/9000
CIFS/9000 Process Model . . . . . . . . . . . . . . . . . . . . . . . . . . . . . . . . . . . . . . . . . . . . . . .
Overview of Kernel Configuration Parameters . . . . . . . . . . . . . . . . . . . . . . . . . . . . . .
Configuring Kernel Parameters for CIFS/9000 . . . . . . . . . . . . . . . . . . . . . . . . . . . . . .
Swap Space Requirements . . . . . . . . . . . . . . . . . . . . . . . . . . . . . . . . . . . . . . . . . . . . .
Memory Requirements . . . . . . . . . . . . . . . . . . . . . . . . . . . . . . . . . . . . . . . . . . . . . . . .
133
134
135
136
137
8. GNU GPL License
GNU General Public License V. 2,
June 1991 . . . . . . . . . . . . . . . . . . . . . . . . . . . . . . . . . . . . . . . . . . . . . . . . . . . . . . . . . . . . 140
Glossary . . . . . . . . . . . . . . . . . . . . . . . . . . . . . . . . . . . . . . . . . . . . . . . . . . . . . . . 149
5
Contents
Index . . . . . . . . . . . . . . . . . . . . . . . . . . . . . . . . . . . . . . . . . . . . . . . . . . . . . . . . . . 151
6
1
Introduction to the CIFS/9000
Server
This chapter provides a general introduction to this document,
CIFS/9000, information about Samba, the Open Source Software suite
Chapter 1
7
Introduction to the CIFS/9000 Server
upon which the CIFS/9000 server is based, HP enhancements to the
Samba source, along with the various documentation resources available
for CIFS/9000.
8
Chapter 1
Introduction to the CIFS/9000 Server
Preface
Preface
The information in this manual is intended for network managers or
network security administrators who install and administer the
CIFS/9000 server.
This manual describes how to install, configure, and troubleshoot the HP
CIFS/9000 software product on HP 9000 systems.
The manual is organized as follows:
Chapter 1
Chapter 1
“Introduction to the CIFS/9000 Server” describes the
Open Source Software (OSS) Samba Suite, upon which
CIFS/9000 is based, and HP’s CIFS Enhancements to
the Samba Server Source.
Chapter 2
“Installing and Configuring the CIFS/9000 Server”
describes how to install, configure and verify the
CIFS/9000 server software.
Chapter 3
“Managing HP-UX File Access Permissions from
Windows NT/2000” describes how to use Windows NT
and 2000 Clients to view and change standard Unix file
permissions and VxFS POSIX Access Control Lists
(ACLs).
Chapter 4
“Primary Domain Controller (PDC) Support” describes
how to set up and configure a CIFS/9000 Server as the
Primary Domain Controller (PDC).
Chapter 5
“Domain Member Server Support” describes the
process for joining a CIFS/9000 Server to a Windows
NT domain.
Chapter 6
“Configuring HA CIFS/9000” describes Active-Standby
and Active-Active HA CIFS/9000 configurations.
Chapter 7
“HP-UX Configuration for CIFS/9000” includes
information about the CIFS/9000 process model, kernel
configuration parameters, and kernel parameter
configuration for CIFS/9000.
Chapter 8
“GNU GPL License” contains a copy of the GPL license.
9
Introduction to the CIFS/9000 Server
Introduction to CIFS/9000
Introduction to CIFS/9000
CIFS/9000 provides HP-UX with a distributed file system based on the
Microsoft Common Internet File System (CIFS) protocols. CIFS/9000
implements both the server and client components of the CIFS protocol
on HP-UX.
The current CIFS/9000 Server (version A.01.08) is based on the
well-established open-source software Samba, version 2.2.3a, and
provides file and print services to CIFS clients including Windows NT,
XP, 2000 and HP-UX machines running CIFS/9000 Client software.
The CIFS/9000 Client enables HP-UX users to mount as UNIX file
systems shares from CIFS file servers including Windows servers and
HP-UX machines running CIFS/9000 Server. The CIFS/9000 client also
offers an optional Pluggable Authentication Module (PAM) that
implements the Windows NTLM authentication protocols. When
installed and configured within HP-UX’s PAM facility, PAM NTLM
allows HP-UX users to be authenticated against a Windows
authentication server.
What is the CIFS Protocol?
CIFS, or the Common Internet File System, is the Windows specification
for remote file access.
CIFS had its beginnings in the networking protocols, sometimes called
Server Message Block (SMB) protocols, that were developed in the late
1980's for PCs to share files over the then nascent Local Area Network
technologies (e.g., Ethernet). SMB is the native file-sharing protocol in
the Microsoft Windows 95, Windows NT, XP and OS/2 operating systems
and the standard way that millions of PC users share files across
corporate intranets.
CIFS is simply a renaming of SMB; and CIFS and SMB are, for all
practical purposes, one and the same. (Microsoft now emphasizes the use
of “CIFS,” although references to “SMB” still occur.) CIFS is also widely
available on UNIX, VMS(tm), Macintosh, and other platforms.
10
Chapter 1
Introduction to the CIFS/9000 Server
Introduction to CIFS/9000
Despite its name, CIFS is not actually a file system unto itself. More
accurately, CIFS is a remote file access protocol; it provides access to files
on remote systems. It sits on top of and works with the file systems of its
host systems. CIFS defines both a server and a client: the CIFS client is
used to access files on a CIFS server.
CIFS/9000 speaks the CIFS protocol from the HP-UX machines, which
enables directories from HP-UX servers to be mounted on to Windows
machines and vice versa.
Chapter 1
11
Introduction to the CIFS/9000 Server
The Open Source Software (OSS) Samba Suite
The Open Source Software (OSS) Samba Suite
The CIFS/9000 server source is based on Samba, an Open Source
Software (OSS) project developed in 1991 by Andrew Tridgell in
Australia. This section includes a very brief introduction to the Samba
product. As there are many publications about Samba available online
and in most bookstores, HP recommends that you use these source
materials, some of which were written by Samba team members, for
more detailed information about this product.
Open Source Software
Samba has been made available to HP and other users under the terms
of the GNU Public License (GPL). This means that Samba is “free
software”; free, that is, of any copyright restrictions. The goal of this type
of software is to encourage the cooperative development of new software.
To learn about the GNU Public License, go to the following web site:
http://www.fsf.org.
Samba Server Description and Features
With the Samba suite of programs, systems running UNIX and
UNIX-like OSs are able to provide services using the Microsoft
networking protocol. This capability makes it possible for DOS and
Windows machines using native networking clients supplied by
Microsoft to access a UNIX file system and/or printers.
As a user, you will see the UNIX file system as a drive-letter or an icon in
the “Network Neighborhood” and you will be able to open files from
inside your Windows program as if they are stored on your local system.
To accomplish this, Samba implements the Server Message Block (SMB)
networking protocol on top of NetBios over TCP/IP.
For a complete discussion of Samba and its protocols, refer to chapters 1
and 2, in Using Samba by Robert Eckstein, David Collier-Brown and
Peter Kelly
To access the Samba web site, go to http://www.samba.org.
12
Chapter 1
Introduction to the CIFS/9000 Server
The Open Source Software (OSS) Samba Suite
Samba Documentation: Printed and Online
When using the CIFS/9000 product, HP recommends that you refer to
Using Samba, by Robert Eckstein, David Collier-Brown and Peter Kelly
along with the supplemental HP CIFS/9000 product documentation
available in the /opt/samba/docs directory shipped with the product.
Using Samba is shipped with the CIFS/9000 Server and can be found in
/opt/samba/swat/using_samba. Starting with this release, it will be
available through SWAT.
IMPORTANT
The book Using Samba describes a previous version of Samba (V.2.0.4).
However, much of the information in Using Samba is applicable to this
version of the CIFS Server. Readers should always use the HP-provided
Samba man pages or the SWAT help facility for the most definitive
information on the HP CIFS/9000 server.
Installing and Administering the CIFS/9000 Server will also be
available on the http://www.docs.hp.com/hpux/communications web
site.
A list of current non-HP Samba documentation is shown below.
Chapter 1
•
Using Samba, Robert Eckstein, David Collier-Brown and Peter Kelly.
(O’Reilly, 2000), ISBN: 1-56592-449-5.
•
Samba, Integrating UNIX and Windows by John D Blair (Specialized
Systems Consultants, Inc., 1998), ISBN: 1-57831-006-7.
•
Samba in 24 Hours by Carter, Gerald and Richard Sharpe. (SAMS,
1999), ISBN: 0-672-31609-9.
•
Samba Administrator’s Handbook by Ed Brooksbank, George
Haberberger, and Lisa Doyle. (M&T Books, 2000), ISBN:
0-7645-4636-8.
•
Samba Black Book by Dominic Baines. (Coriolis, 2000), ISBN:
1-57610-455-9.
•
Samba Web site: http://www.samba.org/samba/docs.
13
Introduction to the CIFS/9000 Server
The Open Source Software (OSS) Samba Suite
NOTE
14
Please note that non-HP Samba documentation sometimes includes
descriptions of features and functionality planned for future releases of
Samba. The authors of these books do not always provide information
indicating which features are in existing releases and which features will
be available in future Samba releases.
Chapter 1
Introduction to the CIFS/9000 Server
HP CIFS/9000 Enhancements to the Samba Server Source
HP CIFS/9000 Enhancements to the Samba
Server Source
The HP CIFS/9000 server product consists of Samba source code which
has been enhanced with a variety of functional enhancements. The
sections that follow will provide an overview of each of these
enhancements. In some cases, separate sections of information will be
provided. One section will be for version A.01.07 of the server and
another for version A.01.08. Be sure that you are reading the
information appropriate for your version. The sections are:
•
Access Control List (ACL) Mapping Features for version A.01.07
•
Access Control List (ACL) Mapping Features for version A.01.08
•
NT Printing Support (new for version A.01.08)
•
Distributed File System (DFS) Server Functionality (new for version
A.01.08)
•
Primary Domain Controller (PDC) Functionality (new for version
A.01.08).
Access Control List (ACL) Mapping Features (version
A.01.07)
The HP CIFS/9000 server product consists of Samba source code which
has been enhanced with ACL (Access Control List) mapping features.
These mapping features allow you to change ACLs from an NT client.
These features include:
•
Improved access to UNIX permission data through the NT ACL
graphical interface on NT clients.
•
Access to VxFS POSIX ACLs through the NT ACL graphical
interface on NT clients.
Samba supports the viewing and changing of UNIX file permissions and
VxFS POSIX ACLs from Windows NT clients.
You can view and change UNIX file permissions through the standard
Windows Explorer interface when accessing NT ACLs.
Chapter 1
15
Introduction to the CIFS/9000 Server
HP CIFS/9000 Enhancements to the Samba Server Source
Refer to Chapter 2 in this document for detailed information about
configuring ACL support.
Refer to Chapter 3 in this document for more detailed descriptions of
UNIX file permissions and of VxFS POSIX ACLs.
In addition, CIFS/9000 works with CIFS UNIX extensions. For more
information about CIFS UNIX extensions, refer to the Installing and
Administering CIFS/9000 Client manual.
Access Control List (ACL) Mapping Features (version
A.01.08)
HP enhancements to the CIFS/9000 Server for version A.01.08 include
all those for the previous version (A.01.07 - see the previous section),
plus the following:
•
This version provides a share level variable called “nt acl support”
which allows users to turn ACL support on or off, on a per-share
basis. Previous versions (A.01.07 and earlier) used a parameter
called “acl schemes” to configure ACL support. This is no longer used.
•
Support for NT Access Control Lists (ACLs) on printer objects. See
the next section.
Refer to Chapter 2 in this document for detailed information about
configuring ACL support.
NT Printing Support (version A.01.08)
These enhancements are new for version A.01.08. The CIFS/9000 Server
now provides the following NT printing functionality:
•
Printer driver files may be downloaded to Windows NT, 2000 and XP
clients that do not have them
•
Printer driver files may be uploaded from a Client’s disk to a
CIFS/9000 Server that does not have them. This is done using the
Windows NT, XP or Windows 2000 Add Printer Wizard
For detailed information about configuring printer support, please refer
to Chapter 2 in this document.
16
Chapter 1
Introduction to the CIFS/9000 Server
HP CIFS/9000 Enhancements to the Samba Server Source
Distributed File System (DFS) Server Functionality
(version A.01.08)
These enhancements are new for version A.01.08. The CIFS/9000 Server
now provides the following DFS functionality:
•
A CIFS/9000 Server can act as a Distributed File System (DFS)
server
•
The Distributed File System (DFS) provides a way to separate the
logical view of files and directories that users see from the actual
physical locations of these network resources
•
The DFS tree allows users to easily access any particular resource on
the network server
•
The CIFS/9000 DFS tree is accessible from the following types of
DFS-aware clients:
Windows NT
Windows XP
Windows 2000
•
A DFS root directory can host DFS links in the form of symbolic links
which point to other servers
For detailed information about setting up DFS support, please refer to
Chapter 2 in this document.
Primary Domain Controller (PDC) Functionality
(version A.01.08)
These enhancements are new for version A.01.08. Please refer to
Chapters 4 and 5 in this document for detailed information about setting
up and configuring a PDC. The CIFS/9000 Server now provides the
following PDC functionality:
Chapter 1
•
Continue the support for joining a Samba server to the Windows NT
domain as a member server
•
Provide the ability to act as a Primary Domain Controller (PDC) for
Windows clients which include Windows NT, XP and 2000
•
Support the Domain logon feature for Windows NT 4.0 SP3+,
Windows XP and Windows 2000 clients
•
Support for Windows NT group and username mapping
17
Introduction to the CIFS/9000 Server
HP CIFS/9000 Enhancements to the Samba Server Source
•
Support Windows NT logon scripts
•
View resources on a Samba PDC using Microsoft’s “Server manager
for Domain” tool
•
Support local and roaming profiles
•
Support the specified logon home share to a Samba server
Exceptions:
Version A.01.08 of the CIFS/9000 Server does not support Security
Accounts Manager (SAM) databases (containing NT user account
information) nor does it provide any Backup Domain Controller (BDC)
features, and will not support BDCs in a domain in which it is serving as
a PDC.
Advantages of the Domain Model
The Windows NT domain model provides a number of advantages:
•
Windows NT administrators may group workstations and servers
under the authority of a domain controller
•
Domain member servers may be centrally administered by using
domains to group related machines
•
The domain controller can be a central machine which performs all
user logons and authentication
Primary Domain Controllers
The Primary Domain Controller (PDC) is responsible for several tasks
within the domain. These include:
18
•
Authenticating user logons for users and workstations that are
members of the domain
•
Acting as a centralized point for managing user account and group
information for the domain
•
A user logged on as the domain administrator can add, remove or
modify account information on any machine that is part of the
domain
Chapter 1
Introduction to the CIFS/9000 Server
HP CIFS/9000 Enhancements to the Samba Server Source
Domain Members
Chapter 1
•
A domain member server can be a Windows NT Server, a Windows
NT workstation, a Windows 2000 or XP machine or a CIFS/9000
machine
•
Users on a domain member machine can access network resources
within the domain. Some examples of these resources are file and
printer shares and application servers
•
Domain member servers do not participate in authenticating user
logons
19
Introduction to the CIFS/9000 Server
HP CIFS/9000 Server Documentation: Printed and Online
HP CIFS/9000 Server Documentation: Printed
and Online
The full set of HP CIFS/9000 server documentation consists of one
non-HP book available at most technical bookstores, and this printed and
online HP CIFS/9000 server manual.
The HP manual is Installing and Administering the CIFS/9000 Server.
The non-HP book is: Using Samba, Robert Eckstein, David
Collier-Brown and Peter Kelly (O’Reilly, 2000), ISBN: 1-56592-449-5.
NOTE
Please note that non-HP Samba documentation sometimes includes
descriptions of features and functionality planned for future releases of
Samba. The authors of these books do not always provide information
indicating which features are in existing releases and which features will
be available in future Samba releases.
Use the HP-provided Samba man pages or the SWAT help facility for the
most definitive information on the HP CIFS/9000 server.
Documentation Availability by Topic
This section includes brief descriptions of major Samba topics.
CIFS/9000 Basics
The CIFS/9000 Basics section include information about the location of
files on the server, installing CIFS/9000, configuring CIFS/9000, and
starting and stopping CIFS/9000.
Location of Files on the Server
The default location of CIFS/9000 is /opt/samba. In this case, the
following directories should exist in the Samba directory: bin/, docs/,
script/, examples /, HA/, man/, and swat/. Refer to the complete listing
of CIFS/9000 Server files and directories in the Overview section in
chapter 2.
20
Chapter 1
Introduction to the CIFS/9000 Server
HP CIFS/9000 Server Documentation: Printed and Online
The CIFS/9000 configuration files are in /etc/opt/samba. The
CIFS/9000 log files and any temporary files are created in
/var/opt/samba.
For more information about CIFS/9000 files and directories, refer to
chapter 2 of this manual.
Installing CIFS/9000
The HP CIFS/9000 Server product is installed using the swinstall utility.
The steps to install this product are documented in chapter 2 of this
manual.
Configuring CIFS/9000
All the information needed to run the CIFS/9000 configuration script is
provided in chapter 2 of this manual.
There are also other configuration options that you may want to include.
These options include global configuration options, service configuration
options, and browser configuration options.
For more detailed information about these options, refer to “Chapters 4,
Disk Shares,” “Chapter 5, Browsing and Advanced Disk Shares,” and
“Chapter 7, Printing and Name Resolution in Using Samba.
Starting and Stopping CIFS/9000
Use the following commands to start and stop CIFS/9000:
/opt/samba/bin/startsmb
/opt/samba/bin / stopsmb
These commands are described in chapter 2 in this manual.
Other CIFS/9000 Topics
The Other CIFS/9000 Topics section includes information about
CIFS/9000 scripts, adding and removing printers, utilities, the SWAT
configuration tool, a browser description, troubleshooting and NIS and
CIFS/9000.
CIFS/9000 Scripts
Chapter 1
21
Introduction to the CIFS/9000 Server
HP CIFS/9000 Server Documentation: Printed and Online
In Using Samba, check Appendix D, “Summary of Samba Daemons and
Commands,” for detailed information about the command-line
parameters for Samba programs such as smbd, nmbd, smbstatus and
smbclient. There is also information about user scripts in Chapters 4 and
5.
Setting Up Printers
For an explanation of the process of how printing takes place on a
CIFS/9000 server, print commands, printing variables, and a minimal
printing setup, refer to chapter 7, “Printing and Name Resolution” in
Using Samba. This chapter also contains more in-depth information
about Samba printing options and print to Windows client printers.
SWAT Configuration Tool
The Samba Web Administration Tool (SWAT) is a GUI which you can use
to set up or change your Samba configuration in the smb.conf file. You
will be able to change information in the following areas: globals, shares,
printers, status, view (smb.conf), and password.
For information about SWAT, refer to chapter 1 of Using Samba.
Browsing
Browsing gives you the ability to view the servers and shares on your
network. Samba provides over fourteen different browsing options. HP,
however, recommends that you start with the default values.
Refer to “Chapter 5, Browsing and Advanced Disk Shares” in Using
Samba for a description of all browsing options.
Troubleshooting
In “Chapter 9, Troubleshooting Samba” of Using Samba, you will find a
description of the Samba tool bag. It includes a list of tools to be used
when troubleshooting Samba. These tools include: Samba log files and
Unix utilities such as trace and tcpdump. It also includes a fault tree to
fix problems that occur during Samba installation or reconfiguration.
There are also several excellent tools that are very useful for
troubleshooting on HP systems. For example, nettl and netfmt are used
for tracing activity specifically on HP-UX systems. Microsoft’s NetMon
has become a widely used tool for use on WIndows 2000 servers.
22
Chapter 1
Introduction to the CIFS/9000 Server
HP CIFS/9000 Server Documentation: Printed and Online
NIS and CIFS/9000 CIFS/9000 now works with NIS and NIS+. For
detailed information on special options, refer to chapters 2 and 6 in
Using Samba.
CIFS/9000 Documentation Roadmap
Use the following road map to locate the Samba and CIFS/9000
documentation that you need.
Table 1-1
CIFS/9000 Product
Document Title: Chapter: Section
Server Description
Installing and Administering the
CIFS/9000 Server: Chapter 1, “Introduction
to the CIFS/9000 Server”
Samba Meta FAQ No. 2, “General
Information about Samba”
Samba FAQ No. 1, “General Information”
Samba Server FAQ: No. 1, “What is Samba”
Using Samba: Chapter 1, “Learning the
Samba”
Client Description
Samba Man Page: samba(7)
Installing and Administering the
CIFS/9000 Client: Chapter 1, “Introduction
to the CIFS/9000 Client”
HP Add-on Features
Installing and Administering the
CIFS/9000 Server: Chapter 1 “Introduction
to the CIFS/9000 Server,” Section: “HP
CIFS/9000 Enhancements to the Samba
Server Source” and Chapter 3, “Access
Control Lists (ACLs).”
Installing and Administering the
CIFS/9000 Client: Chapter 1, “Introduction
to the CIFS/9000 Client,”. Sections: “HP
CIFS Extensions” and “ACL Mappings.”
Chapter 1
23
Introduction to the CIFS/9000 Server
HP CIFS/9000 Server Documentation: Printed and Online
Table 1-1
(Continued)
CIFS/9000 Product
Document Title: Chapter: Section
Server Installation
Installing and Administering the
CIFS/9000 Server: Chapter 2. “Installing
and Configuring the CIFS/9000 Server”
Samba FAQ: No 2, “Compiling and
Installing Samba on a UNIX Host.”
Client Installation
Installing and Administering the
CIFS/9000 Client: Chapter 2. “Installing
and Configuring the CIFS/9000 Client”
Samba GUI
Administration Tools
Using Samba: Chapter 2, “Installing
Samba on a Unix System”
Server Configuration
Installing and Administering the
CIFS/9000 Server: Chapter 2, “Installing
and Configuring the CIFS/9000 Server”
Client Configuration
Installing and Administering the
CIFS/9000 Client: Chapter 2, “Installing
and Configuring the CIFS/9000 Client”
Configuration: PAM
Installing and Administering the
CIFS/9000 Client: Chapter 6,
“Authentication”
HP-UX Man page: pam(3)
HP-UX Man page: pam.conf
Server: Starting &
Stopping
Client: Starting &
Stopping
Server: Samba Scripts
24
Installing and Administering the
CIFS/9000 Server, Chapter 2
Installing and Administering the
CIFS/9000 Client, Chapter 2.
Using Samba: Appendix D, “Summary of
Samba Daemons and Commands”
Chapter 1
Introduction to the CIFS/9000 Server
HP CIFS/9000 Server Documentation: Printed and Online
Table 1-1
(Continued)
CIFS/9000 Product
Document Title: Chapter: Section
SMB & CIFS File
Protocols
Samba Meta FAQ No. 3, “About the SMB
and CIFS Protocols”
SMB & CIFS Network
Design
Using Samba: Chapter 1, “Learning the
Samba”
Samba Meta FAQ No. 4, “Designing an
SMB and CIFS Network”
Samba Man Pages
http://us1.samba.org/samba/docs
Samba Meta FAQ No. 1, “Quick Reference
Guide to Samba Documentation”
Chapter 1
Server Utilities
Using Samba: Appendix D, “Summary of
Samba Daemons and Commands”
Client Utilities
Installing and Administering the
CIFS/9000 Client: Chapter 4, “CIFS/9000
Client Utilities”
Server Printing
Using Samba: Chapter 7, “Printing and
Name Resolution”
Server Browsing
Using Samba: “Chapter 5, Browsing and
Advanced Disk Shares”
Server Security
Using Samba: Chapter 6, “Users Security
and Domains
25
Introduction to the CIFS/9000 Server
HP CIFS/9000 Server Documentation: Printed and Online
Table 1-1
(Continued)
CIFS/9000 Product
Document Title: Chapter: Section
Server Troubleshooting
Installing and Administering the
CIFS/9000 Server: Chapter 3,
“Troubleshooting the CIFS/9000 Client”
Using Samba, “Chapter 9, Troubleshooting
Samba”
Samba FAQs No. 4, “Specific Client
Application Problems” and No 5,
“Miscellaneous”
DIAGNOSIS.txt in the /opt/samba/docs
directory
Client Troubleshooting:
Samba Man page: debug2html(1), smbd(8),
nmbd(8), smb.conf(5)
Installing and Administering the
CIFS/9000 Client: Chapter 3,
“Troubleshooting the CIFS/9000 Client”
CIFS/9000 Server File and Directory Information
This section briefly describes the important directories and files that
comprise the CIFS Server.
Table 1-2
26
CIFS/9000 Server Files and Directories
File/Directory
Description
/opt/samba
This is the base directory for
most of the CIFS/9000 Server.
/opt/samba_src
This is the directory that
contains the source code for the
CIFS/9000 Server (if the source
bundle was installed).
Chapter 1
Introduction to the CIFS/9000 Server
HP CIFS/9000 Server Documentation: Printed and Online
Table 1-2
Chapter 1
CIFS/9000 Server Files and Directories (Continued)
File/Directory
Description
/opt/samba/bin
This is the directory that
contains the binaries for
CIFS/9000 Server, including the
daemons and utilities.
/opt/samba/docs
This is the directory that
contains documentation in
various formats including html
(htmldocs) and text (textdocs).
/opt/samba/examples
This directory contains example
smb.conf files, example scripts
and other utilities, among other
things.
/opt/samba/man
This directory contains the man
pages for CIFS/9000 Server.
/opt/samba/script
This directory contains various
scripts which are utilities for the
CIFS/9000 Server.
/opt/samba/swat
This directory contains html and
image files which the Samba
Web Administration Tool
(SWAT) needs.
/opt/samba/HA
This directory contains example
High Availability scripts,
configuration files, and
README files.
/var/opt/samba
This directory contains the
CIFS/9000 Server log files as
well as other dynamic files that
the CIFS/9000 Server uses, such
as lock files.
27
Introduction to the CIFS/9000 Server
HP CIFS/9000 Server Documentation: Printed and Online
Table 1-2
28
CIFS/9000 Server Files and Directories (Continued)
File/Directory
Description
/etc/opt/samba
This directory contains
configuration files which the
CIFS/9000 Server uses,
primarily the smb.conf file.
/etc/opt/samba/smb.conf
This is the main configuration
file for the CIFS/9000 Server
which is discussed in great detail
elsewhere.
/etc/opt/samba/smb.conf.default
This is the default smb.conf file
that ships with the CIFS/9000
server. This can be modified to fit
your needs.
/opt/samba/COPYING,
/opt/samba_src/COPYING,
/opt/samba_src/samba/COPYI
NG
These are copies of the GNU
Public License which applies to
the CIFS/9000 Server.
/sbin/init.d/samba
This is the script that starts
CIFS/9000 Server at boot time
and stops it at shutdown (if it is
configured to do so).
/etc/rc.config.d/samba
This text file configures whether
the CIFS/9000 server starts
automatically at boot time or
not.
/sbin/rc2.d/S900samba,
/sbin/rc1.d/K100samba
These are links to
/sbin/init.d/samba which are
actually executed at boot time
and shutdown time to start and
stop the CIFS/9000 Server, (if it
is configured to do so).
Chapter 1
2
Installing and Configuring the
CIFS/9000 Server
This chapter describes the procedures to install and configure the HP
CIFS/9000 Server software. It contains the following sections:
Chapter 2
29
Installing and Configuring the CIFS/9000 Server
•
CIFS/9000 Server Requirements and Limitations
•
Step 1: Installing HP CIFS/9000 Server Software
•
Step 2: Running the Configuration Script
•
Step 3: Modify the Configuration
•
Step 4: Starting the CIFS/9000 Server
NOTE
If the CIFS/9000 Server software has been pre-installed on your
system, you may skip Step 1 above and go directly to “Step 2:
Running the Configuration Script”
NOTE
You can download the most recent version of CIFS/9000 Server from
the www.software.hp.com website.
NOTE
You can find the most recent and most complete version of CIFS/9000
documentation on the www.docs.hp.com website.
30
Chapter 2
Installing and Configuring the CIFS/9000 Server
CIFS/9000 Server Requirements and Limitations
CIFS/9000 Server Requirements and
Limitations
Prior to installing the CIFS/9000 product, check that your system can
accommodate the following product requirements and limitations.
HP-UX 11.0 Memory and Disc Requirements
Although an 11.x 32-bit and 64-bit HP-UX system can boot with as little
as 64MB RAM and 1GB of disc space, the performance of such a
configuration would be prohibitive. The HP recommended minimums are
as follows
•
11.x 32-bit: 128MB RAM, 1-2GB disc
•
11.x 64-bit: 512MB RAM, 2-3GB disc
Updated CIFS/9000 Server Memory Requirements for versions A.01.05
and later.
As of version A.01.05, the CIFS/9000 Server processes increased their
base use of system memory by 20 percent. This represents an increase of
approximately 100KB per smbd process over and above a base of 500KB.
The increased memory footprint is the result of new caching mechanisms
to improve performance.
In addition to the base memory increase, the smbd process may now also
allocate memory for specialized caching requirements as needed. The
size and timing of these memory allocations vary widely depending on
the client type and the resources being accessed. A single smbd process
may temporarily use up to 2.5MB of memory. However, most client access
patterns will not trigger such specialized caching. System administrators
should routinely monitor memory utilization in order to evaluate this
new dynamic memory behavior.
You may need to adjust HP-UX server memory configurations to
accommodate these changes when upgrading from previous versions
Chapter 2
31
Installing and Configuring the CIFS/9000 Server
CIFS/9000 Server Requirements and Limitations
CIFS/9000 Server Installation Requirements
The CIFS/9000 server product requires about 15MB of disc space for
product installation. The CIFS/9000 server product is composed of the
following:
•
CIFS/9000 server source code files: 5 MB
•
CIFS/9000 File and Print Services: 12MB
CIFS/9000 Server Memory and Disc Requirements
Refer to Chapter 6, “HP-UX Configuration for CIFS/9000” in this manual
for more detailed information.
32
Chapter 2
Installing and Configuring the CIFS/9000 Server
Step 1: Installing HP CIFS/9000 Server Software
Step 1: Installing HP CIFS/9000 Server
Software
CIFS/9000 Server Upgrades:
If you are upgrading an existing CIFS/9000 Server configuration, HP
recommends that you create a backup copy of your current environment.
The SD install procedure may alter or replace your current configuration
files. All files under /var/opt/samba and /etc/opt/samba must be saved
in order to ensure that you will be able to return to your current
configuration, if necessary. For example:
$
$
$
$
stopsmb
mkdir /tmp/cifs_save
tar -cvf /tmp/cifs_save/var_backup.tar /var/opt/samba
tar -cvf /tmp/cifs_save/etc_backup.tar /etc/opt/samba
Do not use the -o option with the tar command. This will ensure proper
file ownership.
If a problem with the upgrade does occur, use SD to remove the entire
CIFS/9000 Server product and reinstall your current version. Once this
is done, you may restore the saved configuration files. For example:
$ tar -xvf /tmp/cifs_save/var_backup.tar
$ tar -xvf /tmp/cifs_save/etc_backup.tar
This procedure is not intended to replace a comprehensive backup
strategy that includes user data files.
Overview:
Installation of the HP CIFS/9000 Server software includes loading the
HP CIFS/9000 Server filesets using the swinstall(1M) utility, completing
the CIFS/9000 configuration procedures, and starting Samba using the
startsmb script.
Procedure:
Follow the steps below to install the HP CIFS/9000 Server software
using the HP-UX swinstall program.
1. Log in as root.
2. Insert the software media (disk) into the appropriate drive.
Chapter 2
33
Installing and Configuring the CIFS/9000 Server
Step 1: Installing HP CIFS/9000 Server Software
3. Run the swinstall program using the command:
swinstall
This opens the Software Selection Window and Specify Source
Window.
4. Change the Source Host Name if necessary, enter the mount point of
the drive in the Source Depot Path field, and activate the OK button
to return to the Software Selection Window. Activate the Help button
to get more information.
The Software Selection Window now contains a list of available
software bundles to install.
5. Highlight the HP CIFS/9000 Server software for your system type.
6. Choose Mark for Install from the ‘‘Actions’’ menu to choose the
product to be installed. With an exception of the man pages and
user’s manual, you must install the complete CIFS/9000 product.
7. Choose Install from the ‘‘Actions’’ menu to begin product
installation and open the Install Analysis Window.
8. Activate the OK button in the Install Analysis Window when the
Status field displays a Ready message.
9. Activate the Yes button at the Confirmation Window to confirm that
you want to install the software. swinstall displays the Install
Window.
View the Install Window to read processing data while the software
is being installed. When the Status field indicates Ready and the
Note Window opens.
swinstall loads the fileset and runs the control scripts for the fileset.
Estimated time for processing: 3 to 5 minutes.
10. Check the log files in /var/adm/sw/swinstall.log
and /var/adm/sw/swagent.log to make sure the installation was
successful.
34
Chapter 2
Installing and Configuring the CIFS/9000 Server
Step 2: Running the Configuration Script
Step 2: Running the Configuration Script
Prior to running the configuration script, you must obtain the name of
your domain or workgroup, choose either a “workgroup model” or
“domain security model” role for your server and decide which security
level you would like to use. After you have this information, run the
samba_setup configuration script.
1. Run the Samba configuration script using the command below.
/opt/samba/bin/samba_setup
To specify a domain role and an authentication type, enter the
number listed to the left of your choice. Answer the other questions
prompted by the script. The questions will vary according to the
workgroup or domain role that you selected.
2. Choose a domain role for your server.
With NT, Microsoft Corporation added the domain security model to
the more primitive workgroup model. Domain security offers
centralized administration and security. CIFS/9000 Servers not only
support the workgroup model but can also play the role of Primary
Domain Controller (PDC) or Domain Member Server in the domain
security model.
Samba_setup will ask you to choose Primary Domain Controller,
Domain Member Server, or Workgroup roles.
Chapter 2
•
Primary Domain Controllers perform the machine account and
authentication services which enables domain-wide logons.
Domain logons are convenient because users can log on to the
domain with one logon and password rather than logging on to
each individual server in the domain. See Chapters 4 and 5 for
more information about CIFS/9000 Server PDC features.
Samba_setup will configure CIFS/9000 Server PDCs to use
user-level security for you.
•
Domain Member Servers participate in domain security by
forwarding logon requests to the PDC for authentication.
Samba_setup will configure CIFS/9000 Server Domain Member
Servers to use domain-level security for you.
35
Installing and Configuring the CIFS/9000 Server
Step 2: Running the Configuration Script
•
Workgroups do not utilized the centralized authentication of
domains. Samba_setup will require workgroups to choose either
server, share, or user-level security.
Since there are many important aspects of workgroup and domain
architecture too lengthy to be discussed here, you should consult
some of the many books or white papers available through the
world-wide web and book stores if you are not already familiar with
the subject.
3. Select your authentication security type.
Samba supports four types of security: Domain-level security,
Server-level security, User-level security, and Share-level security.
You must select one of these security types for your server prior to
running the configuration script.
•
Domain-level security: When this type of security is used, Samba
responds as a member of a Windows domain and checks the
password against the information contained in the Windows NT
domain controller.
•
Server-level security: When this security type is specified,
password authentication is handled by another SMB password
server. When a client attempts to access a specific share, Samba
checks that the user is authorized to access the share. Samba
then validates the password via the SMB password server.
•
User-level security: When this security type is specified, each
share is assigned specific users. When a request is made for
access, Samba checks the user’s user name and password against
a local list of authorized users and only gives access if a match is
made.
•
Share-level security: When this security type is specified, each
share (directory) has at least one password associated with it.
Anyone with a password will be able to access the share. There
are no other access restrictions.
You might use multiple passwords when you want different users
to have different types of access (read-only, read-write, etc).
These security types are described in detail in “Chapter 6, Users,
Security, and Domains” of Using Samba by Eckstein, Collier-Brown
and Kelly.
36
Chapter 2
Installing and Configuring the CIFS/9000 Server
Step 2: Running the Configuration Script
This information will be requested by the configuration script in Step
4: Starting the CIFS/9000 Server, located later in this chapter.
4. Enter the name of the domain or workgroup that you want this
server to be part of.
The script will modify the smb.conf file according to the information that
you have entered.
For in-depth information about configuring disk shares; browsing; users,
security and domains; and printing and name resolution; refer to
chapters 4, 5, 6, and 7 in Using Samba by Eckstein, Collier-Brown and
Kelly.
Chapter 2
37
Installing and Configuring the CIFS/9000 Server
Step 3: Modify the Configuration
Step 3: Modify the Configuration
CIFS/9000 Server requires configuration modifications for the following
functionality:
•
ACL Support
•
Case Sensitivity for the Client and Server for UNIX Extensions
•
DOS Attribute Mapping
•
Print Services for version A.01.07
•
Print Services for version A.01.08 (current version)
•
Distributed File System (DFS) Support
•
Configure MC/ServiceGuard High Availability (HA)
•
German Character Support
•
Japanese Character Support
Configure ACL Support (for version A.01.07)
Two ACL schemes are currently supported: unix UNIX file permissions
and hpux_posix VxFS POSIX ACLs on HP-UX.
Example values are shown below:
•
Example one:
acl schemes = unix
This is the default ACL scheme. This ignores UNIX ACL capabilities
and uses UNIX file permissions.
•
Example two:
acl schemes = none
This example turns off all ACL support for the share and an error
will be returned whenever the client tries to get to or set ACL
information on any file system on the share.
•
Example three:
acl schemes = hpux_posix
38
Chapter 2
Installing and Configuring the CIFS/9000 Server
Step 3: Modify the Configuration
This example supports only VxFS POSIX ACLs on the entire share.
Attempts to get or set ACLs from the client will only succeed if VxFS
POSIX ACLs are supported on that file system. If only UNIX
permissions are supported, attempts to get or set ACLs from the
client will fail.
•
Example four:
acl schemes = hpux_posix unix
CIFS/9000 will attempt to use VxFS POSIX ACLs. If ACLs are not
present, it will use UNIX permissions.
Configure ACL Support (for version A.01.08)
CIFS/9000 Server, version A.01.08, provides a share level variable called
“nt acl support.” The possible values for this variable are “yes” and “no.”
This variable defaults to “yes.” Using this variable, users can turn on/off
ACL support on a per-share basis. Refer to chapter 3 in this manual for
more information about ACLs.
IMPORTANT
VxFS POSIX ACL file permissions only work when JFS 3.3 or disk
layout version 4 is installed on your system. Learn how to install JFS 3.3
on HP-UX 11.0 in the HP JFS 3.3 and HP OnLineJFS 3.3 Release Notes
(MPN B3929-90007), located at www.docs.hp.com. Learn about installing
and upgrading disk layout versions in the HP JFS 3.3 and
HPOnLineJFS 3.3 VERITAS File System 3.3 System Administrator’s
Guide (MPN B3929-90011) also located at www.docs.hp.com.
Configure Case Sensitivity
By default, the HP CIFS Server is configured to be case insensitive, like
DOS and NT.
NOTE
HP recommends that when using CIFS Extensions for UNIX, both the
CIFS Client and Server be configured to be case sensitive.
For the CIFS Server, edit the server configuration file:
/etc/opt/samba/smb.conf as follows.
Chapter 2
39
Installing and Configuring the CIFS/9000 Server
Step 3: Modify the Configuration
case sensitive = yes
For the CIFS Client, in the /etc/opt/cifsclient/cifsclient.cfg file, ensure
the following default is set:
caseSensitive = yes
Configure DOS Attribute Mapping
There are three parameters, map system, map hidden, and map archive,
that can be configured in Samba to map DOS file attributes to owner,
group, and other execute bits in the UNIX file system.
When using the CIFS Client, you may want to have all three of these
parameters turned off. If the map archive parameter is on, any time a
user writes to a file, the owner execute permission will be set. This is
usually not desired behavior for HP CIFS clients or UNIX clients in
general.
By default, map system and map hidden are off, and map archive is on.
To turn map archive off, modify /etc/opt/samba/smb.conf as follows:
map archive = no
Configuring Print Services for CIFS/9000 Version
A.01.07
This section provides information about configuring Print Services on
systems running CIFS/9000 version A.01.07. Please refer to the next
section if you are running CIFS/9000 version A.01.08.
Configure Print Services
The minimal printing setup is shown below. Refer to chapter 7 in Using
Samba for more detailed information on how to set up printing in Samba
servers.
To configure a printer share, modify /etc/opt/samba/smb.conf as
follows:
printable=yes
printer=printer_name_string
Where printer_name_string is the name of an HP-UX-defined printer
under the control of the LP spooler.
40
Chapter 2
Installing and Configuring the CIFS/9000 Server
Step 3: Modify the Configuration
Configure A Printer Share
This is a special share to automatically create printing services. Refer to
chapter 7 in Using Samba for more detailed information on how to set up
printing in Samba servers.
If you create a share named [printers] in the smb.conf file, the server will
automatically read in your printer capabilities file and create a printing
share for each printer that appears in that file.
Add the following information to the global and printers sections of the
smb.conf file:
[printers]
printable=yes
Manually Set Up Printer Drivers
Each client needs to install the appropriate driver for each printer it
wants to use. Refer to chapter 7 in Using Samba for more detailed
information on how to set up printing in Samba servers.
Invoke the Windows Add Printer Wizard dialog by double-clicking on the
printer icon in the Network Neighborhood.
Enter the name of the printer. If you selected an uninstalled printer,
Windows will ask you to select the printer manufacturer and model.
Windows should load the appropriate driver.
Automatically Set Up Printer Drivers
Printer drivers can be automatically set up for a specific printer. There
are four steps:
•
Install the drivers for the printer on a Windows client.
•
Create a printer definition file from the information on a Windows
machine.
•
Create a PRINTER$ share where the resulting driver files can be
placed.
•
Modify the smb.conf file
Refer to chapter 7 in Using Samba for more detailed information on how
to set up printing in Samba servers.
Chapter 2
41
Installing and Configuring the CIFS/9000 Server
Step 3: Modify the Configuration
Install Printer Drivers. Install the drivers using a Windows 95/98
client only. Other versions of Windows clients will be supported in future
releases. The printer does not have to be attached to the machine to
install the drivers.This step is getting the appropriate driver files into
the Windows directory.
Go to the Printers windows of My Computer and double-click on the Add
Printer icon.
Follow the Add Printer Wizard dialogs, providing the name or
manufacturer and model of the printer.
Create a Printer Definition File. Copy the following four files from a
Windows client:
C:\WINDOWS\INF\MSPRINT.INF
C:\WINDOWS\INF\MSPRINT2.INF
C:\WINDOWS\INF\MSPRINT3.INF
C:\WINDOWS\INF\MSPRINT4.INF
These files contain specific printer driver files. If the printer driver starts
with the letter A-K, use either MSPRINT or MSPRINT3. If it begins
with L-Z, user MSPRINT2 or MSPRINT4 in the next step.
Use the make_printerdef script located in /opt/samba/bin Directory and
the appropriate printer driver INF file to create a printer definition file:
$make_printerdef MSPRINT3.INF HP DeskJet 560C Printer
printers.def
Create a PRINTER$ Share. Create a PRINTER$ share in the
smb.conf file that points to an empty directory on the CIFS server as
follows:
[PRINTER$]
path = /opt/samba/print
This is where the resulting driver files will be placed.
Copy the files noted in step 2 to this location. Typically these files can be
found in the C:\WINDOWS\SYSTEM directory.
Copy the printers.def file that you created in step 2 to this location as
well.
42
Chapter 2
Installing and Configuring the CIFS/9000 Server
Step 3: Modify the Configuration
Modify the smb.conf file. Modify the smb.conf file by adding three
options:
•
Printer driver
•
Printer driver file
•
Printer driver location
Example smb.conf entries:
[global]
printer driver file = /opt/samba/print/printers.def
[hpdeskjet]
printer driver=HP DeskJet 560C Printer
printer driver=Hp DeskJet 560C Printer
printer driver location=\\%L\PRINTERS$
Configuring Print Services for CIFS/9000 Version
A.01.08
This section provides information about configuring Print Services on
systems running CIFS/9000 version A.01.08. Please refer to the previous
section if you are running CIFS/9000 version A.01.07.
These enhancements are new for version A.01.08. The CIFS/9000 Server
now provides the following NT printing functionality:
•
Printer driver files may be downloaded to Windows NT, 2000 and XP
clients that do not have them
•
Printer driver files may be uploaded using the Windows NT/XP/2000
Add Printer wizard
•
Support for NT Access Control Lists (ACL) on printer objects
Information about setting up and configuring each of the Print Services
(except ACLs) is shown in the following sections. Information about
configuring ACL Support is discussed in a previous section.
Configuring a [printers] share
The following is a minimal printing setup. Use either one of the following
two procedures to create a [printers] share:
1. SWAT (Samba Administration Tool)
Chapter 2
43
Installing and Configuring the CIFS/9000 Server
Step 3: Modify the Configuration
-or2. Create a [printers] share in the /etc/opt/samba/smb.conf file. Refer
to the following example:
[hpdeskjet]
path = /tmp
printable = yes
Where “hpdeskjet” is the name of the printer to be added.
Creating a [printers] share
Configure a [printers] share in the /etc/opt/samba/smb.conf file. Refer
to the following example:
[printers]
path = /tmp
printable = yes
browseable = no
This share is required if you want the printer’s list to be displayed in
SWAT, which is not defined in the smb.conf file, but exists on the
CIFS/9000 Server. If this share is not defined, the printer’s list will
display only those printer shares which are defined in the smb.conf file.
Setup Server for automatically uploading printer driver files
In order to add a new driver to your Samba host using version A.01.08 of
the software, one of two conditions must hold true:
1. The account used to connect to the Samba host must have a uid of 0
(i.e. a root account), or...
2. The account used to connect to the Samba host must be a member of
the printer admin list. This will require a [global] smb.conf
parameter as follows:
printer admin = netadmin
The connected account must still possess access to add files to the
subdirectories beneath [print$]. Keep in mind that all files are set to
‘read only’ by default, and that the ‘printer admin =’ parameter must
also contain the names of all users or groups that are going to be allowed
to upload drivers to the server, not just ‘netadmin’.
The following is an example of the other parameters required:
44
Chapter 2
Installing and Configuring the CIFS/9000 Server
Step 3: Modify the Configuration
1. Create a [print$] share in the smb.conf file that points to an empty
directory named “/etc/opt/samba/printers” on the CIFS/9000 Server.
Refer to the following example:
[print$]
path = /etc/opt/samba/printers
browseable = yes
guest ok = yes
read only = yes
write list = netadmin
In this example, the parameter “write list” specifies that
administrative lever user accounts will have write access for
updating files, on the share.
2. Create the subdirectory tree, under the [print$] share, for each
architecture that needs to be supported. Refer to the following
example:
cd /etc/opt/samba/printers
mkdir W32X86
mkdir Win40
There are two possible locations (subdirectories) for keeping driver
files, depending upon what version of Windows the files are for:
For Windows NT, XP or Windows 2000 driver files, the files will
be stored in the /etc/opt/samba/printers/W32X86 subdirectory.
For Windows 9x driver files, the files will be stored in the
/etc/opt/samba/printers/Win40/0 subdirectory.
Setup Client for automatically uploading of printer drivers
Printer driver files can be automatically uploaded from disk to the
printers on a CIFS/9000 Server. Here are the steps:
1. Invoke the Windows Add Printer Wizard dialog by double-clicking on
the printer icon in Network Neighborhood.
2. Enter the printer share name for an installed printer on the
CIFS/9000 Server. Viewing the printer properties which has the
default driver assigned will result in the error message:
Chapter 2
45
Installing and Configuring the CIFS/9000 Server
Step 3: Modify the Configuration
Device settings can not be displayed. The driver for the
specified printer is not installed, only spooler
properties will be displayed. Do you want to install the
driver now?
3. Click “yes” in the error dialog and the printer properties window will
be displayed, with an APW.
4. Select the printer driver e.g. hp LaserJet 5i. You will be asked for the
driver files. Give the path where the driver files are located. The
driver files will be uploaded from the disk, and stored into the
subdirectories under the [print$] share.
Migrating Printing Services From version A.01.07 to A.01.08
The following are some typical reasons for migrating from a CIFS/9000
Server, version A.01.07, to version A.01.08:
•
If you do not intend to use the new Windows NT/XP/2000 print
driver support feature, nothing should be done. All of the existing
configuration parameters for printer services will continue to work
the same way.
•
If you want to take advantage of the new NT/XP/2000 printer driver
support, but do not want to migrate the Windows 9x drivers to the
new setup, then use the existing printers.def file.
•
If you install a Windows 9x driver for a printer on a CIFS/9000
Server, the new setup information will take precedence and the three
old parameters (printer driver, printer driver file and
printer driver location) will be ignored.
•
If you have a printer installed on a CIFS/9000 Server version A.01.07
or below, and you migrate to Server version A.01.08, you must reboot
the Windows client in order to make the printer work under version
A.01.08.
Setting Up Distributed File System (DFS) Support
This section will provide the procedures for:
46
•
Setting up a DFS Tree on a CIFS/9000 Server
•
Setting up DFS Links in the DFS root directory on a CIFS/9000
Server
Chapter 2
Installing and Configuring the CIFS/9000 Server
Step 3: Modify the Configuration
NOTE
HP does not recommend filesharing of the root. Only subdirectories
under the root should be set up for filesharing.
Setting Up a DFS Tree on a CIFS/9000 Server
After the DFS Tree is set up using this procedure, users on DFS clients
can browse the DFS tree located on the CIFS/9000 Server at
\\servername\DFS.
1. Select a CIFS/9000 Server to act as the Distributed File System
(DFS) root directory.
2. Configure a CIFS/9000 server as a DFS server by modifying the
smb.conf file to set the global parameter host msdfs to yes.
Example:
[global]
host msdfs = yes
3. Create a directory to act as a DFS root on the CIFS/9000 Distributed
File System (DFS) Server.
4. Create a share and define it with the parameter path = directory
of DFS root in the smb.conf file. Example:
[DFS]
path = /export/dfsroot
5. Modify the smb.conf file and set the msdfs root parameter to yes.
Example:
[DFS]
path = /export/dfsroot
msdfs root = yes
Setting Up DFS Links in the DFS Root Directory on a CIFS/9000
Server
A Distributed File System (DFS) root directory on a CIFS/9000 Server
can host DFS links in the form of symbolic links which point to other
servers.
Chapter 2
47
Installing and Configuring the CIFS/9000 Server
Step 3: Modify the Configuration
Before setting up DFS links in the DFS root directory, you should set the
permissions and ownership of the root directory so that only designated
users can create, delete or modify the DFS links.
Symbolic link names should be all lowercase. All clients accessing a DFS
share should have the same user name and password.
An example for setting up DFS links follows:
1. Use the ln command to set up the DFS links for “linka” and “linkb”
on the /export/dfsroot directory. Both “linka” and “linkb” point to
other servers on the network. Example commands:
cd /export/dfsroot
chown root /export/dfsroot
chmod 775 /export/dfsroot
ln -S msdfs:serverA\\shareA linka
ln -S msdfs:serverB\\shareB serverC\\shareC linkb
2. If you use the ls -l command on the /export/dfsroot directory, it
should show an output similar to this one:
lrwxrwxrwx l root sys 24 Oct 30 10:20
linka -> msdfs:serverA\\shareA
lrwxrwxrwx l root sys 30 Oct 30 10:25
linkb -> msdfs:serverB\\shareB, serverC\\shareC
In this example, “serverC” is the alternate path for “linkb”. Because
of this, if “serverB” goes down, “linkb” can still be accessed from
“serverC”. “linka” and “linkb” are share names. Accessing either one
will take users directly to the appropriate share on the network.
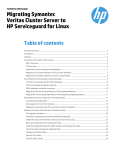
Refer to the following screen snapshot for an example:
48
Chapter 2
Installing and Configuring the CIFS/9000 Server
Step 3: Modify the Configuration
Figure 2-1
Link Share Names Example
MC/ServiceGuard High Availability Support
Highly Available CIFS/9000 Server allows the CIFS/9000 Server product
to run on an MC/ServiceGuard cluster of nodes. MC/ServiceGuard allows
you to create high availability clusters of HP 9000 server computers.
Template files for version A.01.08 have been revised to allow any number
of cluster nodes and other advantages over previous schemes.
Follow the configuration procedures provided in Chapter 6.
Configure for German Character Support
Modify the parameters below in the smb.conf file for German character
support:
character set = ISO8859-1
client code page = 850
In order to view the file and directory names and contents correctly from
the UNIX side, you must set the locale to ISO 8859-1 as follows:
export LANG=de_DE.iso88591
Refer to the Internationalization section later in this chapter for more
detailed information.
Chapter 2
49
Installing and Configuring the CIFS/9000 Server
Step 3: Modify the Configuration
Configure for Japanese Character Support
To enable CIFS/9000 Japanese capabilities, start CIFS/9000 with the
smb.conf variables set as follows:
codingsystem = SJIS
client code page = 932
In order to view the file and directory names and contents correctly from
the UNIX side, you must set the locale to Shift-JIS like this:
export LANG=ja_JP.SJIS
Refer to the Internationalization section later in this chapter for more
detailed information.
50
Chapter 2
Installing and Configuring the CIFS/9000 Server
Step 4: Starting the CIFS/9000 Server
Step 4: Starting the CIFS/9000 Server
Run the script below to start Samba.
/opt/samba/bin/startsmb
When the command successfully starts Samba, a message is displayed
indicating the specific processes that have been started. When the script
is successful, the exit value is 0. If the script fails, the exit value is 1.
Samba installation and configuration are complete.
To stop the Samba server, run:
/opt/samba/bin/stopsmb
When the script is successful, the exit value is 0. If the script fails, the
exit value is 1.
Automatically Starting the CIFS/9000 Server
When the CIFS/9000 Server is installed, by default it will not be
configured to automatically start when the system boots up and stop
when the system shuts down. You can enable this feature by doing the
following:
1. Edit the /etc/rc.config.d/samba file.
2. Change the last line of the file to: RUN_SAMBA=1.
3. Save the file.
If you later decide to disable the automatic start feature, change the last
line back to:
RUN_SAMBA=0
Chapter 2
51
Installing and Configuring the CIFS/9000 Server
Other Samba Configuration Issues
Other Samba Configuration Issues
Translate Open-Mode Locks into HP-UX Advisory
Locks
The CIFS/9000 Server A.01.07, and subsequent versions, can translate
open mode locks into HP-UX advisory locks. This functionality prevents
HP-UX processes from obtaining advisory locks on files with conflicting
open mode locks from CIFS clients. This also means CIFS clients cannot
open files that have conflicting advisory locks from HP-UX processes.
You must change the map share modes setting in smb.conf to yes to
translate open mode locks to HP-UX advisory locks. The default setting
of map share modes is no.
Performance Tuning using Change Notify
This section describes performance tuning using the Change Notify
feature and internationalization.
The Samba Server supports a new feature called Change Notify. Change
Notify provides the ability for a client to request notification from the
server when changes occur to files or subdirectories below a directory on
a mapped file share. When a file or directory which is contained within
the specified directory is modified, the server notifies the client. The
purpose of this feature is to keep the client screen display up-to-date in
Windows Explorer. The result: if a file you are looking at in Windows
Explorer is changed while you are looking at it, you will see the changes
on the screen almost immediately.
The only way to implement this feature in Samba is to periodically scan
through every file and subdirectory below the directory in question and
check for changes made since the last scan. This is a resource intensive
operation which has the potential to affect the performance of Samba as
well as other applications running on the system. Two major factors
affect how resource intensive a scan is: the number of directories having
a Change Notify request on them, and the size of those directories. If you
have many clients running Windows Explorer (or other file browsers) or
if you have directories on shares with a large number of files and/or
subdirectories, each scan cycle might be very CPU intensive.
52
Chapter 2
Installing and Configuring the CIFS/9000 Server
Other Samba Configuration Issues
To counteract the possible performance impact, you can control how
often Samba scans for changes in the directories it has been requested to
monitor. The parameter that controls how often Samba scans for changes
is Change Notify Timeout. The parameter value represents the number
of seconds between the start of each scanning cycle. The default value is
60. So, if your system takes 55 seconds to complete the scan of all the
directories with Change Notify requests, it would be under a heavy load
at nearly all times.
You can increase the Change Notify Timeout value to a larger number to
decrease how often these Change Notify directory scans are done. The
trade off is that your clients will take longer to see that changes were
made in the directories that they have placed Change Notify requests on.
You will have to decide what the right trade-off is: performance loss or
slow updates to client file browsers.
Chapter 2
53
Installing and Configuring the CIFS/9000 Server
Internationalization
Internationalization
This section describes European and Japanese character support for the
CIFS/9000 server.
European Character Support
CIFS/9000 provides European character support for Windows 95, XP and
NT clients. CIFS/9000 also supports MS-DOS and Windows 3.x clients
using the PC850 code page. To enable European character support for
Windows 95, XP and NT, which includes applications running in
DOS-PROMPT windows under these environments, the CIFS/9000
server must be started with the smb.conf variables character set and
client code page set correctly.
For configuration examples, refer to “Step 4, Modifying the Configuration
in this chapter”.
In order to view the file and directory names and contents correctly from
the UNIX side for various languages, you must set the locale to the
appropriate value. Here are two examples:
export LANG=de_DE.iso88591
-orexport LANG=de_DE.iso88915@euro
The CIFS/9000 server must be restarted for the character set or client
code page parameters change to take effect. You cannot administer
resource permissions on shares that contain German umlauts in their
names from the Windows 95 Explorer. Permissions can be administered
if the resource is accessed through the Network Neighborhood. Microsoft
has acknowledged this behavior but has indicated that it is by design
and no fixes will be forthcoming.
Japanese Character Support
CIFS/9000 supports Japanese character sets as follows:
54
•
CIFS/9000 supports Japanese only in Shift-JIS encoding. The EUC
codeset is not supported.
•
The following clients have been tested with CIFS/9000 with
Japanese:
Chapter 2
Installing and Configuring the CIFS/9000 Server
Internationalization
— Windows 95 Japanese
— Windows NT 4.0 Japanese
•
To enable CIFS/9000 Japanese capabilities, start CIFS/9000 with
smb.conf variables set as follows:
codingsystem = SJIS
client code page = 932
•
Japanese is supported for the following:
— File/directory names
— File contents
— Printing
Japanese is not supported for share names, domain names, user
login names or user passwords.
In order to view the file and directory names and contents correctly
from the UNIX side, you must set the locale to Shift-JIS like this:
export LANG=ja_JP.SJIS
•
DOS utilities uchmod.exe, ud.exe, uren.exe, and udir.exe are not
supported for Japanese file/directory name. The bundled server
management tools for Windows NT or XP workstation and Windows
95 are not supported on Japanese Windows NT workstation(J) and
Windows 95(J).
•
CIFS/9000 cannot handle the following characters as file or directory
names from Windows 95(J) clients. 8260 - 8279 (SJIS code)
•
CIFS/9000 can only run batch files from Windows 95(J) clients if the
file or directory names are specified in the 8.3 format. This is not a
Japanese specific problem but an MS-DOS limitation.
For example, the following batch files cannot run.
g:\a1234567890est.bat
g:\a123456est567890.bat
There is no workaround.
For configuration examples, refer to “Step 4, Modifying the Configuration
in this chapter.”
Chapter 2
55
Installing and Configuring the CIFS/9000 Server
Internationalization
56
Chapter 2
3
Chapter 3
Managing HP-UX File Access
Permissions from Windows
NT/XP/2000
57
Managing HP-UX File Access Permissions from Windows NT/XP/2000
Introduction
Introduction
This chapter describes how to use Windows NT, XP and 2000 clients to
view and change standard UNIX file permissions and VxFS POSIX
Access Control Lists (ACL) on a CIFS/9000 server. A new configuration
option, acl_schemes, is also introduced.
58
Chapter 3
Managing HP-UX File Access Permissions from Windows NT/XP/2000
UNIX File Permissions and POSIX ACLs
UNIX File Permissions and POSIX ACLs
The CIFS/9000 Server enables the manipulation of UNIX file
permissions or VxFS POSIX ACLs from Windows NT, XP or Windows
2000 clients. With this capability most management of UNIX file
permissions or POSIX ACLs can be done from the familiar Windows
Explorer interface.
NOTE
Although concepts of file ACLs are similar across the Windows and
HP-UX platforms, there are sufficient differences in functionality that
one cannot substitute UNIX ACLs for Windows ACLs (i.e. full emulation
is not provided). For example, a Windows application that changes the
ACL data of a file may behave unexpectedly if that file resides on a
CIFS/9000 Server.
Viewing UNIX Permissions From Windows NT
As a result of the ACL data differences in NT and UNIX file permissions
and VxFS POSIX, Samba must map data from UNIX to NT and NT to
UNIX.
The table below shows how UNIX file permissions translate to Windows
NT ACL access types:
Table 3-1
Chapter 3
UNIX Permission
NT access type
r--
Special Access(R)
-w-
Special Access(W)
--x
Special Access(X)
rw-
Special Access(RW)
r-x
Read(RX)
-wx
Special Access(WX)
59
Managing HP-UX File Access Permissions from Windows NT/XP/2000
UNIX File Permissions and POSIX ACLs
Table 3-1
(Continued)
UNIX Permission
NT access type
rwx
Special Access(RWX)
r--
Special Access
In addition to the permission modes shown above, UNIX file permissions
also distinguish between the file owner, the owning group of the file, and
other (all other users and group).
UNIX File Owner Translation in NT ACL
A UNIX file system owner has additional permissions that others users
do not have. For example, the owner can give away his ownership of the
file, delete the file, rename the file, or change the permission mode on the
file. These capabilities are similar to the delete (D), change permissions
(P) and take ownership (O) permissions on the Windows NT client.
Samba adds the DPO permissions to represent UNIX file ownership in
the Windows NT explorer interface.
For example, if a file on the UNIX file system is owned by UNIX user
john and john has read and write (rw-) permissions on that file, the
Windows NT client will display the same permissions for user john as:
Special Access(RWDPO)
You can also display the UNIX owner in the Windows NT Explorer
interface. If you are in the File Properties dialog box with the Security
tab selected and you press the Ownership button, the owning UNIX
user's name will be displayed.
UNIX Owning Group Translation in NT ACL
The owning group on a UNIX file system is represented on the Windows
NT client with the take ownership (O) permission. While the meaning of
the take ownership permission on NT doesn't exactly match the meaning
of an owning group on the UNIX file system, this permission is still
translated into the take ownership permission.
This representation becomes even more significant when translating
VxFS POSIX ACLs, as there can be many groups with different
permissions on an individual file in this file system. Without this
permission type, you would not be able to tell the owning group entry
from other group entries.
60
Chapter 3
Managing HP-UX File Access Permissions from Windows NT/XP/2000
UNIX File Permissions and POSIX ACLs
For example, if an owning group named sales on the UNIX file system
has read and execute (r-x) permissions on a file, the Windows NT client
will display the permissions for group sales as:
Special Access(RXO)
UNIX Other Permission Translation in NT ACL
In UNIX, the other permission entry represents permissions for any user
or group that is not the owner, and doesn't belong to the owning group.
This entry maps to the everyone access control entry on the Windows NT
client.
NT Directory and File Permission Translations
Windows NT clients display two sets of permissions for directory entries:
directory permissions and file permissions. Directory Permissions are the
permissions for the directory itself. File Permissions are the permissions
inherited by the files and subdirectories created in the directory. Samba
translates UNIX permissions for a directory into Windows NT directory
permissions and vice versa. Windows NT file permissions are not
supported when the translation is to/from UNIX permissions.
NT file permissions, however, are supported with VxFS POSIX ACLs (as
described in the next section).
Setting UNIX Permissions from Windows NT
With one exception, reversing the UNIX to NT translations described
above will always work. You cannot, however, change the owner or
owning group by adding Special Access(DPO) or Special Access(O) to a
user or group from the client.
All NT permissions, except read, write and execute, are disregarded
when applied to files on the Samba server. These include delete (D),
change permissions (P) and take ownership (O).
The table below shows how NT access types map to UNIX permissions:
Table 3-2
Chapter 3
NT access type
UNIX Permission
Special Access(R)
r--
Special Access(W)
-w-
Special Access(X)
--x
61
Managing HP-UX File Access Permissions from Windows NT/XP/2000
UNIX File Permissions and POSIX ACLs
Table 3-2
(Continued)
NT access type
UNIX Permission
Special Access(RW)
rw-
Read(RX)
r-x
Special Access(WX)
-wx
Special Access(RWX)
rwx
Special Access
r--
When mapping to UNIX file permissions from NT, you will not be able to
add new NT ACL entries because only the owner, owning group and
other ACL entries are supported by UNIX permissions. UNIX ignores
unrecognized entries. Conversely, you cannot delete any of the three
entries listed above as these entries are required by UNIX.
Pre-defined NT Permissions
The Windows NT Explorer ACL interface allows you to choose predefined
permissions like Change and Full Control in addition to creating custom
Special Access permissions.
62
Chapter 3
Managing HP-UX File Access Permissions from Windows NT/XP/2000
UNIX File Permissions and POSIX ACLs
Figure 3-1
Windows NT Explorer ACL Interface
If you use pre-defined NT access types to set permissions on a Samba
share, the permissions that are displayed later will not match what you
set in NT.
For example, Full Control will become rwx on the Samba server, and
when it is displayed on the Windows NT client, it will show up as Special
Access (RWX).
Table 3-3
Chapter 3
NT Access Type
UNIX Permission
No Access
---
Read
r-x
Change
rwx
Full Control
rwx
63
Managing HP-UX File Access Permissions from Windows NT/XP/2000
UNIX File Permissions and POSIX ACLs
Figure 3-2
Windows NT Special Access Permissions
The VxFS POSIX ACL File Permissions
VxFS POSIX ACLs are a superset of UNIX file permissions. VxFS
POSIX ACLs extend the concept of UNIX file permissions in three ways.
•
VxFS POSIX ACLs allow for more entries than the basic owner,
group and other UNIX file permissions.
•
VxFS POSIX ACLs support default Access Control Entry (ACE) for
directory permissions. This means that any files created in that
directory will automatically inherit the default ACEs of the parent
directory. It adds an inheritance permission type to directory
permissions.
•
A special ACE called the class ACE is used. The role of the class ACE
is to limit the other ACEs. The base UNIX permissions are not
affected.
For example, if the class ACE for a file is set to read (r--), then even
when ACEs grant some users and groups write and execute access,
write and execute access will not be given to them. The class ACE acts
64
Chapter 3
Managing HP-UX File Access Permissions from Windows NT/XP/2000
UNIX File Permissions and POSIX ACLs
as a mask that filters out the permissions of non-class ACEs. If the
class ACE was set to (---) or no access, other ACEs might exist, but
they would not change the effective permissions.
IMPORTANT
VxFS POSIX ACL file permissions only work when JFS 3.3 or disk
layout version4 is installed on your system.
Learn how to install JFS 3.3 on HP-UX 11.0 in the HP JFS 3.3 and HP
OnLineJFS 3.3 Release Notes (MPN B3929-90007) located at
www.docs.hp.com.
Learn about installing and upgrading disk layout versions in the HP
JFS 3.3 and HPOnLineJFS 3.3 VERITAS File System 3.3 System
Administrator’s Guide (MPN B3929-90011) located at www.docs.hp.com.
VxFS POSIX ACLs translated to NT ACLs
The extra features of VxFS POSIX ACLs affect the translations to and
from NT ACLs in the following ways:
Chapter 3
•
The extra VxFS POSIX ACEs show up as NT ACEs on the Windows
NT client. The permission mode translates like a UNIX permission
mode. With this feature you can also add new user and group entries
from the Windows NT client. The limitations to this feature will be
discussed in the next section.
•
The default ACEs that are supported for inheritance by directories
are translated into file permissions for a directory on NT. The file
permissions displayed on the Windows NT client represent the
default ACEs on the UNIX file system of the Samba server. If the file
permissions are set on a directory on the NT client, equivalent
default ACEs are set on the directory on the UNIX file system.
•
The class ACE used to limit the other ACEs is ignored. It is not
displayed on the Windows NT client and there is no way to set it from
the NT client. It would be difficult to support on the client side, as
Windows NT has nothing similar to a class ACE.
65
Managing HP-UX File Access Permissions from Windows NT/XP/2000
Using the NT Explorer GUI to Create ACLs
Using the NT Explorer GUI to Create ACLs
Use the Windows NT Explorer GUI to set new ACLs.
This section describes how to add new entries to the ACE list:
•
Figure 3-3
NOTE
66
Click the add button in the File/Directory Permissions dialog box of
the Windows NT GUI to bring up the Add Users and Groups dialog
box.
Windows NT Explorer File Permissions
The List Names From field displays the source of the list of group
names. It may also show the name of your domain. Do not use the
domain list to add new ACLs.
Chapter 3
Managing HP-UX File Access Permissions from Windows NT/XP/2000
Using the NT Explorer GUI to Create ACLs
Figure 3-4
Windows NT Explorer List Names From Field
Instead, what you need is a list of groups and users that can be
recognized by the underlying UNIX file system.
Since the actual ACLs will be UNIX file permissions or VxFS POSIX
ACLs in their final form, the only valid groups and users are UNIX
groups and users that the Samba server knows about.
•
Chapter 3
Go to the List Names From dropdown list in the Add Users and
Groups dialog box. One screen choice is to list names on your Samba
server. This is the list HP recommends.
67
Managing HP-UX File Access Permissions from Windows NT/XP/2000
Using the NT Explorer GUI to Create ACLs
Figure 3-5
68
Windows NT Explorer Add Users and Groups Dialog Box
•
Select any name on the list that is labelled local UNIX group. Those
groups are actually UNIX groups on the Samba server.
•
Optionally, click the Show Users button and all the UNIX users on
the Samba server will be added to the list as well. You will always be
able to add an ACE for the local Unix groups and the users in this
list.
Chapter 3
Managing HP-UX File Access Permissions from Windows NT/XP/2000
Using the NT Explorer GUI to Create ACLs
Figure 3-6
Add UNIX Groups and Users
•
You can type user and group names into the Add Names text field to
add users and groups. If the names are valid UNIX group or user
names, the users and groups will be added.
•
Optionally, add the Samba server name and a backslash to the
beginning of the user or group name and it will be added (for
example, server1\users1). When you select names off the name list,
the GUI will put that name in the text list and automatically add the
server name as well.
•
Optionally use the user name mapping feature to define a mapping
of NT user names (or domain names) to UNIX user names. For
example, you could map the NT user names administrator and
admin to the UNIX user name root. The mapping can be either
one-to-one or many-to-one.
Samba supports the creation of ACEs with NT user names that are
mapped to UNIX user names.
To continue the example above, you could create an ACE for the
administrator user on the NT client and, on the Samba server, the
ACE would be created for the root user. The client will display the
corresponding ACE as being for the root user, not the administrator
user.
Chapter 3
69
Managing HP-UX File Access Permissions from Windows NT/XP/2000
Using the NT Explorer GUI to Create ACLs
If you add an ACE for one user name, like administrator and then
display the list of ACEs and see a new ACE for a different user name
(root), it maybe confusing. As many NT user names can be mapped to
one UNIX user name, Samba only displays the one UNIX user name.
It cannot display the NT name that was mapped to the UNIX user
name.
You also have to be careful not to create multiple conflicting ACEs for one
UNIX user. For example, in the NT GUI you might add an ACE for the
user administrator, admin and root. But when you apply these changes,
Samba maps administrator and admin to the UNIX user root and the
result is that Samba tries to add three different ACEs, all for the user
root, to one file. That is not valid and Samba ignores two of the three
ACEs.
Selecting Names From the Samba Name List
The NT user names mapped to UNIX users will also be displayed when
you press the Show Users button in the Add Users and Groups dialog
box. Every valid name that you add to an ACE is in the name list on the
Samba server (after you hit the Show Users button). You do not need to
type in names or select names from the NT domain list. If, however, you
pick a name from the NT domain list and it happens to be a UNIX user
name on the Samba server, it will be added. This also applies to names
that have a user name mapping in Samba.
There is another reason HP recommends selecting names from the
Samba server's list of names instead of typing names in manually. There
might be a UNIX group and a UNIX user with the same name. If you
select a name from the list, Samba knows whether you mean the user or
the group. If you type the name in, there is no way for you to specify the
user or the group and Samba may add the ACE for a user when you
meant the UNIX group with the same name.
70
Chapter 3
Managing HP-UX File Access Permissions from Windows NT/XP/2000
POSIX ACLs and Windows 2000 Clients
POSIX ACLs and Windows 2000 Clients
The CIFS/9000 Server A.01.07, and subsequent versions, allow Windows
2000 clients to view and set POSIX ACL permissions. The information in
this section assumes you are familiar with Windows 2000 permissions.
The purpose of this section is to explain how the CIFS/9000 Server
interprets Windows 2000 permissions, and how Windows 2000 clients
interpret and display HP-UX permissions.
Windows 2000 clients interact with POSIX ACLs similar to Windows NT
clients, except for the minor differences covered in the following sections.
Learn more about ACLs and Windows 2000 clients in the previous
sections in this chapter. You can also learn more about POSIX ACLs with
man aclv.
Viewing Windows 2000 Client Permissions from the
CIFS/9000 Server
The following table shows how the CIFS/9000 Server displays
permissions set by Windows 2000 clients:
Table 3-4
Chapter 3
CIFS/9000 Displays Windows 2000 Client Permissions
CIFS/900
0
Windows 2000
r--
Read
-w-
Write
--x
Traverse Folder or Execute (Advanced)
rw-
Read, Write
r-x
Read and Execute
-wx
All Write and Execute Attributes
(Advanced)
rwx
Read, Write, Read and Execute, Modify
---
None (Advanced)
71
Managing HP-UX File Access Permissions from Windows NT/XP/2000
POSIX ACLs and Windows 2000 Clients
NOTE
In the table above, the permissions labeled Advanced can be viewed from
the ACL dialog box by clicking on Advanced, then View/Edit.
Setting Windows 2000 Client Permissions
The following table shows each Windows 2000 client permission and
what each permission means to the CIFS/9000 Server:
Table 3-5
72
CIFS/9000 Server Interpretations of Windows 2000 Permissions
Windows 2000
CIFS/9000
Full Control
rwx
Write
-w-
Modify
rwx
Read and Execute
r-x
Read
r--
List Folder / Read Data (Advanced)
r--
Read Attributes (Advanced)
r--
Read Extended Attributes (Advanced)
r--
Read Permissions (Advanced)
r--
Create Files / Write Data (Advanced)
-w-
Create Folder / Append Data (Advanced)
-w-
Write Attributes (Advanced)
-w-
Write Extended Attributes (Advanced)
-w-
Traverse Folder / Execute File
(Advanced)
--x
Delete Subfolders and Files (Advanced)
No meaning on
HP-UX
Chapter 3
Managing HP-UX File Access Permissions from Windows NT/XP/2000
POSIX ACLs and Windows 2000 Clients
Table 3-5
CIFS/9000 Server Interpretations of Windows 2000 Permissions
Windows 2000
CIFS/9000
Delete (Advanced)
* see explanation
following table
Change Permissions (Advanced)
* see explanation
following table
Take Ownership (Advanced)
* see explanation
following table
* The Delete, Change Permissions, and Take Ownership permissions
represent file and group ownership. On a user ACE, the user owns the
file if Delete, Change Permissions, and Take Ownership permissions are
set. On a group ACE, the group owns the file if the Take Ownership
permission is set.
NOTE
The Windows 2000 permissions labeled Advanced in the table above can
be viewed from the ACL dialog box by clicking on Advanced, then
View/Edit.
NOTE
The CIFS Server ensures that at least “read” permission is set for the file
owner. For example, if a user tries to set a file’s permissions to “- - -”, the
CIFS Server will actually set it to “r - -”.
Viewing ACLs from Windows 2000 Clients
Step 1. Right-click on a file and select Properties
Chapter 3
73
Managing HP-UX File Access Permissions from Windows NT/XP/2000
POSIX ACLs and Windows 2000 Clients
Step 2. Click on the Security tab
Displaying the Owner of a File
Step 1. Click on Advanced
Step 2. Click on the Owner tab on the Access Control Settings dialog box
74
Chapter 3
Managing HP-UX File Access Permissions from Windows NT/XP/2000
Configuring Samba ACL Support
Configuring Samba ACL Support
For CIFS/9000 Version A.01.07
In non-HP Samba versions, you could only turn Samba's NT ACL
Support on or off on a serverwide basis. When turned on, UNIX file
permission support was enabled for all Samba shares. There was no
support for any ACL scheme, including VxFS POSIX ACLs. Instead, you
configured the old NT ACL support through the smb.conf variable nt acl
support. This functionality is still supported in the CIFS/9000 product.
In CIFS/9000, however, there is a new smb.conf variable that you can use
to configure Samba ACL support. And, with this Samba version, you may
configure every share on the Samba server differently.
Since there may be many UNIX file systems under the root of a Samba
share, one Samba share may have files on HFS file systems, VxFS 3.3 file
systems, NFS file systems, and older VxFS file systems. If you assign one
type of ACL support for the share, you might not be taking full
advantage of the capabilities of each file system located there. So with
this version of Samba you can create a list of ACL schemes for each
share.
The list of ACL schemes specifies the order that ACL schemes will be
attempted on a file in that share. Currently the ACL scheme unix is
supported (meaning UNIX file permissions) and hpux_posix is supported
(meaning VxFS POSIX ACLs on HP-UX).
In the examples below, assume that HP-UX HFS ACLs are also
supported and that this scheme is called hpux_hfs. The name of the
per-share variable in the smb.conf is acl_schemes.
Examples:
Following are five examples of ACL schemes.
Example 1:
acl schemes = hpux_posix hpux_hfs unix
If a share has this acl schemes parameter set, Samba will attempt to use
VxFS POSIX ACLs. If that scheme is not supported, it trys HFS ACLs.
And, if that scheme is not supported, it would use UNIX file permissions.
Chapter 3
75
Managing HP-UX File Access Permissions from Windows NT/XP/2000
Configuring Samba ACL Support
If a Windows client makes a request to see the ACL for a file on an HFS
file system in that share, Samba attempts to use the POSIX ACL system
call. It will fail and return an error indicating that the ACL scheme is not
supported on that file. Then Samba would try the HFS ACL system call
and it would succeed. The user would not see the initial failure described
in this example.
Example 2:
acl schemes = unix
This is the default ACL scheme. The default ignores UNIX ACL
capabilities and uses UNIX file permissions, as was the case with
previous versions of Samba.
Example 3:
acl schemes = none
This ACL example turns off all ACL support for the share and causes an
error to be returned whenever a client tries to get or to set ACL
information on any file system on the share.
Example 4:
acl schemes = hpux_posix
This ACL example supports only VxFS POSIX ACLs on the entire share.
For files on NFS, HFS or VxFS pre 3.3 file systems, all attempts from the
client to get or to set ACLs will fail. This example will not fall back to the
UNIX file permissions. ACL support will only work for files on file
systems supporting POSIX ACLs (currently VxFS 3.3 or higher).
Example 5:
acl schemes = unix hpux_posix
This ACL example is the same as setting acl scheme to unix (Example 2)
because UNIX file permissions are supported on every UNIX file system
type. This means the scheme will never fall through to the next ACL
scheme in the list. The unix scheme will be the first and last scheme
attempted in each case.
The examples described above show how any combination of ACL
schemes can be supported on a Samba share.
If you plan to have many schemes in the ACL scheme list, you will want
to setup the best order to maximize efficiency. For example, if the files
accessed the most are all on a VxFS 3.3 file system, put hpux_posix first
76
Chapter 3
Managing HP-UX File Access Permissions from Windows NT/XP/2000
Configuring Samba ACL Support
on the ACL scheme list for that share. Otherwise, Samba will make
many system calls for other ACL schemes before it locates the right one.
This prioritization will become even more important in the future when
Samba supports more and more ACL types.
For CIFS/9000 Version A.01.08
With CIFS/9000 Server version A.01.08, the “nt acl support”
configuration variable is made share level. It was previously a Global
level variable. Its default value is “yes”. Using this variable, users can
now control the ACL support on a per-share basis.
Except for setting the above variable, there is no other special
configuration needed for supporting ACLs.
For a share supporting NT ACLs, the CIFS Server always tries to get, or
set, POSIX ACLs on the Unix file system. If the underlying file system
does not support POSIX ACLs, then the CIFS Server will use the Unix
file permissions. In such a case, the user will only be able to set or get the
three default ACEs (owner, group and everyone). Additional ACEs will
be ignored.
With version A.01.08 of the CIFS Server, the configuration variable “acl
schemes” (exists in version A.01.07, and below) is not supported.
However, having this variable in the configuration file will not hurt CIFS
Server operation.
The user is advised to remove or comment out occurrences of these
variables from the configuration file (smb.conf) to prevent confusion.
IMPORTANT
Chapter 3
VxFS POSIX ACL file permissions only work when JFS 3.3 or disk
layout version4 is installed on your system. Learn how to install JFS 3.3
on HP-UX 11.0 in the HP JFS 3.3 and HP OnLineJFS 3.3 Release Notes
(MPN B3929-90007) located at www.docs.hp.com. Learn about installing
and upgrading disk layout versions in the HP JFS 3.3 and
HPOnLineJFS 3.3 VERITAS File System 3.3 System Administrator’s
Guide (MPN B3929-90011) located at www.docs.hp.com.
77
Managing HP-UX File Access Permissions from Windows NT/XP/2000
In Conclusion
In Conclusion
Samba ACL support is a feature that enables the manipulation of UNIX
file permissions or UNIX ACLs from Windows NT clients.
With this feature, almost any modification you want to make to UNIX
permissions or VxFS POSIX ACLs can now be done from an NT client
(with the exception of the class entry for VxFS POSIX ACLs).
Windows applications running on the Windows NT client cannot expect
full NT ACL support. Although much of the NT ACL information is
retained and retrieved by the Samba server, some of the information may
be lost or changed in some cases.
The ACL support is not an NT ACL emulation, but rather access to
UNIX ACLs through the NT client. Therefore you cannot run Windows
applications which require full, perfect NT ACL support.
78
Chapter 3
4
Chapter 4
Primary Domain Controller
(PDC) Support
79
Primary Domain Controller (PDC) Support
Introduction
Introduction
This chapter describes how to set up, and configure, a CIFS/9000 Server
as a Primary Domain Controller (PDC).
The following are a list of recent enhancements for the CIFS/9000
Server. Those that are new for version A.01.08 have been identified as
such.
NOTE
•
Continue the support for joining a Samba server to the Windows NT
domain as a member server
•
New for A.01.08: provide the ability to act as a Primary Domain
Controller (PDC) for Windows clients which include Windows 95, 98,
NT, XP and 2000
•
New for A.01.08: provide Domain login feature for Windows NT 4.0
SP3+, XP and 2000 member servers and Samba member servers
•
New for A.01.08: support mapping for Windows built-in group and
username to a Unix group
•
New for A.01.08: support Windows NT logon scripts
•
New for A.01.08: view resources on a Samba PDC using Microsoft’s
“Server manager for Domain” tool
•
New for A.01.08: support local and roaming profiles
•
New for A.01.08: support the specified logon home share to a Samba
server
Version A.01.08 of the SIFS/9000 Server does not support Security
Accounts Manager (SAM) databases (containing NT user account
information) nor does it provide any Backup Domain Controller (BDC)
features, and will not support BDCs in a domain for which it is serving
as a PDC.
Advantages of the Domain Model
The Windows NT domain model provides a number of advantages:
80
Chapter 4
Primary Domain Controller (PDC) Support
Introduction
•
Windows NT administrators may group workstations and servers
under the authority of a domain controller
•
Domain members may be centrally administered by using domains
to group related machines. One of the benefits of this is the ability for
user accounts to be common for multiple systems. A user may now
make one password change which will affect multiple systems
accessed by that user. Another benefit is that IT administration work
is reduced, since there is no longer a need for individual accounts to
be administered on each system
Primary Domain Controllers
The Primary Domain Controller (PDC) is responsible for several tasks
within the domain. These include:
•
Authenticating user logons for users and workstations that are
members of the domain
•
Acting as a centralized point for managing user account and group
information for the domain
•
A user logged on to the Primary Domain Controller (PDC) as the
domain administrator can add, remove or modify Windows domain
account information on any machine that is part of the domain
•
It should be noted that the current version of the PDC does not
support having a BDC in the domain. Because of this, if the PDC
fails, there is no way for Windows Client users of the domain to be
authenticated. And, if a disk fails on the PDC, there is no backup on
the domain with the critical credential data. This means that it is
very important to make backups of users credential files. It also
means that there is no system that can be easily promoted to a PDC
to take the place of the existing PDC
Domain Members
•
The following member servers are supported:
— Windows NT
— Windows 2000
— Windows XP
— CIFS/9000
Chapter 4
81
Primary Domain Controller (PDC) Support
Introduction
— AS/U
82
•
Users on a domain member machine can access network resources
within the domain. Some examples of these resources are file and
printer shares and application servers
•
Domain members do not perform the user authentication for user
logons. Instead, the member sends the credentials to a domain
controller via a secure channel. The domain controller checks the
credentials against those in its database and returns the results to
the member server. Access is granted based on the results returned
Chapter 4
Primary Domain Controller (PDC) Support
Create the Machine Trust Accounts
Create the Machine Trust Accounts
Creating the Machine Trust Accounts for a Windows Client (Client =
member server) on a CIFS/9000 Server acting as a PDC means:
•
Creating machine accounts in the file named /etc/passwd
•
Creating the machine accounts entries in the file named
/var/opt/samba/private/smbpasswd
The following steps are used to create a machine account for a Windows
Client on a CIFS/9000 Server acting as a Primary Domain Controller
(PDC).
1. On the Samba PDC Server, use the following command(s) to create a
new group called “machines”. This group should be created in the
/etc/group file.
groupadd machines
2. Create the machine trust account for a Windows Client in the
/etc/passwd file, using the following command:
useradd -g machines -c NT_workstation -d /home/temp -s
/bin/false client1$
The resulting entry for a client machine named “CLIENT1” would
be:
client1$:*.801:800:NT Workstation
1:/home/temp:/bin/false
where 801 is a uid and 800 is the group id of a group called
“machines.” A uid or group id can be any unique number. You may
find that uid values 0 through 100 are considered special, and/or
server specific. This may, or may not apply to your system.
The machine account is the machine’s name with a dollar sign
character (“$”) appended to it. The home directory can be set to
/home/temp. The shell field in the /etc/passwd file is not used and
can be set to /bin/false.
3. On the Samba PDC server, run the “smbpasswd” program to add a
machine entry for a Windows client to the
/var/opt/samba/private/smbpasswd file. Example:
Chapter 4
83
Primary Domain Controller (PDC) Support
Create the Machine Trust Accounts
smbpasswd -a -m client1
In this example, the “client1” is the machine name of a Windows
Client.
84
Chapter 4
Primary Domain Controller (PDC) Support
Configure Domain Users
Configure Domain Users
The following examples show the commands used to configure Domain
Users, Domain Administrators and Domain Guests on a CIFS/9000
Server configured as a PDC.
•
If you are a root-level user, create a Domain User in the group named
“users”, located in the /sbin/sh directory. For example:
useradd -g users -c “Domain Users” -s /sbin/sh domuser
If you are not a root-level user, create a Domain User in the group
named “users”, located in the /usr/bin/sh directory. For example:
useradd -g users -c “Domain Users” -s /usr/bin/sh domuser
where domuser is the name of a Domain User.
•
If you are a root-level user, create a Domain Administrator in the
group named “adm”, located in the /sbin/sh directory. For example:
useradd -g adm -c “Domain Administrators” -s /sbin/sh domadmin
If you are not a root-level user, create a Domain Administrator in the
group named “adm”, located in the /usr/bin/sh directory. For
example:
useradd -g adm -c “Domain Administrators” -s /usr/bin/sh domadmin
where domadmin is the name of a Domain Administrator.
•
If you are a root-level user, create a Domain Guest in a group named
“users”, located in the /sbin/sh directory. For example:
useradd -g users -c “Domain Guest” -s /sbin/sh domguest
If you are not a root-level user, create a Domain Guest in a group
named “users”, located in the /usr/bin/sh directory. For example:
useradd -g users -c “Domain Guest” -s /usr/bin/sh domguest
where domguest is the name of a Domain Guest.
Be sure that all of the users that were created (see the example above)
have been added to the /etc/passwd file.
Chapter 4
85
Primary Domain Controller (PDC) Support
Configure the CIFS/9000 Server as a PDC
Configure the CIFS/9000 Server as a PDC
When configured to act as a Primary Domain Controller (PDC), the
CIFS/9000 Server should create machine accounts for Windows Clients
(member servers). To enable this feature, choose “Primary Domain
Controller” when executing samba_setup, then verify the following:
1. The smb.conf file is as shown:
[global]
workgroup = SAMBADOM #Samba Domain
security = user
domain logon = yes
domain master = yes
encrypt passwords = yes
[netlogon]
comment = The domain logon service
path = /var/opt/samba/netlogon
writeable = no
guest ok = no
2. /var/opt/samba/netlogon subdirectory for the domain logon service
exists.
NOTE
domain logons: This parameter must be set to “yes” in order for the
CIFS/9000 Server to act as a PDC.
Encrypt passwords: If this parameter is set to “yes”, the passwords
used to authenticate users will be encrypted. This parameter must be set
to “yes” when a CIFS/9000 Server is configured to act as a PDC.
Configuration Options
The configurations shown in this section are not required for the basic
PDC functionality.
86
Chapter 4
Primary Domain Controller (PDC) Support
Configure the CIFS/9000 Server as a PDC
Map an NT Domain Admin Group to a Unix Group
A Samba Server can be configured as a PDC to map a Windows NT
domain admin group to the Unix group.
Modify the smb.conf file to set the global parameter named domain
admin group to point to the Unix admin group and user. Example:
[global]
domain admin group = root @adm
In this example, a group called “adm” should be created by the user in
the /etc/group file.
Map an NT Domain Guest Group to a Unix Group
A Samba Server can be configured as a PDC to map a Windows NT
domain guest group to the Unix group.
Modify the smb.conf file to set the global parameter named domain
guest group to point to the Unix guest built-in group and user.
Example:
[global]
domain guest group = guest @guest
In this example, a group called “guest” should be created by the user in
the /etc/group file.
Chapter 4
87
Primary Domain Controller (PDC) Support
Join a Windows Client to a Samba Domain
Join a Windows Client to a Samba Domain
1. Verify the following parameters in the smb.conf file:
Set the security parameter to “user.”
Set the workgroup parameter to the name of the domain.
Set the encrypt passwords parameter to “yes.”
[global]
security = user
workgroup = SAMBADOM #SAMBA Domain name
domain logon = yes
encrypt passwords = yes
2. On the Samba PDC Server, create a machine trust account for a
Windows Client in the /etc/passwd file, using the following
command:
useradd -g machines -c NT_workstation -d /home/temp -s
/bin/false client1$
An example of the command can be seen within the upper dark
rectangle in Figure 4-1, below.
The resulting entry for a client machine named “CLIENT1” would
be:
client1$:*.801:800:NT Workstation
1:/home/temp:/bin/false
where 801 is a uid and 800 is the group id of a group called
“machines.” A uid or group id can be any unique number. You may
find that uid values 0 through 100 are considered special, and/or
server specific. This may, or may not apply to your system.
The machine account is the machine’s name with a dollar sign
character (“$”) appended to it. The home directory can be set to
/home/temp. The shell field in the /etc/passwd file is not used and
can be set to /bin/false.
An example of the entry can be seen within the lower dark rectangle
in Figure 4-1, below.
88
Chapter 4
Primary Domain Controller (PDC) Support
Join a Windows Client to a Samba Domain
Figure 4-1
Create A Machine Trust Account
3. Run the smbpasswd program to add a machine entry for a Windows
Client to the /var/opt/samba/private/smbpasswd file using the
following command:
smbpasswd -a -m client1
An example of this command can be seen within the upper dark
rectangle in Figure 4-2, below, and an example of the associated
machine entry can be seen in the lower rectangle.
In this example, the “client1” machine entry is the machine name
of a Windows Client.
Chapter 4
89
Primary Domain Controller (PDC) Support
Join a Windows Client to a Samba Domain
Figure 4-2
Add A Machine Entry
4. Logon to Windows NT as a local admin user.
5. From the Windows NT desktop, click ‘Start’, ‘Settings’ and ‘Control
Panel’. When the Control Panel window opens, double-click on the
‘Network’ icon. When the ‘Network’ window opens, click the
‘Identification’ tab. Refer to Figure 4-3 below.
6. Enter the Samba domain name in the ‘Domain’ field, and click on the
‘Change’ button. Refer to Figure 4-3 below.
90
Chapter 4
Primary Domain Controller (PDC) Support
Join a Windows Client to a Samba Domain
Figure 4-3
Chapter 4
Entering A Samba PDC Domain Name
91
Primary Domain Controller (PDC) Support
Roaming Profiles
Roaming Profiles
The CIFS/9000 Server, configured as a PDC, supports Roaming Profiles
with the following features:
•
A user’s environment, preference settings, desktop settings, etc. are
stored on the CIFS/9000 Server
•
Roaming Profiles can be created as a share, and be shared between
Windows clients
•
When a user logs on to a workstation in the domain, the roaming
profile is downloaded from the share which is on a CIFS/9000 Server
configured as a PDC, to the local machine. Upon logout, the profile is
copied back to the server
Configuring Roaming Profiles
Use the following procedure to configure roaming profiles:
1. Modify or enable roaming profiles by using the global parameter
named logon path, in the smb.conf file. Example:
[global]
logon path = \\%L\profile\%U
workgroup = SAMBADOM
security = user
encrypt passwords = yes
domain logon = yes
2. Create a [profiles] share for roaming profiles. The following is an
example configuration for the [profiles] share:
[profiles]
path = /var/opt/samba/profiles
read only = no
create mode = 600
directory mode = 770
writeable = yes
browseable = no
guest ok = no
92
Chapter 4
Primary Domain Controller (PDC) Support
Configuring User Logon Scripts
Configuring User Logon Scripts
The following is an example configuration for user logon scripts:
[global]
logon script = %U.bat
[netlogon]
path = /var/opt/samba/netlogon
writeable = yes
browseable = no
guest ok = no
In this example, the batch (.bat) file is executed from a file share called
[netlogon] on a CIFS/9000 Server configured as a PDC.
Running Logon Scripts When Logging On
A CIFS/9000 Server configured as a PDC can enable the execution of
logon scripts when users log on. To enable this feature, the following
must be done:
Chapter 4
•
User logon scripts should be stored in a file share on the CIFS/9000
Server called [netlogon].
•
The CIFS/9000 Server enables the execution of login scripts by
setting the global parameter named logon script in the smb.conf
file.
•
Any logon script that is to be executed on a Windows Client must be
in DOS text format and contain executable permission.
93
Primary Domain Controller (PDC) Support
Home Drive Mapping Support
Home Drive Mapping Support
A CIFS/9000 Server provides user home directories and home drive
mapping functionality by using the following two global parameters in
the smb.conf file:
•
login home
•
logon drive
Example:
[global]
logon drive = H:
logon home = \\%L\%U
94
Chapter 4
5
Domain Member Server
Support
This chapter describes the process for Joining a CIFS/9000 Server to a
Windows NT or Samba Domain.
Chapter 5
95
Domain Member Server Support
Join a CIFS/9000 Server to a Windows NT, Windows 2000 or Samba Domain
Join a CIFS/9000 Server to a Windows NT,
Windows 2000 or Samba Domain
Step-by-step Procedure
1. Choose “Domain Member Server” when executing samba_setup.
When prompted, you will need to add your domain Member Server
machine account to the PDC.
For Windows NT: Go to the Windows NT PDC and create a
machine account for the CIFS/9000 Member Server by performing
the following steps:
a. Open the “start/programs/administrator/tools/server manager”
tool.
b. Select the “computer/add to domain” icon and enter the host
name of the CIFS/9000 Server.
c.
Choose the “Windows NT Workstation or Server” option when
you are asked for the computer type.
For Windows 2000: Go to the Windows 2000 PDC and create a
machine account for the CIFS/9000 Member Server by using the
Active Directory Controller Wizard.
The CIFS/9000 Server only supports NTLM security.
For Samba (including CIFS/9000): Go to the Samba Server acting
as a PDC and create a machine account for the CIFS/9000 Member
Server by following the steps provided in Chapter 4 section titled,
“Create a Machine Trust Account.” samba_setup will then perform
the following commands for you:
smbpasswd -j NTDOM -r DOMPDC
The NTDOM parameter is the Windows NT domain name.
The DOMPDC parameter is the NetBIOS name of the Windows PDC
machine.
2. Verify the following parameters in the smb.conf file:
96
Chapter 5
Domain Member Server Support
Join a CIFS/9000 Server to a Windows NT, Windows 2000 or Samba Domain
[global]
security = domain
workgroup = NTDOM #Window NT or Samba Domain name
password server = DOMPDC
encrypt passwords = yes
NOTE
workgroup: This parameter specifies the domain name of which the
CIFS/9000 Server is a member.
security: When the CIFS/9000 Server joins a domain as a member,
this parameter must be set to “domain”.
password server: This parameter defines the NetBIOS name of the
PDC machine which performs the username authentication and
validation.
encrypt passwords: If this parameter is set to “yes”, the passwords
used to authenticate users will be encrypted.
Chapter 5
97
Domain Member Server Support
Join a CIFS/9000 Server to a Windows NT, Windows 2000 or Samba Domain
98
Chapter 5
6
Configuring HA CIFS/9000
CIFS/9000 has two High Availability configurations: Active-Standby and
Active-Active.
Chapter 6
99
Configuring HA CIFS/9000
An “active-standby” High Availability configuration is a configuration
where, under normal conditions, one node of the MC/ServiceGuard
cluster is running the MC/ServiceGuard package and one or more other
nodes are in a “wait” mode, waiting to run the package if anything goes
wrong on the first node. Only one node can run the package at any given
time. Hence the names in this type of HA configuration are: “active” for
the first node and “stand by” for the other node(s).
An “active-active” High Availability configuration is a configuration
where, under normal conditions, both (or all) of the MC/ServiceGuard
cluster nodes are running similar MC/ServiceGuard packages at the
same time. If one of the nodes fails, one of the other nodes has to start
doing the work that the failed node had been doing. Both nodes are
normally actively working. Neither one is standing by idle, waiting for a
failure to occur. In our example, both MC/ServiceGuard cluster nodes
normally are running CIFS/9000 Servers.
This chapter includes complete descriptions of both types along with the
steps required to configure each one.
100
Chapter 6
Configuring HA CIFS/9000
Overview of HA CIFS/9000 Server Active-Standby
Overview of HA CIFS/9000 Server
Active-Standby
Highly Available CIFS/9000 Server allows the CIFS/9000 Server product
to run on a MC/ServiceGuard cluster of nodes. MC/ServiceGuard allows
you to create high availability clusters of HP 9000 Server computers.
You must set up an MC/ServiceGuard cluster before you can set up an
HA CIFS/9000 Server. For instructions on setting up an
MC/ServiceGuard cluster, refer to the Managing MC/ServiceGuard
manual.
HA CIFS/9000 Server provides customizable configuration, control
scripts and monitor scripts. These scripts as well as a README file
reside in the directory /opt/samba/HA/active_standby. These are
sample scripts and should be customized for your environment.
This section and the files in /opt/samba/HA/active_standby only apply
to an active-standby HA configuration. The equivalent files which apply
to an active-active HA configuration are in the
/opt/samba/HA/active-active directory.
Recommended Clients
The recommended clients for HA CIFS/9000 Server are Windows 95 and
Microsoft NT Workstation. Older clients, such as DOS/Windows 3.1 LM
2.2C and Windows for Workgroups, may not respond well to CIFS/9000
Server stopping and network connections terminating as occurs during
an HA CIFS/9000 Server switchover.
Review the “Special Notes for HA CIFS/9000 Server” section contained
later in this chapter for usage considerations.
Chapter 6
101
Configuring HA CIFS/9000
Installing Prerequisites
Installing Prerequisites
HA CIFS/9000 Server must be installed and configured on both the
primary and alternate cluster nodes.
Before creating a Highly Available CIFS/9000 Server package, however,
you must set up your MC/ServiceGuard cluster according to the
instructions in the Managing MC/ServiceGuard manual.
To do so, perform the following:
1. Following the instructions, configure the disk hardware for high
availability.
2. Use SAM or LVM commands to set up volume groups, logical
volumes, and file systems needed for the data that must be available
to the primary and alternate cluster nodes when failover occurs.
102
Chapter 6
Configuring HA CIFS/9000
Install the HA CIFS/9000 Server
Install the HA CIFS/9000 Server
Follow the steps below to load the HA CIFS/9000 Server software.
1. Install the CIFS/9000 Server using SD on the primary and alternate
nodes. If the CIFS/9000 Server is already installed and configured on
the primary node, stop it using the /opt/samba/bin/stopsmb
command and skip to Step 3 below.
2. On the primary node:
Run the /opt/samba/bin/samba_setup script to configure the
installed files. Enter the server name and domain/workgroup name
for the HA CIFS/9000 Server at this time.
3. On the alternate nodes:
Run the /opt/samba/bin/samba_setup script and configure it with
the same authentication level and domain/workgroup as the primary
node.
NOTE
For users used to authenticate CIFS clients, make sure that they
have the same name, user ID number, primary group and password
on all nodes. This is a very important step.
4. Add the following to the [global] section of the
/etc/opt/samba/smb.conf file on both nodes:
interfaces = XXX.XXX.XXX.XXX 127.0.0.1
bind interfaces only = yes
Where “XXX.XXX.XXX.XXX 127.0.0.1” is replaced with the
relocatable IP address for the MC ServiceGuard package, not the
LANIC IP address associated with the physical LAN card of the
system. If your MC ServiceGuard package has more than one
relocatable IP address, put the all on this line.
Chapter 6
103
Configuring HA CIFS/9000
Install the HA CIFS/9000 Server
IMPORTANT
This is important to ensure the IP address of the CIFS/9000 server
doesn’t change when a failover occurs. If the IP address changed on
failover, clients might experience problems.
5. Check that the RUN_SAMBA parameter in the
/etc/rc.config.d/samba file is set to 0 on all nodes.
104
Chapter 6
Configuring HA CIFS/9000
Configure a Highly Available CIFS/9000 Server
Configure a Highly Available CIFS/9000
Server
To configure the HA CIFS/9000 Server product, you must complete the
steps below. These steps are described in detail in the following sections.
1. Move data to the CIFS/9000 share volume.
2. Edit the samba.conf package configuration file.
3. Edit the samba.cntl control script.
4. Create the MC/ServiceGuard Binary Configuration File.
Move Data to the CIFS/9000 Share Volume
To configure the highly available CIFS/9000 Server package, complete
the following tasks on the Primary Node of your MC/ServiceGuard
cluster:
1. Move all relevant data to the CIFS/9000 Server package shared
volume.
Relevant data, consisting of all directories and files which will be
accessed using CIFS/9000 Server, should reside on shared volumes.
This data includes any shares created by the user. For example, if the
CIFS/9000 Server administrator creates a TEST=c:/tmp/test share,
then all the data from /tmp/test should reside on a shared logical
volume.
NOTE
Chapter 6
HP recommends that you configure your /etc/opt/samba directory
to reside on a shared logical volume. This allows all nodes to share
an smb.conf file. This simplifies the configuration, but requires that
the names of printers shared by Samba and directory paths to the
root of Samba shares be identical. While you could keep separate
smb.conf files on each node, it would be difficult to keep the smb.conf
file on every node updated each time a change is made.
105
Configuring HA CIFS/9000
Configure a Highly Available CIFS/9000 Server
It would also be difficult to configure and manage a configuration
where the names of shared printers and share locations vary from
node to node.
NOTE
If you plan to use a username mapping file, HP recommends that you
configure its location under the /etc/opt/samba directory. This way,
when changes are made, all nodes will be updated.
Below is an example of copied data from the required CIFS/9000
Server directories to the logical volumes in the volume group
vgsamba.
mkdir /tmp/share1_copy /tmp/share2_copy /tmp/etc_copy
mount /dev/vgsamba/lvol1 /tmp/share1_copy
mount /dev/vgsamba/lvol2 /tmp/share2_copy
mount /dev/vgsamba/lvol3 /tmp/etc_copy
cp -r /opt/share1/* /tmp/share1_copy
cp -r /home/share2/* /tmp/share2_copy
cp -r /etc/opt/samba/* /tmp/etc_copy
umount /tmp/share1_copy
umount /tmp/share2_copy
umount /tmp/share3_copy
rm -rf /tmp/share1_copy /tmp/share2_copy /tmp/etc_copy
2. Create a directory for the CIFS/9000 Server cluster package.
mkdir /etc/cmcluster/samba
3. Copy the sample scripts samba.conf, samba.cntl and samba.mon
from /opt/samba/HA to /etc/cmcluster/samba on the primary
node. Make all of the scripts writeable.
cp /opt/samba/HA/active_standby/samba.*
chmod 666 samba.conf samba.cntl samba.mon
/etc/cmcluster/samba
4. Customize the sample scripts for your MC/ServiceGuard
configuration. A sample customization of the HA CIFS/9000 Server
package configuration, control and monitor scripts is shown below.
5. Ensure that the control (samba.cntl) and monitor (samba.mon)
scripts are executable.
chmod 777 samba.cntl samba.mon
106
Chapter 6
Configuring HA CIFS/9000
Configure a Highly Available CIFS/9000 Server
Edit the samba.conf Configuration File
To configure the samba.conf configuration file, complete the following
tasks on the Primary Node of your MC/ServiceGuard cluster:
1. Set the PACKAGE_NAME variable.
PACKAGE_NAME
Sambapkg
2. Create a NODE_NAME variable for each node that will be running
the package. The first NODE_NAME variable should specify the
primary node. All other NODE_NAME variables should specify
alternate nodes in the order in which they are to be tried.
NODE_NAME
NODE_NAME
node1
node2
3. Set the RUN_SCRIPT and HALT_SCRIPT variables to the full path
name of the control script.
RUN_SCRIPT
/etc/cmcluster/samba/samba.cntl
RUN_SCRIPT_TIMEOUT NO_TIMEOUT
HALT_SCRIPT /etc/cmcluster/samba/samba.cntl
HALT_SCRIPT_TIMEOUT NO_TIMEOUT
4. Set the SERVICE_NAME variable to samba_mon.
SERVICE_NAME samba_mon
SERVICE_FAIL_FAST_ENABLED
SERVICE_HALT_TIMEOUT
NO
300
5. Set the SUBNET variable to the subnet that will be monitored for
the package, as in the following example:
SUBNET 15.13.2.0
6. The following initialization settings will cause a package failover to
occur if there is a node or network failure, even if the CIFS/9000
Server monitor script is not being used.
PKG_SWITCHING_ENABLED
NET_SWITCHING_ENABLED
YES
YES
7. If the NODE_FAIL_FAST_ENABLE variable is set to NO, the node
is not brought down when the package goes down.
NODE_FAIL_FAST_ENABLED
Chapter 6
NO
107
Configuring HA CIFS/9000
Configure a Highly Available CIFS/9000 Server
Edit the samba.cntl Control Script
To configure the samba.cntl Control Script file, you must complete the
following tasks:
1. Create a volume group for the CIFS/9000 Server directories:
VG[0]=/dev/vgsamba
2. Create a separate LV[n] and FS[n] variable for each volume group
and file system that will be mounted on the server, for example:
LV[0]=/dev/vgsamba/lvol1;FS[0]=/opt/share1
LV[1]=/dev/vgsamba/lvol2;FS[1]=/home/share2
LV[2]=/dev/vgsamba/lvol3;FS[1]=/etc/opt/samba
Add additional LV variables, if required.
3. Specify the relocatable IP address and the address of the subnet to
which the IP address belongs.
IP[0]=15.13.171.20
SUBNET[0]=15.13.168.0
4. If you want to use the CIFS/9000 Server monitor script, set the
NFS_SERVICE_NAME variable to the value of the
SERVICE_NAME variable in the package configuration file
samba.conf.
SERVICE_NAME[0]=samba_mon
SERVICE_CMD[0]=/etc/cmcluster/samba/samba.mon
5. Use the following example as a template for
customer_defined_run_cmds :
function customer_defined_run_cmds
{
# ADD customer defined run commands.
findproc smbd
if [ "$pid" = "" ]
then
findproc nmbd
if [ "$pid" = "" ]
then
/opt/samba/bin/startsmb
else
/opt/samba/bin/stopsmb
/opt/samba/bin/startsmb
fi
108
Chapter 6
Configuring HA CIFS/9000
Configure a Highly Available CIFS/9000 Server
else
findproc nmbd
if [ "$pid" = "" ]
then
/opt/samba/bin/stopsmb
/opt/samba/bin/startsmb
fi
fi
test_return 51
}
6. Use the following as a template for customer_defined_halt_cmds:
function customer_defined_halt_cmds
{
# ADD customer defined halt commands.
findproc smbd
if [ "$pid" = "" ]
then
findproc nmbd
if [ "$pid" = "" ]
then
:
else
/opt/samba/bin/stopsmb
fi
else
/opt/samba/bin/stopsmb
fi
test_return 52
}
WARNING
Make sure that all processes/applications that access the file
systems mounted by sambapkg are shutdown in the
customer_defined_halt_cmds subroutine. This will allow the
filesystems to be unmounted and failed over to the standby node.
Package failover may not occur if any of the file systems
mounted by the sambapkg cannot be unmounted.
Chapter 6
109
Configuring HA CIFS/9000
Configure a Highly Available CIFS/9000 Server
Create the MC/ServiceGuard Binary Configuration
File
NOTE
In the steps below, the cluster configuration file is assigned the name
/etc/cmcluster/cluster.conf, and the HA CIFS/9000 Server package
configuration file is assigned the name
/etc/cmcluster/samba/samba.conf. The actual cluster and HA
CIFS/9000 Server package configuration file names on your system may
be different.
To configure the MC/Service Guard Binary file, you must complete the
following tasks:
1. Use the cmcheckconf command to verify the contents of your cluster
and package configuration.
cmcheckconf -C /etc/cmcluster/cluster.conf \
-P /etc/cmcluster/samba/samba.conf
2. On the alternate node create cluster package directory:
mkdir
/etc/cmcluster/ samba
And, copy the package scripts from the primary node.
rcp primary_node:/etc/cmcluster/samba/*
/etc/cmcluster/samba
3. Use the cmapplyconf command to copy the binary configuration file
to all the nodes in the cluster.
cmapplyconf -v -C /etc/cmcluster/cluster.conf \
-P /etc/cmcluster/samba/samba.conf
This command will distribute the updated cluster binary
configuration file to all of the nodes in the cluster.
You are ready to start the HA CIFS/9000 Server package on the primary
node.
You have completed your configuration of the HA CIFS/9000 Server.
110
Chapter 6
Configuring HA CIFS/9000
Special Notes for HA CIFS/9000 Server
Special Notes for HA CIFS/9000 Server
There are several areas of concern when implementing Samba in the
MC/ServiceGuard HA framework. These areas are described below:
•
Client Applications
HA CIFS/9000 Server cannot guarantee that client applications with
open files on a CIFS/9000 Server share, or applications launched
from CIFS/9000 Server shares, will transparently recover from a
switchover. In these instances there may be cases where the
application will need to be restarted and the files reopened as a
switchover is a logical shutdown and restart of the CIFS/9000 Server.
•
File Locks
File locks are not preserved during failover. File locks are lost and
applications are not advised about any lost file locks.
•
Print Jobs
If a failover occurs when a print job is in process, the job may be
printed twice or not at all, depending on the job state at the time of
the failover.
•
Domain Authentication
If you are using domain level authentication for your Samba server,
there are some files in /var/opt/samba/private that are very
important to authentication working properly. HP recommends that
you make the /var/opt/samba/private directory part of a shared
logical volume in this case.
•
Symbolic Links
If you have your Samba server configured with follow symlinks set to
yes and wide links set to yes, the defaults for these parameters, you
should be cautious.
Symbolic links in the shared directory trees may point to files outside
of any shared directory. If the symbolic links point to files that are
not in logical shared volumes, then, after a failover occurs, the
symbolic link may point to a different file or no file. Keeping the
targets of all shared symbolic links synchronized with all
MC/ServiceGuard nodes at all times could be difficult in this
situation.
Chapter 6
111
Configuring HA CIFS/9000
Special Notes for HA CIFS/9000 Server
Easier options would be to set wide links to no or to be sure that
every file or directory that you point to is on a logical shared volume.
•
Encrypted Passwords
If you have your Samba server configured with encrypt passwords set
to yes, then you have to use an smbpasswd file. By default, this file is
in /var/opt/samba/private, but you can specify a different path
with the smb passwd file parameter.
HP recommends that you locate your smbpasswd file on a logical
shared volume if you use this file. You can do so by setting smb
passwd file to a path within a logical shared volume or by making
/var/opt/samba/private part of a logical shared volume.
•
Samba as a WINS Server
If you configure your Samba server to be a WINS server by setting
the wins support parameter to yes, it will store the WINS database
the file /var/opt/samba/locks/WINS.DAT.
If this file is not on a logical shared volume, when a failover occurs,
there will be a short period of time when all the WINS clients update
the Samba WINS server with their address. However, if this short
period of time to restore the WINS database is not acceptable, you
can reduce the period of time to restore the full WINS service.
To do so, configure /var/opt/samba/locks/WINS.DAT to be a
symbolic link to a WINS.DAT file on a logical shared volume. HP
does not recommend putting the entire /var/opt/samba/locks
directory on a logical shared volume, because the locking data may
not be correctly interpreted after a failover.
•
Samba as a Master Browser
If you configure your Samba server to be the domain master browser
by setting the domain master to yes, it will store the browsing
database in the /var/opt/samba/locks/BROWSE.DAT file. HP
does not recommend doing this in an HA configuration.
If you do so, you will probably want to configure
/var/opt/samba/locks/BROWSE.DAT as a symbolic link to a
BROWSE.DAT file on a logical shared volume. HP does not
recommend putting the entire /var/opt/samba/locks directory on a
logical shared volume because the locking data may not be correctly
interpreted after a failover.
•
112
Automatic Printer Sharing
Chapter 6
Configuring HA CIFS/9000
Special Notes for HA CIFS/9000 Server
If you configure your Samba server with a [printers] share to
automatically share all the printers on your HP-UX system, then you
will need to be certain that all your MC/ServiceGuard nodes have the
same HP-UX printers defined. Otherwise, when a failover occurs, the
list of shared printers for the Samba server will change resulting in
problems on clients using those printers.
•
LMHOSTS File
If you wish to use an LMHOSTS file to store the static addresses for
certain NetBios names, HP recommends that you put the LMHOSTS
file on a logical shared volume.
By default the LMHOSTS file is in the /etc/opt/samba directory,
which should already be in a logical shared volume, so the smb.conf
file is shared for all the MC/ServiceGuard nodes. If you specify a
different path for the LMHOSTS file with the -H option when you
invoke nmbd, HP recommends that you put the LMHOSTS file on a
logical shared volume so that all the nodes can share it.
Chapter 6
113
Configuring HA CIFS/9000
Overview of HA CIFS/9000 Server Active-Active
Overview of HA CIFS/9000 Server
Active-Active
Highly Available CIFS/9000 Server allows the CIFS/9000 Server product
to run on a MC/ServiceGuard cluster of nodes. C/ServiceGuard allows
you to create high availability clusters of HP 9000 Server computers.
You must set up an MC/ServiceGuard cluster before you can set up an
HA CIFS/9000 Server. For instructions on setting up an
MC/ServiceGuard cluster, refer to the Managing MC/ServiceGuard
manual.
The HA CIFS/9000 Server provides customizable configuration, control
scripts and monitor scripts. These scripts as well as this README file
are in the /opt/samba/HA/active_active directory. These are sample
scripts for you to customize for your environment.
This README and the files in /opt/samba/HA/active_active only apply
to an active-active HA configuration. The equivalent files, which apply to
an active-standby HA configuration, are in the
/opt/samba/HA/active-standby directory.
IMPORTANT
This active-active configuration scheme has been revised and now differs
from the scheme provided by initial CIFS/9000 Server releases. This
scheme allows for any number of cluster nodes. The templates are
simpler. This scheme also avoids confusion about netbios name to IP
address mapping and registration with WINS servers. This scheme
avoids the “ghost” session issues when packages are moved. As with the
previous scheme, the SWAT utility has limited capabilities in an HA
environment.
Recommended Clients
The recommended clients for the HA CIFS/9000 Server are Windows 9x
and Microsoft NT/2000. Older clients, such as DOS/Windows 3.1 LM
2.2C and Windows for Workgroups, may not respond well to the
CIFS/9000 Server stopping and to network connections terminating, as
occurs during an HA CIFS/9000 Server switchover.
114
Chapter 6
Configuring HA CIFS/9000
Overview of HA CIFS/9000 Server Active-Active
Review the “Special Notes for HA CIFS/9000 Server” section contained
later in this section for usage considerations.
Installing Highly Available CIFS/9000 Server
HA CIFS/9000 Servers must be installed and configured on all cluster
nodes in the Active-Active configuration. All cluster nodes act as
“primary” nodes and, at the same time, as “alternate” nodes for others. If
there is no failover, each cluster node runs one of the packages. If a
failover occurs, a cluster node will pick up the failed package in addition
to its original package.
Before creating a Highly Available CIFS/9000 Server package, you must
set up your MC/ServiceGuard cluster according to the instructions in the
Managing MC/ServiceGuard manual.
To do so, perform the following:
1. Following the instructions, configure the disk hardware for high
availability.
2. Use SAM or LVM commands to set up the volume groups, logical
volumes, and file systems needed for the data that must be available
to the primary and alternate cluster nodes when failover occurs.
HA CIFS/9000 Server Installation
1. Install CIFS/9000 Server using SD on all cluster nodes. If CIFS/9000
Server is already installed and configured on either node, simply stop
it with the /opt/samba/bin/stopsmb command and skip to step 4.
2. On the first node:
Run the script /opt/samba/bin/samba_setup to configure the
Samba server. Enter the server name and domain/workgroup name
for the HA CIFS/9000 Server.
3. On the secondary nodes:
Run the script /opt/samba/bin/samba_setup to configure the second
node. You will need to specify the same domain/workgroup name
specified on the first node. Do not use the same server name.
4. For any UNIX users used to authenticate CIFS clients, check that
they have the same name, user ID number, primary group and
password on both of the nodes.
Chapter 6
115
Configuring HA CIFS/9000
Overview of HA CIFS/9000 Server Active-Active
This is required for any users used to authenticate to either Samba
server in the Active-Active configuration. This means that any user
name used on both Samba servers must have the same user ID,
primary group ID, and password on both cluster nodes. If this isn’t
the case, you cannot use Samba as an Active-Active server for this
MC/ServiceGuard cluster.
5. Check that the RUN_SAMBA parameter in the /etc/rc.config.d/samba
file is set to 0 on both nodes.
Configure a Highly Available CIFS/9000 Server
Introduction
Before configuring the MC/Serviceguard packages, it is important to
understand how CIFS/9000 Server is able to support active-active
configurations.
The CIFS/9000 Server permits multiple instances of its NetBIOS and
SMB master demons.
Each CIFS Server has its own smb.conf file to define its behavior. The
NetBIOS name and IP address that the client connects to is used to
decide which smb.conf file is used for the connection. This multiple CIFS
master demon configuration allows CIFS/9000 to run multiple
MC/ServiceGuard packages simultaneously.
When a failover occurs, MC/ServiceGuard transfers the IP address from
the failing cluster node to another node. When MC/ServiceGuard moves
the package from the failing cluster node to the other node, it activates
the appropriate CIFS Server on a remaining node. With the IP address
switched, all the traffic that was going to the failed node now goes to the
other active node. The key is to have a CIFS Server configured to look
and act just like the CIFS Server that was running on the original node.
Load balancing between systems while all systems are up can be
achieved by having the CIFS shares accessible only through certain
CIFS Server names (NetBIOS names). Keep this in mind when you
associate the CIFS shares and directories with logical volumes during
server configuration.
116
Chapter 6
Configuring HA CIFS/9000
Overview of HA CIFS/9000 Server Active-Active
Instructions
The following instructions are for one of the MC/ServiceGuard package.
You will have to go through these steps for each CIFS server package
(one for each node). You will then need to copy all the files to all nodes in
your cluster.
When complete, each HPUX system will have a package using the
NetBIOS name for each node in the cluster, though only the package
with its own NetBIOS name will be active until a failover occurs.
For example, if you have a three node cluster, you will have three
packages on each of the three HPUX systems.
There will be three cluster directories:
1. /etc/cmcluster/samba/sambapkg1
2. /etc/cmcluster/samba/sambapkg2
3. /etc/cmcluster/samba/sambapkg3.
There will be three configuration files:
1. /etc/opt/samba/smb.conf.ha_server1,
2. /etc/opt/samba/smb.conf.ha_server2
3. /etc/opt/samba/smb.conf.ha_server3.
There will be three directories:
1. /var/opt/samba/ha_server1
2. /var/opt/samba/ha_server2
3. /var/opt/samba/ha_server3
...where the locks and log files will reside.
Complete the following for each CIFS package of your MC/ServiceGuard
cluster:
1. Create the following directories:
/var/opt/samba/<netbios name>
/var/opt/samba/<netbios name>
/locks/var/opt/samba/<netbios name>/logs
where <netbios name> is the name for your CIFS server. For
example:
Chapter 6
117
Configuring HA CIFS/9000
Overview of HA CIFS/9000 Server Active-Active
$mkdir /var/opt/samba/ha_server1
$mkdir /var/opt/samba/ha_server1/locks
$mkdir /var/opt/samba/ha_server1/logs
This step is IMPORTANT because these paths are referenced
by the MCServiceGuard cluster scripts, samba.cntl and
samba.mon.
2. Create a file /etc/opt/samba/smb.conf.<netbios name> (For
example, /etc/opt/samba/smb.conf.hp_server1) with the following
lines:
[global]
workgroup = ha_domain
netbios name = ha_server1
interfaces = XXX.XXX.XXX.XXX/xxx.xxx.xxx.xxx
bind interfaces only = yes
log file = /var/opt/samba/ha_server1/logs/log.%m
lock directory = /var/opt/samba/ha_server1/locks
Replace the "XXX.XXX.XXX.XXX/xxx.xxx.xxx.xxx" with one (space
separated) relocatable IP address and subnet mask for the MC
ServiceGuard package.
If /opt/samba/bin/samba_setup was run during installation as
suggested:
•
Take the workgroup line from the /etc/opt/samba/smb.conf file.
Add in the rest of your desired configuration items.
•
Take the NetBIOS name line from the same file, or, if there is no
NetBIOS name line, put in the UNIX host name for the server on
the NetBIOS name line.
•
Consider load balancing when creating the share paths.
•
Consider whether you need to locate your private files on a
shared volume, etc. You may want to review “Special Notes for
HA CIFS/9000 Server” found at the end of this section, now.
Make sure that the file name is in all lowercase letters (e.g.
/etc/opt/samba/smb.conf.ha_server1, NOT
/etc/opt/samba/smb.conf.HA_Server1) even if the NetBIOS
name of the server has capital letters. If capital letters are used
in the file name, failover will not work properly.
3. Move all relevant data to the CIFS/9000 Server package shared
volume.
118
Chapter 6
Configuring HA CIFS/9000
Overview of HA CIFS/9000 Server Active-Active
Relevant data, consisting of all directories and files which will be
accessed using CIFS/9000 Server, should reside on shared volumes.
This data includes any shares created by the user. For example, if the
CIFS/9000 Server administrator creates a TEST=c:/tmp/test share,
then all the data from /tmp/test should reside on a shared logical
volume.
Below is an example of copied data from the required CIFS/9000
Server directories to the logical volumes in the volume group
vgsamba. The same can be done for vgasambapkg2.
mkdir /tmp/share1_copy /tmp/share2_copy
mount /dev/vgsamba/lvol1 /tmp/share1_copy
mount /dev/vgsamba/lvol2 /tmp/share2_copy
cp -r /opt/share1/* /tmp/share1_copy
cp -r /homes/share2/* /tmp/share2_copy
umount /tmp/share1_copy
umount /tmp/share2_copy
rm -rf /tmp/share1_copy /tmp/share2_copy
4. Create a directory for CIFS/9000 Server cluster package:
mkdir /etc/cmcluster/samba
mkdir /etc/cmcluster/samba/sambapkg1
5. Copy the sample scripts samba.conf, samba.cntl and samba.mon
from /opt/samba/HA/active_active to /etc/cmcluster/sambapkg1
(or /etc/cmcluster/sambapkg2) on the primary node. Make all
scripts writeable.
cp /opt/samba/HA/active_active/samba.* /etc/cmcluster/sambapkg1
chmod 666 samba.conf samba.cntl samba.mon
6. Customize the sample scripts for your MC/ServiceGuard
configuration. A sample customization of the HA CIFS/9000 Server
package configuration, control and monitor scripts are shown below.
7. Ensure that the control (samba.cntl) and monitor (samba.mon)
scripts are executable.
chmod 750 samba.cntl samba.mon
Edit the package configuration file samba.conf
To configure the samba.conf configuration file, complete the following
tasks below:
Chapter 6
119
Configuring HA CIFS/9000
Overview of HA CIFS/9000 Server Active-Active
1. Set the PACKAGE_NAME variable.
PACKAGE_NAME cifs_pkg1
or
PACKAGE_NAME cifs_pkg2
...depending on which package you are currently working on.
2. Create a NODE_NAME variable for each node that will run the package.
The first NODE_NAME should specify the primary node. All other
NODE_NAME variables should specify the alternate nodes in the order
in which they will be tried.
NODE_NAME
NODE_NAME
ha_server1
ha_server2
...for Sambapkg1,
NODE_NAME
NODE_NAME
ha_server2
ha_server1
...for Sambapkg2, etc.
3. Set the RUN_SCRIPT and HALT_SCRIPT variables to the full path
name of the control script.
RUN_SCRIPT /etc/cmcluster/sambapkg1/samba.cntl
RUN_SCRIPT_TIMEOUT NO_TIMEOUT
HALT_SCRIPT /etc/cmcluster/sambapkg1/samba.cntl
HALT_SCRIPT_TIMEOUT NO_TIMEOUT
...for sambapkg1, and
RUN_SCRIPT /etc/cmcluster/sambapkg2/samba.cntl
RUN_SCRIPT_TIMEOUT NO_TIMEOUT
HALT_SCRIPT /etc/cmcluster/sambapkg2/samba.cntl
HALT_SCRIPT_TIMEOUT NO_TIMEOUT
...for sambapkg2, etc.
4. Set the SERVICE_NAME variable to samba_mon
SERVICE_NAME samba_mon1
SERVICE_FAIL_FAST_ENABLED NO
SERVICE_HALT_TIMEOUT
300
...for Sambapkg1, and
120
Chapter 6
Configuring HA CIFS/9000
Overview of HA CIFS/9000 Server Active-Active
SERVICE_NAME samba_mon2
SERVICE_FAIL_FAST_ENABLED
SERVICE_HALT_TIMEOUT
NO
300
...for Sambapkg2, etc.
5. Set the SUBNET variable to the subnet that will be monitored for the
package, as in the following example:
SUBNET 15.13.2.0
6. The following initialization will cause package failover to occur if
there is a node or network failure, even if the CIFS/9000 Server
monitor script is not being used.
PKG_SWITCHING_ENABLED
NET_SWITCHING_ENABLED
YES
YES
7. If NODE_FAIL_FAST_ENABLE is set to NO, the node is not brought down
when the package goes down.
NODE_FAIL_FAST_ENABLED
NO
Edit the samba.cntl Control Script
To configure the samba.cntl Control Script file, you must complete the
following tasks:
1. Set the NETBIOS_NAME variable to your NetBIOS name.
NETBIOS_NAME=ha_server1
...for sambapkg1 and
NETBIOS_NAME=ha_server2
...for sambapkg2, etc.
2. Create a volume group for the CIFS/9000 Server directories:
VG[0]=/dev/vgsambapkg1
...for sambapkg1, and
VG[0]=/dev/vgsambapkg2
...for sambapkg2, etc.
3. Create a separate LV[n] and FS[n] variable for each volume group
and file system that will be mounted on the server, for example:
Chapter 6
121
Configuring HA CIFS/9000
Overview of HA CIFS/9000 Server Active-Active
LV[0]=/dev/vgsambapkg1/lvol1;FS[0]=/opt/share1
LV[1]=/dev/vgsambapkg1/lvol2;FS[1]=/home/share2
Add more LVs if required for sambapkg.
LV[0]=/dev/vgsambapkg2/lvol1;FS[0]=/opt/share1
LV[1]=/dev/vgsambapkg2/lvol2;FS[1]=/home/share2
Add more LVs if required for sambapkg2.
4. Specify the relocatable IP address and the address of the subnet to
which the IP address belongs:
IP[0]=15.13.171.20
SUBNET[0]=15.13.168.0
for sambapkg1,
IP[0]=15.13.171.21
SUBNET[0]=15.13.168.0
...for sambapkg2, etc.
5. If you want to use the CIFS/9000 Server monitor script, set the
NFS_SERVICE_NAME variable to the value of the SERVICE_NAME
variable in the package configuration file samba.conf.
SERVICE_NAME[0]=samba_mon1
SERVICE_CMD[0]=/etc/cmcluster/sambapkg1/samba.mon
6. Use the following as a template for customer_defined_run_cmds.
NETBIOS_NAME=ha_server1
CONF_FILE=/etc/opt/samba/smb.conf.${NETBIOS_NAME}
LOG_FILE=/var/opt/samba/${NETBIOS_NAME}/log
SMBD_PID_FILE=/var/opt/samba/${NETBIOS_NAME}/locks/smbd.
pid
NMBD_PID_FILE=/var/opt/samba/${NETBIOS_NAME}/locks/nmbd.
pid
findproc() {
# return pid of the named
process(es)
pid=`/usr/bin/ps -e |
/usr/bin/grep "$1" | grep "mbd" |
/usr/bin/sed -e 's/^ *//' -e 's/ .*//'`
}
function customer_defined_run_cmds
122
Chapter 6
Configuring HA CIFS/9000
Overview of HA CIFS/9000 Server Active-Active
{
# ADD customer defined run commands.
nmbd -D -l ${LOG_FILE} -s ${CONF_FILE}
smbd -D -s ${CONF_FILE}
test_return 51
}
7. Use the following as a template for customer_defined_halt_cmds:
function customer_defined_halt_cmds
{
#ADD customer defined halt commands.
if [ ! -f ${SMBD_PID_FILE} ]
then
print "\tERROR: Kill of smbd.pid failed."
print "\tERROR: ${SMBD_PID_FILE} could not be found."
else
SMBD_PID=`cat ${SMBD_PID_FILE}`
findproc $SMBD_PID
if [ "$pid" = "" ]
then
print "\tERROR: Kill of smbd.pid failed."
print "\tERROR: ${SMBD_PID} could not be found."
else
kill ${SMBD_PID}
fi
fi
if [ ! -f ${NMBD_PID_FILE} ]
then
print "\tERROR: Kill of nmbd.pid failed."
print "\tERROR: ${NMBD_PID_FILE} could not be found."
else
NMBD_PID=`cat ${NMBD_PID_FILE}`
findproc $NMBD_PID
if [ "$pid" = "" ]
then
print "\tERROR: Kill of nmbd.pid failed."
print "\tERROR: ${NMBD_PID} could not be found."
else
Chapter 6
123
Configuring HA CIFS/9000
Overview of HA CIFS/9000 Server Active-Active
kill ${NMBD_PID}
fi
fi
test_return 52
}
WARNING
Make sure that all processes/applications that access the file
systems mounted by sambapkg are shutdown in the
customer_defined_halt_cmds subroutine. This will allow the
filesystems to be unmounted and failed over to the adoptive
node. Package failover may not occur if any of the filesystems
mounted by the sambapkg cannot be unmounted.
Edit the samba.mon Monitor Script
To configure the samba.mon Monitor Script file, you must complete the
following tasks:
1. Set the NETBIOS_NAME variable to your NetBIOS name.
NETBIOS_NAME=ha_server1
...and sambapkg1,
NETBIOS_NAME=ha_server2
...for sambapkg2, etc.
2. Use the following template provided with samba.mon.
CONF_FILE=/etc/opt/samba/smb.conf.${NETBIOS_NAME}
LOG_FILE=/var/opt/samba/${NETBIOS_NAME}/log
SMBD_PID_FILE=/var/opt/samba/${NETBIOS_NAME}/locks/smbd.pid
NMBD_PID_FILE=/var/opt/samba/${NETBIOS_NAME}/locks/nmbd.pid
INTERVAL=30
MAX_NMBD_RETRYS=1
MAX_SMBD_RETRYS=1
PATH=$PATH:/opt/samba/bin
124
Chapter 6
Configuring HA CIFS/9000
Overview of HA CIFS/9000 Server Active-Active
error_msg()
{
print "$(date '+%b %e %X') - $1"
}
#
# Function findproc
#
findproc() {
# return pid of the named process(es)
pid=`/usr/bin/ps -e |
/usr/bin/grep "$1" | grep "mbd" |
/usr/bin/sed -e 's/^ *//' -e 's/ .*//'`
}
#
# Function startnmbd
#
startnmbd() {
# start the nmbd
logger -t "${NETBIOS_NAME}.mon" "${NETBIOS_NAME} nmbd
daemon is not running. Restarting daemon."
nmbd -D -l ${LOG_FILE} -s ${CONF_FILE}
}
startsmbd() {
# start the nmbd
logger -t "${NETBIOS_NAME}.mon" "${NETBIOS_NAME}
smbd daemon is not running. Restarting daemon."
smbd -D -s ${CONF_FILE}
}
while :
do
if [ ! -f ${NMBD_PID_FILE} ]
then
sleep 1
print "\tERROR: ${NMBD_PID_FILE} could not be found!"
exit 1
else
NMBD_PID=`cat ${NMBD_PID_FILE}`
findproc $NMBD_PID
if [ "$pid" = "" ] ; then
if [ "$MAX_NMBD_RETRYS" -gt 0 ] ; then
startnmbd
Chapter 6
125
Configuring HA CIFS/9000
Overview of HA CIFS/9000 Server Active-Active
if
[ "$MAX_NMBD_RETRYS" -ge 1 ] ; then
(( MAX_NMBD_RETRYS = MAX_NMBD_RETRYS - 1 ))
fi
else
sleep 1
echo "ERROR: ${NETBIOS_NAME} nmbd not running!"
exit 1
fi
fi
fi
if [ ! -f ${SMBD_PID_FILE} ]
then
sleep 1
print "\tERROR: ${SMBD_PID_FILE} could not be found!"
exit 1
else
SMBD_PID=`cat ${SMBD_PID_FILE}`
findproc $SMBD_PID
if [ "$pid" = "" ] ; then
if [ "$MAX_SMBD_RETRYS" -gt 0 ] ; then
startsmbd
if [ "$MAX_SMBD_RETRYS" -ge 1 ] ; then
(( MAX_SMBD_RETRYS = MAX_SMBD_RETRYS - 1 ))
fi
else
sleep 1
echo "ERROR: ${NETBIOS_NAME} smbd not running!"
exit 1
fi
fi
fi
sleep $INTERVAL
done
Create the MC/ServiceGuard Binary Configuration File
NOTE
126
In the following example, the cluster configuration file will be assigned
the name / etc/cmcluster/cluster.conf and the HA CIFS/9000 Server
package configuration file will be assigned the name
Chapter 6
Configuring HA CIFS/9000
Overview of HA CIFS/9000 Server Active-Active
/etc/cmcluster/samba/sambapkg1/samba.conf. The actual cluster and
HA CIFS/9000 Server package configuration file names on your system
may be different.
1. On alternate nodes create a cluster package directory:
mkdir /etc/cmcluster/samba/sambapkg1 or sambapkg2, sambapkg3..n
Copy the package scripts from the primary node.
rcp primary_node:/etc/cmcluster/samba/sambapkg1/* \
/etc/cmcluster/samba/sambapkg1
2. Use the cmcheckconf command to verify the contents of your cluster
and package configuration. At this point it is assumed that you have
created your MCServiceGuard cluster configuration file
(cmclconf.ascii) through MCServiceGuard procedures.
cmcheckconf -C /etc/cmcluster/cmclconf.ascii \
-P /etc/cmcluster/samba/sambapkg1/samba.conf \
-P /etc/cmcluster/samba/sambapkg2/samba.conf
3. Use the cmapplyconf command to copy the binary configuration file
to all the nodes in the cluster.
cmapplyconf -v -C /etc/cmcluster/cmclconf.ascii \
-P /etc/cmcluster/samba/sambapkg1/samba.conf \
-P /etc/cmcluster/samba/sambapkg2/samba.conf
This command will distribute the updated cluster binary
configuration file to all of the nodes of the cluster.
You are ready to start the HA CIFS/9000 Server packages.
The configuration of the HA CIFS/9000 Server is now complete.
Chapter 6
127
Configuring HA CIFS/9000
Special Notes for HA CIFS/9000 Server
Special Notes for HA CIFS/9000 Server
There are several areas of concern when implementing Samba in the
MC/ServiceGuard HA framework. These areas are described below:
•
Client Applications
HA CIFS/9000 Server cannot guarantee that client applications with
open files on a CIFS/9000 Server share, or, applications launched
from CIFS/9000 Server shares, will transparently recover from a
switchover. In these instances there may be cases where the
application will need to be restarted and the files reopened as a
switchover is a logical shutdown and restart of the CIFS/9000 Server.
•
File Locks
File locks are not preserved during failover. File locks are lost and
applications are not advised about any lost file locks.
•
Print Jobs
If a failover occurs when a print job is in process, the job may be
printed twice or not at all, depending on the job state at the time of
the failover.
•
Symbolic Links
If you have your Samba server configured with follow symlinks set to
yes and wide links set to yes, the defaults for these parameters, you
should be cautious.
Symbolic links in the shared directory trees may point to files outside
any shared directory. If the symbolic links point to files that are not
in logical shared volumes, then, after a failover occurs, the symbolic
link may point to a different file or no file. Keeping the targets of all
shared symbolic links synchronized with all MC/ServiceGuard nodes
at all times could be difficult in this situation.
Easier options would be to set wide links to no or to be sure that
every file or directory that you point to is on a logical shared volume.
•
Security Files and Encrypted Passwords
Authentication is dependent on several entries in different security
files. An important security file is the user password file, smbpasswd.
If you have your Samba server configured with encrypt passwords
128
Chapter 6
Configuring HA CIFS/9000
Special Notes for HA CIFS/9000 Server
set to yes, then you have to use an smbpasswd file. By default, this
file is located in the path /var/opt/samba/private but you may
specify a different path with the smb passwd file parameter.
Another important security file used with domain level security is
the machine account file, <domain.server>.mac. Since this file will be
updated periodically (as defined in smb.conf by machine password
timeout, 604800 seconds by default), HP recommends that you
locate <domain.server>.mac on a shared logical volume. As with the
smbpasswd file, discussed above, the location of this file is defined by
the smb.conf parameter smb passwd file. For example, smb passwd
file = /var/opt/samba/shared_vol_1/private/smbpasswd will
result in the file
/var/opt/samba/shared_vol_1/private/<domain.server>.mac.
For both the machine account file and user password file, HP
recommends that you locate the files on a shared logical volume. Do
so by setting smb passwd file to a path within a logical shared
volume.
•
Username Mapping File
If you configure your Samba server to use a username mapping file,
HP recommends that you configure it to be located on a shared
logical volume. This way, if changes are made, all the nodes will
always be up-to-date. The username mapping file location is defined
in smb.conf by the parameter username map, e.g. username map =
/var/opt/samba/shared_vol_1/username.map. There is no
username map file by default.
•
Samba as a WINS Server
If you configure your Samba server to be a WINS server by setting
the wins support parameter to yes, it will store the WINS database
in the file /var/opt/samba/locks/WINS.DAT.
If this file is not on a logical shared volume, when a failover occurs,
there will be a short period of time when all the WINS clients update
the Samba WINS server with their address. However, if this short
period of time to restore the WINS database is not acceptable, you
can reduce the period of time to restore the full WINS service.
Chapter 6
129
Configuring HA CIFS/9000
Special Notes for HA CIFS/9000 Server
To do so, configure /var/opt/samba/locks/WINS.DAT to be a
symbolic link to a WINS.DAT file on a logical shared volume. HP
does not recommend putting the entire /var/opt/samba/locks
directory on a logical shared volume, because the locking data may
not be correctly interpreted after a failover.
•
Samba as a Master Browser
If you configure your Samba server to be the domain master browser
by setting the domain master to yes, it will store the browsing
database in the /var/opt/samba/locks/BROWSE.DAT file. HP does
not recommend doing this in an HA configuration.
If you do so, you will probably want to configure
/var/opt/samba/locks/BROWSE.DAT as a symbolic link to a
BROWSE.DAT file on a logical shared volume. HP doesn’t
recommend putting the entire /var/opt/samba/locks directory on a
logical shared volume because the locking data may not be correctly
interpreted after a failover.
•
Automatic Printer Sharing
If you configure your Samba server with a [printers] share to
automatically share all the printers on your HP-UX system, then you
will need to be certain that all your MC/ServiceGuard nodes have the
same HP-UX printers defined. Otherwise, when a failover occurs, the
list of shared printers for the Samba server will change, resulting in
problems on clients using those printers.
•
Samba's LMHOSTS File
If you wish to use an LMHOSTS file to store the static addresses for
certain netbios names, HP recommends that you put the LMHOSTS
file on a logical shared volume. To do this you will need to specify a
different path for the LMHOSTS file using the -H option when
invoking nmbd. HP recommends that you put the LMHOSTS file on
a logical shared volume so that all the nodes can share it.
You will need to edit the MC/ServiceGuard scripts to add the -H
options to the places where nmbd is invoked directly. You will also
need to edit the /opt/samba/bin/startsmb script to add the -H
option to the places where nmbd is started.
130
Chapter 6
7
HP-UX Configuration for
CIFS/9000
This chapter describes HP-UX tuning procedures for the HP CIFS/9000
Server. It contains the following sections:
Chapter 7
131
HP-UX Configuration for CIFS/9000
•
CIFS/9000 Server Memory and Disc Requirements
•
CIFS/9000 Process Model
•
Overview of Kernel Configuration Parameters
•
Configuring Kernel Parameters for CIFS/9000
The following information should be considered as general guidelines
and not a rigid formula to determine the resource requirements of a
CIFS/9000 server running on HP-UX 11.0. Each customer configuration
is unique and on-line tools should be used while the system is running its
normal load to ascertain the requirements of each system.
NOTE
132
Guidelines have changed in version A.01.08. Specifically, the use of nfiles
has increased from a minimum of 8, to 23, and nflocks has been added as
a mandatory configurable parameter.
Chapter 7
HP-UX Configuration for CIFS/9000
CIFS/9000 Process Model
CIFS/9000 Process Model
The SMB daemon process, smbd, handles all SMB requests from a client.
One such process is launched for each connected client. Each SMBD
process handles one and only one client. Therefore, if there are 2048
connected clients, there will be 2048 SMBD processes. Such a large
number of processes will demand system resources, requiring
adjustment of certain kernel configuration parameters. It will also
deplete memory, disc and swap space resources.
Chapter 7
133
HP-UX Configuration for CIFS/9000
Overview of Kernel Configuration Parameters
Overview of Kernel Configuration Parameters
The kernel configuration parameters, maxuser, nproc, ninode, nflocks
and nfile are described below. These are the kernel parameters that you
must adjust to support a large number of clients on CIFS/9000.
134
•
maxusers: the name of this kernel parameter is a misnomer as it
does not directly control the number of UNIX users that can logon to
HP-UX. However, this kernel parameter is used in various formulae
throughout the kernel. In fact, the default values for nproc, nfiles
and ninodes are expressed in terms of maxusers.
•
nproc: this kernel parameter controls the size of the process table. Its
default formula is (20+8*maxusers). On most systems the default
value for this parameter is 21, which yields a default value of
20+8*32 or 276 maximum processes supported. When this table fills
up prior to launching a process, the error message: “proc: table is
full” will appear on the console. It will be viewable via the dmesg
command.
•
nfile: this kernel parameter controls the size of the system file table
and limits the total number of open files in the system. Note that this
affects each instance of an open file since the same file opened twice
would take up 2 entries in the system file table. This default formula
is (16*(nproc+16+maxusers)/10+32+2*(npty+nstrpty+nstrtel)).
When this tables becomes full, the console message file: table is full
will appear on the console.
•
ninode: this kernel parameters controls the size of the in-core inode
table or the inode cache. To improve performance, the most recently
accessed inodes are kept in memory. The default formula for this
parameter is ((nproc+16+maxusers)+32+(2*npty)). Attempts to open
a file beyond the capacity of this table will result in the message
inode table full being displayed on the console.
•
nflocks: defines the maximum combined total number of file locks
that are available system-wide to all processes at any given time.
The default value of 200 will need to be increased for CIFS/9000
Servers.
Chapter 7
HP-UX Configuration for CIFS/9000
Configuring Kernel Parameters for CIFS/9000
Configuring Kernel Parameters for CIFS/9000
The first step in configuring HPUX to be able to support a large number
of clients on a CIFS/9000 server is to adjust the maxusers kernel
parameter.
The second step involves adjusting nproc, nfile, nflocks and ninode
individually so as to allow a large number of users to be connected
simultaneously.
1. Configuring maxusers
Determine the maximum number of simultaneous clients that will be
connected and add this number to the current value of maxusers. For
example, if 2048 clients are to be supported, simply add 2048 to the
current value of maxusers. Note that, unless the parameters have
been manually changed, adjusting maxusers automatically adjusts
the corresponding values for nproc, nfile and ninodes.
For example, if the default maxusers value of 32 is adjusted to
32+2048 or 2080 to support the maximum allowable clients of 2048,
the other parameters will be adjusted as follows on a typical system:
nproc will be increased to 8,468
nfile will be increased to 15,656
ninode will be increased to 9,692
If these values are found to be too large or too small for that matter,
then the individual kernel parameters can be adjusted as described
below.
2. Configuring nproc, nfile and ninode.
•
Chapter 7
nproc: since each client will be handled by one unique smbd
process, and each process will take up one entry in the process
table, this parameter has to be at least equal to the maximum
number of simultaneously connected clients. This is a necessary
condition, but it will obviously not be sufficient since there will be
others processes, including system processes beyond your
control, that will take up proc table entries. In practice then, this
parameter needs to be set to the anticipated maximum number
of clients plus the number of the other processes that will also be
running concurrent with CIFS/9000.
135
HP-UX Configuration for CIFS/9000
Configuring Kernel Parameters for CIFS/9000
•
nfile: when an SMBD process is launched, it will, right at the
beginning, take up 23 entries in the system file table.
This does not include any other files that the client will open and
operate on. At a minimum, therefore, the value of nfile, should be
equal to the anticipated number of simultaneous clients times
(23 + the anticipated number of files simultaneously opened by
each client). Again, this is necessary, but it may not be sufficient,
since there will be other non-CIFS/9000 processes that will have
files opened, concurrent with CIFS/9000.
•
ninode: unlike nfile, each instance on an open will NOT increase
the number of inode entries. Rather, each unique opened file will
only take up one entry, regardless of how many times it is
opened. Therefore this parameter should be set to the
anticipated number of UNIQUE open files used by CIFS/9000
plus the number opened by other processes in the system.
•
nflocks: each smbd process will utilize at least ten file locks.
Therefore, the value of nflocks should, at least, be equal to the
anticipated number of simultaneous clients, multiplied by ten
(10). The use of nflocks by other applications must also be
considered.
Swap Space Requirements
Due to the one-process-per-client model of CIFS/9000, perhaps the most
stringent requirement imposed on the system is that of swap space.
HPUX reserves a certain amount of swap space for each process that is
launched, to prevent it from being aborted in case it needs to swap out
some pages during times of memory pressure. Other operating systems,
only reserve swap space when it is needed. This results in the process not
finding the swap space that it needs, in which case it has to be
terminated by the OS.
Each smbd process will reserve about 1.7MB of swap space. For a
maximum of 2048 clients, 1.7 * 2048 or about 4GB of swap space would
be required. Therefore, HP recommends configuring enough swap space
to accommodate the maximum number of simultaneous clients connected
to the CIFS/9000 server.
136
Chapter 7
HP-UX Configuration for CIFS/9000
Configuring Kernel Parameters for CIFS/9000
Memory Requirements
Each smbd process will need approximate 1/2 MB of memory. For 2048
clients, therefore, the system should have at least 1 GB of physical
memory. This is over and above the requirements of other applications
that will be running concurrent with CIFS/9000.
Chapter 7
137
HP-UX Configuration for CIFS/9000
Configuring Kernel Parameters for CIFS/9000
138
Chapter 7
8
GNU GPL License
This chapter contains the GNU General Public License.
Chapter 8
139
GNU GPL License
GNU General Public License V. 2, June 1991
GNU General Public License V. 2,
June 1991
Copyright (C) 1989, 1991 Free Software Foundation, Inc.
675 Mass Ave, Cambridge, MA 02139, USA
Everyone is permitted to copy and distribute verbatim copies of this
license document, but changing it is not allowed.
Preamble
When we speak of free software, we are referring to freedom, not price.
Our General Public Licenses are designed to make sure that you have
the freedom to distribute copies of free software (and charge for this
service if you wish), that you receive source code or can get it if you want
it, that you can change the software or use pieces of it in new free
programs; and that you know you can do these things.
To protect your rights, we need to make restrictions that forbid anyone to
deny you these rights or to ask you to surrender the rights. These
restrictions translate to certain responsibilities for you if you distribute
copies of the software, or if you modify it.
For example, if you distribute copies of such a program, whether gratis or
for a fee, you must give the recipients all the rights that you have. You
must make sure that they, too, receive or can get the source code. And
you must show them these terms so they know their rights.
We protect your rights with two steps: (1) copyright the software, and (2)
offer you this license which gives you legal permission to copy, distribute
and/or modify the software.
Also, for each author’s protection and ours, we want to make certain that
everyone understands that there is no warranty for this free software. If
the software is modified by someone else and passed on, we want its
recipients to know that what they have is not the original, so that any
problems introduced by others will not reflect on the original authors’
reputations.
140
Chapter 8
GNU GPL License
GNU General Public License V. 2, June 1991
Finally, any free program is threatened constantly by software patents.
We wish to avoid the danger that redistributors of a free program will
individually obtain patent licenses, in effect making the program
proprietary. To prevent this, we have made it clear that any patent must
be licensed for everyone’s free use or not licensed at all.
The precise terms and conditions for copying, distribution and
modification follow.
GNU GENERAL PUBLIC LICENSE TERMS AND CONDITIONS FOR
COPYING, DISTRIBUTION AND MODIFICATION
0. This License applies to any program or other work which contains a
notice placed by the copyright holder saying it may be distributed under
the terms of this General Public License. The “Program”, below, refers to
any such program or work, and a “work based on the Program” means
either the Program or any derivative work under copyright law: that is to
say, a work containing the Program or a portion of it, either verbatim or
with modifications and/or translated into another language.
(Hereinafter, translation is included without limitation in the term
“modification”.) Each licensee is addressed as “you”.
Activities other than copying, distribution and modification are not
covered by this License; they are outside its scope. The act of running the
Program is not restricted, and the output from the Program is covered
only if its contents constitute a work based on the Program (independent
of having been made by running the Program). Whether that is true
depends on what the Program does.
1. You may copy and distribute verbatim copies of the Program’s source
code as you receive it, in any medium, provided that you conspicuously
and appropriately publish on each copy an appropriate copyright notice
and disclaimer of warranty; keep intact all the notices that refer to this
License and to the absence of any warranty; and give any other
recipients of the Program a copy of this License along with the Program.
You may charge a fee for the physical act of transferring a copy, and you
may at your option offer warranty protection in exchange for a fee.
2. You may modify your copy or copies of the Program or any portion of it,
thus forming a work based on the Program, and copy and distribute such
modifications or work under the terms of Section 1 above, provided that
you also meet all of these conditions:
a) You must cause the modified files to carry prominent notices stating
that you changed the files and the date of any change.
Chapter 8
141
GNU GPL License
GNU General Public License V. 2, June 1991
b) You must cause any work that you distribute or publish, that in whole
or in part contains or is derived from the Program or any part thereof, to
be licensed as a whole at no charge to all third parties under the terms of
this License.
c) If the modified program normally reads commands interactively when
run, you must cause it, when started running for such interactive use in
the most ordinary way, to print or display an announcement including an
appropriate copyright notice and a notice that there is no warranty (or
else, saying that you provide a warranty) and that users may
redistribute the program under these conditions, and telling the user
how to view a copy of this License. (Exception: if the Program itself is
interactive but does not normally print such an announcement, your
work based on the Program is not required to print an announcement.)
These requirements apply to the modified work as a whole. If identifiable
sections of that work are not derived from the Program, and can be
reasonably considered independent and separate works in themselves,
then this License, and its terms, do not apply to those sections when you
distribute them as separate works. But when you distribute the same
sections as part of a whole which is a work based on the Program, the
distribution of the whole must be on the terms of this License, whose
permissions for other licensees extend to the entire whole, and thus to
each and every part regardless of who wrote it.
Thus, it is not the intent of this section to claim rights or contest your
rights to work written entirely by you; rather, the intent is to exercise the
right to control the distribution of derivative or collective works based on
the Program
In addition, mere aggregation of another work not based on the Program
with the Program (or with a work based on the Program) on a volume of
a storage or distribution medium does not bring the other work under
the scope of this License.
3. You may copy and distribute the Program (or a work based on it, under
Section 2) in object code or executable form under the terms of Sections 1
and 2 above provided that you also do one of the following:
a) Accompany it with the complete corresponding machine-readable
source code, which must be distributed under the terms of Sections 1 and
2 above on a medium customarily used for software interchange; or,
b) Accompany it with a written offer, valid for at least three years, to
give any third party, for a charge no more than your cost of physically
performing source distribution, a complete machine-readable copy of the
142
Chapter 8
GNU GPL License
GNU General Public License V. 2, June 1991
corresponding source code, to be distributed under the terms of Sections
1 and 2 above on a medium customarily used for software interchange;
or,
c) Accompany it with the information you received as to the offer to
distribute corresponding source code. (This alternative is allowed only
for noncommercial distribution and only if you received the program in
object code or executable form with such an offer, in accord with
Subsection b above.)
The source code for a work means the preferred form of the work for
making modifications to it. For an executable work, complete source code
means all the source code for all modules it contains, plus any associated
interface definition files, plus the scripts used to control compilation and
installation of the executable. However, as a special exception, the source
code distributed need not include anything that is normally distributed
(in either source or binary form) with the major components (compiler,
kernel, and so on) of the operating system on which the executable runs,
unless that component itself accompanies the executable.
If distribution of executable or object code is made by offering access to
copy from a designated place, then offering equivalent access to copy the
source code from the same place counts as distribution of the source code,
even though third parties are not compelled to copy the source along
with the object code.
4. You may not copy, modify, sublicense, or distribute the Program except
as expressly provided under this License. Any attempt otherwise to copy,
modify, sublicense or distribute the Program is void, and will
automatically terminate your rights under this License. However,
parties who have received copies, or rights, from you under this License
will not have their licenses terminated so long as such parties remain in
full compliance.
5. You are not required to accept this License, since you have not signed
it. However, nothing else grants you permission to modify or distribute
the Program or its derivative works. These actions are prohibited by law
if you do not accept this License. Therefore, by modifying or distributing
the Program (or any work based on the Program), you indicate your
acceptance of this License to do so, and all its terms and conditions for
copying, distributing or modifying the Program or works based on it.
6. Each time you redistribute the Program (or any work based on the
Program), the recipient automatically receives a license from the original
licensor to copy, distribute or modify the Program subject to these terms
Chapter 8
143
GNU GPL License
GNU General Public License V. 2, June 1991
and conditions. You may not impose any further restrictions on the
recipients’ exercise of the rights granted herein. You are not responsible
for enforcing compliance by third parties to this License
7. If, as a consequence of a court judgment or allegation of patent
infringement or for any other reason (not limited to patent issues),
conditions are imposed on you (whether by court order, agreement or
otherwise) that contradict the conditions of this License, they do not
excuse you from the conditions of this License. If you cannot distribute so
as to satisfy simultaneously your obligations under this License and any
other pertinent obligations, then as a consequence you may not
distribute the Program at all. For example, if a patent license would not
permit royalty-free redistribution of the Program by all those who
receive copies directly or indirectly through you, then the only way you
could satisfy both it and this License would be to refrain entirely from
distribution of the Program.
If any portion of this section is held invalid or unenforceable under any
particular circumstance, the balance of the section is intended to apply
and the section as a whole is intended to apply in other circumstances
It is not the purpose of this section to induce you to infringe any patents
or other property right claims or to contest validity of any such claims;
this section has the sole purpose of protecting the integrity of the free
software distribution system, which is implemented by public license
practices. Many people have made generous contributions to the wide
range of software distributed through that system in reliance on
consistent application of that system; it is up to the author/donor to
decide if he or she is willing to distribute software through any other
system and a licensee cannot impose that choice.
This section is intended to make thoroughly clear what is believed to be a
consequence of the rest of this License.
8. If the distribution and/or use of the Program is restricted in certain
countries either by patents or by copyrighted interfaces, the original
copyright holder who places the Program under this License may add an
explicit geographical distribution limitation excluding those countries, so
that distribution is permitted only in or among countries not thus
excluded. In such case, this License incorporates the limitation as if
written in the body of this License
144
Chapter 8
GNU GPL License
GNU General Public License V. 2, June 1991
9. The Free Software Foundation may publish revised and/or new
versions of the General Public License from time to time. Such new
versions will be similar in spirit to the present version, but may differ in
detail to address new problems or concerns.
Each version is given a distinguishing version number. If the Program
specifies a version number of this License which applies to it and “any
later version”, you have the option of following the terms and conditions
either of that version or of any later version published by the Free
Software Foundation. If the Program does not specify a version number
of this License, you may choose any version ever published by the Free
Software Foundation.
10. If you wish to incorporate parts of the Program into other free
programs whose distribution conditions are different, write to the author
to ask for permission. For software which is copyrighted by the Free
Software Foundation, write to the Free Software Foundation; we
sometimes make exceptions for this. Our decision will be guided by the
two goals of preserving the free status of all derivatives of our free
software and of promoting the sharing and reuse of software generally.
NO WARRANTY
11. BECAUSE THE PROGRAM IS LICENSED FREE OF CHARGE,
THERE IS NO WARRANTY FOR THE PROGRAM, TO THE EXTENT
PERMITTED BY APPLICABLE LAW. EXCEPT WHEN OTHERWISE
STATED IN WRITING THE COPYRIGHT HOLDERS AND/OR OTHER
PARTIES PROVIDE THE PROGRAM “AS IS” WITHOUT WARRANTY
OF ANY KIND, EITHER EXPRESSED OR IMPLIED, INCLUDING,
BUT NOT LIMITED TO, THE IMPLIED WARRANTIES OF
MERCHANTABILITY AND FITNESS FOR A PARTICULAR
PURPOSE. THE ENTIRE RISK AS TO THE QUALITY AND
PERFORMANCE OF THE PROGRAM IS WITH YOU. SHOULD THE
PROGRAM PROVE DEFECTIVE, YOU ASSUME THE COST OF ALL
NECESSARY SERVICING, REPAIR OR CORRECTION.
12. IN NO EVENT UNLESS REQUIRED BY APPLICABLE LAW OR
AGREED TO IN WRITING WILL ANY COPYRIGHT HOLDER, OR
ANY OTHER PARTY WHO MAY MODIFY AND/OR REDISTRIBUTE
THE PROGRAM AS PERMITTED ABOVE, BE LIABLE TO YOU FOR
DAMAGES, INCLUDING ANY GENERAL, SPECIAL, INCIDENTAL
OR CONSEQUENTIAL DAMAGES ARISING OUT OF THE USE OR
INABILITY TO USE THE PROGRAM (INCLUDING BUT NOT
LIMITED TO LOSS OF DATA OR DATA BEING RENDERED
INACCURATE OR LOSSES SUSTAINED BY YOU OR THIRD
Chapter 8
145
GNU GPL License
GNU General Public License V. 2, June 1991
PARTIES OR A FAILURE OF THE PROGRAM TO OPERATE WITH
ANY OTHER PROGRAMS), EVEN IF SUCH HOLDER OR OTHER
PARTY HAS BEEN ADVISED OF THE POSSIBILITY OF SUCH
DAMAGES.
END OF TERMS AND CONDITIONS
Appendix: How to Apply These Terms to Your New Programs
If you develop a new program, and you want it to be of the greatest
possible use to the public, the best way to achieve this is to make it free
software which everyone can redistribute and change under these terms.
To do so, attach the following notices to the program. It is safest to attach
them to the start of each source file to most effectively convey the
exclusion of warranty; and each file should have at least the “copyright”
line and a pointer to where the full notice is found.
<one line to give the program’s name and a brief idea of what it does.>
Copyright (C) 19yy <name of author>
This program is free software; you can redistribute it and/or modify it
under the terms of the GNU General Public License as published by the
Free Software Foundation; either version 2 of the License, or (at your
option) any later version.
This program is distributed in the hope that it will be useful, but
WITHOUT ANY WARRANTY; without even the implied warranty of
MERCHANTABILITY or FITNESS FOR A PARTICULAR PURPOSE.
See the GNU General Public License for more details.
Also add information on how to contact you by electronic and paper mail.
If the program is interactive, make it output a short notice like this when
it starts in an interactive mode:
Gnomovision version 69, Copyright (C) 19yy name of author
Gnomovision comes with ABSOLUTELY NO WARRANTY; for details
type `show w’. This is free software, and you are welcome to redistribute
it under certain conditions; type `show c’ for details.
The hypothetical commands `show w’ and `show c’ should show the
appropriate parts of the General Public License. Of course, the
commands you use may be called something other than `show w’ and
`show c’; they could even be mouse-clicks or menu items--whatever suits
your program.
146
Chapter 8
GNU GPL License
GNU General Public License V. 2, June 1991
You should also get your employer (if you work as a programmer) or your
school, if any, to sign a “copyright disclaimer” for the program, if
necessary. Here is a sample; alter the names
Yoyodyne, Inc., hereby disclaims all copyright interest in the program
`Gnomovision’ (which makes passes at compilers) written by James
Hacker
This General Public License does not permit incorporating your program
into proprietary programs. If your program is a subroutine library, you
may consider it more useful to permit linking proprietary applications
with the library. If this is what you want to do, use the GNU Library
General Public License instead of this License.
Chapter 8
147
GNU GPL License
GNU General Public License V. 2, June 1991
148
Chapter 8
Glossary
A
C
ACL Access Control List, meta-data that
describes which users are allowed access to
file data and what type of access is granted
to that data. ACLs define “access rights.” In
this scheme, users typically belong to
“groups,” and groups are given access rights
as a whole. Typical types of access rights are
read (list), write (modify), or create (insert.)
Different file systems have varying levels of
ACL support and different file systems
define different access rights. For example,
DOS has only one set of rights for a file
(since only one user is considered to use a
DOS system). A POSIX 6-compliant file
system allows multiple rights to be assigned
to multiple files and directories for multiple
users and multiple groups of users.
CIFS Common Internet File System, a
specification for a file access protocol
designed for the Internet.
ASP Application service provider, an
e-business that essentially “rents”
applications to users.
CIFS/9000 Hewlett-Packard's
implementation of CIFS for UNIX.
CIFS/9000 provides both server and client
modules for both HP 9000 servers and
workstations.
Credential A piece of information that
identifies a user. A credential may be as
simple as a number that is uniquely
associated with a user (like a social security
number), or it may be complicated and
contain additional identifying information. A
strong credential contains proof, sometimes
called a verifier, that the user of the
credential is indeed the actual user the
credential identifies.
D
Authentication Scheme to ensure that a
user who is accessing file data is indeed the
intended user. A secure networked file
system uses authentication to prevent access
occurring from someone pretending to be the
intended user.
Authorization Ensures that a user has
access only to file system data that the user
has the right to access. Just because a user is
authenticated does not mean he or she
should be able to read or modify any file. In
the simplest form or authorization, users are
given read or modify permissions to
individual files and directories in a file
system, through the use of access control
information (called an Access Control List,
or ACL.)
Glossary
Diffie-Hellman A protocol used to securely
share a secret key between two users.
Diffie-Hellman protocol uses a form of public
key exchange to share the secret key.
Diffie-Hellman is known to be susceptible to
an interceptor's attack, but authenticated
Diffie-Hellman Key Agreement, a later
enhancement, prevents such a
middle-person attack.
E
Encryption Encryption ensures that data
is viewable only by those who possess a
secret (or private) key. Encrypted data is
meaningless unless the secret key is used to
decrypt the data. Encryption and decryption
of data is called ciphering.
149
Glossary
Integrity
I
S
Integrity Integrity ensures that file system
data is not modified by an intruder. An
intruder can not intercept a file system data
packet and modify it without the network
file system discovering and rejecting the
tampering.
Samba An open source product that first
appeared in the mid-1990's. Samba provides
NT file and print server capability for UNIX
systems, including most of the capabilities of
Advanced Server for UNIX, with the
exception of the Primary Domain Controller
(PDC) and Backup Domain Controller (BDC)
synchronization protocols. Although Samba
is widely used, vendor support for it is not
generally available.
K
Kerberos An authentication and
authorization security system developed by
MIT and the IETF working group. It is based
on secret key technology, and is generally
easier to manage than a public key
infrastructure because of its centralized
design. However, Kerberos is not as scalable
as a public key infrastructure.
P
Public Key An encryption method by which
two users exchange data securely, but in one
direction only. A user, who has a private key,
creates a corresponding public key. This
public key can be given to anyone. Anyone
who wishes to send encrypted data to the
user may encrypt the data using the public
key. Only the user who possesses the private
key can decrypt the data.
Secret Key Secret key, also known as
symmetric-key or shared-key, encryption is a
ciphering technique by which two users
exchange data by encrypting and decrypting
data with a shared secret key. Data is both
encrypted and decrypted with the same key.
The secret key must be exchanged securely
(such as through the “cones of silence”) since
anyone knowing the secret key can decrypt
the data.
SMB Server Message Block, the file-sharing
protocol at the heart of Windows networking.
SMB is shared by Windows NT, Windows 95,
Windows for Workgroups, and OS/2 LAN
Manager. CIFS is essentially a renaming of
this protocol.
Public Key Infrastructure Method of
managing public key encryption. Although
public key technology has the advantage of
never exchanging decryption keys, it has the
disadvantage of being difficult to manage.
Some issues include distribution of public
keys with proof of the key's ownership, and
revocation of expired or terminated keys.
150
Glossary
Index
A
Access Control Lists, 57
configuring, 75
VxFS, 59
ACLs. See Access Control Lists
active-standby HA, 101
adding ACE entries, 66
F
files
location on server, 20
B
browsing
description, 22
documentation, 22
H
highly available CIFS/9000, 101
HP-UX 11.0 memory and disc requirements,
C
Change Notify, 52
CIFS
description, 10
protocol, 10
CIFS/9000
documentation, 30
introduction, 10
CIFS/9000 Server
description, 15
documentation, 20
documentation roadmap, 23
features, 15
file and directory information, 26
installation requirements, 32
memory and disc requirements, 32
process model, 133
requirements and limitations, 31, 132
starting, 51
Common Internet File System. See CIFS
configuring
documentation, 21
kernel parameters for CIFS/9000, 135
overview, 33
printing, 40
D
documentation
CIFS/9000 enhancements, 15
CIFS/9000 Server, 20
file and directory information, 26
most recent, 30
roadmap, 23
Samba, 13
www.docs.hp.com, 30
G
GNU Public License, 12
31
I
installing
documentation, 21
loading software, 33
overview, 33
K
kernel configuration parameters
configuring, 134
description, 134
L
loading software, 33
M
maxusers, 134
N
nfile, 134
nflocks, 134
ninode, 134
NIS and Samba
documentation, 23
nproc, 134
NT
ACLs, 59
directory translations, 61
file permission translations, 61
O
obtaining CIFS/9000 software, 30
Open Source Software, 12
OSS. See Open Source Software
overview
configuring, 33
151
Index
installing, 33
P
performance tuning, 52
pre-defined permissions, 62
pre-installed software, 30
printing
configuring, 40
documentation, 22
S
Samba server
description, 12
documentation, 13
features, 12
name list, 70
requirements and limitations, 31, 132
scripts, 21
starting, 21
Samba Web Administration Tool (SWAT), 22
Server Message Block, 10, 12
setting new ACLs, 66
SMB. See Server Message Block
software, loading, 33
startsmb, 51
stopsmb, 51
swap space requirements, 136
swinstall(1M), 33
T
troubleshooting
information, 22
U
UNIX
file owner, 60
other permission, 60
owning group, 60
permissions, 59
V
VxFS POSIX ACL File Permission Superset,
64
W
www.docs.hp.com, 30
www.software.hp.com, 30
152