1
Setting up Database
Oracle FLEXCUBE Universal Banking
Version-11.3.0
[May] [2011]
Table of Contents
1.
SETTING UP DATABASE ............................................................................................................................ 1-1
1.1
INTRODUCTION ........................................................................................................................................... 1-1
1.2
PREREQUISITES........................................................................................................................................... 1-1
1.3
PRE-INSTALLATION TASKS ......................................................................................................................... 1-1
1.3.1
Purpose.............................................................................................................................................. 1-1
1.3.2
Setting up Database for Oracle FLEXCUBE .................................................................................... 1-1
1.4
BEFORE GETTING STARTED ........................................................................................................................ 1-5
1.5
INSTALLER SWITCHES ................................................................................................................................ 1-6
2.
INSTALLING ORACLE FLEXCUBE DATABASE................................................................................... 2-7
2.1
INTRODUCTION ........................................................................................................................................... 2-7
2.2
CREATING SCHEMA BY IMPORTING FULL DUMP ........................................................................................ 2-7
2.3
CREATING SCHEMA FROM SHIPMENT MEDIA ............................................................................................. 2-7
2.3.1
Load from Shipment Media................................................................................................................ 2-8
2.3.2
Using Multiple Source Directories .................................................................................................. 2-12
2.4
LOADING DATA ........................................................................................................................................ 2-15
2.4.1
Loading Static Data from Shipment media and Basic Setup ........................................................... 2-15
2.4.2
Basic Setups ..................................................................................................................................... 2-19
2.4.3
Importing Data Dump with Data Pump........................................................................................... 2-22
2.4.4
Importing PDATA ............................................................................................................................ 2-26
2.5
CREATING ORACLE FLEXCUBE SCHEMA USING CLONE DATABASE OR TEMPLATE BASED SETUP ........ 2-30
3.
SETTING UP FGL DATABASE ................................................................................................................... 3-1
3.1
INTRODUCTION ........................................................................................................................................... 3-1
3.2
CREATING FGL SCHEMA BY IMPORTING FULL DUMP ................................................................................ 3-1
3.3
CREATING FGL SCHEMA FROM SHIPMENT MEDIA ...................................................................................... 3-1
3.3.2
Using Multiple Source Directories .................................................................................................... 3-4
3.3.3
Loading Data ..................................................................................................................................... 3-6
4.
SETTING UP ELCM DATABASE................................................................................................................ 4-1
4.1
INTRODUCTION ........................................................................................................................................... 4-1
4.2
CREATING ELCM SCHEMA BY IMPORTING FULL DUMP ............................................................................. 4-1
4.3
CREATING ELCM SCHEMA FROM SHIPMENT MEDIA .................................................................................. 4-1
4.3.2
Using Multiple Source Directories .................................................................................................... 4-4
4.3.3
Loading Data ..................................................................................................................................... 4-6
1-1
1.
1.1
Setting up Database
Introduction
This document explains the steps to install the Host and Branch database. These steps include
Load objects, Import Dump, Basic Setup, and Clone Database.
This tool automates the creation of the database. The database created using this tool will have
the database objects that are available in the shipment media.
1.2
Prerequisites
Following are the prerequisites for installing decentralize branch database:
Prerequisite
Description
Operating System
Windows 2000/XP, UNIX
Software
You will require the following software:
1. JDK1.6 or later version (Update 17 or higher for JDK1.6)
2. Oracle 11g Client or later version (Refer the release
certificate)
Note the following:
Ensure that Oracle FLEXCUBE Schema (Branch) and database connectivity details are as
per the standards.
Make sure that Oracle FLEXCUBE Schema and database connectivity exist as per the
norms in ‘TNSNAMES.ORA’ file of Oracle 11g Client or later versions.
During the setup, service/DB jobs should not be running in the schema. If some services
are still running in the schema, use 'exec dbms_job.remove('||job||');' from user_jobs.
1.3 Pre-Installation Tasks
1.3.1 Purpose
To guide DBA to setup the database for Oracle FLEXCUBE and to do the routine DBA basic
activities for the following DB version:
DB version
Refer Release Certificate
FLEXCUBE
version
Oracle Database 11g Enterprise Edition Release 11.2.0.2.0 - 64bit
Production
1.3.2 Setting up Database for Oracle FLEXCUBE
This section guides you through the steps to setup database for Oracle FLEXCUBE.
1-1
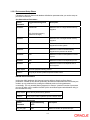
1.3.2.1 Environment Setup Phase
Following are the main Kernel and database initialization parameters that you need to setup as
part of the environment.
Sun Solaris Kernel Parameters
Kernel
Parameter
Suggested Starting Value
Description
SHMMAX
4294967295
Maximum size of a single shared memory
segment
or
70% of physical memory
(whichever is larger)
SHMMIN
1
Minimum size of a single shared memory
segment
SHMMNI
100
Maximum number of shared memory
segments in entire system
SHMSEG
10
Maximum number of shared memory
segments one process can attach
SEMMNS
2000
Maximum number of semaphores in entire
system
SEMMSL
1000
Maximum number of semaphores per set
SEMMNI
100
Maximum number of semaphore sets in
entire system
Swap Space
Twice the physical memory present
Patches
Verify as per Oracle’s platform specific release notes
IBM AIX Kernel Parameters
Unlike other UNIX platforms, AIX does not have the ability to directly configure Kernel
parameters. Instead, the AIX Kernel dynamically allocates and reallocates resources as they are
needed, up to a predefined limit, making the traditional practice of tuning parameters
unnecessary. The only tuneable Kernel parameter is ‘maxuprc’ (maximum number of processes
per user ID) which can be modified via SMIT (AIX's menu-based system administration utility) or
the command line utility.
Swap Space
Twice the Physical memory present
Patches
Verify as per Oracle’s platform specific release notes
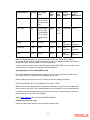
HP UNIX Kernel Parameters
Kernel
Parameter
Suggested Starting
Value
Description
aio_max_ops
2048
Maximum number of queued AIO ops
1-2
Kernel
Parameter
Suggested Starting
Value
Description
dbc_min_pct
2
Minimum percentage of system memory used
for buffer cache
dbc_max_pct
ensure <= 128MB
Maximum percentage of system memory used
for buffer cache
Fsasync
0
Asynchronous i/o on file systems
max_async_ports
1024
Maximum ports for asynchronous I/O
operations
maxdsiz64
1Gb
Shadow process' heap size
Maxfiles
512
Soft limit number of open files per process
maxfiles_limit
1024
Hard limit number of open files per process
Maxusers
no of Oracle
connections+64
Influences nproc, nfile, ninode and maxuprc
Maxuprc
maxusers*5
Number of processes per user ID
nfile
use SAM formula
Open files system wide
Nflocks
>= (200 + (sum of db files
))
File locks system wide
Nproc
use SAM formula
Processes system wide
Shmmax
4294967295
Maximum size of a single shared memory
segment
Swap Space
Twice the physical memory present
Patches
Verify as per Oracle’s platform specific release notes
1.3.2.2 Database Setup
This section contains the following details:
Create database using Oracle DBCA utility with (jvm and xdb options)
Create Oracle FLEXCUBE schema
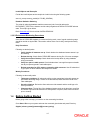
Storage for Oracle FLEXCUBE schema
TABLESPACES
Storage
%
FCC Data
60%
Table Space
Name
Table
Space
Type
Extent
Size
(KB)
Extent
Allocation
Type
Segment
Space
Management
FCCDATASML
15% or 4 GB
DATA
128
UNIFORM
AUTO
1-3
1024
TABLESPACES
Storage
%
Table Space
Name
Table
Space
Type
FCCDATAMED
25% or 20 GB
Extent
Size
(KB)
Extent
Allocation
Type
Segment
Space
Management
UNIFORM
AUTO
Not
applicable
Not
applicable
Not
applicable
Not
applicable
Not
applicable
Not
applicable
5120
FCCDATALAR
60%
FCC Index
40%
FCCINDXSML
15% or 4 GB
INDEX
128
512
FCCINDXMED
25% or 20 GB
5120
FCCINDXLAR
60%
System
5 GB
SYSTEM
SYSTEM
Temporary
5 GB
TEMP
TEMP
Undo
5 GB
UNDO
UNDO
1024
Note: The storage parameters for FCC Data and FCC Index table spaces are provided as
percentage. The exact sizing for these table spaces need to be worked out based on the sizing of
Oracle FLEXCUBE, which is a factor of volumes at the bank.
For the parameters to be set at the database level for Oracle FLEXCUBE, refer to the excel sheet
‘Initparameters_to_change.xls’ in the folder ‘INSTALLER/DOCS’.
Granting Rights to Oracle FLEXCUBE Schema
You need to disable the password case sensitivity and grant rights to the schema. While doing
this, ensure that you are connected to the database as ‘sys’ user.
Before granting rights to the schema, you need to execute the following command:
ALTER SYSTEM SET SEC_CASE_SENSITIVE_LOGON = FALSE;
Note: The above command should be executed if the database is Oracle 11G and the application
server is Oracle SOA Suite. This command disables the case sensitivity of the schema password.
Further, execute the following script to grant rights to the schema. This should also be executed
while connected as “sys” user to the database.
Refer ‘grants_dbms.sql’ file in the folder ‘INSTALLER/DOCS’.
Listener and Tnsentries setup
Create the listener and tnsentries using Oracle net manager utility.
1-4
Invalid Objects and Recompile
Find all the invalid objects and recompile the invalid units using the following syntax.
exec utl_recomp.recomp_parallel(4, ‘FCUBS_SCHEMA)
Database Statistics Gathering
The script for gathering database statistics creates two jobs. Once job gathers the
DICTIONARY_STATS of the instance and the other job gathers the Oracle FLEXCUBE schema
stats. The script is given below:
Refer ‘StatsJobs.sql’ file in the folder ‘INSTALLER/DOCS’.
1.3.2.3 Environment Monitoring Procedures
Once Oracle FLEXCUBE database is created and being used, a set of regular monitoring steps
should be carried out by the DBA. This section outlines a set of such daily, weekly and monthly
tasks.
Daily Procedures
Following are the daily tasks:
Verify whether all instances are up: Check whether the database instance status is up
and running.
Review alert log: Check Oracle FLEXCUBE instance alert log file of for error messages.
Verify the success of backup: Check whether the backup taken by using database
utility is successful.
Verify free space in table spaces: Check whether there is enough free space to handle
the day’s expected growth in each table space.
Review contention for CPU, memory, network or disk resources: Use OS related tool
to get report on above statistics and analyze the details.
Weekly Procedures
Following are the weekly tasks:
1.4
Table space violations: All indexes should lay on the appropriate index table spaces as
specified at the design stage. If there are invalid indexes, those should be rebuilt to the
index tablespace.
Security violations: Review the client and server side network and the audit logs to for
security violations.
Cleanup actions: The log files of the database instance such as the alert logs, trace files
and listener logs should be cleared on a weekly basis. If required, these can be archived
prior to cleanup.
Before Getting Started
Before going to the next step, you need to run the command given below:
Go to Start > Run on your system and enter the command given below and press Enter key:
Sqlplus (schema_name)/(password)@(connect_string)
1-5
Example
Suppose that you are connecting to a schema FCUBS (schema_name). The password is FCUBS and
connect string is FCUBS.WORLD (Connect_string ). In that case, you need to run the following command:
Sqlplus FCUBS/[email protected]
Ensure that you are able to connect to the schema without errors. Also, check the SQL* Plus
version is 10.2.0.0 or above.
1.5
Installer Switches
The installer switch is required in case of RMAN/TEMPLET based DB installations. The
installation steps are maintained depending on the tag of FCUBS-ENV-CHECK.xml. This is
available under the folder ‘<INSTALLER_PATH>/InstallOptions/Database/Config’.
<ENVIRONMENT>
<INSTOPT>VER</INSTOPT>
</ENVIRONMENT>
Based on the following tag values, the installer will navigate to different screens:
1. DEV: For Development, a folder based database creation.
2. VER: For Vercon, a restoration of the database provided by DBA’s and customization of the
modules according to customer’s requirements. Take a backup after the customization. The
files are then ready to be shipped to the customer.
3. TMP: For Template, the concept remains the same as it was in the previous release of our
Installer.
Note: In case of template based DB setup, the tag value of DBCA_TEMPLATE in folder
‘<INSTALLER_PATH>/InstallOptions/Database/Config/FCUBS-ENV-CHECK.xml’ should be
the name of the template given by DBA team.
<DBCA_TEMPLATE>FCUBS_ModelBank</DBCA_TEMPLATE>
4. PRD: For Customers, the RMAN backup is bundled in the installer. This will restore the
database at customer site.
1-6
2.
2.1
Installing Oracle FLEXCUBE Database
Introduction
Oracle FLEXCUBE database can be installed in one of the following methods.
Import full dump – Import the Oracle FLEXCUBE objects into an empty schema using full
dump. This is a manual activity.
From Shipment Media – Load the Shipment Mediaobjects into an empty schema using
Installer.
Clone database or template based setup – Clone the database using Installer.
These methods are discussed in detail under the following heads.
2.2
Creating Schema by Importing Full Dump
Under this method, you need to manually import the Oracle FLEXCUBE DMP file into the Oracle
FLEXCUBE schema. This can be done using the following command.
$ imp user_name/password file = dmp_file_name.dmp full = Y commit = Y log = imp.log
compile=n
Post Import Activities
Once the DMP file is imported, you need to carry out the following activities:
Enabled all triggers by running the procedure ‘pr_instlr_post_import.prc’ located under
the folder ‘InstallOptions\Database\Common’
Update STTM_BANK with auto_gen_cif='N'
Update the following tables:
actb_daily_log
bktb_schema_defaults
dstb_maint, ictb_acc_action
ictb_action_log, ictb_resolution_error
lmtb_offline_nodes, lmtb_offline_utils
mstb_current_msg_ind_out
mstb_dly_msg_in
mstb_dly_msg_out
mstm_mcs
mstm_undo
sttm_branch_node
sttm_branch
sttm_customer
Set node as the connection string for the above tables.
2.3
Creating Schema from Shipment Media
Under this method, you need to create the schema from the Shipment Media.
2-7
2.3.1 Load from Shipment Media
You have an option of loading both host and branch objects together. Database installation
includes the provision of details of the schema to connect and the location of the source objects.
The objects of the selected modules are compiled as explained below.
Source input for installer for DB setup
Copy the folder ‘MAIN’ from the shipment media to a folder in the local system.
Eg: D:\source\MAIN
Further, copy the folder ‘ELCM’ from the shipment media to a folder in the local system.
Eg: D:\source\ELCM
The folder to which you have copied the sources can be the source to the Installer.
Note: After copying all the sources from shipment media to a folder in the local system, ensure
that the folder containing those has full rights for that user.
It is not mandatory to copy the sources to local system. You may also directly refer the Installer to
the shipment media.
2.3.1.1 Loading Objects from Shipment Media
The steps to load objects from the Shipment Media are given below:
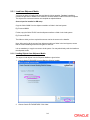
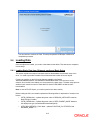
1. Launch Oracle FLEXCUBE Universal Banking Solution Installer.
2. Choose ‘Oracle FLEXCUBE UBS’. Click ‘Next’.
2-8
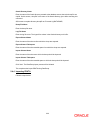
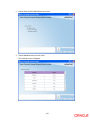
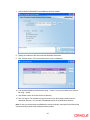
The following screen is displayed:
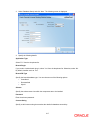
3. Choose ‘Database Setup’ and click ‘Next’.
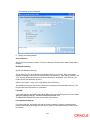
4. Specify the following details:
Application Type
Select FCJ as the application type.
2-9
Install
If you select ‘Host Database’ radio button, the Installer loads both Host and Branch objects
together.
Branch Plug-in
If you require branch plug-in, select ‘Yes’. By default ‘Yes’ is selected.
Branch DB Type
Choose the DB type based on your requirement. Following deployment types are available:
Centralized (default)
Decentralized
Hybrid
Schema
Specify the schema name into which database components are installed.
Password
Specify the schema password.
Connect String
Enter a valid connect string that contains the details for the database connectivity.
IP Address
Specify the IP address of the system where the database schema is installed.
SID Service Name
Specify the SID/service name.
Port
Specify the port number of the schema.
5. Click ‘Next’.
2-10
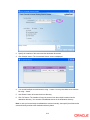
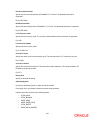
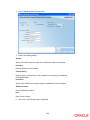
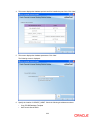
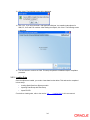
The following screen is displayed:
6. Specify the following details:
Source Directory
Specify the source directory location. The source directory should have the ‘MAIN’ folder and the
contents.
Destination Directory
Specify the destination directory.
This is optional. If you do not specify the destination directory, on clicking ‘Next’, the Installer
displays a message ‘Sources will be compiled from source directory’. If you want to proceed, click
‘Yes’. The files will be taken directly from source directory for compilation. If you click ‘No’, you
need to specify the destination directory.
(Refer point number 7 under 2.3.2 Using Multiple Source Directory)
The Installer will copy the source files from the source directory to the destination directory. The
files are taken from this location for compilation.
Load DDL
If you check this box, the Installer will load the DDL scripts, types and sequences from the folders
‘MAIN\DATABASE\Host\DDL’, ‘MAIN\DATABASE\Branch\DDL’ and
‘ELCM\MAIN\DATABASE\EL’ to the source folder of the schema.
Load Application Objects
If you check this box, the Installer will load the views, procedures, functions, package bodies,
package specifications and triggers to the schema, based on the modules that you select in the
next screen.
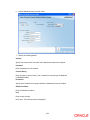
2-11
Load Installer Objects
If you check this, the Installer will load the procedures required for running cyclic compilation, preimport and post-import.
Compile Objects
If you check this option, the Installer will execute the cyclic compilation procedure compiled in the
schema, which would have been compiled already, if you would have checked the Load Installer
Objects option.
Load Data
Check this box after invalids have been reduced. This option can be selected after compiling the
objects.
Load Static Data/Load PData
You have the f ollowing options:
Load Static Data - For details on loading static data, refer to the section ‘2.4.1
Static Data from Shipment media and Basic Setup’.
Import PData (Data Pump) - If Oracle database version is 11g or later, you need to use
this option. For other versions, you can use ‘Import PData’. For details, refer to the
section ‘2.4.3 Importing Data Dump with Data Pump’.
Loading
CONSOL/DELTA
Choose one of the following:
CONSOL – Choose this for fresh installation of the sources.
DELTA – Choose this for incremental releases
2.3.2 Using Multiple Source Directories
You can specify multiple source directories using ‘Multiple’ button. This is not required for creating
EAR for Oracle FCUBS 11.3. This is meant only for consolidation purpose.
1. Invoke Oracle FLEXCUBE Installer.
2-12
2. Specify the locations of the source and the destination directories.
3. Click ‘Multiple’ button. The ‘Incremental Source’ screen is displayed.
4. You can add multiple source directories using ‘+’ button. You may also delete a row from the
list using ‘-‘ button.
5. Use ‘Browse’ button to browse the source directory.
6. Click ‘OK’ button. The Installer will copy the sources from the multiple locations into the
destination directory. You can have consolidated sources in the destination directory.
Note: In case you have already consolidated the sources manually, then specify that folder as the
sources directory and leave the destination directory blank.
2-13
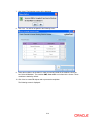
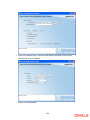
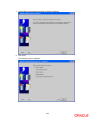
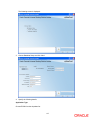
7. Click ‘Next’. The following screen will be displayed.
8. Click ‘Yes’. You will be navigated to the following screen:
9. Select the modules to be included. In case you need to include all the modules, check the
box ‘Select All Modules’. The modules SMS, Core and EL are lot listed in the screen. These
modules are loaded by default.
10. Click ‘Next’ to create DB objects and to process the compilation.
The following screen is displayed:
2-14
You can choose to continue or finish. This step completes the DB object creation and
compilation processes.
2.4
Loading Data
Once the objects are loaded, you need to insert data into the tables. This task can be completed
in three ways.
2.4.1 Loading Static Data from Shipment media and Basic Setup
This section explains the steps to load static data into the database and the basic setup to be
done. You need to provide the details of the schema and the location of source objects.
Further, you need to run the INC scripts that are available in the folders
‘MAIN\DATABASE\Host\INC’ and ‘MAIN\\DATABASE\Branch\INC’ from the source to the
schema. Once the INCs are loaded, you can proceed to the basic setup. The basic setup process
adds the basic entries into some of main tables of Oracle FLEXCUBE to enable its basic
functionalities.
Note: In case of PDATA import, you need not perform the above activity
Before loading the INCs, the Installer updates the following tables for duplication of records in the
branch:
CSTB_PARAM table – updates the param value of ‘BRANCH_INSTALLED’ based on
Branch Plugin (Yes/No)
CSTB_PARAM table – updates the param value of ‘DEPLOYMENT_MODE’ based on
the deployment type (Centralized/Decentralized/Hybrid)
STTB_BRN_REFRESH_FUNC table – updates FUNCTION_ID= STDSTAFN and
REFRESH_REQD = Y
2-15
CSTB_PARAM table – updates the param value of ELMS_USER_ID based on the user
ID specified
Follow the steps given below:
1. LaunchOracle FLEXCUBE Universal Banking Solution Installer.
2. Select ‘Oracle FLEXCUBE UBS’ and click ‘Next’.
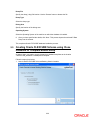
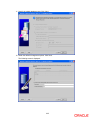
The following screen is displayed:
2-16
3. Select ‘Database Setup’ and click ‘Next’. The following screen is displayed:
4. Specify the following details:
Application Type
Select ‘FCJ’ from the drop-down list.
Branch Plugin
If you need to include branch plug-in, select ‘Yes’ from the drop-down list. Otherwise, select ‘No’.
By default, Installer sets it to ‘Yes’.
Branch DB Type
Specify the branch database type. You can choose one of the following options:
Centralized
Decentralized
Hybrid
Schema
Specify the schema name into which the components are to be installed.
Password
Enter the schema password.
Connect String
Specify a valid connect string that contains the details for database connectivity.
2-17
IP Address
Specify the IP address of the system where the database schema is installed.
SID/Service Name
Specify SID/Service name.
Port
Specify the port number.
5. Once you have set the details, click ‘Next’.
The following screen is displayed:
6. Specify the following details:
Source Directory
Specify the location of the source directory.
Destination Directory
Specify the location of the destination directory.
This is an optional field. If the source folder is there in the local machine, you need not specify the
source directory.
CONSOL/DELTA
Choose one of the following:
CONSOL: If this is a fresh installation of sources, you need to select ‘CONSOL’.
DELTA: If this is an Incremental release, you need to select ‘DELTA’.
2-18
Load Data
Check this box.
Load Static Data
Check this box.
7. Click ‘Next’. The Installer will execute all INCs. Further, it will execute the basic setup
procedures.
2.4.2 Basic Setups
You will be navigated to the screen given below.
8. Following screen is displayed:
9. The screen displays the entries found in CSTB_PARAM table for MODIFY_FIELD=‘Y’. In
addition to the fields shown in the above screen, you will find another field ‘ELMS_USER_ID’.
You need to enter the user ID for triggering ELCM from Oracle FLEXCUBE. This table lists
out all fields and their values, which can be modified. The modified values are updated in the
CSTB_PARAM table.
10. Click ‘Next’.
2-19
The following screen is displayed:
11. Specify the following details.
Bank Code
Specify a valid bank code. The bank code should have three characters in uppercase.
Eg: CHO
Bank Name
Specify a valid bank name. The bank name can have maximum 120 characters. It can be
numeric or alpha numeric and may contain special characters.
Eg: Citi Head Office
Branch Code
Specify a valid branch code. The branch code can have numeric or alphanumeric characters.
Eg: CHO, 001
Input Date
Specify the input date in ‘DD-MMM-YYYY’ format.
Eg: 04-SEP-2009
Current Business Date
Specify the current business date in DD-MMM-YYYY format. The alphabets should be in
uppercase.
Eg: 04-SEP-2009
2-20
Previous Business Date
Specify the previous business date in DD-MMM-YYYY format. The alphabets should be in
uppercase.
Eg: 03-SEP-2009
Next Business Date
Specify the next business date in DD-MMM-YYYY format. The alphabets should be in uppercase.
Eg: 05-SEP-2009
Local Currency Code
Specify the local currency code. The currency code should have three characters in uppercase.
Eg: USD
Local Currency Name
Specify the local currency name.
Eg: U.S. DOLLAR
Current Fin Cycle
Specify the name of the current financial cycle. The format should be ‘FY’ followed by the year.
Eg: FY2009
Current Fin Period
Specify the current financial period. This should have three characters. The format should be ‘QT’
followed by the quarter number.
Eg: QT3
Debug Area
Specify a valid path for debug.
Operating System
Choose the Operating System on which the DB is installed.
On clicking ‘Next’, the Installer executes the basic setup procedure.
Installer inserts the records into the following tables:
STTM_BANK
STTM_BRANCH
SMTB_USER
SMTB_USER_ROLE
STTM_DATES
SMTB_ROLE_MASTER
2-21
SMTB_PARAMETERS---Updating with HO Branch
CYTM_CCY_DEFN
SMTB_ROLE_DETAIL
12. Once you have specified the details, click ‘Next’. The following screen is displayed:
13. You can create the User IDs and set passwords to login to Oracle FLEXCUBE. Specify the
user name and password. These details are updated in the tables STTM_BANK,
STTM_BRANCH, SMTB_USER, SMTB_USER_ROLE and CYTM_CCY_DEFN.
Note: Use Enter key after entering the user name and password to register the values. If any of
the field is in editing state, the Installer will not consider that.
2.4.3 Importing Data Dump with Data Pump
Manual steps in case of import PDATA Dump (with data pump)
Earlier, importing of PData was carried out in Installer by using IMP.exe executable file. Oracle
does not support EXP.exe and IMP.exe from 11g onwards. You need to do the Export and Import
using DataPump Utility (EXPDP.exe and IMPDP.exe).
Importing the PData using Installer is not supported as the process requires creation of a
directory (ORACLE DIRECTORY) on the Database server, giving grants to that directory. The
.DMP file should be copied into that directory for importing. These processes are not automated
and the import of PData is a manual activity.
Follow the steps given below:
1. Create Oracle Directory in the database server. Use the following command:
SQL>create or replace directory <ORACLE_DIR_NAME> as ‘<OS_DIR>’;
2. Grant privileges to the directory.
SQL>grant read, write on DIRECTORY <ORACLE_DIR_NAME> to <DB_ACCOUNT>;
2-22
Note: The above steps are carried out by DBA. If the database is on a local system, then you
need to login as SYSDBA user to execute these commands.
3. Copy the .DMP file to the <ORACLE_DIR_NAME> directory.
4. Run the installer to complete the import process. Launch Oracle FLEXCUBE Universal
Banking Solution Installer.
5. Choose Oracle FLEXCUBE UBS and click ‘Next’.
The following screen is displayed:
2-23
6. Choose Database Setup and click ‘Next’.
7. Specify the following details:
Schema
Specify the schema name into which the P-data dump needs to be imported.
Password
Enter the password of the schema.
Connect String
Enter the Host or connect string. This is needed for connecting to the database
(TNSNAMES.ORA).
IP Address
Specify the IP address of the system where the database schema is installed.
SID/Service Name
Enter the SID/Service Name.
Port
Enter the port number.
Click ‘Next’. The following screen is displayed.
2-24
8. Check the Load Data option, Select the Import PDATA(Data Pump) radio. Click Next.
Following screen is
displayed.
9. Specify the following details:
2-25
Oracle Directory Name
Enter the name of the Oracle directory created at the database server where the dump file are
copied. On this screen, ‘dumpDir’ is the name of the Oracle directory given while executing this
command.
SQL>create or replace directory dumpDir as ‘D:\oracle11g\DATAPUMP’;
Dump File Name
Enter the dump file name.
Log File Name
Enter the log file name. The logs will be written in the Oracle directory on this file.
Export Schema Name
Enter the name of the schema from which the dump are exported.
Export Schema Tablespace
Enter the name of the schema table space from which the dump are exported.
Import Schema Name
Enter the name of the schema to which the dump should be imported.
Import Schema Tablespace
Enter the name of the schema table space to which the dump should be imported.
Click ‘Next’. The DataPump import process will be initiated.
This completes the import PDATA using DataPump.
2.4.4 Importing PDATA
Follow the steps below:
2-26
1. Launch Oracle FLEXCUBE Universal Banking Solutions Installer.
2. Choose Oracle FLEXCUBE UBS and click ‘Next’.
2-27
3. Choose Database Setup and click ‘Next’.
4. Specify the following details:
Schema
Specify the schema name into which the P-data dump needs to be imported.
Password
Enter the password of the schema.
Connect String
Enter the Host or connect string. This is needed for connecting to the database
(TNSNAMES.ORA).
IP Address
Specify the IP address of the system where the database schema is installed.
SID/Service Name
Enter the SID/Service Name.
Port
Enter the port number.
5. Click ‘Next’. The following screen is displayed.
2-28
6. Check the Load Data option , select the Import PDATA radio button and click Next.
The following screen is displayed:
7. Specify the following details:
2-29
Dump File
Specify the dump (.dmp) file location. Use the ‘Browse’ button to browse the file.
Dump Type
Select the dump type.
Debug Area
Specify the location of the debug area.
Operating System
Select the Operating System of the machine on which the database is installed.
8. Once you have specified the details, click ‘Next’. This process imports the selected P-Data
Dump into the schema.
This completes Oracle FLEXCUBE database installation process.
2.5
Creating Oracle FLEXCUBE Schema using Clone
Database or Template Based Setup
As part of clone, you need to copy the latest clone database templates to the location
‘<INSTALLER_SOURCE> \InstallOptions\Template’.
Follow the steps given below:
1. Launch Oracle LEXCUBE Universal Banking Solution Installer.
2-30
2. Choose Oracle FLEXCUBE UBS and click ‘Next’.
3. Choose Database Setup and click ‘Next’.
The following screen is displayed:
2-31
4. This screen displays the database option that will be installed as part of this. Click ‘Next’.
5. This screen displays the database parameters. Click ‘Next’.
The following screen is displayed:
6. Specify the location of ‘ORACLE_HOME’. Check the following checkboxes as shown:
Copy FCUBS Database Template
Auto Launch Oracle DBCA
2-32
7. Oracle DBCA is automatically launched to install the database.
8. Click ‘Next’.
The following screen is displayed:
2-33
9. Choose ‘Create a Database’. Click ‘Next’.
10. Choose the template you need to install.
The following screen is displayed:
2-34
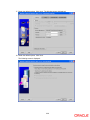
11. Specify the global database name. Click ‘Next’.
12. Retain the default management options. Click ‘Next’.
The following screen is displayed:
2-35
13. Enter the password for all the database accounts. Remember the password.
14. Retain the default system options. Click ‘Next’.
The following screen is displayed:
2-36
15. Retain the default file locator options. You may change this in the upcoming steps.
16. Retain the default options. Click ‘Next’.
The following screen is displayed:
2-37
17. Retain the default options. Click ‘Next’. The following screen is displayed:
18. Retain the default options. Click ‘Next’.
The following screen is displayed:
2-38
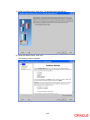
19. Retain the default options. Click ‘Next’. The following screen is displayed:
20. Retain the default options. Click ‘Next’.
The following screen is displayed:
2-39
21. Click ‘Controlfile’, ‘Datafile’ and ‘Redo Log Groups’ to change the installation location of
database files. Click ‘Next’.
22. Check the box ‘Create Database’. Click ‘Finish’. This completes the database installation
process and starts the database.
23. Once you exit from DBCA, the Installer displays the following screen:
This completes the template based database installation process.
2-40
3.
3.1
Setting up FGL Database
Introduction
This chapter explains the steps to set up database for FGL.
3.2
Creating FGL Schema by Importing Full Dump
You can create the FGL schema by way of a full dump import. This is a manual activity. For
details, refer to the section ‘2.2 Creating Schema by Importing Full Dump’. You may follow the
same steps for FGL database setup.
3.3
Creating FGL Schema from Shipment media
You can create the FGL schema by loading the objects from the shipment media itself. The
method is described under the following headings.
3.3.1.1 Loading Objects from Shipment Media
This section explains the steps to load objects for setting up the FGL database. Database
installation includes the provision of schema details and source of objects.
1. Start Oracle FLEXCUBE Universal Banking Solutions Installer.
2. Choose Oracle FLEXCUBE UBS and click ‘Next’.
3-1
The following screen is displayed:
3. Choose Database Setup and click ‘Next’.
4. Specify the following details:
Application Type
Choose FGL from the dropdown list.
3-2
Schema
Specify the schema name into which the database components need to be installed.
Password
Enter the password of the schema.
Connect String
Specify the connect string. This is needed for database connectivity.
IP Address
Specify the IP address of the system where the database schema is installed.
SID/Service Name
Enter the SID/Service Name.
Port
Enter the port number.
5. Click ‘Next’. The following screen is displayed:
6. Specify the following details:
Source Directory
Specify the source directory location. The source directory will have the ‘MAIN’ folder and the
contents.
Destination Directory
Specify the destination directory.
3-3
This is optional. If you do not specify the destination directory, on clicking ‘Next’, the Installer
displays a message ‘Sources will be compiled from source directory’. If you want to proceed, click
‘Yes’. The files will be taken directly from source directory for compilation. If you click ‘No’, you
need to specify the destination directory.
The Installer will copy the source files from the source directory to the destination directory. The
files are taken from this location for compilation.
Load DDL
If you check this box, the Installer will load the DDL scripts, types and sequences from the folders
‘MAIN\\DATABASE\Host\DDL’ and ‘MAIN\\DATABASE\Branch\DDL’ to the source folder of the
schema.
Load Application Objects
If you heck this box, the Installer will load the views, procedures, functions, package bodies,
package specifications and triggers to the schema, based on the modules that you select in the
next screen.
Load Installer Objects
If you check this, the Installer will load the procedures required for running cyclic compilation, preimport and post-import.
Compile Objects
If you check this option, the Installer will execute the cyclic compilation procedure compiled in the
schema.
Load Data
Check this box after invalids have been reduced. This option can be selected after compiling the
objects
Load Static Data/Load PData
You have the following options:
Loa d Static Data - For details on loading static data, refer to the section ‘2.4.1
Static Data from Shipment media and Basic Setup’.
Import PData (Data Pump) - If Oracle database version is 11g or later, you need to use
this option. For other versions, you can use ‘Import PData’. For details, refer to the
section ‘2.4.3 Importing Data Dump with Data Pump.
Loading
CONSOL/DELTA
Choose one of the following:
CONSOL – Choose this for fresh installation of the sources.
DELTA – Choose this for incremental releases
3.3.2 Using Multiple Source Directories
You can specify multiple source directories using ‘Multiple’ button. This is not required for creating
EAR for Oracle FCUBS 11.3.
3-4
7. Launch Oracle FLEXCUBE Universal Banking Solution Installer.
8. Specify the locations of the source and the destination directories.
9. Click ‘Multiple’ button. The ‘Incremental Source’ screen is displayed.
10. You can add multiple source directories using ‘+’ button. You may also delete a row from the
list using ‘-‘ button.
11. Use ‘Browse’ button to browse the source directory.
12. Click ‘OK’ button. The Installer will copy the sources from the multiple locations into the
destination directory. You can have consolidated sources in the destination directory.
Note: In case you have already consolidated the sources manually, then specify that folder as the
sources directory and leave the destination directory blank.
3-5
13. Click ‘Next’. The following screen will be displayed.
14. Click ‘Yes’. If you have checked ‘Load Application Objects’, the Installer loads objects for
SMS, EL, Core and FGL modules. After loading the objects, click ‘Next’. The following screen
is displayed:
15. You can choose to continue or finish. This step completes the database objects compilation
processes.
3.3.3 Loading Data
Once the objects are loaded, you need to insert data into the tables. This task can be completed
in three ways.
Loading Static Data from Shipment media
Importing Data Dump with Data Pump
Import PDATA
For details on loading data, refer to the section ‘2.4
3-6
Loading Data’ in this user manual.
4.
4.1
Setting up ELCM Database
Introduction
This chapter explains the steps to setup ELCM database.
4.2
Creating ELCM Schema by Importing Full Dump
You can create the ELCM schema by way of a full dump import. This is a manual activity. For
details, refer to the section ‘Creating Oracle FLEXCUBE Schema by Importing Full Dump’. You
may follow the same steps for ELCM database setup.
4.3
Creating ELCM Schema from Shipment media
You can create the ELCM schema by loading the objects from the shipment media itself. The
method is described under the following headings.
4.3.1.1 Loading Objects from Shipment media
This section explains the steps to load objects for setting up the ELCM database. Database
installation includes the provision of schema details and source of objects.
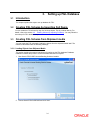
1. Launch Oracle FLEXCUBE Universal Banking Solutions Installer.
2. Choose Oracle FLEXCUBE UBS and click ‘Next’.
4-1
The following screen is displayed:
3. Choose Database Setup and click ‘Next’.
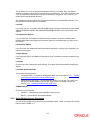
4. Specify the following details:
Application Type
Choose ELCM from the dropdown list.
4-2
Schema
Specify the schema name into which the database components need to be installed.
Password
Enter the password of the schema.
Connect String
Specify the connect string. This is needed for database connectivity.
IP Address
Specify the IP address of the system where the database schema is installed.
SID/Service Name
Enter the SID/Service Name.
Port
Enter the port number.
5. Click ‘Next’. The following screen is displayed:
6. Specify the following details:
Source Directory
Specify the source directory location. The source directory will have the ‘MAIN’ folder and the
contents.
Destination Directory
Specify the destination directory.
4-3
This is optional. If you do not specify the destination directory, on clicking ‘Next’, the Installer
displays a message ‘Sources will be compiled from source directory’. If you want to proceed, click
‘Yes’. The files will be taken directly from source directory for compilation. If you click ‘No’, you
need to specify the destination directory.
(Refer point number 13 under 4.3.2 Using Multiple Source Directory)
The Installer will copy the source files from the source directory to the destination directory. The
files are taken from this location for compilation.
Load DDL
If you check this box, the Installer will load the DDL scripts, types and sequences from the folders
‘MAIN\\DATABASE\Host\DDL’ and ‘MAIN\\DATABASE\Branch\DDL’ to the source folder of the
schema.
Load Application Objects
For ELCM, you need to leave it unchecked.
Load Installer Objects
If you check this, the Installer will load the procedures required for running cyclic compilation, preimport and post-import.
Compile Objects
If you check this option, the Installer will execute the cyclic compilation procedure compiled in the
schema.
Load Data
Check this box after invalids have been reduced. This option can be selected after compiling the
objects
Load Static Data/Load PData
You have the following options:
Load Static Data - For details on loading static data, refer to the section ‘2.4.1
Static Data from Shipment media and Basic Setup’.
Import PData (Data Pump) - If Oracle database version is 11g or later, you need to use
this option. For other versions, you can use ‘Import PData’. For details, refer to the
section ‘2.4.3 Importing Data Dump with Data Pump’.
Loading
CONSOL/DELTA
Choose one of the following:
CONSOL – Choose this for fresh installation of the sources.
DELTA – Choose this for incremental releases
4.3.2 Using Multiple Source Directories
You can specify multiple source directories using ‘Multiple’ button. This is not required for creating
EAR for Oracle FCUBS 11.3.
4-4
7. Launch Oracle FLEXCUBE Universal Banking Solution Installer.
8. Specify the locations of the source and the destination directories.
9. Click ‘Multiple’ button. The ‘Incremental Source’ screen is displayed.
10. You can add multiple source directories using ‘+’ button. You may also delete a row from the
list using ‘-‘ button.
11. Use ‘Browse’ button to browse the source directory.
12. Click ‘OK’ button. The Installer will copy the sources from the multiple locations into the
destination directory. You can have consolidated sources in the destination directory.
Note: In case you have already consolidated the sources manually, then specify that folder as the
sources directory and leave the destination directory blank.
4-5
13. Click ‘Next’. The following screen will be displayed.
14. Click ‘Yes’. If you have checked ‘Load Static Data’, the Installer loads the INCs also. After
loading the objects, click ‘Next’. The following screen is displayed:
15. You can choose to continue or finish. This step completes the database objects compilation
processes.
4.3.3 Loading Data
Once the objects are loaded, you need to insert data into the tables. This task can be completed
in three ways.
Loading Static Data from Shipment media
Importing Data Dump with Data Pump
Import PDATA
For details on loading data, refer to the section ‘2.4
4-6
Loading Data in this user manual.
Setting up Database
[May] [2011]
Version 11.3.0
Oracle Corporation
World Headquarters
500 Oracle Parkway
Redwood Shores, CA 94065
U.S.A.
Worldwide Inquiries:
Phone: +1.650.506.7000
Fax: +1.650.506.7200
www.oracle.com/ financial_services/
Copyright © [2011] Oracle Financial Services Software Limited. All rights reserved.
No part of this work may be reproduced, stored in a retrieval system, adopted or transmitted in any form or by any means,
electronic, mechanical, photographic, graphic, optic recording or otherwise, translated in any language or computer
language, without the prior written permission of Oracle Financial Services Software Limited.
Due care has been taken to make this document and accompanying software package as accurate as possible. However,
Oracle Financial Services Software Limited makes no representation or warranties with respect to the contents hereof and
shall not be responsible for any loss or damage caused to the user by the direct or indirect use of this document and the
accompanying Software System. Furthermore, Oracle Financial Services Software Limited reserves the right to alter,
modify or otherwise change in any manner the content hereof, without obligation of Oracle Financial Services Software
Limited to notify any person of such revision or changes.
All company and product names are trademarks of the respective companies with which they are associated.
4-1