1
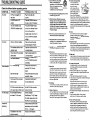
User’s Manual
IMPORTANT: Pack carefully in original package if possible.We are not
responsible for damage incurred in returning items for repair, A letter
stating your exact street addres,daytime phone number,and the problem
you are experiencing should be included. You must also enclose a copy
of the original receipt a sproof of date of purchase
www.pyleaudio.com
300W iPod/iPhone 2.1 Soundbar Docking System
with Aux-In and Video Output
iPhone Docking System
www.pyleaudio.com
IMPORTANT SAFETY INSTRUCTIONS
GENERAL SPECIFICATIONS
Power Source of Remote Control: ...... DC =-=-= 3V, 2 x MA size batteries (Included)
Power Consumption: ..... .. ... ... ... ....... ... ..... ...... ....... ........................... 300 W
Audio Power.
c.wnotf: TO RBJUCf. TH! dK OF!l.!C'TRtC SHOCK, DO NOT
RaKJl't'ECOY!R (OR IIACIQ. NO UIER IER'''CEABLE
JIIUtn ICII:JE.Im'O I8MCaNO TO QUALI'ED
Woofer .............................................. .......................... 150W
Loud Speaker .... ... .... .. ... ....... .. ................ ....... ....... ..... 75 W x 2
....... - .
WARNING
USE UNDER SUPERVISION OF AN ADUl.11lUE TO LONG CORD
11111 una hu I long AC ..1Il 0' oIhor long ..1Il1h11 Cln oally be tripped on or pullod on, Clullng Injury, PI_ maulu"
II is Irrangod .. a will not dllpe OYI' IlIblolop,otc. Wh... a con be pullod on by chlld"n 0' tripped ..., accldlnllily.
FCC NOTICE:
This equipment has b..n t.IWd and found to comply
with the limits for a ClUI B digital dablCII, pursuant to
part 15 of the FCC Rul... The.. limits a,.. designed to
pr0vid8 rwaidantial prtJtection against harmful
interference in 11 relkI..,tlallnttaliation. ThIs equipmllnt
generatH,u"s and can I1IIdiat8 radio fr.quancy anergy
and,if not Installed and UMd In accorclafICI with the
instrucIion$,may cau •• harmtullnt.rter.nc. to radio
c:ommunicationl.
HowIrver ,tIwrw is no guiWW'ltM that i~ wi l not
oa::ur in 8 partk:ular inltiJlltion. !t on equiprneri. don
cause harmful interflnnQe to radio or taecision
1'BC8ption. wNch (WI be dNm1iMMi by Iwning'"
aquipmalt orr and on,1M
enc:cuaged to try to
oonvct the i ~ by one or men of the foIowing
UMf"
""""'"""
• Reorient or rvlocate ttl. recelvi\g anl8nn• .
• InmNlse the separation between the equipment and
recaiY8r.
• Connel the equlprrMmt Into an olJUet on a circuilr
dilferant from that to which Itt. receiver is connected.
• Consun the deeler or an experienced radiolTV
technician for help.
FCC NOTICE:
To assure oontlnued compliance, follow the atlAllched
installation instructions and UN only . hlelded cables
when connecting to other davlcas. Modlftcation. nat
authorized by the manufacturer rrwy void u...... authority
to operate this davica.
Before usinl the unit, be SUN to.-d all opermlnl
instruc:tion. earm!!ly. PI. . . note that th. . are pneral
pl\l!Clllutlons and may nat pertain to your unit. Far I!X:IImple,
this unit may nat haw the capability m be mnnected to an
outdoor antennL
1. Read these Instructions
2.1C.ap theM in.structions
1. Heed .. wwninp
... FoIow .. imtnK:IicJn.
Accessories:
1 x Instruction Manual
1 x Remote Control
2 x "MA' size batteries for remote control
1 x 3.5mm mini plug audio connection cable
5. Do not use this apf*8I:US ""WIIIar
6. Clean only with dry doth
7. Do not bled any ventilation opanlnp. Install In
acc:ordance with the manufacturer'. Instructions.
a. Do not Install nar any h.t .OIIKH such as radiators,
heat I'8f:iatenl, st:av., or ath.r apparatus Qndudinl
IIImplifiers) thu produca h.L
9. Do not dafeat the uNty purpo.. of the polarized or
poundinl-type plul. A polarized plul has two blades
with one wider than the ot..... alftlundinl type plul
ha. two 1Md. and a third pundln. pron.. the wide
blade or the third pro. a,. provided for JOUr uNty.
ifthe pl'OYided plu, does not fit into your outlet, consult
an eledridan for replacamant of the obsolete outlet.
10. ProCect the power cord from bel,. wabd on or pinched
pardcuIarty at pt.'P. mIWI\ancI'&cap I ,and the
point wt.. tt.y aitfTvm the appMStua.
n . Only ... atiKhmania/.-=
ric spMifiad by
the man..r.ct..w.
10
12. Use only with the cart, stand. tripod.
TROUBLESHOOTING GUIDE
braclm. or tabl. spec:1fIed by the
Check the follows before requesting service
SYMPTOM
POSSIBLE CAUSE
Nopower
AC Plug not plugged into
POSSIBLE SOULTION
Plug ~ to 1he wal oude!
WIll outlet
property
POWER 5'Mtx:h it OFF
Press 1he POWER 5'Mtx:h on
1he rear 01'..,1 to ON position
Press 1he STANDBY Button
position
The unit In standby mode
(STANDBY Indicator is light)
on the unit or Remote Control
to tum on 1he unn from
standby mode. One of AJJX 1;
AUX 2; i~Phone Indicator
wililighl
No Sound
Volume in minimum position
The connected device is not in
playback mode
Rise volume level by press
the VOL (Volume) + Button
Plays 1he music/movie In the
connected device
Sound output of the connected
device weak
Inplt SOUt:8 incooact
Rise 1he volume level 01' the
comected device
Set 1he Inplt SOUt:8 to AUX 1,
AUX 2 or Pod/Phone as the
00I11eCti1g
SolO1ddi_
No video output
Volume
_100 high
Reduce 1he volume level by
press the VOL (VoIume)-
Bass level too high
Button
Reduce the bass level by press
the BASS - Button
Volume level of the oonnected
device too high
Reduoe the volume level of
the oonnec1ed device
EO of 1he oonnected device was
set to super bass or others mode
Set the EO of the oonnected
device to normal
Set the comected
iPodfIPhone to TV OUT Mode
The oonnected i~Phone
Is not set 10 TV out mode
(For detais, please refer to 1he
Pod/Phone's US81's Manual)
Poirt 1he ramcIa control 10 1he
RemoIanot
functioning
The batteries in 1he ",mole
oontrol are used up
9
®
12. outdoor .manna FOundln.
Ifan outside antenna is
connected to the product,
be sure the antennil
system is grounded 50 as
to provide some protection
against voltage surges and
built up static charges.
Section 810 of the National
Electrical Code, ANSI/NFPA 70, provides information
with respect to pro~ to grounding of the mut and
supporting structure, ,roundin. of the k,ad·jn wire to an
antenna dtscharge product, size of grounding conductors
location of amennadischilrge product. connection to
grounding electrodes and requirements forthe groundin.
electrodes.
manufactu ... or .old with the apparatus.
When a cart is used, use caution when
movinl the Cl.l1/apparatus
........ Ott ... m"·
combln.tlon to avoid injury from tip-ovw.
13. Unpl", this .pparatus durin.lilhtninl storms or when
unuad far lon, periods of'tlme.
, .... R.r.aI a.vidnr &0 qlAlliH.d..me. petSOnrMl
ServklnJ It requl,., when the appwatus has been
ctam.pd in.",..." such u power...... ppIJ cord or
"'" ~ damapd, .... kI has " - ......... objods
have faller! into the apparatus, the apparatus has beeft
expoHd to ...'n or moisture dGel not operate normally.
or h.. bMn dropped.
23. Service
Do not attempt to service this product yourself as
opening or remOVing covers may expose you to
dangerous voltage or other hilZards. Refer all servicing
to qualified service personnel.
15. The malnll plug III uaed 88 the disconnect devlce,the
dleconnect device ahall remain readily operable.
16. The apparatua shall not be exposed 1D drtpplng or
apl8llhlng and that no obJecta filled wHh liquids, such as
vases, ahall
~
204. Rep"ment parb
When replacement Pilrts are required, be sure the service
technician uses replacement parts specified by the
manufacturer or those that have the same characteristics
as the original part. Unauthorized substitutions may resu
in fire or electric shock or other hazards.
placed on the apparatus.
17. WARNING, To reduce the risk of nre or electric shock,
do not expol8 this apparatus to rain or moisture.
1&. Power Source
The product should be operated only from the type of
power sourc:t! Indicated on the marting label. If you are
not sure of the type of powe!" supply to)'OUr home.
consult your ap~iance dealer or local power company.
For products Intended to operate from battery power,
or other SOUtttS. ~r to the operating instructions.
25. S.r.ty check
Upon completion of any SeMce or repairs to this product
ask the service technician to petfonn safety cheds to
determine that the product is in proper operating conditi
26. Dam... NqU1ri"l . . . .
Unplug the product from the wall outlet and refer
servicing to qualrfied service personnel under the
followina conditions:
a. When the power-supply cord or plug is damaged.
b. If liquid has ~n spilled or objects have fallen into the
product.
c. If the product has been exposed to rain or water.
d. If the product does not operate normally by following the
operating Instructions.
Adjust only those controls that are covered by the
operating instructions, as an adjustment of other
controls may result in damage and will and require
extensive wort by. qualified technidan to restore in the
product to Its normal operation.
e. If the product has been dropped or the cabinet has been
damaged.
f. When the product exhibits a distinct change in
performance - this indicates a need for service.
19. Pawl, lin.
An outside antenna system should not be located in
the vicinity of overheild power lines or other electric
light or power circuits, or where it an filII into such
power lines or drcults. When installing an outside
antenna system, extreme care should be uken to keep
from touching such power lines or circuits as conuct
with them might be fatal.
20. OverIoadln,
Do not overload wall outlets ilnd extension cords as this
can result In a risk or fire or electric shode.
21. Object and liquid entry
Nl!Ver push objects of any kind into this product through
as they may touch dangerous voltage points or short out
parts that could resu lt in fire or electric shock.
Never spill or SP"y any type ofliquid on the product.
27. Note. CATV qdIIm inmJler
This reminder 15 provided to all the CATV system
Installer's attention to Article 820-4Q of the NEe that
provides auldellnes for proper grounding and, in
particular, specifies that the able Cround shall be
connected to the Crounding system of the building, as
close to the point of cable entry as practical.
remote sensor on the unit within
16 feet ,+/- 30 degree
Replace by new batteries
2
LOCATION OF CONTROLS
OPERATION
1. VIDEO OUT Jack
2. AUX 1 Input Jacks
3. POWER ON/OFF Switch
4. AUX 2 (Input) Jack
5. VOL (Volume) - Button
6. VOL (Volume) + Button
7. iPod / iPhone Indicalor
8. AUX 2 Indicalor
9. AUX 1 Indicator
10. STANDBY Indicator
11. t!J Standby ON/OFF
Bullon
12. ~(Skip/Fast Search Backward)
Bullon
13. HI (Play/Pause) Button
14. ~ (Skip/Fast Search Forward)
Bullon
15. SOURCE Bullon
1. Press the POWER Switch on the rear of unit to ON position to power on the unit.
The STANDBY Indicator will tum on.
2. Press the STANDBY Button on the unit or Remote Control to tum the unit on from
standby mode. The STANDBY Indicator will tum off but the selected input source's
indicator will tum on.
3. Presses the SOURCE Bullon on the unit or Remote Control repeatedly to select
the input source as the connections to AUX 1 (AUX 1 Indicator will tum on); AUX 2
(AUX 2 Indicalorwill tum on) or iPodnPhone (iPodIiPhone Indicalorwill tum on).
4. Press the VOL (Volume) +/- Bullons to adjust volume level.
5. Press the BASS +/- Buttons on the Remote Control to
increase/decrease the bass level.
6. Press the MUTE Button on the Remote Control to tum off the sound temporary,
press again to tum it back.
7. When finished, press the STANDBY Bullon on the unit or Remote Control to tum
the unit off (standby mode).
8. If the unit is not used for a long period of time, tum off unit using rear master power
switch. All top ready lights will go off.
o
o
o
... . . . . . . . . . . . . . . . . . . . . . . . . . . . . .·;;;;;·CJ
~
o
o
0
side panel
[I~I)
~:::::: ::::::>..
.........;:::::: :::::::::
9······ ·':.O··ij'b"b @f 0 " 0
10 ....••• "__,..'&11'......- _ '" •••••••• 6
=
=
11
··· ... ... ...
=
=
12
=
=
13
=
=
=
=
14 15
top panel
NOTES
1. When iPod or iPhone connected, it will recharge automatically.
2. During playback the musiclvideo files from iPod or iPhone:
A. Presses the Skip/Fast Search ~ or ~ Bullons repeatedly to skip the tracks
forwardnbackward.
B. Press and hold the Skip/Fast Search ~ or ~ to fast searching the specific
section of the track forward/backward.
C. Presses the REPEAT Bullon on the Remote Control to set repeat modes,
correspond icons will ooeur on the connected iPodnPhone's display.
D. Press the RANDOM Bullon on the Remote Control to tum the random playback
mode on or off , correspond icons will occur on the connected iPodIiPhone's display.
E. Press the MENU Button on the Remote Control, the setting menu will appear on the
connected iPodnPhone's display. Using the Direction'" /",; Skip/Fast
Search ~, ~ Bullons to move the cursor within the display, press
the ENTER Bullon to confirmed the selections.
SYSTEM CONNECTIONS
REMOTE CONTROL ·LOCATION OF CONTROLS
To watching the video files in the connected iPodflPhone:
1. Connected the externallY to the Video Out Jack on the rear of unn as the figure
below (connection cable not included).
2. Set the lY to AV 1 or AV 2 modes as connection.
3. Plug the iPod/iPhone to the iPod/iPhone docking on the top of unn.
4. Press the source button repeatedly until the iPodflPhone indicator is lighted.
5. Plays the video files in the connected iPod/iPhone as usual (Make sure it is set to
lY oul For details, please refer to the iPod/iPhone's Use~s Manual).
•
•
2
1
3
4
7
6
2
8
9
5
-0
•
~
TV
To Video Input
•
•
· 11
•
side panel
12 .
o
(Connection cable not included)
-0
~
(Connection cables not included)
•
Audio Out Jacks I
side panel
I
on theTV/DVD/1
VCRlDVRI
o
1. STANDBY Button
2. Direction .... I ... (UpIDown) Button
3. MUTE Button
DVD
To listening the music from "TV; DVD Player; VCR or DVR .
1. Connected the exiemallYlDVDNCRlDVR to the AUX 1 Jack on the rear of unit
as the figure above (connection cable not included).
2. Power on the connected external device and plays videa/music as usual.
3. Power on the unn, presses the SOURCE Button repeatedly until AUX 1 Indicator is lighl
7
4.
~ (SkipflFast Search
Backward) Button
5. HI (PlayflPause) Button
6. ~ (SkipflFast Search Forward) Button
4
7. RANDOM Button
8. REPEAT Button
9. SOURCE Button
10. [31 (Enter) Button
11. BASS +1- Button
12. VOL (Volume) +1- Button
BATTERIES INSTALLATION
SYSTEM CONNECTIONS
1. Slide and lifting the battery door as figure 1 below.
Listening the music from extemal audio device or iPod/iPhone:
2. Installed 2 (two) AAA size batteries (included) into the battery compartment as
1. Plug the iPod/iPhone to the iPod/iPhone docking. Or, Connect the external audio device such
the polarity makings inside as figure 2 below.
like MP3 Player to the AUX 2 Jack on the top of unit as the figure below:
3. Replace the battery door as figure 3 below.
2. Power on the unit, press the SOURCE Button repeatedly to set to AUX 2 or iPod/iPhone as
the connection.
I:
'-
3. Plays the music in the connected audio device or iPod/iPhone as usual.
0.111111111" °
:::co,
_~
If
1\
0
:c
IIPI==
" =====':ill
II-
2
0
111111111"
3
BATTERY PRECAUTIONS:
Follow these precautions when using a battery in this device:
1. Use only the size and type of battery specified.
2, Be sure to follow the correct polarity when installing the battery as indicated in the battery
compartment. A reversed battery may cause damage to the device.
3. Do not mix different types of batteries together (e.g. Alkaline and Carbon-zinc) or old batteries
with fresh ones.
4, If the batteries in the device are consumed or the device is not to be used for a long period of time,
remove the batteries to prevent damage or injury from possible battery leakage.
5. Do not try to recharge the battery not intended to be recharged; it can overheat and rupture.
(Follow battery manufacturer's instructions.)
6, The batteries shall not be exposed to excessive heat such as sunshine, fire or the like.
7, Clean the battery contacts and also those of the device prior to battery installation
EFFECTIVE DISTANCE OF REMOTE TRANSMITTER
NOTES:
• When there is an obstacle between the unit and
MP3
the transmitter, the transmitter may not operate.
•
top view
pc
To the Phones/Aux Out/Line Out
Jack on the external audio device
When direct sunlight, an incandescent lamp,
fluorescent lamp or any other strong light
shines on the REMOTE SENSOR of the
A~~rox,16Ieel
unit, the remote operation may be unstable.
30°
30°
j