1
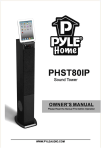
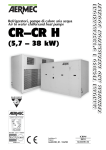
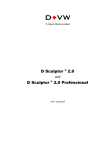
PHST80lP
Sound Tower
OWNER'S MANUAL
Please Read the Manual First before Operation
Operating Instruction
2. Back Paael Connection
&
_.-
b@J1
PHST8DIP
~!
~
000
000
=
[QJ
· 0
111111
Component Video Out fur iPodJiPhoneliPad ....-
I
.- ~
. 1-" 0
'ilIJ[]l
111-
j0
---~
TV
LJ
«(
Puwer
AC 120V-24OV 'OHv'60Hz
Front Panel Function
..
a
PHST80IP
Saund'lbwar
.."
tPod
"",.
'"
(t.
Ii
",.
' O-
I. Master volume adjust selector.
2. LED display.
3. Input mode selector.
4. Sleep mode selector.
~
s"'"
"
~
~
III
Remote Control System
1. Sleep mode control selector
2. Mute mode control selector
3. Input mode selector(iPod, PM, AUX)
4. Tuner control area
S. iPodIiPhoneliPad control area
6. B888 volume adjust selector
7. Treble volume adjust selector
8. Clock selector
9. Alarm selector
10. SWvolume adjust selector
11. Adjust settings
12. Alarm onIoff selector
13. Return to the previous menu when select
the clock/alarm.
Battery Installadon
Since the remote control will be used for many units to control operations, you should begin by installing
the supplied battery:
1. Tum the remote control over and pull out the battery comparbnent cover.
2. Insert the battery according to the battery comparbnent
3. Close the battery compartment cover.
4. Test the unit by pressing Mute or any mode key. If the battery is inserted correctly, the system will
response to the instruction.
Note
• Do not leave the remote control in an extremely hot or humid place.
• Do not expose the remote sensor to direct sunlight or lighting apparatuses. Doing so may cause a
malftmc1ion.
• If you do not intend to use the remote control for an extended period of time, remove the batteries to
avoid possible damage from batteIy leakage and corrosion.
• If you find that the remote control can be used at a normal distance to the main unit, then the batteIy
could be weak, so you need to replace the battery with a new one.
• Ifbattery leak, remove it immediately, and properly dispose it Avoid touching the leaked material and
splashing it to clothing, etc. Clean the battery comparbnent thoroughly before installing new battery.
Basic Operation
Power Up the System
Connect theAC adaptor and torn on the "power" in the back panel, the system will open automatically.
Select Sleep Mode
Sleep mode allows you to make the system sleep at a selected time.
1. Press" O "key or press the sleep button on the front panel to select an amount of time before the system
shuts off: 5, IS, 30 minutes or off.
2. Wake up the system by pressing the same key when the system in the sleep mode .
Muter Volume Control
2
00
Press the " 0 " or the" Vol- w.-"K.ey on the front panel to adjust the main channel volume.
How to Adjullt Treble
!!
Press the " 0 " to adjust the treble volume.
How to Adjust BaIS
~
Press the "0 " to adjust the bass volume.
How to Adjust sw
9
Press the " 0 " to adjust the SW volume.
How to Play AUX
Make sure AUX lines are well-connccted, Press the
or" I~ II key to choose the AUX input mode.
How to Play iPodJiPboneliPad
l,iPod/iPhoneliPad connection
Insert iPodIiPhoneliPad into the docking socket. The system will tum to "iPod" input mode automatically.
When you move out of the iPodIiPhoneliPad. it will return to the previous input mode.
2.iPodIiPhoneliPad Con1ro1
At the middle of the remote control there is an area designed especially for iPods/iPhoncliPad player.
Controls the play and pause function of the iPod/iPhone/iPad player.
"45 "
"9. ":
"99 " :Press and hold for 2 seconds to Fast Forward or Fast Reverse.
"99 " :Controls the iPodliPhoneliPad player to play the previous or the next song.
n
~
" :
Selects the previous file of the iPodliPhoneliPad player.
. g ":Selects the next file of the iPodIiPhoneIiPad Player.
.. g ": Selects the iPodliPhoneliPad player to return to the previous submemL
. i ":Controls the iPodIiPhone/iPad player to enter next submenu.
.. "~ " : Selects the repeat mode on the iPodliPoneliPad.
...~. " : Selects the random mode on the iPodiiPone/iPad.
"..POol" : Selects the iPodliPoneIiPad "video out" on or off.
How to Play 1'uD.er
I.S.lect FM Input Mode
Press the "0 "or" I~" key to choose the FM input mode. The LED will display the last turner
frequency. for example: 87.5.
2.Listen to the Preset Program
q -9 "
Press the number keys"
to select the radio program that you already saved. Once
selected. screen will display the radio program's frequency in the memory area.
3. Select Program
Press the " 0
/ 0 "key to adjust the band of tuner. Press the " 0 /0 .. key fur 2 seconds. the FM will
search au~ti:ny. Then you can press the
".!!./,!!. "key on: t;;top the function.
4.Memory Program
When you receive a clear radio program and want to save the channel, press one of the "c;t number key for 2 seconds to assign that number key to that channel.
9 "10
.5.
How to Adjust the Clock
,2
Press " @) "key to enter the clock. adjustment menu. Then you can adjust the hours by press " 0 II key.
After hours setting. press II @ II key to adjust the minutes, after minutes setting. you can press " @ "key
to confinn the setting, or Press " a:> II key to return the holD's adjustment menu.
How to Adjust the Alarm
1.Alann Setting
'The a1ann setting has the same operation as the clock setting.
2.ThmonioffAlann
key to tum on or off the alarm. When the alarm is on,
After setting the alarm time, you can press ..
you also can press" g " key to tum off the alarm. Then the system will tum to last input mode.
2 ..
How to Mute
Press
"0''' key to turn sound off/on. Press again to restore the audio to the original level.
Trouble Sbooting
Problem.
The system has no power.
No sound at all.
Poslible Reasons/solutions
.. The AC adapter is connected incorrectly.
.. The socket has no power.
.. Incorrect selection of input signal.
.. If mute state :is turned on.
.. Sound source machine is not powered.
Either of the main channels has
no sound..
LED screen displays abnonnally.
.. The signal plug is connected incorrectly or
lines are short-circuited.
.. It may be effected by exterior strong disturbance,
tum off first and then tum on again.
.. Avoid direct sunlight/heat
PYLE MISCELLANEOUS PARTS
MISC ACCESSORIES