1
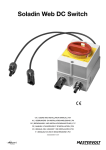
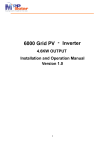
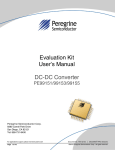
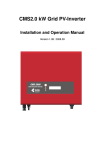
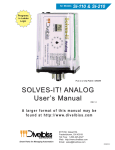
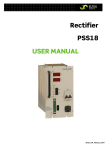
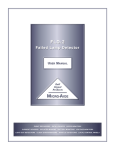
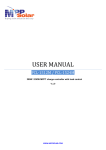
USER MANUAL MPI-1500/2000/3000/4000/6000 Series GRID-TIED SOLAR INVERTER 1.5KW ~ 6.0KW V.1.2 WWW.MPPSOLAR.COM WARNING: ONLY A CERTIFIED ELECTRICIAN OR TRAINED ASSEMBLING PROFESSIONAL SHOULD OPEN OR INSTALL THE INVERTER. Before you start… Thanks for purchasing MPI series grid-tied inverter. The MPI series inverters are highly reliable products with innovative designs and strict quality control. This manual contains important information of installation, operation and safety reminding of this unit. Be sure to read this manual carefully before using this product. If you encounter any problem during installing or running this unit, please check this manual first before contacting with your local dealer or representative. Most of the problems you encountered will be solved according to the instruction inside. Thank you for purchasing our product again. Please keep this manual in safe place for later use. 1 Safety instructions 1. Risk of Electric Shock Do not remove the covers. No user serviceable parts inside. Refer service to qualified service 2. personnel. Both AC and DC voltage sources are terminated inside this equipment. Each circuit must be individually disconnected before servicing. 3. When a photovoltaic array is exposed to light, it supplies a DC voltage to this equipment. 4. Risk of electric shock from energy stored in capacitors. Do not remove cover until 3 hours after disconnecting all power sources. 5. 6. This unit is designed to feed power to grid (utility) only, do not connect this unit to AC power supplier. If connecting to those facilities, AC power supplier will be damaged. Please take out the unit from packaging box carefully. Check if there is any outside damage. If you find any damage, please contact with your local dealer. WARNING: HIGH LEAKAGE CURRENT! THE EXTERNAL PROTECTIVE EARTH (PE)-TERMINAL MUST BE CONNECTED TO THE PE-CONDUCTOR BEFORE CONNECTING SUPPLY. 2 1. Overview MPI-1500, 2000, 3000 Series (1.5KW~3KW) LCD DISPLAY RED LED (FAULT) FRONT VIEW BLUE LED (WORKING) USB LCD DISPLAY BUTTON RS232 AC CONNECTOR INPUT DC SWITCH EXTERNAL PROTECTIVE BOTTOM VIEW EARTH (PE) TERMINAL SOLAR PANEL DC INPUT COMMUNICATION SLOT FOR SNMP & RS485 (OPTIONAL) 3 MPI-4000, 6000 Series (4KW, 6KW) FRONT VIEW (MPI-6000) FRONT VIEW (MPI-4000) LCD DISPLAY BLUE LED (WORKING) RED LED (FAULT) LCD DISPLAY BUTTON BOTTOM VIEW (MPI-4000) AC CONNECTOR COMMUNICATION SLOT FOR SNMP & RS485 (OPTIONAL) INPUT DC USB RS232 SOLAR PANEL DC INPUT EXTERNAL PROTECTIVE EARTH (PE) TERMINAL BOTTOM VIEW (MPI-6000) 4 SWITCH 2. Installation Before starting installation please check the following items: This unit is designed for indoor and outdoor usage. But the unit cannot be exposed under rain or water directly and using a shelter to protect the unit would be recommended. Do not expose this unit to the sun directly. This may reduce the output power due to high temperature. Check the ambient temperature of installation is within specification (-25~+55°C). The grid to which the inverter is connected must only be 230V system. The connection to grid is approved by utility company. The installation must be done by qualified personnel. Though MPI inverter can be installed where temperature up to 50°C, we still strongly recommend that it should be installed where ambient temperature in the range of 0~40°C. Mount MPI inverter to the wall 1. Select a wall or solid place can support the inverter. 2. Convection cooling space required. To dissipate the heat generated by inverter, 25cm space at least on the top and bottom is necessary. 3. Mark the hole position according to following table or mounting template attached. 5 W (mm) H (mm) MPI 1500 347.6 257 MPI 2000 347.6 257 MPI 3000 347.6 257 4. Drill the holes with screw. 5. Hang the inverter on the 4 screws. 6. Drive “fix screw” on bottom leg to fix the inverter. MPI 4000 546 257 MPI 6000 546 327 Be sure to check the mounting of inverter. Try to lift up the inverter on the bottom, make sure it is firmly attached. Select the installation location carefully. The height of inverter should be visible, so that user can check 6 the inverter status easily; the wall must be strong enough to support the inverter to prevent vibration while in operation.. Connect to grid (AC utility) 1. Check the grid (utility) voltage and frequency, 230VAC (or 220VAC), 50/60Hz, single phase. 2. Open the AC breaker or fuse between AC wire and utility. 3. For 1500/2000/3000/4000 series, connect AC wires as follows: Disassemble female socket. Connect AC wires to connection socket as indicated below: Female insert with Shell coupling ring AC wire inserting direction Pressing Pinch ring screw Insert Line wire to L, Neutral wire to N and Ground wire to pin Assembly the socket again. Insert the whole socket set to inverter. 7 4. Twist the coupling ring to receptacle on inverter. Make sure it is perfectly matched. For 6000 series, connect AC wires as follows: Disassemble female socket and turn on the lock key 1. Connect AC wires to connection socket as indication: Insert Line wire to 1 or L, Neutral wire to N and Ground wire to pin Assembly the socket again and turn off the lock key 1. Insert the whole socket set to inverter and turn off the lock key 2. Female insert with coupling ring Pressing screw Lock key 1 AC wire Lock key 2 Pinch ring inserting direction 5. Twist the coupling ring to receptacle on inverter. Make sure it is perfectly matched. Suggested wire size for AC cable: Model AWG no. φ (mm) MPI-1500 ≥1.29 ≤16 MPI-2000 ≤16 ≥1.29 MPI-3000 ≥1.72 ≤14 MPI-4000 ≥2.05 ≤12 MPI-6000 ≥2.85 ≤8 Connect to PV array (DC) MPI-1500/2000/3000 8 MPI-4000/6000 1. 2. 3. 4. 5. Turn off the DC switch. Make sure the maximum open circuit voltage (Voc) of each PV string is less than 500V UNDER ANY CONDITION (MPI-6000 is 600V). We recommend use PV array which Voc is less than 430VDC under 25°C ambient. Use MC (Multi-contact or Tyco) connectors as PV array terminals. Connect positive from array to (+) terminals and negative to (-) terminals. Each DC terminal on Inverter can withstand 20A DC current at most (6000 is 30A). Turn on the DC switch. Note: Before connecting to DC terminals, please make sure the polarity is correct. Incorrect connection will damage the unit PERMANENTLY! Checklist: 1. After connecting DC1, the message on the LCD display should be in the sequence of “INV WaiGng” → “No Utility” and the RED fault LED keeps on. 2. Close the AC breaker or fuse in previous section, check whether the inverter starts to work. 3. If inverter works normally, the LCD will show “Working mode”. That is the power feed to grid. 4. The checking is completed. 1 AC is not yet connected at this point. 9 3. System diagram 1. 2. A sample grid-tied PV system is indicated in figure below. PV array: Provide DC power to inverter. 3. Inverter: Convert DC power from PV array to AC (Alternative Current) power. Because MPI inverter is a grid-connected inverter, it works to control its current amplitude according to power provided from PV array. The inverter will always try to extract maximum power from PV array. Connection system: The “interface” between Utility and inverter. It may consist of electrical breaker, fuse and terminals for connection. To ensure safety, this part must be performed by qualified technician. Utility: It is also call “grid” in this manual. The way your power company provides power to your home. Please note that MPI inverters can be connected to low-voltage system (220, 230VAC) system 4. 5. only. 10 4. Inverter status MPI inverter is designed to be user-friendly; therefore, the status of inverter can be easily shown by panel display. All possible information is shown in the following table. LED Display There are 2 LED’s on Inverter, one is blue and the other is red. 1. Power on (Blue LED): It lights up when Inverter is working. 2. It will be dark when fault mode or shutdown mode. Fault (red LED): Once this LED lights up, it means inverter meets “fault” or “failure” conditions. The detail conditions can be found in the table below. LCD Display (A) Under normal conditions, LCD will show “Working Mode” as inverter is working. (B) When LCD shows “Working Mode”, press button over 3 sec., LCD will show “Setting” then enter setting function mode: LCD Contrast setting > press button over 3 sec. to enter Press button to select: Contrast 1 to Contrast 5 Then press button over 3 sec. LCD will show “Setting”, Contrast setting is OK. LCD Language setting > press button over 3 sec. to enter Press button to select: English or French or German. Then press button over 3 sec. LCD will show “Setting”, Language setting is OK. If user doesn’t touch button over 5 sec., LCD will escape setting function mode. (C) In “Working Mode”, you can toggle button to enter meter value mode, LCD will show general meter value by turns: O/P WATT = PV VOLT = GRID VOLT = GRID FREQ = O/P CUR = xxx KWH (O/P energy) RATING= xx KW (PV Inverter Rating) M CPU Ver. xxx (Firmware version of Mater CPU) S CPU Ver. xxx (Firmware version of Slave CPU) 11 1). If user doesn’t touch button over 5 sec., LCD will escape meter value mode and shows “Working Mode”. 2). During meter value mode, if user presses button over 5 sec. the screen will “Freeze” (Lock). 3). If screen freezes (Locked), user presses button over 5 sec. and the screen will “Unfreeze” (Unlock). (D) Error Message: No Utility PV Over Voltage No AC Line PV Voltage is too high DC Bus High DC Bus Low DC bus voltage is too high DC bus voltage is too low Over Temperature Temperature is too high Grid Fault Device Fault Isolation Fault Impedance Fault Ground I Fault Relay Failure DC INJ High Ref 2.5V Fault DC Sensor Fault GFCI Fault Sci Fault Consistent Fault CPU Ver. Mismatch EEPROM Fault Grid V Mismatch Grid F Mismatch Grid Z Mismatch GFCI Mismatch DC Curr Mismatch Grid Voltage or Grid Frequency is wrong Hole sensor, GFCI Device or AD Reference Voltage Fault PV Panel isolation problem Grid Impedance Fault Output ground leakage current too high Output Relay Fail Output DC injection too high 2.5V reference voltage inside problem Output DC sensor abnormal GFCI detection problem Communication between Master and Slave problem The value of Master and Slave are mismatch Firmware Version of Master and Slave are not the same EEprom problem The Grid V of Master and Slave are mismatch The Grid F of Master and Slave are mismatch The Grid Impedance of Master and Slave are mismatch The GFCI value of Master and Slave are mismatch The Output DC current of Master and Slave are mismatch Message table in English Operating conditions Power off Standby Initialization & waiting Display message Description Normal working status No display PV inverter is totally shutdown, IPV <=90V. INV Standby 90V< Input voltage < =100V. Input voltage range 100~150V during start-up. INV Waiting After PV voltage is higher than 100V, inverter is waiting for feeding to grid. 12 Check grid Feeding grid, MPPT Updating Master CPU firmware Updating Slave CPU firmware Instantaneous Output power Accumulated energy information Grid voltage Grid frequency AC feeding current PV panel voltage Isolation failure GFCI (Ground Fault Current Interrupter) active Grid failure Abnormal Grid Impedance No grid utility voltage DC-Input voltage too high Consistent failure Bus failure Device failure Temperature too high When PV voltage> 150V, inverter is checking feeding conditions. Working Mode Inverter is feeding power. The internal program is updating Master CPU Master Flash through RS232 interface. The internal program is updating Slave CPU Slave Flash through RS232 interface. Monitoring parameters O/P Watt=xxxxW The real time output power in xxxx W. Total energy which has been feed to grid since xxxxx KWh inverter was installed. GRID VOLT=xxx.xV Grid voltage in xxx.x VAC. GRID FREQ=xx.xHz Grid frequency in xx.x Hz. O/P CUR=xx.xA AC grid current amount in xx.x A. PV VOLT=xxx.xV Input voltage from PV panel, xxx.x VDC. System fault Earth fault of the PV-panels or failure of surge Isolation Fault voltage protection. Testing Ground I Fault Current on ground conductor is too high. Grid measured data is beyond the specification (voltage & frequency). Grid Fault 1. Grid impedance higher than the permissible Impedance Fault value. 2. Grid impedance change is higher than limit. 1. Inverter is not connected to grid No Utility 2. Grid is absent. DC-Input voltage higher than the permissible PV Over Voltage 500V. Inverter failure The readings of 2 microprocessors are not Consistent Fault consistent. It is probably caused by CPU and/or other circuit not functioning well. DC Bus High DC-Bus voltage too high or too low. DC Bus Low Device Fault The device is unable to return to normal status. The internal temperature is higher than specified Over Temperature normal value. 13 5. Communication MPI inverters are equipped with power communication interface and options. User can use “Solar Control” software to monitor the status of inverter with PC. Also, qualified personnel can upgrade the F/W (firmware) inside through RS232 port. 1. RS232: To use RS232 port, you have to remove the RS232 cover on bottom side of Inverter. It is a DB9 socket, the pin definition is : Pin 1 2 3 4 5 6 7 8 9 Assignment Description N.C. TxD RxD N.C. Common N.C. N.C. N.C. N.C. N.C. means “No Connection” 2. 3. Optional communication slot: This slot is a very useful feature for future expansion. Inverter can accept interface cards specially designed for the slot only. There are 2 kinds of cards can be applied now. One is RS485 card and the other is SNMP (Simple Network Management Protocol) card. In the future, extension cards such as data logger or others may be developed. For card detail information, please refer to use manual of individual card. F/W upgrade: To keep the firmware newest, one can use RS232 port and special program to upgrade inside F/W. To do this, please contact with your local representative. WARNING: END USERS ARE STRONGLY NOT RECOMMENDED TO UPGRADE THE F/W HIMSELF. IMPROPER PROCEDURE MAY RESULT IN INVERTER FAILURE. 14 6. Troubleshooting In this section, troubleshooting techniques are listed to assist technicians in understanding the nature of a problem and deciding a proper action. Tools needed: 1. Digital Multi-Meter: For checking DCV, ACV, ACF (AC frequency) and open-short circuit. 2. Screwdriver: For removing unit form bracket and disconnect wiring 3. 4. This manual. Laptop computer with the installation of solar control and firmware upgrade program. 5. 6. Standard RS232 cable. Oscillate Scope (optional). Fault condition message in English Fault Display Possible actions 1. Check the impedance between PV (+) & PV (-) and earth ground. The impedance must be larger than 8MΩ. Isolation Fault 2. If above action is useless, the isolation detection circuit fails, replace one unit. 1. This is caused by too high ground current. 2. Unplug PV generator from the input, check AC peripheral system. Ground I 3. After the cause is cleared, plug PV input again. Check the status of Fault the inverter. 4. If above actions are useless, the GFCI circuit fails, replace one unit. 1. Wait for 30 seconds, if the grid come back to normal, inverter will start again automatically. Grid Fault 2. Make sure grid voltage and frequency meet the specifications. System 3. Use solar control to adjust operation range. fault 4. If above actions are ineffective, replace one unit. 1. Grid impedance higher than the permissible value. 2. Wait for 30 seconds, see if it works again. 3. Check the wires between inverter and grid. Change larger wires if Impedance necessary. Fault 4. Adjust impedance parameter by solar control program. 5. If useless, the impedance circuit inside failure, please replace another one. 1. Grid is not connected; check the AC connection by multi-meter. 2. Check grid connection, such as wire and connector to the inverter. No Utility 3. Check breaker between inverter and grid; if it is tripped, DO NOT CLOSE again, replace another unit. 15 Fault Inverter failure Display Possible actions 1. Check the PV open voltage; see if it is more than or too close to 500VDC. PV Over 2. If PV voltage is much less than 500VDC (e.g. <430V), measure the Voltage DCV by multi-meter, compare the readings on meter and LCD, if >5%, replace another unit. 1. It is caused by the reading between main and redundant controllers Consistent are different. Fault 2. Disconnect PV (+) or PV (-) from the input, start the unit again. 3. If this does not work, replace another one. 1. Caused by improper operation of the circuit. Device Fault 2. Disconnect PV (+) or PV (-) from the input, start the unit again. 3. If it does not work, replace another one. 1. The internal temperature is higher than specified normal value. 2. Reduce the ambient temperature by some other ways or move Over inverter to cooler place. Temperature 3. If it is not effective, the temperature sensors fails, replace another one. 16 7. Specification: Model MPI-1500 MPI-2000 MPI-3000 MPI-4000 MPI-6000 Output power 1500W 2000W 3000W 4000W 6000W Maximum power 1650W 2200W 3300W 4400W 6000W Input Nominal DC voltage 360 VDC Maximum PV open 500 VDC 600V voltage MPPT range 150 to 500VDC 150 to 600VDC Working range 100 to 500VDC 100 to 600VDC Max. input current 7.5ADC 10ADC 15ADC 20ADC 30ADC Output Operational voltage 230VAC Operational frequency 50/60Hz, auto selection Current distortion < 3% Power factor > 0.99 Conversion efficiency >94% >95% >95% >96% >96% (max) European efficiency >93% >94% >94% >95% >95% Environment Protection degree IP 65 Operation temperature -25 to 55ºC, output power derating at 40 °C and higher Humidity 0 to 95%, non-condensing Heat Dissipation Convection Acoustic noise level <40dB, A-weighted. Communication & features Comm. Interface RS232 standard, USB, SNMP & RS485 optional F/W upgrade Yes, via RS232 Mechanical 352x300x133 352x300x133 352x300x143 550x300x133 550x420x143 W×D×H (mm) Weight (kg) 14 14 14 21 27 ∗Product specifications are subject to change without notice. 17