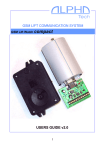
1
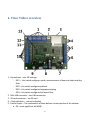
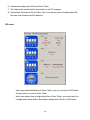
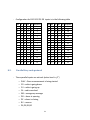
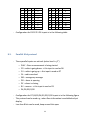
ALPHATECH TECHNOLOGIES s.r.o. Jeremenkova 88, Praha 4, Czech Republic www.alphatechtechnologies.cz FLOOR TALKER User manual Table of Contents 1. Introduction .................................................................................................................................................................... 3 2. Basic description ............................................................................................................................................................. 4 3. Technical parameters...................................................................................................................................................... 5 4. Floor Talker overview...................................................................................................................................................... 6 5. Installation ...................................................................................................................................................................... 8 5.1. Loudspeaker mounting ............................................................................................................................................... 8 5.2. Mounting of the electronics........................................................................................................................................ 9 5.3. SD card ........................................................................................................................................................................ 9 5.4. Power supply ............................................................................................................................................................. 10 5.5. DIP settings ............................................................................................................................................................... 10 5.6. Led indication ............................................................................................................................................................ 11 5.7. USB connection ......................................................................................................................................................... 11 5.8. Parallel inputs............................................................................................................................................................ 12 5.9. Serial input ................................................................................................................................................................ 12 6. Getting started .............................................................................................................................................................. 12 7. PC program ................................................................................................................................................................... 13 7.1. List of sequences ....................................................................................................................................................... 14 7.2. Controls and Statuses ............................................................................................................................................... 17 8. Protocols ....................................................................................................................................................................... 20 8.1. Parallel 5bit protocol................................................................................................................................................. 20 8.2. Parallel Gray code protocol....................................................................................................................................... 21 8.3. Parallel 8-bit protocol ............................................................................................................................................... 22 8.4. Serial 8bit protocol .................................................................................................................................................... 23 8.5. Serial 9 bit protocol ................................................................................................................................................... 24 8.6. Serial multi byte protocol ......................................................................................................................................... 24 2 1. Introduction Dear customer, thank you for purchasing our product. Floor talker is mainly used to inform person about current position of the elevator. Possibly, some other information may be reported e.g. opening and closing of the elevator doors, direction of movement, overload of the elevator or user defined reports. In many countries, the voice announcement is mandatory, according to law or the other regulations. Floor Talker is mainly necessary for sightless, but also can be useful for other elevator users, e.g. sometimes it’s hard to watch display. Manufacturer is continually improving the software equipment, which is contained in this product. Floor talker features possibility of change firmware using SD card, computer with USB or Ethernet connection. The latest software can be obtained on the site http://www.alphatechtechnologies.cz/ We recommend you use the latest version of our software, which provides new product features and fixes any errors. Necessary instructions can be found on this user guide. 3 2. Basic description Announcing of messages in several languages Include SD-card with all message and firmware and settings (up to 2GB) To record your own message can be used o SD-card reader o PC with USB (without driver – mass storage) o Optionally Ethernet connection (remote - long distance) Possibility change firmware, setting and message by using SD-card reader, by using PC with USB (without driver – mass storage), optional by using ethernet connection (remote - long distance) Floor annunciation Gong simulation Easy setting High quality of voice Possibility to record your own messages - WAV files (16bit, 14KHz sample) practically isn't limitation of the number of messages and duration of message look to large capacity SD-card PC program with all function for SD-card record, USB connection or Ethernet connection with floor talker. Type of announcements: o “door is closing“ o “next direction of movement …up“, o “cabin overloaded“ o “lift is in fire service” 4 LED indication for easy install 4 DIP switch for easy install – the lowest floor selection, language selection, input code selection, basic mode section (gong, move of cabin, open/close door) Dimensions: 105 x 90 x 25mm Power supply: DC 10-30V / max 200mA, minus is common Output power: 1W / 8ohms 4 you use speaker in cabin or speaker in Remic or NLLW, output of Floor Talker is through relay, board have connector speaker in, speaker out Input - serial or binary (parallel) - in default is 8 typical input codes and step by step want to support encoding for another switchboard from different producers Input levels 0-2V = "0" 8-24V = "1", active is "0", pull up resistors - 22Kohm 3. Technical parameters Power supply voltage Current Consumption Fuse Voice Adjustment Memory Audio format USB interface for PC Operating position Loudspeaker Dimension Inputs Logic levels "Pull up" resistors Max. input voltage 9 - 30 V DC, (12V DC to 24V DC recommended) Max. 200mA with 8 Ω loudspeaker T 1A Hlasitost- min. logarithmic law Treble - flat characteristics in the middle position SD card (up to 2GB) in format FAT12/16/32 Digital, WAV ADPCM, 16bit, 14500hz USB1.0, USB2.0 Vertical, DIP switches, SD and USB connector upstairs Minimum impedance 8Ω. Minimum power 0.5W 82x108x25 [mm] "0" = 0 to 2V (active level) "1" = 6 to 30V 22kΩ to the positive power supply +/-40V respective to positive power supply 5 4. Floor Talker overview 1. Dip switches – see DIP settings - DIP1 – this switch configures mode, announcement of door and cabin and skip floor - DIP2 – this switch configures protocol - DIP3 – this switch configures language and gong - DIP4 – this switch configures the lowest floor 2. Mini USB connector – see USB connection 3. SD card connector – see SD card 4. 4 Led indication – see Led indication 5. Parallel inputs – The combination of them defines current position of the elevator a. D4 – most significant bit (MSB) 6 b. D3 c. D2 d. D1 e. D0 – least significant bit (LSB) 6. Speaker connectors – see loudspeaker mountings a. IN connector – from other device b. OUT connector – to speaker 7. Volume adjustment a. Volume b. Treble 8. Power supply connector a. + : positive (VCC) b. - : negative (GND) 9. Reset jumper 10. Parallel inputs – other announcement a. PLAY – when input active „0“, floor announcement is being started b. CD – cabin is going down c. CU – cabin is going up d. OL – cabin overload e. EM – emergency message f. DO – doors is opening g. DC – doors is closing h. RV - reserve 11. Serial input - SER 12. Connector for extern ethernet module 13. Jumper for serial input 7 5. Installation 5.1. Loudspeaker mounting We recommend the following parameters of loudspeaker: Impedance : greater or equal than 8 Ω Diameter: greater than 50 mm Maximal power: greater or equal than 0,5 W Floor Talker has two connectors SPK IN, SPK OUT, so can share its loudspeaker with another device e.g. Remic or NLLW. Floor talker uses its speaker only for the duration of announcement otherwise connector “SPK in” is connected to the connector “SPK out”. See figure 1. Figure 1 Loudspeaker connections 8 5.2. Mounting of the electronics We recommend the following operating position. Circuit board should be vertically, fuse and trimming potentiometers downstairs, DIP switches and USB, SD connectors upstairs. 5.3. SD card Supported formats of SD cards are FAT12, FAT16 and FAT32. Volume label must be FLOORTALKER to detect by our PC program. File structure is created by PC program and is shown on the following example. H: \\ (FLOORTALKER) 1LANG - Wav files, which are located in this folder, are played in selection of 1st language o 1.wav o 2.wav 2LANG - Wav files, which are located in this folder, are played in selection of 2st language o 1.wav 3LANG - Wav files, which are located in this folder, are played in selection of 3st language o 3.wav GONG - Wav files, which are located in this folder, are played in selection of Gong o gong.wav config.cfg - This is configure file of Floor talker, always must be in the SD card and it is generated by PC program firmware.bin - This file contains the new version of firmware. Each file or folder has to have maximal 8 characters length of name and maximal 3 characters length of extension. Allowed characters are a-z, 0-9, A-Z. If the name of file contains other characters PC program automatically correct them. 9 5.4. Power supply Supply voltage must be in interval 9 V DC to 30 V DC, which doesn’t need to be stabilized. We recommend voltage 12 V DC to 24 V DC. Current consumption is 200 mA and depends on loudspeaker impedance and loudness. 5.5. DIP settings Base settings of Floor Talker are provided by DIP switches. When you want to set any parameter, you must enable configure mode. Configure mode is enabled by turning on fourth switch in DIP1, see table 1. In configure mode Floor Talker announce current position of elevator. This feature helps to set the lowest floor. Floor Talker save new settings, when normal mode is enabled by turning off fourth switch in DIP1, see table 1. Normal mode is enabled after 10-announcements time-out too. Floor Talker doesn’t save new settings in this case . DIP 2 4 3 2 1 DIP1 4 2 1 Mode Configure On x x x Normal Off x x x Enable x On x x Disable x Off x x Enable x x On x Disable x x Off x Enable x x x On Disable x x x Off Skip floor Door's sequence Cabin's sequence Table 1. DIP4 Protocol 3 position offset Lowest floor selection serial, 8 bit Off On Off Off sequence 0 0 0 serial, 9 bit Off Off On Off sequence 1 1 1 serial, multiple-byte Off Off Off On sequence 2 2 2 parallel, binary code On Off Off Off Sequence 3 3 3 parallel, parallel 8bit On On Off Off sequence 4 4 4 parallel, Gray code On On On Off sequence 5 5 5 sequence 6 6 6 sequence 7 7 7 sequence 8 8 8 DIP3 4 3 2 1 Language Defined by PC program Off Off Off x sequence 9 9 9 1. Language On Off Off x sequence 10 A 10 10 2. Language Off On Off x sequence 11 B 11 3. Language Off Off On x sequence 12 C 12 1. + 2. Language On On Off x sequence 13 D 13 1. + 3. Language On Off On x sequence 14 E 14 2. + 3. Language Off On On x sequence 15 F 15 1. + 2. + 3. Language On On On x Enable x x x On Disable x x x Off Gong Table 2, 3 and 4 5.6. Led indication Floor Talker has 4 Leds for signalization. PWR led (green) when led blink, floor talker is in the normal mode when led light, floor talker is in the configure mode when led doesn’t light and Floor Talker doesn’t signalize any error, Floor Talker is just announcing a report. USB led (green) when led light, PC and Floor talker is connected via USB cable SD led (green) when led light, SD card is correctly connected to Floor Talker when led blink, Floor Talker doesn’t have valid firmware ERR led (red) if Led light, Floor Talker signalizes any error. If PWR Led blink and this Led light some wav file probably miss in the SD card if Led blink, Floor Talker doesn’t have valid SD card in its slot. 5.7. USB connection USB connection is realized as mass storage. It means when you connect the Floor Talker to PC, operation system automatically detect Floor Talker same as when you insert SD card to your SD card reader. Your operation system doesn’t need any extern driver for USB. When Floor 11 Talker is connected to PC via USB cable, Floor Talker doesn’t respond on any inputs and any change of DIP switches. 5.8. Parallel inputs Input levels 0-2V = "0" 8-24V = "1", active level is "0" pull up resistor - 22Kohm default minimal time of active input signal is 200 ms. This interval should be changed by PC program These inputs are filtered by Floor Talker against any error on bus. 5.9. Serial input Input levels 0-2V = "0" 8-24V = "1", active level is "0" Pull up resistor – 22 Kohm, when serial input jumper is on Without pull up resistor, when serial input jumper is off Other settings of serial input such as baud rate or kind of filtration is given by used serial protocol 6. Getting started - Prepare a SD card by our PC program Plug the SD card into SD card connector Connect a loudspeaker Connect alive power supply to terminal Set DIP switches Check the function Set volume, treble 12 7. PC program Figure 2 Main figure Our PC program serves to compose sequence of wav files, which floor talker announce. Main window have three following parts. See figure 2. 1. Menu a. File – Save, Open, New configuration file b. Languages – Select Language of PC program c. Help – for get help about using of PC program 2. List of sequences a. Contains open sequence – can be edited b. Contains close sequence – must be firstly open to edit 3. Controls and Statuses – have 3 parts a. Main page – main control of PC program 13 b. DIP status – when you download data from Floor Talker, you can see current DIP switch setting, which is saved in Floor Talker c. Expert settings – you can change some parameters of inputs, filtrations. when you download data from Floor Talker, you can see current expert settings, which is saved in Floor Talker 7.1. List of sequences Control list of sequences - When you want scroll the list, hold right mouse button and drag up or down - When you want open the sequence, click right mouse button on the sequence - Opened sequence is always only one, when you open next sequence, last sequence will be closed 14 Menu control - File -> Save – you can save this configuration file of this list File -> Open – you can open this configuration file of this list File -> New – you can create this configuration file of this list File -> Close – you can close this configuration file of this list Opened sequence 1. The Wav File is in this position. According to the line it is assigned to language. In this case it is assigned to 1. Language. 2. Free position. You can drag a wav file from the file trees in the Main page to this position or drag a wav file from other position in this sequence. (hold left mouse button and drag) 3. Menu of wav file. When you click right button on the wav file this menu is shown on the position of your cursor. a. Play – play the wav file b. Delete – delete wav files c. Copy to all sequences – Copy this wav files to the same position in each sequence d. Delete from all sequences - Delete this wav files from the same position in each sequence 15 e. Properties - Properties of this wav file is shown on the screen. 4. 5. 6. 7. The pause between wav files If this option is checked, the floor Talker repeats this sequence Play – play all wav files in the sequence Length - Total Time of sequence 16 7.2. Controls and Statuses Main Page 1. Local wav files storage – It is placed in the install directory /media 2. Floor Talker storage – If SD card or Floor Talker via USB cable is connected. You can check right storing configuration file with its wav files. 3. Search – When you need upgrade current firmware, you must specifies source path of new firmware 4. If this option is checked, new firmware will be uploaded together with synchronization 5. Synchronize button – Upload configuration file to Floor Talker 17 6. Download configuration file from Floor Talker 7. This label helps you for better orientation in this PC program 8. Upload only firmware to Floor Talker. Don’t use before upload configuration file, because new firmware will be deleted. DIP status - - when you download data from Floor Talker, you can see current DIP switch setting, which is saved in Floor Talker when you upload new configuration file to Floor Talker, you must switch to configuration mode before download configuration file to see DIP status 18 Expert settings - you can change some parameters of inputs, filtrations. when you download data from Floor Talker, you can see current expert settings, which is saved in Floor Talker - when you upload new configuration file to Floor Talker, you must switch to configuration mode before download configuration file to see expert settings - when some value is zero, Floor Talker uses default settings. The default setting is seen on the figure of Expert settings. 19 8. Protocols - Floor talker has 6 basic implemented protocols o Parallel 5bit Binary Code o Parallel 4bit Gray code o Parallel 8bit Binary Code o Serial 8bit o Serial 9bit o Serial multi byte - If you have own protocol, which is not one of them, Floor Talker has reservated place for your protocol. Please contact us and we add your protocol to Floor Talker. 8.1. Parallel 5bit protocol - Binary code - These parallel inputs are actived (active level is „0“) o o o o o o o o o PLAY – floor announcement is being started CD – cabin is going down CU – cabin is going up OL – cabin overload EM – emergency message DO – doors is opening DC – doors is closing RV – reserve D4,D3,D2,D1,D0 20 - Configuration for D4 D3 D2 D1 D0 inputs is in the following table D4 D3 D2 D1 D0 Sequence 1 1 1 1 1 0 1 1 1 1 0 1 1 1 1 0 1 2 1 1 1 0 0 3 1 1 0 1 1 4 1 1 0 1 0 5 1 1 0 0 1 6 1 1 0 0 0 7 1 0 1 1 1 8 1 0 1 1 0 9 1 0 1 0 1 10 1 0 1 0 0 11 1 0 0 1 1 12 1 0 0 1 0 13 1 0 0 0 1 14 1 0 0 0 0 15 8.2. D4 D3 D2 D1 D0 Sequence 0 1 1 1 1 16 0 1 1 1 0 17 0 1 1 0 1 18 0 1 1 0 0 19 0 1 0 1 1 20 0 1 0 1 0 21 0 1 0 0 1 22 0 1 0 0 0 23 0 0 1 1 1 24 0 0 1 1 0 25 0 0 1 0 1 26 0 0 1 0 0 27 0 0 0 1 1 28 0 0 0 1 0 29 0 0 0 0 1 30 0 0 0 0 0 31 Parallel Gray code protocol - These parallel inputs are actived (active level is „0“) o o o o o o o o o PLAY – floor announcement is being started CD – cabin is going down CU – cabin is going up OL – cabin overload EM – emergency message DO – doors is opening DC – doors is closing RV – reserve D3,D2,D1,D0 21 D3 D2 D1 D0 sequence 1 1 1 1 0 1 1 1 0 1 1 1 0 0 2 1 1 0 1 3 1 0 1 1 4 1 0 1 0 5 1 0 0 0 6 1 0 0 1 7 D3 D2 D1 D0 sequence 0 0 1 1 8 0 0 1 0 9 0 0 0 0 10 0 0 0 1 11 0 1 0 1 12 0 1 0 0 13 0 1 1 0 14 0 1 1 1 15 - Configuration for D3 D2 D1 D0 inputs is in the following table 8.3. Parallel 8-bit protocol - These parallel inputs are actived (active level is „0“) o o o o o o o o o PLAY – floor announcement is being started CD – cabin is going down -> this input is used as D6 CU – cabin is going up -> this input is used as D7 OL – cabin overload EM – emergency message DO – doors is opening DC – doors is closing RV – reserve -> this input is used as D5 D4,D3,D2,D1,D0 - Configuration for D7,D6,D5,D4,D3,D2,D1,D0 inputs is in the following figure - This protocol can be used e.g. when floor information is availabled only at display. - Less than 8 bits can be used, keep unused bits open 22 8.4. Serial 8bit protocol - Baud rate : 1200 bit/s - Format : 8 bits, no parity, 1 stop bit - Used input : SER - Data packet : S3 S2 S1 S0 sequence 1 1 1 1 0 1 1 1 0 1 1 1 0 1 2 1 1 0 0 3 1 0 1 1 4 1 0 1 0 5 1 0 0 1 6 1 0 0 0 7 S3 S2 S1 S0 sequence 0 1 1 1 8 0 1 1 0 9 0 1 0 1 10 0 1 0 0 11 0 0 1 1 12 0 0 1 0 13 0 0 0 1 14 0 0 0 0 15 S4 S5 sequence 1 1 Floor Announcement will be started 0 1 Car is going down 1 0 Car is going up 23 8.5. Serial 9 bit protocol - Baud rate 1200 bit / s - Format : 9 bits, no parity, stop bit - When 9th bit is “1” , this data packet contains an address packet - When 9th bit is “0”, this data packet contains a data packet - Address and data periodically alternates in data stream. Floor Talker receives only data packet following upon address 01. - Data packet : S3 S2 S1 S0 sequence 1 1 1 1 0 1 1 1 0 1 1 1 0 1 2 1 1 0 0 3 1 0 1 1 4 1 0 1 0 5 1 0 0 1 6 1 0 0 0 7 S3 S2 S1 S0 sequence 0 1 1 1 8 0 1 1 0 9 0 1 0 1 10 0 1 0 0 11 0 0 1 1 12 0 0 1 0 13 0 0 0 1 14 0 0 0 0 15 S4 S5 sequence 1 1 Floor Announcement will be started 0 1 Car is going down 1 0 Car is going up 8.6. Serial multi byte protocol - Baud rate 300 bit/s - Number of bytes in data packet : 5 24 - Format : 9bit, no parity, stop bit Structure of data packet - 1st byte : 01 H - 2nd byte : xxx S4 S3 S2 S1 S0 o S4(MSB), S3,S2,S1,S0 (LSB) – binary code same as table in parallel 5bit - 3rd byte Bit Position in byte 7 6 5 4 3 2 1 0 Sequence Door is opening Door is closing x x Floor Announcement will be started x x x - 4th byte Bit Position in byte 7 6 5 4 3 2 1 0 Sequence Car is going down Car is going up x x Gong Emergency message Car is overloaded x 25 ALPHATECH TECHNOLOGIES s.r.o. Jeremenkova 88, Praha 4, Czech Republic www.alphatechtechnologies.cz ALPHATECH TECHNOLOGIES s.r.o. Jeremenkova 88 140 00 Praha 4 Czech Republic VAT: CZ27577350 Company is registered in the Commercial Register administered by the Municipal Court in Prague, Section C, Record 116886 Banking details: Komerční banka, account No. 43-7671450207/0100 IBAN: CZ0801000000437671450207 SWIFT: KOMBCZPPXXX