Transcript
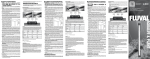
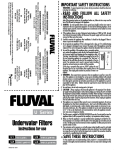
•
U Series
•
•
7.
Underwater Filters
8.
Instructions for use
9.
U2
12-30 U.S. gal/45-110 L
09502100 15G08
U3
U4
24-40 U.S. gal/90-150 L
34-65 U.S. gal/130-240 L
SAVE THESE INSTRUCTIONS
10.
For the complete use and understanding of this product it is recommended that this
manual is thoroughly read and understood. Failure to do so may result in damage to this
product.
BIOMAX CARTRIDGE
POLY/CARBON CARTRIDGES
FOAM PAD
FOAM CARTRIDGE
FRAME
FOAM PAD
FOAM CARTRIDGE
FRAME
FLIP TOP COVER
3-WAY
FLOW CONTROL
KNOB
VENTURI
VALVE
DIRECTIONAL
OUTPUT NOZZLE
FILTER
BRACKET
INTEGRATED
SPRAY BAR
(D)
(E)
(F)
Note: In order to have the airflow /venturi work properly, it must remain above water.
Keep this in mind when putting the filter into its final position. Turning the valve located
on the top of the venturi valve will regulate the quantity of air produced.
7. The filter can now be fitted into the aquarium. Grasp the filter by the sides and
hold it into position. When properly positioned push against the filter adhering
the 3 suction cups to the wall of the aquarium.
Note: Be sure the line cord is correctly positioned in the slots on the back side of the
filter body (ill. D).
(O)
(P)
Note A: In order to have the airflow /venturi work properly, it must remain above water.
Keep this in mind when putting the filter into its final position. Turning the valve located
on the top of the venturi valve will regulate the quantity of air produced. (ill. N).
8. Plug into power source.
Note B: Be sure the line cord is correctly positioned in the slot on the back side of the
filter body. (ill. P).
ADJUSTING THE WATER FLOW
By simply rotating the adjustable control knob you can adjust the flow rate. (ill. F).
MAINTAINING THE U1 FILTER
IMPELLER
SHAFT ASSEMBLY
Following a routine maintenance schedule will result in a healthier aquarium and extend
the life of the filter. Fluval filters have been designed to facilitate these tasks as they can
be done within a matter of minutes. For best results please follow our maintenance
schedule recommendations.
MOTOR
(Q)
7. Slide the Filter onto the filter bracket and then lock it in place by squeezing the
filter case and filter bracket together. (ill. O).
MAGNETIC IMPELLER
SUCTION CUPS
(4-6)
(N)
Note: Ensure the top outlet is at a minimum of 1 cm below the aquarium’s water surface
and if venturi valve is to be used it is sticking out of the water. (ill. E).
WARNING: ALWAYS DISCONNECT APPLIANCES IN THE AQUARIUM FROM THE ELECTRICAL
SUPPLY BEFORE PLACING HANDS IN THE WATER, BEFORE PUTTING ON OR TAKING OFF
PARTS, AND WHENEVER THE FILTER EQUIPMENT IS BEING INSTALLED, MAINTAINED OR
HANDLED.
FILTER BODY
FILTER CARTRIDGE REPLACEMENT
Replace 1 Poly/Carbon cartridge every 2 weeks. Replace Alternate Foam Pads every
3-6 months. Replace ½ quantity of BIOMAX nodes every 5-6 months
The impeller well has an effective self-cleaning feature. However, it is recommended that
you remove the motor and inspect the impeller as part of your routine maintenance.
Keeping the impeller clean lengthens its life and the life of the motor.
1. Unplug the power cord.
2. Gently remove the filter from the aquarium. Keep the filter in a vertical position
to avoid releasing debris back into the aquarium.
3. Slip the electric wire out of its slot.
4. Release the motor from the filter body by squeezing the two release arms on the
side of the motor housing. (ill. I).
FILTER CARTRIDGE REPLACEMENT
Replace Foam Pads every 3-6 months.
(I)
(J)
5. If the impeller needs cleaning, grasp the fan and draw it gently from the impeller
well. Rinse it under clean water. NEVER use soap or detergents, as traces of cleaning
products will harm fish. (ill. J).
6. If the impeller well needs cleaning, scrub it gently with a Fluval Cleaning Brush. In
case of major cleaning you need to remove the Impeller Shaft Assembly by inserting
the shaft tool (not included) until you feel it engage at the base of the shaft, then pull
it up and out gently.
7. To replace, position the magnetic impeller on the shaft assembly and insert into
impeller well; push on impeller fan until the assembly locks into place.
The impeller will wear out over time. A replacement may be ordered from your local
Fluval dealer or by contacting our customer service at Rolf C. Hagen Corp.
Following a routine maintenance schedule will result in a healthier aquarium and extend
the life of the filter. Fluval filters have been designed to facilitate these tasks as they can
be done within a matter of minutes. For best results please follow our maintenance
schedule recommendations.
8. The filter can now be fitted into the aquarium. Grasp the filter by the sides and
hold it into position. When properly positioned push against the filter adhering the
4 or 6 suction cups to the wall of the aquarium.
Note: Ensure the top outlet is at a minimum of 1 cm below the aquarium’s water surface
and if venturi valve is to be used it is sticking out of the water. (ill. Q).
9. Plug into power source.
FILTER MAINTENANCE
Clean Impeller and Impeller well every 4 months. Replace impeller yearly for optimal
performance and to prevent wearing. Clean filter body 1 time per year.
HOW TO CARE FOR THE IMPELLER AND MOTOR
The impeller well has an effective self-cleaning feature. However, it is recommended that
you remove the motor and inspect the impeller as part of your routine maintenance.
Keeping the impeller clean lengthens its life and the life of the motor.
CALL US ON OUR TOLL-FREE NUMBER:
Canada only: 1-800-554-2436 between 9:00 a.m. and 4:30 p.m.
Eastern Standard Time. Ask for Customer Service.
U.S. only: 1-800-724-2436 between 9:00 a.m. and 4:00 p.m.
Eastern Standard Time. Ask for Customer Service.
U.K. only: Helpline Number 01977 556622.
Between 9:00 AM and 5:00 PM, Monday to Friday (excluding Bank Holidays).
To register your warranty on line or for more information on this and other
products go to www.hagen.com.
U4
U3
Tel.:
F
Prov./State/County
Store
Prov./State/County
U2
Sex
Type(s) of fish
M
U1
U2 - U3 - U4 PARTS
WARNING: ALWAYS DISCONNECT APPLIANCES IN THE AQUARIUM FROM THE
ELECTRICAL SUPPLY BEFORE PLACING HANDS IN THE WATER, BEFORE PUTTING ON OR
TAKING OFF PARTS, AND WHENEVER THE FILTER EQUIPMENT IS BEING INSTALLED,
MAINTAINED OR HANDLED.
Size of aquarium
HOW TO CARE FOR THE IMPELLER AND MOTOR
WARNING: ALWAYS DISCONNECT APPLIANCES IN THE AQUARIUM FROM THE ELECTRICAL
SUPPLY BEFORE PLACING HANDS IN THE WATER, BEFORE PUTTING ON OR TAKING OFF PARTS,
AND WHENEVER THE FILTER EQUIPMENT IS BEING INSTALLED, MAINTAINED OR HANDLED.
Age
NEVER use soap or detergents as these products could be harmful to the inhabitants of your
aquarium.
CANADA: Hagen Industries, Consumer Repair, 3235 Guénette,
Montréal QC H4S 1N2
U.S.A.: Rolf C. Hagen (U.S.A.) Corp., 305 Forbes Blvd, Mansfield, MA. 02048
UK: Rolf C. Hagen (UK) Ltd, Customer Service Department
California Drive, Whitwood Ind Est., Castleford
West Yorkshire WF10 5QH
No
(C)
MAINTAINING THE U2, U3 and U4 FILTERS
Yes
(B)
4. Attach suction cups to the filter bracket. Use the top 4 slots for models U2 and U3,
use top 4 slots and lower 2 slots for model U4. Note: For easy filter bracket removal
position the suction cups so that the suction cup tabs are facing outwards. (ill. K).
5. Insert the output nozzle with venturi vent into the top output on the filter body,
making sure that the vent is facing up. If required insert the second output
nozzle into the bottom output on the filter body. (ill. L).
6. If the Venturi System is to be used, place the Venturi valve into the top of
the vent. (ill. M).
Was this a gift?
(A)
MOTOR
(M)
(L)
(H)
City/Town
(K)
(G)
(A) Top output, for maximum circulation and oxygenation.
(B) The integrated spray bar, to provide even gentle flow for planted aquariums.
(C) Bottom output for deep water agitation and maximum circulation.
If you have any queries or comments about the operation of this product, please
let us try to help you before you return the product to your retailer. Most queries
can be handled promptly with a phone call. When you call (or write), please have
all relevant information such as model number, age of product, details of
aquarium set-up, as well as the nature of the problem.
Date Purchased
IMPELLER
SHAFT ASSEMBLY
For Authorized Warranty Service please return (well packaged and by registered
post) to the address below enclosing dated receipt and reason for return.
YY
FILTER BODY
MAGNETIC IMPELLER
FOR AUTHORIZED GUARANTEE REPAIR SERVICE:
DD
VENTURI VALVE
1. Unplug the power cord.
2. Open the filter cover. (ill. G).
3. Slide the Foam out of the filter body and place it in an empty bucket. Rinse the foam
cartridge using water taken from the aquarium or replace the foam following the
recommended replacement schedule. Do not use tap water as this will kill the
beneficial bacteria in your foam. (ill. H).
Fluval U Series Power Filters are guaranteed against defects in material or workmanship under
normal aquarium usage and service for 3 years. We offer a 3 year guarantee on all nonreplaceable parts which means that the filter will be repaired or replaced at the
manufacturer's discretion, free of charge, when the complete pump is returned with proof of
purchase and postage paid. This warranty does not apply to any filter that has been subjected
to misuse, negligence, or tampering. No liability is assumed with respect to loss or damage to
livestock or personal property irrespective of the cause thereof.
Postal/Zip Code
3.
SUCTION CUPS (3)
1. Unpack and identify all parts. Use the parts diagram as a guide.
2. Decide on filter placement. Allow enough space above the filter to be able to easily
open the top cover
3. Once all parts have been identified, rinse the foam in tap water before the first
installation.
4. Insert the 3 suction cups into the 3 slots on the rear of the filter. (ill. A).
5. Insert the output nozzle with venturi vent into the output on the filter body, making
sure that the vent is facing up. (ill. B).
6. If the Venturi System is to be used, place the Venturi valve into the top of the vent. (ill. C).
6. Replace the foam pad. Make sure the foam is positioned
behind the tabs on the sides of the frame.
7. With the carbon side facing out re-insert the Poly/
Carbon cartridge by inserting the lower end of the (T)
cartridge into the lower end of the cartridge frame then
snapping the top side of the cartridge under the two
(U)
tabs on the top side of the frame. Do not press too hard
as the cartridge must sit on the top of the tabs on the
sides of the frame.
Hint: For best results replace 1 poly/Carbon cartridge
every 2 weeks.
8. Slide the BIOMAX cartridge out and place it in the sink
or bucket.
9. Pull open the tab on the side of the cartridge, opening
the cover. Rinse the BIOMAX with aquarium water, never tap water, or replace ½ the
quantity every 5-6 months. Never replace all the
BIOMAX nodes at one time, as valuable
colonies of beneficial bacteria would be lost.
(ill. V).
10. After rinsing, put the BIOMAX back in cartridge
and close the cover. For best results completely fill
the cartridge with BIOMAX nodes but allow the (V)
cover to close easily.
11. Re-insert foam cartridge frames into the filter with
the poly/carbon pad facing inwards. Re-insert the BIOMAX cartridge into the filter
making sure to properly align the hole at the bottom of the cartridge directly on the
top of the impeller opening. Close the filter cover and if required snap the filter body
back into position on the filter bracket.
MM
CARTE D’ENREGISTREMENT DE LA GARANTIE
TARJETA DE REGISTRO DE LA GARANTÍA
Déposer la carte de garantie dûment remplie dans une enveloppe
suffisamment affranchie et poster à :
D.
DIRECTIONAL
OUTPUT NOZZLE
GETTING STARTED FLUVAL U1
IMPORTANT: To enhance bacterial action, pour a dose of Nutrafin Cycle Biological
Aquarium Supplement onto your filter cartridge each time you change the media.
3 YEAR WARRANTY
City/Town
C.
FLOW CONTROL
KNOB
HOW TO REPLACE THE FILTER CARTRIDGES
NEVER use soap or detergents as these products could be
harmful to the inhabitants of your aquarium.
Address
B.
And all the important notices on the appliance before use, failure to do so may result in
loss of fish life and/or damage to this appliance.
DANGER - To avoid possible electric shock, special care should be taken since water is
employed in the use of aquarium equipment. For each of the following situations, do not
attempt repairs yourself; return the appliance to an authorized service facility for service
or discard the appliance.
If the appliance shows any sign of abnormal water leakage or if RCD (or GFCI- Ground
Fault Current Interrupter) switches off disconnect the power supply cord from mains and
remove the filter pump from water.
Carefully examine the appliance after installation. It should not be plugged if there is
water on parts not intended to be wet.
Do not operate any appliance if it has a damaged cord or plug, or if it is malfunctioning
or it is dropped or damaged in any manner. The power cord of this appliance cannot be
replaced; if the cord is damaged, the appliance should be discarded. Never cut the cord.
To avoid the possibility of the appliance plug or receptacle getting
wet, position the appliance to one side of a wall mounted receptaill. 1
cle to prevent water from dripping onto the receptacle or plug. A
"drip loop" (see illustration 1) should be arranged by the user for
the cord connecting appliance to a receptacle. The "drip loop" is
that part of the cord below the level of the receptacle or the connector if an extension cord is used, to prevent water travelling
along the cord and coming in contact with the receptacle.
If the plug or receptacle does get wet, DON'T unplug the cord.
Disconnect the fuse or circuit breaker that supplies power to the
appliance. Then unplug and examine for presence of water in receptacle.
WARNING - Close supervision is necessary when any appliance is used by or near children. This appliance is not intended for use by persons (including children) with reduced
physical, sensory or mental capabilities, or lack of experience and knowledge, unless they
have been given supervision or instruction concerning use of the appliance by a person
responsible for their safety. Children should be supervised to ensure that they do not
play with the appliance.
To avoid injury, do not touch moving parts or hot parts.
CAUTION – Always unplug or disconnect all appliances in the aquarium from electricity supply before placing hands in water, before putting on or taking off parts and whilst
the equipment is being installed, maintained or handled. When inserting or removing the
filter pump from the water, always pull out the main electricity plug. Never yank cord to
pull plug from outlet. Grasp the plug and pull to disconnect. Always unplug an appliance
from an outlet when not in use.
This is an aquarium filter-pump. Do not use this filter pump for other than intended use
(i.e.: do not use in swimming pools, bathrooms, etc.). The use of attachments not recommended or sold by the appliance manufacturer may cause an unsafe condition.
Do not use this filter pump in swimming pools or other situations where people are
immersed.
This filter pump is suitable for use in water temperatures up to 35 °C.
Do not use this filter pump with inflammable or drinkable liquids.
This filter pump is suitable for INDOOR use only. Do not install or store the appliance
where it will be exposed to the weather or to temperatures below freezing.
Make sure that the filter pump is securely installed before operating it. Do not allow pump
to run dry. The filter pump must be immersed in water completely. This filter pump must
never operate outside of water.
If an extension cord is necessary, a cord with proper rating should be used. A cord rated
for less amperes or watts than the appliance rating may overheat. Care should be taken
to arrange the cord so that it will not be tripped over or pulled. The connection should be
carried out by a qualified electrical installer.
FLIP TOP COVER
FOAM PAD
1. Unpack and identify all parts. Use the parts diagram as a guide.
2. Decide on filter placement. Allow ample space on the side and front of filter to be
able to easily tilt it forward during future cartridge replacement and removal for
maintenance.
3. Once all parts have been identified remove the cartridge frames with the foam pads
and poly/carbon cartridges, BIOMAX cartridge with BIOMAX nodes from the filter
and rinse under tap water to remove any dust particles before the first installation.
Make sure to remove the BIOMAX nodes from the shipper bag and replace into
BIOMAX cartridge before rinsing or use. Once rinsed replace the loaded cartridges
back into filter. (See the MAINTENANCE section for more details).
ADJUSTING THE WATER FLOW
The water output can be custom selected based on the desired flow. By simply rotating the
adjustable 3-way flow control knob you can select one of 3 output settings as well as
adjust the flow rate.
Name
A.
READ AND FOLLOW ALL SAFETY
INSTRUCTIONS
WARNING: Disconnect the plug of all aquarium appliances before placing your hands into
the aquarium water and / or performing any maintenance of any kind. Do not plug filter
in until setup is complete and aquarium is filled with water.
GETTING STARTED FLUVAL U2, U3 AND U4
WARRANTY REGISTRATION CARD
2.
6.
15 U.S. gal/55 L
(Fluval Underwater Filter Models U1, U2, U3 and U4)
FILTER MAINTENANCE
Clean Impeller and Impeller well every 4 months. Replace impeller yearly for optimal
performance and to prevent wearing. Clean filter body 1 time per year.
Return to validate your guarantee. Or, if you prefer, you may register on our web site at www.hagen.com
1.
4.
5.
U1
INSTALLATION and USE
U1 PARTS
WARNING - To guard against injury, basic safety precautions should be observed,
including the following:
WARRANTY REGISTRATION CARD
When complete, place Warranty Registration Card in an envelope,
affix correct postage and mail to:
GARANTIE-REGISTRIERUNGSKARTE
GERMANY
HAGEN Deutschland
GmbH & Co. KG,
25488 Holm
ESPAÑA
Rolf C. Hagen España S.A.,
Av. De Beniparrell n. 11 y 13
46460 Silla, Valencia
www.hagen.com
Una vez llenada, coloque la tarjeta de registro de la garantía en un sobre
debidamente franqueado y envíela a:
U.S.A.
Rolf C. Hagen (U.S.A.) Corp.,
305 Forbes Blvd,
Mansfield, MA. 02048
FRANCE
Hagen France SA.,
F-77388 Combs la Ville.
Bitte zurücksenden zur Erhaltung der Garantie. Damit wir Sie besser betreuen
können, füllen Sie bitte diese Registrierungskarte aus und schicken
Sie sie an uns zurück.
CANADA
Rolf C. Hagen Inc.
20500 Trans Canada Hwy,
Baie d’Urfé, Québec H9X 0A2
UK
Rolf C. Hagen (U.K.) Ltd.
Castleford, W. Yorkshire
WF10 5QH
To register online, visit our website at www.hagen.com • Pour l’enregistrement en ligne, visiter notre site Web à www.hagen.com
Falls Sie dies vorziehen, können Sie sich statt dessen auch auf unserer Website unter www.hagen.com registrieren.
Para el registro en línea, visite nuestro sitio web en www.hagen.com
IMPORTANT SAFETY INSTRUCTIONS
HOW TO REPLACE THE FILTER CARTRIDGES
IMPORTANT: Do not replace all filtration cartridges at the same time. Alternate filter
cartridge changes so that some older cartridges remain in use. This ensures the re-seeding of
beneficial bacteria, so that colonies discarded with older cartridges will be replaced by
vigorous new ones. To enhance bacterial action, pour a dose of Nutrafin Cycle Biological
Aquarium Supplement onto your filter cartridges each time you change the media.
1. Unplug the power cord.
2. Open the filter cover (To make the operation easier
and in case the filter is positioned under an aquarium
frame, tilt the filter forward until it stops but make en
sure there is enough electrical cord to allow the filter
to pull forward). (ill. R-S).
3. Slide the Foam cartridge frames out of the filter body
keeping them vertical to avoid releasing the debris
collected inside the debris receptacle. Place them in an
empty bucket. (ill. T).
4. Remove the Poly/carbon cartridge from the cartridge
frame. (ill. U).
5. Remove the foam. Rinse the debris receptacle and the
foam pads using water taken from the aquarium or
replace one of the foams following the recommended
replacement schedule. Do not use tap water as this
will kill the beneficial bacteria in your foam.
(R)
(S)
RECYCLING
(W)
(X)
(Y)
1. Unplug the power cord.
2. Release the filter by tilting it forward then pulling up and out of the filter bracket.
(ill. W).
3. Slip the electrical wire out of its slot.
4. Release the motor from the filter body by squeezing the two release arms on the side
of the motor housing. (ill. X).
5. If the impeller needs cleaning, grasp the fan and draw it gently from the impeller well.
Rinse it under clean water. NEVER use soap or detergents, as traces of cleaning
products will harm fish. (ill. Y).
6. If the impeller well needs cleaning, scrub it gently with a Fluval Cleaning Brush.
In case of major cl eaning you need to remove the Impeller Shaft Assembly by
inserting the shaft tool (not Included) until you feel it engage at the base of the shaft,
then pull it up and out gently.
7. To replace, position the magnetic impeller on the shaft assembly and insert into
impeller well; push on impeller fan until the assembly locks into place.
The impeller will wear out over time. A replacement may be ordered from your local
Fluval dealer or by contacting our customer service at Rolf C. Hagen Corp.
REPLACEMENT PARTS
U1
U2
U3
U4
A-15407
BIOMAX Cartridge
—
A-15207
A-15307
This symbol bears the selective sorting symbol for waste electrical and electronic
equipment (WEEE). This means that this product must be handled pursuant to
European Directive 2002/96/EC in order to be recycled or dismantled to minimize
its impact on the environment. For further information, please contact your local or
regional Authorities.
BIOMAX Nodes
—
A-495
A-495
A-495
Foam Cartridge Frame
—
A-15219
A-15319
A-15419
A-485
A-486
A-487
A-488
—
A-490
A-491
A-492
Electronic products not Included in the selective
sorting process are potentially dangerous for the
environment and human health due to the presence
of hazardous substances.
Filter Body
A-15109
A-15209
A-15309
A-15409
Flip Top Cover
A-15110
A-15210
A-15210
A-15410
Directional Output Nozzle
A-15044
A-15044
A-15044
A-15044
Venturi Valve
A-13921
A-13921
A-13921
A-13921
Filter Bracket
—
A-15204
A-15204
A-15404
Suction Cups
A-15039
A-15041
A-15041
A-15041
Magnetic Impeller 60Hz
A-15232
A-15232
A-15332
A-15333
Magnetic Impeller 50Hz
A-15133
A-15233
A-15332
A-15333
Impeller Shaft Assembly
A-15101
A-15101
A-15101
A-15401
Motor
A-15103
A-15203
A-15303
A-15403
Foam Filter Pad
Poly/Carbon Filter Cartridge