1
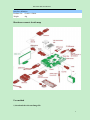
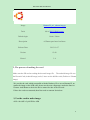
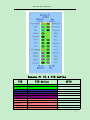
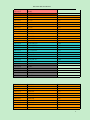
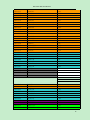
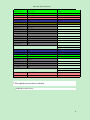
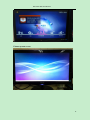
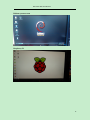
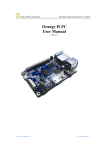
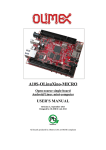
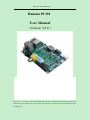
Banana PI M1 User Manual
Banana PI M1
User Manual
<Version: V2.0 >
Banana PI
is the open source hardware platform which published to assistant the Elastos.org
open source OS, Banana PI
is the dual core Android 4.2 product which more better than the
Raspberry Pi.
1
Banana PI M1 User Manual
Banana Pi
series run Android,Debian linux,Ubuntu linux, Raspberry Pi imange and
cubieboard imange.
Elastos coordinate multi CUP to from the family cloud entirnment which based on the
“software/hardware service”
Banana PI hardware: 1Ghz ARM7 dual-core processor, 1GB DDR3 SDRAM,
Banana PI with Gigabit ethernet port, SATA Socket. It can run with Android 4.2.2 smoothly.
The size of Banana PI M1 like the credit card, it can easily run with the game it support 1080P
high definition video output, the GPIO compatible with Raspberry Pi and can run the ROM
Image directly
Hardware specification
CPU
A20 ARM Cortex™-A7 Dual-Core
GPU
ARM Mali400MP2Complies with OpenGL ES 2.0/1.1
Memory
(SDRAM)
1GB DDR3 (shared with GPU)
Onboard
Storage
SD (Max. 64GB) / MMC card slot UP to 2T on 2.5 SATA disk
Onboard
Network
10/100/1000 Ethernet RJ45,optional WIFI
Video Input
A CSI input connector allows for the connection of a designed camera module
Video
Outputs
HDMI, CVBS , LVDS/RGB
Audio Output 3.5 mm Jack and HDMI
Power
Source
5 volt via MicroUSB(DC In Only) and/or MicroUSB (OTG)
USB 2.0
Ports
2 (direct from Allwinner A20 chip)
Buttons
Reset button: Next to MicroUSB connector
Power button: Next to Reset button
Boot button (Optional): Behind HDMI connector
GPIO(2X13) GPIO,UART,I2C bus,SPI bus with two chip selects,
pin
CAN bus,ADC,PWM,+3.3v,+5v,ground.
LED
Power Key & RJ45
Remote
IR (Optional)
OS
Android 4.2,Firefox OS and Linux etc. OS
2
Banana PI M1 User Manual
Interface definition
Product size
92 mm × 60mm
Weight
48g
Hardware connect sketch map
Use method
1, download the relevant Image file
3
Banana PI M1 User Manual
Android Images files
Android
Image
Banana PI_m1_android.img.gz
Tools
PhoenixCard_V309.rar
Instruction
Instruction
SHA-1 Checksum
N/A
Description
An Android port
Release Date
2013-11-07
Version
4.2.2
Kernel
3.3
Linux Images
To use an image file, you will need to untar it first, and write it to a suitable SD
card (4GB or larger):
4
Banana PI M1 User Manual
Linux users should use the UNIX tool dd: sudo dd if=YourSDCardImage
of=/dev/YourSDCard bs=1M
Windows users should use Win32DiskImager
Debian
Image
Banana PI_m1_debian.img.gz
Tools
dd or Win32 Disk Imager
Default login
cubie / cubieboard
Description
A Debian port
Release Date
2013-11-07
Kernel
3.4
Ubuntu
5
Banana PI M1 User Manual
Image
Banana PI_m1_ubuntu.img.gz
Tools
dd or Win32 Disk Imager
Default login
linaro / linaro
Description
A Ubuntu port based on linaro
Release Date
2013-11-07
Version
13.08
Kernel
3.4
2, The process of making the card
Make start the SD card according the downed image file. The android image file use
the PhoenixCard (Android Image) tools, Linux use the dd-like tools (Debian or Ubuntu
image)
We provide the card which compatible with the Rasberry PI to use on Banana PI, no
matter the image or the 8GB card, please use the root competence under the linux or
Ubuntu. And Mount to check the device name/dev/sdx of the SD card.
If have the card was mounted, then first need to umount/ dex/sdxxx
1, Use the card to make image
dd if=/dev/sdX of=pi.8GB bs=10M
6
Banana PI M1 User Manual
The sdx here have to see the which SD card your system correspondence , Sda or
SDB or SDC. It will have the PI.8GB image file which almost 8GB, it is the
mother-board.
“If” means input file, “of” mean the output file, “bs” means buffer size
The details you can check mad dd
If for convenient transfer, need to compression file:
tar czvf pi.8GB.tgz pi.8GB
Then can compress to 2.4GB, because the raspberry PI have 1.4GB, and Debin is
about 2GB, so after compression, it is about 2.4GB
If need to restore to pi.8GBv: tar xvf pi.8GB.tgz
2, Use the image file to make the SD card
dd if=pi.8GB of=/dev/sdX bs=10M
The sdx here have to see which SD card your system correspondence , Sda or SDB or
SDC.
3, Insert the made SD start card
4, Connect with the display screen
5, Connect with the USB charger wire
6, Open the system
7, GPIO define
2,GPIO
7
Banana PI M1 User Manual
Banana Pi V1.4 PIN define
PIN
CON1-P01
CON1-P02
CON1-P37
CON1-P36
CON1-P07
CON1-P09
CON1-P04
CON1-P06
CON1-P08
CON1-P10
CON1-P13
PIN define
GPIO
LINEINL
LINEINR
HPL
HPR
FMINL
FMINR
ADC_X1
ADC_X2
ADC_Y1
ADC_Y2
LRADC0
8
Banana PI M1 User Manual
CON1-P15
CON1-P33
CON1-P17
CON1-P19
CON1-P21
CON1-P23
CON1-P25
CON1-P27
CON1-P29
CON1-P31
CON1-P20
CON1-P24
CON1-P28
CON1-P30
CON1-P18
CON1-P26
CON1-P32
CON1-P34
CON1-P14
CON1-P16
CON1-P12
CON1-P22
CON1-P35
CON1-P38
CON1-P40
CON1-P05
CON1-P11
CON1-P39
CON1-P03
LRADC1
RESET#
CSI-D0
CSI-D1
CSI-D2
CSI-D3
CSI-D4
CSI-D5
CSI-D6
CSI-D7
CSI-PCLK
CSI-MCLK
CSI-VSYNC
CSI-HSYNC
CSI0-STBY-EN
CSI0-RESET#
CSI1-STBY-EN
CSI1-RESET#
TWI1-SDA
TWI1-SCK
CSI-FLASH
CSI0-PWR-EN
CSI-IO0
IPSOUT
IPSOUT
GND
GND
GND
VCC-CSI
CON2-P09
CON2-P11
CON2-P13
CON2-P15
CON2-P17
CON2-P19
CON2-P21
CON2-P23
CON2-P25
CON2-P27
CON2-P29
LCD0-D00
LCD0-D01
LCD0-D02
LCD0-D03
LCD0-D04
LCD0-D05
LCD0-D06
LCD0-D07
LCD0-D08
LCD0-D09
LCD0-D10
PE4
PE5
PE6
PE7
PE8
PE9
PE10
PE11
PE0
PE1
PE3
PE2
PH19
PH14
PH18
PH13
PB19
PB18
PH17
PH16
PH11
PD0
PD1
PD2
PD3
PD4
PD5
PD6
PD7
PD8
PD9
PD10
9
Banana PI M1 User Manual
CON2-P31
CON2-P33
CON2-P35
CON2-P37
CON2-P39
CON2-P40
CON2-P38
CON2-P36
CON2-P34
CON2-P32
CON2-P30
CON2-P28
CON2-P26
CON2-P22
CON2-P20
CON2-P18
CON2-P16
CON2-P14
CON2-P12
CON2-P10
CON2-P08
CON2-P06
CON2-P04
CON2-P02
CON2-P07
CON2-P01
CON2-P03
CON2-P05
CON2-P24
LCD0-D11
LCD0-D12
LCD0-D13
LCD0-D14
LCD0-D15
LCD0-D16
LCD0-D17
LCD0-D18
LCD0-D19
LCD0-D20
LCD0-D21
LCD0-D22
LCD0-D23
LCD0-CLK
LCD0-CS
LCD0-HSYNC
LCD0-VSYNC
LCD0-DE
LCD0-IO2
PWM0
LCD0-IO1
LCD0-IO0
TWI3-SCK
TWI3-SDA
LCDIO-03
IPSOUT
IPSOUT
GND
GND
PD11
PD12
PD13
PD14
PD15
PD16
PD17
PD18
PD19
PD20
PD21
PD22
PD23
PD24
PH6
PD26
PD27
PD25
PH9
PB2
PH8
PH7
PI0
PI1
PH12
CON3-P18
CON3-P16
CON3-P23
CON3-P21
CON3-P19
CON3-P24
CON3-P26
CON3-P05
CON3-P03
CON3-P15
CON3-P22
CAN_RX
CAN_TX
SPI0_CLK
SPI0_MISO
SPI0_MOSI
SPI0_CS0
SPI0_CS1
TWI2-SCK
TWI2-SDA
UART2_CTS
UART2_RTS
PH21
PH20
PI11
PI13
PI12
PI10
PI14
PB20
PB21
PI17
PI16
10
Banana PI M1 User Manual
CON3-P11
CON3-P13
CON3-P10
CON3-P08
CON3-P12
CON3-P07
CON3-P01
CON3-P17
CON3-P02
CON3-P04
CON3-P09
CON3-P25
CON3-P06
CON3-P14
CON3-P20
UART2_RX
UART2_TX
UART3_RX
UART3_TX
PH2
PWM1
VCC-3V3
VCC-3V3
VCC-5V
VCC-5V
GND
GND
GND
GND
GND
PI19
PI18
PH1
PH0
PH2
PI3
J12-P03
J12-P05
J12-P04
J12-P06
J12-P01
J12-P02
J12-P07
J12-P08
PH5
PH3
UART7_RX
UART7_TX
VCC-5V
VCC-3V3
GND
GND
PH5
PH3
PI21
PI20
J11-P01
J11-P02
UART0-TX
UART0-RX
PB22
PB23
7, The splash screen show as below
Android system screen
11
Banana PI M1 User Manual
Ubuntu system screen
12
Banana PI M1 User Manual
Debian system screen
Raspberry Pi
13