1
Charles University in Prague
Faculty of Mathematics and Physics
MASTER THESIS
Martin Koníček
Debugger Visualizers for the SharpDevelop IDE
Department of Software Engineering
Supervisor of the master thesis: Mgr. Pavel Ježek
Study programme: Computer science
Specialization: Software systems
Prague 2011
I would like to thank my supervisor Pavel Ježek for his time and his very helpful, constructive
advice on this thesis.
I would like to extend a very honest “thank you” to David Srbecký, the author of the
SharpDevelop Debugger and Daniel Grunwald, the lead developer of SharpDevelop IDE. They
were both very helpful and the work on this thesis probably wouldn’t start without them. I
would also like to thank Christoph Wille for running the project, Matt Ward, Siegfried
Pammer, Peter Forstmeier, Eusebiu Marcu and all the other SharpDevelop contributors for
their work and enthusiasm and of course Mike Krüger, Bernard Spuida and Christian Holm for
originally starting the SharpDevelop project. They all deserve much respect for their work.
Last but not least, I thank Google for supporting students to work on interesting open source
projects.
I declare that I carried out this master thesis independently, and only with the cited sources,
literature and other professional sources.
I understand that my work relates to the rights and obligations under the Act No. 121/2000
Coll., the Copyright Act, as amended, in particular the fact that the Charles University in
Prague has the right to conclude a license agreement on the use of this work as a school work
pursuant to Section 60 paragraph 1 of the Copyright Act.
In Prague
Martin Koníček
Title: Debugger Visualizers for the SharpDevelop IDE
Author: Martin Koníček
Department: Department of Software Engineering
Supervisor of the master thesis: Mgr. Pavel Ježek
Abstract:
The overall goal of the thesis is to explore new approaches to debugging managed code,
namely visualization of data in the program being debugged. Particular goals of the work are:
(a) to build an object graph visualizer, which displays selected data structure used in the
program as directed graph, (b) improve visualization of object collections by providing an
overview of collection contents and supporting broad range of collection types.
The work is implemented for the SharpDevelop open source IDE for .NET. The author
cooperates with the SharpDevelop team and the results of the work have been already
incorporated into the new version of the IDE.
Keywords: debugging, IDE, data visualization, .NET
Contents
1.
2.
Introduction ..................................................................................................................................................................8
1.1
Style conventions..............................................................................................................................................8
1.2
Terminology........................................................................................................................................................8
1.3
Context...................................................................................................................................................................8
1.4
Motivation............................................................................................................................................................8
1.4.1
Object graphs ............................................................................................................................................9
1.4.2
Collections ............................................................................................................................................... 11
1.4.3
Debugger tooltips................................................................................................................................. 13
1.5
Goals .................................................................................................................................................................... 13
1.6
Preview .............................................................................................................................................................. 14
1.6.1
Object graph visualizer ...................................................................................................................... 14
1.6.2
Collection visualizer............................................................................................................................ 15
1.6.3
Debugger tooltips................................................................................................................................. 15
1.7
Contribution of this thesis ......................................................................................................................... 16
1.8
Background ...................................................................................................................................................... 16
Analysis ........................................................................................................................................................................ 18
2.1
Introduction to the SharpDevelop IDE ................................................................................................. 18
2.2
The architecture of SharpDevelop ......................................................................................................... 19
2.2.1
Reusable parts of SharpDevelop ................................................................................................... 19
2.2.2
ICSharpCode.Core ................................................................................................................................ 20
2.2.3
ICSharpCode.SharpDevelop............................................................................................................. 23
2.2.4
NRefactory .............................................................................................................................................. 23
2.2.5
ICSharpCode.SharpDevelop.Dom.................................................................................................. 24
2.2.6
Future of NRefactory and Dom ...................................................................................................... 24
2.2.7
Debugger.................................................................................................................................................. 25
2.3
Fundamental problem of debugging ..................................................................................................... 30
2.4
Division of work ............................................................................................................................................. 32
2.5
Collections......................................................................................................................................................... 33
2.5.1
Types of collections............................................................................................................................. 33
2.5.2
First approach – treating all collections as IEnumerable ................................................... 35
2.5.3
Second approach – special case for IList ................................................................................... 36
2.5.4
Third approach – converting IEnumerable to IList............................................................... 36
2.5.5
Conclusion ............................................................................................................................................... 37
2.6
2.6.1
Existing work ......................................................................................................................................... 38
2.6.2
What needs to be done ...................................................................................................................... 38
2.6.3
Graph building....................................................................................................................................... 39
2.6.4
Graph layout ........................................................................................................................................... 45
2.6.5
Graph transitions ................................................................................................................................. 51
2.7
Existing work ......................................................................................................................................... 53
2.7.2
What needs to be done ...................................................................................................................... 54
2.7.3
Grid columns, generic vs. non-generic collections ................................................................ 54
Debugger tooltips .......................................................................................................................................... 55
2.8.1
Existing work ......................................................................................................................................... 55
2.8.2
What needs to be done ...................................................................................................................... 56
Implementation ........................................................................................................................................................ 57
3.1
Common base for visualizing collections ............................................................................................ 57
3.2
Object graph visualizer................................................................................................................................ 58
3.2.1
Graph building....................................................................................................................................... 59
3.2.2
The ObjectGraph................................................................................................................................... 59
3.2.3
Graph layout ........................................................................................................................................... 61
3.2.4
Graph matching..................................................................................................................................... 67
3.2.5
Graph drawing and transitions ...................................................................................................... 67
3.2.6
The result................................................................................................................................................. 67
3.3
Collection Visualizer ..................................................................................................................................... 69
3.3.1
Lazy loading items when scrolling ............................................................................................... 69
3.3.2
Expanding rows of the grid.............................................................................................................. 70
3.3.3
Lazy loading columns (object properties) ................................................................................ 71
3.3.4
The result................................................................................................................................................. 71
3.4
4.
Collection Visualizer ..................................................................................................................................... 52
2.7.1
2.8
3.
Object graph visualizer................................................................................................................................ 37
Debugger tooltips .......................................................................................................................................... 72
3.4.1
Integration of visualizers.................................................................................................................. 72
3.4.2
The result................................................................................................................................................. 73
Conclusion and future work................................................................................................................................ 75
References ............................................................................................................................................................................ 77
Appendices ........................................................................................................................................................................... 79
User manual .................................................................................................................................................................... 79
Content of CD.................................................................................................................................................................. 79
Table of listings and figures ..................................................................................................................................... 80
1. Introduction
The ideas for this thesis are based on a desire for better debugging features in current IDEs. A
vision about innovative ways of debugging, namely debugging object graphs and collections,
was implemented in form of new functionality for SharpDevelop – the open source IDE for
.NET. This thesis first describes the motivation behind this functionality – i.e. why to build
new features even though developers could live without them so far. Then, detailed analysis of
the work is presented, including an overview of SharpDevelop architecture and means of
integration of the work into SharpDevelop. Finally, the Implementation section describes the
design and highlights interesting parts of the implementation.
1.1 Style conventions
The following style conventions are used throughout the document:
Text in italics denotes special terms and definitions.
Fixed-width font is used for code and pseudocode listings and references to symbols.
1.2 Terminology
Debugger – a program which controls execution and observes state of another program.
Debuggee – the process being debugged by the debugger.
IDE – Integrated development environment. A collection of software development tools such
as a code editor, a debugger etc.
By the term collection this thesis refers to .NET Lists, ObservableCollections, arrays, or any
other IEnumerables. Similar classes exist in other environments and most ideas mentioned in
this thesis would apply there as well.
1.3 Context
This thesis is about debugging managed programs in the context of .NET environment.
Therefore, whenever the text mentions classes and their instances, it refers to managed .NET
instances, references etc. Likewise, the term object properties in the context of this thesis
refers to standard .NET properties – i.e. a getter and/or a setter method usually with a backing
field. Still, a lot of concepts and ideas described in this thesis can be directly applied to other
managed environments, for example Java.
1.4 Motivation
Debuggers and Integrated Development Environments are a very live topic in software
engineering and they have seen a lot of improvement in the last years. However, current
debuggers still do not solve some scenarios sufficiently – this section identifies such scenarios.
8
1.4.1 Object graphs
Currently, most visual debuggers are similar in terms of presenting data from the debuggee
(the program being debugged) to users. The most typical way of presenting such data are
watches, which show variables in current scope in a tree view fashion - if an object contains
references to other objects, these become its children in the tree. Debugger tooltips are a very
similar feature to watches; the difference is that debugger tooltips allow users to explore
values of expressions by pointing mouse cursor directly at expressions in code. This makes
debugger tooltips easier to use than watches, since users do not have switch their focus
between the watch window and the code editor.
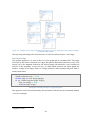
Figure 1 – Watch window and debugger tooltips in Eclipse 3.5 (watch window is called "Variables" in
Eclipse)
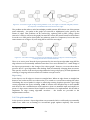
But neither debugger tooltips nor watches are perfect for all scenarios – take, for instance, a
structure of two objects having a reference to each other:
Figure 2 – Two instances having a reference to each other
Figure 2 shows a simple data structure as usually depicted by people. However, the following
figure shows how such structure is presented by watches or debugger tooltips:
9
Figure 3 – Data structure from Figure 2 presented by debugger tooltips in Visual Studio 2010
The problem is that using current debugging tools, users have very little means of
determining how the data structure actually looks in reality. In the example from Figure 3 the
tooltips can be expanded infinitely.
Another problem which is not very well solved today is visualization of changes. If a user
performs a step in the debugger how can he or she determine what changes occurred in the
state of the program? Sometimes the change is easy to understand from the code, as in:
IFoo foo = GetFooImplementation(context);
But if the code being stepped over changes multiple variables, it can be useful to see what just
happened. This is solved in some IDEs by highlighting variables whose values were just
changed.
10
Figure 4 – In the Visual Studio 2010 Locals window, values of variables changed by debugger step are
highlighted automatically.
Unfortunately, this approach is not great for visualizing changes to data structures. What if an
item was inserted into a linked list, or what if a tree rotation occurred? I realized this problem
when teaching Introduction to programming to university freshmen. What I frequently
observed was that there was code on one side of the whiteboard and a drawing of a data
structure on the other side. The teacher was explaining the code by pointing to the current
“instruction pointer” with a finger and moving the finger from one line of the program to the
next line. At the same time a student was updating the drawing of a data structure by erasing
parts of it and drawing new parts as the structure was being modified. By seeing how each
statement modified the data structure the students could clearly see how the program
worked.
After several weeks of running this university class I had an idea – why not automate the
process? The IDE could actually let users step through the code and draw and update data
structures in a similar way we did in the class.
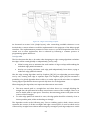
1.4.2 Collections
The second issue with current debuggers are insufficient possibilities to explore and
understand contents of collections of complex objects. For example, when debugging a program
that works with a collection of objects of type Person, such collection is commonly visualized
in the following way in current debuggers:
11
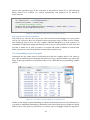
Figure 5 – Debugger tooltip in Visual Studio 2010 showing contents of a collection of objects
The problem is that such view does not provide almost any information – there is no way to
get an overview of the contents of the collection and there is also no way to quickly locate
individual items based on their properties. The only possibility is to drill down the items of
the collection, opening and closing items one by one, which takes a lot of time. Combined with
the fact that collections are one of the most common data structures, this is a serious
shortcoming of current debuggers.
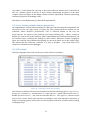
Figure 6 – Debugger tooltip in Visual Studio with one collection item expanded. The interesting property
was declared in a base class so expanding multiple times was needed to locate the desired property.
In
Visual
Studio,
debugger support for DebuggerDisplayAttribute
and
DebuggerTypeProxyAttribute [1], [2] partially solves this problem but these attributes have
to be included in the code being debugged and also provide only hard-wired view of
individual fields or properties.
Apart from general issues with debugging collections, there are issues specific to
SharpDevelop. SharpDevelop’s integrated debugger currently lacks support the IEnumerable
type and does not support large collections efficiently (expanding contents of a large
collection can block whole SharpDevelop for a long time, depending on the size of the
collection).
12
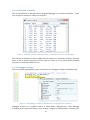
1.4.3 Debugger tooltips
Debugger tooltips are a feature similar to watches, as shown in the following screenshot:
Figure 7 – Debugger tooltips in SharpDevelop 3
The advantage of debugger tooltips compared to watches is that users can just point a mouse
cursor at anything they are interested in. They don’t have to look for variables in the watch
window which typically contains more than a dozen of available variables. Debugger tooltips
are a frequently used feature of Visual Studio’s integrated debugger and SharpDevelop
implements them as well. However, the debugger tooltips in SharpDevelop 3 are missing two
very important features: support for large collections, and support for the IEnumerable type.
The importance of support for IEnumerable is very high since typical programs use
IEnumerable extensively. Moreover, the UI of SharpDevelop 3 was built using Windows Forms
and starting with SharpDevelop version 4.0, Windows Forms has been deprecated in and the
UI of SharpDevelop has been rewritten to WPF, which means that completely new tooltips
implemented in WPF are needed. This thesis covers a new implementation of debugger
tooltips for SharpDevelop 4.0.
1.5 Goals
To address the issues identified in section 1.4 (Motivation), this thesis sets the following goals:
Provide a way for users to explore state of data structures in a debuggee in a similar way
people draw data structures on a whiteboard.
Make it possible for users to see the changes occurring to data structures caused when
stepping in the debugger. The more understandable the visualization of the change, the
better.
13
Provide a way for users to get an overview of contents of collections of objects, in an
easier way than using debugger tooltips.
Add support for IEnumerable collections to SharpDevelop’s integrated debugger.
Add efficient support for large collections (tens of thousands of items) to SharpDevelop’s
integrated debugger.
Reimplement SharpDevelop’s debugger tooltips in WPF, also adding support for
IEnumerable collections and large collections.
Make it possible to open debugger visualizers from the debugger tooltips; make the
integration extensible, enabling users to implement new debugger visualizers.
Implemented features should work when debugging C# and VB .NET code.
1.6 Preview
To give the reader a better overview of what this thesis is about, this section presents a short
preview of some of the results of this thesis.
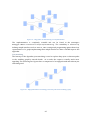
1.6.1 Object graph visualizer
Our first addition to SharpDevelop’s integrated debugger is a visualizer of object graphs.
Figure 8 – Object graph visualizer showing in-memory instances and references between them
The Object graph visualizer lets users explore data structures. The graph is updated live as the
user steps in the debugger and the state of the data structure changes.
14
1.6.2 Collection visualizer
The second addition to SharpDevelop’s integrated debugger is a collection visualizer – a new
way to explore contents of collections of objects.
Figure 9 – Collection visualizer showing contents of a collection of objects in the debugger
The Collection visualizer provides insight into the contents of collections of objects. The main
point is that it displays properties of the collection items in a way which makes multiple
properties of each item visible at once.
1.6.3 Debugger tooltips
The third feature implemented as part of this thesis are debugger tooltips for SharpDevelop.
Figure 10 – New debugger tooltips for SharpDevelop 4, with support for visualizers
Debugger tooltips are a popular feature of Visual Studio. SharpDevelop 3 had debugger
tooltips but two important features were missing - support for IEnumerable collections, and
15
support for large collections. As a part of this thesis the tooltips were reimplemented in WPF
for SharpDevelop 4.0, including added support for IEnumerable collections and large
collections.
1.7 Contribution of this thesis
As a result of this thesis SharpDevelop is currently the only IDE to have the features described
in the thesis and we are expecting user feedback to see how these features help users in their
everyday development tasks. Some users have already provided positive feedback – for
example, they expressed a need for a better Collection debugging support in their favorite
IDEs.
Note that this thesis is not about implementation of a feature similar to Visual Studio’s
debugger visualizers [3]. In Visual Studio, users can include debugger visualizers for custom
types into their code and Visual Studio then offers these visualizers in its debugger tooltips.
Since the approach used in Visual Studio would be too limiting1 for the visualizers described
in this thesis, we rather implement visualizers directly in SharpDevelop and provide
extensibility points for other visualizers to be added in form of SharpDevelop AddIns.
Functionality similar to Visual Studio’s user defined visualizers is not supported in
SharpDevelop yet.
1.8 Background
The first ideas for this thesis come from the beginning of 2009 when I was experimenting with
visualizing object graphs using the Visual Studio debugger [4], thinking about improving the
way people debug data structures. Then I found about the Google summer of code program.
Seeing that SharpDevelop IDE was among the mentoring organizations and the team even
wanted to improve their debugger, applying to SharpDevelop in Google summer of code was a
no-brainer.
Google summer of code [5] is a program run by Google. Open source organizations apply to
the program and Google selects the most attractive organizations to participate. Among
participating organizations are such ones as Eclipse, Firefox, gcc, Haskell, Mono, Ogre3D,
OpenOffice, Scala and many others. The students then apply to individual organizations with
detailed proposals of their ideas. Google distributes approximately 1000 slots to the
organizations, based on how popular the organization is (that is how many applications the
organization received). For example, SharpDevelop had five slots in 2009. Then it is up to the
mentoring organization members (that is, the long-term contributors to the open source
project) to select the students they like the most. These students then work for 3 months
fulltime on their projects and receive $5000 from Google, provided the mentoring
organization confirms that the student did a good job. The not-so-unofficial goal of Summer of
code is that students stay with the project after the summer and become contributors.
My experience with working on SharpDevelop has been very positive mainly because the
SharpDevelop team is made by the best programmers I have had an opportunity to work with.
They deserve a lot of respect not only for contributing their skills and free time, but also for
Visual Studio’s debugger visualizers use serialization to transport whole object to be visualized from
the debuggee to the IDE.
1
16
the quality of their work. SharpDevelop is a very good source for learning about design, coding
practices and technologies. Moreover, the team members are helpful and discussions with
them are always effective.
Figure 11 - SharpDevelop meeting in August 2009 in Bad Ischl, Austria. Left to right: Tomasz Tretkowski
(Gsoc: C++ Backend Binding), Daniel Grunwald (Senior Developer, Architect), Martin Koníček (Gsoc:
Debugger visualizers), Siegfried Pammer (Gsoc: Xaml Binding), David Srbecký (Debugger), Peter
Forstmeier (SharpDevelop Reports), Christoph Wille (Project Management).
17
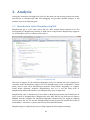
2. Analysis
Having the motivation and high-level goals for the thesis set, this section provides necessary
introduction to SharpDevelop IDE and debugging and provides detailed analysis of the
possible ways of reaching the goals.
2.1 Introduction to the SharpDevelop IDE
SharpDevelop [6] is a free open source IDE for .NET written almost entirely in C#. The
development of SharpDevelop started in 2000 and as of April 2011 SharpDevelop supports
C# 4, Visual Basic 10, F#, IronPython, Boo and C++.
Figure 12 – SharpDevelop IDE
The level of support for the individual languages varies. For example, F# code-completion is
currently under development. Support for C# in SharpDevelop is well comparable to Visual
Studio and in some areas SharpDevelop surpasses Visual Studio. Regarding C++ support,
Visual Studio definitely surpasses SharpDevelop, but C++ is not the main focus of
SharpDevelop. All this information is for SharpDevelop 4.0 as of April 2011.
SharpDevelop runs on Windows (for Linux there is MonoDevelop which was forked from an
early version of SharpDevelop). SharpDevelop uses .NET SDK for the build process (that is
MSBuild and the compilers for individual languages). SharpDevelop 4.0 supports targeting
.NET versions 2.0, 3.0, 3.5 and 4.0. SharpDevelop uses the project and solution file format of
Visual Studio – therefore, it can be used side-by-side with Visual Studio.
SharpDevelop (as of April 2011) does not fully support the following functionality:
18
Web application development. It is possible to build and debug an ASP.NET application
using SharpDevelop [7]. However, the tooling (.aspx code completion etc.) is not
implemented.
WPF designer is work in progress.
As SharpDevelop is completely free, it makes sense to compare it to the Express version of
Visual Studio. SharpDevelop has the following features which are not present in Visual Studio
Express:
Integrated profiler
NUnit integration (unit tests directly in SharpDevelop)
Subversion and Git integration out of the box
Code coverage
ILSpy integration (open source .NET decompiler, developed by the SharpDevelop team)
Reports (developed as part of SharpDevelop)
Debugger visualizers
Productivity features (ReSharper-like context actions, navigation shortcuts, etc.) [8]
Extensibility
Of course, there are many small differences on both sides, but the list should provide a basic
overview.
The last mentioned feature, Extensibility, is important: SharpDevelop can be extended or
modified in almost any way. Its API is well designed and in case there would be an extension
point missing, the team is open to good contributions. Being an open source IDE written
entirely in C# makes SharpDevelop a very interesting project for programmers interested in
.NET who would like to learn advanced topics and have their work used by many people
(SharpDevelop is currently being downloaded around two thousand times a day).
2.2 The architecture of SharpDevelop
This section provides a high-level look at the architecture of SharpDevelop, its extensibility
model and how the Debugger visualizers fit into the picture.
2.2.1 Reusable parts of SharpDevelop
Several parts of SharpDevelop are written as standalone libraries. These include:
ICSharpCode.Core – the generic extensibility framework on which SharpDevelop is built
NRefactory (C# and VB parser and AST)
ICSharpCode.SharpDevelop.Dom (type system representation)
AvalonEdit [9] (code editor with syntax highlighting and code completion window)
Debugger
Profiler
19
Usage data collection (collecting data about how users interact with the application and
uploading them to a server)
Reports (reporting library)
All of these libraries are completely reusable. Most of them are integrated into SharpDevelop
by AddIns which act as a “glue” to provide the functionality of the libraries in SharpDevelop.
For example, Debugger.Core is a managed debugger library and Debugger.AddIn contains user
interface and SharpDevelop-specific logic. Similarly, AvalonEdit is a code editor with support
for syntax highlighting and AvalonEdit.AddIn adds SharpDevelop-specific behavior, like splitview, debugger tooltips, context actions etc.
2.2.2 ICSharpCode.Core
SharpDevelop is an application built using a generic extensibility framework called
ICSharpCode.Core (further referred to as the Core). The Core provides an AddIn
infrastructure, where AddIns can extend almost anything, including other AddIns. The main
point of the Core is to allow users to provide extension points in their applications very easily.
The Core was developed for the purposes of SharpDevelop but it is a standalone framework
on which SharpDevelop is built.
ICSharpCode.Core for WPF and Windows Forms applications
There
are
two
versions
of
the
Core:
ICSharpCode.Core.WinForms
and
ICSharpCode.Core.Presentation, designed to be used in Windows Forms and WPF applications
respectively. They both reference the assembly ICSharpCode.Core which contains all the nonUI-specific functionality.
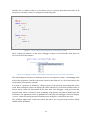
The AddIn tree
The extensibility infrastructure provided by the Core is called the AddIn tree. AddIns are
defined in XML files with .addin extension. There are several standard tags, the basic one
being a tag called Path which essentially enables adding extension points. In the following
example three ToolBarItems are being added to the AddIn tree path called
“/Browser/Toolbar” :
<Path name = "/Browser/Toolbar">
<ToolbarItem id
= "Back"
icon
= "Icons.16x16.BrowserBefore"
tooltip = "${res:AddIns.HtmlHelp2.Back}"
class
= " SharpDevelop.BrowserDisplayBinding.GoBack"/>
<ToolbarItem id = "Separator1" type = "Separator"/>
<ToolbarItem id
= "Home"
icon
= "Icons.16x16.BrowserHome"
tooltip = "${res:AddIns.HtmlHelp2.Homepage}"
class
= "SharpDevelop.BrowserDisplayBinding.GoHome"/>
[...]
Listing 1 - .addin file defining three ToolbarItems
The application built using the Core can then use the following call to obtain a ToolStrip
object with three buttons and a separator, as defined in the .addin xml file :
20
var toolStrip = ToolbarService.CreateToolStrip(this, "/Browser/Toolbar");
Listing 2 – Obtaining items for a Toolbar, defined in Listing 1
Such functionality by itself wouldn’t be very interesting. The interesting part comes when
someone else writes an AddIn for the application, specifying the following in the .addin
definition file:
<Path name = "/Browser/Toolbar">
<Condition name="IsSolutionOpen" action="Disable">
<ToolbarItem id
= "SyncHelpTopic"
icon
= "Icons.16x16.ArrowLeftRight"
tooltip = "${res:AddIns.HtmlHelp2.SyncTOC}"
class
= "HtmlHelp2.SyncTocCommand"
insertafter = "Separator1"/>
[...]
Listing 3 – A different AddIn adding another ToolbarItem
Now, the call to ToolbarService.CreateToolStrip will return a ToolStrip with four
buttons thanks to the fact that the AddIn tree combines all the AddIn definitions together. By
creating the toolbar using the Core API (ToolbarService), the host application has made its
toolbar extensible. The more the host applications uses such calls, the more extensible it will
be.
Listing 3 also shows a standard construct called Condition. The Condition causes the
ToolbarItem to be enabled only if the IsSolutionOpen condition evaluates to true. The
Condition has custom logic implemented in a C# class, which has to be registered in the
following way:
<Runtime>
<Import assembly=":HelpAddin">
<ConditionEvaluator name="IsSolutionOpen"
class="HelpAddin.IsSolutionOpenConditionEvaluator"/>
[...]
Listing 4 – Registering a ConditionEvaluator
In the listings 1 and 3 one can also notice that each of ToolbarItem xml tags has a number of
attributes. The attribute class determines the name of the class that handles the toolbar
button click. The insertafter attribute specifies at which position the item should be inserted.
Insertafter refers to an id of another item. The final order of items is resolved from the
insertafter relations by a topological sort algorithm.
So far the examples have shown two types of tags which can be inserted inside a Path in the
AddInTree: Condition and ToolbarItem. These xml tags are called codons in SharpDevelop
terminology. There are six types of default codons:
Class - Creates object instances by invocating a type's parameterless constructor.
FileFilter - Creates file filter entries for the OpenFileDialog or SaveFileDialog .
21
Include - Includes one or multiple items from another location in the addin tree. You
can use the attribute "item" (to include a single item) or the attribute "path" (to
include all items from the target path).
Icon - Used to create associations between file types and icons.
MenuItem - Creates a menu item (WinForms on WPF depending on the version of Core
used).
ToolbarItem - Creates a toolbar item (WinForms on WPF depending on the version of
Core used).
The class codon is very useful when providing extensibility not related to user interface. A
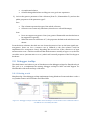
typical usage is to register classes at a well-known Path:
<Path name="/SharpDevelop/Debugger/Visualizers">
<Class class="Debugger.AddIn.Visualizers.ObjectGraphV isualizer" />
</Path>
Listing 5 – Registering service implementations at a well-known path
Then the host application can obtain all the available implementations:
AddInTree.BuildItems<IVisualizer>("/SharpDevelop/Debugger/Visualize rs");
Listing 6 – Obtaining all implementation from a well-known path in the AddIn tree
Such call assumes that all the classes registered at the Path /SharpDevelop/
Debugger/Visualizers implement the IVisualizer interface provided by the host
application (that is SharpDevelop in our case).
Lazy loading
To improve application startup time, the parts of the AddIn tree are only loaded when needed.
For example if an AddIn adds items to a menu, the AddIn assembly will not be loaded until the
menu is opened for the first time.
Extensibility
So far, six default types of codons (Class, FileFilter, Include, Icon, MenuItem,
Toolbar) were described. All these codons are actually not hardwired into the AddIn tree
implementation. There is a generic mechanism of turning codons (i.e. the xml tags) into
objects, and this mechanism is extensible. We will not go into details here because there is an
excellent article by Daniel Grunwald [10] covering this topic and more.
Localization
ICSharpCode.Core provides support for localization. Localization strings are stored in
standard .NET resource files with extensions denoting culture, such as
“StringResources.de.resx”. The individual strings can have arbitrary identifiers but a
namespace-like convention is usually used to prevent collisions. The strings are then
accessible in XAML using a markup extension:
"${res: AddIns.Profiler.ProfilingView.CpuCyclesText}"
Listing 7 – Accessing localized strings from XAML
22
And in code using e.g.
StringParser.Parse("${res:AddIns.Profiler.ProfilingView.CpuCyclesText}")
Listing 8 – Accessing localized strings from C#
In SharpDevelop itself, the resource files are being generated by a custom tool from a
translation database filled by contributors using a translation website1.
Remarks
For more information about SharpDevelop.Core see [10] and [11].
2.2.3 ICSharpCode.SharpDevelop
As said before, SharpDevelop is an application built using ICSharpCode.Core. The codebase of
SharpDevelop itself consists of many AddIns. Even the IDE “itself” is an AddIn (defined in
ICSharpCode.SharpDevelop.addin). The SharpDevelop AddIn contains the base of
SharpDevelop UI and a part of functionality but it is not a working IDE - it rather provides
interfaces to be implemented by other AddIns. For example, code editing, code completion,
and debugger are all implemented as AddIns extending ICSharpCode.SharpDevelop.
2.2.4 NRefactory
NRefactory is a standalone library providing object model for C# and VB code. NRefactory is
important to this thesis because the debugger is using NRefactory extensively to represent
expressions to be evaluated.
NRefactory contains a lexer and a parser of C# and VB languages2. The main use of NRefactory
is parsing of source code and providing a Syntax tree of the code. There are many possible
types of nodes in the syntax tree, for example ForStatement, SwitchStatement ,
MemberReferenceExpression , BinaryOperatorExpression etc. For example the following
code snippet is parsed into the following syntax tree:
var foo = Foo.Size + 2;
Listing 9 – Sample code to be parsed by NRefactory
VariableDeclaration(Name=foo)
Intializer=
BinaryOperatorExpression(op=Add)
MemberReferenceExpression(MemberName=Size)
IdentifierExpression(Identifier=Foo)
PrimitiveExpression(Value=2)
Figure 13 – Parse tree for the the code snippet from Listing 9
The important fact to realize is that the syntax tree does not contain any semantic information
– for example it is not known whether Foo is a class, a local variable, or a property.
From a personal point of view, it is a rewarding feeling to add a new string into the UI and see it
translated into ten languages by people from around the world.
2 The lexer and parser are kept up to date with most recent language specifications changes.
1
23
Visitors
NRefactory uses the classical Visitor pattern for all operations on the syntax tree: the root of
the class hierarchy, INode, defines a method AcceptVisitor and each specific type of node
overrides AcceptVisitor to call a specific version – e.g. ForStatement.AcceptVisitor calls
visitor.VisitForStatement(this). The logic of the tree traversal is implemented in
AbstractAstVisitor from which users can derive new visitors to implement new
operations1.
2.2.5 ICSharpCode.SharpDevelop.Dom
In the section 2.2.4 (NRefactory) it was stated that the NRefactory syntax tree does not
contain any semantic information – in Figure 13 it can be seen that Foo is an Identifier but no
more information is provided – there is no information about whether it is a class, a property,
a field or a local variable.
Of course, the IDE needs a lot of semantic information about the code to provide features such
as Go to definition, Find references and Code completion. The semantic understanding of the
code is provided by ICSharpCode.SharpDevelop.Dom. The Dom provides an object model for
representation of classes, methods, types, parameters etc. An important part of the Dom are
resolvers (that is implementations of IResolver). Resolvers accept the identifier Foo from
our example plus context (position in the source code file) and return information telling
whether the symbol is a class, a property or other symbol, where to find its definition etc.
In order for the resolvers to be able to work correctly, the Dom representation of all the
symbols in the currently open solution is needed. When a solution is opened, SharpDevelop
reads and parses all the solution files to build an initial Dom representation. When files are
being edited, SharpDevelop is reparsing the files in background and updating the Dom
representation.
ICSharpCode.SharpDevelop.Dom depends only on NRefactory and is therefore reusable
outside of SharpDevelop. The principle of programming against interfaces is strictly followed,
so for example PythonClass (coming from the IronPython backend binding) implements
Dom.IClass and the code in Dom can work with it without knowing anything about Python.
Similarly, concrete implementations of IResolver provide resolvers implementing the
semantic rules of C#, VB, Xaml and the other supported languages.
2.2.6 Future of NRefactory and Dom
In retrospect, the decision to split the syntactic and semantic representation of code into
NRefactory and Dom was not the best one – there could be a unified representation bringing
the facilities of NRefactory and Dom together. Also, NRefactory was designed when C# and VB
were identical languages differing only in syntax. However, the features of C# and VB cannot
be mapped 1:1 anymore. As a result, new version of NRefactory [12] has been designed to be
used in the future versions of SharpDevelop.
There is also a very interesting initiative from Microsoft to open the internals of their
compiler which could be very useful for SharpDevelop and many other tools dealing with
AbstractAstVisitor is intented for read-only operations. If an operation needs to modify the parse tree,
it should subclass AbstractAstTransformer.
1
24
source code. The problem with the current C# compiler is that it acts as a black box,
consuming source code and producing binary output. In the process of turning the source
code into bytecode, the compiler builds large amount of very useful semantic information
about the code, and then throws it away.
IDEs and other tools have to re-implement the logic that is already present in the black-box
compiler – NRefactory contains a full C# parser, the resolvers implement type inference and
overload resolution exactly according to the C# language specification etc. All these features
are present in the compiler but not accessible (yet).
Note that the Scala programming language already has an open compiler (called Presentation
compiler [13]) exposing all its understanding of the code so for example the Scala IDE for
Eclipse [14] and Ensime IDE for Emacs [15] are both using the Scala Presentation compiler.
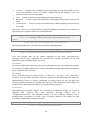
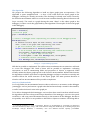
2.2.7 Debugger
SharpDevelop ships with an integrated debugger. The overall schema of interaction of the
debugger with the debuggee is the following:
Figure 14 – Overall shema of debugging. An important fact to realize is that the debuggee lives in a separate
process.
SharpDevelop’s integrated debugger consists of two components – Debugger.Core and
Debugger.AddIn. Debugger.Core is a standalone debugging library for .NET and
Debugger.AddIn integrates this library into SharpDevelop.
Debugger.AddIn
Debugger.AddIn is essentially SharpDevelop’s integrated debugger. It contains all the IDEspecific logic and user interface, including the Debugger tooltips and Debugger visualizers.
Debugger.AddIn relies on Debugger.Core for most of its functionality, for example setting
breakpoints, stepping, or evaluating expressions.
Debugger.Core
Debugger.Core is a standalone debugging library for .NET. It provides features typically
present in debuggers: attaching to and controlling a user program, stepping, setting
breakpoints, exploring state of the variables in the program etc. Debugger.Core uses a lowlevel debugging COM API provided by the .NET runtime [16]. Parts of this section are based on
information from David Srbecký, namely [17].
25
Architecture
Debugger.Core consists of four cleanly separated layers. Starting from the lowest layer, these
layers are:
COM API: The low-level unmanaged debugging API of the .NET framework. The API
contains interfaces such as ICorDebug or ICorDebugManagedCallback.
COM wrappers: Auto-generated thin layer over the COM API which makes it a bit easier to
use. It converts 'out' parameters to return values and tracks returned COM objects so that
they can be explicitly released (this is necessary so that the debugger does not lock
assemblies). The layer also contains several hand-written methods that handle marshaling
of strings and other objects.
NDebugger: The debugging library itself. It provides access to variables and types via
reflection-like interface. It provides commands for setting breakpoints, stepping and
basically everything usually expected from a debugger.
ExpressionEvaluator: Extension on top of NDebugger which can evaluate C# expressions.
ExpressionEvaluator depends on SharpDevelop's NRefactory.
Fundamentals of debugging
The debugger can start a new debuggee process or it can attach to an existing one. While the
debuggee is running, there is not much the debugger can do. Almost all operations are
forbidden. The debugger has to wait until the debuggee pauses - usually because user's
breakpoint is hit. Once the debuggee is paused, the debugger can investigate its state - it can
look at the call stack, read local variables and so on. Stepping or pressing "Continue" will put
the debuggee into running state again. An important thing to realize is that the debugger and
the debuggee are running in separate processes.
Sample
To demonstrate Debugger.Core in practice, let’s look at an example of its usage. Assume we
have the following “Hello world” program:
class Program
{
public static void Main(string[] args)
{
string message = "Hello World!";
System.Console.WriteLine(message);
}
}
Listing 10 – Sample program to be debugged
This program can be debugged using the following code:
26
NDebugger debugger = new NDebugger();
Breakpoint breakpoint = debugger.AddBreakpoint("Program.cs", 6);
breakpoint.Hit += delegate { Console.WriteLine("Breakpoint hit"); };
// Start the debugee
Process process = debugger.Start("HelloWorld.exe", "C:\\", null);
// Waits until the breakpoint is hit if it did not
// already happen.
process.WaitForPause();
// The breakpoint hit message should be shown now
// Show the name of the current method on the stackframe
Console.WriteLine("Current method =
" + process.SelectedStackFrame.MethodInfo.FullName);
// Get reference to the local variable
Value localVariable =
process.SelectedStackFrame.GetLocalVariableValue("message");
Console.WriteLine(string.Format("message = {0} (type: {1})",
localVariable.AsString(), localVariable.Type.Name));
// Resume execution after the breakpoint
process.AsyncContinue();
Listing 11 – Sample usage of the debugger
The program produces the following output:
Breakpoint hit
Current method = Program.Main
message = Hello World! (type: String)
Listing 12 – Ouput of the program from listing 10
Investigating state of variables
The sample code in the previous section showed that it is possible to obtain values of
variables defined in the debuggee process. This section described how the process of
obtaining values of variables works and what the design decision were when building this
part of the debugger API.
Values
Listing 11 in the previous section showed a statement for obtaining the value of a variable:
Value localVariable =
process.SelectedStackFrame.GetLocalVariableValue("message");
Console.WriteLine(string.Format("message = {0} (type: {1})",
localVariable.AsString(), localVariable.Type.Name));
Listing 13 – Getting values of variables using the debugger
The object returned by the GetLocalVariableValue call is of type Debugger.Value . The
Debugger.Value class has an AsString() method which returns a string representation of
the value of the variable.
What exactly is the Debugger.Value? As said before, the debugger and the debuggee are
running in separate processes. That means a Debugger.Value cannot hold a direct reference
to an instance in the debuggee process (because memory spaces of individual processes are
27
strictly separated by the operating system). Instead, some sort of interprocess communication
must be used. The ICorDebug API used by the Debugger.Value class under the hood takes of
this communication.
If the value in the debuggee is of primitive type like string or integer, its actual content can be
requested. However if the value is a class, we must enumerate its fields and properties and
get the values for the ones that we are interested in. We are of course free to get fields of the
new values as well and drill down as much as we want to.
There is a good reason why this model is appropriate. The debugger does not know that the
user will create a field "myHelloWorldMessage" and therefore it cannot reference it. Even if
direct reference to the object in the other process was somehow available, the debugger
would still have to use reflection to figure out what fields the object contains and then get
their values one by one. In fact, most of the debugger's API inherits from the abstract
reflection classes (like Type, MethodInfo) so anyone familiar with reflection should have no
problems using the debugger API.
Lifetime of Values
The .NET garbage collector (GC) presents a significant complication to the debugger. When
the debuggee is paused no code can be executed including the garbage collector so it is safe to
investigate it as much and as long as we want. However, if the debuggee is resumed even for
just a few instructions, the GC might have been run and it might have moved all variables
around in memory. The GC takes care to update all references within the debuggee so that it
does not even notice. However, it unfortunately does not tell the debugger. This means that
whenever the debuggee is resumed, all debugger's Values become invalid because they might
be pointing to wrong memory (Value holds a reference to the COM object identifying the value
in the debuggee). The next time the debuggee is paused, it has to obtain all values again. This
problem is more problematic than it might initially seem - getting a value of a property or
calling Object.ToString() both require that the debuggee is resumed for a while so that the
methods can be injected into the debuggee and executed. Imagine that we are debugger
tooltips to drill down to object "foo.bar.Person" which contains two properties - FirstName
and Surname. After we evaluate the "FirstName" property, all values will become invalid and
we will have to obtain "foo.bar.Person" again just so that you we evaluate "Surname".
Permanent references
The ICorDebug API provides a facility to get around the problem with the lifetime of Values –
it is possible to create a strong handle, which does not become invalid when the debuggee is
resumed and always points to the right place in the memory where the debuggee instance
resides, even after the target instance was moved by the garbage collector. This functionality
is accessible using the Value.GetPermanentReference() method in Debugger.Core. In this
thesis, we refer to Values returned from GetPermanentReference() as Permanent references.
It seems that the problem with the lifetime of Debugger.Values is solved by immediately
obtaining a Permanent reference immediately when obtaining any Debugger.Value.
However, the documentation states that user code should never keep many Permanent
references (more than a few hundred). Therefore, the problem remains as we are allowed to
create Permanent references and use them shortly but we cannot keep many of them as long
as we need to.
28
Expressions
To get around the problem with Garbage collection invalidating Values, Debugger.Core
provides Expressions, using NRefactory.Ast.Expression . An Expression is a tree which
represents a way to obtain a Debugger.Value.
Expressions can be turned into their string representation (e.g. "foo.bar.Person“) and parsed
from a string in C# format. This functionality is provided by NRefactory. Expressions can be
evaluated by calling Expression.Evaluate() , producing a Debugger.Value. This is the main
point of expressions in the debugger – instead of keeping a Debugger.Value and never
knowing when it becomes invalid, we keep an Expression an evaluate it whenever we need its
value. Indeed, this how all the UI of SharpDevelop’s integrated debugger uses Expressions:
When the user has foo.bar open in a debugger tooltip and expands Person, the debugger
tooltip generates an expression foo.bar.Person and then evaluates it.
At one point in the past, the Value class was designed so that it would remember the
expression using which it was obtained and automatically reevaluate itself if needed.
However, this approach turned out to be quite difficult to debug since a relatively simple call
could cause complicated chain of events. The expression based approach is more explicit and
thus allows better reasoning about the program - both in terms of behavior and performance.
Expression evaluation
Expression.Evaluate() is implemented in the ExpressionEvaluator class which acts as a
visitor, traversing the syntax tree of the Expression. This design takes advantage of the fact
that expression evaluation can be defined recursively:
For example, when evaluating expressions list[i+3].Name or person.Name, list[i+3] or person is
evaluated first and then the field or property called Name is evaluated on the result of the
evaluation. To evaluate list[i+3], i+3 is evaluated and the result is passed as a parameter to the
indexer of list.
This is exactly how ExpressionEvaluator works. Methods calls are also supported (so
foo.Bar(foo).Foo can be evaluated).
Caching
For better performance, the ExpressionEvaluator caches results of evaluations in form of
Permanent references. This is useful because often a series of Expressions like
this.Person.FirstName, this.Person.LastName and so on are evaluated and thanks to caching,
this.Person is evaluated only once. When the debuggee is resumed by user request (for
example by a debugger step) the cache is cleared.
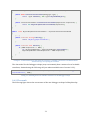
Performance tricks
There are some clever tricks used to improve performance of the evaluation. For example, in
.NET it is very common to have properties with getter methods just returning a backing field,
such as (in C#).
string Name { get { return this.name; } }
Listing 14 – Property with a backing field
or
29
string Name { get; set; }
// backing field is generated by the compiler
Listing 15 – Property with an auto-generated backing
Exploiting the fact that getting values of fiels is much faster that using getters (which requires
resuming the debuggee and waiting for result), the value of the field is returned directly when
possible.
This is done by looking at IL of the getter method to see if it is a method in the form return
field;. Such IL can have four different versions when generated by Microsoft’s C# compiler
(depending on the property being instance/static and the backing field being
explicit/generated). The pattern to recognize all four versions is the following (can be found
in DebugMethodInfo.cs):
nop || nothing
ldarg.0; ldfld || ldsfld
<field token>
stloc.0; br.s; offset+00; ldloc.0 || nothing
ret
Listing 16 – IL structure of a property getter returning value of a backing field
The type system
The debugger can not only provide information about the values in the debuggee, but also
about their types. In fact, to be able to obtain contents of a complex value (instance of a class)
we must know the type of the value to be able to iterate its fields and properties and get their
values one by one. This is a very common pattern used everywhere in SharpDevelop,
including the Debugger visualizers.
The API provided by the debugger to investigate the types in the debuggee is very easy to
understand if one is familiar with Reflection. In fact, the API is exactly the same as the
reflection API. The class DebugType implements the abstract class System.Type, so it has
methods such as GetProperties()
and
GetMethods()
which return
System.Reflection.PropertyInfo , MethodInfo etc. They actually return debugger-specific
implementations of these types but that is not a concern to the user.
Again, under the covers, the debugger uses the low level COM API provided by the .NET
runtime (for example the IMetadataImport interface).
Multithreading
Unfortunately from the specification of the underlying ICorDebug API, all the debugger calls
have to be invoked from the main thread. Evaluating multiple expressions at once would be a
performance improvement for some parts of the code working with the Debugger API
(including the Debugger visualizers) but it is unfortunately not possible.
2.3 Fundamental problem of debugging
There are several important facts to realize about debugging in general when object properties
are involved. The first fact is that the debugger is actually changing the state of the debuggee
by observing it. This is because the only correct way to obtain a value of a property is to
invoke its getter, and if the getter has some side effects it can change the state of the program.
30
Another fact to realize is that it is not always easy to correctly determine the values of all
properties of an object. Take, for example, the following class:
public class Tricky
{
int a;
int b;
public int A {
get
{
b++;
return a;
}
}
public int B {
get
{
a++;
return b;
}
}
}
Listing 17 – Class with two property getters incrementing each other
After creating an instance of this class, debugger tooltips in Visual Studio 2010 show an
incorrect state of the instance:
Figure 15 – Debugger tooltip in Visual Studio 2010 showing „incorrect“ state of an instance
The state displayed in Figure 15 definitely does not correspond to reality – the debugger read
both of the properties A and B so the actual values of the fields are a=1, b=1. But what are the
actual values of properties A and B?
If a value of a property is defined by calling a getter of the property and reading the return
value, then reading the value of A changes the value of B and vice versa, which means values of
both A and B cannot be determined at the same time. The debugger could get around the
problem with values of fields by first evaluating all properties and then all fields (here the
evaluation was apparently done in aplhabetical order) but the debugger can never display
„correct“ values for both properties A and B because such pair of values does not exist.
The problem might seem a little theoretical, but there are very practical scenarios which
exhibit similar problems:
31
public class Caching
{
object cachedInstance;
public object Instance {
get {
if (cachedInstance == null)
cachedInstance = new object();
return cachedInstance;
}
}
}
Listing 18 – Property getter caching a value
Figure 16 – Debugger tooltip in Visual Studio 2010 showing incorrect state of an instance
The situation in Figure 16 could be solved by first evaluating properties and then fields. But
what if there is another property which only reads cachedInstance? Then the value of such
property would be shown incorrectly if it were evaluated before evaluating Instance. Next
solution would then be evaluating all properties twice, which would incur a large performance
overhead (especially concerning the expensiveness of the debugger API) and still would not
solve all cases – when there are more instances shown at the same time (watch window, or
multiple levels of a debugger tooltip expanded), all of them would have to be updated because
a property getter could also change other instances.
Probably the only relatively reasonable solution is evaluating properties first and then fields,
which would solve some common scenarios like the one in Figure 16, but such solution would
have to evaluate all properties even when they would be out of view (scrolled away) which
would again incur mostly unnecessary performance overhead. As seen in the screenshot,
current debuggers do not try to solve these problems – the user has better understanding of
the code and can reevaluate relevant parts as needed.
2.4 Division of work
In the motivation section it was stated that this thesis aims to solve issues with the current
state of debugging Object graphs and Collections and to improve SharpDevelop’s debugger
tooltips in the direction of collection support. As visualizing changes in object graphs and
visualizing contents of collections are distinct topics, it was decided (after a discussion with
the SharpDevelop team) that there will be two new separate features in SharpDevelop – the
Object graph visualizer and the Collection visualizer. The third feature are the debugger
tooltips. The debugger tooltips will conceptually stay the same as they were in SharpDevelop
3, but will be re-implemented in WPF with added proper support for debugging collections.
32
This thesis will analyze the Object graph visualizer, the Collection visualizer, and the Debugger
tooltips mostly separately but it will also identify common functionality shared by these three
features – such as collection support.
2.5 Collections
From the goals set for the Collection visualizer and Debugger tooltips, it is clear that both of
them will handle collections – the Debugger tooltips need support for IEnumerable collections
and large collections and the Collection visualizer will handle the same types of collections as
well. As for the Object graphs – the individual nodes in actual object graphs can, indeed, also
be collections, therefore it would be best to support collections in the Object graph visualizer
as well.
The common requirement for all of the visualizers is that large collections are supported
without significant degradation in performance. In the previous version of SharpDevelop,
when a collection variable was expanded in the debugger tooltips, the tooltips first obtained
all of the collection items from the debugger and only then displayed first few items. Since the
communication with the debugger has to be done on the main thread (as discussed in section
2.2.7 (Debugger)), the whole IDE was blocked for up to minutes, depending on the size of the
collection.
This thesis takes a lazy approach to getting items of collections from the debugger – only the
first few items needed to be displayed are obtained and as the view is scrolled more items are
being pulled from the debugger. This approach can be applied to all of the visualizers.
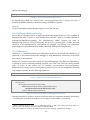
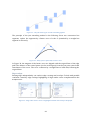
2.5.1 Types of collections
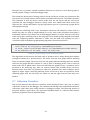
The basic inheritance hierarchy of .NET collection interfaces is the following.
33
Figure 17 - .NET collections inheritance hierarchy
As seen from the diagram, all the collection types in .NET framework implement IEnumerable.
Also, when dealing with user-defined collection types (including enumerators implemented
using the yield return construct in C#), it is safe to assume that any user type that has
semantics of a collection will implement IEnumerable. Therefore by supporting IEnumerable,
all possible types of collections would be supported.
However, the IEnumerable interface itself is very basic – it only enables sequential iteration
over the collection, without random access. The following three sections analyze possible
approaches to supporting collection types in the visualizers.
34
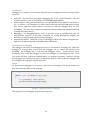
2.5.2 First approach – treating all collections as IEnumerable
The
starting
point
for
all the visualizers is a Debugger.Value or
NRefactory.Ast.Expression (which, when evaluated, yields a Debugger.Value). First, it
must be verified that the debuggee instance represented by the Debugger.Value implements
System.Collections.IEnumerable ,
which
can
be
done
by
examining
Value.Type.FullName . Then it is possible to obtain the individual Values representing the
items: the method GetEnumerator() is invoked and the result is stored as a Permanent
reference. Then, whenever the collection view is scrolled and more items are needed, the
MoveNext() method and Current getter are invoked on the enumerator object to obtain a
Value representing the next item. When MoveNext() returns false, there are no more items
available.
A very important requirement in all of the visualizers is that the individual items of collections
can be expanded further. To expand an item, an identification of the item is needed – either a
Debugger.Value or an Expression. For Debugger.Values obtained from an enumerator,
there are no corresponding Expressions – the instances returned from the enumerator can
be new objects which cannot be reached through any variables in user code simply because
the user code does not reference the instances. The only remaining possible identification of
the Debugger.Values obtained from the enumerator are therefore the Values themselves, in
form of Permanent references (because without Permanent references they would all become
invalid immediately when obtaining the next item). The problem is that scrolling the view of
the collection would cause more and more Permanent references to be kept and, by
specification, holding many Permanent references is not allowed.
The only solution possible here would be not to hold any identification of the
Debugger.Values and when an item at index i is expanded, iterate over the collection from
the beginning (by obtaining a new enumerator) to the i-th item and expanding it. Such
solution would not be very efficient and moreover, the item obtained by re-enumerating the
collection could be a different instance from the one which is being expanded.
Pros
One implementation supports all types of .NET collections.
Supports infinite collections. It is not a problem if MoveNext() never returns false - first
few items will be displayed immediately and more and more items will be obtained as
needed.
Cons
Expanding individual items is not really possible (only by re-enumerating the collection
from the beginning).
Fast scrolling (faster than items can be obtained from the debugger) is not possible due
to the sequential nature of IEnumerable interface.
If a collection only implements IEnumerable, the number of items (needed to display an
accurate scrollbar) cannot be determined. The only possible solution would be
evaluating MoveNext() and Current in loop, which is unacceptably slow. Evaluating
System.Linq.Enumerable.Count(e) would count the items quickly but it cannot be
guaranteed that the debuggee process references System.Core. The difference between
evaluating MoveNext() in a loop and evaluating Count() is that each MoveNext() call
35
needs an expensive interprocess debugger API call, while Count() is one debugger API
call and all the work is done directly in the debuggee. Injecting a foreach loop into the
debuggee to emulate missing System.Linq.Enumerable.Count() is not possible, as the
debugger API only supports expressions, not statements (foreach is a statement).
Summary
The cons of the IEnumerable solution are significant and it can be observed that all of them
are caused by the simple nature of the IEnumerable interface allowing only sequential access
to the items. The problem with determining the length of the collection and fast scrolling
cannot be resolved. Expanding can be solved only partially by re-enumerating the collection
always from the beginning, possibly obtaining wrong instances. The Pros of this solution are
outweighed greatly by its Cons.
2.5.3 Second approach – special case for IList
In the .NET collection interface hierarchy there is an interface called IList which adds an
indexer allowing random access to the items (the ICollection interface is not interesting in our
scenario because it only adds the Count property and otherwise has exactly the same
drawbacks like IEnumerable). This section explores the possibilities of dealing with
collections that also implement IList. It can be verified that a Debugger.Value implements
System.Collections.IList by examining Value.Type. The individual items from the IList
can be obtained by invoking the indexer getter on the Debugger.Value representing the
whole IList instance.
Pros
Expanding individual items is not a problem: to expand an item at position i, it is
sufficient to remember the Permanent reference representing the whole IList and invoke
the indexer on this Permanent reference, passing i as a parameter.
The length of the collection is immediately known by evaluating the “Count” property on
the IList Value. A scrollbar of correct size can be displayed.
There are no limitations on the speed of scrolling. If properly implemented, it will be
possible to skip evaluation of items which are being scrolled over fast.
Cons
Works for IList but not for IEnumerable.
Summary
The Pros of making a special case for IList are so significant that it is definitely worth it to
support IList separately. When an instance does not implement IList and only implements
IEnumerable, a fallback to the basic IEnumerable solution can be implemented.
2.5.4 Third approach – converting IEnumerable to IList
There is another possible approach to IEnumerable which is not immediately obvious –
having an expression e representing an IEnumerable<T>, by evaluating an Expression
“new List<T>(e)“, the IEnumerable<T> gets fully enumerated directly in the debuggee (as if
the debuggee itself called new List<T>(e)) and a Value representing the new List is returned.
Then the visualizers can access the List items randomly and get the Count of the List, enabling
expanding, accurate scrollbar, and fast scrolling. The constructor of List<T> is always
36
available because List<T> resides in mscorlib.dll which is always loaded in any .NET process
(mscorlib defines all the system types, like System.Int32 or System.String).
The solution is then to visualize ILists using the Second approach and visualize
IEnumerable<T> by converting it into IList and then also using the Second approach.
Pros
All the Pros of the Second approach hold not only for IList and IList<T>, but also for
IEnumerable<T>.
Cons
This solution cannot be applied to non-generic IEnumerable collections. Unfortunately,
there is no method in .NET 2.0 mscorlib (we want to support .NET 2 programs) that
accepts non-generic IEnumerable and returns an IList. Injecting a piece of code that
would emulate this functionality into the debuggee is not possible using the debugger
API, as the debugger API only supports expressions, not statements.
Infinite IEnumerable<T> collections are not supported – the evaluation will timeout.
2.5.5 Conclusion
From the three approaches, the last one was chosen to be used in both the visualizers and the
Debugger tooltips. It has very strong Pros only at the cost of not supporting non-generic
IEnumerable and infinite collections, which are both rare cases. To support these two cases,
the fallback to the first approach can be implemented, but it was decided not to do so – it
would mean maintaining more code only to support two uncommon cases which arguably
most programmers almost never encounter (actually we had the First approach implemented
but removed it for maintainability reasons – the First approach works with Debugger.Values
while the Third approach enables working with Expression consistently everywhere).
Note: Experiments with Visual Studio 2008 show that its integrated debugger timeouts when
expanding an infinite IEnumerable collection in a debugger tooltip. This indicates that the
Visual Studio debugger is probably using an approach similar to our Third approach.
Expression caching
The visualizers will be getting the individual collection items by evaluating Expressions such
as list[i].Name. In section Expression evaluation (subsection of 2.2.7), it was stated that the
ExpressionEvaluator internally caches Permanent references of evaluated expressions. This
means that when scrolling a view of a collection, more and more Permanent references would
be held by the Expression cache. To solve this problem, after a discussion with David Srbecký
a method to clear the Expression cache was added to Debugger.Core and the visualizers will
call this method periodically to avoid holding many Permanent references when working with
large collections.
This concludes the analysis of handling collections in the visualizers.
2.6 Object graph visualizer
The high level idea of the Object graph visualizer is the following:
37
The user enters an expression to be visualized. The visualizer explores the object graph
starting at this expression and presents it to the user in a similar way people draw data
structures on a whiteboard. When a step in the debugger is performed, the drawing of the
graph is updated using a transition from the old state to the new state. The transition should
help users understand the changes that occurred during the debugger step.
2.6.1 Existing work
There have been attempts to implement something similar. Probably the most significant
effort so far has been the Data Display Debugger [18] which is a graphical frontent to the
command line debuggers like GDB or a Python debugger pydb. Unfortunately, none of these
debuggers support debugging managed .NET programs.
Figure 18 – DiplayDataDebugger showing a graph of in-memory structures in a C program
2.6.2 What needs to be done
The basic requirement for the Object graph visualizer is that an object graph for a given
expression is presented to the user in a similar way people draw the object graphs on a
whiteboard. Can the task be split into separate parts / steps? Yes it can, at least into these two
independent steps:
1. Building the graph - given an expression, determine the vertices and edges of the graph
2. Drawing the built graph to the screen
The second step can be split into two independent steps:
Determining the layout of the graph (that is the positions of nodes and edges on a
plane)
The actual drawing to the screen
38
The last required feature are Graph transitions which visualize the changes caused by steps in
the debugger. This leaves us with:
1.
2.
3.
4.
Graph building
Graph layout
Graph drawing
Graph transitions
As said, the first three steps can be done independently; but what about the last step – Graph
transitions? Will Graph transitions be a completely separate step or will they interact with
Graph building / layout / drawing?
Graph transitions
To decide how Graph transitions integrate with the rest of the algorithm, one has to realize
how debugger steps work. During a debugger step, a temporary breakpoint is placed at the
location of the next code segment and the debuggee is resumed to run at full speed until it hits
the breakpoint. When the temporary breakpoint is hit, the control is returned to the debugger.
Graph transitions should visualize the change caused by the debugger step, by moving existing
nodes to their new positions, and making it clear which nodes have been added and removed.
A natural idea would be to obtain some kind of a diff from the debugger describing the
changes which occurred and based on this diff then produce the transition. Unfortunately, the
debugger has no control over the debuggee while the debuggee is running and obtaining such
state diff directly is not possible.
However, we propose that it is still possible to infer a diff based on observations of the
debuggee state before and after the step. After the debugger step is finished and the control is
returned to the debugger, a new Object graph is built, reflecting the current state. The
instances found in this new Object graph are compared to the instances found in the old
Object graph from before the step and as a result of this comparison a diff describing the
changes is obtained. Using this diff a graphical transition explaining the changes can be
produced.
The conclusion to this section is that Graph building, Layout and Drawing will not depend on
Graph transitions. Graph transitions will use the information obtained in the Graph building
phase to infer a diff between two Object graphs and produce a graphical transition from the
first graph to the second one.
2.6.3 Graph building
Definition: Object graph is an oriented graph, where vertices represent in-memory instances.
Let v A and v B denote two vertices representing two instances A and B in the debuggee process.
There is an oriented edge from v A to v B if and only if instance A has a direct reference to B
(through a field or a property).
The problem: Given a reference to an instance in the debuggee, build an object graph
representing all instances reachable from this instance (up to a maximum depth in case the
graph is too large).
39
The algorithm
We propose the following algorithm to build an object graph given an expression e. The
algorithm is quite straightforward – it does a DFS walk down the object graph in the
debuggee, checking for already seen nodes. The checking for already seen nodes is done by
the function GetSeenNode which is crucial because it enables detecting shared references and
loops correctly. The result is a graph having the same “shape” as the object graph in the
debuggee (in other words the graph built by this algorithm is isomorphic to the actual graph
in the debuggee).
// evaluate the Expression e to obtain a Value
value = Evaluate(e)
// build the graph
graph = BuildGraph(value)
// value is a Debugger.Value representing an instance in the debuggee process
BuildGraph(value):
If maximum recursion depth has been reached, return null.
node = create a new graph node representing this value
// get all instances this instance points to
foreach referencedValue in GetReferencedValues(value)
// do we already have a node reprenting this referenced instance?
existingNode = GetSeenNode(referencedValue)
// if yes, just add an edge to this node
if existingNode != null then MakeEdge(node, existingNode)
// otherwise continue recursively
else MakeEdge(node, BuildGraph(referencedValue))
Listing 19 – Graph building algorithm
Will this be possible to implement? The calls Evaluate and GetReferencedValues will need
to access the debugger API. Both of them will be possible to implement: evaluating
expressions as well as enumerating fields and properties of objects is supported. What
actually makes the Object graph special is the function GetSeenNode. Without this function
the algorithm would be equivalent to expanding debugger tooltips or watches recursively and
wouldn’t follow the actual structure of the object graph. The main question therefore is
whether and how GetSeenNode will be possible to implement.
Analysis of GetSeenNode
In our algorithm, the GetSeenNode function takes a reference to an instance in the debuggee
(a Debugger.Value) and returns a graph node that has been already created for this instance,
or null if such node doesn’t exist in the graph yet.
To be able to distinguish which Debugger.Values have been seen from those which haven’t,
the algorithm will have to keep some unique identifiers of the Debugger.Values. One option
would be to add some extra information directly to the instances in the debuggee, but that is
not possible, as in .NET it is not possible to add fields to objects at runtime1. Not being able to
It would be possible to create a Dictionary directly in the debuggee by evaluating an expression
“dict=new Dictionary<object, int>()“ and track instances using this Dictionary by evaluating dict[o] and
dict.Add(o, new_id). However, a Dictionary uses user defined instance equality (overridden
1
40
add unique identifiers to the instances in the debuggee process means that unique identifiers
have to be added to the Values living in the debugger process. Permanent references
represent a possible unique identification. Expressions represent another possibility because
when evaluated they also uniquely identify Values. As it will be shown, Permanent references
and Expressions are mostly interchangeable for the purposes of building the Object graph.
A first solution using Expressions follows. The algorithm works with Expressions and keeps
an Expression for every node in the graph. GetReferencedExpressions creates Expressions
by appending all field and property names to given Expression, based on the actual type of the
Expression (the Type is determined by evaluating the Expression). For example, by appending
property name FooProp to object foo.bar we get an expression foo.bar.FooProp.
BuildGraph(expression):
If maximum recursion depth has been reached, return null.
node = create a new graph node representing this expression
foreach referencedExpression in GetReferencedExpressions(expression)
existingNode = GetSeenNode(referencedExpression)
if existingNode != null then MakeEdge(node, existingNode)
else MakeEdge(node, BuildGraph(referencedExpression))
Listing 20 – Graph building algorithm using Expressions
In order to determine whether an Expression identifies an already seen instance,
GetSeenNode queries the debugger to compare the Expression to all of the seen Expressions
(by evaluating Expressions such as foo.bar.Name == e, where e is replaced by all the
expressions seen so far, such as foo.bar etc.). This works because an expression a==b
evaluates to true if an only if expressions a and b refer to the same instance in the debuggee,
because evaluating an expression a == b is equivalent to executing a == b in the debuggee1.
Pseudocode for GetSeenNode follows:
GetSeenNode(Expression exprToTest)
foreach node in graphNodesSoFar
if Evaluate(BinaryOpExpression(op.Equals, node.Expression, exprToTest))
return node
return null
Listing 21 –GetSeenNode has to compare given Expression to every other known Expression
As can be seen from the pseudocode, every call of GetSeenNode has to perform many
Evaluate calls, which is the most significant problem of this algorithm because GetSeenNode
will be called once per edge and it needs do up to n Evaluate calls, the total number of
Evaluate calls in O(n.E) where n is the size of the resulting graph and E is the number of edges
in the graph. We implemented this algorithm and found it to be too slow. Even though the
graphs to visualize will usually not be very large, the Evaluate calls are unfortunately so
expensive that this algorithm is unacceptable.
GetHashCode and Equals methods) while in the Object graph visualizer we are interested in instance
equality.
1 Evaluating a==b does not execute a==b directly in the debuggee, but is evaluated recursively using the
ExpressionEvaluator (see section Expression evaluation), which must be implemented correctly so that
the expected behavior is met.
41
The algorithm using Permanent references would be exactly the same, including the needed
calls to the debugger in a loop, expect it would work with Permanent references. Permanent
references provide instance addresses (offsets in the memory space of the debuggee) but
these are not usable as they can be changed by the garbage collector which moves the
instances around during the run of the graph building algorithm when the debuggee is being
resumed and paused again. Therefore, addresses cannot be used as unique instance identifiers
and the only way to use Permanent references is the same way as using Expressions.
The conclusion is that the main problem with identifying debuggee instances by Expressions
or Permanent references is that GetSeenNode has to compare all the unique identifiers one by
one by querying the debugger. The best solution to this problem would be some different
form of unique identification of instances in the debuggee such that GetSeenNode could run
faster than in O(n), ideally in O(1) in average case.
.NET hash codes
Could standard .NET hash codes serve as unique identifiers in the Object graph building
algorithm?
In CLR, the runtime representation of every instance has a data member which stores the hash
code for the instance. This data member is assigned by the CLR and it is accessible from
managed code through RuntimeHelpers.GetHashCode(Object) method which returns the
same value as the default Object.GetHashCode() . While Object.GetHashCode() can be
overridden
to
define
equality
semantics
for
structures
and
classes,
RuntimeHelpers.GetHashCode(Object) always returns the original hash code assigned by
the runtime. In the Object graph visualizer we are interested in instance equality to display
actual state of objects in memory, not user defined equality. Therefore the default hash codes
(accessible through RuntimeHelpers.GetHashCode ) will be used. The default hash codes
have a good property that they never change during the lifetime of an instance and, being
integers, they can be used as keys for a hash table.
However, there is no guarantee that the hash codes will be unique – there is no guarantee that
two different instances will have different hash codes. The “theoretical” reason behind this is
that the hash code is a 32-bit integer (on a 32-bit system), hence the space of all hash codes is
limited and it can be guaranteed that sooner or later two different objects with the same hash
code will be encountered. There is, however, one very practical reason. One could think that
32-bit space is large enough and in practice different instances with same hash codes would
almost never be encountered in a given small object graph. However, our tests on CLR
(Microsoft’s implementation of CLI) are quite surprising. The following code generates new
objects until two different objects with same hash code are encountered. It turns out that such
case occurs very quickly, after creating as few a few thousand instances:
42
Hashtable hashCodesSeen = new Hashtable();
LinkedList<object> l = new LinkedList<object>();
int n = 0;
while (true)
{
object o = new object();
// remember instances to be sure they don't get collected
l.AddFirst(o);
int hashCode = o.GetHashCode();
n++;
if (hashCodesSeen.ContainsKey(hashCode))
{
// same hashCode seen twice for DIFFERENT instances
Console.WriteLine("Hashcode seen twice after „ + n + „steps“);
break;
}
hashCodesSeen.Add(hashCode, null);
}
Listing 22 – Generating instances until a hash code collision is found
During our tests, the output of the program was Hashcode seen twice after 5322 steps, which
means that the possibility of different objects having same hash codes is very real and must
definitely be accounted for. The article [19], which was the original source for this experiment,
gives very similar results.
Interestingly, during our tests, the output was always the same on a given machine. This
shows that the hash code generation on the current implementation of the CLR is
deterministic.
The final algorithm
The final Object graph building algorithm takes advantage of the .NET hash codes while
correctly accounting for different instances having same hash codes. This is done by looking
up graph Nodes by hash codes and comparing instance addresses1 in case of hash code
collisions to be sure the hash code collision was not a coincidence. The main BuildGraph
algorithm stays almost the same as in the first version, with the exception that graph Nodes
are being added into a hashcode->Nodes hashtable. Ideally, when there are no hash code
collisions, the hashtable will contain exactly one Node for every hash code.
hashtable: 'hashCode' -> (list of objects with hash code == 'hashCode')
BuildGraph(value):
If a maximum recursion depth is reached, return null.
node = create a Node for this value (holding a Permanent reference )
add the node to the hashtable,
key=value.HashCode
// HashCode being the in-debuggee hash code
Each graph Node holds a Permanent reference to be able to access the address of the in-debuggee
instance it represents.
1
43
foreach referencedValue in GetReferencedValues(value)
existingNode = GetSeenNode(referencedValue)
if existingNode != null then MakeEdge(node, existingNode)
else MakeEdge(node, BuildGraph(referencedValue))
Listing 23 – The final Object graph building algorithm
GetSeenNode then takes the advantage of the hashtable in the following way:
GetSeenNode(value) {
candidates = hashtable[value.HashCode] // instances with same hashCode
if no candidates, the object is new
if some candidates, compare their addresses to o .Address
if no address equal, o is new // hashCode collision was a coincidence
if some address equal, o already seen
Listing 24 – The final version of GetSeenNode, using .NET hash codes for quick lookup
GetSeenNode only works with addresses of Permanent references, which is safe because
getting addresses of Debugger.Values does not resume the debuggee and therefore the
addresses are guaranteed to be fixed during the execution of GetSeenNode.
Note: As said in the previous section (.NET hash codes), the algorithm always obtains hash
codes by invoking RuntimeHelpers.GetHashCode() in the debuggee. If the algorithm instead
used Object.GetHashCode() and user code would override GetHashCode to always return
zero (for example), the algorithm would still work. The whole algorithm would, however, run
in O(n.E) (n being the number of vertices and E being the number of edges in the object graph)
– the same as the original slow algorithm.
Expanding nodes
The graph building algorithm as described can be considered finished. It handles very large
(up to infinite) graphs by limiting the maximum depth of recursion.
There is, however, one user experience aspect that deserves analysis - when the user enters
an expression which evaluates to a very large object graph expanding the whole graph up to
some maximum depth would be a bad user experience:
If the maximum depth is small, nodes the user is actually interested in can be missing
from the graph.
If the maximum depth is large, too many nodes are shown while the user is not
interested in most of them; the drawing is confusing. Visualization takes too much time
to show nodes that are not needed.
Instead of always traversing the whole graph, a solution is proposed where users can choose
which nodes to include in the graph by expanding them manually. The algorithm stays
essentially the same but it is split into steps determined by user actions. The body of the
Expand function called when a Node is being expanded is the same as the body of the original
loop iterating over all Node properties.
44
// a property is being expanded on this node
Expand(node, propertyName)
// get the value of the property being expande
targetValue = EvaluateProperty(node, propertyName)
// and add the value to the graph
// (either an edge to an existing node, or a new node)
existingNode = GetSeenNode(targetValue)
if existingNode != null then MakeEdge(node, existingNode)
else MakeEdge(node, NewNode(targetValue))
}
Listing 25 – Expanding a property in the Object graph
The algorithm does not recalculate the whole Object graph on every Expand action it assumes
that property getters don’t have any side effects on the rest of the graph, which is a reasonable
tradeoff between graph correctness and expand performance. Having property getters modify
other properties is rarely done in practice – the only reasonable use case is when a property
getter caches a value in a field or a data structure. Such scenario would be solved by
reevaluating all the properties of the instance instead of evaluating a single property. In
principle, property getters could modify also anything in the any other instances of the graph,
but that would a very bad programming practice and it is practically never done, therefore it
was decided not to make the general case much slower in order to account for a theoretical
edge case. After the graph is rebuilt completely (either when requested by user or after a
debugger step) the graph is in correct state. See also section 2.3 (Fundamental problem of
debugging) for more general discussion on the problems with determining debuggee state.
Of course, apart from Expanding, there will be also a Collapse feature, which consists of
removing the target Node and all its inbound and outbound edges from the graph.
2.6.4 Graph layout
Having the Object graph (that is, a graph inside the debugger isomorphic to the actual graph in
the debuggee) built, this section focuses on how to position the vertices and edges of the
Object graph on a 2D plane so that it looks natural to users.
Dynamic graphs and incremental stability
There is one special requirement to the Graph layout – the Object graph visualizer deals with
dynamic graphs, which directly relates to the Graph transitions feature.
There is a problem with calculating layout for dynamic graphs – if the layout algorithm does
not account for graph dynamicity, a small change to the graph can cause drastic changes to the
layout. Say for example that one node or edge is added to the graph and most nodes are
rearranged completely in the new layout. In other words, such layout is incrementally
unstable. In our scenario, incremental instability would mean large groups of nodes moving
around randomly when a debugger step introduces only small changes to the graph, which
would certainly mean bad user experience. The solution should therefore aim for incremental
stability of the layout.
45
Existing layout engines
Graph layout is a not a new problem so naturally, existing solutions were researched. A good
comprehensive list of graph layout engines can be found at [20]. The list does not include
Dynagraph, which was also considered. As SharpDevelop is LGPL-licensed free software, any
commercial solutions were out of question. Apart from being free, any code included in
SharpDevelop must come from a live, maintained project.
Most of the layout engines also handle rendering of graphs. However, the Object graph
visualizer has a special requirement for graph transitions, where existing nodes move to their
new positions after the graph is changed. The visualizer needs to control these transitions and
to be able to do so, the information about the positions of individual nodes is needed – if the
layout engine acts as a black box producing images, it might be well usable in some scenarios
but not for the Object graph visualizer.
Out of all the existing layout engines, only Graphviz and Dynagraph were considered an
analyzed in detail. All the other layout engines were ruled out quickly – the reasons are
summarized in the following table.
Layout engine
Graphviz
MAGL
ILOG Diagram
.NET
Dynagraph
Diagram.NET
Omnigator
Pajek
Piccolo
Flare
UbiGraph
aiSee
Graph#
free
for
maintained
suitable
x
x
x
x
x
x
x
x (Flash)
x (client-server)
x (low quality output)
x (did not exist at the time
of our research)
x (only circular layouts)
x (standalone app, not a
library)
x (Java)
x (graph algorithm library,
does not deal with graph
layout)
x (implemented in Excel)
Circos
Cytoscape
Treemaps
QuickGraph
NodeXL
Table 1 –Graph layout engines considered during our research
Dynagraph
Dynagraph [21] is an incremental layout engine based on the code of Graphviz. Being an
incremental layout engine means that it is actually designed to work with dynamic,
incrementally changing graphs. Dynagraph is a standalone executable with an API which
works by writing text commands to standard input and parsing responses from standard
output (there is also a partial, undocumented COM interface).
46
Pros
Dynagraph is the only layout engine dealing with incremental layouts by accepting commands
such as “add edges between nodes A and B” and responding in the terms of “node B moved
down by 2cm, added edge A->B as a straight line” [22].
Cons
Dynagraph is an unmaintained library (last update from 2007), which makes it unfortunately
not suitable for being used in SharpDevelop.
Graphviz
Graphviz [23] is a mature, widely used graph layout and visualization toolkit for Linux and
Windows. Graphviz consists of set of executables (dot, neato, etc.) where each of these
implements one particular layout algorithm. All of the executables act as batches accepting
command line parameters and standard input and returning results (text, image) using
standard output or writing to a file.
Graphviz provides ways for users to control the layout to some degree using node clusters,
explicitly specified edge endpoints etc. The following graph, which looks almost exactly like
what the Object graph visualizer should look like, was rendered using Graphviz:
Figure 19 – A graph rendered using Graphviz
Pros
The output of dot layout algorithm (Figure 19) seems suitable to the needs of the Object graph
visualizer.
Graphviz separates layout calculation from rendering: a graph (plain vertices and edges) can
be passed to Graphviz and the same graph with added position information is returned. There
are several formats in which the result can be returned, configurable using command line
switches.
47
Graphviz is fast – for the purposes of the Object graph visualizer where the graphs are not
very large (up to 20 nodes and 60 edges), the time needed to calculate graph layout including
launching the dot executable was under 100ms on a modest machine1.
Cons
As Graphviz does not have any notion of dynamic graphs, its layouts can suffer from
incremental instability – when a graph is slightly changed by a debugger step and the layout is
recalculated, the layout can visually differ a lot from the previous layout. Graphviz does not
provide any option to calculate new layout incrementally based on old layout and a graph diff.
Including Graphviz binaries would add 10MB to the size of SharpDevelop installer, while the
whole SharpDevelop setup is currently only 15MB. The problem is that the Graphviz
executables statically link a lot of other libraries and even when dot.exe or neato.exe are given
parameters specifying text-only input and output, these executables won’t start without
libraries for image encoding. This point alone is enough to say no to Graphviz because adding
10MB of binaries to SharpDevelop to support a single feature is unacceptable. The solution
would be either to modify Graphviz code or ask users to install Graphviz separately in order to
use the Object graph visualizer.
Graphviz API is text based – using Graphviz from an application means launching a separate
executable, writing graph specification to the standard input, and parsing response from the
standard output, which is not trivial. If a non-interactive rendering of the graph is sufficient,
Graphviz can write the output to an image file and the host application can then read the file.
Conclusion – Tree layout algorithm
The conclusion of our research of existing graph layout engines is that no existing solution fits
the scenario of the Object graph visualizer for SharpDevelop and therefore a new solution will
be implemented.
One option is to design an incremental layout algorithm which takes an existing layout plus a
description of changes (a graph diff) and produces a new layout, trying to make only small
changes to the layout when the diff is small. When designing such algorithm, methods used in
Dynagraph would be studied as a starting point.
Another option is a solution which does not deal with graph diffs at all. We propose that it is
possible to design a graph layout algorithm specialized for dealing with object graphs (graphs
of data structures), which has no notion of incremental layout but still produces layouts that
behave well in terms of incremetal stability. The idea for the algorithm comes from two intial
observations: first, object graphs are very often close to trees (the numbers of edges is not
much larger than n-1, where n is the number of nodes), and second, the edges in object graphs
have a special meaning – the edges represent named object fields and properties.
The algorithm is the following: when the input graph is a tree, layout it using a standard tree
layout algorithm: Place the root to the top, order the child subtrees by names of properties
they represent and place the child subtrees next to each other below the root. Example:
1
Laptop with 1.6Ghz Pentium CPU, 2GB RAM.
48
Figure 20 – Example of a tree layout
Pseudocode of the standard tree layout algorith follows. The algorithm is done in two
recursive passes over the tree, which we call Measure and Arrange:
Measure(node):
foreach child in node.Children
Measure(child)
subtreeW = node.Children.Sum(n => n.Width)
node.treeW = max(node.ownW, subtreeW);
Listing 26 – Measure layout pass
Arrange(node, position)
subtreeW = node.Children.Sum(n => n.treeW)
node.Pos = CenterHorizontally(position, node.ownW, subtreeW)
currentChildPos = position
foreach child in node.Children
Arrange(node, currentChildPos)
// place next child subtree next to this child subtree
currentChildPos.X += child.treeW
Listing 27 – Arrange layout pass
The important case is when the input graph is not a tree. In such case, we select some subset
of n-1 edges to obtain a tree, layout it using the tree layout algorithm, fix the layout, and then
add the remaining edges to the layout. Example:
49
Figure 21 – Example of a tree layout when the input graph is not a tree. The graph is the graph from Figure
20 with two edges added.
The only thing remaining to be resolved is how to select the subset of the n-1 tree edges.
Selecting tree edges
One possible approach is to start in the root of the graph and do a standard DFS1. The edges
traversed by the DFS are declared tree edges. Because the DFS enters and leaves every node
exactly once, the subgraph formed by the selected edges will indeed be a tree. Pseudocode
follows: in the beginning, Traverse(root) is called which traverses the whole graph and
marks n-1 edges as tree edges. There is a helper structure called nodeAlreadySeen used to
mark visited nodes.
Traverse(node):
nodeAlreadySeen[node] = true
foreach edge in node.OutgoingEdges
if not nodeAlreadySeen[edge.target]
edge.IsTreeEdge = true
Traverse(edge.target)
Listing 28 – Selecting tree edges in a graph using DFS
This approach works, but unfortunately does not behave well in terms of incremental stability
– here is an example:
1
Depth-first search.
50
Figure 22 – From left to right: an edge is being added to a tree, tree edges are selected using DFS, and new
Tree layout is calculated based on the selected tree edges.
The problem is that when a node has multiple possible parents, DFS selects one of the parents
quite arbitrarily – the paths in the graph are traversed in alphabetical order, given by the
names of edges. This problem can be resolved by replacing DFS by BFS1 (using a queue
instead of a stack to traverse the graph) because BFS selects the parent based on the distance
from the root. BFS prefers short paths, not arbitrary paths. For comparison, here is the exact
same situation as in Figure 22, now using BFS to select the tree edges:
Figure 23 – The same situation as in Figure 22, but different set of tree edges is selected using BFS,
resulting in much more intuitive behavior
There is no strict proof that the layout generated by the tree layout algorithm using BFS for
edge selection is incrementally stable because there is no strict definition of “small change of
the layout proportional to the change of the object graph”. However, our tests show that in
practice this is a good algorithm when dealing with incrementally changing data structures.
This specific version of the tree layout algorithm also has a good property of fixed alphabetical
ordering of outgoing references which is a familiar concept to users.
Edge routing
In the layout, not all edges are drawn as straight lines. When an edge drawn as straight line
between two nodes would cross other nodes, it is routed as a curved line avoiding the nodes.
Calculating the curved paths for edges is called edge routing. Graphviz provides a good edge
routing algorithm but again, including 10MB of binaries into SharpDevelop is unacceptable
and moreover the communication with Graphviz is done via standard input and output so a
parser of edge routes returned from Graphviz would have to be implemented. We decided to
implement an edge routing algorithm ourselves – the details are provided in the
Implementation section.
2.6.5 Graph transitions
In the previous section a layout algorithm was presented which is sufficiently incrementally
stable even while not accounting for incremental graph updates explicitly. This section
1
Breadth-first search.
51
discusses how to produce smooth transitions between two layouts of two object graphs to
visually explain changes caused by debugger steps.
The transitions should move existing nodes from the old layout to their new positions in the
new layout and visually indicate which nodes were added and removed. To be able to produce
such transition it must be known which nodes from the old layout and the new layout
represent the same debuggee instances, which nodes were added and which nodes were
removed. We call this information a graph diff and the process of producing a graph diff is
called graph matching.
To realize the matching, hash codes, Permanent references and addresses can be used in a
similar way they are used in Graph building. For every node in the old and the new graph, a
Permanent reference and a hash code of the debuggee instance is stored. Then for every node
in the new graph a matching node in the old graph can be found quickly using the stored hash
code and comparing instance addresses to make sure the hash code equality was not a
coincidence (like in the Object graph building algorithm). Pseudocode follows:
FindMatchingNodeInOldGraph(Node nodeInNewGraph):
find a node in the old graph by nodeInNewGraph.hashCode
if found, compare found.PermRef.Address and nodeInNewGraph.PermRef.Address
if the addresses are the equal , return the found node
Listing 29 – Node matching in order to build a graph diff
This algorithms works because the hash codes of instances never change during their lifetime
(using RuntimeHelpers.GetHashCode ). The nodes from the new graph without matching
nodes are marked added. The nodes from the old graph without matching nodes are marked
removed. The graph diff then consists of a list of pairs of matching nodes, a list of removed
nodes, and a list of added nodes. Given such diff and two graph layouts, a transition can be
produced in the following way: fade out removed nodes, fade in added nodes and move
matched nodes from their old positions to their new positions. The same technique can be
applied to edges: edges connecting matched nodes are moved to their new positions, all the
remaining edges from the old layout are faded out and the edges from the new layout are
faded in.
2.7 Collection Visualizer
This section discusses the Collection visualizer, which should provide a new way to explore
collections of objects in the debugger. The visualizer should help users understand contents of
collections easier than when using watches or debugger tooltips. The following solution is
proposed: Display a grid where rows represent individual items of a collection and columns
represent properties of those individual items.
52
Figure 24 – The Collection visualizer – rows represent collection items and each column represents one
public property.
This advantage of this approach is that users get a good overview of the contents of the
collection and can locate individual items quickly. Compare this to using watches or debugger
tooltips, where individual items have to be expanded and collapsed one by one to accomplish
the same goal.
The Collection visualizer will use the same approach to accessing individual items of
collections described in section 2.5 (Collections) – a special case for IList plus conversion of
IEnumerable<T> to IList<T>. Therefore, the Collection visualizer inherits the properties of the
solution – non-generic IEnumerable as well as infinite IEnumerable will not be supported but
the number of items will be known, scrolling will be fast, and it will be possible to further
expand individual rows.
2.7.1 Existing work
There are some existing tools to visualize collections in the debugger in a way similar to our
proposition, for example [24] (a debugger visualizer for Visual Studio). However, this
visualizer is designed only to visualize one type of objects specific to one application – e.g. a
ShoppingCart . In other words, the visualizer is not generic. A generic visualizer for List and
Dictionary types exists [25] but due to the architecture of Visual Studio Visualizers, the
collection items need to marked with the [Serializable] attribute which can’t be always
guaranteed and requires users to change their code in order to view data. Also, if the
visualizer wanted to support IEnumerable, every IEnumerable class would have to be
registered manually by users as Visual Studio debugger visualizers can't be registered for
interfaces [26].
Our collection visualizer should be completely generic – it should work for collections
containing any types of objects out of the box, and it shouldn’t need to transfer the whole
collection from the debuggee to the debugger in order to display first few items. We haven’t
found any existing generic solution which accomplishes this.
53
2.7.2 What needs to be done
Summarizing the previous thoughts, here are the requirements for the Collection visualizer:
Display contents of a collection of objects: rows represent objects, columns represent
their properties.
Support IEnumerable<T>, IList, IList<T> and one-dimensional arrays.
Should not suffer a noticeable slowdown for collections containing thousands of items.
Should work out of the box, without any need to manually register types or modify code.
Will be a standard part of the IDE so no additional downloads are needed.
2.7.3 Grid columns, generic vs. non-generic collections
The main difference between the Collection visualizer and the Debugger tooltips is that the
Collection visualizer presents values of multiple properties of all the items at once, using one
column for each property. This brings us to an important question: Given a collection, how to
determine what the columns will be?
If all the items of the collection were guaranteed to be of same type, it would be certainly a
correct solution to make one column per each public property of this type (possibly also
including properties from base classes). The problem is that the collection can, in fact, contain
items of various types and it is not possible to know all these types in advance because
determining them is too expensive due to the expensiveness of the debugger API calls.
Realizing that it is not possible to have full information about types of all the items, there are
three options:
1) Look at the first item in the collection and use its public properties.
Pros:
None.
Cons:
The columns for the whole collection are determined only by the type of the first
item.
When subsequent items have additional properties, these properties will not be
shown.
When subsequent items miss some of the properties, the cells will be empty.
2) When scrolling and evaluating new items, add columns to the grid dynamically when
new properties are encountered.
Pros:
All of the properties of every item are always shown.
Cons:
When items miss some of the properties, the cells will be empty.
54
A complicated solution.
Columns being added when scrolling are not a good user experience.
3) Look at the generic parameter of the collection (IList<T>, IEnumerable<T>) and use the
public properties of the parameter type T.
Pros:
The columns represent the type of the whole collection.
Collection can contain only subclasses; therefore no cells will be empty.
Cons:
Does not support non-generic IList (non-generic IEnumerable was decided not to
be supported in general).
When the items are subclasses of T, the properties defined in the subclass are not
shown.
From the three solutions, the third one was chosen because its Cons are the least significant –
non-generic ILists are not a common case (a fallback to the first solution could be
implemented for non-generic ILists). Regarding the second Con: If the collection is of type
IEnumerable<ICar> and the user knows that all the items are actually of type Truck, the user
can add a cast to ( IEnumerable<Truck> ) which will cause all properties of the Truck type to
be shown.
2.8 Debugger tooltips
The third feature we built as a part of this thesis are the debugger tooltips for SharpDevelop 4.
The goal is to re-implement the existing debugger tooltips in WPF and add support for
IEnumerable collections and large collections.
2.8.1 Existing work
SharpDevelop 3 has debugger tooltips implemented using Windows Forms and there is also a
very similar feature in Visual Studio and other IDEs.
Figure 25 – Debugger tooltips in Visual Studio 2010 and Eclipse 3.5. The feature is has a different name in
each IDE but it is essentially the same.
55
2.8.2 What needs to be done
The debugger tooltips in SharpDevelop 3 have cleanly separated user interface code from the
underlying data model, which means the data model can be reused. Support for IEnumerable
collections will be added to the data model according to section 2.5 (Collections). The user
interface implemented in Windows Forms will be removed from SharpDevelop and reimplemented using WPF.
Integration of the Debugger visualizers with the Debugger tooltips will be implemented so
that the visualizers can be opened directly from tooltips. This integration should be extensible
so that new visualizers become available in the tooltips.
56
3. Implementation
This section highlights interesting parts of the implementation of Debugger visualizers for
SharpDevelop and documents the codebase and design decisions.
In the SharpDevelop codebase [27], most of the Debugger visualizers code is located in the
Debugger.AddIn project (AddIns/Debugger/Debugger.AddIn folder), specifically in subfolders
Visualizers and Tooltips. The code of SharpDevelop and Debugger.Core is very well designed
and needed only minor modifications to integrate the debugger visualizers and debugger
tooltips. The directory structure of the code is the following (namespaces mostly follow
directory structure):
Debugger.AddIn
Tooltips – logic and UI of debugger tooltips
TreeModel – data model for the debugger tooltips
Visualizers
Commands – opening visualizers from debugger tooltips
Common – code shared by multiple visualizers (such as collections support)
GraphVisualizer –Object graph visualizer
Drawing – rendering of the graph using WPF
ExpandedPaths – remembering expand state between debugger steps
Layout – calculation and representation of layout
SplineRouting – reusable implementation of edge routing
Object graph – building and representation of the Object graph
CollectionVisualizer – Collection visualizer
Presentation – WPF-related reusable code
Utils –generic reusable code
AvalonEdit.AddIn
CodeEditorView.cs – integration of debugger tooltips with the code editor
3.1 Common base for visualizing collections
All of the visualizers are dealing with collections in essentially the same way, described in
section 2.5 (Collections). Each of the visualizers has a different data model for collection items
(tooltips show a tree of Expressions, the Object graph visualizer has edges outgoing from
property trees, and the Collection visualizer uses a grid) but they all essentially handle
57
collections as described in the Collections section of the Analysis - converting IEnumerable to
IList by constructing a List in the debuggee by evaluating an expression such as “new
List<T>(enumerable)” where T is the generic parameter of the type of the enumerable variable
in debuggee, and then accessing individual items of the List by evaluating expressions such as
list[i]. If an instance already implements IList, the conversion is skipped (this check is
implemented in TypeResolver). The conversion of IEnumerable to IList is implemented in
DebuggerHelpers .
3.2 Object graph visualizer
In section 2 (Analysis), the high level architecture of the Object graph visualizer was outlined.
It was decided that building and layout of the graph will be separate steps, and a Tree layout
algorithm, which does not work incrementally but behaves well in terms of incremental
stability, was proposed. The following diagram shows the design following the decisions from
section 2.6 (Object graph visualizer):
Figure 26 – Basic design of the Object graph visualizer
Of course, constructing a static ObjectGraph and presenting it to users is only half of the
picture. As further discussed in section 2 (Analysis), the changes which occur during debugger
steps are being visualized by smooth transitions between graphs. The transitions are
produced using graph diffs which are inferred by comparing graph state before and after each
debugger step. The following diagram explains the design of the Object graph visualizer in this
dynamic context:
58
Figure 27- Design of the Object graph visualizer
All the processes outlined in the diagram are coordinated from the Object graph visualizer
main window, implemented in ObjectGraphControl.
3.2.1 Graph building
The graph building algorithm including the decisions behind it was largely described in the
Analysis section. In the implementation, this algorithm resides in the ObjectGraphBuilder
class. Its method BuildGraphForExpression takes an NRefactory.Ast.Expression and
produces an ObjectGraph.
3.2.2 The ObjectGraph
The ObjectGraph is composed of a collection of ObjectGraphNodes . An ObjectGraphNode
represents one debuggee instance and contains a tree of properties of this instance, grouping
the properties by their visibility and class where they were declared. The properties are
represented by PropertyNodes, each containing an ObjectGraphProperty, pointing to a
target ObjectGraphNode, thus representing a named edge. There also also special nodes in
the property tree used to group PropertyNodes into subtrees, like BaseClassNode or
NonPublicMembersNode .
Lazy evaluation of properties
The ObjectGraphProperties inside ObjectGraphNodes are lazily-evaluated. When a node
contains many properties, only the first few are evaluated and when the contents of the node
are scrolled, the properties coming into view are being evaluated as needed.
59
Figure 28 – UI for ObjectGraphNode (implemented by PositionedGraphNodeControl). The properties out of
view have not been evaluated yet and will be evaluated when they are scrolled into view.
This saves a lot of performance especially when objects have a lot of properties. The lazy
evaluation is controlled by user interface because only the UI has exact information about
which properties are currently in view. The implementation exploits the fact that WPF
ListView pulls items from its ItemsSource as the items come into view. As the ItemsSource
for the ListView, an instance of VirtualizingObservableCollection is supplied.
VirtualizingObservableCollection adds on-demand evaluation support to an existing
ObservableCollection (Decorator pattern).
Collections
When an ObjectGraphNode represents a collection, the collection is converted to a List using
the common approach, the Count property of the List is evaluated and a flat list of empty
ObjectGraphProperties is generated quickly – each ObjectGraphProperty representing
one item of the List (with Expressions list[0] up to list[Count-1]) – this logic is implemented in
ObjectGraphBuilder . The lazy evaluation then works using exactly the same mechanism as
the lazy evaluation of properties described in the previous section.
Figure 29 – ObjectGraphNode representing a collection
Expanding nodes
As discussed in section 2.6.3 (Graph building), the ObjectGraph returned from the
ObjectGraphBuilder is not fully expanded up to some given maximum depth but users
control which individual nodes are expanded by clicking a plus button next to fields and
properties.
60
When a field or property is being expanded, its target is evaluated and either a new node is
added to the graph, or only an edge to an existing node is added in case the target was already
present in the graph. Then the layout for the whole graph is recalculated. When a field or
property is collapsed, its target is removed from the graph including all its inbound and
outbound edges. Expanding and collapsing is implemented in ObjectGraphControl –
PositionedNodeControls raise events and ObjectGraphControl reacts to them by
implementing the logic just described.
Remembering expanded nodes between debugger steps
A large part of the design of the Object graph visualizer focuses on debugger steps. The
expanding of nodes must also fit into the picture – namely, when some nodes are expanded,
these nodes must also stay expanded after a debugger step. Considering the fact that after the
debugger step the ObjectGraph is being rebuilt from scratch, the information about expanded
nodes must be kept somewhere separately. The structure holding this information is called
simply Expanded. The Expanded structure holds the information about expanded nodes by
holding a set of string expressions describing expanded paths in the graph, such as a[0].left,
a[0].left.right etc. After a debugger step, the same paths are expanded again, which is
equivalent to the user manually clicking the same plus buttons on the same nodes. Of course,
these nodes might not represent the same debuggee instances anymore but this approach is
quite intuitive and behaves as expected.
An implementation detail is that re-expanding of the right paths after a debugger step is not
implemented by repeatedly invoking an Expand function but instead the expanding is
incorporated right into the graph building algorithm. The ObjectGraphBuilder gets the
Expanded data structure and when recursively exploring the graph, it only follows the paths
which are present in the Expanded set.
3.2.3 Graph layout
This section describes our Tree layout algorithm in detail. The whole layout algorithm
consists of two separate steps:
Calculating the positions of nodes (node layout)
Calculating the paths of edges (edge routing)
Naturally, edge information is involved in the first step as well. The separation into two steps
means that after the node positions are determined, the positions are fixed and only then edge
paths are being added to the layout. The dot algorithm implemented in Graphviz uses exactly
the same separation into two steps.
As the calculation of node positions was largely described in section 2.6.4 (Graph layout), this
section focuses mainly on the algorithm for calculating edge paths.
TreeLayouter, PositionedGraph
The algorithms described in this section and section 2.6.4 (Graph layout) are implemented in
classes TreeLayouter (responsible for node layout) and EdgeRouter (responsible for edge
routing). The TreeLayouter takes an ObjectGraph as input, calculates node positions, calls
EdgeRouter to calculate edge routes, and produces a PositionedGraph .
61
The difference between ObjectGraph and PositionedGraph is that ObjectGraph is an UIindependent model of a graph of debuggee instances and PositionedGraph also contains
position information for nodes and positioned paths for edges. The PositionedGraph is not
produced by copying an ObjectGraph; it rather wraps the ObjectGraph and adds position
and UI information.
To be able to work with real sizes, the PositionedGraph is WPF-dependent and contains the
WPF user interface elements for graph nodes (PositionedGraphNodeControl ) and edges
(System.Windows.Shapes.Path ).
Node layout
In section 2.6.4 (Graph layout), the Tree layout algorithm for calculating positions of nodes
was proposed. The algorithm is implemented exactly as described, by selecting a tree
subgraph of the input graph using BFS and then recursively traversing the tree twice – first to
calculate the areas needed for the subtrees and then arranging the subtrees next to each
other. The implementation can be found in the TreeLayouter class.
Similarity to WPF’s “Measure-Arrange” layout algorithm
The two recursive passes over the tree are named Measure and Arrange in our algorithm. The
fact that the two layout passes in WPF are named the same is not a coincidence – the layout
algorithms in WPF and many other UI frameworks work on exactly the same principle.
In WPF the user interface elements are organized into a tree called the Visual tree. When an
UIElement is asked for its size ( Measure() method) it asks its children for their desired sizes
so that it can determine its own desired size. When an UIElement is told its new position
(Arrange() method) it also repositions its children, knowing their sizes because Measure() is
called before Arrange() for any element.
In WPF the users can define their own user interface elements and completely control the
layout by subclassing FrameworkElement and overriding the MeasureOverride() and
ArrangeOverride() methods. This is also how existing UIElements are implemented. For
example, StackPanel is a panel which stacks its children next to each other – this logic is
implemented in the ArrangeOverride method of the StackPanel.
Edge routing
After the node positions are calculated and fixed, the paths for graph edges are determined.
The problem: Given a set of positioned rectangles on a 2D plane and a set of directed edges
between pairs of rectangles, find paths for the edges so that the paths avoid the rectangles and
look natural.
Example of a solution (Graphviz):
62
Figure 30 – Edges routed using Graphviz
As discussed in section 2.6.4 (Graph layout), after researching available solutions it was
decided that a custom solution would be implemented for the purposes of the Object graph
visualizer. The implementation presented in this section is not WPF-dependent and can be
reused as-is in other applications; this is achieved by following a common practice of
programming against interfaces.
Our algorithm
The first decision that has to be made when designing an edge routing algorithm is whether
the edges will be routed globally or independently (one by one):
Global routing tries to minimize the total number of edge overlaps while making the
individual edge paths look natural.
One-by-one routing calculates each edge path independently from others, trying to
make each edge path look natural.
Like the edge routing algorithm used by Graphviz [28] [29], our algorithm processes edges
one by one, treating each edge as separate input. The Graphviz paper [28] also mentions a
possibility of a global algorithm that would try to make edges avoid each other or emphasis
routing edges in parallel but does not provide any ideas for such algorithm.
When designing the algorithm, two important observations were made:
The most natural path is a straight line and when there is a rectangle blocking the
straight line, the path must be broken around some corners of the rectangle. There is no
need to break paths in open space. Therefore, the interesting points in the plane are the
corners of the rectangles.
To make edge paths look natural to users, the edge paths should be relatively close to
closest possible paths, while not bending too sharply.
The algorithm works in the following way: First a visibility graph is built, where vertices
represent the corners of all the rectangles and edges connect pairs of vertices which can be
connected by straight lines without intersecting any rectangles (each edge endpoint is visible
63
from the opposite edge endpoint). The pairs of vertices where the edge would be blocked by a
rectangle are not connected. Then, to find routes for edges, shortest path are found in the
visibility graph.
Determine edge start and end points in the plane:
For each edge e in G:
Determine edge start and end point of edge e:
take a straight line from the center of edge’s source rectangle
to the center of edge’s target rectangle.
Where this line intersects the source rectangle is the start point e s
analogically end point et
Build the visibility graph:
Build the following graph Gv (visibility graph):
1
V = {every 4 corners of all rectangles on input } ∪ {all start and end points of
all edges}
E = {pairs (u, v) from V where u is visible from v: straight line can be drawn
from u to v without crossing the body of any rectangle}
Find edge routes (each edge independently):
For each edge e in G:
In Gv find shortest path from es to et (using A* or Dijkstra’s algorithm)
Smoothen the path by replacing each sharp join by a bend (join smoothing)
Our implementation has time complexity of O(n3) where n is the number of rectangles due to
the construction of visibility graph: O(n2) vertex pairs are tested for visibility and each test
needs O(n) line-rectangle intersections. The time complexity could be probably reduced but
for our needs this is sufficient (note that Graphviz also uses an O(n3) implementation).
The following figure shows an example of a result of our implementation:
Note: the vertices of the visibility graph do not lie exactly in the corners of the rectangles but further
from the rectangles by a small offset so that the paths go around the rectangles, not directly through
their corners.
1
64
Figure 31 – Edge paths calculated using our implementation
The implementation is completely reusable and can be found in the namespace
Debugger.AddIn.Visualizers.Graph.SplineRouting . The reusability is achieved by
defining simple interfaces such as IPoint, IRect, IEdge and programming against them. Any
representation of a graph implementing these simple interfaces is then a suitable input to the
algorithm.
Join smoothing
The last step of the algorithm, join smoothing, is used to replace sharp joins on shortest paths
in the visibility graph by smooth bends. As a result, the output is visually much more
appealing. The following two figures show a comparison of an edge path with and without join
smoothing used:
Figure 32 – Edge path without smoothing (a shortest path in the Visibility graph)
65
Figure 33 – The path from Figure 32 with smoothing applied
The principle of the join smoothing method is the following: Given two consecutive line
segments, replace the segments by a Bezier curve of order 3 (extended by a straight line
segment at each end):
Figure 34 – Sharp join is replaced by a bezier curve
In Figure 34, the tangents of the bezier curve are aligned with the original lines of the edge
path. The distance of the control points (circles in the figure) from the join point controls the
smoothness of the curve. The curve continues by a straight line on both ends, following the
original lines.
Edge overlaps
Routing edges independently can result in edge crossings and overlaps. To deal with possible
confusion caused by edge overlaps, highlighting of edges under cursor is implemented in the
GraphDrawer .
Figure 35 – Edge under mouse cursor is highlighted in bold and a tooltip is displayed.
66
Multiple edges, self-edges
The implementation also deals with situations when there are multiple edges between one
pair of rectangles. This is solved by distributing the edge start and end points along the border
of the rectangles. Self-edges are solved in the same way.
Figure 36 – Multiple edges between two rectangles and self-edges
Explicitly determined start and end points
Some layout engines (including Graphviz) let users specify starting and ending points of
edges. This feature could be useful in the Object graph visualizer because the edge outgoing
from an object property could start directly next to the title of the property. We considered
this and concluded that the layout would get problematic when the contents of nodes are
scrolled – the edge point would have to move and the edge would have to be re-routed when
scrolling. Therefore it was decided not to implement this feature for now.
3.2.4 Graph matching
Graph matching is used to produce graph transitions between two graph states. Graph
matching is implemented as described in the Analysis section in the class GraphMatcher
which accepts two ObjectGraphs and produces a GraphDiff object containing a list of pairs
of matched nodes, a list of nodes which were added in the new graph, and a list of nodes
which were removed from the old graph. Figure 27 explains this process the best.
3.2.5 Graph drawing and transitions
After the layout of ObjectGraph is calculated by the TreeLayouter producing a
PositionedGraph where nodes and edges are already represented by WPF elements, graph
drawing is the final step which actually draws the PositionedGraph to screen. Graph drawing
is implemented in the GraphDrawer class, which positions graph nodes and edges on a WPF
Canvas. GraphDrawer also produces the transitions by creating a set of WPF Animation
objects (one animation per each node and edge) based on a GraphDiff. The animations
transform existing graph drawing to its new state.
While positioning the edges on the Canvas, GraphDrawer also adds tooltips to the edges,
which appear when mouse cursor is hovered over the edges.
3.2.6 The result
The following two figures show the final state of the Object graph visualizer in context of
SharpDevelop:
67
Figure 37 – Object graph visualizer showing the state of the debuggee
The next figure shows the changed state of the object graph after a debugger step is
performed:
Figure 38 – Object graph updated after a step in the debugger
All of the work described in this thesis is included in standard releases of SharpDevelop 4.x.
The easiest way to try the Object graph visualizer is to download a stable release or a nightly
build of SharpDevelop (which always contains the newest version).
68
3.3 Collection Visualizer
Section 2.5 (Collections) identified the conceptual difference between IList and IEnumerable
collections and the need for obtaining collection items lazily. An important question of how to
determine the columns for the Collection visualizer’s grid was also resolved. The Collection
visualizer, implemented in CollectionVisualizerWindow , follows these decisions. This
section covers the data model of the visualizer, the implementation in WPF and explains how
not only rows, but also columns of the grid are evaluated lazily for best possible performance.
3.3.1 Lazy loading items when scrolling
Following the common approach to collections, any collection which is not an IList is
converted to a List prior to being visualized. The implementation uses a WPF ListView
(containing a GridView) and exploits the way in which ListView accesses items from its
ItemsSource . When the ItemsSource is an IList, the ListView accesses the items which are
needed to be rendered using the IList’s indexer.
Our implementation supplies a special collection, called VirtualizingCollection , as the
ListView.ItemsSource . This collection is a wrapper around some data source (in our case
the debuggee collection) and when asked for an item at index i it queries its underlying data
source for item i, returns it and caches it. This principle is often referred to as data
virtualization.
Figure 39 (Class diagram) – Data virtualization using VirtualizingCollection<T>
The top half of the class diagram in Figure 39 is a generic data virtualization implementation.
The bottom half is specific to debugging. The items returned by the indexer of
ListValuesProvider are instances of ObjectValue – a representation of a collection item
specific to the Collection visualizer. ObjectValue contains the index of the item in the
collection and a map of values of item’s properties.
The map of property values in ObjectValue is used to provide indexing by property name,
which is used by the data binding of dynamically created ListView columns (based on the
69
generic type parameter type of the collection as discussed in section 2.7.3). The following
listing shows how columns are created dynamically and prepared to be bound to
ObjectValues .
foreach (var member in itemTypeMembers)
{
var memberColumn = new GridViewColumn();
memberColumn.Header = member.Name;
// "{Binding Path=[Name].Value}"
memberColumn.DisplayMemberBinding=new Binding("["+member.Name+"].Value");
gridView.Columns.Add(memberColumn);
}
Listing 30 – Data binding of ObjectValues to GridView columns
Note on generic data virtualization
Note that in our case, the only way to get a set of items from the debugger is to query items
one by one. However, there are scenarios where querying a range of items at once is faster
than obtaining items one by one (for example relational databases). In such scenario it is
reasonable to implement paging mechanism in the concrete value provider so that when the
provider is asked for an item at position i it queries and caches a number of items around
index i (because it is very likely that these items will be needed soon).
3.3.2 Expanding rows of the grid
Sometimes also the values shown in individual grid cells are complex objects. The values in
grid cells are obtained by invoking the standard ToString() method which only returns the
name of the type (when not overridden) which is not a desirable way of presenting complex
objects.
Figure 40 – The values of property Badge are complex objects.
Thanks to the design of general handling of collections described in section 2.5 (Collections), it
is possible to implement expanding of individual rows in the following way: display an expand
button next to each grid row and when it is clicked, open a Debugger tooltip for expression
70
c[i], where c is the Expression referring to the whole collection instance and i is the index of
the row. Another option would be to add columns representing properties of the inner
complex object (in Figure 40 the Badge column would be replaced by columns representing
individual properties of the Badge class).
This feature is not implemented yet but will be implemented.
3.3.3 Lazy loading columns (object properties)
We implemented a column-selection feature so that users can select only the columns they are
interested in (see top right corner of Figure 40). The columns which are hidden are not
evaluated, which improves performance. This is achieved thanks to the way the
ObjectValues are bound to the GridView (see Listing 30Listing 30) – when a column is
hidden, it is removed from the GridView (this is implemented in GridViewColumnHider) and
the ListView stops evaluating the binding for this column. When the column is displayed
again, the ListView only evaluates the bindings for the items which are in the visible range.
This means that the Collection visualizer is as lazy as possible – only what needs to be
rendered is obtained from the debugger.
3.3.4 The result
The following figure shows the current state of the Collection visualizer:
Figure 41 – Final state of Collection visualizer
The Collection visualizer has been successfully tested on the following types: array, List<T>,
ArrayList, HashSet<T>, IEnumerable<T> , IQueryable<T>, ObservableCollection<T>,
ReadOnlyCollection<T> and IParallelEnumerable<T>. The types of collection items
tested were various classes and structures (including a class with inheritance hierarchy of
depth 4 containing generic classes). We are also using the Collection visualizer while working
on SharpDevelop.
71
3.4 Debugger tooltips
Unlike with the two previous visualizers, the data model for the Debugger tooltips was
already present in previous versions of SharpDevelop (see the Debugger.AddIn.TreeModel
namespace). Thanks to the clean separation of data representation from user interface the
whole tree model was reused and a new type of node called IEnumerableNode was added to
support IEnumerable collections in the Debugger tooltips. The main part of the work on the
Debugger tooltips was to implement the user interface including the lazy evaluation of values
from the debugger (see the Debugger.AddIn.Tooltips namespace) and integrate the new
implementation into SharpDevelop’s code editor (see the CodeEditorView class in
AvalonEdit.AddIn). The user interface of the tooltips is implemented using WPF Popups
containing DataGrids (see DebuggerTooltipControl).
3.4.1 Integration of visualizers
The new implementation of Debugger tooltips adds extensible support for Debugger
visualizers:
Figure 42 – Debugger tooltips offering available Debugger visualizers for current value
To add a new debugger visualizer to SharpDevelop, one has to implement a simple interface
IVisualizerDescriptor and register it in the .addin definition file at a well known path
/SharpDevelop/Services/DebuggerService/Visualizers. The following two listings show how
existing visualizers are registered:
<Path name="/SharpDevelop/Services/DebuggerService/Visualizers">
<Class class="Debugger.AddIn.Visualizers.ObjectGraphVisualizerDescriptor" />
<Class class="Debugger.AddIn.Visualizers.CollectionVisualizerDescriptor" />
</Path>
Listing 31 – Object graph and Collection visualizers registered in the Debugger.AddIn.addin file
72
public class ObjectGraphVisualizerDescriptor : IVisualizerDescriptor
{
public bool IsVisualizerAvailable(DebugType type) {
return !type.IsAtomic() && !type.IsSystemDotObject();
}
public IVisualizerCommand CreateVisualizerCommand(Expression expression) {
return new ObjectGraphVisualizerCommand(expression);
}
}
public class ObjectGraphVisualizerCommand : ExpressionVisualizerCommand
{
[...]
public override string ToString() {
return "Object graph visualizer";
}
public override void Execute() {
if (this.Expression != null) {
var objectGraphWindow = ObjectGraphWindow.EnsureShown();
objectGraphWindow.ShownExpression = this.Expression;
}
}
}
Listing 32 – VisualizerDescriptor tells when the visualizer is available, and returns a Command which
defines the logic for opening the visualizer
The data model for the Debugger tooltips ( ExpressionNode) then contains a list of available
visualizers, obtained using the following call (see subsection AddIn tree of section 2.2.2):
AddInTree.BuildItems<IVisualizerDescriptor>("/SharpDevelop/Services/DebuggerServ
ice/Visualizers", null);
Listing 33 – Obtaining the list of available visualizers for the Debugger tooltips
3.4.2 The result
The following figure shows the current state of the new Debugger tooltips for SharpDevelop:
73
Figure 43 – New Debugger tooltips for SharpDevelop 4.0
Text visualizer and XML visualizer
Apart from the Object graph visualizer and Collection visualizer, two simple visualizers which
were missing in previous versions of SharpDevelop were implemented (and registered as
described in section 3.4.1 (Integration of visualizers)): Text visualizer and XML visualizer.
Both are used to view long strings. The XML visualizer uses the XML syntax highlighting
feature built into AvalonEdit.
Figure 44 – Debugger visualizer for XML strings
74
4. Conclusion and future work
Section 1 explained the motivation for this thesis and set goals for innovative debugger
features for the SharpDevelop IDE. Section 2 discussed how to design algorithms for the
visualizers around numerous limitations of the Debugger API and resolved questions where
multiple solutions were possible by identifying pros and cons of every solution; more often
than not, compromises between feature completeness, performance and code maintainability
had to be made – a constant factor in the field of Software engineering. Section 3 discussed
details of the implementation, integration of the work into the SharpDevelop IDE and
extensibility.
The initial goals were to implement a visualizer of data structures in the debuggee and to
improve visualization of collections, in general and also specifically in SharpDevelop. These
goals were met and the work is already a part of the standard release of the SharpDevelop
IDE. As the Debugger tooltips and Debugger visualizers build on top of NRefactory, they are
usable when debugging code written in C# and VB .NET. This thesis should provide a good
starting point for anyone wanting to build on our work – SharpDevelop is a live project
downloaded approximately two thousand times a day, used by developers around the globe. I
plan to continue working on SharpDevelop as well.
There are many possible future improvements to SharpDevelop’s integrated debugger. The
following list provides several ideas:
The Object graph visualizer could display a graph not only for one expression, but a
combined graph for multiple expressions (for example all local variables). This would
be useful for debugging algorithms where different variables point to different
instances in a data structure, or instances are moved between data structures.
The Object graph visualizer could also remember scroll offsets in individual nodes.
Currently after a debugger step, content of nodes is scrolled to the top.
Implement expanding of individual rows in the Collection visualizer.
Integrate the Collection visualizer directly into the Debugger tooltips: A debugger
tooltip is essentially a grid with two columns: name and value. There could be an
option to expand the Debugger tooltip by adding more columns, thus having the same
view the Collection visualizer provides directly in the Debugger tooltip.
In the Debugger tooltips, an option could be added to show properties from all base
classes so that users do not have to search for a property by expanding Base class
nodes.
Support DebuggerDisplayAttribute and DebuggerTypeProxyAttribute [1], [2].
Implement functionality identical to Visual Studio’s support for user defined debugger
visualizers. The best way would be to directly support all existing visualizers for
Visual Studio – this would be an interesting project as it would need some IL
manipulation.
75
Implement more visualizers, such as Display Data Debugger’s visualizers for array of
numbers.
Figure 45 – GNU Data Display Debugger’s visualizers for arrays of numbers
76
References
1. DataTips, Visualizers and Viewers Make Debugging .NET Code a Breeze. MSDN Magazine.
[Online] 5 2004. http://msdn.microsoft.com/en-us/magazine/cc163974.aspx.
2. Enhancing Debugging with the Debugger Display Attributes. MSDN Library. [Online]
http://msdn.microsoft.com/en-us/library/ms228992.aspx.
3. Visualizers. MSDN Library. [Online] http://msdn.microsoft.com/enus/library/zayyhzts.aspx.
4. Konicek, Martin. Debugger Visualizer for Visual Studio. Coding time blog. [Online]
http://coding-time.blogspot.com/2009/03/debugger-visualizer-for-visual-studio.html.
5. Google Summer of Code Website. [Online] http://code.google.com/soc/.
6. SharpDevelop Website. [Online] http://www.icsharpcode.net/opensource/sd/.
7. Marcu, Eusebiu. SharpDevelop Classic ASP.NET websites using IIS Express. SharpDevelop
blog. [Online] 28. 12 2010.
http://community.sharpdevelop.net/blogs/marcueusebiu/archive/2010/12/28/sharpdevelo
p-classic-asp-net-websites-using-iis-express.aspx.
8. Konicek, Martin. New productivity features in SharpDevelop 4 Beta 2. SharpDevelop blogs.
[Online] 1. 8 2010.
http://community.sharpdevelop.net/blogs/martinkonicek/archive/2010/08/01/resharperfor-sharpdevelop-new-features.aspx.
9. Grunwald, Daniel. Using AvalonEdit (WPF Text Editor). CodeProject. [Online] 2009.
http://www.codeproject.com/KB/edit/AvalonEdit.aspx.
10. Grunwald, Daniel. Building Applications with the SharpDevelop Core. [Online] 3. 1 2006.
http://www.codeproject.com/KB/cs/ICSharpCodeCore.aspx.
11. Grunwald, Daniel. Line Counter - Writing a SharpDevelop Add-In. [Online] 18. 7 2006.
http://www.codeproject.com/KB/cs/LineCounterSDAddIn.aspx.
12. NRefactory repository. GitHub. [Online] https://github.com/icsharpcode/NRefactory/.
13. Building an IDE with the Scala Presentation Compiler. The Ensime blog. [Online] 2010.
http://ensime.blogspot.com/2010/08/building-ide-with-scala-presentation.html.
14. Scala IDE for Eclipse. [Online] http://www.scala-ide.org/.
15. Ensime. GitHub. [Online] https://github.com/aemoncannon/ensime.
16. Debugging Interfaces. MSDN Library. [Online] http://msdn.microsoft.com/enus/library/ms404484.aspx.
77
17. Srbecký, David. Internals of SharpDevelop's Debugger. David Srbecký's blog. [Online]
http://community.sharpdevelop.net/blogs/dsrbecky/archive/2010/07/29/debugger.aspx.
18. DisplayDataDebugger Website. [Online] http://www.gnu.org/software/ddd/.
19. Griffiths, Ian. The Rules for GetHashCode. IanG on Tap. [Online] 2004.
http://www.interact-sw.co.uk/iangblog/2004/06/21/gethashcode.
20. Saveen, Reddy. A List of Tools for Automatic Graph and Diagram Layout. Saveen Reddy's
blog. [Online] 2009. http://blogs.msdn.com/b/saveenr/archive/2009/07/29/a-list-of-toolsfor-automatic-graph-and-diagram-layout.aspx.
21. Woodhull, Gordon. Dynagraph Web site. [Online] http://www.dynagraph.org/.
22. Dynagraph documentation. Dynagraph Web site. [Online]
http://www.dynagraph.org/documents/dynagraph.html.
23. Graphviz Web site. [Online] http://www.graphviz.org/.
24. Hayden, David. Create a Debugger Visualizer in Visual Studio 2005 for Custom Types and
Classes. David Hayden's blog. [Online] 2005.
http://davidhayden.com/blog/dave/archive/2005/12/26/2645.aspx.
25. Carvalho Liedke, Daniel. A Generic List and Dictionary Debugger Visualizer for VS.NET.
CodeProject. [Online] 2008. http://www.codeproject.com/KB/macros/ListVisualizer.aspx.
26. Code for Rapid C# Windows Development eBook + LINQPad and Data Tools. CodePlex.
[Online]
http://rapiddevbookcode.codeplex.com/wikipage?title=EnumerableDebugVisualizer.
27. SharpDevelop repository. GitHub. [Online]
https://github.com/icsharpcode/SharpDevelop.
28. Dobkin, David P. et al. Implementing a General-Purpose Edge Router. 1997.
29. Ellson, John et al. Graphviz and Dynagraph – Static and Dynamic Graph Drawing Tools.
2003.
78
Appendices
Content of attached CD
The file system structure of the attached CD is the following:
overviewVideo – short screen recording showing an overview of the features described in this
thesis
SharpDevelop – source code of the most recent version of SharpDevelop. The source code for the
work described in this thesis can be found in project Debugger.AddIn, according to the beginning
of section 3 (Implementation). To run SharpDevelop, run SharpDevelop.exe. SharpDevelop can
work with Visual Studio solutions.
samples – sample code to test the features described in this thesis
thesis – an electronic version of this thesis
User manual
Software requirements: Installed .NET Framework 4 (SharpDevelop is built against .NET 4).
The usage of the Debugger tooltips and Debugger visualizers is quite intuitive. While
debugging code in SharpDevelop and the code is paused (for example because a breakpoint
was hit) hover the mouse cursor over a variable in the code - this works like in any other IDE.
A debugger tooltip is displayed showing the value of the variable. If the variable is a complex
object it is possible to expand the tooltip. The visualizer selector (magnifying glass icon) in the
debugger tooltip offers visualizers available for the current variable. Select Object graph
visualizer or Collection visualizer. Object graph visualizer is available for any complex type;
collection visualizer is available for collections.
Object graph visualizer
The Object graph visualizer displays the graph of instances in memory of the debugged
program and references between them. To expand a node, click one of the plus buttons inside
the displayed node (if available). The graph can be re-evaluated by clicking the Inspect button.
Zooming is possible using the Zoom slider or by using Ctrl + Mouse wheel. There are two
layout modes – Left to right and Top to bottom, which can be switched using the ComboBox.
When a debugger step is performed, the state of the graph is updated.
79
Collection visualizer
The collection visualizer displays contents of collections in a form of a grid. Each grid row
represents one collection item and each grid column represents one public property. To show
or hide individual grid columns, use the Combobox in the top right corner.
Table of listings and figures
Listing 1 - .addin file defining three ToolbarItems.................................................................................... 20
Listing 2 – Obtaining items for a Toolbar, defined in Listing 1 ............................................................ 21
Listing 3 – A different AddIn adding another ToolbarItem ................................................................... 21
Listing 4 – Registering a ConditionEvaluator .............................................................................................. 21
Listing 5 – Registering service implementations at a well-known path .......................................... 22
Listing 6 – Obtaining all implementation from a well-known path in the AddIn tree............... 22
Listing 7 – Accessing localized strings from XAML ................................................................................... 22
Listing 8 – Accessing localized strings from C#.......................................................................................... 23
Listing 9 – Sample code to be parsed by NRefactory ............................................................................... 23
Listing 10 – Sample program to be debugged ............................................................................................. 26
Listing 11 – Sample usage of the debugger................................................................................................... 27
Listing 12 – Ouput of the program from listing 10.................................................................................... 27
Listing 13 – Getting values of variables using the debugger................................................................. 27
Listing 14 – Property with a backing field .................................................................................................... 29
Listing 15 – Property with an auto-generated backing........................................................................... 30
Listing 16 – IL structure of a property getter returning value of a backing field ........................ 30
Listing 17 – Class with two property getters incrementing each other........................................... 31
Listing 18 – Property getter caching a value................................................................................................ 32
Listing 19 – Graph building algorithm ............................................................................................................ 40
Listing 20 – Graph building algorithm using Expressions ..................................................................... 41
Listing 21 –GetSeenNode has to compare given Expression to every other known
Expression................................................................................................................................................................... 41
Listing 22 – Generating instances until a hash code collision is found ............................................ 43
Listing 23 – The final Object graph building algorithm........................................................................... 44
Listing 24 – The final version of GetSeenNode, using .NET hash codes for quick lookup........ 44
Listing 25 – Expanding a property in the Object graph........................................................................... 45
Listing 26 – Measure layout pass ...................................................................................................................... 49
Listing 27 – Arrange layout pass ....................................................................................................................... 49
Listing 28 – Selecting tree edges in a graph using DFS............................................................................ 50
Listing 29 – Node matching in order to build a graph diff ..................................................................... 52
Listing 30 – Data binding of ObjectValues to GridView columns........................................................ 70
Listing 31 – Object graph and Collection visualizers registered in the
Debugger.AddIn.addin file. .................................................................................................................................. 72
Listing 32 – VisualizerDescriptor tells when the visualizer is available, and returns a
Command which defines the logic for opening the visualizer. ............................................................ 73
Listing 33 – Obtaining the list of available visualizers for the Debugger tooltips ....................... 73
Figure 1 – Watch window and debugger tooltips in Eclipse 3.5 (watch window is
called "Variables" in Eclipse) .................................................................................................................................9
80
Figure 2 – Two instances having a reference to each other .....................................................................9
Figure 3 – Data structure from Figure 1 presented by Debugger tooltips in Visual
Studio 2010................................................................................................................................................................. 10
Figure 4 – In the Visual Studio 2010 Locals window, values of variables changed by
debugger step are highlighted automatically. ............................................................................................. 11
Figure 5 – Debugger tooltip in Visual Studio 2010 showing contents of a collection of
objects ........................................................................................................................................................................... 12
Figure 6 – Debugger tooltip in Visual Studio with one collection item expanded. The
interesting property was declared in a base class so expanding multiple times was
needed to locate the desired property............................................................................................................ 12
Figure 7 – Debugger tooltips in SharpDevelop 3 ....................................................................................... 13
Figure 8 – Object graph visualizer showing in-memory instances and references
between them ............................................................................................................................................................ 14
Figure 9 – Collection visualizer showing contents of a collection of objects in the
debugger ...................................................................................................................................................................... 15
Figure 10 – New debugger tooltips for SharpDevelop 4, with support for visualizers............. 15
Figure 11 - SharpDevelop meeting in August 2009 in Bad Ischl, Austria. Left to right:
Tomasz Tretkowski (Gsoc: C++ Backend Binding), Daniel Grunwald (Senior
Developer, Architect), Martin Koníček (Gsoc: Debugger visualizers), Siegfried Pammer
(Gsoc: Xaml Binding), David Srbecký (Debugger), Peter Forstmeier (SharpDevelop
Reports), Christoph Wille (Project Management). .................................................................................... 17
Figure 12 – SharpDevelop IDE ........................................................................................................................... 18
Figure 13 – Parse tree for the the code snippet from Listing 9 ........................................................... 23
Figure 14 – Overall shema of debugging. An important fact to realize is that the
debuggee lives in a separate process. ............................................................................................................. 25
Figure 15 – Debugger tooltip in Visual Studio 2010 showing „incorrect“ state of an
instance ........................................................................................................................................................................ 31
Figure 16 – Debugger tooltip in Visual Studio 2010 showing incorrect state of an
instance ........................................................................................................................................................................ 32
Figure 17 - .NET collections inheritance hierarchy .................................................................................. 34
Figure 18 – DiplayDataDebugger showing a graph of in-memory structures in a C
program........................................................................................................................................................................ 38
Figure 19 – A graph rendered using Graphviz ............................................................................................ 47
Figure 20 – Example of a tree layout ............................................................................................................... 49
Figure 21 – Example of a tree layout when the input graph is not a tree. The graph is
the graph from Figure 17 with two edges added. ...................................................................................... 50
Figure 22 – From left to right: an edge is being added to a tree, tree edges are selected
using DFS, and new Tree layout is calculated based on the selected tree edges. ........................ 51
Figure 23 – The same situation as in Figure 19, but different set of tree edges is
selected using BFS, resulting in much more intuitive behavior. ......................................................... 51
Figure 24 – The Collection visualizer – rows represent collection items and each
column represents one public property. ....................................................................................................... 53
Figure 25 – Debugger tooltips in Visual Studio 2010 and Eclipse 3.5. The feature is has
a different name in each IDE but it is essentially the same. .................................................................. 55
Figure 26 – Basic design of the Object graph visualizer ......................................................................... 58
Figure 27- Design of the Object graph visualizer ....................................................................................... 59
81
Figure 28 – UI for ObjectGraphNode (implemented by PositionedGraphNodeControl).
The properties out of view have not been evaluated yet and will be evaluated when
they are scrolled into view................................................................................................................................... 60
Figure 29 – ObjectGraphNode representing a collection. ...................................................................... 60
Figure 30 – Edges routed using Graphviz ..................................................................................................... 63
Figure 31 – Edge paths calculated using our implementation. ............................................................ 65
Figure 32 – Edge path without smoothing (a shortest path in the Visibility graph).................. 65
Figure 33 – The path from Figure 30 with smoothing applied. ........................................................... 66
Figure 34 – Sharp join is replaced by a bezier curve................................................................................ 66
Figure 35 – Edge under mouse cursor is highlighted in bold and a tooltip is displayed. ......... 66
Figure 36 – Multiple edges between two rectangles and self-edges. ................................................ 67
Figure 37 – Object graph visualizer showing the state of the debuggee. ........................................ 68
Figure 38 – Object graph updated after a step in the debugger. ......................................................... 68
Figure 39 (Class diagram) – Data virtualization using VirtualizingCollection<T>. .................... 69
Figure 40 – The values of property Badge are complex objects.......................................................... 70
Figure 41 – Final state of Collection visualizer. .......................................................................................... 71
Figure 42 – Debugger tooltips offering available Debugger visualizers for current
value............................................................................................................................................................................... 72
Figure 43 – New Debugger tooltips for SharpDevelop 4.0 .................................................................... 74
Figure 44 – Debugger visualizer for XML strings....................................................................................... 74
Figure 45 – GNU Data Display Debugger’s visualizers for arrays of numbers. ............................. 76
Table 1 –Graph layout engines considered during our research ........................................................ 46
82