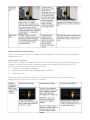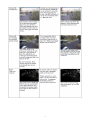
1
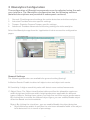
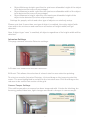
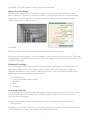
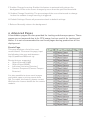
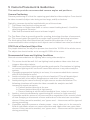
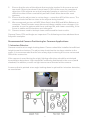
IQanalytics
Vandal, Motion and Intrusion Detection
User Guide
1
Contents
1
2
3
4
5
6
7
Overview
Installation
IQanalytics Configuration
Advanced Pages
Camera Placement & Guidelines
Recommended Settings
Event Output Format
2
3
4
5
8
9
11
14
1 Overview
IQanalytics software provides an advanced solution that performs
intelligent video analysis and fully automates video monitoring. It
automatically tracks and identifies objects, analyzes motion and extracts
video intelligence from the camera. These analytics can output real-time
events and object data for video data mining or storage in a database.
IQanalytics is focused on automating video analysis and security alerts,
thus eliminating the need for manual work and huge monitoring costs. It
also increases productivity and efficiency of video surveillance systems
and the people who monitor them.
The analytics offered are:
• Motion Detection
• Intrusion Detection
• Camera Tamper Detection
Motion Detection
This analytic application analyzes video in real-time and detects valid motion in a
scene.
Intrusion Detection
Intrusion detection provides automated perimeter monitoring and secure area
protection. It continuously monitors user-selected zones or areas for people
or vehicle intrusion. This analytic issues real-time alarms upon detecting true
people or vehicle intrusions into a secure area.
Camera Tamper Detector
Camera Tamper Detector monitors the video and automatically detects camera
failure or sabotage. It detects any attempts to tamper with the camera--partially
or completely blocking its lens or field of view--or drastically changing the
camera angle.
3
2 Installation
If the IQanalytics Application package is not pre-installed on your camera,
manual installation will be required. Before installation, please ensure the
IQanalytics.iqa application file is available.
1. Connect IQeye camera onto the local network
2. To help detect camera on local network, use IQeye Auto run CD that is provided
with the camera
3. Click “Scan for IQeye cameras on my network” to find IP address of the camera.
4. Type camera IP address into your browser.
5. Go to “setup” tab in camera web UI (if prompted for authentication information,
the default username is “root”, default password is “system”)
6. Go to “security” tab in camera web UI
7. Click on the application package file in “Application File”, select IQanalytics.iqa
and press “upload”. Please don’t switch off or reset camera until uploading and
rebooting is complete.
8. After uploading, the message “IQanalytics: Installed “ in the “Camera
Application” section on “security” page should be displayed.
9. After installation, if application is not licensed, please contact IQeye for license
keys.
4
3 IQanalytics Configuration
The configuration of IQanalytics parameters can be adjusted using the web
user interface. The IQanalytics configuration has the following sections
(detailed descriptions are provided in subsequent sections):
1.
2.
3.
4.
General: Provides general settings for motion detection and video analytics
Intrusion Provides Intrusion specific settings
Tamper: Provides Camera Tamper specific settings
Advanced: Provides Advanced and learning settings for video analytics
Select the IQanalytics app from the ‘applications’ tab to access the configuration
pages.
General Settings
The following parameters are available for general setting (tuning).
A. Motion Events: Enable to detect all object enter and object exit events.
B. Sensitivity: A higher sensitivity value will detect more motion/movements.
C. Object Sizes: The Object classification table specifies the allowable maximum width-height and minimum width-height parameters applicable for different types of objects. Setting these values, can help fine tune the engine performance. By clicking the check box for different object types, you can enable/disable object detection based on size thresholds.
Object: By clicking the check box , you can enable/disable the object detection
• Object Minimum width: It specifies the minimum allowable width of the object
to be detected. It is in terms of percentage
5
•
Object Minimum height: specifies the minimum allowable height of the object
to be detected (in terms of percentage)
• Object Maximum width: specifies the maximum allowable width of the object
to be detected (in terms of percentage)
• Object Maximum height: specifies the maximum allowable height of the
object to be detected (in terms of percentage)
Settings for people, vehicle and other type of objects are similarly setup.
Please note that if more than one type of object is enabled, the entire object (with
sizes within the minimum and maximum set values of height-width) will get
detected.
Also, if object type ‘none’ is enabled, all objects regardless of its height-width will be
detected.
Intrusion Settings
This page contains Intrusion Detector settings.
A. Enable: will enable the Intrusion detection.
B. Brush: This allows the selection of a brush size for area selection painting.
To select an area for Intrusion Detector, click and drag on the image to paint the
scene. The area highlighted in red will be the intrusion area. Click and drag on the
red area to de-select that section of the grid.
Camera Tamper Settings
This notifies you when a camera has been tampered with. It looks for blocking, defocusing, power/video loss, light changes and drastic changes in camera angle.
6
A. Enable: This will enable Camera Tamper Detection.
Ignore Area Settings
Enabling the ‘ignore area’ allows the engine to ignore processing in areas that
don’t require it. This may include the ceiling, moving light sources, environmental
conditions, or areas where no activity is expected. This allows processing to be
reduced and lowers false alarms.
A. Enable: will enable the ‘ignore area’.
B. Brush: allows area selection painting to use a larger 3x3 area.
To select an area to ignore, click and drag on the image to paint the scene. The area
highlighted in red will be the ignored. Click and drag on the red area to de-select that
section of the grid.
Advanced Settings
C. Processing Quality: Select the Processing Quality type from the drop down box
depending upon scene. The higher quality allows for detecting smaller objects,
however overall accuracy may be reduced as frame rate will be decreased due to
additional processing power requirements.
The choices are:
i. Low (Default Recommended)
ii. Medium
iii. High
iv. Original
Learning Settings
The learning settings effect how IQanalytics learns the background over time. Finetuning these parameters will help in reducing false detections due to scene or
environmental changes.
D. Object Learning: Enable this feature to “learn” stationary objects into the background.
E. Object Learn Time: The time in seconds a stationary object is in the scene before IQanalytics will “learn” the object into the background.
7
F. Sudden Change Learning: Enable this feature to automatically relearn the background if the entire scene changes by more than the specified threshold.
G. Sudden Change Sensitivity: The percentage of the scene that needs to change before the sudden change learning is triggered.
H. Default Settings: Resets all parameters back to default settings.
I. Relearn: Manually relearn the background.
4 Advanced Pages
A few hidden pages are also provided for testing and demo purposes. These
pages are not exposed due to its CPU usage, but are useful for testing and
demo. It is not recommended to use these pages during production or live
deployment.
Events Page
This page displays a list of the most
recent events. To access this page, input
the following into your web browser http://<ipaddress>:88/event.cgi
Events that are supported:
• Object Entered (iVMD)
• Object Exited (iVMD)
• Intrusion (Intrusion Detector)
• Camera Tampered (Camera Tamper
Detector)
It is also possible to store event images
and videos upon receiving events from
IVA. To enable this feature, please contact
IQinVision for license details for the events
module.
8
5 Camera Placement & Guidelines
This section provides recommended camera angles and positions.
Camera Positioning
Camera positioning is critical for capturing good data for video analytics. Care should
be taken to avoid a) object size being set too large, and b) occlusions.
Typically, cameras should be installed with one of three views:
1. Top-Down view (vertical ceiling mount)
2. Perspective or Angled view (wall or corner mount looking down) – Useful for
detecting general intrusion.
3. Side View (horizontal wall mount at lower height).
The Top-Down View is generally good for counting, detecting direction of movement,
etc. The second option (perspective or angle view) is good for detecting intrusions.
The third option (side view) should only be used for face detection. It is not
recommended for other analytics since objects can be hidden from view (occlusions).
FOV (Field of View) and Object Size
For people detection, the object or person size should be 10-20% of the whole scene.
The object size should not be set to occupy 40-100% of the scene.
Recommended Scene and Lighting Conditions
General recommendations for lighting when using video analytics.
1. The scene should be well-lit. Low lighting levels produce video noise that can
triggers false object alerts.
2. Stable and consistent lighting will provide good results. Fluctuations in lighting
or uneven lighting at the scene will cause false alarms in any video analytics
system.
3. If providing appropriate lighting is an issue, it is recommended that a camera
with IR illumination be used.
4. Avoid occlusions (one object going in front of another). This will break object
tracks and will cause object disappearance and other related problems.
5. Avoid pointing the camera directly at light sources as described below. The
following situations will make the video unusable for analytics and will
temporarily signal saturation.
a. Camera pointed directly at the sun.
b. Camera pointed directly at light source
c. Camera looking at vehicles with headlights (cars, trains in tunnels)
6. Avoid or minimize shadows by repositioning the camera or light source(s).
7. If possible avoid the presence of trees and other vegetation in the camera’s field
of view. Swaying or movement of trees and bushes in the wind can cause false
alarms. If they cannot be avoided, use ‘ignore area’ – these zones will be ignored
during processing.
8. If possible, avoid the presence of water areas – rivers, lakes etc. in the camera’s
field of view. Water areas can cause reflections and ripples that can cause false
alarms. If they cannot be avoided, use ‘ignore area’ – these zones will be ignored
during processing.
9
9. Ensure that the size of the objects that are to be tracked in the scene are not
too small. Object sizes have to be at least 5-10% of the scene for consistent
detection. If the objects are only a few pixels (people or vehicles), it will be
difficult to detect them consistently and will cause false alarms on most
systems.
10. Ensure that the object size is not too large – more than 40% of the scene. The
camera should not be too close to the objects being tracked.
11. We recommend you turn off AGC (Auto Gain), Auto IRIS and White Balance on
cameras. These fluctuate some times and cause notable scene changes. It is
possible to run the system with these settings ON, with lower sensitivity, if the
scene is stable and fluctuations are infrequent.
12. Camera lenses need to be kept clean and focused for best results.
Camera Zoom, FOV and Angle are important. The following sections address them
fully with examples.
Recommended Camera Positioning for Common Applications
1. Intrusion Detector
Camera must be at an angle looking down. Camera should be installed at sufficient
height to avoid occlusions. The object size should not be too large relative to the
scene. It is recommended that the size of any object entering the scene not exceed
50% of the scene size.
If the camera is used during the night, lighting reflections should be minimized
to avoid false detections. Light should be uniformly distributed in the scene (avoid
shadows). In addition, ensure no light sources are directed at the camera.
A camera that is pointed at an angle looking down is optimal for intrusion detection,
as seen below.
10
2. Camera Tamper Detector
For tamper detection, the camera can be installed in any position; top-down view,
side view or front view. The maximum size of objects entering the scene should
not exceed 50-60% of scene size. If the camera is used during the night, lighting
reflections should be minimized to avoid false detections. Light should be uniformly
distributed in the scene (avoid shadows). In addition, ensure no light sources are
directed at the camera.
6 Recommended Settings
Overview
The performance of the video analytics engine relies greatly on scene type and
the settings applied to those scenes. This section provides a collection of common
scenes and the corresponding recommended settings for each. These recommended
settings are meant to be used only as a guide toward obtaining more accurate
results. Since every scene is different, the recommended settings do not show
specific values. They are simply a guide to what settings need to be adjusted for in
different scenarios to improve on certain aspects of the results.
Adjusting Basic Settings
For some scenes, the default settings should be sufficient without changing anything
other than minimum and maximum object sizes, and sensitivity. For example:
11
Adjusting Advanced Settings
Some scenes require extra or advanced settings like continuous learning, shadow
suppression etc.
Continuous Learning
This feature allows the engine to learn the scene as it changes gradually. Learning
happens in every frame and gradual changes in background are captured. This
feature is typically used for scenes such as:
1. Outdoor scenes with shadows
2. Indoor scenes with changing lighting conditions
3. Parking areas
There are other features involved in continuous learning, such as learn object,
learning time, learn scene, etc. For example:
12
13
7 Event Output Format
When an event is generated, IQanalytics will provide event metadata and object
metadata associated with that event. This metadata will be included in the JPEG
headers or H264 Headers. Please contact IQeye on details for parsing this data from
the stream.
The event information is provided in the following xml structure. Aside from the
camera tamper event, every other event will be accompanied by object data that
gives the ID, Location, and Size of the object triggering the event.
<EventType>EVENT_INTRUSION</EventType>
<ObjectData>
<_>
<!-- ObjectID = 3 -->
<LeftSide>20</LeftSide>
<TopSide>40</TopSide>
<RightSide>50</RightSide>
<BottomSide>80</BottomSide>
<Area>527</Area>
</_>
</ObjectData>
a. The Event Type can contain following values:
• EVENT_INTRUSION
• EVENT_TAMPER
• EVENT_ENTER (Motion Detection)
• EVENT_EXIT
b. The Object ID is the ID of the object that created the event. One object can create multiple events. For motion detection an object will create an Entry and Exit event to signal when the object entered and left the camera FOV.
c. The Object Location values in in the ObjectData are mean positions of the object rectangle sides in pixels of the processing picture.
d. The Object Size is provided as the area value of an object in pixel count.
901-0360 Rev A
33122 Valle Road San Juan Capistrano, CA 92675-4853 USA | phone +1 949 369 8100 | fax +1 949 369 8105 | www.iqeye.com
14