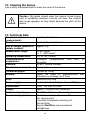
1
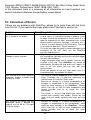
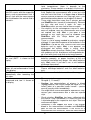
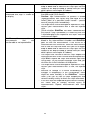
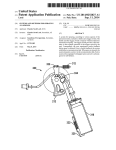
User Manual
______________________________________________________________
GlukiPlus
Talking Blood Glucose Meter for
Self-Monitoring
Table of Contents
1: Introduction
2: Contents of Package
3: Description of Unit and Strips
3.1: Description of Unit
3.2: Description of Check-, F-, and Test Strips
4: Power Delivery
5: Start of Using the Unit
5.1: Switch on and Control the Unit
5.2: Calibration with the F-strip
6: Blood Sugar Calibration
6.1: Preparation
6.2: Inserting the Test Strip
6.3: Taking Blood
6.4: Calibration Stage
6.5: Normal Values for Capillary Full Blood
6.6: Short Summary of Blood Sugar Calibration
7: Memory Functions
7.1: Call up Memory
7.2: Erase Memory
7.3: Single Entry Erase
7.4: Mark of a Test Result
8: Control of Unit
9: Safety Hints
10: Correction of Errors
11: Limitation of the Use of
12: Cleaning the device
13: Technical Data
14: Guarantee and Service
15: Legal Notice on the Disposal of Electronic Devices
15.1: Disposal of used Electronic Devices
15.2: Recycling Batteries
16: Symbols used
17: Manufacturer
2
page 3
page 4
page 4
page 4
page 4
page 6
page 7
page 7
page 8
page 9
page 9
page 11
page 11
page 12
page 13
page 13
page 14
page 15
page 15
page 16
page 16
page 17
page 18
page 20
page 23
page 24
page 24
page 25
page 26
page 26
page 26
page 27
page 28
1: Introduction
GlukiPlus is a talking blood glucose meter for blind and visually impaired
people to monitor the content of glucose in their blood by themselves. Its test
method is based on the most modern electrode strip technology. To say it in an
easy way: the electrical resistance of blood on a strip is measured and the
content of glucose is calculated. The unit is calibrated to capillary blood. It is
put onto the strip and evaluated by GlukiPlus. GlukiPlus is calibrated with the fstrip to each new package of strips, which means that it is adjusted to each
single package of strips.
After the above-mentioned calibration the evaluation process runs in two steps.
As a first step the strip is inserted into the GlukiPlus. Then the opening of the
strip is guided to the drop of blood with the GlukiPlus. By means of capillary
action the correct amount of blood is automatically drawn into the test chamber
of the strip. The results are shown and announced after 30 seconds. The unit
automatically turns on by putting a strip into the slot and it turns off
automatically when the strip is removed.
CONSULT INSTRUCTIONS BEFORE USE! Do not operate
GlukiPlus without reading the instruction manual. Get
acquainted with the device and all the accessories. Keep the
instruction for reference reading and pass it on with the
device.
Caution: There is a user’s manual available on a CD for
blind and visually impaired people.
Caution: Practice the correct way of handling the unit under
supervision of your doctor, pharmacist or your diabetes
advisor. Make measurements only in the way you have
been advised.
3
2: Contents of Package
The basic set of GlukiPlus consists of a GlukiPlus blood sugar monitor,
batteries (2 AA/Mignon alkali batteries), a check-strip, and a user’s manual on
a CD.
3: Description of Unit and Strips
3.1: Description of Unit
Put the GlukiPlus with the smooth side up in front of you and the slot for the
strips on the small side pointing away from you. On the left small side there are
two sockets for connectors.
Up side
on the upper side there is a big deepened rectangle with the display and you
can feel five points down left on it for the speaker.
Sides of the unit
− On the left side there are two sockets. The one furthest away from you is
reserved for service purposes and for the interface to a PC. The one
closer to you is a 3,5 mm jack socket for headphones.
− On the right side in the half furthest away from you, you will find a round
button to adjust the volume for the speakers and the headphones. As
soon as you have inserted the batteries you can change the volume by
pressing on this button. You adjust the volume in a loop of 1 - 2 - 3.
− On the side pointing away from you, you can feel a rectangular slot. All
strips that are used with the unit (check-, f-, and test strips) are inserted
into this slot.
− The side pointing to you has no items on it.
Bottom side
on the bottom side in the third closest to you, you will find the cover of the
battery compartment with a snap fit to open it in the middle.
3.2: Description of Check-, F-, and Test Strips
− Check-strip: It is within the contents of package. It is used to check the
electronics of the unit regularly. It is a small rectangular yellow sensor
with a length of approximately 2 cm and a blob on one end. Please take
the strip out of its packaging and put it in front of you with the blob on the
right upper side.
4
Hint: The sensor should only be touched on the side with the
blob. The other side is inserted into the GlukiPlus and should
not be touched with fingers (or only with caution and dry
fingers) because this could lead to false test results.
To insert it into the GlukiPlus take the check strip in your
hand, check the right position, by moving along the long side
of it and feel the small notch on the side closer to you that
prohibits from wrong insertion.
− F-strip: In each package with test strips there is – separately packed – a
green f-senor (again with a blob on one side). This f-strip is used to
calibrate the GlukiPlus to each pack of test strips. The F-strip is
approximately 2 cm long and has a notch on one side to prevent from
wrong inserting into GlukiPlus.
− Test strip: The test strips are used to test the blood sugar concentration.
They get in contact with blood. They are approximately 2 cm long and are
almost rectangle shape. The difference is that one side is not squared but
a semicircle. You may touch this side with clean dry fingers. Put the test
strip in front of you with the semicircle pointing to the right and the notch
on the long side pointing to you (same way as with the other strips). In
this position the left side of the strip is the one to be put into GlukiPlus and
should not be touched with fingers. If you move along the surface of the
strip with your fingers from right to left, you can feel a ridge that
represents the border to which the strip is inserted into GlukiPlus. In the
right area of the test strip you can feel a small hole. It is used for
ventilation.
Caution: the blood has to be put onto the semicircle part of
the strip. The blood is absorbed by capillary action. Never
put blood to the flat sides of the strip and make sure there is
no blood over the ventilation hole.
Hint: After you have used the test strip dispose it without
using it for further measurements. The results of
measurements made with strips touched too firmly may be
false readings.
5
Caution: Check- and f-strips can be told apart only optically
using colours and imprinting but not in a tactile way. Make
sure that you store them in separate boxes.
Caution: All strips must only be touched with dry clean
hands. The part of strips to be inserted into GlukiPlus must
under no circumstances be touched with wet fingers as the
test results might be falsified.
4: Power Delivery
Before you can start to work with GlukiPlus, you have to ensure batteries are
inserted. Put the unit upside down in front of you with the slot for inserting the
strips pointing away from you.
Move your fingernail to the semi-circled notch above the cover of the battery
compartment. Press the snap fit with your fingernail in the direction of the cover
of the battery box (or in your direction) and lift the cover. You may remove the
cover completely. In the inner side of the battery box you can feel two metal
contacts on the right and left side. Now put two new 1,5 Volt AA/Mignon alkali
batteries into the battery compartment. The one closest to you points with its
minus pole (flat side) to the right and the one away from you points with its
minus pole to the left. You might also orientate yourself by means of the 4
tactile marks in the battery box, which you can find close to the metal contacts.
A small blob point close to a contact shows that the battery with its positive side
should be placed here. As soon as the batteries are placed correctly you can
hear a signal.
Close the battery box again with the cover by putting the two noses you can
find on the bottom end of the cover into the notches that you will find on the
side of the battery box, which is closest to you. You will hear the snap fit
closing after you have pressed the cover onto the GlukiPlus.
If the voltage of the batteries is close to an end it is shown “Bat” on the display
and “batteries low” is announced. Please remove the old batteries and replace
with new ones. Check its functionality with the check-strip (for details see
chapter 5.1 below), before you start your next measurement.
6
5: Start of Using the Unit
In order to make GlukiPlus operate correctly you need the following testing
materials: test strips (to measure the content of glucose in blood), check-strips
(to check the electronics of the unit), and f-strips (to calibrate the unit with the
test strips used)
GlukiPlus is delivered with a check-strip, while the f-strips come with each pack
of test strips. In addition you need a lancing unit in order to get some blood out
of your body. Further more you can check the correct functioning of the whole
system using control fluids. You can order these fluids separately at Caretec
GmbH, as they are not in the contents of package.
5.1: Switch on and Control the Unit
The electronic parts of the unit are checked with the check-strip. It is within the
contents of package and is in the small recloseable plastic bag. It is a small
approximately 2 cm long yellow sensor.
Caution: The check-strip feels like the f-strip. Please ensure
that you keep both of them apart and that you are in a
position to differentiate between them using different means
of storage. With this different packaging you can doubtless
choose the needed strip.
In order to make handling easier the strip has a blob on one end. Lay the
GlukiPlus in front of you with the slot for the strips pointing away from you and
the display on the surface. Get the strip at the thicker end and insert it into
GlukiPlus with the notch pointing to the right (the side with the volume button
on the GlukiPlus). Press the strip softly into the GlukiPlus until you hear its
automatic turn on signal.
On the display the function control appears and after a short time you can hear
the test result of the check strip e.g. “control value 105 milligram”. If this value
is between 95 and 115 mg/dl respectively between 5,3 and 6,4 mmol/l (called
the area of trust), the unit is ready for operation. Take the check-strip out of the
GlukiPlus (the unit turns off automatically) and put it back into the container
provided for it.
7
Caution: After each removal or change of batteries you have
to do this test, otherwise there might be malfunctions. Take
care to store the check-strip with caution.
Caution: To blind and visually impaired people we
recommend to execute this test with the check-strip regularly
(after 10 measurements each).
5.2: Calibration with the F-strip
In addition to the 50 test strips each pack of strips contains a single f-strip. You
can find it in the bag with a zigzag pattern on two sides and the printed code
“code strip” on it.
The f-strip is used to adjust the unit to each new packet of test strips. On one
end it has a blob for better handling. Lay the GlukiPlus in front of you with the
slot for the strips pointing away from you and the display on the surface. Hold
the strip at its thicker end and insert it into GlukiPlus with the notch pointing to
the right (the side with the volume button on the GlukiPlus). Press the strip
softly into the GlukiPlus until you hear its automatic turn on with a signal.
After inserting the strip the f-number of the strip is announced and shown on
the display (e.g. F5). The announcement is repeated after some seconds. Now
you have calibrated your GlukiPlus to your new measurement strips. Take your
f-strip out of the GlukiPlus and store it in the bag designed for it. You can check
the calibration by putting a new unused test strip into GlukiPlus. With f-strips
and test strips out of the same delivery bag, the same f-number has to be
announced. If not, you need to do a new calibration and make sure you use the
right f-strip.
Caution: Please keep the f-strip as long as you have test
strips of that batch, in order to recalibrate GlukiPlus. As soon
as the pack with test strips is finished, you should dispose of
the respective f-strip as well. Only after disposal of the old
strips open a new pack of test strips. GlukiPlus has to be
calibrated with the f-strip of the new pack before you start
measurements.
8
Caution: To blind and visually impaired people we
recommend to mark each pack of test strips with their fnumber using either stickers with Braille letters (e.g.
TapeQueen from CareTec GmbH) or with labels and an
electronic reader system (e.g. Sherlock from CareTec
GmbH).
6: Blood Sugar Calibration
The content of glucose in blood is changing during the day depending on
medication, physical activity, diet, insulin or other oral anti diabetics
(pharmaceuticals against diabetes for oral application) as well as other stress
or diseases. The monitoring of glucose in blood delivers information that might
help to cope with your diabetes or to keep the concentration of glucose in your
blood to the level required.
Caution: Only change medication based on values of the
measurements with GlukiPlus after consulting your
physician.
The test strips are quite the same as the above-mentioned f-strips or checkstrips. They don’t have a blob on one side of the sensor, but an integrated
capillary tube that draws blood to the test chamber automatically. The opening
of that tube is in the middle of the semicircular end on the small side of the
sensor. Therefore this is the part of the sensor that has to get into contact with
the blood.
Caution: Don’t put blood on the broad sides of the sensor.
Avoid putting blood over the opening of the ventilation hole
on one side of the sensor.
6.1: Preparation
In order to measure glucose in your blood you need a GlukiPlus ready to work,
a lancing unit with a sterile lancet in order to gain your blood, a new (sterile)
test strip and a cloth made from cellulose to clean your finger. You should wash
your hands with warm soap, water before taking the measurements. Rinse
9
them with care and dry them thoroughly with a clean cloth. This way on one
side a falsificated measurement caused by contaminations is avoided and on
the other side the circulation of blood in the hand is enhanced and with it, it is
easier to gain blood from the fingers.
Hint: Please always stick to these hygienic routines. For
example if you have eaten fruits before a measurement or if
you have applied an after-shave and you didn’t wash your
hands carefully the results of the measurements may be
extremely wrong and of no use for you.
The test strips are packed to 5 units in an aluminium foil. To get a single strip
you first have to separate it from the others along the perforation. The best way
to find the perforation is to carefully fold the packages.
To each test strip there is a corn of salt packed. It is used to keep the strip dry.
On the end at the opposite of the salt corn, you can open the pack by carefully
pulling the two overlapping foils apart. The test strip is then exposed open and
can be carefully taken out of the packaging. Don’t use test strips coming out of
damaged packaging, as they won’t be sterile any more.
Caution: We recommend that as soon as a new pack of test
units arrives a seeing person should read the expiry date
from it. Take this date down and use all the strips before this
date is reached. Never use test strips past their expiry date.
Hint: We recommend opening the packaging of the test strip
at the upper flaps then to pull out the strip and immediately
insert it into the slot at the GlukiPlus. Working this way
pollution by accident or a wrong touch of the test unit is
almost impossible.
Caution: GlukiPlus may only be used with test strips
„Ascensia Elite” from the company Bayer. It might be that
functional parameters of GlukiPlus don’t fit to other test strips
from other manufacturers.
Using test strips of other
10
manufacturers might lead to wrong results. There is no
warranty provided to the usage of GlukiPlus with test strips
from other manufacturers or types of test strips by CareTec
GmbH.
6.2: Inserting the Test Strip
Put the GlukiPlus in front of you with the slot to insert the strips pointing away
from you and the display upper most. Take the strip on the semicircular end
and insert the other side into GlukiPlus with the notch on the edge pointing to
the right. Press gently until you hear GlukiPlus turning on automatically with a
signal. Subsequently the f-number from the last calibration (e.g. F 5) is
announced and shown in the display. If there are results saved in the unit the
latest value is announced.
Caution: Don’t become confused by the announcement of
the values of the latest measurement saved.
Caution: Don’t use measurement strips, which are in
packages that are damaged. They might not be sterile
anymore. So don’t use them under any circumstances.
Caution: Only unpack test strips immediately before use and
use each strip only once. The sterility of the measurement
strips can’t be warranted under any circumstances.
You now have 3 minutes to bring your blood to the test strip. If you exceed this
time, the last values measured are announced automatically and GlukiPlus
turns itself off automatically. The test strip can be pulled out and inserted again
as often as you like, but it should be used as soon as possible.
6.3: Taking Blood
Collecting of blood samples may be performed in many different ways.
Experiences from the past showed that the following procedures turned out to
be very useful.
11
Caution: Please get familiar with the handling of your
lancing unit and make sure you know and understand the
notes and the manual from its producer. Have a seeing
person teach you how to use the lancing unit.
Hold your hand close to horizontal. Put your lancing unit to the side of a finger
pad (sensitive part of front phalanx). You may mark the surroundings of the
puncture using your thumbnail. Activate your lancing unit and remove it
afterwards. Massage the “marked” area with your thumb without leaving it. Try
to hold your hand in a way that the puncture of the lancing unit is the lowest
part. Thus according to the power of gravity the blood will flow there and it will
ensure a big drop of blood is collected. Move the GlukiPlus with the test strip
inserted to the point marked with your thumbnail. From there carefully get
GlukiPlus with the test strip to the puncture of the lancing unit. As soon as the
opening of the capillary tube has reached the blood it is sucked into the
reaction chamber automatically. Please keep in mind that the blood is drawn
into the hole at the opening of the capillary tube on the edge in the middle of
the semicircular end of the test strip. This means that the blood must not be
applied to the upper or bottom side of the test strip.
If there is enough blood in the reaction chamber a feedback is given through a
peep. Please don’t stop the process until another signal announces the
beginning of the measurement.
6.4: Calibration Stage
Keep the test strip in the GlukiPlus and after a total of 30 seconds the
concentration of glucose in the blood is shown in the display and announced
acoustically. The announcement is repeated until you remove the test strip out
of GlukiPlus. If you don’t pull the test strip out of the unit, GlukiPlus is turned off
automatically after approximately 3 minutes.
Caution: You are only allowed to use test strips and lancing
units once. Dispose of the test strip and the lancing unit
carefully to avoid any infection or other harm to other
persons. You may use the open packaging of used strips for
disposal purposes.
12
Caution: Note the value in your diabetes diary. GlukiPlus
itself saves up to 20 values and calculates an average out of
them.
If „LO“ is shown in the display and „too low“ is announced, the concentration of
glucose in the blood is below 20 mg/dl (1,1 mmol/l). If “HI” is shown in the
display and “too high” is announced, the concentration of glucose in the blood
is above 600 mg/dl (33,3 mmol/l). In these cases this might be an error
message and we recommend that you check the unit again with the control
fluid and you perform the measurement once again.
In order to go easy on the batteries take the test strips immediately after each
measurement out of the GlukiPlus. It is only allowed to use each test strip
once. If the test strip is removed from GlukiPlus after it has turned off
automatically the latest value measured is shown and announced.
Hint: Please show the correct procedure of blood glucose
monitoring, the handling of GlukiPlus, and the different strips
to others too. This is so that you can get help if you need it.
Caution: A concentration of glucose in blood below 50 or
above 250 mg/dl (below 2,8 or above 13,9 mmol/l) can be a
hint of a serious medical status. Should your level of glucose
in the blood be beyond these values, you should
immediately consult a physician.
6.5: Normal Values for Capillary Full Blood
Sober/pre-prandial
90-120 mg/dl (5,0-6,7 mmol/l)
1-2 hours after meals/ postprandial 130-160 mg/dl (7,2-8,9 mmol/l)
Before bedtime
110-140 mg/dl (6,1-7,8 mmol/l)
6.6: Short Summary of Blood Sugar Calibration
Here we present a shortened step-by-step summary of blood glucose
monitoring:
− Your GlukiPlus has to be ready to use and the batteries must have
enough power for operation.
13
− Control the functionality of your GlukiPlus with the check-strip. The
announced value has to be within the area of trust (95 – 115 mg/dl or 5,3
– 6,4 mmol/l).
− Calibrate your GlukiPlus using the f-strip to the test strips used.
− Get your GlukiPlus, your lancing unit with a sterile lancelet, and a sterile
test strip ready for use.
− Wash your hands carefully with lukewarm water and carefully dry them
afterwards with a clean clothe. The hands must not be humid during use
of GlukiPlus and its strips.
− Take the test strip out of the packaging.
− Insert the test strip into the strip slot on one of the small sides of the
GlukiPlus. Hold it on the rounded end and insert the other end into the
slot. Make sure the notch on the edge of the test strip is on the side that
points to the side of the GlukiPlus with the volume button on it and
carefully push the sensor into the unit until you hear an acoustical signal.
You now have about 3 minutes time to bring your blood to the strip,
− Lance yourself with your lancing unit with a sterile lancelet into the side of
your finger pad. Mark this area with the thumbnail of that hand.
− Hold your hand in a way that the puncture is on the deepest point. This
will ensure that there is a big drop of blood collected and does not trickle
off.
− In the other hand take your GlukiPlus with the test strip inserted and guide
the test strip starting from the mark with your thumbnail in the direction of
the puncture. Move slowly and wait for a bleep from your GlukiPlus. Stop
and hold the test strip of the GlukiPlus to the puncture and wait for the
next signal (3 bleeps). Now GlukiPlus starts with the evaluation of your
blood.
− Remove the GlukiPlus from the puncture, keep the test strip in the unit,
and wait until after approximately 30 seconds when the result is
announced.
− Note the result of the blood glucose monitoring and remove the test strip.
− Dispose of the test strip and the lancelet in a proper way. (to avoid the
risk of infections to you and others).
7: Memory Functions
GlukiPlus saves the latest 20 values automatically. With a new measurement
the oldest value is deleted automatically. The saved values are shown or
announced in a reverse order (latest value first). Also an average is
automatically calculated from all of the saved values.
14
Caution: GlukiPlus cannot differ automatically between
blood glucose measurements and control measurements
with a control fluid. In order to avoid that these control
measurement values are taken into the calculation of the
average, you have to either mark them right before the
measurement or delete them just after the measurement
(see chapter 7.3 delete a single value and chapter 7.4 mark
a value).
7.1: Call up Memory
With the check-strip you can relatively quickly hear your values from
monitoring. If you insert the check-strip a control value is announced. After
some 10 seconds an “A” appears in the display with the average value of the
whole memory and “memory” and the average value is announced. After that
the announcement of all the different values starts in a reversed order. Which
means that you can hear the latest values first. The values are numbered from
one to twenty. If there are no values in the memory GlukiPlus shows “---“ in the
display and announces “memory clear”
If your check-strip is not available, you can use a new unused test strip to recall
the content of the memory. In this case you have to wait 3 minutes after
inserting the test strip before the content of the memory is displayed and
announced.
7.2: Erase Memory
You have to recall the memory of your GlukiPlus before you are able to delete
it. Please insert the check-strip or an unused test sensor into the strip slot and
wait until “memory” is announced. As the unit starts to tell you the single values
you pull the strip out again for a short time and reinsert it (within a maximum of
2 seconds).
Hint: As it is difficult to reinsert the strip under pressure of
time, we recommend not removing the senor completely. So
please pull gently until the first resistance is overcome. Now
the strip is still with 1 to 2 mm within the slot. Again press the
strip gently into the slot.
On the display in an interval of 1 second there is shown „dEL“ and „ALL“ in an
interchanging way. Your GlukiPlus announces 5 times “delete all” and then
15
turns off automatically with a signal. All values from the memory are now
deleted. If you have used a test strip, dispose of it properly.
Caution: If you reached the delete function by accident,
remove the strip immediately before the announcement
stops and the display gets dark, otherwise all values are
deleted.
7.3: Single Entry Erase
A single value can only be removed immediately after a measurement, which
means only within the three minutes this value is shown and announced.
Caution: If the test strip has already been removed, the
single value can’t be removed any more.
In order to delete a single value remove the sensor for a short time and put it in
again (within 2 seconds) during the announcement of the values.
Hint: As it is difficult to reinsert the strip under pressure of
time, we recommend not removing the sensor completely.
Please pull gently until the first resistance is overcome. Now
the strip is still 1 to 2 mm within the slot. Press the strip
gently into the slot again.
On the display there is „dEL“ shown for 2 seconds and „delete“ is announced.
GlukiPlus turns off automatically. If you have used a test strip dispose of it
properly.
7.4: Mark of a Test Result
To avoid single values being saved in the memory mark them. In order to mark
a value you remove the strip before the measurement for a moment and insert
it again (within 2 seconds).
16
Hint: As it is difficult to reinsert the strip under pressure of
time, we recommend not removing the sensor completely.
So please pull softly until the first resistance is overcome.
Now the strip is still 1 to 2 mm within the slot. Press the strip
gently into the slot again.
GlukiPlus now announces “control measurement” and the value is not used in
calculation for average values.
8: Control of Unit
Control measurements on a regular basis are a good method to practice how to
use the unit. Also the test area of the test strip can be checked this way.
Control measurements can only be performed with a control fluid. You can buy
these fluids at CareTec GmbH.
Procedure
Insert a new test strip into GlukiPlus. The F-number and the latest test value
are announced. We recommend marking a control measurement (see chapter
7.4 above). Then the value of the control measurement is not used to calculate
average values of all blood glucose measurement values from the memory. In
order to mark a value remove the strip for a moment from the slot before the
measurement and put it in again within 2 seconds. GlukiPlus announces,
“Control measurement”.
Hint: As it is difficult to reinsert the strip under pressure of
time, we recommend not removing the senor completely. So
please pull gently until the first resistance is overcome. Now
the strip is still with 1 to 2 mm within the slot. Press the strip
gently into the slot again.
Apply a small drop of a control fluid to a place you can retrieve easily (e.g. in a
teaspoon). Dip the opening for measurement of the test strip in a GlukiPlus into
the control fluid until you have heart first one and then three bleeps. A small
amount of the control fluid is automatically sucked into the test strip. After 30
seconds the value for the control measurement is announced. You can now
remove the test strip and dispose of it properly.
17
Compare this value with the values on the „control range card“ from the
packaging of your measurement strips or with the one below. If the result of the
control measurement is not in the range mentioned there, there might be
something wrong with the measurement strips, or there has been a mistake in
handling the procedure.
Measurement range of the „Control Range Card“
Type of control fluid
Control fluid „Normal“ – for
simulated, normal values
of glucose in blood
Control fluid „High“ – for
simulated, high values of
glucose in blood
Control fluid „Low“ – for
simulated, low values of
glucose in blood
Measurement range, the value
has to be within (mg/dl)
Measurement range the
value has to be within
(mmol/l)
76 to 109 mg/dl
4,2 to 6,1 mmol/l
250 to 338 mg/dl
13,9 to 18,8 mmol/l
43 to 68 mg/dl
2,4 to 3,8 mmol/l
Hint: At the time this manual was written (December 2009)
these have been the valid values for measurement ranges of
the control fluids. Please compare this values with the values
on the packaging of measurement strips in an interval of half
a year, with the help of a sighted person. Please note
possible changes.
If you have marked the control values, the value is not included into the
calculation for average values. But you can hear these values if you recall the
memory. If the value has been marked, you can hear “control measurement”
followed by the value at the announcement of the values from the memory.
9: Safety Hints
The talking blood glucose monitor GlukiPlus is in accordance with the rules of
safety of EN 61010-1.
− GlukiPlus is designed for private indoor use.
− Handle it carefully. If GlukiPlus has fallen to the floor, electronic parts
might have been damaged or malfunctions may have occurred. In that
case please return your unit for a check to us.
− Never expose the unit, the test strips, the f-strips, and the check-strips to
high humidity, heat, cold, dust, or dirt, and make sure no humidity gets
18
−
−
−
−
−
−
−
−
−
−
−
−
into the unit. Make sure that the electric parts of the measurement strips
not get wet, dirty, or damaged.
If humidity did get into your GlukiPlus, remove the batteries and dry the
unit. Send it to us for a check in any case, as follow up damages might
evolve from that.
If the unit gets splashed with water, dry it and check again with the checkstrip.
Don’t use any other strips as the ones described here.
Don’t use GlukiPlus in extreme ranges of temperature. (Functionality can
only be warranted in a temperature range between +10° and +40°
Celsius).
Never use a damaged GlukiPlus.
Before a measurement wash and dry your hands carefully. Never touch
the test strips with wet hands not even wet from perspiration.
Please be aware that blood has a potential to cause infections.
Immediately dispose of the used test strips and lancelets and clean the
GlukiPlus.
If the voltage of the batteries gets low, and if “BATT” is shown on the
display or “batteries low” is announced, don’t take any new
measurements. You should immediately exchange the batteries, as no
correct measurements can be guaranteed in this case.
After each exchange of batteries adjust the electronics of your GlukiPlus
doing the test with the check-strip (see chapter 5.1 above).
If you intend not to use the unit for a long time, remove the batteries to
avoid damage caused by leakage of them.
Keep GlukiPlus away from Children.
If you use ear- or headphones be sure to adjust their volume to a level
your ears won’t be damaged.
Caution: potential risk of infections!
Medical professionals who use GlukiPlus with several
patients, must do this in accordance with the hygienic rules
of their institution (hospital, laboratory, diabetes consulting,
pharmacy…) All objects that get in touch with human blood
contain even if they are cleaned carefully a certain risk of
infections.
The user should follow the instructions described in the following document:
„Protection of Laboratory Workers from Instrument Biohazards and Infectious
Disease Transmitted by Blood, Body Fluids, and Tissues: Approved
Guidelines“ des National Committee for Clinical Laboratory Standards. (NCCLS
19
Document M29-A [ISBN 1-56238-339-6]; NCCLS, 940 West Valley Road, Suite
1400, Wayne, Pennsylvania 19087-1898, USA, 1997).
In this document there is a summary of all information on how to protect you
against infectious diseases transmitted by human blood.
10: Correction of Errors
If there are any problems with GlukiPlus, please try to solve them with the hints
from this list. If you need further help, please don’t hesitate to contact us.
Problem
Possible solutions
GlukiPLus announces „error“ and
„Err“ is shown in the display
No announcement or
although a strip is inserted
signal
After inserting a test strip GlukiPlus
announces another f-number than
inserting an f-strip.
After inserting the check-strip the
announced value is beyond the
range of trust of 95 to 115 mg/dl
(5,3 to 6,4 mmol/l).
− GlukiPLus may be beyond the temperature range
(+10 to +40°C) it is designed to work in properly. It has
to adjust itself to the temperature. Please leave it in a
room for around half an hour. Afterwards start a new
measurement. If the error message is still there, this is
a hint of a serious damage in the electronics. The unit
is not ready for operation. Please contact us.
− This error message may point to serious damage in the
electronics of the unit. Don’t use the GlukiPlus
anymore and contact us.
− Check the power supply. Take care that the batteries
are inserted the right way and they are not discharged.
Use only alkali batteries.
− It might have been more then 3 minutes since you last
inserted a test strip. Then GlukiPlus has turned off
automatically. Remove the strip and insert it again. As
soon as the unit reacts you can start with your
measurement.
− Check the position of the test strip. Make sure it is
inserted correctly see chapter 6.2 above.
− You have to calibrate GlukiPlus to the respective test
strips. Therefore use a f-strip that represents the
relevant code (F5-strip for F5 test strips)
− Because of storage in a humid surrounding or of
changes in temperature in the surroundings, there
might be some humidity in the GlukiPlus. Please
leave it for half an hour at room temperature and
normal humidity and try to check the strips
afterwards.
− The check-, f-, or test strip might have come into
contact with humidity (wet hands). Please dry the
strips and your hands carefully and insert the strip
again.
− Because of storage in a humid surrounding or of
changes in temperature in the surroundings, there
might be some humidity in the GlukiPlus. Please
leave it for half an hour at room temperature and
normal humidity and try to check the strips
afterwards.
20
Inserting a f-, check-, or test strip
GlukiPlus reacts with the respective
signals and announcements but it
doesn’t start with the measurement
after the blood or the control fluid is
sucked in.
GlukiPLus announces „battery
low“ and „BATT“ is shown on the
display.
Recalling memory the respective
values are not announced or shown
in the display.
GlukiPLus
doesn’t
turn
off
automatically after removing the
test strips.
After a measurement „too low“ is
announced and „low“ is shown on
the display
− If the error still exists, even after an adjustment to
local temperatures, there is damage to the
electronics. Please contact us and don’t use the unit.
− There might not have been enough blood or control
fluid. Repeat the measurement with a new test strip
and take care that there is a bigger drop of blood or
control fluid and to hold the test strip right into it. (For
detailed information please see chapter 6.3 above)
− There might have been more than 3 minutes passed
and GlukiPlus has turned off automatically. Remove
the test strip and insert it again. As soon as
GlukiPlus reacts you can start to measure again.
− You might try to use a damage-test strip or its expiry
date has expired. Retry the measurement with a new
not expired test strip. Hint: if you open a new
package of test strips you have to calibrate your
GlukiPlus with the f-Strip before you start
measurements.
− There is a lot of energy needed to evaluate a sample
of blood. It is possible the power of the batteries in the
GlukiPlus is to low for that. Please insert new alkali
batteries and try again. Hint: if the batteries are
discharged too quickly under a critical value,
GlukiPlus cannot announce “Battery low”. Therefore
with problems of this kind please exchange batteries,
do a test with check-strip and restart measurement.
− The power of the batteries is too low. Exchange the
batteries promptly, as proper functions of the unit
cannot be warranted any longer. Use alkali batteries
only. Hint: even if you don’t use a unit batteries
discharge themselves.
− Power supply is not strong enough to recall values.
Please exchange batteries and use alkali batteries
only.
− Please remove the batteries and insert them again.
− The concentration of glucose in your blood is below
20 mg/dl (1,11 mmol/l).
− Caution: low concentrations of glucose in blood
(hypoglycaemia) with values below 50 mg/dl or 2,78
mmol/l point to a possible health hazard – please
consult your physician immediately.
− You might have used a damaged or expired test strip.
Restart your measurement with a new not expired
strip.
− Check whether GlukiPlus has been calibrated with
the correct f-strip. Recalibrate it if necessary with the
f-strip belonging to the respective test strips. Start the
measurement again.
− Sometimes it can happen that there is not enough
blood in the measurement chamber and GlukiPlus
goes on with the measurement. If the results of a
measurement are unrealistic, redo the measurement
21
After a measurement „too high“ is
announced and „high“ is shown on
the display
−
−
−
−
GlukiPlus delivers results of
measurements
that
are
questionable or not reproducible.
−
−
−
−
−
with a new test strip and make sure you use a bigger
drop of blood and to hold the test strip right into the
middle of the drop of blood or control fluid (for more
details please see chapter 6.3 above).
The concentration of glucose in your blood is higher
than 600 mg/dl (33,3 mmol/l).
Caution: high concentrations of glucose in blood
(hyperglycaemia) with values over 250 mg/dl or 13,9
mmol/l point to a possible health hazard – please
consult your physician immediately.
You might have used a damaged or expired test strip.
Restart your measurement with a new not expired
strip.
Check whether GlukiPlus has been calibrated with
the correct f-strip. Recalibrate it if necessary with the
f-strip belonging to the respective test strips. Start the
measurement again.
Sometimes it can happen that there is not enough
blood in the measurement chamber and GlukiPlus
goes on with the measurement. If the results of a
measurement are unrealistic, redo the measurement
with a new test strip and make sure you use a bigger
drop of blood and to hold the test strip right into the
middle of the drop of blood or control fluid (for more
details please see chapter 6.3 above).
You might have reused an old test strip. Repeat the
measurement with a new unused and not expired test
strip. Hint: Dispose old strips and lancelets right after
using them, so you cannot exchange them and you
minimize the risk of infections of third parties.
You might have used a damaged or expired test strip.
Restart your measurement with a new, not expired
strip.
Because of storage in a humid surrounding or of
changes in temperature in the surroundings, there
might be some humidity in the GlukiPlus. Please
leave it for half an hour at room temperature and
normal humidity and try to check the strips afterwards.
If the test strip was exposed to great heat or humidity,
this could lead to strongly falsified results of
measurements. Repeat measurement with fresh
strips.
22
11: Limitation of the Use of
Preservative agents
− Fluorides – don’t use fluorides as preservative agents of blood samples
− Jodoacetic acid– don’t use jodoacetic acid as preservative agent for blood
samples.
Arterial blood
Arterial blood with a partial pressure of oxygen greater than 200 mmHg has a
small deviation at the determination (an average of – 6%) of glucose in blood
measured with GlukiPlus and in the laboratories. The normal range of partial
pressure of oxygen is between 80 to 110 mmHg or 11,04 to 14,36 kPa.
Use with neonates
GlukiPlus must not be used for the measurement of glucose in blood of
neonates or newborns. Because of the high values for hematocrit it will deliver
falsified values.
Metabolites
Reductive substances like ascorbic and uric acid have normal concentrations
of glucose in blood no substantial influences to the results of measurements
with GlukiPlus.
Hematocrit With normal concentrations of glucose in blood and values of 20 to
60 % of hematocrit, the results gained with the test strips are not influenced
significantly. At concentrations of glucose in blood 300 mg/dl or 16,7 mmol/l
and higher and at the same time hematocrit of 55 % and higher the results are
lower.
Lipaemic samples Cholesterin concentrations up to 500 mg/dl or 13mmol/l and
triglyceride concentrations up to 3000 mg/dl or 33.9 mmol/l have no important
influence on the test results. Values of glucose in blood from samples with lipid
concentrations above these values should be interpreted with restrictions.
Contraindications
Measurements of glucose in blood don’t reflect exactly the venous
concentration of glucose in blood at very low blood pressure. You should not
do measurements of glucose in blood from capillary blood with critically ill
persons (with malign tumours, life threatening infections, endometritis, and
respiratory insufficiency) or with patients with heavy loss of body fluids or
severe shock.
23
12: Cleaning the device
Use a lightly moistened cloth to clean the case of the device.
Caution: No liquids should enter the device! Avoid strong
acid or scrubbing cleansers and do not clean the surface
with rough sponges as they might damage the case of the
device.
13: Technical Data
Sample (used for
measurement):
Results:
Capillary whole blood
Size of sample (amount of
sample needed):
Measurement range:
Approx. 2 µl
Calibrated to whole blood
Operating temperature:
20-600 mg/dl
1,11 – 33,3 mmol/l
+10 to +40°Celsius
Compensation of
temperature:
Humidity:
Automatic compensation
thermistor
20-80% relative humidity
Time for measurement:
30 seconds
Calibration graph:
Chosen by f-strip
Memory:
Strip:
Saves the latest 20 measurements and
calculates an average out if them
Ascensia Elite Strip
Power supply:
2 x 1,5 Volt Alkali-Batteries Type AA/Mignon
Dimensions:
L/B/H: 120 x 64 x 22 mm
Weight:
Approx. 145 gram (incl. batteries)
Contents of package:
GlukiPlus, Batteries, Check-strip, manual
Accessories (optional):
Measurement strips (Ascensia Elite)
Var. lancing units
Lancelets to respective lancing unit
Control fluids
Bag for GlukiPlus and accessories
Headphones
24
with
built
in
14: Guarantee and Service
From the date of purchase, we issue to the original purchaser of this product a
guarantee of:
− twenty-four (24) months on the device itself,
− twelve (12) months on the accessories (e.g. power supply, earphones
etc.),
− six (6) months on wear parts (e.g. battery, case etc.)
Please note that we do not issue any guarantee on batteries!
During the guarantee periods mentioned above, the product will be either
repaired or replaced free of charge. In no event shall CareTec be liable for
indirect, special or consequential damages. The exposure of the device to
liquids, strong electromagnetic fields, heat as well as dropping the device or
opening the case causes immediate loss of guarantee. In case of problems
please contact CareTec or your local distributor before returning the device
without any apparent reason. We will then inform you about the necessary
procedures. The device may only be opened by authorized technicians!
CareTec reserves the right to make any changes or improvements to its
products without further notice.
25
15: Legal Notice on the Disposal of Electronic Devices
15.1: Disposal of used Electronic Devices
This product must be disposed of separately from household
waste at specially designated collection and recycling points.
For further information please contact your local authorities.
15.2: Recycling Batteries
Batteries must not be disposed of in household waste. As a
consumer you are legaly obligated to bring your old batteries
to public collecting points (in your community or any shop
that provides these batteries).
Pb-Cd-Hg These signs can be found on contaminant-laden batteries.
Pb = containing lead
Cd = containing cadmium
Hg = containing mercury
26
16: Symbols used
Caution.
Additional information.
Must be disposed off separately from household waste.
Manufactured by.
27
17: Manufacturer
CareTec International GmbH, Stubenbastei 1, A-1010 Wien,
Austria
is the manufacturer of this product.
Phone (+43 1) 513 80 81 0
Fax (+43 1) 513 80 81 9
E-mail: [email protected]
Web: www.caretec.at
GlukiPlus 09/2011
28