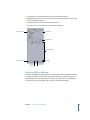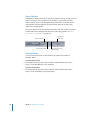
1
Bruce UM Homepage.qxp 3/11/05 12:47 PM Page 1 Soundtrack Pro User Manual To view the user manual, click a topic in the drawer on the side. Otherwise, click a link below. m Late-Breaking News m Soundtrack Pro Support m Soundtrack Pro on the Web m Apple Training Centers m Feedback 2 The Soundtrack Pro Interface 2 In Soundtrack Pro, you work in four main windows: the Project window, the Mixer, the Media and Effects Manager, and the Utility window. Project window Utility window Media and Effects Manager  The Project window includes the Timeline, where you arrange audio clips, and the Waveform Editor, where you edit audio files.  The Mixer is where you mix multitrack projects. It includes channel strips for each track, bus, and output, as well as other controls.  The Media and Effects Manager is where you locate and preview audio and video files to add to your project, and also where you add and adjust realtime effects.  The Utility window has tabs where you can add and view a video in a project, see the master level meters, get details on clips and other items, and set up recording. 23 Project Window The Project window is the “canvas” where you work on your projects. For multitrack projects, the Timeline is where you arrange and edit audio clips. For audio file projects, the Waveform Editor is where you edit audio files. Toolbar Tabs Mono Mix button Master volume slider Playhead Position value slider Transport controls Selection Length value slider  Toolbar: Includes tools for common functions. You can customize which tools appear in the Toolbar.  Tabs: You can switch between any projects open in the Timeline or Waveform Editor.  Transport controls: Control playback and the position of the playhead, and turn recording on or off. (For more information, see “Transport Controls” on page 25.)  Master volume slider: Adjusts the overall volume when you play the project. The volume level defaults to 0 dB when you create a project. Adjusting the master volume slider does not affect export volume.  Mono Mix button: Click to listen to a temporary mono mix of the project.  Playhead Position value slider: Displays the current playhead position. You can move the playhead by clicking the arrows, dragging, or typing a value.  Selection Length value slider: Displays the length of the current Timeslice (in the Timeline) or selection (in the Waveform Editor). You can change the Timeslice or selection length by clicking the arrows, dragging, or typing a value. 24 Chapter 2 The Soundtrack Pro Interface Toolbar The Toolbar is located at the top of the Project window. When you first open Soundtrack Pro, the Toolbar includes buttons for creating a new project, creating a new audio file, showing the Mixer and the Utility window, managing layouts, adding markers, and other common functions. You can customize the Toolbar, adding buttons for functions you want to access frequently. For information about customizing the Toolbar, see “Customizing the Toolbar” on page 49. Transport Controls You use the transport controls to control playback, set the position of the playhead, start recording, and activate the playback region. Play from Beginning Record Go to Beginning Play Cycle Go to End MIDI Sync  Record button: Starts and stops the recording process.  Play from Beginning button: Starts playback from the beginning of the project.  Go to Beginning button: Moves the playhead to the beginning of the project, or to the beginning of the playback region if it is active.  Play/Pause button: Starts playback at the current playhead position. If the project is playing, stops playback.  Go to End button: Moves the playhead to the end of the project, or to the end of the playback region if it is active.  Cycle button: Activates the playback region, if one is set in the Time ruler.  MIDI Sync button: Synchronizes playback with incoming MIDI Clock and MIDI Timecode (MTC) signals. For information on using the transport controls, see “Controlling Playback With the Transport Controls” on page 55. Chapter 2 The Soundtrack Pro Interface 25 Timeline The Timeline gives you a visual representation of a multitrack project, showing the position of clips, the playhead, and other items in time. The Timeline is organized into three groups of horizontal rows called tracks, busses, and outputs. You can add and arrange audio clips in tracks, use busses to create submixes, and send audio to physical output channels using outputs. You can control the sound of each track, bus, and output using the controls in its header. Automation Mode pop-up Project controls Global Timeline view Timeline editing tools Level meters Time display Time ruler Track area Audio tracks Timeline controls Scroll bar  Timeline editing tools: Select items using the Selection (arrow) tool, or split audio clips using the Split (razor) tool.  Automation Mode pop-up menu: Choose the mode for recording automation using either the onscreen controls or an external control surface.  Project controls: Set the project’s time signature, tempo, key, sample rate, time format, and other properties using these controls.  Show pop-up menu: Choose whether the video track, audio tracks, busses, outputs, and master envelopes are visible in the Timeline.  Global Timeline view: Shows a miniature view of the entire Timeline and the playhead position, and lets you move quickly to different parts of a project.  Time display: Shows the current playhead position in both Time-based and Beatsbased formats. You can set the playhead by typing a new playhead position in the time display. 26 Chapter 2 The Soundtrack Pro Interface  Level meters: As the project plays, the level meters show the volume level of the first output (Output 1).  Time ruler: You can precisely position clips, the playhead, and other items to a specific point in time (minutes, seconds, frames) or to a musical beat using the Time ruler.  Track area: Includes horizontal rows for tracks, busses, and outputs. Also includes the playhead, envelopes, and markers.  Headers: Each track, bus, and output has a header with an icon, name, volume slider, and other controls. (For more information, see “Headers” on page 27.)  Timeline controls: Includes controls to show the master envelopes, turn snap on or off, set the track height, and zoom in or out. (For more information, see “Timeline Controls” on page 28.)  Scroll bar: Moves the Timeline horizontally so you can see different parts of the project. Headers Each track, bus, and output in the Timeline has a header that includes the track name, track icon, and a set of track controls. Name field Record Enable button Effects button Mute button Envelopes disclosure triangle Solo button Drag handle Output pop-up menu Icon Volume slider Pan slider  Drag handle: Click to select the track, bus, or output and drag to reorder it in the Timeline.  Icon: You can choose an icon for the track, bus, or output, making it easy to quickly distinguish them in a large project.  Name field: You can type a new name for the track, bus, or output in the name field.  Record Enable button: Enables (or disables) the track for recording when you click the Record button. Only tracks have Record Enable buttons, not busses or outputs.  Mute button: Mutes (or unmutes) the track, bus, or output.  Solo button: Solos (or unsolos) the track, bus, or output. Soundtrack Pro supports both multiple solo and exclusive solo.  Effects button: Displays the Effects tab of the Media and Effects Manager with the track, bus, or output effects settings.  Envelopes disclosure triangle: Shows the track, bus, or output envelopes in the area directly below the track. Chapter 2 The Soundtrack Pro Interface 27  Volume slider: Sets the track, bus, or output relative volume in the overall mix.  Output pop-up menu: Choose an output for the track or bus, or choose the physical output channels for the output from the menu.  Pan slider: Sets the pan position of the track or bus. Appears in track and bus headers only, not in output headers. For detailed information on using the track controls, see “Using the Track Controls” on page 102. Timeline Controls The lower-left corner of the Timeline contains controls for various aspects of Timeline display and operation. Snap button Track Height control Master Envelopes button Zoom control Snap To Value pop-up menu     Master Envelopes button: Shows or hides the master envelopes. Snap button: Turns snap on or off. Snap To Value pop-up menu: Sets the value to which items in the Timeline snap. Track Height control: Sets the height of tracks, busses, and outputs to one of four settings, from Reduced to Large.  Zoom control: Click the control or drag the slider to change the zoom level. You can zoom in to edit clips precisely, or zoom out to display more of the Timeline. For information about using master envelopes, see “Master Envelopes” on page 220. For information about snap, see “Using Snap” on page 72. For information about using the Track Height control and zoom control, see “Moving Around in the Timeline” on page 94. 28 Chapter 2 The Soundtrack Pro Interface  Record Enable button: Click to enable the track for recording. When you click a track’s Record Enable button, the Recording tab of the Utility window appears, showing the track’s current recording settings. Appears in track channel strips only, not in bus or output channel strips.  Mute button: Click to mute (or unmute) the channel strip.  Solo button: Click to solo (or unsolo) the channel strip.  Name field: You can type a new name for the channel strip. Waveform Editor You can edit audio files in the Waveform Editor using actions. Actions give you a powerful and flexible way to edit audio files nondestructively using professional audio processing effects and other operations. You can turn individual actions on or off, reorder actions, flatten actions, and compare the project with and without actions. You can also analyze audio files in the Waveform Editor and fix common audio problems, including clicks and pops, hum, and phase problems. Automation Mode pop-up menu Previous and Next Selection buttons Global Waveform view Waveform editing tools Waveform View and Spectrum View buttons Time display Level meters Waveform display Actions list Master volume slider Playhead Position value slider Transport controls  Waveform editing tools: Includes the Selection, Sample Edit, Audio Stretching, and Zoom tools that you can use to graphically edit audio files.  Automation Mode pop-up menu: Choose the automation mode from the pop-up menu.  Previous and Next Selection buttons: Move back and forward through selections you’ve made in the waveform display. Chapter 2 The Soundtrack Pro Interface 31  Waveform View and Spectrum View buttons: Change the display between Waveform view and Spectrum view.  Time display: Shows the current position of the playhead.  Global Waveform view: Shows you a miniature view of the entire waveform and the playhead position, and lets you move quickly to different parts of an audio file.  Waveform display (and editing area): Shows the waveform of the audio file (or its frequency spectrum, in Spectrum view). You can select parts of the audio file to apply different actions to.  Level meters: Show the levels of the audio file as it plays.  Transport controls: Control playback and the position of the playhead, and turn recording on or off. (For more information, see “Transport Controls” on page 25.)  Playhead: Shows the part of the audio file currently playing.  Actions and Analysis buttons: Shows either the Actions list and related controls, or the Analysis Type, Parameter, and Analysis Results lists and related controls. When the Actions button is active, the following items are available:  Effects button: Shows the Effects tab, where you can add realtime effects to the project.  Actions pop-up menu: Choose menu items to flatten actions, delete actions, and perform other operations.  Actions list: Shows the actions you apply to the project.  Action Insert bar: Shows where new actions will be added in the Actions list, and which actions are heard when you play the project.  Actions list: You can add, select, and reorder actions in the list. Effects button Actions/Analysis buttons Actions menu Actions Action Insert bar When the Analysis button is selected, the following items replace the Actions list:  Analysis Type list: Lists the types of analysis you can select.  Parameters list: Some analysis types (Click/Pop and Silence) have parameters you can adjust before analyzing the file. The parameters appear in this list.  Analyze button: Click to analyze the file for the problems selected in the Analysis Type list.  Analysis Results list: Lists items found by analyzing the file. 32 Chapter 2 The Soundtrack Pro Interface  Clear Fixed button: Removes fixed items from the Analysis Results list.  Magnify button: Zooms in on the selected item in the Analysis Results list for as long as you hold down the button.  Fix All button: Fixes all items in the Analysis Results list.  Fix button: Fixes the selected items in the Analysis Results list. Parameter list Analysis Type list Analyze button Analysis Results list Fix button Clear Fixed button Magnify button Fix All button Media and Effects Manager The Media and Effects Manager is where you locate and preview media (audio and video) to add to your project. It has five tabs: The Browser, Favorites, and Search tabs give you three different ways to find media files; the Bin gives you quick access to media files for the current project; and the Effects tab is where you add and adjust effects. Chapter 2 The Soundtrack Pro Interface 33 Browser Tab The Browser tab displays the disks connected to your computer in a view similar to the Finder’s list view. You can also preview files in the Browser tab, and drag them to the Timeline. Tabs Back and Forward buttons Computer and Home buttons Path pop-up menu File list Preview controls Media pop-up menu  Back and Forward buttons: Move through previously viewed levels of the folder hierarchy.  Computer button: Displays your computer’s hard disk and other storage media connected to your computer.  Home button: Displays the contents of your home directory.  Path pop-up menu: Displays the levels of the file path to the current location, letting you move back to a previous level.  File list: Displays the files and folders at the current location.  Preview controls: Include Play and Mute buttons and a volume slider. For information on using the Preview controls, see “Using the Preview Controls” on page 69.  Media pop-up menu: Choose menu items to add a Favorite, add a file to the Bin, open a file in the Waveform Editor, and perform other functions. 34 Chapter 2 The Soundtrack Pro Interface Bin Tab The Bin tab lists the media files added to the project. You can drag files from the Bin tab to the Timeline. You can also add files to the Bin for easy access in a project. Files not currently added to the project appear dimmed, and offline files appear in red text. File list Preview controls Media pop-up menu  File list: Displays the media files in the current project.  Preview controls: Include Play and Mute buttons and a volume slider. For information on using the Preview controls, see “Using the Preview Controls” on page 69.  Media pop-up menu: Choose menu items to add a Favorite, add a file to the Bin, open a file in the Waveform Editor, and perform other functions. 38 Chapter 2 The Soundtrack Pro Interface Utility Window The Utility window features tabs for viewing a video in a project, observing project levels, viewing details, and setting up recording. Video Tab The Video tab is where you add a video to a project, view the video, and control video playback. Video Scale pop-up menu Video Playback value slider Video viewing area Video transport controls  Video Playback value slider: Move the video to a specific frame by dragging, clicking the left or right arrow, or double-clicking and typing a value in the value slider.  Video Scale pop-up menu: Choose the scale of the video in the Video tab from the pop-up menu.  Video viewing area: You add a video by dragging it into the viewing area, and watch it play in the viewing area.  Video transport controls: You control playback of the video with the project using the Play from Beginning, Previous Frame, Play/Pause, Next Frame, and Cycle buttons. 40 Chapter 2 The Soundtrack Pro Interface Recording Tab The Recording tab is where you edit a track’s recording settings. When you click a track’s Record Enable button, the Recording tab appears, displaying the track’s current recording settings. Input pop-up menu Peak indicator Gain slider and field Stereo checkbox Monitor pop-up menu Level meters Mute Project checkbox Disk space indicator  Peak indicator: Shows the highest level reached by the recording input signal. If the level rises above 0 dB, the peak indicator becomes red to indicate clipping.  Level meters: Show the input volume for the selected track during recording.  Input pop-up menu: Choose the input device and input channel (or channels) for recording.  Gain slider and field: Drag the slider or type a number in the field to set the input gain for recording.  Stereo checkbox: Select to record to a stereo file, or deselect to record to a mono file.  Monitor pop-up menu: Choose the output device and output channel (or channels) for monitoring during recording.  Mute Project checkbox: Select to mute the project during recording, so you hear only the sound being recorded.  Disk space indicator: Shows the available disk space on the recording sessions location set in Recording Preferences. Chapter 2 The Soundtrack Pro Interface 41 Meters Tab The Meters tab displays stereo level meters that you can use to observe the volume of the first output in a multitrack project or the overall output for an audio file project. Peak indicator Reset button Go to Peak buttons Level meters Peak Value and Location display  Peak indicator: Shows the highest level reached as the project plays. If the level rises above 0 dB, the peak indicator becomes red to indicate clipping.  Level meters: Show the output volume of the overall project as the project plays.  Peak Value and Location display: For each channel, displays the highest (peak) value played, and its location.  Go to Peak buttons: Move the playhead to the channel’s peak.  Reset button: Resets the Peak Value and Location display and the peak indicator to their default values. 42 Chapter 2 The Soundtrack Pro Interface 3 Getting Started With Soundtrack Pro 3 This chapter describes the two kinds of projects you can create in Soundtrack Pro, and describes how to work with windows, use layouts, play projects, and set Soundtrack Pro preferences. Two Kinds of Projects You can use Soundtrack Pro to create and work with two kinds of projects: multitrack projects and audio file projects. The two project types have different project properties, and appear with different icons in the Finder. Multitrack projects and audio file projects appear as tabs in the Project window. Multitrack Projects Multitrack projects let you arrange audio clips in tracks in the Timeline and synchronize them to a video clip. You add clips to the Timeline from the Media and Effects Manager or from the Finder, and can also record audio directly into tracks. Each track has controls you can use to adjust volume and pan, mute or solo the track, add effects, and adjust effect parameters. The Timeline also includes busses and outputs with similar controls. You can automate volume, pan, and other controls using envelopes in the Timeline. You mix a multitrack project in the Mixer, which features a channel strip for each track, bus, and output in the Timeline. You can adjust volume and pan, mute and solo channel strips, record audio, and record automation in the Mixer. As you work on a multitrack project, you can view it in both the Timeline and the Mixer and switch between the two. 45 You can export a project mix to an audio file, which you can import into Final Cut Pro or another application. You can also export selected tracks, busses, and outputs, or export a project using the Compressor application. For information about creating, saving, and working with multitrack projects, see Chapter 4, “Working With Multitrack Projects,” on page 81. For information about working in the Timeline, see Chapter 5, “Working in the Timeline,” on page 93. For information about working in the Mixer, see Chapter 6, “Working in the Mixer,” on page 123. Note: For multitrack projects, the audio files used in a project are not stored as part of the project file. The project file only saves references (pointers) to their location on disk. This keeps the size of the project file relatively small, and lets you use an audio file in multiple projects. Audio File Projects Audio file projects let you edit individual audio files using the powerful actions feature in the Soundtrack Pro Waveform Editor. Actions let you process an audio file or a selection nondestructively using a set of professional audio effects, perform noise reduction, add ambient noise, and perform other tasks. You can turn individual actions on or off, reorder actions, and bounce realtime effects to an action. You can analyze audio files for common problems, including clicks and pops, hum, and clipped signals, and have Soundtrack Pro fix the analyzed problems automatically. You can also cut, copy, and paste audio in the Waveform Editor. You can save an audio file as an audio file project, which lets you change action settings when you reopen the project in Soundtrack Pro. For information about creating, saving, and working with audio file projects in the Waveform Editor, see Chapter 7, “Working in the Waveform Editor,” on page 143. 46 Chapter 3 Getting Started With Soundtrack Pro Setting the Playhead The playhead appears as a thin black line running vertically through the Timeline in multitrack projects, and through the waveform display in audio file projects. Where it crosses the Time ruler, the top of the playhead has a triangular handle that makes it easier to see its position onscreen and drag the playhead. To set the playhead, do one of the following: m Click anywhere in the Timeline (in a multitrack project) or the waveform display (in an audio file project) to set the playhead to that position. m Drag the triangular handle at the top of the playhead to the position you want to set it. As you drag the playhead, you hear the audio at the current playhead position. Drag the playhead where you want it or click in the Timeline. Drag the playhead where you want it or click in the waveform display. When you set the playhead, it snaps to the nearest Snap To position if snap is turned on. For information on setting the Snap To value, see “Using Snap” on page 72. You can also set the playhead using the transport controls or using the Playhead Position value slider. Chapter 3 Getting Started With Soundtrack Pro 51 Controlling Playback Using Keyboard Shortcuts There are a number of keyboard shortcuts you can use to control playback of your project. To use keyboard shortcuts, the pointer cannot be in a text field.  Space bar: Plays back the project from the current playhead position. If the project is playing, pressing the Space bar sets the playhead back to the point from which the project started playing. This is equivalent to clicking the Play button.  Return: Sets the playhead to the beginning of the project. If the playback region is active, pressing Return sets the playhead to the beginning of the playback region. This is equivalent to clicking the Go to Beginning button.  Shift-Return: Sets the playhead to the beginning of the project, and starts playback if it is stopped. This is equivalent to clicking the Start from Beginning button. For a complete list of Soundtrack Pro keyboard shortcuts, see Appendix B, “Soundtrack Pro Keyboard Shortcuts,” on page 279. Locating and Adding Audio Files You can locate media files to use in a project using the Media and Effects Manager, or drag files from the Finder. The Media and Effects Manager gives you three ways to locate audio files: the Browser, Favorites, and Search tabs. You can also store media files for a project in the Bin for easy access in a project. Supported Audio File Formats You can add AIFF, WAV, MP3, and AAC (except protected AAC) files to a project. You can also add QuickTime (.mov) audio files. You can import audio files with any combination of the following sample rates and bit depths: Sample Rates  Any sample rate from 8 kHz to 192 kHz Bit Depths  8 bit  16 bit  24 bit  32 bit (both integer and floating point) Note: Files with lower bit depths or sample rates do not have the same playback quality as do higher-rate formats. 56 Chapter 3 Getting Started With Soundtrack Pro Using the Browser to Locate Files The Browser tab shows the hard disks and other storage media connected to your computer, and lets you browse through the file hierarchy to find audio files located on disk. To locate audio files using the Browser: m Double-click a volume or folder in the Browser to view its contents. m You can move back through the previous locations in the Browser using the Forward and Back buttons, or through the levels of the file hierarchy using the Path pop-up menu. 58 Chapter 3 Getting Started With Soundtrack Pro Previewing Audio Files Once you locate an audio file you want to use in your project, you can preview the file in the Media and Effects Manager. When you preview files, Soundtrack Pro matches the sample rate of the file to the project sample rate. When you preview looping files, Soundtrack Pro matches their tempo and key to the project tempo and key. To preview an audio file: m Select the file in the Media and Effects Manager. The selected file starts playing. If the project is playing when you preview a file, Soundtrack Pro starts playback of the previewed file on the downbeat of the next measure of the project. You can turn preview playback on and off by holding down Option and pressing the Space bar. Select an audio file in the Media and Effects Manager to preview it. Audio files tagged as loops play back repeatedly when previewed. You can control the playback of the file being previewed using the preview controls. You can only preview one audio file at a time. You can also preview video files. When you double-click a video file in the Media and Effects Manager, the video appears in a small window in the Details tab. To preview a video file: 1 Click the Details tab in the Utility window to make the tab active. 2 Select the video file in the Media and Effects Manager. 3 Click the Play button in the Preview controls at the bottom of the Media and Effects Manager. To stop playback, click the Play button again. For more information on working with video files, see Chapter 8, “Working With Video in Soundtrack Pro,” on page 183. 68 Chapter 3 Getting Started With Soundtrack Pro Using the Preview Controls The preview area at the bottom of the Media and Effects Manager contains controls you can use when previewing audio files. Play button Media pop-up menu Mute button Volume slider  Play button: Starts playback of the preview file. If the file is playing, stops playback.  Mute button: Mutes playback of the preview file without stopping project playback. Clicking the button again unmutes the preview file.  Volume slider: Sets the playback volume of the preview file.  Media pop-up menu: Choose whether to add the file to Favorites, open it in the Waveform Editor or Apple Loops Utility, or reveal it in the Finder. To preview an audio file with a project: 1 Click the Play button in the transport controls to play the project. 2 When the project reaches the point in time where you want to hear the preview file, select the file in the Media and Effects Manager. To preview a file without the project (solo): 1 If the project is playing, click the Stop button in the transport controls to stop playback of the project. 2 Select the file in the Media and Effects Manager to preview the file. You can also preview a video file using the preview controls. For information about previewing a video file, see “Playing the Video” on page 185. Chapter 3 Getting Started With Soundtrack Pro 69 Using Snap When you move and resize clips in the Timeline, or select part of an audio file in the Waveform Editor, you usually want them to start and end at a specific point in time. To synchronize clips with a video, you may want to position them in line with a specific frame. In a music-based project, you may want to align clips with measures and beats. Soundtrack Pro includes a snap feature that causes clips, the playhead, and other items in the Timeline and Waveform Editor to “snap” to the nearest Snap To position. Snap applies to the following operations:  Dragging audio clips to the Timeline  Moving audio clips  Resizing audio clips  Setting the playhead  Setting the playback region  Inserting markers  Moving markers  Selecting Timeslices  Adding envelope points  Moving envelope points  Moving crossfade edges You can use snap to ensure that audio clips are synchronized to a measure or beat, that they begin playing back at a precise point in time, and that they are precisely aligned with other clips in the Timeline. When you turn on snap, the item you are moving snaps to the nearest Snap To position in the Timeline. The available Snap To values depend on the time format of the project. For projects set to Time-based format, the available Snap To values are:  Ruler ticks  Seconds  Frames  Clips on Adjacent Tracks  Markers 72 Chapter 3 Getting Started With Soundtrack Pro Reconnecting Media Files Because Soundtrack Pro multitrack projects contain references to media files, and not the files themselves, a multitrack project cannot play back if the media files it uses are erased or moved. When you open a multitrack project in Soundtrack Pro, the application checks to see if the media files it uses exist in the same location as they did when the project was last opened. If the media files are not in the expected location, Soundtrack Pro displays a Can’t Find File dialog, with three choices.  Skip File: Opens the project without reconnecting the missing file.  Cancel: Cancels the Open command.  Find File: Presents a dialog that lets you locate the missing file and reconnect it to the project. If you choose to open the project without reconnecting its files, you can reconnect individual audio files from the Bin tab, and reconnect a video file in the video track in the Timeline. To reconnect an audio file: 1 Do one of the following:  Control-click the audio file in the Bin tab, then choose “Reconnect [filename]” from the shortcut menu.  Select the clip in the Bin tab, then choose “Reconnect [filename]” from the Media pop-up menu.  Select the clip in the Timeline, then choose Clip > Reconnect.  Control-click the clip in the Timeline, then choose Reconnect from the shortcut menu. 2 In the dialog that appears, locate the audio file you want to reconnect. 3 Click Open to reconnect the file. To reconnect a video file: 1 Control-click the video clip in the video track, then choose “Reconnect offline source” from the shortcut menu. 2 In the dialog that appears, locate the video file. 3 Click Open to reconnect the file. 74 Chapter 3 Getting Started With Soundtrack Pro 4 Working With Multitrack Projects 4 You can arrange and mix audio clips in a multitrack project. Multitrack projects include tracks, busses, and outputs you can use to create sophisticated mixes. When you create a multitrack project, you can set the project’s properties and the project length. You locate and add media to your project using the Media and Effects Manager. Creating and Opening Multitrack Projects When you open Soundtrack Pro, a new, blank project appears. You can change the default startup behavior in the Preferences window. For information about setting preferences, see “Setting Soundtrack Pro Preferences” on page 75. To create a new multitrack project: m Choose File > New > Multitrack Project (or press Command-N). A new, untitled project appears. You can name the project when you save it. For information on saving projects, see “Saving Multitrack Projects” on page 86. To open an existing project: 1 Choose File > Open (or press Command-O). 2 Optionally, to view only multitrack projects in the dialog, choose Multitrack Document from the File Type pop-up menu. 3 Locate and select the project, then click Open. You can also open a recently open project by choosing it from the File > Open Recent menu, and can open a project by dragging it onto the Soundtrack Pro icon in the Dock. You can have multiple projects open in Soundtrack Pro, and cut and paste between them, but you can only play one project at a time. You can open projects created with earlier versions of Soundtrack (with the extension .loop) but can only save them as multitrack projects (with the extension .stmp) 81 Closing Multitrack Projects To close a project: m Select the project’s tab in the Project window, then choose File > Close Project (or press Command-Shift-W). Setting Project Properties Each project has a set of project properties, which include time format, sample rate, tempo, time signature, key, and overlap mode. Each project property has a default setting, described below. You can change the project properties using the project controls in the Project window in the Timeline. The most important project properties are time format and sample rate. The remaining properties (tempo, time signature, and key) are important for projects set to Beatsbased format. For projects set to Time-based format, you can usually leave the tempo, time signature, and key properties at their default settings. You can change the default project properties for new projects in the Project pane of the Preferences window. For information on setting preferences, see “Setting Soundtrack Pro Preferences” on page 75. Time Format Each multitrack project has a project time format, which can be either Time-based or Beats-based format. Setting the time format controls the appearance of the Time display, Time ruler, Timeline gridlines, and available Snap To values. For projects set to Time-based format, time is displayed using the Time ruler units chosen in the View menu. For projects set to Beats-based format, the time is displayed in measures, beats, and beat divisions. The default format is Time-based. Setting the format to Time-based lets you align clips and other items in the Timeline with specific points in time, for example, specific frames in a video file. Setting the format to Beats-based lets you align items in the Timeline with measures, beats, and other musical units of time, regardless of tempo. You can switch between Time-based and Beats-based format while working on a project. 82 Chapter 4 Working With Multitrack Projects To set the time format: m Click the Time Format button to set the format to Time-based, or click the Beats Format button to set the format to Beats-based. Time-based Format button Beats-based button You can also set individual tracks to use a different time format than the project’s time format. For information on setting a track’s time format, see “Changing Track Time Format” on page 104. Sample Rate The project sample rate determines the number of samples per second Soundtrack Pro uses for audio playback and export. When you add audio files to your project, their sample rate is matched (upsampled or downsampled) on the fly to the project sample rate. The available sample rates are 32 kHz, 44.1 kHz, 48 kHz, 88.2 kHz, and 96 kHz. The default is 44.1 kHz, which is the standard for CD-quality audio recording. Note: Digital video projects, including video for DVD, often use a 48 kHz sample rate. When creating a score for a video, be sure you save and export your project at the same sample rate the final video project will use. To set the sample rate: m Choose the sample rate from the Sample Rate pop-up menu. Sample Rate pop-up menu Note: If you open your project on a computer that cannot support the project sample rate, the project is resampled to the nearest rate the hardware supports for playback. When you export your project, it is exported at the project sample rate, regardless of hardware limitations. For more information on hardware sample rates, see Chapter 1, “Setting Up Your System,” on page 13. Chapter 4 Working With Multitrack Projects 83 Key The project key sets the root note (or tonic) for the project. When you add looping files to a project, their key is matched to the project key. You can set the project key to any note of the chromatic scale (from A through G#), or to None (–). The default key is A. Note: The key does not determine the scale used (major, minor, or another scale), only the tonic or root note of the project. To set the project key: m Choose a key from the Key pop-up menu. Key pop-up menu Overlap Mode The project overlap mode determines what happens when you move an audio clip so that it partially or completely overlaps another clip on the Timeline. There are two overlap modes: crossfade mode and truncate mode. In crossfade mode, when you drag an audio clip so that it partially overlaps another audio clip in a track in the Timeline, a crossfade is created for the overlapped part of the two audio files. You can adjust the boundaries of the crossfade in the Timeline. In truncate mode, when you drag an audio clip so that it partially overlaps another audio clip in a track in the Timeline, the overlapped part of the clip is truncated. To set the project overlap mode: m Click the Crossfade Mode button to set the project to crossfade mode, or click the Truncate Mode button to set the project to truncate mode. Crossfade Mode button Truncate Mode button Chapter 4 Working With Multitrack Projects 85 Setting the Project Length By default, the length of a project depends on the media in the project. The project length is set to the end of the last clip in the project. If the project uses a time-based effect, and the effect extends past the end of the last clip, the project length extends to include the effect’s “tail.” Adding a clip to the end of the project, or adding an effect that produces a “tail,” extends the project length to include the new clip or the effect’s tail. You can optionally set the project to a definite length. To set the project length: m In the Timeline, place the playhead at the point where you want the project to end, then choose Mark > Set End of Project. End-of-project marker You can move the end-of-project marker to change the length of the project, or delete it if you decide you no longer want it in the project. To delete the end-of-project marker: m Select the marker in the Timeline, then choose Edit > Delete (or press the Delete key.) Saving Multitrack Projects To save your project: m Choose File > Save. Multitrack projects are saved as documents with the extension .stmp. Important: When you save a project, the audio files used by the project are not saved as part of the project file. To play a project on another computer, you must install the audio files the project uses on that computer, or on a disk it can access. If you remove the audio files used in a project so that your computer cannot access them, you cannot play back the project. You can save a project and the media files the project uses together. This makes it easy to move projects between computers, and ensures that all needed audio files are available for playback.  When you select Collect Audio Files, the project file and all the audio files the project uses are saved in the same folder.  When you select Collect Video File, the video file is included with the project and its audio files. 86 Chapter 4 Working With Multitrack Projects To save a project and its audio files together: 1 Choose File > Save. 2 In the dialog that appears, select the Collect Audio Files checkbox. 3 Navigate to the folder in which you want to save the project and its audio files, then click Save. The project file, and a copy of every audio file the project uses, are saved to the selected location. 4 You can optionally click the New Folder button to create a new folder for the collected project. It’s a good idea to save each collected project in its own folder. 5 If the project includes a video file, you can optionally select the Collect Video File checkbox to save the video to the selected location. If the folder already contains any of the media files, an alert appears, asking if you want to replace the existing files. Note: Because video files are typically very large files, saving a copy of the video file may take several minutes and may require a large amount of disk space. You can also save a compressed version of the project. When you save a project compressed, the data used to draw the audio waveforms in the Timeline is not saved. This reduces the size of the project, but means that the waveforms must be redrawn each time the project is opened. To save a project compressed: m In the Save dialog, select the Save Compressed checkbox. Adding Audio Files to a Multitrack Project Once you’ve located and previewed an audio file you want to add, you drag the file to the Timeline to add it to the project. When you drag an audio file to the Timeline, Soundtrack Pro creates an audio clip from the audio file, and adds the clip to the project. An audio clip does not contain the actual audio data; instead, it contains a reference to the file stored on disk. Editing an audio clip in the Timeline does not change the source audio file. Each audio clip has a playback mode. For untagged files and files tagged as nonlooping files, the clip playback mode is non-looping. For files tagged as looping files, the clip playback mode is looping. If the playback mode of a clip is looping, the clip appears with notched edges to indicate where the audio file repeats when you resize the clip. Chapter 4 Working With Multitrack Projects 87 To add an audio file from the Media and Effects Manager, do one of the following: m Drag the file from the File list in the Media and Effects Manager to a track in the Timeline. m Drag the file from the File list between two existing tracks. A new track is created and the clip is added to the track. m Drag the file from the File list to the empty part of the Timeline below the outputs. A new track is created and the clip is added to the track. m Drag a file from the File list to a track or to the part of the Timeline below the existing tracks. Drag the file from the Media and Effects Manager to the Timeline. If you have adjusted the preview volume, the track volume is automatically set to the preview volume of the file. 88 Chapter 4 Working With Multitrack Projects To add an audio file from the Finder: m Drag the file from the Finder to the Timeline to a track, between two existing tracks, or to the area below all existing tracks. When the Bin tab of the Media and Effects Manager is active, the Bin shows all of the audio clips in the project. You can drag a clip from the list to the Timeline to add a new clip from the same audio file at a different point in time, or to a different track. To add an audio file from the Bin tab: m Drag the file from the Bin tab to the Timeline, either to a track or to the area below the existing tracks. Note: When you drag an audio file to the Timeline, the file snaps to the nearest Snap To position if snap is turned on. For information on setting the Snap To value, see “Using Snap” on page 72. Viewing and Editing Clip Properties When you create an audio clip by dragging an audio file to the Timeline, the audio clip has a set of properties. These properties are specific to the clip, and can be different for two clips created from the same source audio file. The following properties for the selected clip are displayed, and can be edited, in the Clip tab of the Details tab:  Playback buttons: Set whether the clip is looping or non-looping. When you add an audio file to the Timeline, the clip will be non-looping unless the audio file is tagged as a looping file.  Measure in pop-up menu: Sets the units shown in the Position, Duration, and Offset value sliders.  Position value slider: Sets the start point for the clip in the Timeline. Chapter 4 Working With Multitrack Projects 89  Duration value slider: Sets the duration of the clip. The duration of looping files is displayed in number of beats; the duration of non-looping files is displayed in seconds.  Offset value slider: Sets the number of beats (for looping files) or seconds (for nonlooping files) from the beginning of the source file at which the clip begins playing.  Transpose pop-up menu: Sets the transposition in semitones for looping files; the range is –12 to +12 semitones.  Clip Speed pop-up menu: Sets the playback speed for looping files, which can be Quadruple, Double, Normal, Half, or Quarter. Some properties can be changed by editing the clip in the Timeline. For detailed information on editing audio clips, see “Editing Audio Clips in the Timeline” on page 107. The name of an audio clip appears on the clip in the Timeline. By default, the entire name appears on the clip if the clip is long enough to display it. You can change the default behavior in the General pane of the Preferences window, so that long clip names are truncated from the center. For information on setting preferences, see “Setting Soundtrack Pro Preferences” on page 75. Tracks, Busses, and Outputs Multitrack projects contain tracks, busses, and outputs. Tracks, busses, and outputs appear as horizontal rows in the Timeline and as vertical channel strips in the Mixer. In both the Timeline and Mixer, tracks, busses, and outputs are grouped together, with a separator between each category. You can move each type within its own category, but cannot move one to either of the other categories. Each track, bus, and output has a header with its icon, name, and a set of controls. Tracks Tracks contain the audio you add to your project in the Timeline. Each track has a drag handle, a name, an icon, and a set of controls that appear in the track’s header in the Timeline and in its channel strip in the Mixer. Track controls include a volume slider, a pan control, an output pop-up menu, and buttons to mute or solo the track, add effects, and enable the track for recording. In addition, each channel strip includes stereo level meters you can use to watch the track’s levels, and a set of effects slots where you can add and order track effects and sends. 90 Chapter 4 Working With Multitrack Projects Busses Using busses, you can create submixes, letting you adjust volume and pan and add effects to groups of related tracks. You use busses by adding sends to effects chains in the Effects tab or the Mixer, then routing audio from each send to a bus. Each bus has a drag handle, a name, an icon, and a set of controls that appear in the bus’s header in the Timeline and in its channel strip in the Mixer. Bus controls are the same as track controls, except that a bus does not have a Record Enable button (because you can’t record audio to a bus.) The bus controls affect the audio of every track sent to that bus. For example, you could route every dialogue track for a particular actor to a bus with the actor’s name. You could adjust the volume of all the actor’s dialogue using the bus volume fader, and add an EQ effect that brings out the actor’s voice in the mix. You could then send (route) the bus to a particular output. You route audio from a track to a bus by adding a send to the track in the Effects tab or in the Mixer. When you add a send, the send is assigned to a bus. You can change the bus to which a send is assigned, and can adjust the volume and pan for the send. Outputs Outputs let you route the audio from tracks and busses to physical outputs. If you are using external audio hardware that supports multiple physical outputs, you can add outputs to a project and choose the physical output to which each Mixer output sends its audio. You can also send audio from multiple tracks or busses to a single output, control volume and pan for all the tracks using the output’s controls, and add effects to the output. For example, you could have a bus with the dialogue tracks for each actor, and route all the dialogue busses to a single output. You could route all sound effects tracks to another output, and adjust the volume or add effects to each output. For a final stereo mix, you could route both outputs to the same pair of physical output channels (channels 1 and 2, for example). Chapter 4 Working With Multitrack Projects 91 5 Working in the Timeline 5 The Timeline is where you arrange audio clips to build your soundtrack. You can also adjust volume and panning, add effects, and edit envelopes to control automation. The Timeline displays a visual representation of a project, showing the point in time when audio clips start playing and their duration. You control when and how long clips play by moving and resizing them in the Timeline. The Timeline is arranged in three sets of horizontal rows: tracks, busses, and outputs. You add audio clips to tracks, create submixes using busses, and send audio to physical output devices using outputs. For information about working with tracks, busses, and outputs, see “Tracks, Busses, and Outputs” on page 90. The Timeline also displays vertical gridlines that make it easy to position clips precisely in time. The gridlines correspond to the divisions of time in the Time ruler. The units of time the gridlines display change depending on the time format and the current zoom level. 93 Moving Around in the Timeline Soundtrack Pro provides several controls that let you change the view of the Timeline and move to different parts of your project. You can zoom in or out for a closer or wider view of the Timeline, control how many tracks are displayed in the Timeline, and change which part of the project is currently visible using the scroll bars and Timeline controls. You can split the Timeline view, and use the Global Timeline view to quickly move to different parts of your project. Using the Scroll Bars If the entire project cannot be displayed in the Timeline, you can scroll through the project using the horizontal scroll bar located at the bottom of the Timeline. Drag the horizontal scroll bar left or right to move the visible part of the Timeline. If your project contains more tracks than can be displayed in the Timeline, a vertical scroll bar appears along the right edge of the Timeline. Drag the vertical scroll bar up or down to change which tracks are visible. Vertical scroll bar Horizontal scroll bar In the lower left of the Timeline are the Timeline controls, including the Track Height control and Zoom control. 94 Chapter 5 Working in the Timeline Using the Zoom Control You can zoom in to make precise edits in the Timeline, or zoom out for a wider view of your project using the Zoom control. The Zoom control features a slider on a graduated scale. Moving the slider to the left or clicking the left side of the control zooms in for a closer view, displaying a smaller area of the Timeline close up. Moving the slider to the right or clicking the right side of the control zooms out for a wider view, displaying a wider area of the Timeline. Timeline zoomed in Timeline zoomed out Chapter 5 Working in the Timeline 95 You can also zoom in and out using menu commands or keyboard shortcuts. If your mouse has a scroll wheel, you can use it to zoom in and out. You can also fit the entire project in the visible area of the Timeline. To zoom in, do one of the following: m Move the Zoom slider to the left. m Click the left side of the Zoom control. m Choose View > Zoom In. m Press the Up Arrow key. m Press Command-plus (+). m If the mouse connected to your computer has a scroll wheel, move the scroll wheel. To zoom out, do one of the following: m Move the Zoom slider to the right. m Click the right side of the Zoom control. m Choose View > Zoom Out. m Press the Down Arrow key. m Press Command-minus (–). m If your mouse has a scroll wheel, move the scroll wheel. By default, when you zoom in or zoom out using the scroll wheel, the playhead remains in the same position on your screen, and the Timeline zooms in or out on both sides of the playhead. You can change the default scrollwheel behavior in the General Preferences pane. To fit the project in the visible area of the Timeline: m Choose View > Fit in Window (or press Shift-Z). 96 Chapter 5 Working in the Timeline Setting Track Height You set the height of tracks, busses, and outputs in the Timeline using the Track Height control. The Track Height control has four settings. The smallest rectangle sets the track height to a minimized setting, with each track (and track header) reduced to halfheight, allowing more tracks to be displayed in the Timeline. To set the height of tracks, busses, and outputs: m Click one of the four rectangles on the Track Height control. Reduced track height Large track height Using the Global Timeline View The Global Timeline view, located above the Time display and Time ruler, shows a miniature view of the entire project. The playhead appears as a black vertical line with a triangular handle. The part of the project currently visible in the Timeline is indicated by a blue rectangle in the Global Timeline view. To move to a new area of the Timeline using the Global Timeline view: m Drag the visible area rectangle to a new position. Drag this rectangle to a new position. You can quickly move to different parts of the Timeline by dragging the blue rectangle. This is especially useful when working on longer projects. You can also drag the rectangle up or down to move vertically in the Global Timeline view. This is useful if your project contains more tracks, busses, and outputs than can be displayed in the Project window. Chapter 5 Working in the Timeline 97 Using the Time Ruler The Timeline has a Time ruler that shows the divisions of time in a project. You can set the playhead to a precise frame, point in time, or sample number using the Time-based units on the Time ruler, or to a specific musical measure or beat using the Beats-based units, to synchronize playback of audio clips in the Timeline. The Time ruler changes depending on the time format of the project and the Time ruler units. If the project is currently set to Time-based format, Time-based units appear in the upper part of the ruler. If the project is set to Beats-based format, Beats-based units appear in the upper half of the ruler. You can use the Time ruler to position clips or the playhead at a precise point in time, including synchronizing them to a specific timecode reference in a video file. To set the playhead to a specific point in the Time ruler: m Click the Time ruler at the point where you want to set the playhead. Working With the Playback Region You can create a playback region in a project, an area that plays back repeatedly. This is sometimes called “cycling” or “looping” playback. A project has only one playback region, but you can move and resize it as often as you want. You also use the playback region when recording multiple takes. For information on recording, see Chapter 11, “Recording Audio in Soundtrack Pro,” on page 235. To set the playback region: m Drag in the bottom half of the Time ruler from the beginning of where you want the playback region to the end. Drag in the Time ruler to set the playback region. Playback region The playback region is lighter in color than the rest of the Time ruler, with triangular markers indicating its start and end points. If a playback region already exists, you can drag anywhere in the Time ruler outside of the current playback region to set the playback region to a new position. If cycling is turned off, you must turn it on for the playback region to be active. The Cycle button darkens to indicate that the playback region is activated. 98 Chapter 5 Working in the Timeline To activate the playback region: m Click the Cycle button in the transport controls. To move the playback region: m Click in the bottom half of the playback region and drag it to a new position in the Timeline. To resize the playback region: m Select either the start point or end point handle in the Time ruler and drag to resize the playback region. To remove the playback region: m Click in any part of the Time ruler outside of the current playback region. Working With Tracks, Busses, and Outputs in the Timeline The Timeline is arranged into three groups of horizontal rows: tracks, busses, and outputs. You add audio to tracks in your project, use busses to create and control submixes, and send audio to physical output channels using outputs. Tracks, busses, and outputs are described in greater detail in “Tracks, Busses, and Outputs” on page 90. The tracks in a project appear in the upper part of the Timeline. Busses appear below tracks, and outputs appear below busses. A separator between each group helps visually distinguish them, and disclosure triangles on each separator let you show or hide the groups. Tracks, busses, and outputs in the Timeline correspond to channel strips in the Mixer. When you add a track, bus, or output, adjust its controls, or add effects, the same changes appear in the corresponding channel strip when you open the Mixer. Adding Tracks, Busses, and Outputs To add a track, do one of the following: m Choose Multitrack > Add Track (or press Command-T). m Control-click an open area of the Timeline, then choose Add Track from the shortcut menu. m Control-click a track, then choose either Add Track Above or Add Track Below from the shortcut menu. Chapter 5 Working in the Timeline 99 To add a bus, do one of the following: m Choose Multitrack > Add Bus. m Control-click a bus, then choose either Add Bus Above or Add Bus Below from the shortcut menu. To add an output, do one of the following: m Choose Multitrack > Add Output. m Control-click an output, then choose either Add Output Above or Add Output Below from the shortcut menu. Selecting Tracks, Busses, and Outputs You can select a track, bus, or output in order to move, copy, or remove it, and can also select tracks, busses, and outputs to export. The headers of selected tracks, busses, and outputs appear darker in the Timeline. To select a track, bus, or output, do one of the following: m Click the drag handle along the left edge of the header for the track, bus, or output. m Click anywhere in the row for the track, bus, or output in the Timeline. Drag handle You can select multiple tracks, busses, or outputs in the Timeline. To select adjacent tracks, busses, or outputs: m Shift-click the drag handle in the header of each track, bus, or output. To select nonadjacent tracks, busses, or outputs: m Command-click the drag handle in the header of each track, bus, or output. 100 Chapter 5 Working in the Timeline Moving and Copying Tracks, Busses, and Outputs As you work on your project, you may want to rearrange tracks, busses, and outputs. You can move and copy them to change their vertical arrangement in the track, bus, or output section of the Timeline. You cannot move one to the area for another (as indicated by the rows labeled “Tracks,” “Busses,” and “Outputs” in the Timeline). You can only move or copy one track, bus, or output at a time. To move a track, bus, or output: m Drag the track, bus, or output drag handle up or down to a new vertical position. A light blue horizontal line in the header area indicates the place the track, bus, or output will be moved to when you release the mouse button. To copy a track, bus, or output: m Option-click the drag handle in the header for the track, bus, or output, then drag it up or down. A copy of the track, bus, or output appears when you release the mouse button. Renaming Tracks, Busses, and Outputs By default, tracks are numbered when created, and take the name of the first audio clip you add to them. Busses and outputs are numbered starting from one (Bus 1, Out 1, and so on). You can rename a track, bus, or output and use the names to distinguish the type of audio it contains (for example, dialogue, voiceovers, music, or sound effects), its part in the overall project, or to identify it in some other way. To rename a track, bus, or output: m Click the name field in the header for the track, bus, or output and type a new name. Changing a Track, Bus, or Output Icon You can choose a new icon from the icon grid, or add your own image to the grid. To change the icon for a track, bus, or output, do one of the following: m Click the icon, then select a new icon from the icon grid that appears. m Drag a graphics file from the Finder to the icon. Chapter 5 Working in the Timeline 101 Using the Track Controls Tracks, busses, and outputs have headers, located along the left side of the Timeline. Each header contains track controls that you can use to mute or solo the track, bus, or output, adjust its volume level and pan position, add effects, and show or hide its envelopes. Adjusting Volume The volume slider controls the volume (the loudness relative to other tracks) of the track, bus, or output. To adjust the volume level of a track, bus, or output: m Drag the volume slider left or right. Drag the volume slider left or right. The range is –96 dB to +6 dB, with the default at 0 dB. Double-clicking the slider resets it to the 0 dB position. Adjusting Pan Position Tracks and busses also include a pan slider. The pan slider controls the pan position (the left-to-right placement in the stereo field) of the track. To adjust the pan position of a track or bus: m Drag the pan slider left or right. Drag the pan slider left or right. The range is –100 (full left) to +100 (full right), with the default at 0 (center position). Double-clicking the slider resets it to the center position. 102 Chapter 5 Working in the Timeline Muting and Soloing Tracks, Busses, and Outputs The Mute button mutes (silences) the track, bus, or output. You can mute multiple tracks, busses, and outputs, allowing you to hear only the remaining, unmuted ones. Muting lets you compare the sound of the project using different combinations of tracks, busses, and outputs, and hearing the result of changes you make to them. To mute a track, bus, or output: m Click the Mute button. Click the Mute button again to unmute the track, bus, or output. Muted tracks, busses, and outputs appear darker in the Timeline, making it easy to identify which tracks are currently audible. Click the Mute button to mute the track, bus, or output. The Solo button solos the track, bus, or output, muting all others. Soloing a track, bus, or output lets you quickly isolate it from the rest of the project, so you can adjust the sound of the soloed track, bus, or output and make changes. Soundtrack Pro supports multiple solo and exclusive solo. Clicking the Solo button for multiple tracks, busses, or outputs solos them and mutes all others. When you exclusively solo a track, bus, or output, all others are muted, regardless of whether they are soloed. To solo a track, bus, or output (multiple solo): m Click the Solo button. Click the Solo button again to unsolo the track, bus, or output. Click the Solo button to solo the track, bus, or output. To exclusively solo a track, bus, or output: m Option-click the Solo button. Click the Solo button again to unsolo the track, bus, or output. When you solo tracks, busses, or outputs, the ones not soloed appear darker in the Timeline. Chapter 5 Working in the Timeline 103 Editing Audio Clips in the Timeline You can edit audio clips in a variety of ways in the Timeline. You can select, cut, copy, and paste clips, move, resize, transpose, split and join them, and edit them in other ways. Selecting Audio Clips You select the audio clips you want to edit. You can select a single clip or multiple clips, including clips in different tracks. When you select a clip, it appears darker than unselected clips. To select an audio clip: m Click the clip in the Timeline. To select multiple audio clips in the same track, do one of the following: m Command-click the clips in the Timeline. m Drag from a point in the track before the first clip you want to select to a point after the last clip you want to select, encompassing the clips. m If the clips are adjacent, Shift-click the clips in the Timeline. To select multiple audio clips in different tracks: m Shift-click or Command-click the clips in the Timeline. To select all clips using the same source audio file, do one of the following: m Select the clip in the Timeline or the Bin tab, then choose Clip > “Select All Occurrences of [filename].” m Control-click the source audio file in the Bin tab, then choose “Select All Occurrences of [filename]” from the shortcut menu. Chapter 5 Working in the Timeline 107 Cutting, Copying, and Pasting Audio Clips You can cut, copy, and paste audio clips in the Timeline. You can also paste multiple copies of a clip. To cut an audio clip: m Select the clip in the Timeline, then choose Edit > Cut (or press Command-X). The clip is removed from the Timeline and placed on the Clipboard. To copy an audio clip, do one of the following: m Select the clip in the Timeline, then choose Edit > Copy (or press Command-C). m Option-drag the clip to the position where you want to copy it. To paste an audio clip: m Set the playhead at the position where you want to paste the clip, then choose Edit > Paste (or press Command-V). The clip is pasted in the currently selected track, starting at the current playhead position. If no track is selected, the clip is pasted in the track from which it was cut or copied. When pasting clips cut or copied from different positions in the Timeline or from multiple tracks, the following conditions apply:  Pasting clips from different Timeline positions: The clip closest to the beginning of the project is pasted at the current playhead position, and the remaining clips are pasted at the same positions in time relative to the first clip as when they were cut or copied.  Pasting clips from multiple tracks: The clip from the topmost track is pasted in the currently selected track, and the remaining clips are pasted at the same positions relative to the first clip as when they were cut or copied. If there are not enough tracks to accommodate the clips being pasted, a dialog appears asking if you want to create new tracks for the clips. If you choose not to create new tracks, only the clips for which tracks already exist are pasted. When pasting audio clips, you can choose to paste multiple copies of the clip in succession. Using the Paste Repeat command, you can paste any number of copies of a clip in the selected track. 108 Chapter 5 Working in the Timeline To paste multiple copies of a clip: 1 Cut or copy the clip. 2 Set the playhead to the point you want to paste the first copy of the clip. 3 If you want to paste the copies in a different track, select the track. 4 Choose Edit > Paste Special > Paste Repeat (or press Option-Command-V). 5 In the Paste Repeat sheet, enter the number of times you want to paste the clip. Type the number of times you want to paste the clip in the Paste Repeat sheet. The copies are pasted in the selected track, starting at the current playhead position. If no track is selected, the copies are pasted in the same track as the cut or copied clip. The copies are pasted in the selected track, starting at the current playhead position. Moving Audio Clips You can move an audio clip in the Timeline by dragging the clip to a new position. You can also move the clip to a different track. To move an audio clip to a new time position: m Drag the clip left or right to a new position in the Timeline. Drag a clip up or down to move it to a different track. Drag a clip left or right to move it to a new position. Chapter 5 Working in the Timeline 109 To move an audio clip to a new track: m Drag the clip up or down to a different track. You can also move an audio clip using the Left and Right Arrow keys with various modifier keys. Using the Option key with the Arrow keys moves the clip by one pixel at a time; using the Option and Shift keys with the Arrow keys moves the clip to the next gridline in the Timeline. When you move a clip by one pixel, the amount the clip moves in time depends on the current zoom setting. To nudge an audio clip in pixel increments: m Hold down the Option key while you press the Left or Right Arrow key. To nudge an audio clip to the next gridline: m Hold down the Option and Shift keys while you press the Left or Right Arrow key. Snapping Clips to Clips on Adjacent Tracks If snap is turned on, you can snap a clip to the edges of a clip in an adjacent track (the track either directly above or directly below the track containing the clip). This is especially useful when the start and end points of clips do not fall on the current Snap To value. To snap a clip to adjacent clips: m Choose View > Snap To > Adjacent Tracks. Resizing Audio Clips You control the duration of an audio clip (the amount of time the clip plays back) by resizing the clip. When you add a clip to the Timeline, the clip has the same duration as the source audio file. You can shorten clips to play back only a part of the source file. When you lengthen a clip with looping playback mode, it repeats the source file multiple times. 110 Chapter 5 Working in the Timeline To resize an audio clip: 1 Place the pointer at either the left or right edge of the audio clip. The pointer changes to a Clip Resize pointer. 2 Click the edge of the clip and drag left or right to resize it. When you lengthen a clip with looping playback mode, the notches at the top and bottom of the clip indicate the end of each repetition of the source audio file. Drag the clip to the left or right to resize it. Notches indicate the points where a looping clip repeats. When you resize a clip by shortening its left edge, you change the point in the source audio file at which the clip starts playing, making the earlier part of the source audio inaudible. When you resize a clip by shortening its right edge, the part you shorten becomes inaudible. You cannot lengthen the left edge of a clip with non-looping playback mode beyond the beginning of the source audio file. When you resize a clip, the edge being resized jumps to the nearest Snap To position if snap is turned on. If you want to resize the clip independently of the Snap To value, change the Snap To value, or turn off snap before you resize the clip. For information about snap, see “Using Snap” on page 72. Creating Crossfades Between Audio Clips Soundtrack Pro lets you easily create crossfades between two audio clips in the Timeline. Crossfades let you create smooth transitions between one audio clip and the next, and avoid clicks or sudden changes in loudness that can result when placing audio files one after another. To create a crossfade between audio clips, you set the project to crossfade mode, then drag an audio clip so that it overlaps another clip. A crossfade is created for the length of the overlapped area. Chapter 5 Working in the Timeline 111 To set the project to crossfade mode: m Click the Crossfade Mode button, located above the Global Timeline view. Crossfade Mode button Truncate Mode button In crossfade mode, when you drag an audio clip so that it partially overlaps another audio clip in a track in the Timeline, a crossfade is created for the overlapped part of the two audio files. You can adjust the boundaries of the crossfade in the Timeline. To create a crossfade: m In the Timeline, drag an audio clip so that it overlaps another audio clip. The crossfade appears in the overlapped area of the two clips. Crossfade You can adjust crossfades in several ways. You can change the edges of the crossfaded clips or move the position of the crossfade without changing its length. To adjust crossfade boundaries: 1 Move the pointer over the left or right edge of the crossfade. The pointer becomes a crossfade pointer. 2 Drag the edge of the crossfade to adjust the crossfade boundary. To move the crossfade without changing its length: m Drag the lower area of the crossfade left or right. As with other edits you make in the Timeline, creating a crossfade between two audio clips does not change the source audio files. 112 Chapter 5 Working in the Timeline Truncating Overlapping Audio Clips You can have Soundtrack Pro truncate the overlapping part of audio clips in the Timeline instead of crossfading them. To truncate audio clips, you set the project to truncate mode, then drag an audio clip so that it overlaps another clip. To set the project to truncate mode: m Click the Overlap Mode button, located above the Global Timeline view. In truncate mode, when you drag an audio clip so that it partially overlaps another audio clip in a track in the Timeline, the overlapped part of the clip is truncated. To truncate an audio clip: m In the Timeline, drag another audio clip over part of the clip. Splitting and Joining Audio Clips You may want to use only part of the source audio file in an audio clip. Soundtrack Pro lets you split the clip into segments and use the segments in the Timeline as independent clips. You can move the segments, edit them, and split each one into additional segments. There are two ways to split clips: using the Split (razor) tool, or using the Split menu item in the Edit menu with the playhead. Each method has advantages, depending on the situation. Using the Split tool, you can perform many splits consecutively without moving the playhead each time. Using the playhead, you can split clips in several tracks at once. To split audio clips with the Split tool: 1 Click the Split Tool button above the Timeline. Split Tool button 2 Click a clip at the point where you want to split it. Chapter 5 Working in the Timeline 113 To split audio clips with the playhead: 1 Set the playhead at the point where you want to split the clip, then select the clip or clips you want to split. You can split multiple clips in the same operation. Move the playhead to where you want to split the selected clip. 2 Choose Edit > Split (or press S). Every selected clip under the playhead is split into two segments. The first segment ends at the playhead position, and the second segment begins at the playhead position. The clip is split into two segments, each of which plays part of the source audio file. You can join clips from the same original audio file, including segments of split clips. Clips being joined must be adjacent to each other and in the same track. To join audio clips: 1 Place the clips next to each other in the same track. 2 Select the clips, then choose Edit > Join (or press J). When you join looping files or segments of looping files, the joined file plays to the end of the source audio file before looping. The notches in the joined file indicate the end of the source audio file. 114 Chapter 5 Working in the Timeline To replace the source audio file in all clips using the same source file: 1 Select all occurrences of the clip for which you want to replace the source audio file, following the steps described in “Selecting Audio Clips” on page 107. Every clip using the same source audio file is selected. 2 Replace the source audio file with another source audio file, following the steps described in “Replacing the Source Audio in a Clip” on page 117. Removing Audio Clips As you work on a project, you may decide that a clip that sounded great on its own no longer fits with the overall composition. You can remove clips from a project by deleting them from the Timeline. To remove an audio clip: m Select the clip, then choose Edit > Delete (or press the Delete key). Working With Markers Markers have a variety of uses in the Timeline and the Waveform Editor. For example, you can use markers to:  Mark the start and end points of major sections in your project  Indicate places you want to come back to and work on later  Mark points where you want to synchronize the audio with the picture in a video  Indicate where particular sounds begin and end in an audio file Markers extend vertically through the Timeline, like the playhead. Each marker has a handle in the area above the Time ruler, letting you position the marker precisely in the Timeline. Chapter 5 Working in the Timeline 119 Types of Markers Soundtrack Pro displays Final Cut Pro HD scoring markers, and lets you add your own markers to a project. You can add two kinds of markers: time markers and beat markers. The two types can be distinguished by their handles: Time markers have green handles, and beat markers have purple handles. Final Cut Pro HD scoring markers have orange handles. This section discusses how to work with time markers and beat markers in a project. For information about working with Final Cut Pro HD scoring markers, see “Using Final Cut Pro Scoring Markers” on page 191. Time marker (green) Beat marker (purple) End-of-project marker (red) Final Cut Pro HD scoring marker (orange) Inserting Markers You can insert a beat marker or time marker at any point in the Timeline or Waveform Editor. To insert a beat marker: m Set the playhead to the point where you want to add the marker, then choose Project > Insert Beat Marker (or press the B key). To insert a time marker: m Set the playhead to the point where you want to add the marker, then choose Project > Insert Time Marker (or press the M key). 120 Chapter 5 Working in the Timeline Naming Markers You can name time markers and beat markers, so that each marker can provide a unique visual cue to a specific point in the Timeline or Waveform Editor. For example, you can name markers to define sections of your project (Introduction, Verse, or Chorus), to reflect what’s happening in the music (Latin Rhythm or Fast Groove), or to serve as reminders for your workflow (Add Horns Here, Transpose to D, Insert Delay Effect). To name a beat marker or time marker, do one of the following: m Control-click the marker handle, choose Edit from the shortcut menu, type a name in the Marker Name field of the dialog that appears, then click OK. m Make the Details tab active, select the marker, then type a name in the Name field of the Details tab. Type a name in the Marker Name field. Enter a time position here to move the marker to that position. To view marker titles in the Timeline: m Choose View > Show Marker Titles. Moving Markers You can move a marker either by dragging the marker’s handle, or by entering a new position for the marker in an Edit dialog. To move either a beat marker or time marker, do one of the following: m Drag the marker by its handle, located in the area above the Time ruler, to a new position in the Timeline. m Show the Details tab, click the marker you want to move, then enter a new position in the Position field. m Control-click the marker handle, choose Edit from the shortcut menu, then type a new position in the Time field. You can also select and drag multiple markers. When you move a marker by dragging, the marker’s position snaps to the nearest Snap To position if snap is turned on. For information on setting the Snap To value, see “Creating Crossfades Between Audio Clips” on page 111. Chapter 5 Working in the Timeline 121 Deleting Markers To delete a marker: m Click the marker handle to select the marker, then choose Edit > Delete (or press Delete). You can’t delete Final Cut Pro scoring markers in Soundtrack Pro. 122 Chapter 5 Working in the Timeline 7 Working in the Waveform Editor 7 You can edit audio files nondestructively in the Waveform Editor, and analyze and fix common audio problems. The Soundtrack Pro Waveform Editor gives you extensive audio file editing capabilities. You can open an audio file in the Waveform Editor, view it in Waveform or Spectrum view, process the file using actions, analyze it for common audio problems, fix analyzed problems individually or together, then save the edited file as an audio file project or as a standard audio file. The Waveform Editor includes a set of graphical waveform editing tools, a Time display, a Global Waveform view, an Actions list, and a waveform display. 143 Getting Started With Audio File Projects You can create audio file projects, open audio files in the Waveform Editor, create a new audio file, and save an audio file as an audio file project. Supported Audio File Formats You can open the audio files in the following formats in the Waveform Editor:  Audio file project  AIFF  WAVE  MP3  AAC (except protected AAC files)  Sound Designer II  NeXT Sound File  QuickTime Movie You can open audio files with any combination of the following sample rates and bit depths: Sample Rates  Any rate between 8 kHz and 192 kHz Bit Depths  8-bit integer  16-bit integer  24-bit integer  32-bit integer  32-bit floating point You can open audio files up to four hours in length in the Waveform Editor. Note: You can open audio files with any sample rate between 8 kHz and 192 kHz. When you edit the file in the Waveform Editor, it maintains its sample rate. When you play the file, it plays at the nearest sample rate your hardware can support. The audio file project format is the native format of the Soundtrack Pro Waveform Editor. Audio files saved in this format have some special features, which are described in this chapter. 144 Chapter 7 Working in the Waveform Editor Creating and Opening Audio File Projects You start working in the Waveform Editor by creating an audio file project, opening an existing audio file project, or opening an audio file in the Waveform Editor. To create a new, blank audio file project: m Choose File > New > Audio File. To open an audio file project or audio file in the Waveform Editor, do one of the following: m Choose File > Open (or press Command-O), locate and select the project or file, then click Open. m Drag the project or file over the Soundtrack Pro icon in the Dock. m In the Multitrack window or the Media and Effects Manager, Control-click a project or file, then choose Open in Editor from the shortcut menu. When you open a clip from the Multitrack window, if the clip is part of a larger audio file, the Waveform Editor zooms in to the length of the clip. A marker is added to mark the start and end points of the clip. When you open a stereo audio file in the Waveform Editor, the left channel appears in the upper part of the waveform display, and the right channel appears in the lower part. You can have multiple audio file projects open in Soundtrack Pro, and cut and paste between them, but only one project can play back at a time. Closing Audio File Projects You can close the project when you no longer want to work on it, or close the Project window and close all open projects (both multitrack and audio file projects). To close a project: m Choose File > Close Project. To close all open projects and close the Project window: m Choose File > Close Window. Chapter 7 Working in the Waveform Editor 145 Saving Audio File Projects You can save a project as an audio file project or as a standard audio file, and can choose other options when you first save the file. Audio file projects are saved with the extension .stap. Saving a project as an audio file project lets you make changes to actions and other edits when you reopen the project in the Waveform Editor. You can also save a project as a standard audio file. In this case, the edits you have made are rendered into the audio file, and cannot be changed or undone the next time you open the audio file in the Waveform Editor. To save a project as an audio file project: 1 Choose File > Save. 2 In the Save dialog, type a name for the file and browse to the location where you want to save it. 3 Choose the file type for the project from the File Type pop-up menu. The available choices in the Save dialog change depending on whether you choose Audio File Project or an audio file format as the file type. 4 Optionally, select the Flatten checkbox to flatten the project. Flattening a project flattens or coalesces the actions in the project, reducing project complexity and file size. Once you flatten a project, you can no longer edit existing action settings. 5 Optionally, select the Render checkbox to create a render file in the project. If you are working with a clip sent from Final Cut Pro, be sure this checkbox is selected. 6 Click Save. 146 Chapter 7 Working in the Waveform Editor For audio file projects sent from Final Cut Pro or Motion and for reference movies, the original source media file (whether video or audio) is not saved in the project by default, but instead a reference to the media file is saved. You can save the source media file in the project. Saving the source media file in the project allows you to move the project to another computer or storage device and continue working, but can significantly increase project size. To collect the original source media in the project: m In the Save As dialog, select the Collect Source File checkbox. You can save a project to any of the audio file formats listed in “Supported Audio File Formats” on page 144, except MP3 and AAC. To save a project as an audio file: 1 Choose File > Save. 2 In the Save dialog, type a name for the file and browse to the location where you want to save it. 3 Choose the file type for the project from the File Type pop-up menu. The available choices in the Save dialog change depending on whether you choose Audio File Project or an audio file format as the file type. 4 Choose the bit depth for the project from the Bit Depth pop-up menu. 5 Choose the sample rate for the project from the Sample Rate pop-up menu. 6 Optionally, select the Dither checkbox to dither the file. Dithering is useful when saving a project at a lower bit depth or sample rate. In general, you should dither a project only when saving it as an audio file, and only when you have finished all bit depth or sample rate conversions. Chapter 7 Working in the Waveform Editor 147 7 Click Save. When you save an audio file with the same name, location, and extension as the original audio file, you overwrite the existing audio file. Setting the Time Ruler Units in the Waveform Display You can set the Time Ruler units in the waveform display to any format in the Time Ruler Units submenu. To set the Time Ruler units in the waveform display: m Choose View > Time Ruler Units, then choose a format from the submenu. 148 Chapter 7 Working in the Waveform Editor Choosing the Sample Units in the Waveform Display Along the left edge of the waveform display is a scale of sample units for the audio file. You can set this scale to any of the following sample units:  Sample Value  Normalized  Percent  Decibels To set the sample units in the waveform display, do one of the following: m Choose View > Time Ruler Units, then choose a format from the submenu. m Control-click along the left edge of the waveform display where the sample units appear, then choose the sample units you want from the shortcut menu. Zooming In and Out in the Waveform Editor You can zoom in on a specific part of an audio file to make precise edits and perform other tasks. To zoom in or out, do one of the following: m Drag the Zoom control left to zoom in for a closer view, or drag right to zoom out for a wider view. m Choose View > Zoom In to zoom in one level. m Choose View > Zoom Out to zoom out one level. If you have a mouse with a scrollwheel connected to your computer, you can set Soundtrack Pro to zoom in or out when you move the scrollwheel. You can select part of the audio file and zoom in on the selected area, zoom in to see individual samples in the waveform, or zoom out to peaks. To set Soundtrack Pro to zoom the waveform display when you move the scrollwheel: 1 Choose Soundtrack Pro > Preferences. 2 If the General Preferences pane is not visible, click the General button. 3 In the Timeline section of the General Preferences pane, choose “Zooms at playhead” from the Scrollwheel pop-up menu. To zoom in or out using a scrollwheel: m Move the scrollwheel up to zoom in, or move it down to zoom out. To zoom in on a selection: 1 In the waveform display, select the area you want to zoom in on. 2 Choose View > Zoom to Selection. Chapter 7 Working in the Waveform Editor 149 To zoom in to see individual samples: m Choose View > Zoom To Samples. If you have previously zoomed in to a level where individual samples are visible in the waveform display, choosing Zoom To Samples zooms in to the same zoom level. To zoom out to see the entire waveform: m Choose View > Zoom To Peaks. If you have previously zoomed out to a level where waveform peaks are visible in the waveform display, choosing Zoom To Peaks zooms out to the same zoom level. To return to the original zoom level: m Choose View > Zoom Normal. You can also zoom in on a selected area using the Zoom tool. For information about using the Zoom tool, see “Zoom Tool” on page 160. Using the Global Waveform View The Waveform Editor includes a Global Waveform view, located directly above the main waveform display. The Global Waveform view displays a miniature view of the entire audio file, and shows the current playhead position. The part of the audio file visible in the waveform display appears inside a blue rectangle. You can quickly move to different parts of the audio file by dragging the visible area rectangle. To move to a different part of the audio file using the Global Waveform view: m Drag the blue visible area rectangle to a new position. Drag this rectangle to a new position. 150 Chapter 7 Working in the Waveform Editor Viewing an Audio File in Spectrum View When you first open the Waveform Editor, it shows the audio file in Waveform view. You can also view and edit an audio file in Spectrum view. In Spectrum view, the display shows the frequency spectrum of each channel of a stereo audio file on a scale from 0 Hertz (Hz) to half the sample rate of the file. For example, for a 48 kHz audio file, the scale progresses from 0 Hz to 24 kHz. To view an audio file in Spectrum view: m Click the Spectrum View button above the right corner of the Global Waveform view. Waveform View button Spectrum View button The display changes to show the audio file’s frequency spectrum. You can select parts of the audio file, apply actions, and edit the audio file in Spectrum view in the same way as in Waveform view. You can also change the Spectrum view display to show the frequency spectrum linearly or logarithmically, use different window functions, and change the number of samples used to calculate the view. Chapter 7 Working in the Waveform Editor 151 To show the frequency spectrum on a logarithmic scale: m Control-click the Sample ruler along the left edge of the display, then choose Logarithmic from the shortcut menu. To show the frequency spectrum on a linear scale: m Control-click the Sample ruler along the left edge of the display, then choose Linear from the shortcut menu. To display the audio file in Spectrum view, part of the audio data for each given point in time is analyzed. Each method of analysis represents a slightly different compromise between frequency resolution and spectral leakage. You can choose between several different analysis methods, called window functions, used to display the frequency spectrum in Spectrum view. To choose a window function for Spectrum view: m Control-click the spectrum display, then choose a window function from the upper part of the shortcut menu. You can also choose the number of samples used to calculate the spectrum display. To choose the number of samples used for Spectrum view: m Control-click the spectrum display, then choose a number from the lower part of the shortcut menu. To return to Waveform view: m Click the Waveform View button. Playing Audio Files in the Waveform Editor You can play an audio file in the Waveform Editor, so you can hear the file and any changes you make to it. To play an audio file: m Click the Play button in the transport controls (or press the Space bar). Click the Play button (or press the Space bar) again to stop playback. You can set the playhead in the Waveform Editor in the same way as you set it in the Timeline, by clicking in the waveform display or in the Time ruler, using the transport controls, or using the Playhead Position value slider. For more information, see “Setting the Playhead” on page 51. 152 Chapter 7 Working in the Waveform Editor Scrubbing Audio Files in the Waveform Editor You can also scrub the audio file in the Waveform Editor. Scrubbing the audio file lets you hear the audio at the playhead position as you drag the playhead, so you can find a particular sound or event in the audio file. To scrub an audio file: 1 Press and hold the triangular part of the playhead. 2 While holding the playhead, drag left or right at the speed you want to scrub the audio file. Scrubbing is useful to help identify the part of an audio file that you want to edit. While you are scrubbing an audio file, you can select the part of the file that you want to edit. To make a selection while scrubbing: m As you move the playhead, press and hold the Shift key. Using the Timeline Controls in the Waveform Editor You can use the Timeline controls, located at the lower-left corner of the Project window, while working in the Waveform Editor. Some of these controls have slightly different functions in the Waveform Editor than they do in the Timeline.  Master Envelopes button: You can show or hide the envelopes for the audio file.  Snap button: You can turn snap on or off in the Waveform Editor.  Snap To button: You can choose the Snap To value that the playhead and other items snap to. In the Waveform Editor, the choices for snap are Ruler Ticks and Zero Crossings.  Track Height control: Sets the height of the envelope rows when you show envelopes in the Waveform Editor. Chapter 7 Working in the Waveform Editor 153 Editing Audio Files in the Waveform Editor You can edit audio files in many different ways in the Waveform Editor. You can edit the entire file, or select part of the file to edit. Selecting Part of an Audio File When you apply an action to an audio file in the Waveform Editor, the action is applied to the entire file unless you select part of the file. You can select different parts of the audio file and apply different actions to each selection. To select part of an audio file: m In the waveform display, drag horizontally across the part of the waveform you want to select. Selected area Some actions can only be applied to a selection. The selection can contain the entire audio file. 154 Chapter 7 Working in the Waveform Editor To select the entire audio file: m Choose Edit > Select All. You can select one channel (left or right) of a stereo audio file, and apply actions to only the selected channel. You can also select only part of one channel. To select the left channel of an audio file: 1 Move the pointer near the upper edge of the waveform display. The pointer changes to the letter “L.” 2 Drag the pointer to select the part of the left channel you want to work with. Left channel selected As you drag, the right (lower) channel of the audio file becomes darker in the waveform display. You can also double-click in the upper part of the waveform display to select the entire left channel. Chapter 7 Working in the Waveform Editor 155 To select the right channel of an audio file: 1 Move the pointer near the lower edge of the waveform display. The pointer changes to the letter “R.” 2 Drag the pointer to select the part of the right channel you want to work with. Right channel selected As you drag, the left (upper) channel of the audio file becomes darker in the waveform display. You can also double-click in the lower part of the waveform display to select the entire right channel. When you play a selected left or right channel, the audio from that channel plays in both the left and right output channels of the output. The other channel is not heard. If you have added time or beat markers to an audio file project, you can select the area between two markers. To select the area between two markers: m Double-click the waveform display in the area between the two markers. If there are additional markers, you can expand the selection by dragging toward them. 156 Chapter 7 Working in the Waveform Editor Moving Between Selections You can select different areas of the audio file to apply different actions or to play different areas. Any selection can include the same part of an audio file as another selection. As you work on the audio file, you can move back and forth between selections. Waveform View button Next Selection button To move to the previous selection: m Click the Previous Selection button above the waveform display. The previous selection becomes the current selection. The selection area appears darker than the rest of the waveform. To move to the next selection: m Click the Next Selection button above the waveform display. The next selection becomes the current selection. The selection area appears darker than the rest of the waveform. Cutting, Copying, and Pasting in the Waveform Editor You can cut, copy, and paste audio in the Waveform Editor. Cutting, copying, and pasting can change the length of an audio file. To cut part of an audio file in the Waveform Editor: 1 Select the part of the file you want to cut. 2 Choose Edit > Cut (or press Command-X). The selected part of the file is removed, and the file shortens by the cut amount. To copy audio in the Waveform Editor: 1 Select the part of the file you want to copy. 2 Choose Edit > Copy (or press Command-C). 3 You can paste audio in the Waveform Editor. You can paste at the playhead position, paste mix, or paste repeat. Chapter 7 Working in the Waveform Editor 157 To paste audio in the Waveform Editor: 1 Set the playhead to the point where you want to paste the audio. 2 Choose Edit > Paste (or press Command-V). The cut or copied audio is pasted starting at the playhead position. The audio after the playhead in the file moves to accommodate the pasted audio, and the file lengthens by the pasted amount. You can also paste mix in the Waveform Editor. When you paste mix, the pasted audio is mixed (or blended) with the existing audio in the audio file. You can control the mix of the pasted audio and existing audio, and can crossfade the pasted audio. To paste mix audio in the Waveform Editor: 1 Set the playhead to the point where you want to paste the audio. 2 Choose Edit > Paste Special, then choose Paste Mix from the submenu. 3 In the Paste Mix sheet, drag the Original Material Level slider to set the mix level of the existing audio in the pasted area. 4 Drag the Clipboard Level slider to set the mix level of the pasted audio. 5 Optionally, you can crossfade the pasted audio by selecting the Crossfade In and Out Points checkbox and typing crossfade values (in milliseconds) in the Fade In Length and Fade Out Length fields. 6 Click OK. The cut or copied audio is mixed with the existing audio. You can also paste repeat in the Waveform Editor. When you paste repeat, the cut or copied audio is pasted the number of times you specify in succession, so that each copy starts at the end of the previous one. To paste repeat in the Waveform Editor: 1 Set the playhead to the point where you want to paste the audio. 2 Choose Edit > Paste Special, then choose Paste Repeat from the submenu. 3 In the Paste Repeat sheet, type the number of copies you want to paste in the field. 4 Click OK. The copies are pasted starting at the playhead position. The audio after the playhead in the file moves to accommodate the pasted audio, and the file lengthens by the pasted amount. 158 Chapter 7 Working in the Waveform Editor Graphically Editing Audio Files The Waveform Editor includes four waveform editing tools you can use to graphically edit the audio file in the waveform display. Selection Tool You can use the Selection tool to select part of an audio file, as described in “Selecting Part of an Audio File” on page 154. When you open the Waveform Editor, the pointer is a selection pointer (arrow). When you are done using another waveform editing tool, you can return the pointer to a selection pointer by clicking the Selection Tool button. Selection Tool button Sample Edit Tool You can graphically edit samples in the audio file using the Sample Edit tool. To use the Sample Edit tool, the waveform display must be zoomed in enough to see individual samples, which appear as small squares connected by a thin line. Sample Edit Tool button To edit samples using the Sample Edit tool: 1 Click the Sample Edit Tool button above the time display. The pointer becomes a Sample Edit pointer. 2 Zoom in on the part of the waveform you want to edit. 3 To graphically edit samples, do one of the following:  Drag a sample up or down to a new value.  Click directly above or below a sample.  Drag left or right to reshape the waveform. You can also edit samples numerically in the waveform display. To edit samples numerically: 1 Control-click a sample, then choose Set Value from the shortcut menu. 2 In the sheet that appears, type a new value for the sample. 3 Click OK. Chapter 7 Working in the Waveform Editor 159 Stretch Tool You can time stretch all or part of an audio file to change the amount of time it occupies. When you stretch an audio file, the length of time changes but not the pitch (letting you fill dialogue, music, or other audio to a specific amount of time). For audio files with music or other repeating patterns, stretching the file changes the tempo of the music without changing the key. Stretch Tool button To graphically time stretch an audio file: 1 Click the Stretch Tool button above the time display. 2 In the waveform display, drag horizontally across the waveform to select the part you want to time stretch. The pointer becomes a Stretch pointer. 3 Drag the right edge of the selection left to shorten the selected area, or drag it right to lengthen the selected area. Note: Stretching an audio file by a large amount can degrade the sound quality of the audio file. Zoom Tool You can zoom in on a specific part of the waveform display to make precise edits. Zoom Tool button To zoom in using the Zoom tool: 1 Click the Zoom Tool button above the time display. The pointer changes to a Zoom pointer. 2 In the waveform display, do one of the following:  Click to zoom in.  Option-click to zoom out.  Drag horizontally to select the part of the waveform you want to zoom in on. The waveform display zooms in on the selected area. For information on other ways to zoom in and out in the waveform display, see “Zooming In and Out in the Waveform Editor” on page 149. 160 Chapter 7 Working in the Waveform Editor Processing Audio Files You can process audio files in the Waveform Editor in a variety of ways. You can choose processing effects and other operations from the Process menu and apply them to an entire file, or select part of the file and apply the effect to the selection. When you choose an item from the Process menu, the item appears as an action in the Actions list. The Process menu contains the following items: Effects Submenu The Effects submenu contains an extensive set of professional audio effects you can apply to an audio file or a selection. The audio effects in the Effects submenu are the same as the realtime effects you can apply to tracks, busses, and outputs in the Timeline. For information about individual effects in the Effects submenu, see “Audio Effects Included With Soundtrack Pro” on page 196. The effects included with Soundtrack Pro are categorized by type in the Effects submenu. Below these effect categories is a submenu for Mac OS effects. If you have installed third-party Audio Units effects on your computer, additional submenus for the third-party effects appear at the bottom of the Effects submenu. When you apply a processing effect from the Effects submenu, the floating advanced settings window for the effect appears. The advanced settings window contains controls for previewing the effect in the Waveform Editor, bypassing, applying or canceling the effect, resetting effect parameters, and applying effect presets. Show/Hide Presets button Play button Apply button Reset button Volume slider Bypass button Cancel button  Play button: Plays the audio file or selection with the effect.  Volume slider: Controls the volume of the audio file or selection as you play it.  Bypass button: Bypasses the effect so you can hear the difference in the sound of the audio file or selection with and without the effect. Chapter 7 Working in the Waveform Editor 161  Reset button: Resets all effect parameters to their default values.  Cancel button: Closes the advanced settings window without applying the effect.  Apply button: Applies the effect to the audio file or selection and closes the advanced settings window.  Show/Hide Presets button: Shows or hides the Presets drawer so you can apply effect presets. For information about applying effect presets in the Waveform Editor, see “Working With Effect Presets” on page 217. For information about the effects in the Effects submenu, see Chapter 9, “Working With Audio Effects,” on page 195. Fade In Choosing this command fades in the audio file or selection. The fade in progresses in linear fashion from the beginning to the end of the audio file or selection. Fade Out Choosing this command fades out the audio file or selection. The fade out progresses in linear fashion from the beginning to the end of the audio file or selection. Normalize Choosing this command normalizes (adjusts the gain of ) the audio file or selection to the decibel level shown in the Normalization Level field. The highest peak in the file is raised or lowered to the level you set, and the rest of the audio file is raised or lowered by the same amount. When you choose Process > Normalize, the level is set to 0 dB. To set the normalization level: 1 Choose Process > Normalize. 2 In the Normalize dialog, drag the Normalization Level slider or select the value in the Normalization Level field and type a new value. 3 Click OK. You can preview the audio file at the normalization level before closing the Normalize dialog. This makes it easy to set the level before normalizing the file. To preview the file at the normalization level: m In the Normalize dialog, select the Preview checkbox. 162 Chapter 7 Working in the Waveform Editor Adjust Amplitude Choosing this command raises or lowers the gain of the audio file or selection by the amount shown in the Amplitude Level field. When you choose Process > Adjust Amplitude, the level shown in the field is zero (0) dB, or unity gain. To set the amplitude level: 1 Choose Process > Adjust Amplitude. 2 In the Adjust Amplitude dialog, drag the Amplitude Level slider or select the value in the Amplitude Level field and type a new value. 3 Click OK. Silence Choosing this command replaces the audio file or selection with complete silence. Invert Choosing this command inverts the phase of each sample in the audio file or selection. Each sample’s amplitude is unchanged, but the phase is inverted. In the waveform display, the wave’s crests become troughs and vice versa. Reverse Choosing this command reverses the order of the samples in the audio file or selection so that the first sample becomes the last and vice versa. Swap Channels Choosing this command swaps the left and right channel of a stereo audio file or selection. If the file is mono, Swap Channels is disabled. Insert You can insert silence, noise, or a waveform in an audio file or selection. When you choose Process > Insert, then choose one of the three items from the Insert submenu, the silence, noise, or waveform is inserted at the current playhead position. The remainder of the audio file ripples so that it continues after the inserted silence, noise, or waveform. Inserting Silence When you choose Process > Insert, then choose Silence from the Insert submenu, the Insert Silence sheet appears. You can set the length of silence to insert, and choose the format for setting the length of the silence (any of the Time Ruler Units formats). Chapter 7 Working in the Waveform Editor 163 To set the length of the inserted silence: 1 In the Insert Silence sheet, choose the format you want to use from the Format pop-up menu. 2 In the “Length of silence to insert” value slider, do one of the following:  Click the left arrow to shorten the length of the inserted silence, or click the right arrow to increase the length.  Click the center of the value slider, then drag the slider that appears left or right to change the length of inserted silence.  Click the value in the value slider, then type a new value. 3 Click OK. Inserting Noise When you choose Process > Insert, then choose Noise from the Insert submenu, the Noise Generator dialog appears. You can set the type of noise to insert, set the length of the inserted noise, choose the format for setting the noise length (any of the Time Ruler Units formats), and set the volume of the inserted noise. The inserted noise can be white noise (emphasizing higher frequencies) or pink noise (equal distribution of frequencies). To choose the type of noise to insert: m In the Noise Generator dialog, choose the type of noise from the Waveform Type popup menu. To set the length of the inserted noise: 1 In the Noise Generator dialog, choose the format you want to use from the Duration pop-up menu. 2 In the Duration value slider, do one of the following:  Click the left arrow to shorten the length of the inserted noise, or click the right arrow to increase the length.  Click the center of the value slider, then drag the slider that appears left or right to change the length of inserted noise.  Click the value in the value slider, then type a new value. 3 Click OK. 164 Chapter 7 Working in the Waveform Editor To set the volume level of the inserted noise: m In the Noise Generator dialog, drag the Volume slider left or right to set the noise level. You can also type a level (in decibels) in the Volume field. Inserting a Waveform When you choose Process > Insert, then choose Waveform from the Insert submenu, the Wave Generator dialog appears. You can set the type of waveform to insert, set the length of the inserted waveform, choose the format for setting the waveform length (any of the Time Ruler Units formats), and set the volume of the inserted waveform. The inserted waveform can be a sine, sawtooth, square, or triangle wave. To choose the type of waveform to insert: m In the Wave Generator dialog, choose the type of waveform from the Waveform Type pop-up menu. To set the frequency of the inserted waveform: m In the Wave Generator dialog, drag the Frequency slider left or right to set the frequency. You can also type a frequency (in Hertz) in the Frequency field. To set the length of the inserted waveform: 1 In the Wave Generator dialog, choose the format you want to use from the Duration pop-up menu. 2 In the Duration value slider, do one of the following:  Click the left arrow to shorten the length of the inserted waveform, or click the right arrow to increase the length.  Click the center of the value slider, then drag the slider that appears left or right to change the length of the inserted waveform.  Click the value in the value slider, then type a new value. 3 Click OK. Chapter 7 Working in the Waveform Editor 165 Time Stretch You can time stretch an audio file or selection. When you time stretch an audio file, you change the duration (length) of the file without changing the frequency (pitch) of the file. For example, for a file containing music, the tempo of the music is changed, but not the pitch. When you time stretch an audio file, you can choose the format for time values you enter. To time stretch an audio file: 1 Select the part of the file you want to time stretch (it can be the entire file). 2 Choose Process > Time Stretch. The Time Stretch sheet appears. 3 In the Time Stretch sheet, choose the format for setting the amount to time stretch the file from the Format pop-up menu. 4 In the “Length of selection” value slider, do one of the following:  Click the left arrow to shorten the length, or click the right arrow to increase the length.  Click the center of the value slider, then drag the slider that appears left or right to change the length.  Click the value in the value slider, then type a new value. 5 Click OK. Adding Ambient Noise When editing an audio file, you may want to remove some sounds from the file while preserving the room tone or other ambient background noise in the file. Soundtrack Pro features two commands, Set Ambient Noise Print and Apply Ambient Noise, that you can use together to add ambience to the file. Set Ambient Noise Print The Set Ambient Noise Print command lets you copy part of an audio file containing only ambient noise that you want to add to another part of the file (or another file). To copy part of an audio file to ambient noise: 1 In the waveform display, select the part of the audio file containing only ambient noise. 2 Choose Process > Set Ambient Noise Print. The ambient noise is stored in a special buffer separate from the Clipboard, and is saved to the project. 166 Chapter 7 Working in the Waveform Editor Apply Ambient Noise The Apply Ambient Noise command applies the ambient noise stored in the ambient noise buffer to the audio file or selection. To apply ambient noise to an audio file: 1 In the waveform display, select the part of the audio file to which you want to apply the ambient noise. 2 Choose Process > Apply Ambient Noise. The ambient noise replaces the selected part of the file. If the selection is longer than the copied ambient noise, the ambient noise repeats to fill the selection. Convert to Mono Choosing this command converts a stereo audio file to mono. You can choose whether to convert the file to mono by using only the left channel, using only the right channel, or combining the two channels. Combining the left and right channels sums them as an equal gain mix. To select how a stereo file is converted to mono: 1 Choose Process > Convert to Mono. 2 In the Convert to Mono dialog, select the button corresponding to the method by which you want to convert the file to mono. 3 Click OK. The Convert to Mono action converts the entire stereo file to mono. You cannot convert only a selection of a file to mono. The Convert to Mono action flattens the file, removing existing actions from the Actions list. For information about flattening actions, see “Flattening Actions” on page 174. Resample Choosing this command resamples the audio file to a new sample rate. To choose the new sample rate: 1 Choose Process > Resample. 2 In the Resample sheet, choose a sample rate from the Sample Rate pop-up menu. You can also type a sample rate (in Hertz) in the Sample Rate field. 3 Click OK. The Resample action flattens the file, removing existing actions from the Actions list. For information about flattening actions, see “Flattening Actions” on page 174. Chapter 7 Working in the Waveform Editor 167 Reducing Noise Some audio files contain unwanted noise, making it difficult to hear the voices, music, or other content of the file. Soundtrack Pro features two commands, Set Noise Print and Reduce Noise, that you can use together to reduce noise in an audio file or selection. Set Noise Print The Set Noise Print command lets you select part of an audio file containing only the noise that you want to remove as a “noise print.” The noise print provides a signature of the frequencies to reduce or remove from the file. Setting the noise print before reducing noise is optional. If you do not set a noise print before using the Reduce Noise command, Soundtrack Pro will extract a noise print from the selected part of the audio file. To set part of an audio file as a noise print: 1 In the waveform display, select the part of the audio file containing only the noise you want to reduce. 2 Choose Process > Set Noise Print. The selected noise is stored as a noise print. Reduce Noise The Reduce Noise command uses the frequency content of the noise print to reduce noise in the audio file or selection. To reduce noise using the noise print: 1 In the waveform display, select the part of the audio file in which you want to reduce noise. 2 Choose Process > Reduce Noise. The Reduce Noise dialog appears. In the Reduce Noise dialog, you can optionally set the noise threshold and tone for noise reduction. You can also preview the noise reduction with the dialog open. The noise threshold determines the level below which audio in the noise print is considered to be noise. Lowering the threshold results in only very low signals being reduced, while raising the threshold results in more high level signals being reduced. 168 Chapter 7 Working in the Waveform Editor To set the threshold of the noise reduction: m In the Reduce Noise dialog, drag the Noise Threshold slider left to lower the threshold or drag it right to raise the threshold. You can also type a value (in decibels) in the Noise Threshold field. To change the tone of the noise reduction: m In the Reduce Noise dialog, drag the Tone Control slider left to preserve more low frequency content (bass) or drag it right to preserve high frequency content (treble) during noise reduction. You can preview noise reduction with the Reduce Noise dialog open, and adjust the threshold and tone of noise reduction. You can also hear the audio file or selection with and without noise reduction, and hear only the noise to be removed. To preview the file with noise reduction: m Click the Play button in the lower part of the Reduce Noise dialog. To set the preview volume level: m Drag the Volume slider in the lower part of the Reduce Noise dialog left to lower the volume or right to raise the volume. To compare the file with and without noise reduction: m Click the Bypass button to hear the file without noise reduction. Click the button again to hear the file with noise reduction. To hear only the noise to be removed: m Select the Noise Only checkbox. To use a noise reduction preset: 1 In the Reduce Noise dialog, click Show Presets. The Presets drawer appears. 2 In the Presets drawer, select a preset from either the Factory Presets or User Presets list. 3 Click Apply. Chapter 7 Working in the Waveform Editor 169 Analyzing an Audio File Soundtrack Pro includes a set of audio analysis tools. You can analyze an audio file for common problems such as clicks and pops, hum, phase issues, and clipping, and fix them individually or in a single operation. When you analyze an audio file, you can select which types of analysis to perform. To show the analysis lists and tools: m In the Waveform Editor, click the Analysis button. The Analysis Type list, Parameter list, and Analysis Results list replace the Actions list in the window. Analysis Type list Parameter list Analyze button Analysis Results list Fix buttons and Magnify button To analyze an audio file: m Click the Analyze button, located below the Parameter list. Chapter 7 Working in the Waveform Editor 177 Types of Audio Analysis The following types of analysis can be performed in the Waveform Editor: Clicks and Pops Sudden, short peaks in the audio file can result from a variety of causes, including mechanical defects in analog recordings. You can set the threshold above which Soundtrack Pro considers peaks to be clicks or pops. (Power Line) Hum Power lines and other electrical equipment can produce a steady hum, often at 50 or 60 Hz. The hum can also include low-order harmonics of the fundamental frequency. DC Offset DC offset is a shift in the audio, causing the positive and negative parts of the signal not to average to zero. DC offset can limit the dynamic range of an audio file. Phase Issues Phase issues can result from a distorted or inaccurate stereo image, caused by poor microphone placement or other issues. When converting a stereo file to mono, the presence of phase issues can cause the left and right channels to cancel each other out partially or completely. Clipped Signal A clipped or overloaded signal can result from several causes, including poor gain staging in a preamp during recording, bad electrical cables, or surface damage to an analog recording. Silence Silence detects parts of the audio file at which the audio signal falls to zero (0). You can set the threshold below which Soundtrack Pro considers the signal to be silence. To select the types of analysis to perform: 1 In the Analysis Type list, select the checkboxes next to the types of analysis you want to perform on the audio file. 2 To analyze the file, click Analyze. 178 Chapter 7 Working in the Waveform Editor Setting Analysis Parameters The Clicks and Pops and Silence analysis types have parameters you can set. Each type has a Threshold slider you can drag to set the threshold for detecting clicks and pops or detecting silence. To set analysis parameters: 1 In the Analysis Type list, click the disclosure triangle for the analysis types for which you want to set parameters. 2 Drag the Threshold slider left to lower the threshold or right to raise the threshold. You can also type a value in the Threshold field. Reading Analysis Results When you analyze an audio file, the problems detected through analysis are shown in the Results list. For each item, the following information appears in the Results list.      Status: Shows whether the problem is fixed or not fixed. Problem: Shows the analysis type to which the problem belongs. Start: Shows the point at which the problem begins. Length: Shows the duration of the problem. Channels: Shows whether the problem occurs in the left channel (L), the right channel (R), or both channels (LR) of a stereo audio file. You can select items in the Results list. When you select an item in the Results list, the part of the audio file to which the problem applies becomes red in the waveform display, making it easy to see where in the audio file the problem occurs. If you select multiple items, the parts of the audio file to which any of the selected problems apply become red. Chapter 7 Working in the Waveform Editor 179 11 Recording Audio in Soundtrack Pro 11 You can record your own audio in a track in the Timeline, as well as recording audio in the Mixer and the Waveform Editor. You get ready to record by setting recording preferences and checking that your audio equipment is working. For multitrack projects, you enable a track for recording, or record audio in a new track. You can record a single take or record multiple takes. If you record multiple takes, you can review them after recording and choose which one to use in your project, or assemble a composite take using segments of each recorded take. For audio file projects, you record in the Waveform Editor. When you record in the Waveform Editor, the recording replaces (overwrites) any audio over which you record. If you record for a longer duration than the current length of the file, the file is lengthened to include the recorded audio. Getting Ready to Record Before you start recording, also make sure that any audio equipment you plan to use in your recording session (such as microphones, musical equipment, mixers, or external processors) is connected to your computer and is working. When you record, the recorded audio is saved to disk at the location set in the Recording pane of the Preferences window. Audio files, while smaller than video files of comparable duration, can be quite large (each minute of 16-bit, 44.1 kHz stereo audio requires roughly 10 MB of disk space), so you should make sure you have enough free disk space to store your recordings before you start. You can set the input device and output monitoring device for recording in the Preferences Recording pane, or change them in the Recording tab. For detailed information on Recording preferences, see “Recording Preferences” on page 77. 235 Recording Audio in the Timeline You record in the Timeline by enabling a track for recording, setting the playhead, then clicking Record. You can record a single take or record multiple takes by turning on cycling before you start recording. When you finish recording, your recorded audio appears in a track in the Timeline. If you record multiple takes, you can audition each take to choose which one you want to use in your project. You can also assemble composite takes by splitting and combining your recorded takes. Enabling a Track for Recording Before you start recording, you enable the track you want to record to. You can record audio only to a track, not to a bus or output. If no track is enabled for recording, a new track is created below the existing tracks, and the take appears on the new track when you click the Record button. To enable a track for recording: m Click the Record Enable button (the red circle) in the track’s header (or Mixer channel strip). The Recording tab becomes active, and shows the current recording settings. You can adjust recording settings before you start recording, or between recordings. 236 Chapter 11 Recording Audio in Soundtrack Pro To adjust recording settings: 1 In the Recording tab, choose the input device and channel (or pair of channels) from the Input Device pop-up menu. 2 Choose the device and channel (or pair of channels) to use for monitoring the recorded audio from the Monitor pop-up menu. 3 If you want to record without hearing the existing audio clips in the project, select the Mute Project checkbox. 4 If you want to record in mono, deselect the Stereo checkbox. The level meters in the Recording tab show the level of the audio signal in the input channel. Before recording, you may want to watch the level meters and set the input level, to assure a high enough signal level and to avoid clipping. Recording a Single Take You record a single take by setting the playhead to the point where you want recording to start, then clicking the Record button. Recording starts at the playhead position, and ends when you click either the Record or Play button. To record a single take: 1 If you want to record to an existing track, enable the track. 2 Set the playhead to the point where you want recording to start. You can set the playhead using any of the procedures described in “Setting the Playhead” on page 51. 3 Click the Record button in the transport controls to start recording. As you record, the level meters in the Recording tab show the levels of the input signal being recorded. If the input signal clips (rises above 0 dB), the peak indicator lights red. 4 To stop recording, do one of the following:  Click the Record button again.  Click the Play button. You can punch in and punch out while recording a single take using the Record button. For example, you can start the project playing, then punch in at the point where you want to start recording by clicking the Record button. To punch out, click the Record button again. When you click the Record button while recording, recording stops, but the project continues playing. You can punch in and punch out multiple times while the project is playing. When you click the Play button, both recording and playback stop. Chapter 11 Recording Audio in Soundtrack Pro 237 Recording Multiple Takes You can record multiple takes in the Timeline. You can record multiple takes using the playback region to define where each take starts and ends, or record for the duration of the project. When you record multiple takes, the takes are “stacked” in a single clip in the Timeline. You can audition each take, and can create composite takes by splitting the clip and choosing the take for each split segment. To record multiple takes: 1 If you want to record to an existing track, enable the track. 2 If cycling is turned off, click the Cycle button in the transport controls to turn it on. 3 Set the playback region to the part of the Timeline where you want recording to start and end. For information on setting the playback region, see “Working With the Playback Region” on page 98. If no playback region is set, recording starts at the beginning of the project and lasts until the end of the last clip in the project. If the project contains no clips, a single take is recorded, starting at the current playhead position. 4 Click the Record button in the transport controls to start recording. As you record, the level meters in the Recording tab show the levels of the input signal being recorded. If the input signal clips (rises above 0 dB), the peak indicator lights red. The playhead advances to the end of the playback region, then returns to the beginning of the playback region for the next take. 5 To stop recording, click the Play button. When you record multiple takes, the takes are recorded sequentially to an audio file in the recording location set in Recording Preferences. The takes appear in a single clip in the Timeline. The current take number appears in the lower-right corner of the clip. You can choose which take you hear when you play the project. When you finish recording, the current take number corresponds to the number of completed takes. 238 Chapter 11 Recording Audio in Soundtrack Pro To choose a take, do one of the following: m Select the clip, choose Clip > Recording Take, then choose the take number from the submenu. m Control-click the clip, choose Take from the shortcut menu, then choose the take number from the submenu. You can split a recorded clip, and choose the take for each segment of the split clip to create a composite take. You can also copy a clip onto several tracks, split the copies, and choose the take for each split copy of the clip. Saving Recorded Clips You can save your recordings in the Timeline. When you save a clip, you can name the clip, choose where to save it, and save it as either a looping or non-looping file. To save a recorded clip: 1 Do one of the following:  Select the clip in the Timeline, then choose Clip > Save Clip As.  Control-click the clip in the Timeline, then choose Save Clip As from the shortcut menu. 2 In the Save As dialog, type a name for the clip and browse to the location where you want to save it. 3 Select the Looping button to save the clip as a looping file, or click the Non-looping button to save the clip as a non-looping file. 4 Click Save. You can use Apple Loops Utility, a companion application included with Soundtrack Pro, to add tags to your saved recordings to make them easier to find using the Search tab in Soundtrack Pro. Chapter 11 Recording Audio in Soundtrack Pro 239 Recording Audio in the Mixer You can record audio in the Mixer in a similar way to recording audio in the Timeline. You can record a single take or record multiple takes. If you want to record multiple takes using a playback region, you must set the playback region in the Timeline before you start recording in the Mixer. To record audio in the Mixer, you follow the procedures described in “Recording Audio in the Timeline” on page 236, with the following differences:  To enable a track for recording in the Mixer, click the Record Enable button (the red circle) in the track’s channel strip.  In the Mixer, you can set the playhead using the transport controls or the Playhead Position value slider. Because the playhead is not visible in the Mixer, you cannot set it by clicking or dragging. Recording Audio in the Waveform Editor You can record audio to an audio file project in the Waveform Editor. When you record audio in the Waveform Editor, you replace (overwrite) any existing audio in the audio file or selection you record to. You can select part of the file in the Waveform Editor to record to. When you record to a selection, recording starts at the beginning of the selection and ends at the end of the selection. The part of the file after the end of the selection is unchanged. If no part of the file is selected, recording starts at the playhead position, and lasts until you stop recording. If your recording extends past the end of the audio file, the file is lengthened to include the recording. To record audio in the Waveform Editor: 1 Select the part of the project you want to record to. If no part of the audio file is selected, recording starts at the current playhead position and proceeds until you stop recording. 2 Click the Record button in the transport controls. 240 Chapter 11 Recording Audio in Soundtrack Pro As you record, the recorded area appears red in the waveform display. The level meters in the Recording tab show the levels of the input signal being recorded. If the input signal clips (rises above 0 dB), the peak indicator lights red. Recorded area Chapter 11 Recording Audio in Soundtrack Pro 241 12 Using Control Surfaces With Soundtrack Pro 12 You can connect and use control surfaces to automate recording, mixing, and other tasks in Soundtrack Pro. Control surfaces provide a set of hardware controls that let you mix and edit your projects with greater flexibility and precision than using a mouse to move onscreen controls. You can also change multiple parameters at once using a control surface. There are a variety of control surfaces available for use with video and audio production applications. Most control surfaces include faders, knobs, and buttons similar to those found on a hardware mixing console, including channel strip controls for volume, pan, mute, solo, and track selection, and a set of transport controls. Control surfaces also typically provide buttons for selecting parameters to edit and for selecting different tracks or banks of tracks, a jog wheel for moving the playhead precisely, and other controls. When you use a control surface with Soundtrack Pro, some controls are premapped to common functions. You can map other controls to Soundtrack Pro commands and functions in the Control Surfaces Preferences pane. To use a control surface, you connect it to your computer, add it to Soundtrack Pro, map the controls you want to use to Soundtrack Pro commands, then record control surface automation data in your project. Recorded control surface automation data appears in the corresponding envelope in the Timeline. Connecting Control Surfaces Soundtrack Pro supports control surfaces that use the Mackie Control and Logic Control protocols to communicate with your computer. In order to use a control surface, you must first connect the control surface to a MIDI interface, and connect the MIDI interface to your computer, unless the control surface allows direct connection to the computer. Before connecting a MIDI interface, be sure your computer supports the MIDI interface you plan to use. Read the installation instructions included with the MIDI interface, and install the latest version of any appropriate firmware or driver software if needed. For more information, refer to the documentation that came with the control surface and with the MIDI interface. 243 Adding and Deleting Control Surfaces When you have connected the MIDI interface to your computer, and connected the control surface to the MIDI interface, you add the control surface in Soundtrack Pro Control Surface Preferences. To add a connected control surface: 1 Choose Soundtrack Pro > Preferences, then click the Control Surfaces button. 2 Click the Add (+) button to add the control surface. The visual representation of the control surface appears in the panel in the upper part of the window. 3 Choose the type of control surface you are adding from the Control Surface Type popup menu. 4 Choose the MIDI input port to use for the control surface from the Input Connection pop-up menu. 5 Choose the MIDI output port to use for the control surface from the Output Connection pop-up menu. 6 Click the Close button to dismiss the Preferences window. You can delete a control surface, if you decide you don’t want to use it any longer. To delete a control surface: 1 Choose Soundtrack Pro > Preferences, then click the Control Surfaces button. 2 Select the control surface in the Control Surfaces display area. 3 Click the Delete (–) button. 244 Chapter 12 Using Control Surfaces With Soundtrack Pro Premapped Controls When you connect a control surface, many controls are premapped to work with specific Soundtrack Pro buttons and commands. Premapped controls include the following: Control Soundtrack Pro button or command Channel strip volume faders Track volume slider Channel strip rotary knobs Track pan slider Channel strip record ready buttons Track Record Enable button Channel strip select buttons Select the track. Channel strip mute buttons Track mute button Channel strip solo buttons Track solo button Transport controls Transport controls (Move back, Move forward, Play, Stop, Record) Jog wheel Moves playhead back or forward. Mapping Commands to Control Surface Buttons Many buttons on control surfaces are not directly assigned to a specific command in Soundtrack Pro. Some buttons, such as the bank and channel buttons, are premapped but can also be mapped to other commands. You can map these buttons in the Control Surface Buttons window and save the mappings or modify them later. To map a command to a control surface button: 1 Choose Soundtrack Pro > Preferences, then click the Control Surfaces button. 2 Click the Control Surface Buttons button to show the Control Surface Buttons window. Chapter 12 Using Control Surfaces With Soundtrack Pro 245 3 In the Control Surface Buttons window, drag an action from the Available Commands list (on the right) to a button in the Control Surface Buttons list (on the left) to map the command to the button. 4 Optionally, you can search for commands and control surface buttons by typing text in the Search field, located at the upper-right corner of the window. Recording Control Surface Automation Once you have connected a control surface and mapped the controls you plan to use, you can use the control surface to control volume, pan, and other functions in your Soundtrack Pro projects. Using the automation modes described in “Automation Modes” on page 228, you can record control surface movements while a project plays. To record control surface movements, follow the procedures described in “Recording Automation Data” on page 228. You can thin automation data recorded from a control surface. For information on thinning automation data, see “Thinning Envelope Points in Recorded Automation Data” on page 229. 246 Chapter 12 Using Control Surfaces With Soundtrack Pro 13 Exporting Multitrack Projects 13 Once you have created a final mix of a multitrack project, you can export the project mix. You can also export individual tracks, busses, or outputs, and export a multitrack project using Compressor. You can export a project to a stereo audio file and set the exported file’s bit depth and sample rate. You can export selected tracks, busses, or outputs to either a stereo audio file or paired mono files. If your project includes a video, you can also export a project to a variety of formats using the Compressor application. You can import an exported audio file into Final Cut Pro (or another video application) to add to a video project, or into a digital audio application for further processing. You can also burn it on a CD or DVD, or open it in iTunes and convert it to MP3 or AAC format that you can distribute over the Internet. 247 Exporting a Project Mix When you export a mix, all unmuted tracks routed to the first output (Output 1) are included in the exported file. You can exclude any tracks from the exported mix by muting those tracks. To export a project to a stereo audio file: 1 Choose File > Export > Export Mix. The Export dialog appears. 2 Choose a bit depth for the exported file from the Bit Depth pop-up menu. 3 Choose a sample rate for the exported file from the Sample Rate pop-up menu. 4 Type a name for the exported file, and browse to the location where you want to save the file. 5 Click Export. Remember that you can create as many mixes of your project as you like by muting tracks, adjusting controls, effects, and envelopes, and then exporting each version as a separate mix. Exporting Selected Tracks, Busses, and Outputs You can export selected tracks, busses, or outputs in a project. When you export selected tracks, busses, or outputs, each is exported to a stereo AIFF file. The output file is given the same name as the track, bus, or output being exported. You can also export a track, bus, or output to a pair of mono files; in this case, the letter L is appended to the filename of the left mono file, and the letter R is appended to the right mono file. 248 Chapter 13 Exporting Multitrack Projects Soundtrack Pro Keyboard Shortcuts B Appendix B General and File Key command Function Creates a new, blank multitrack project. x +N x + x +O x + x +S x + shift x + control x +B Adds the selected audio file to the Bin. x + Closes all projects and quits Soundtrack Pro. shift shift Q +N Creates a new audio file. Opens the Open dialog. +W Closes all open projects. Saves the current project. +S +S Opens the Save As dialog to save the project with a new name. Opens the Save As dialog to save a copy of the project with a different name. Windows, Tabs, and Layouts Key command x +1 x +2 x +3 Function Opens the Mixer for the current multitrack project. Opens the Video tab of the Utility window. Opens the Project window. 279 Key command Function Opens the Browser tab of the Media and Effects Manager. x +4 x +5 x +M x + x + option + H Hides all other windows. x + , Shows the Preferences window. x + shift x + option + ] x + Opens the Effects tab of the Media and Effects Manager. Minimizes Soundtrack Pro. Hides Soundtrack Pro. H shift +? + option + ] Opens the Soundtrack Pro User Manual. Moves to the previous (left) tab. Moves to the next (right) tab. Switches the project layout to the Basic layout. F1 Project Playback and Setting the Playhead Key command Starts playing the project. space If the project is playing, stops project playback. space Moves the playhead to the beginning of the project, or to the beginning of the playback region if it is active. return + shift option return +M +M shift 280 Function Starts playback from the beginning of the project. Moves the playhead to the position of the preceding marker. Moves the playhead to the position of the next marker. x + Moves the playhead to the position of the previous frame in the video clip. x + Moves the playhead to the position of the next frame in the video clip. Appendix B Soundtrack Pro Keyboard Shortcuts General Editing Key command x +Z x + x +X x + x +C x +V shift shift Function Undoes the last command. +Z Redoes the last undone command. Cuts the selected item. +X Ripple cuts the selected item. Copies the selected item. Pastes the cut or copied item. Ripple deletes the selected item. delete x +D x +A x + shift Duplicates the selected item. Selects all items in the window. +A Deselects all items in the window. Turns snap on or off. N Editing Audio Clips in the Timeline Key command Function +V x + x + option + V shift Opens the Paste Mix dialog so that you can paste audio and mix it with the existing audio. Opens the Paste Repeat dialog so that you can paste multiple copies of the cut or copied audio clip. Splits the selected audio clips under the playhead. S Joins the selected clips. J x + F Crossfades the selected clips. Appendix B Soundtrack Pro Keyboard Shortcuts 281 Key command x Function + option + Z Double-click an audio clip. Trims the selected clips. Opens the selected audio clip in the Waveform Editor as a new audio file project. Adjusting Audio Clips in the Timeline Key command Function Nudges the clip or envelope point to the left by one pixel. option + option + option + option + option + shift + option + shift + option + shift + option + shift + Nudges the clip or envelope point to the right by one pixel. Nudges the envelope point up by one pixel. Nudges the envelope point down by one pixel. Shifts the clip or envelope point to the left by one gridline. Shifts the clip or envelope point to the right by one gridline. Shifts the envelope point up by five pixels. Shifts the envelope point down by five pixels. Navigating in the Timeline Key command or x += or x +- x ++ x + option 282 Function shift +Z Zooms in horizontally to the next zoom level. Zooms out horizontally to the next zoom level. Zooms in vertically to the next zoom level. +_ Zooms out vertically to the next zoom level. Zooms in on the current selection. Appendix B Soundtrack Pro Keyboard Shortcuts Key command x Function Returns to the default zoom level. +0 Fits the project in the display size. +Z shift x +6 x +7 x +8 x +9 Reduced track height Small track height Medium track height Large track height Editing Audio Files in the Waveform Editor Key command Function Normalizes the audio file or selection. x +L x + shift x + delete x + option + S Saves the current actions in the Actions list as an AppleScript droplet. x +E Flattens audible actions, as indicated by the position of the Action Insert bar. x + shift +L Adjusts the amplitude of the audio file or selection. Replaces the audio file or selection with complete silence. +E Flattens all actions in the project. shift +I Adjusts selection inward to zero crossing. shift +O Adjusts selection outward to zero crossing. shift + [ Adjusts in point left to zero crossing. shift + ] option shift Adjusts in point right to zero crossing. +] + option + ] Adjusts out point left to zero crossing. Adjusts out point right to zero crossing. Appendix B Soundtrack Pro Keyboard Shortcuts 283 Tracks and Markers Key command Function Adds a new track to the Timeline below the selected track. x +T x + control + T Adds a new bus to the Timeline below the selected bus. x + option + T Adds a new output to the Timeline below the selected output. x + shift +T Removes the selected track, bus, or output from the Timeline. Inserts a beat marker at the current playhead position. B Inserts a time marker at the current playhead position. M control +M Adds time markers at the beginning and end of selection. Video Out Key command x 284 + F12 Function Play using external video output device. Appendix B Soundtrack Pro Keyboard Shortcuts Recording Key command Function x + option + 1 Makes Take 1 the active take for the selected clip. x + option + 2 Makes Take 2 the active take for the selected clip. x + option + 3 Makes Take 3 the active take for the selected clip. x + option + 4 Makes Take 4 the active take for the selected clip. x + option + 5 Makes Take 5 the active take for the selected clip. x + option + 6 Makes Take 6 the active take for the selected clip. x + option + 7 Makes Take 7 the active take for the selected clip. x + option + 8 Makes Take 8 the active take for the selected clip. x + option + 9 Makes Take 9 the active take for the selected clip. Appendix B Soundtrack Pro Keyboard Shortcuts 285