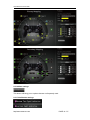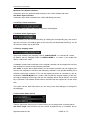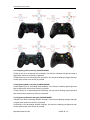
1
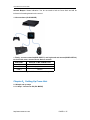
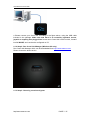
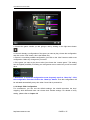
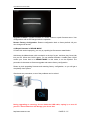
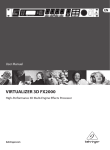
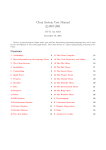
User Manual of Cross Hair
Cross Hair User Manual
V3.4
Sept, 2015
This manual is the intellectual property of ReaSnow. It must only be published in its
original form. Using parts or republishing altered parts of this document is prohibited
without permission from ReaSnow.
http//www.reasnow.com
PAGE 1 / 27
User Manual of Cross Hair
Table of Contents
▁▁▁▁▁▁▁▁▁▁▁▁▁▁▁▁▁▁▁▁▁▁▁▁▁
Chapter 1:Introduction: What is Cross Hair
1.1 Advantages
1.2 Technical Specifications
1.3 To know Cross Hair
1.4 Connections
Chapter 2:Setting up Cross Hair
2.1 Simple set up steps
2.2 Basic Settings
2.3 Global Settings
2.4 Setting up in-game
Chapter 3:Playing Games
3.1 Things to do before playing
3.2 Ways to Use Cross Hair
Chapter 4:Upgrade and Restoration
4.1 Upgrade firmware and restore configuration
4.2 Repair firmware in REPAIR MODE
http//www.reasnow.com
PAGE 2 / 27
User Manual of Cross Hair
Chapter 1:Introduction: What is Cross Hair
Cross Hair aims to provide the best mouse and keyboard control solution for all game
consoles (such as PS4, PS3, XBOX ONE,XBOX 360 etc), and the freedom to choose
between the keyboard, mouse, joystick, and other controllers.
For beginners, Cross Hair can give you a smooth and easy experience while playing
games using your own keyboard and mouse. On the contrary,a controller for aiming in
FPS(First-Person Shooting) games is really troublesome.
For advanced users, it lets you enjoy the game as you wish with whatever hardware you
http//www.reasnow.com
PAGE 3 / 27
User Manual of Cross Hair
like: the gaming-grade keyboard and mouse or joystick or preferred controller.
Cross Hair has 4 working modes, which you should know.
●PLAY MODE: When connecting to game console, controller, keyboard and mouse are
ready, its LOGO will be a breathing color, and then you can play your game.
●PC MODE: When connecting to PC and no USB device plugged into it, its LOGO will be
white, then it can be configured on PC by using Cross Hair Manager. Meanwhile you can
upgrade firmware and restore factory configuration in this mode.
●CONFIG MODE: Any time while playing a game (in PLAY MODE), just press
SHARE+OPTIONS (PS4 platform) keys on your controller to enter this mode and the
LOGO’s light will be turned off in this mode. Then you can change settings and get instant
feed back.
●REPAIR MODE: Hold down the button, then plugging Cross Hair into your PC, when the
LOGO is green, you can then release the button, and a stable green light means REPAIR
MODE. In this mode, Cross Hair’s firmware and configurations can be repaired.
MODE
Sound on start
Color
Function
Attached Device
PLAY MODE
1 beep
Breathing color
Play games
Controller, KB, MS
PC MODE
2 beeps
White
Configure and upgrade
NO
CONFIG MODE
3 beeps
Black
Configure in game
Controller, KB, MS
REPAIR MODE
4 beeps
Green
Repair firmware
NO
Please refer to chapter 2.4 for CONFIG MODE details and chapter 4 for REPAIR MODE
details.
Color and Sound:
Mode
COLOR
PLAY MODE
Breathing color
CONFIG MODE
Black
BEEP
Function
As configured
flash red
Higher pitch beep
HIP ADD
flash red
Lower pitch beep
HIP SUB
flash green
Higher pitch beep
ADS ADD
flash green
Lower pitch beep
ADS SUB
flash blue
Normal beep
Key mapping
1.1 Advantages
● Support all platforms: PS4/PS3/ XBOX ONE/XBOX 360
● Mice, Keyboards, Joysticks compatibility
● Cross platform controller usage (All controllers on any console)
● Intelligent Engine (best mouse precision, 1:1 movement in game)
● Most of the settings can be adjusted on the fly
● Xbox headsets supported
● Firmware in field upgrade
● Active community online
● Seamless aluminum enclosure
http//www.reasnow.com
PAGE 4 / 27
User Manual of Cross Hair
● Color and sound indication (clear and convenient)
1.2 Technical Specifications
Outline
75*75*22mm
Net Weight
105g
Platforms
PS4/PS3/XBOX ONE/XBOX 360
Configuration
16 configurations, user defined
Color
Black
PORT
3 USB ports
For controller, keyboard and mouse
1 MINI USB device port
Connecting to game console
BUTTON
Firmware repair
BEEPER
Internal beeper
Temperature
-10~50℃ (14~122℉)
Humidity
Below 90%
Sound indication
1.3 To know Cross Hair
MINU USB: Connect to game console.
USB1: Connect to the genuine official wired controller shipped with game console. As for
wireless controller, just connect it with suitable USB cable to this USB port. The exception
is that Xbox 360 requires a genuine wired Xbox 360 controller.
USB2: Connect to your keyboard, joystick or other controller.
USB2: Connect to your mouse.
BUTTON: Firmware reparation.
LOGO LED: Status indication.
http//www.reasnow.com
PAGE 5 / 27
User Manual of Cross Hair
Internal Beeper: Status indication. You do not need to look at Cross Hair and will be
informed of meaning based on the sound.
1.4 Connections (PLAY MODE)
● Firstly, connect controller(USB PORT1) and keyboard and mouse(USB PORT2-3)
to Cross Hair, then, connect Cross Hair to console.
USB PORT
DEVICE TO BE CONNECTED
USB 1
Official wired controller
USB 2
Keyboard or joystick or other controller
USB 3
Mouse
Please refer to Chapter 3.2 for more connection options.
Chapter 2:Setting Up Cross Hair
2.1 Simple set up steps
2.1.1 Step 1: Connect to PC (PC MODE)
http//www.reasnow.com
PAGE 6 / 27
User Manual of Cross Hair
● Please connect your Cross Hair according to the figure above, using the USB cable
included in the package. Make sure that there is no controller, keyboard, mouse,
joystick or anything else plugged into it. And when Cross Hair LOGO is white, it enters
into PC MODE, and can then be configured on PC.
2.1.2 Step 2: Run Cross Hair Manager (Windows OS only)
Run Cross Hair Manager which can be downloaded from http://www.reasnow.com
Please choose the latest version.
2.1.3 Step 3: Choosing console and game
http//www.reasnow.com
PAGE 7 / 27
User Manual of Cross Hair
● Choose the game console you are going to use by clicking on the right-arrow button
● If there is already a configuration of the game you want to play, choose the configuration
and click on the “Edit” button, this is the fastest way.
● If there is no existing suitable configuration, just click on the “New” button to add a new
configuration. Make any changes as you see fit.
● If the game you want to play do not exist, just choose the “custom game”. This setting
has the highest possibility of working, as most games are not varied very much from each
other.
● Remember to mark the configuration most frequently used as “Start Up”. Click
the configuration first then click on the “Start Up” button. Then this configuration will
be activated automatically every time when Cross Hair is powered on.
2.1.4 Step 4: Edit Configuration
For convenience, you can use the default settings, but should remember the keys’
mapping, while advanced users can choose their favorite settings. For details of every
setting, please refer to chapter 2.2
http//www.reasnow.com
PAGE 8 / 27
User Manual of Cross Hair
2.1.5 Step 5: Save and Exit
You should save the configuration first, before exiting Manager, and after that, unplug the
Cross Hair from PC.
Changes you made will not be saved in you Cross Hair until you have clicked on the
“Save” button. Do not shake the USB cable, unplug it, or turn off your PC during the
saving. These behaviors will damage your Cross Hair.
This is the final step before you can enjoy gaming. But if you want to know Cross
Hair better, the following chapters are also very important.
2.2 Basic Settings
2.2.1
Choose platform
By clicking on the right-arrow button, you can choose from PS4/PS3/XBOX ONE/XBOX
360.
2.2.2
Save configuration
Any change made to an existing configuration or made by adding a new one has to be
saved in Cross Hair by this button.
2.2.3
Edit an existing configuration
http//www.reasnow.com
PAGE 9 / 27
User Manual of Cross Hair
If you want to change existing configurations, you can use “Edit” button for this purpose.
2.2.4
Add a new configuration
If a new configuration is your choice, just click on the “New” button, and you can then
make detailed changes.
2.2.5
Copy a configuration
If you would like to add a configuration that is similar to an existing one, you can copy a
configuration and make necessary changes.
2.2.6
Delete a configuration
If you want to delete a configuration, click it first and then click on the “Delete” button.
2.2.7
Set a certain configuration as Start Up.
Select one configuration first and click on the “Start Up” button. Then this configuration will
be activated automatically every time when Cross Hair is powered on.
2.2.8 Key mapping
Click the mapped key icon, and you will enter into a mapping dialog as shown below.
http//www.reasnow.com
PAGE 10 / 27
User Manual of Cross Hair
Firstly, choose the hardware from the options of mouse, keyboard, joystick and NONE.
Secondly, use Auto Detect
or Drop-down menu
, to
select the key you want to use, and to substitute a certain key on controller.
Thirdly, click OK to end this mapping.
2.2.9
Change the name you want to use
in this field.
2.2.10
Clicking the color will change the color of LOGO.
This color can indicate which configuration you are using.
2.2.11
Choose the hotkey for this configuration for
fast activation.
Once the hotkey is invoked in PLAY MODE, this configuration will be activated instantly.
Please pay attention to this function. It can not only be used to swap between different
games but also to swap between different battle modes. Such as, you set up a
configuration for infantry in BF4 and you also set up another configuration for tank in BF4
with different keymapping and HIP/ADS sensitivity. With this function in hand, you can
swap between different battle modes instantly during your gaming.
2.2.12 Stick mapping
http//www.reasnow.com
PAGE 11 / 27
User Manual of Cross Hair
These settings are dedicated for the original controller, the one plugged into USB
port 1.
● Choose keys from keyboard or mouse or joystick to replace left and right stick.
● Deadzone: The deadzone here is used to adjust the sensitivity of left and right stick on
the original controller, the one plugged into USB port 1. Leave it as default, if you have no
trouble with the sticks on controller. A smaller value means more sensitivity, but that
sometimes may also causes trouble for controlling. By default, the value is 16.
2.2.13 Joystick setting
These settings are dedicated for the third-party controller, the one plugged into
USB port 2 or 3.
Such as: Logitech G13, Sony Move Navigation Controller, Logitech Attack3 and other
controllers which are used to replace the original one.
● Deadzone: The dead-zone here is used to adjust the sensitivity of left and right stick on
the third-party controller (Joystick), the one plugged into USB port 2 or 3. Leave it as
default, if you have no trouble with that controller. A smaller value means more sensitivity,
but that sometimes may also causes trouble for controlling. By default, the value is 16.
● Vibration Strength: A bigger value means stronger vibration, a smaller value means
weaker vibration. By default, the value is 10. If it is set to 0, there will be no vibration on the
third-party controller (Joystick).
● Steering Sensitivity: This setting is effective only in legacy mode racing game
configurations, when you are using a supported steering wheel.
A bigger value means the wheel is more sensitive in game. By default, the value is 10.
http//www.reasnow.com
PAGE 12 / 27
User Manual of Cross Hair
There is no such setting in expert mode racing game configurations. In expert mode, you
do not need to change that.
And there is no such setting in general game configuration either.
2.2.14 Mouse Sensitivity
These settings are dedicated for mouse controlling.
Typically in FPS games, you will have two modes of shooting: HIP and ADS (Aim Down
Sight), so you have to set them separately. If you are not familiar with these values, just
leave them as default.
Please remember to set mouse’s DPI and game’s LOOK sensitivity to maximum first. And
after these two procedures are done, if the mouse is too slow, you need to set HIP and
ADS sensitivity to a bigger value. If the mouse is too fast, you need to set HIP and ADS
sensitivity to a smaller value.
As for YX Ratio, it’s the ratio of mouse’s Y and X direction movement speed. Do not
change it, unless you understand its meaning.
2.2.15 Primary and secondary mapping
This right-arrow button is used to switch between primary and secondary mapping.
In this way, you can have two options for one key on the original controller.
As default, the secondary mapping is used for a third-party controller. You can change that
to whatever you like.
http//www.reasnow.com
PAGE 13 / 27
User Manual of Cross Hair
2.2.16 More settings
This button will bring you to options that are not frequently used.
2.2.17 Notification settings
http//www.reasnow.com
PAGE 14 / 27
User Manual of Cross Hair
Maximum Turn Speed indication:
If selected, when turn speed exceeds maximum, the LOGO will flash red twice.
Aim Down Sight indication:
If selected, when ADS is activated, the LOGO will flash green twice.
2.2.18 Flip vertical movement
Once enabled, your mouse’s vertical movement will be flipped.
2.2.19 Aim Down Sight toggle
Once enabled, you can activate ADS firing by clicking the corresponding key, such as the
right key of mouse. And clicking again on the same key will deactivate ADS firing. You do
not need to hold the key all the while.
2.2.20 Key mapping mode
We provide 2 kinds of key mapping mode in CONFIG MODE: 1:1 mode and N:1 mode
By default, the key mapping mode in CONFIG MODE is 1:1 mode. If you enable this
option, it will be N:1 mode.
1:1 mode: It means that one button on the original controller can be mapped into one key
from keyboard or mouse or the third-party controller.
N:1 mode: It means that multiple buttons on the original controller can be mapped into
one key from keyboard or mouse or the third-party controller. It can provide flexibility, but it
will also cause some confusion. For if you are mapping a button on controller to a key on
keyboard in CONFIG MODE in N:1 mode, it will not clear the original mapping of this key,
the original mapping will be kept, and the new mapping will be add to the key. Once this
key is pressed, it will release all the buttons’ functions that are mapped to it at the same
time.
This option will not take effect when you are using Cross Hair Manager to change the
keymappings.
2.2.20 Custom Game options
These 2 options are used only for Custom Game, do not change them in preset games.
Aim Down Sight: ADS function may be invoked by different key on controller, due to
http//www.reasnow.com
PAGE 15 / 27
User Manual of Cross Hair
different game and console. If you are using a Custom Game configuration, please select
correct key of ADS.
Deadzone Type: If you are using a Custom Game configuration, please select correct
type of Deadzone according to the game.
2.2.21 Load Behavior
This option will change the behavior of your configuration, after it was activated by hotkey.
There are three choices: Standard, Temporary Hold, and Temporary Toggle.
Standard: The configuration is activated by its hotkey and stays active.
Temporary Hold: The configuration is activated only when its hotkey is pressed and the
previous configuration will be reloaded back when the hotkey is released.
Temporary Toggle: The configuration is activated after its hotkey is invoked and the
previous configuration will be reloaded back when the hotkey is invoked again.
2.2.22 Swap L/R sticks
Once the key is clicked, it will swap the functions of L/R stick. Clicking it again will restore
the original state.
2.3 Global Settings
2.3.1 Previous and next configuration
These keys can be alternative ways to activate a configuration instead of the hotkey.
2.4 Setting up in-game (CONFIG MODE)
We provide our users with this function for the most flexible and comfortable setting
experience. Although everything of Cross Hair can be configured on PC using its Manager,
http//www.reasnow.com
PAGE 16 / 27
User Manual of Cross Hair
you will like setting it up in-game, for this procedure will give you instant feed back when
changing the settings.
Any time in game, just press SHARE+OPTIONS(PS4 platform)keys on your controller to
enter CONFIG MODE and the LOGO’s light will be turned off in this mode.
Different platform has different keys to use.
Game Console
Controller
Keys to enter/exit CONFIG MODE
PS4
Dual Shock 4
SHARE+OPTIONS
PS3
Dual Shock 3
SELECT+START
XBOX ONE
VIEW+MENU
XBOX 360
BACK+START
In CONFIG MODE, you can use the controller to change HIP and ADS sensitivity as well
as key mapping.
Color and Sound in CONFIG MODE:
KEY
COLOR
BEEP
Functions
D-Pad Up
flash red
Higher pitch beep
HIP ADD
D-Pad Down
flash red
Lower pitch beep
HIP SUB
D-Pad Right
flash green
Higher pitch beep
ADS ADD
D-Pad Left
flash green
Lower pitch beep
ADS SUB
Triangle/Y
flash yellow
Higher pitch beep
Vibration ADD
Cross/A
flash yellow
Lower pitch beep
Vibration SUB
Circle/B
flash blue
Higher pitch beep
Steering ADD
Square/X
flash blue
Lower pitch beep
Steering SUB
flash blue
Normal beep
Key mapping
After changing settings to you liking, just press the combination keys again, and you will
exit the CONFIG MODE, and return to PLAY MODE.
http//www.reasnow.com
PAGE 17 / 27
User Manual of Cross Hair
2.4.1 Adjusting HIP sensitivity (CONFIG MODE)
D-Pad Up key is for increasing HIP sensitivity. You will see a flashing red light and hear a
higher pitch sound once the key is pressed.
D-Pad Down key is for decreasing HIP sensitivity. You will see a flashing red light and hear
a lower pitch sound once the key is pressed.
2.4.2 Adjusting ADS sensitivity (CONFIG MODE)
D-Pad Right key is for increasing ADS sensitivity. You will see a flashing green light and
hear a higher pitch sound once the key is pressed.
D-Pad Left key is for decreasing ADS sensitivity. You will see a flashing green light and
hear a lower pitch sound once the key is pressed.
2.4.3 Adjusting Vibration Strength (CONFIG MODE)
Triangle/Y key is for increasing vibration strength. You will see a flashing red light and hear
a higher pitch sound once the key is pressed.
Cross/A key is for decreasing vibration strength. You will see a flashing red light and hear
a lower pitch sound once the key is pressed.
http//www.reasnow.com
PAGE 18 / 27
User Manual of Cross Hair
2.4.4 Adjusting Steering sensitivity (CONFIG MODE)
Circle/B key is for increasing steering sensitivity. You will see a flashing green light and
hear a higher pitch sound once the key is pressed.
Square/X key is for decreasing steering sensitivity. You will see a flashing green light and
hear a lower pitch sound once the key is pressed.
2.4.5 Mapping keys (CONFIG MODE)
In CONFIG MODE, to begin a key mapping, you should press the PS key (PS4/PS3) or
GUIDE key (XBOX ONE/360). Then the LOGO will show flashing blue. This means you
can choose one key on the controller to be mapped.
Once the key on the controller is pressed, LOGO will show a stable blue light, and then
wait for the corresponding key on the keyboard, mouse, joystick, etc. After selecting your
key, Cross Hair will keep flashing blue again. Then a new key mapping can be continued.
Just like the general key’s mapping, if you are planning to use keys on keyboard or mouse
to replace stick on controller, push the stick to its maximum on one direction (such as Up
direction), LOGO will show a stable blue light, and then wait for the corresponding key on
the keyboard, mouse, etc. After selecting your key, Cross Hair will keep flashing blue
again. Then you can continue to map a new direction of this stick.
After mapping all the keys, you can press SHARE+OPTIONS(PS4 platform)keys on your
controller to exit the CONFIG MODE, and end the mapping procedure.
Mapping keys in CONFIG MODE is recommended, as you can get instant response
in-game, and all the keys can be mapped. On the contrary, in PC MODE, some special
keys of your mouse, keyboard or joystick may not be detected due to OS's limitations.
It is especially recommended to use CONFIG MODE for mapping keys of joystick or
controller.
Chapter 3:Playing Games
There are still 3 steps before playing
Step 1: Set mouse DPI to Maximum
Step 2: Set sensitivity in game to Maximum
Step 3: Change HIP/ADS sensitivity of Cross Hair according to your need
http//www.reasnow.com
PAGE 19 / 27
User Manual of Cross Hair
3.1 Step 1: Set mouse DPI to Maximum
If you have a configurable mouse, please follow 3.1.1 – 3.1.4.
If you have a mouse which can not be configured, just skip 3.1.1 – 3.1.4.
If your mouse is configurable but have no on-board memory in it that means your
settings will be lost when the mouse is unplugged from PC, remember to set its DPI
to maximum by using the DPI button on it every time you use the mouse with Cross
Hair.
3.1.1 Mouse DPI(CPI)
Make sure the mouse you are using is configured at its highest DPI, or you should connect
it to a PC, and use some software from the producer to change the DPI to maximum.
Remember high DPI can give you better experience in game.
3.1.2 Mouse Report Rate
Set your mouse USB polling rate to 500 or 1000.
3.1.3 Mouse Button Function
Buttons of some mouse can be configured. If you want to use them to replace buttons
from controller, you should set them as standard keys of keyboard or mouse, do not set
them as combination keys or special function keys. For example, Ctrl + C, Volume
Up/Down, DPI up/down are all unacceptable.
3.1.4 Save to On-Board Memory
Some mice have on-board memory to store DPI and other settings, please remember to
save all these in On-Board Memory.
Other mice have no on-board memory, but their DPI can be adjusted, so you need to set
their DPI to maximum every time powered on.
http//www.reasnow.com
PAGE 20 / 27
User Manual of Cross Hair
3.2 Step 2: Set sensitivity in game to Maximum
Please set the game’s “SENSITIVITY” or “LOOK SENSITIVITY” to maximum in the game
on game console. It may be called insane, maximum, 10, 20 or 100%.
3.3 Step 3: Change HIP/ADS sensitivity of Cross Hair according to your need
There are 2 ways to change Cross Hair sensitivity.
WAY 1 – using PC software (Manager):
Cross Hair has 2 sensitivities : HIP Sensitivity and ADS Sensitivity
The bigger the value, the faster the mouse movement. You can change them to a suitable
value, according to your mouse and game.
HIP: Shooting without aiming optics
ADS: Shooting with aiming optics
ADS sensitivity is normally bigger than HIP.
http//www.reasnow.com
PAGE 21 / 27
User Manual of Cross Hair
YX Ratio:
It’s the ratio of mouse's speed in Y and X directions. Do not change it, unless
you understand its meaning.
WAY 2 – using controller in Config Mode:
http//www.reasnow.com
PAGE 22 / 27
User Manual of Cross Hair
1. Any time in game, just press SHARE+OPTIONS(PS4 platform)keys on your controller
to enter CONFIG MODE and the LOGO’s light will be turned off in this mode.
2. Use the D-pad keys on controller to change HIP and ADS sensitivity of Cross Hair.
3. After changing settings to you liking, just press the combination keys again, and you
will exit the CONFIG MODE, and return to PLAY MODE.
Other important things:
● Battery of controller or mouse
Make sure your controller is fully charged and the mouse is also fully charged, if there is
battery in it.
● Controller’s layout in game
Your controller’s layout should be set as default, and change of these will confuse Cross
Hair.
3.4 Ways to Use Cross Hair
Connect all devices (controller/keyboard/mouse) to Cross Hair first, and then
connect Cross Hair to game console.
http//www.reasnow.com
PAGE 23 / 27
User Manual of Cross Hair
1. Use a keyboard and mouse instead of controller
2. Use a joystick and mouse instead of controller
3. Use another controller instead of the original one (Cross platform controller
usage)
http//www.reasnow.com
PAGE 24 / 27
User Manual of Cross Hair
The controller connected to USB 1 should always be the original one shipped with
the console.
Only official controllers are tested and recommended!
Supported Controller:
Game
Console
DS4
PS4
DS3/
Sixaxis
XBOX ONE
CONTROLLER
XBOX 360
CONTROLLER
●
●
●
●
●
PS3
●
XBOX ONE
●
●
XBOX 360
●
●
●
●
PS1. Connect all devices to Cross Hair first, and then connect Cross Hair to game
console. That is the procedure we recommend. Change your connection only when
Cross Hair is powered off.
PS2. Make sure to logout the user on your game console before connect Cross Hair
to it. Or connect all the devices before game console is powered on.
PS3. It’s better to turn off your controller on game console before connecting it to
Cross Hair.
PS4. Wireless controller of XBOX 360 can not be used as wired controller with a
USB cable connected on it. For the USB port on this controller can only be used for
charging, no data lines in this port. While all other wireless controllers can be used
as wired ones with a USB cable connected, such as controllers of PS4, PS3, XBOX
ONE.
http//www.reasnow.com
PAGE 25 / 27
User Manual of Cross Hair
Chapter 4:Upgrade and Restoration
4.1 Upgrade firmware and restore configuration
Please connect your Cross Hair according to the figure below, using the USB cable
included in the package. Make sure there is no controller, keyboard, mouse, joystick
or anything else plugged into it. When the Cross Hair LOGO is white, it enters into PC
MODE, and can then be upgraded and restored on PC.
Click the icon at the bottom right corner of the screen.
http//www.reasnow.com
PAGE 26 / 27
User Manual of Cross Hair
Upgrade Firmware: Upgrade firmware to a newer version or repair firmware errors. Your
configurations will not be changed after the operation.
Restore Factory Configuration: Restore configuration back to factory default. All your
own changes will be lost.
4.2 Repair firmware in REPAIR MODE
If Cross Hair works improperly, you may try repairing its firmware as stated below.
Hold down the hidden button with a toothpick or the tip of a pen, and then plug Cross Hair
into your PC. When the LOGO is green, you can release the button. A stable green LOGO
means your Cross Hair is in REPAIR MODE. In this mode, it can be repaired. The
procedure is the same as firmware upgrade and restore factory configuration.
Please try both upgrading firmware and restoring factory configuration, so you will get a
completely clean system.
After these two procedures, most of the problems can be solved.
During upgrading or restoring, do not shake the USB cable, unplug it, or turn off
your PC. These behaviors will damage your Cross Hair.
http//www.reasnow.com
PAGE 27 / 27