1
Smart
Q
Ultraviolet Sensor
TECHNOLOGY
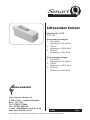
The Smart Q Ultraviolet Sensor is equipped with a microcontroller that greatly
improves its accuracy, precision and consistency. The microcontroller contains the
calibration for the six ranges. The stored calibration for the selected range is
automatically loaded into EASYSENSE when the Ultraviolet Sensor is connected.
POWER
SERIAL
DATA HARVEST
EASY SENSE
Connecting
ENTER
METER
STOP
A
1
2
5
4
3
B
6
Input socket
•
•
•
•
TECHNOLOGY
Smart
DATA HARVEST
Q
Sensor cable
with locating
arrows facing
upwards
Ultraviolet
Sensor
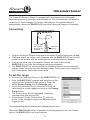
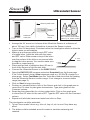
Hold the Ultraviolet Sensor housing with the Smart Q label showing on the top.
Push one end of the sensor cable (supplied with the EASYSENSE unit) into the socket on the Sensor with the locating arrow on the cable facing upwards.
Connect the other end of the sensor cable to the input socket on the EASYSENSE unit (with the locating arrow facing upwards).
The EASYSENSE unit will detect that the Ultraviolet Sensor is connected and display values using the currently selected range. If the range is not suitable for your investigation, set to the correct range.
To set the range
•
•
•
•
•
Connect the Ultraviolet Sensor to the EASYSENSE unit.
Start the EASYSENSE program and select one of the
logging modes from the Home page e.g. EasyLog.
Select Sensor Config from the Settings menu.
Select the Ultraviolet Sensor from the list (it will be
listed using its current range) and click on the Change
Range button.
The current range will be highlighted. Select the
required range and click on OK.
Close Sensor Config. Click on New
and then
Finish for the change in range to be detected by the
logging mode.
The range setting will be retained until changed by the user.
With some EASYSENSE units it is possible to set the range from the unit. Please
refer to the EASYSENSE unit’s user manual.