1
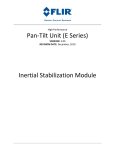
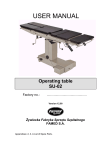
Tecstar Electronics Ltd
Tecstar House, Bramley Road
St. Ives Cambridgeshire
United Kingdom PE27 3WS
Tel: +44 (0)1480 399499 email: [email protected]
Universal Helmet Communication System
Tecstar Electronics Ltd
Instruction &
Installation
Manual
When using optional audio equipment including radar detectors, GPS or other equipment
which is powered from the 12V bike supply, or is grounded to the bike, an isolated cable
must be used. Do not use the standard music cable supplied. Please contact your dealer
for the correct cable required.
Incorrect connection may cause damage to the equipment.
Fitting Optional Audio Equipment
Tecstar Electronics will not accept any liability relating to the installation or use of this
equipment. It remains the user’s responsibility to ensure that their safety will not be
impaired in any way before installing and/or using the system. If you are not completely
satisfied that you can use the system safely, it should be returned to the place of purchase.
Do not use the system at high volume levels as this may cause hearing damage. The
system is capable of high volume, which is only intended for use with earplugs.
When using a mobile phone or other devices that transmit, the rider should check with their
bike dealer that it is safe to do so.
The rider must be able to hear warnings from other road users at all times. The volume
must be set at a level to allow this.
All cabling should be installed so that it will not flap free. There should be no cable slack
that could potentially catch in the moving parts of the vehicle.
When installing the helmet kit, the helmet must not be modified in any way.
When installing the cabling, the safety release connectors must be free to release. Do not
bind or restrict the connections in any way.
Distraction of any kind can be dangerous when riding a motorcycle.
The system must only be used when the rider is completely confident that their riding will in
no way be impaired with the use of audio equipment.
The StarCom equipment is designed for motorbike use but it remains the responsibility of
the rider to ensure that their safety is in no way impaired when using the equipment.
Please read carefully before installing or using this equipment
Safety First
SideCar interface cable
Navigation/Radar cable Isolated lead 2.5mm or 3.5mm mono Jack
StarCom Audio/Phone input splitter, input doubler 3.5mm jack
CAB-06
CAB-35
ADA-01
21
For a full accessories list, please consult your dealer or visit www.starcom1.com
Bluetooth phone adaptor
Remote (Handlebar volume control)
BULKHead fixing bracket (allows for fitting to bike frame)
Bulkhead fitting Phone/Music extension lead 1.5m straight cable
Professional fitting kit inc: 2x HSEX-04 1xEXT-01 1xBKT-01
BKT-01
EXT-01
PRO-FIT1
BMT-01
VOL-01
Head Set extension lead 1.5m coiled cable
Head Set extension lead 60cm straight cable
Head Set extension lead 2m/6ft straight cable
BULKHead Set extension lead 2m/6ft straight cable
BULKHead Set extension lead 60cm/2ft straight cable
Push-To-Talk Handlebar switch kit 2m straight cable. Unobtrusive
mounting, mounts under the left grip.
PTT-02
HSEX-01
HSEX-02
HSEX-03
HSEX-04
HSEX-05
Helmet Set (Full Face) 3.5mm socket for ear phones Inc HSEX-01
Helmet Set (Open Face) 3.5mm socket for ear phones Inc HSEX-01
PlugPhones generic ear plug/phones stereo
PP-04
PP-06
PP-010
BMW power lead
StarCom1 DC power to cigarette power cable
StarCom1 Fitting kit Including DC power
Helmet Set Bud Mic (full face) including adaptor cable (1.5m)
Helmet Set Boom Mic (open face - full open face slide fitting) inc cable
(1.5m)
SH-004
SH-006
CAB-20
SCG-01
SFK-01
Selector switch for bike audio systems with on-bike speakers
SWT-01
Cable to connect Kenwood TK3101 or UBZ/ FunKey446 to StarCom
Cable to connect TS500/700 or XT5000 to StarCom
Cable to connect Motorola 5000/6000 series to StarCom
Cable to connect Uniden radios to StarCom
Cable to connect Alan777, Midland G5 radios to StarCom
Cable to connect StarCom to 4pin CB radio
Cable to connect StarCom to Motorola radios (GP320)
Music lead (walkman type portable stereo headphone socket)
Car stereo isolated music wiring kit
Stereo isolated music cable for bike powered devices 3.5 to 3.5mm jack.
MUS-01
MUS-03
MUS-04
CAB-01
CAB-02
CAB-04
CAB-09
CAB-10
CAB-11
CAB-14
Description
Order Code
Accessories and Spares
20
Radio to Radio Problems
Radio does not receive transmission from another radio: Check both radios are on the
same channel and the same sub channel (if sub channels are being used).
Radio transmits continuously: The VOX system is incorrectly set, see VOX set-up, page 3.
Radio transmits when receiving: The radio volume is set too high; volume on the radios
should be no higher than half.
Power LED fails to illuminate:
1. Check that the bike ignition is turned on and that Head Set 1 is connected.
2. Check the connections made to the fuse and to the bike supply.
3. Check that the fuse contacts are clean and the fuse holder spring is tensioned.
4. Check the power lead has been connected with the correct polarity, 12v +ve to Red
wire, 0v –ve to Black wire.
Music keeps stopping: The VOX system is incorrectly set up, it is too sensitive and lowlevel noise into the mic is triggering it, see VOX set-up, page 3.
Low volume speech:
Poor positioning of microphone or speakers; see Helmet kit installation, page 10.
Low mobile phone volume:
Poor positioning of microphone or speakers; see Helmet kit installation, page 10.
Phone / Navigation only out of one channel: Incorrectly plugged into audio input socket.
Music will not mute: Only music plugged into the audio socket will be muted.
Troubleshooting Guide
The manufacturers provide a 12-month guarantee period from the date of purchase. The
guarantee covers faulty materials and workmanship.
The guarantee will be void if the equipment has been tampered with, modified,
misused or subject to neglect.
Guarantee
If the unit requires cleaning, use a cloth that is only lightly dampened with water or a mild
detergent.
WARNING! TO AVOID DAMAGE TO THE UNIT, NEVER ALLOW WATER TO GET INSIDE
THE CASE. TO AVOID DAMAGE TO THE CASE, NEVER CLEAN WITH SOLVENTS.
Cleaning
The manufacturers or their agents overseas will provide a repair service for any unit
developing a fault.
Maintenance
Page
Issue1.6
1
Quick Setup Guide ……………………………………………………. 2
4
Introduction …………….………………………………………...……
Specification …………….………………………………….….………… 4
4
Pack Contents …………….………………………………………..…
Safety First Please read carefully …………………………..……… 5
5
Installation
5
Considerations …………….……………………………….……
Unit Installation …………….……………………………………..……5
7
Bike Power Cable Installation ………………………………….….……
8
Headset Extension Cable Stowage …………….…………………………
Optional Headset Bulkhead Connectors…………………………. 8
Optional Professional Fitting Kit………………………………….… 9
9
Optional remote volume control ………………………………...
10
Helmet Kit Installation ……………………...…………………..
12
Operation
12
Sole Rider …………….………………………………….……..…
12
Rider to Pillion …………………………….…………..…………
13
Bike to Bike …………………………………….………….……..
14
Volume Setup and Operation …………………………………..…………
VOX Setup and Operation ……………………………………….…….. 16
Rider Pillion Volume Balance …………………………………………. 15
Connecting Two-way Radios ………………………………………. 17
Connecting Mobile Phones ………………………………….…………..17
Connecting Music (Portable Systems) ……………………….……… 18
Connecting Music (Car Radio) ……………………………………… 18
18
Connecting Satellite Navigation or Radar Equipment ………...
19
User Configurations ……….…………………………………………
19
Rider Sidetone …………………………………………………………….
Passenger Sidetone ………………………………………………. 19
Passenger Phone Enable………………………………………… 19
Maintenance …………..…………………………………….….……… 20
20
Cleaning ……………………………………………………………....
Guarantee …………………………………………………….……..… 20
Troubleshooting Guide ……………………………………………….. 20
Accessories …………………………………………………….……… 21
Contents
- fully anti-clockwise (minimum volume)
- fully anti-clockwise (VOX OFF)
- sensitivity mid position (ave sensitivity)
- ½ equal rider/pillion volume
- sensitivity mid position (ave sensitivity)
Reduce < VOL > Increase
Passenger < BAL > Rider
2
The unit provides a rider/passenger volume balance control,
at the mid point the rider and passenger have the same
volume level. For normal operation the control should be in
the centre position with the control pointer at 12 o’clock as
shown. If a user wears ears plugs or has a hearing problem,
the balance can be adjusted.
Turning anti-clockwise will reduce the passenger volume and increase the rider volume.
Turning clockwise will increase the rider volume and reduce the passenger volume.
Balance setup
The pre-set volume level will need to be set loud enough
to hear comfortably whilst not too loud to prevent the rider
from hearing warnings from other road users.
Always start with the volume control set to minimum
(fully anti-clockwise) and only when you can hear sound,
gradually increase (turn clockwise) to the desired setting.
Rider to Passenger
When a rider pillion system is being used the volume should be1 set so that when talking
helmet to helmet the sound level is correct. The volume of other devices e.g. phone or
music can then be set by adjusting the volume at the phone or music system.
Sole Rider
Connect a portable music system or phone with its volume set at mid-level. Then adjust the
StarCom volume to give the desired sound level. Thereafter volume adjustments should be
made to the music system or other added devices.
Bike to Bike
Connect the radio to StarCom and set the radio volume at mid level. Then adjust the
StarCom volume to give the desired sound level; there after volume adjustments should be
made to the radio or other added devices
Volume setup
Connect power to the unit and connect head set 1.
Check the power. (red) LED illuminates when the head set is connected.
Volume
VOX
MIC2
Balance
MIC1
Sidetone
To begin a set-up first set the controls to the factory default:
Volume VOX MIC2 BAL MIC1
19
All switches are set to the OFF position as shown in
the diagram.
Switch factory setting
OFF 1
ON
Passenger sidetone
2
3
4
DIP
To access the configuration switches:
1) Remove the 2 fixing screws at the power socket end of the StarCom case.
2) Slide the inner circuit board out of the case by 1 inch only.
3) Using a pen or small insulated screw driver make the switch change required.
4) Push the circuit board back into the case, ensure the knobs at the other end of the
case locate through the case holes. If not aligned they may need adjustment with a
small screw driver.
Rider sidetone
5) Push the end cap back into position.
VOX Rider sidetone
6) Replace the 2 fixing screws.
Passenger phone enable
Configuration switch access
The factory set-up of the phone and radio input allows only the rider to hear the incoming
conversation. This is a user-selectable configuration. To allow the passenger position to hear
the incoming conversations, switch number ‘3’ must be set to the ON position.
Passenger phone radio enable
Passenger sidetone is a user selectable feature that allows feedback from the passenger
microphone to the passenger speakers, this lets the passenger hear themselves when
talking. This feature is factory set to OFF. To turn it ON, switch number ‘4’ needs to be set to
the ON position.
Passenger sidetone
Rider sidetone is a user selectable feature that allows feedback from the rider microphone to
the rider speakers, this lets the rider hear themselves when talking. This feature is factory set
to OFF. To turn it ON, switch number ‘1’ needs to be set to the ON position.
Rider sidetone
Sidetone is the name given to a system where the sound is fed back so it can be heard as
you talk, through your own speakers. It is only required when you can not hear yourself talk
(e.g when using earplug speakers). Within a crash helmet you can hear yourself even at
speed (try singing to yourself), so feedback isn't normally necessary. The problem with
sidetone is that if you sneeze or blow into your microphone, then you hear it loud and clear,
this can cause serious problems. If wind noise is picked up, you will hear it.
User configurations
Quick setup guide
18
Further electrical devices may be added to the system such as a satellite navigation
system with audio output. If music mute is required then the inputs must be connected to
the 'Phone' input, or the 'Auxiliary' input. An adapter lead is required to connect the
equipment audio-out to a 3.5mm jack plug; please consult your dealer. When connected,
the volume level of this device will need to be adjusted to give the required volume in the
helmet. Always set the volume low and gradually increase to the desired level. To operate ,
turn on, then place in a safe place (waterproof pocket etc.).
Satellite navigation or radar equipment interface
Part number MUS-03 is an isolated cable that will connect to the speaker cables on the onbike system. If the music system has an audio out 3.5mm jack socket on the rear, then a
MUS-04 cable will plug in directly.
When a music system is installed on the bike an isolated stereo cable is required. This is
because a direct connection will allow ignition noise to be picked up and the connection to
the speakers may cause damage to the systems.
Music Interface Installed car radio system
Note: The VOX system may delay the unmute function by 5 seconds.
To add stereo music to the system, a music lead is required. The lead plugs into the
headphone output from the music player and into the StarCom unit’s 'AUDIO’ input. When
connected the volume level of this music system will need to be adjusted to give the
required music volume in the helmet. Always set the volume low and gradually increase to
the desired level.
Music Interface portable personal music systems
3
The circuit is designed to only reduce the mic sensitivity so speech will never be missed,
if the sensitivity is set too low then the mic will work but the volume will be low.
The microphone position must be correct (very close and directly in front of your mouth)
for the sensitivity system to function correctly.
Note: The mic sensitivity adjustments are designed to be protected against accidental
movements and therefore require a flat blade screwdriver for adjustment.
The microphone sensitivity system is an automatic circuit that instantly increases the
microphone volume when you talk and reduces the volume when you are not talking.
For normal conditions this should be set to the mid point sensitive position with the
indication line straight up. If background noise is being picked up by the microphone then
the sensitivity can be reduced by adjusting the control anti-clockwise. If the mic is not
turned up to full volume then adjust the control clockwise.
Advance Microphone Sensitivity (AMS)
MIC sensitivity setup
Connect a music system to StarCom. Then while talking at your desired voice level
directly into the microphone, adjust the VOX level clockwise until the music is muted.
Least < Sensitive > Most
MIC2 MIC1
Setup with two-way radios
See VOX setup page 14.
Setup with music
VOX is not required for rider to passenger operation but it may be used to mute music
when talking. With the VOX control fully anti-clockwise the VOX feature is off. As the
control is turned clockwise the sensitivity will gradually increase.
To set the VOX always start with the control fully anti-clockwise (OFF) and gradually turn
clockwise to the desired level while talking into the microphone. Repeat to confirm the
level. Note: turning the VOX control may falsely trigger the VOX system for a second.
The unit provides a VOX (voice operated control that
works on your voice level) facility with a VOX level
pre-set control. This is designed to provide hands-free
control of the bike to bike radio and also hands-free
muting of the music system. The VOX control should be set to operate at comfortable
voice loudness while insensitive enough to ignore increased background noise or
breathing into the microphone.
VOX setup
OFF < VOX > More sensitive
Audio output power:
Power supply:
External power:
Protection external:
Visual indication:
Power consumption:
Intercom operation:
Music into 2 headsets:
Dimensions:
Weight:
Operating temp:
Phone input:
Audio input:
Auxiliary input :
Remote volume input:
Electrical safety:
EMC:
100mA typical
250mA typical
(WxHxD) 95x55x25mm (3 ¾” x 2 ¼” x 1”)
Approx 200g
-10 to +55ºC
3.5mm stereo jack socket
3.5mm stereo jack socket
3.5mm stereo jack socket
3.5mm stereo jack socket
Designed to EN60950-1: 2002
Complies with EN55103-1: 1997D
Max 1 Watt into each headset speaker
12V DC external power input from vehicle
10V to 15V DC 1000mA max
In-line 2A slow blow fuse
Power on (red) LED,
4
1 x StarCom1 Advance communication unit, 1 x DC power cable with in-line fuse.
1 x Fitting kit, (1 x DC cable fitting kit, 3 x cable crimp connectors, 10 x tie wraps,
1 x 4 Velcro discs, 1 x Instruction & Installation manual, 4 x Rubber mounting pads)
Pack contents
Due to a policy of continuous development, specification and design may be subject to
change without notice.
♦
♦
♦
♦
♦
♦
♦
♦
♦
♦
♦
♦
♦
♦
♦
Specification
StarCom can be used as a sole rider, a rider and passenger, a bike-to-bike system or
all three. The core system is a StarCom Module and a Rider/Driver headset; from this
basis you simply add what’s required either immediately or at a later date.
For rider to passenger communication, simply add a second helmet kit, plug it in and
talk on the full duplex intercom system.
For bike-to-bike communication, simply add one of the ranges of two-way radios.
Stereo music can be connected to the unit’s audio input from a car stereo (a car stereo
adapter accessory is available), Walkman, MP3, sat navigation or radar device.
To add a mobile phone to the system, just add a phone adapter kit, adapters to suit
most phones are available. (The phone must have an auto answer mode.)
Introduction
17
Note:
1) Some digital phones may cause interference. If this is the case then try to mount the
phone as far as possible from the StarCom unit.
2) Some digital phones do not feed the ring tone to the hands free socket, so although the
call will be answered, the music system of StarCom will not be muted until the rider or caller
speaks.
To add a mobile phone to the system, a phone adapter kit is required. This includes a
phone adapter which plugs into the phone, and a 3.5mm to 2.5mm jack lead to connect
the adapter to the StarCom unit. The mobile phone must have the facility to auto answer
an incoming call. Once set in this mode, the phone is plugged into the system, turned on,
and then placed in a safe place (waterproof pocket etc.).
When the phone rings the StarCom unit will mute music, if playing, and allow a normal
phone conversation. When connected, the volume level of the phone will need to be
adjusted to give the required volume in the helmet. Always set the volume low and
gradually increase to the desired level.
Mobile phone Interface
To add a two-way radio, a radio adapter lead is required. This plugs into the StarCom 6pin socket labeled RADIO and the other end to the radio. When connected, the volume
level of the radio will need to be adjusted to give the required volume in the helmet.
Always set the volume low and gradually increase to the desired level. To operate, turn
on and then place in a safe place (waterproof pocket etc.).
Two-way radio Interface
Connecting audio devices
If problems are experienced with the Vox system we recommend that the PPT switch is
used. The two systems can be used together and can be arranged so that the VOX is set
to a fairly high sound level which reduces the chances of falsely turning on, but can still
be used by raising your voice. For quiet, normal talking, the PTT switch is used.
The voice level needs to be set to suit the maximum speed and background noise levels
you intend to encounter. Usually this means a level which requires the user to raise their
voice slightly.
16
Set up with music
Connect a music system to StarCom. Then, while talking at your desired voice level directly
into the mic, adjust the VOX level clockwise until the music is muted.
Set up with two-way radios
Connect the radio to StarCom. Then, while talking at your desired voice level directly into
the mic, adjust the VOX level clockwise until the radio transmit indicator can be observed
turning on when you talk and turning off approximately 1 second after stopping talking.
If the VOX keeps turning off while talking, turn the control slightly clockwise.
If the VOX takes longer than 1 second to turn off when talking is finished, turn the VOX
control slightly anti-clockwise.
It may take a number of trial runs to achieve the best setting.
With the VOX control fully anti-clockwise the VOX feature is OFF. As the control is turned
clockwise the sensitivity will gradually increase.
To set the VOX always start with the control fully anti-clockwise (OFF) and gradually turn
clockwise to the desired level while talking into the microphone. Keep talking to confirm the
level. Note: turning the Vox control may trigger the VOX system.
When the VOX system is active, the sensitivity will be
automatically reduced when the background noise level is increases.
The VOX control will give a full range of control from the MAXIMUM setting (fully clockwise)
which will give almost constant transmit, to the MINIMUM setting (fully anti-clockwise)
which will turn the VOX feature OFF. As the control is turned clockwise from the OFF
position the sensitivity will gradually increase.
The VOX system used on a bike can be subject to fundamental problems:
1) The VOX level has to be set to allow for the maximum road speed conditions, if
set too low the VOX system may turn on in error.
2) A pause in speech of around 1 second, or quiet speech, may cause the system to
turn off in mid sentence.
The unit provides a VOX (voice activated transmission) facility with a VOX level preset
control. This is designed to provide handsfree control of the radio and also hands free
muting of the music system. The VOX control needs to be set to a level of sensitivity that
suits the rider’s voice and the environment, i.e. helmet and bike noise levels. The level
should be sensitive enough to operate at comfortable voice loudness, while insensitive
enough to ignore increased background noise or breathing.
OFF < VOX > More sensitive
The diagram shows the StarCom control
panel. The arrows indicate the VOX adjustment.
Fully anti-clockwise turns the VOX OFF and fully
clockwise gives maximum sensitivity
VOX setup and operation
5
The unit is water-resistant but not waterproof so care must be taken to keep it dry. If
the unit is to be installed on the bike then a fitting kit is supplied. Due to the possible
variations of each installation will require mechanical and electrical knowledge by the
fitter. The unit needs to be positioned so that it is protected from the weather but is
accessible. Care must be taken not to mount the unit near areas which will get hot, for
example, near the engine or exhaust. Also the unit must not be placed close to the
ignition system, HT leads coil, alternator, or parts of the bike that could cause electrical
interference.
Unit Installation
Installations must only be undertaken by a person who has a full understanding of the
electrical, safety and mechanical requirements involved. If in any doubt, please consult
your dealer.
The StarCom unit is supplied with a Velcro disc and a tie wrap mounting kit. It requires
connection to the 12V DC vehicle supply. A power lead with fitting kit and fuse is
supplied.
Considerations
Installation
Installation instructions must be followed carefully.
The StarCom equipment is designed for motorbike use but it remains the responsibility
of the rider to ensure that their safety is in no way impaired when using the equipment.
When installing the helmet kit, the helmet must not be modified in any way.
When installing the cabling, the safety release connectors must be free to release. Do
not bind or restrict the connections in any way.
All cabling should be installed so that it will not flap free. There should be no cable
slack that could potentially catch in the moving parts of the vehicle.
The rider must be able to hear warnings from other road users at all times. The volume
must be set at a level to allow this.
When using a mobile phone or other device that transmits, the rider should check with
your bike dealer that it is safe to do so.
Safety First
6
Note: If electrical noise is present, for example a clicking or a whining sound, this
may be due to the HT system or the alternator and may be cured by moving the
StarCom unit and wiring further from the bike electrics. In some cases it may be
necessary to improve the electrical suppression on the bike; please consult your
bike dealer.
The ideal mounting position is under the seat. Using the Velcro discs provided secure
the unit into position. Four rubber feet are supplied and may be fitted to the underside of
the unit to reduce movement caused by vibration and to prevent the unit from rubbing
against the bike. Long tie wraps are also supplied as an alternative or additional
mounting. Plug in all required cables to the unit ensuring there is some cable slack to
allow for unplugging. The cables need to be secured to prevent them becoming
disconnected from the unit when the cables are tugged or when in use. Cable tie wraps
are included for securing the cables. Ensure the unit is easily accessible and removable.
If the bike is not to be used for some time (for example, during winter months), the unit
should be removed and stored in a dry place.
Unit Installation continued
Least < Sensitive > Most
MIC2 MIC1
15
It may take a number of trial runs to achieve the best setting.
The circuit is designed to only reduce the mic sensitivity, so speech will never be missed.
If the sensitivity is set too low then the mic will work but the volume will be low.
The microphone position must be correct (very close and directly in front of your mouth)
for the sensitivity system to function correctly.
Note: The mic sensitivity adjustments are designed to be protected against accidental
movements and therefore require a flat blade screw driver for adjustment.
The microphone sensitivity system is an automatic circuit
that instantly increases the microphone volume when you
talk and reduces the volume when you are not talking.
For normal conditions this should be set to the mid point
sensitive position with the indication line straight up.
If background noise is being picked up by the microphone then the sensitivity can be
reduced by adjusting the control anti-clockwise. If the mic is not turned up to full volume,
then adjust the control clockwise.
Automatic Microphone Sensitivity (AMS)
Microphone sensitivity Control (AMS) setup and operation
The unit provides a rider/passenger balance control. At the mid point (the default setting)
the rider and passenger have the same volume level.
Turning the control anti-clockwise will increase the passenger volume and decrease the
rider volume.
Turning the control clockwise will increase the rider volume and reduce the passenger
volume.
If both rider and passenger are not wearing plugs and both have good hearing then
before adjusting the volume, the speaker positions should be checked.
The speaker positioning is very critical to volume, see page 11.
The volume balance between the rider and pillion
can be adjusted. This allows for either person using
ear plugs or a variation in their hearing.
Balance setup Rider passenger volume
Passenger < BAL > Rider
Reduce < VOL > Increase
14
The StarCom equipment is designed for motorbike use but it remains the responsibility of
the rider to ensure that their safety is in no way impaired when using the equipment.
The rider must be able to hear warnings from other road users at all times, the volume
must not be set at too high a level to prevent this.
Safety First
It may take a number of trial runs to achieve the best setting.
To setup the preset volume level you will need to have your helmet on. If a second
Helmet kit is to be used then the volume should be set to suit the intercom system. If a
second helmet is not to be used then connect any accessory, a music system, a radio or
a phone with the accessory’s volume set to a mid-point. Start with the preset volume set
to a midpoint and then adjust until the required volume is achieved. Remember that the
volume system is active and will automatically increase when the background noise level
increases (at speed).
The preset volume sets the unit amplification. This will control the intercom loudness
directly. The actual loudness of the music, radio and the phone inputs will also depend
on their individual volume setting.
The volume system is active and will automatically increase the loudness when the
background noise level is increased.
The volume control will give a full range of control from the MAXIMUM setting (fully
clockwise), which will give loudness volume to the MINIMUM setting (fully anti-clockwise)
giving the lowest volume setting. As the control is turned clockwise from the minimum
position the loudness will gradually increase.
This diagram shows the StarCom control
panel. The arrow indicates the direction
to increase and decrease the volume,
fully clockwise sets maximum while fully
anti-clockwise sets minimum volume.
The unit provides a volume level preset/master control. The volume control needs to be
set to a level suitable for the rider’s normal operating conditions, i.e. helmet and bike
noise levels and whether earplugs are used. The level will need to be loud enough to
hear comfortably while not too loud to prevent the rider from hearing warnings from other
road users.
Volume setup and operation
7
Step 4. Using the 10cm cable ties provided, ensure that the fuse crimp connectors and
the wiring is secured to the bike frame along the full cable at least every 10cm. You must
ensure that the wire cannot fall or bend and foul or touch any moving parts. You must
also ensure the wire will not be trapped or pinched in any way, for example, by the seat.
Only mount to the bike frame or bodywork and avoid all working parts including brake
pipes, ignition cables, etc.
Step 3. Using a crimp connector (Crimp 2) or solder joint, connect the StarCom power
lead -ve, which is the black wire, to the bike 0V (negative) supply or to a suitable chassis
ground point. Tape all joints to insulate electrically and protect from moisture.
Step 2. Using a crimp connector (Crimp 1) or solder joint, connect the fused Red wire to
the bike 12V (positive) supply.
Step 1. Locate a suitable point for power connection. This should be a fused supply
ideally from the ignition or the lighting circuit and needs to be carefully selected for both
suitability and location. Please seek advice from your dealer. Never connect directly to
the battery without an in-line fuse placed as close as possible to the battery.
Installation must be carried out by a suitably qualified person. Please consult your
dealer.
The unit is designed to be powered from the vehicle supply. The unit has a built-in
voltage regulator, reverse input protection, and fuse so that it is safe to use directly from
a vehicle’s supply. A power cable is supplied along with an in-line fuse and fitting kit.
Bike power cable Installation
8
The HSEX-04/05 headset extension cable connects the StarCom headset input to a
waterproof bulkhead fitting socket. It can be fitted to any convenient and available body
panel. Once fitted the helmet kit can easily and quickly be connected when required, simply
flip the weatherproof lid and plug in the coiled helmet extension lead. The coiled extension
leads stay with the helmets and plug into the bulkhead socket.
Optional bulkhead connectors HSEX-04 & HSEX-05
An alternative fitting is to add straight extension leads which are connected to the StarCom
unit and are then secured to the bike so that they will not be pulled out. The leads would then
come from under the seat. The coiled extension leads would now stay with the helmet and
plug into the straight extension lead. When not in use, the straight extension leads will plug
into the weatherproof retention caps, secured to side of the bike in a convenient position.
Optional headset extension leads HSEX-02 & HSEX-03
13
Note: The radio and phone are given equal priority and therefore when talking
on the phone with a radio system connected and VOX active, speech will cause
the radio to transmit.
While the radio is transmitting and for 1 second after finishing talking, you will not be
able to receive a message. Note also that having received a message you should wait
for approximately 1 second before talking. Wait for the ‘roger’ beep or end of
transmission click from the distant radio before talking.
Using the mobile radio will automatically mute the music system. It will remain muted
until the radio has been silent for approximately 5 seconds. A mobile phone may be
added to the system. To operate with the system the phone must be set to auto
answer mode. When the phone is answered, the music system will be muted as before
and the rider can converse in the normal way.
It is recommended that you start off with the PTT (push to talk system) to become
acquainted with the radio system and then add VOX later.
With the radio connected, the rider can transmit to a distant radio by using the PTT
switch or (if the VOX system has been setup) by simply talking, and the VOX system
will put the radio into transmit mode. It will remain in transmit mode for approximately
1 second of silence.
Adding a mobile radio will allow communication to another radio. You will need a radio
adapter lead to connect the radio. This plugs into the StarCom via a 6-pin socket
labeled RADIO and the other end connects to the radio.
When connected, the volume level of the radio will need to be adjusted to give the
required volume in the helmet. Always set the volume low and gradually increase to
the desired level.
A standard/typical fitting of StarCom and the cabling would have the StarCom unit located
under the seat with the coiled extension leads connected to the StarCom and secured to the
bike so that they will not be pulled out. The required length of coiled extension leads would
then come from under the seat and plug into the helmets. When not in use the coiled
extension leads will plug into the weatherproof retention caps, secured to the side of the bike
in a convenient position.
A rubber connector cap and fixings are
provided to protect the headset extension
cable connector when not in use. The rubber
cap can be secured to the bike with the cable
tie fixing and cable tie as shown. This
provides weatherproof and secure stowage
when the headset is not being used.
Bike to bike using a mobile radio
Headset extension cable stowage and weatherproof cap
12
If music is added to the system then both rider and pillion will be able to listen to the
music in stereo. If the VOX system has been setup then, when the rider or pillion talks,
the music will be muted. It will remain muted until the conversation has been stopped for
approximately 5 seconds. If a PTT switch is connected then pushing the switch will also
mute the music.
With both helmet kits connected, a full duplex conversation can be held i.e. the rider and
pillion can talk at any time or even at the same time.
Rider to pillion use
If music is added to the system then the rider will be provided with music in stereo. If the
VOX system has been setup then, when the rider talks, the music will be muted and will
remain muted until the rider has been silent for approximately 5 seconds. If a PTT switch
is connected then pushing the switch will also mute the music. If a mobile radio is added
to the system, the music will again be muted when the radio receives a message and the
rider will hear the message clearly. The rider can transmit on the radio by using the PTT
switch or by simply talking with the VOX system. A mobile phone can also be added to
the system. The phone must be set to auto answer mode. When the phone is answered,
again the music system will be muted and the rider can then have a normal telephone
conversation.
Sole rider use
Plugging in the Rider headset (Helmet Kit 1) turns the system ON and removing it will
turn the unit OFF. This is also the case when plugging the helmet kit into the extension
lead. The unit provides a user master volume control and incorporates an intelligent
active volume adjustment system which senses the background noise level and adjusts
the volume to compensate. The master volume is therefore set to a suitable level (see
Volume control section). When this has been determined the control will not need further
adjustment. The unit also provides a VOX system which allows the user to control the
radio transmission and the music mute by voice. By simply talking, the VOX will mute the
music system so that you can talk to a passenger or transmit on the radio to talk to
another vehicle. The VOX can be used instead of, or as well as, the PTT (push to talk)
switch. Once set up operation is very simple: plug in the headset and away you go.
Operation
9
Simple mounting can be attached to a tubular handlebar or to any
suitable point using the anti-slip releasable cable tie mounting.
Measuring only 1¼" x ¾" x 1¾"
StarCom1 Advance has the facility to connect a remote (handlebar)
volume control VOL-01. It plugs directly into StarCom1 Advance, this
overrides the StarCom1 main volume control and allows the volume to
be easily adjusted from the handlebars.
Optional Handlebar volume control
The bracket should be fixed to a convenient position on the bike frame (section 2025mm diameter). Place the P-clip around the selected frame section, place the plate in
front and push the bolt through the plate and P-clip, place the washer onto the bolt then
the shake-proof washer and then the nut, tighten nut, ensure the plate is square and
then fully tighten. Mount the bulkhead connectors and secure with hex nut.
Fixing instructions
The BKT-01 mounting bracket allows the HSEX-04 and/or the HSEX-05 bulkhead
headset cables to be fixed to the bike frame in a suitable position, without the
requirement of cutting a mount hole.
BulkHead fixing bracket
Optional PRO-FIT-01 professional mounting kit
- must be directly in front of your mouth very close to your
INCORRECT
IN CORRECT
Microphone too far Microphone too
high
from mouth
CORRECT
Microphone in front of
and close to mouth
SH-006
Microphone
HOT SPOT
10
Full Face Microphone
The microphone is designed to only pick up sound from directly in front and very close to
it. This minimises the pick up of background noise.
The microphone needs to be mounted very close to the mouth, ideally just touching your
lips. If the distance between the helmet front and your mouth is too great then use
double-sided sticky foam pads to space the mic. Also it MUST be mounted such that you
talk into the centre of the microphone.
Open Face Microphone
Mount the open face microphone such that the ideal hot spot indicated by the white/silver
mark, is very close to the mouth, ideally just touching your lips.
SH-004
Microphone
HOT SPOT
THE TEST: Poke your tongue out, the tip should touch the centre of the HOT SPOT.
INCORRECT
Microphone too
low
The mounting of the microphone is the most critical part of the system. Poor mounting
may result in very low speech volume, requiring a high volume setting and resulting in
poor signal to noise performance and poor vox performance at normal traffic speeds.
lips.
The microphone
The helmet assembly comprises two speakers and a microphone which is Velcro
attached into position, one speaker adjacent to each ear and the microphone in front of
the mouth (a boom mic in the open face helmet kit).
Incorrect helmet kit installation will affect the performance of StarCom1.
Helmet kit Installation
11
THE TEST: Using the music lead supplied and a portable
music player, play music through StarCom with your helmet on.
Twist the helmet left and right and up and down. If the music
becomes louder in either ear then the speaker position needs
adjustment.
The speakers need very careful positioning: ensure that they are
both adjacent to and almost touching each ear; as with
headphones even a small gap reduces the volume significantly.
Any gap will increase the background bike and wind noise
Speaker Installation
The speakers - must be positioned directly over your ear opening.
The wiring should be neatly pushed within the helmet padding leaving a short connection
cable protruding a few centimetres to one side of the helmet. Sticky felt strips are provided
for securing the wires neatly to the helmet. The quick release connector is then ready to
connect to the system.
Two levels of wind protection are provided: the standard foam will protect the microphone
from moderate wind speeds on un-faired bikes while the secondary foam will give the
ultimate protection for completely open face applications. The secondary foam is simply
pushed over the standard foam and secured with the cable tie provided.
Boom microphone
The microphone (SH-006) boom is a strong bend and stay construction with a simple
mounting. The flat rubber spade end to the microphone stem is designed to be inserted
or pushed behind the helmet lining to provide a simple and sturdy fit. The microphone
stem should be installed so that the centre of the foam area is over your lips and there is
as little of the boom showing as possible to minimise the wind drag and microphone
buffeting at speed.
You will need to test the positioning; the volume of the microphone will increase
dramatically as you talk into the ideal spot. Use the sticky felt strips provided to secure
the wire.