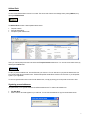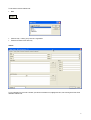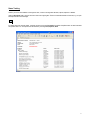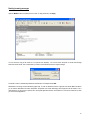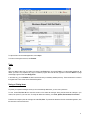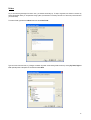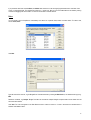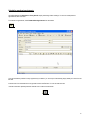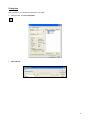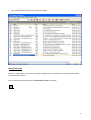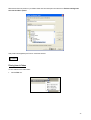
1
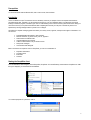
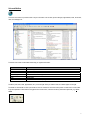
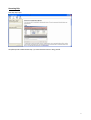
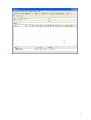
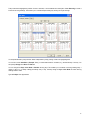
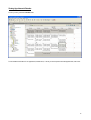
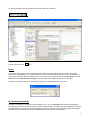
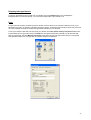
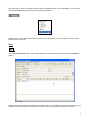
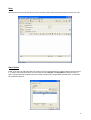
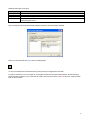
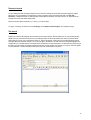
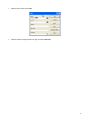
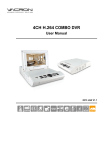
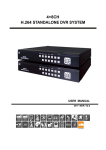
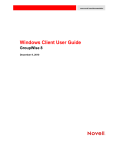
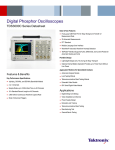
GroupWise 6.5 End-User Training Prerequisites You should be familiar with the Windows GUI, how to use a mouse, files and folders. Introduction This is an interactive course. The instructor will cover the theory and show you samples of how to accomplish tasks within the GroupWise email client. Thereafter, you will practice the exercises on your own. Remember that it is not within the scope of the training to master the program, but rather to give users an understanding of how it works and how to perform the actions. Keep your user-manual so that you can practice the exercises after completing the course at your own pace. The best way to learn is to experience by sending messages either to yourself or to a colleague. GroupWise is a complete messaging system that allows you to easily access, organize, and respond to all types of information. You can use it for: 9 9 9 9 9 9 9 Schedule/delegate appointments, notes and tasks Reserve resources, e.g. board rooms, pool car, projectors Share folders and address books Organize addresses and contacts Create a unified mailbox of all your email accounts Send phone messages Chat real-time with colleagues Bear in mind that to accomplish an action in GroupWise, you can use a combination of: keystroke combinations pull-down menus button-bars shortcuts Starting the GroupWise client From the Start Menu, select Programs, Novell GroupWise, GroupWise. Or from the Desktop, double-click the GroupWise icon. After the logo is displayed, you will see the Universal Mailbox. You could be prompted for a password - enter it. 2 Universal Mailbox This is the main window. It provides access to all your information such as email, phone messages, appointments, tasks, documents, notes, fax messages, etc. To the left of the screen are the folders which help you organize information: Folder Mailbox Sent Items Calendar Work in Progress Cabinet Trash Checklist Contents Items sent to you Items you sent Appointments, tasks, notes Saved items for later sending/draft Personal folders Deleted items Create a task list for items requiring further action The items (mail, tasks, notes, appointments, etc.) are on the right. When you select a folder, its contents appear on the right. The toolbar is customizable. It offers quick access to common commands. Leave the mouse pointer on a button/icon on the toolbar to get an explanation of what action is being performed. On the menus, notice the shortcuts (combination keystrokes), e.g. Print – Ctrl+P. 3 Accessing Help Click Help, Help Topics. GroupWise provides context-sensitive help. If you need information whilst in a dialog, press F1. 4 Sending Email To send a mail message, from the Toolbar click New Mail. In the To: field, begin typing the name of the recipient. GroupWise uses automatic name completion or name resolution to complete the user’s name. Enter a Subject, and begin typing your message text in the Message field. When done, click Send. The Mail Item view: Attaching Files From the Mail window, click Attach. Select the file/files and click OK. The file appears in the Attach window in the bottom of the screen. 5 6 Address Book You can use the Address Book to search for a contact. This can be done from the mail message view by clicking Address, or by opening the Address Book. The Address Book consists of three separate address books: Frequent Contacts Personal Address Book GroupWise system address book Users you most frequently send mail to are stored in the Frequent Contacts address book. You can also access these contact, by selecting the Contacts folder. To open you personal address book, click the folder with your name on it. You can add users to your personal address book and even create multiple personal address books. The Novell GroupWise Address Book contains a list of all users on your GroupWise system in your organization. You can also get information about a user from the address book, or simply by leaving your mouse pointer on the user’s name. Organizing personal addresses GroupWise allows you to organize addresses into different address books. To create a new address book: File, New Book. Enter a name. A new folder appears for your new book. You can add new addresses or copy from other address books. 7 To add entries to the new address book: New Select an entry – contact, group, resource or organization Enter the information for the new entry. Contact: To copy addresses from one book to another, open the source address book, highlight the name, click and drag to the folder of the destination address book. 8 Status Tracking Useful if you want to track whether a message was sent, or when a message was delivered, opened, replied to or deleted. Open the Sent Items folder, and look at the icon next to the outgoing item. These icons describe the status of the item; e.g. an open envelope indicates a read message. For details about the message status, right-click the item and choose Properties. By default GroupWise tracks an item's delivered and opened status. You can request more information by choosing Tools, Options, Send. 9 Reading Incoming messages Open the Mailbox folder and double-click on an item. To reply to the item, click Reply. You can choose to reply to the sender or to all (sender and recipients). You can also check the option to include the message received from the sender. This is helpful when you want to remind the sender of their original message. The sender’s name is automatically entered into the To: field. The subject includes RE:. Attachments in incoming mail are indicated by paper clips. To view an attachment, select it, right-click and choose View. This allows you to view the attachment from within GroupWise. GroupWise uses viewer technology which supports most file formats. This is useful because you don’t have to open the file in the original application that the user created it in. Think of how useful this is when you don’t have the application ! 10 To open the file in the associated application, choose Open. To forward a message to someone, click Forward. Trash When you delete an item from your mailbox, it is placed in the Trash folder. Once in the Trash, it is not permanently deleted yet. By default, your trash is only emptied every 7 days. To delete or purge an item from the trash, right-click it and select Delete. To purge all messages, right-click and select Empty Trash. In the same way, you can Undelete an item from the trash that you mistakenly deleted previously. The recovered item is moved to its original folder. This is similar to the Windows Recycle Bin. Saving or Printing items To protect your important messages so that you don’t inadvertently delete them, you can save or print them. To save, choose File, Save As from the main window or from within the message. Saving the file leaves the message in your mailbox, but copies it to your local drive. To modify the default save directory, click Tools, Options, Environment, File Location. Follow the same steps to print the message, but select File, Print. To print the file attachment from the associated application, click the check box in the lower left corner. 11 Folders As you start receiving messages from other users, your mailbox starts filling up. To keep it organized, use folders to sort them by subject. GroupWise allows you to implement a filing system (not dissimilar to a directory structure on a hard drive) to store the items you want to keep. To create a folder, right-click the Cabinet folder and choose New Folder. Type the name of the new folder, e.g. Budget, and select its position in the existing folder structure by clicking Up, Down, Right or Left. Optionally enter a description for the folder and select Next. 12 If you placed the new folder in the Cabinet, the Cabinet folder will have a + next to it signifying that there exists a sub-folder. Click on the + to expand the folder. This changes the symbol to a – (minus sign). Now you can move related items to this folder by clicking on them and dragging them to this folder. You can also move folder in a similar fashion. Rules You can create a rule in GroupWise to automatically move items into a specific folder, based on certain criteria. To create a rule, choose Tools, Rules. Click New. Type the name of the new rule, e.g. All Budget Docs. Describe the event by marking the Received box, and select the item type, e.g. Mail. Define the conditions, e.g. Subject: Budget. This filters all mail with the subject “Budget” and places them into the folder once the action has been defined. Click Save. The rule now appears in the Rule Name list with a check box next to it. A mark in the check box indicates that it is enabled. Click Close to return. 13 Scheduling meetings/appointments GroupWise features like Auto-date and Busy Search simplify scheduling of team meetings. You can also create personal appointments, tasks and notes. To schedule an appointment, select Schedule New Appointment from the toolbar. Your are scheduled by default for every appointment you initiate. If you are not part of the meeting simply delete your name from the To: field. Invite the users from the address book or type their names in the To: field. You can also add resources. Indicate a start date. Optionally select the calendar icon to view the current month. 14 Today’s date will be highlighted by default. Choose a new date, or move between the months/years. Select Recurring to create a formula for recurring meetings. This enables you to schedule multiple meetings by sending one single message. You are presented with a yearly calendar. Select multiple dates by simply clicking on them and highlighting them. You can also use the Auto-Date by Example. Here, you select dates based on conditions, e.g. the first Monday of January. You also specify a Range with a Start and End date. You can change from Days of the Week to Periodic recurring days. This enables you to schedule a recurring meeting every x number of days, e.g. a weekly meeting periodically every 7 days. Similarly change to Days of the Month to select recurring meetings within a month. Type the Subject of the appointment. 15 To select a time, click on the clock icon next to the date. This denotes the start time of the meeting. You are shown a time scale with two arrows: Green for start time and Red for End time. The duration is automatically filled for you in the appointment window when you select the start and end times of the meeting. Drag these arrows up and down. If you want to check the schedules of other users, select Busy to perform a Busy Search. This disables conflicts. Don’t perform a Busy Search with recurring appointments that involve multiple users. You are presented with a graph showing the users you invited to the meeting showing their appointments. Find a time slot where there is no shading for any person or resource. 16 Select Available Times so that GroupWise can show you a similar graph depicting when each individual will be available. Click on the Auto Select button to let GroupWise decide for you when the next occurrence is that doesn’t share conflicts. When done, click OK and Send to mail the appointment to the other users. Accepting/Rejecting appointments Appointments are sent to your Mailbox. Double-click the appointment, read it and click Accept or Decline. You can send a comment to the sender stating your reasons for declining the appointment if you wish. This is optional. For auto-dated appointments, you can accept/decline this instance or all instances. To decline an already accepted appointment, go to your Calendar, right-click the item you wish to cancel and select Decline. 17 Viewing Appointments/Calendar To view your diary, select the Calendar folder. To view additional information for an appointment, double-click it, or hover your mouse pointer above the appointment, note or task. 18 You can also change the view of the calendar to year, month, week, day or multi-user. To select Today, click on the icon. Alarms You can set an alarm to warn you a few minutes before the scheduled start of the meeting. From your calendar, right-click the appointment and select Alarm. You can specify the number of hours or minutes before the meeting you want to be reminded. You can also launch a program when the reminder is active. To set an alarm for all new appointments, go to Tools, Options and select Date & Time. Choose Set alarm when accepted. This will activate the alarm everytime an appointment is accepted. For alarms to work properly you have to run the Notify program and you must subscribe to your own alarms. Re-scheduling appointments Sometimes it is necessary to re-schedule recurring meetings. To do so, go to your Sent Items folder, select the appointment you sent, right-click it and choose re-send. Choose which instance you want to resend, change the appointment date/time and click send. GroupWise will ask you if you want to retract the original item. Select Yes. Although you cannot retract mail and phone messages if the recipients have opened them, you can resend appointments that other users have already accepted. 19 Delegating tasks/appointments To assign an appointment or task to another user, click the item and choose Delegate. Select a user to delegate the task/appointment to and send the message. You can choose to keep the item in your calendar or not. Proxy In a typical office environment, sometimes you have to let other users have access to your calendar so that they can act on your behalf when you’re away. An example is a secretary and his/her manager – he/she would require access to his/her diary so that she can confirm meetings and accept or schedule new appointments when they’re out of the office. To set up your mailbox so that other users can access your calendar, click Tools, Options, Security, Proxy Access. Select users from the address book or type in their names in the Name field. Grant rights to these users individually, e.g. the Read and Write rights for appointments. The option Minimum User Access grants rights to all users. Be cautious when using it to avoid granting more rights than needed. Also, don’t give other users rights to change your Preferences. 20 Now, these users can access your mailbox and view the items you granted them rights to. This is called Proxy. To do so, that user would click the Proxy button in the top left of the client, just above the folder list. Select the name of the user whose calendar/email you want to read. To revert back to your original mailbox, click on proxy again, and then select your own name. Tasks Click on the Create New Task button, to select multiple recipients of a task. Select the drop down arrow to select a Posted Task instead. Specify the start date and due date. Tasks appear in your calendar. When you’ve completed a task, mark it with a check mark in the check box. It remains incomplete, it moves over the next day. If a task is overdue, the status changes to red to indicate so. 21 Notes Notes are similar to Tasks except that they don’t have an end date. Create a personal task the same way that you did so for notes. Shared folders Enable you to share your folders with other users. Items that you put in the shared folder are visible to everybody who has access to it. To share a folder, right-click the folder you want to share and choose Sharing. Click Shared With and specify the user/s you want to share the folder with. By default each person included in the Share list is assigned READ and ADD access. I the example we’ve added EDIT rights too. 22 Additional access rights can be given : Access rights Read Add Modify Delete Description Allows user to read items in the shared folder. Add items. Modify items, resulting in a new item that is a copy of the original item with its modifications. Delete items from the shared folder, making it inaccessible to any other member of the shared folder. Be careful when granting this access. Type a message to send with the shared folder notification to the users who have access to the folder. Folders you share with other have a blue hand icon identifying them: You can move mailbox items to the shared folder by clicking an item and dragging them to the folder. To accept a shred folder, look in your mailbox for incoming items. Double-click the shared folder notification, read the description, position the folder and place it in your current folder list. Folders other users share with you have a red hand icon. Open the shared folder to view its contents. 23 Discussion threads You can create shred folder messages called discussions. Discussion threads tie all messages and replies together by subject. Discussions can only be started in a shared folder. To begin a discussion thread, open the shared folder, click File, New, Discussion, complete the subject and message fields and click OK. The discussion view does not have a To: field because the recipients are all users with shared folder access. Discussion threads appear with the plus (+) or minus (-) icon next to them. To reply to a discussion, double-click it, and select Reply. Choose Reply to selected subject, and complete your reply. The Internet Suppose you found an interesting web site and wanted to inform others about it. With GroupWise you can copy the Internet (http) address from your web browser and paste it in a mail message. Steps: connect to the address (URL) with your internet browser, select it with your mouse, copy to the clipboard (CTRL+C), switch to GroupWise, create new mail, and paste the address into the message/subject field. Send the message. You can also just type in the address if you wish. Notice how GroupWise highlights and changed the color of the http address. The recipient of the message can now open the location in his web browser by just clicking on the URL in the mail message. GroupWise automatically launches your web browser and connects you to the site. The same applies for email addresses – here the GroupWise client opens a new mail view addressed to the person. 24 Customizing GroupWise Sorting Folders GroupWise allows you to rearrange your columns, sort items in your folders and choose your folder view. To customize your main window: Click and drag any of the column headings at the top of your listed items to a new position. With the mouse pointer resting on the border of a column heading, click and drag the heading to adjust the column width. Remove a column heading by clicking and dragging it off the column. Right-click a column heading at the top of your list box and then select a heading from the list on Quickmenu to insert it on the column row. You can sort your items in an alphanumeric or numeric ascending/descending order, by right-clicking a column heading and select Sort Ascending/Descending. Alternatively, sort by just clicking on the header itself. An arrow indicates the sort order. To permanently define how items are viewed in a folder, right click on the folder and choose Properties and select the Display tab. 25 Finding items With GroupWise you can use filters to locate items in your folders: From the toolbar, click Find in GroupWise. Advanced Find. 26 Click on an item top open it after the search results are complete. Saving Find results Because you might regularly issue the same find requests, GroupWise lets you save the results in a separate folder that updates each time the folder is opened. From the GroupWise Find Results window, click Save Results to Folder on the toolbar. 27 Name the new folder and position it in your Mailbox folder view. Add a description and check the box Find new matching items each time the folder is opened. Query folders are designated by the Find icon in the folder structure. Filtering Items in Folders You can create and save mailbox filters: Click the Filter icon. 28 Enter the search criteria and click OK. Clear the results by clicking the Filter icon again, and select Clear Filter. 29 Getting additional information Cool Solutions Web Site – http://www.novell.com/coolsolutions/gwmag Novell GroupWise Product Web Site – http://www.novell.com/products/groupwise Authors: Paulo Ferreira Systems Engineer Novell, South Africa [email protected] Leandra Streicher Lead Consultant Novell, South Africa [email protected] 30