1
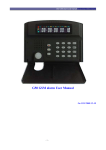
GSM alarm system
JN-M02
GSM ALARM SYSTEM
USER MANUAL
JN-M02
GSM alarm system
GSM alarm system
7.3 How to delete all the devices that have been learnt
Press the " rear black key " of the JN-M02 receiver and hold it on up to
10 seconds, "bibibibi" is heard, then release the " rear black key ", all the
memory is cleared.
Appendix: Operation Guideline
By following steps, you can operate JN-M02 easily at your first try
1. Insert a valid SIM card into the alarm host. (Please see 2.2).
2. Make sure the power supply is connected; turn on the host power
switch. (Please see 2.3).
3. Set the mobile phone/telephone numbers for SMS alarm and
auto-dialing alarm. (For details, please see 3.1.2, 3.1.3, or 4.1, 4.2).
4. Set time of the alarm host (for details, please see 3.1.7 ).
5. Learn all devices into JN-M02. ( for details, see item 7.1, 7.2, 7.3 )
6. Set zone type (please see 3.1.6 for details.) if necessary.
8. Change zone’s name according to your needing if necessary (Please
see 4.6 for more details).
9. Change password of the alarm host. (Please see 3.1.4 and 4.4 for more
details.). if necessary
10. Set time of arm/disarm according to your needing. (Please see 3.1.8
for more details) if necessary
For specific operation, please read this manual carefully.
JN-M02
14
JN-M02
GSM alarm system
GSM alarm system
Ⅶ. Learning operation
7.1 How to learn a sensor/remote controller into JN-M02
Press the " rear black key " and hold it on, 3 seconds later, a beep
tone is heard, release the "rear black key", the JN-M02 receiver is at
learning mode, then let the JN-DCA/JN-SIB wireless infrared beam
sensor send a RF signal, press tamper key and hold it on, then turn
on the power switch to make a test RF sending, the JN-M02 sounds
"di,di--" to show the new sensor has been learned into its memory
successfully. Repeat above operation to make another RF sending
for learning next sensor. After all devices have been learnt, press
the " rear black key " to quit learning mode and ‘di,di’ will be heard
Beep (di,di--)for successfully learning a new device;
Beep (didididi,didididi,didididi) for memory is full;
Up to 8 JN-DCA/JN-SIB sensors and 24 remote controllers can be
learned into a JN-M02 receiver.
7.2 How to know which zone a sensor has been learned into
Set JN-M02 receiver at learning mode (refer to item 7.1), for a
learned sensor, just press and hold the temper switch, then switch
on the JN-DCA/JN-SIB beam sensor, you will hear a different beep
tone for each zone after "di,di--"
For zone 1------- one 0.3s long beep
For zone 2------- two short beeps
For zone 3------- three short beeps
For zone 4------- four short beeps
For zone 5------- one 0.3s long beep + one short beep
For zone 6------- one 0.3s long beep + two short beeps
For zone 7------- one 0.3s long beep + three short beeps
For zone 8------- one 0.3s long beep + four short beeps
JN-M02
JN-M02
GSM alarm system
Contents
I. Instruction
Ⅱ. Installation
2.1 Alarm Host’s section figure
2.2 Insert a valid SIM into the alarm host
2.3 Run
Ⅲ. Operation steps
3.1 Set by keyboard
3.1.1 Password verification
3.1.2 Set/delete three mobile phone numbers for SMS alarm
3.1.3 Set/delete three phone numbers for auto-dialing alarm
3.1.4 Change password of the alarm host
3.1.5 Set new ID of the alarm host
3.1.6 Set type of 8 wireless guarding zone
3.1.7 Set time of the alarm host
3.1.8 Set/cancel the time of arm/disarm/partial arm
3.1.9 Prohibit/allow sending SMS while arm/disarm the
system by controller or keyboard
3.1.10 Alarm
3.1.11 Exit setting status
Ⅳ. SMS control command
GSM alarm system
5.4 Alarm and Handle
When an alarm occurs, the siren will alarm for 90 seconds to inform the
neighbors. At the same time, the system will automatically send SMS to
report the guarding zones and dial the preset phone numbers. When any
phone is answered, you can monitor the alarm site. If the phone line is
busy or can’t put through, the system will auto-dial the next phone number
circularly till one of them is answered. If nobody answers the phone, the
system will stop dialing after auto-dialing circularly for three times.
Ⅵ. Operation Cautions
1. Make sure the equipments have no water.
2. Install the system in a hidden place.
3. Turn off the power supply before insert/take out the SIM
card.
4. Connect the power supply firmly and provide good heat
dissipation.
5. Don’t install the system close to the objects which generate
strong interference, such as TV set and computer.
6. Check all the detectors periodically.
7. Inspect the GSM alarm system periodically
8. This product is designed for the indoor use rather than outdoor
use.
4.1 Set three mobile phone numbers for SMS alarm
4.2 Set three phone numbers for auto-dialing alarm
4.3 Delete alarm phone numbers
4.4 Change password of the alarm host
4.5 Arm/disarm
4.6 Change guard zone’s name
JN-M02
JN-M02
GSM alarm system
a) Arm: Press “ ” on remote controller, the host will make “di” sound,
the LCD display is on, “ ” is twinkling. 30 seconds later, the host enters
into arm mode and the “ ” is on. If you want to arm the system quickly,
please press “ ” when “ ” is twinkling.
b) Partial arm: press “●”, the host will make “di” sound, the LCD display
is on. “●” is twinkling. 30 seconds later, the host enters into partial arm
mode and “●” is on. Press the “ ”, the host will enter into partial arm
mode immediately.
c) Disarm: Press “ ” to close the system, the host enters into disarm
status after the host makes “di, di” sound and the “
” is on.
5.2 Emergency alarm
When an emergency alarm occurs, press “ ” and the host will enter into
emergency alarm status immediately and the siren will alarm for 90
seconds to inform the neighbors. At the same time, it will automatically
dial the preset alarm phone numbers cycled for three times and send SMS
of “Emergency alarm”
GSM alarm system
4.7 Inquire host’s arm/disarm status
4.8 Inquire host’s external power status
Ⅴ. Usage
5.1 Arm/partial arm/disarm by remote controller
5.2 Emergency alarm
5.3 External power failure alarm
5.4 Alarm and handle
Ⅵ. Operation Cautions
Ⅶ. Learning operation
7.1 How to learn a sensor/remote controller into JN-M02
7.2 How to know which zone a sensor has been learnt into
7.3 How to delete all the devices that have been learnt
Appendix: Operation guideline
5.3 External power failure alarm
When the system checks out that there is something wrong with the
external power or the external power is off for more than 2 seconds, it will
enter into alarm status immediately. At the same time, the system will
automatically dial the preset phone numbers cycled for three times and
send the SMS of “Emergency alarm”, refer to item 4.8 to send a inquiry to
the host control panel, “External power failed” will be received.
When the power supply is on, the system will stop alarming immediately
and send the SMS of “External power is OK”.
JN-M02
JN-M02
GSM alarm system
GSM alarm system
4.5 Arm/disarm
SMS for remote arm: 4 numbers for password +A1
1. Instruction
The alarm system adopts SMS data transmission and voice platform of
GSM network to send control command and receive alarm remotely. The
system can be set delayed-arm. When a signal is detected by detectors,
the detectors will send alarm signal to host immediately, then the host
sends alarm SMS to its preset mobile phone numbers, and meanwhile
dials its preset telephone/mobile phone numbers automatically and drive
wiretap. In addition, the color LCD can show the time, date and the
status of arm, disarm, GSM signal, power, alarm etc. With the LCD, it is
very easy for you to operate.
SMS for remote disarm: 4 numbers for password +A2
Example: The host’s password is 1234. If you want to set the host in
arm mode.
Send SMS: 1234A1
4.6 Change zone’s name
Input SMS: 4 numbers for password + DM + zone’s code (2 numbers) +
changed name
Reply SMS: Changed zone’s name
Example: The password is 1234. If you want to change zone 06’s name
to be “PIR alarm for bedroom”.
Following are the specific functions,
Send SMS: 1234DM06 PIR alarm for bedroom
1. With French Wavecome double frequency GSM module.
Note: Changed name should be less than 24 characters.
2. With color LCD show screen and keyboard on the host.
Zone’s code: 01 to 08, each code with two numbers.
3. 10 wireless guarding zones (1 wireless SOS zone, 1 fire alarm zone,
and other 8 wireless guarding zones can be defined by user ) and 1
external power failure alarm zone.
4.7 Inquire host’s arm/disarm status
Input SMS: 4 numbers for password + W1
Reply SMS: The host’s arm/disarm status
4. Send SMS to 3 preset mobile phone numbers automatically while
alarming.
5. Call 3 preset phone numbers automatically and monitor at site while
alarming.
6. Set the time of arm/partial arm/disarm.
4.8 Inquire host’s external power status
Input SMS: 4 numbers for password + W2
Reply SMS: The host’s external power status
Ⅴ. Usage
7. Arm/disarm by the keyboard on the host, remote controller or SMS.
8. Program the alarm host by keyboard or SMS.
JN-M02
5.1 Arm/partial arm/disarm by remote controller
JN-M02
GSM alarm system
GSM alarm system
Example: Set 1388888888 as the first mobile phone number for SMS
9. Modify the name of 8 wireless guarding zones and inquire the status
alarm. The host’s password is 1234.
of alarm host by SMS demand.
Send SMS: 1234DD11388888888
10. Define the 8 wireless guarding zones as arm/partial arm by keyboard
Note: The serial number shows alarm sequence (must be 1,2, 3).
on the alarm host.
11. With standby rechargeable battery
4.2 Set three phone numbers for auto-dialing alarm
Input SMS: 4 numbers for password + DD + serial number + phone
number.
12. The alarm host automatically stores system status, while its power is
off.
13. Connect with the alarm center through GSM network.
Example: Set 01088888888 as the first phone number for auto-dialing
alarm. The host’s password is 1234.
Send SMS: 1234DD401088888888
Note: The serial number shows alarm sequence (must be 4, 5, 6).
4.3 Delete alarm phone numbers
Input SMS: 4 numbers for password +DD + serial number.
Example: The host’s password is 1234. If you want to delete the first alarm
phone number,
Send SMS: 1234DD1
Note: The serial number shows alarm sequence (must be 1, 2, 3, 4, 5, 6).
4.4 Change password of alarm host
Input SMS: 4 numbers for password + DD +7 + 4 new numbers for
password
Specification
a) GSM
GSM frequency: 900/1800MHz or 850/1900MHz (optional)
Consumption: 1W (while sending message)
b) Working frequency of detectors
315M & 433M (optional)
c) External power failure alarm
Start-time: less than 2s
d) Alarm response time
Less than 8s (GSM in normality)
e) The volume of siren
110db
f) Power
Example: The initial password is 1234, if you want to set 5678 as the new
Power requirements: AC 110-220V 50Hz or 60Hz
password,
Working power consumption:less than 3W
Send SMS: 1234DD75678.
JN-M02
JN-M02
GSM alarm system
Standby battery:DC 8.4V
Standby battery working hours: more than 15 Hours
g) Working conditions
Operating temperature: -20℃ ~ 60℃
Humidity: 20% to 95%
GSM alarm system
c) Timing disarm
In disarming status, press SET, when “SET, ” appears on the LCD
display, then input: * + time (hour/minute) + OK.
Example: Set 16:35 as the disarm time, input * + 1635 + OK, then you
will hear “di, di” sound for conformation.
To cancel it, press * + 9999 + OK in disarm mode.
h) Weight of alarm host
Net weight: 0.5Kg
Gross weight: 0.75Kg
i) Dimension of alarm host
Dimension: 160mm (Long)×113mm(Wide)×38mm(High)
Ⅱ. Installation
2.1 Alarm Host’s section figure
3.1.9 Prohibit/allow sending SMS when arm/disarm the
system by controller or keyboard
After passing the verification of password, press SET, when “SET”
appears on LCD display, input 9 + OK, then you will hear “di, di” sound
for confirmation.
3.1.10 Alarm
When the host alarms, “ ”, “SMS”, “TEL” and guarding zones will
appear on the LCD display and it will drive siren to sound for 90 seconds.
(P: external power failure, E: SOS alarm, F: fire alarm, 1-8 wireless
guarding zone).
3.1.11 Exit setting status
In the setting status, the host will exit automatically if there is no response
within 15 seconds.
After setting successfully, press “ESC” to exit.
Ⅳ. SMS control command
4.1 Set three mobile phone numbers for SMS alarm.
Input SMS: 4 numbers for password + DD + serial number + mobile phone
number.
JN-M02
JN-M02
GSM alarm system
GSM alarm system
appears on the LCD display,
Input:# + zone numbers (When there is illegal intrusion, the zones that
can alarm in partial arm mode) + “OK”
Example: Set zone 4, 6, 8 as alarm zones in partial arm mode, input # +
4 6 8 + OK, then you will hear “di, di” sound for confirmation. When
alarming, zone 4, 6, 8 will alarm but other five zones will not alarm in
partial arm mode.
3.1.7 Set time of the alarm host
After passing the verification of password, press SET, when “SET, ”
appears on the LCD display,
Input: 8 + year/month/day/hour/minute/second (each with two numbers) +
OK, then you will hear “di, di” sound for confirmation.
Example: Suppose the present time is 12:13.05 and the date is 08-01-2007,
input 8 + 070108121305+OK.
2.2 Insert a valid SIM into the alarm host
Before installing the host, please insert SIM card through the real slot..
2.3 Run
3.1.8 Set/cancel the time of arm/disarm/partial arm
a) Timing arm
In arming status, press SET, when “SET, ” appears on the LCD display,
then Input: * + time (hour/ minute) + OK.
Example: Set 16:08 as the arm time, input * + 1608 + OK, then you will
hear “di, di” sound for confirmation.
To cancel it, press * + 9999 + OK in arm mode.
b) Timing partial arm
In partial arm status, press SET, when “SET, ” appears on the LCD
display, then input: * + time (hour/minute) + OK.
Example: Set 16:25 as the partial arm time, input * + 1625 + OK, then you
will hear “di, di” sound for confirmation.
To cancel it, press * + 9999 + OK in partial arm mode.
JN-M02
Make sure that the power supply is connected correctly, and turn on the
host power switch. The alarm host will search the GSM network
automatically within 25 seconds after it is started. Then the LCD display
turns on and shows the time and the status of arm, disarm, GSM signal etc.
The COM is twinkling. When the external power is normal, the LCD
display keeps on. If there is no external power, it is off automatically after
operation.
Ⅲ. Operation steps
When setting by the keyboard, every time you press the button you
will hear “di” sound for confirmation. If there’s no voice, if no “di” is
heart when a button is pressed, hold it until “di” appears. To cancel
the input numbers, please press “CLS”
JN-M02
GSM alarm system
button before inputting “OK”. If the LCD display shows “FAIL”,
please check and reset it.
3.1 Set by keyboard
3.1.1 Password verification
Press “SET”, input password + OK, then you will hear “di,di” sound for
confirmation. While “SET” and “SMS” appear on LCD display, it means
that the password is correct.
Note: The initial password is 1234 (must be four numbers).
3.1.2 Set/delete three mobile phone numbers for SMS alarm.
a) Set the mobile phone number
After passing the verification of password, press “SET” button, when
“SET, SMS” appears on the LCD display, input serial number + mobile
phone number + OK
Example: Set 1368888888 as the first mobile phone number for SMS
alarm. Input: 1+ 1368888888 + OK, then you will hear “di, di” sound for
confirmation.
According to the method, you can finish the setting of the other two
mobile phone numbers.
Note: Serial number can only be 1, 2, 3 and the number “1” is the first
mobile phone number. for SMS alarm. The phone No. must be less than/in
20 numbers.
b) Delete the mobile phone number
Input: serial number﹢“OK”, then you can cancel the mobile phone
numbers.
3.1.3 Set/delete three phone numbers for auto-dialing alarm
If you do not need this function, ignore the following setting.
a) After passing the verification of password, press “SET” button, when
JN-M02
GSM alarm system
“SET, TEL” appears on the LCD display.
Input: serial number﹢phone number + OK
Example: Set 1368888888 as the first phone number for auto-dialing alarm.
Input: 4 + 1368888888 + OK, then you will hear “di, di” sound for
confirmation.
Note: Serial number can only be 4, 5, 6 and the number “4” is the first phone
number for auto-dialing alarm. The phone number can be mobile phone or
telephone, but mustn’t be more than 20 numbers.
b) Delete the phone number
Input: serial number﹢OK, then you can cancel it.
3.1.4 Change password of the alarm host
After passing the verification of password, press SET, when “SET, PAS”
appears on the LCD display,
Input: 7﹢new password + OK,
Example: Set 4321 as the new password.
Input: 7 + 4321 + “OK”, then you will hear “di, di” sound for confirmation.
Note: The initial password is 1234 (must be four numbers).
3.1.5 Set new ID of the alarm host
After passing the verification of password, press SET, when “SET,ID”
appears on the LCD display.
Input: 0 + six new ID numbers + OK,
Note: the initial ID is 000000.
Example: Set 123456 as the new ID.
Input: 0 + 123456 + “OK”, then you will hear “di, di” sound for
confirmation.
3.1.6 Set type of 8 wireless guarding zones
After passing the verification of password, press SET, when “SET, TYPE”
JN-M02