1
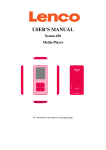
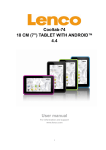
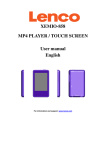
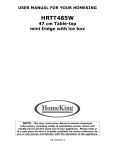
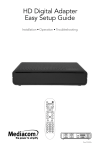
CD Micro System with DAB+ MC-148 DAB+ USER MANUAL www.lenco.com Please read this manual carefully before connecting or operating the appliance. Save it for future reference. 1 TABLE OF CONTENTS IMPORTANT SAFETY INSTRUCTION ........................................................ 2 PANELS AND CONTROL ............................................................................. 4 PREPARATION FOR USE............................................................................ 5 GENERAL OPERATION ............................................................................... 6 CD OPERATION ........................................................................................... 7 DAB+ OPERATION .................................................................................... 10 FM OPERATION ......................................................................................... 14 EXTERNAL INPUT ..................................................................................... 16 SPECIFICATIONS ...................................................................................... 16 TROUBLESHOOTING ................................................................................ 17 SERVICE AND SUPPORT ......................................................................... 18 ACCESSORIES • 1 x The Unit • 2 x Speakers • 1 x Remote Control (with batteries) • 1 x User Manual NOTE: This unit is designed to enter STANDBY mode automatically after 15 MINUTES (approximately) of inactivity. Press the STANDBY button to wake the unit. NOTE: When you power on the unit from standby the last used mode will resume. 1 IMPORTANT SAFETY INSTRUCTION CAUTION! RISK OF ELECTRIC SHOCK DO NOT OPEN TO REDUCE THE RISK OF ELECTRIC SHOCK DO NOT REMOVE COVER (OR BACK) • When using electrical equipments basic safety precautions should always be followed. • This equipment is not intended for use by persons (including children) with reduced physical, sensory or mental capabilities or lack of experience or knowledge. They should be given appropriate supervision and instructions to use the equipment by a person responsible for their safety. • Ensure the equipment is not too close to heat emitting appliances or placed in direct sunlight. • Check that the voltage indicated on the data plate corresponds with that of the local network before connecting the equipment to the mains power supply. • Do not leave the equipment unattended while connected to the power supply. • Do not immerse the equipment in water or any other liquids. It is imperative to unplug the power cord after the equipment has been used, before it is cleaned and while being repaired. • Close supervision is required when using this equipment near children. • Never leave the equipment within reach of children. • Repairs to electrical appliances should only be performed by qualified personnel. Improper repairs may place the user and/or equipment at serious risk. • This equipments intended for household use only and should not be used for industrial or commercial purposes. • Do not operate this appliance with a damaged plug or cord, after a malfunction or after being dropped or damaged in any way. • Do not use this equipment for anything other than its intended use. This equipment must be placed on a stable, heat resistant surface. • Do not push objects into any openings as damage to the equipment and/or electric shock may occur. • Do not use this product in wet or bad weather conditions. This product is not a toy. • Do not play music at excessive levels especially near children. • The normal function of the product may be disturbed by Strong Electro Magnetic Interference. If so, simply reset the product to resume normal operation by following the instruction manual. 2 IMPORTANT SAFETY INSTRUCTION • Refer all serving to qualified service personnel. Servicing is required when the apparatus has been damaged in any way, such as power-supply cord or plug is damaged, liquid has been spilled or objects have fallen into the apparatus, the apparatus has been exposed to rain or moisture. • Please keep the unit in a good ventilation environment. • These servicing instructions are for use by qualified service personnel only. To reduce the risk of electric shock, do not perform any servicing other than that contained in the operating instructions unless you are qualified to do so. • The main plug is used as disconnect device, the disconnect device shall remain readily operable. • This equipment is a class II or double insulated electrical appliance. It has been designed in such a way that it does not require a safety connection to electrical earth. • The lighting with the triangle symbols shows that the unit contains non-insulated dangerous voltage. • The batteries in remote shall not be exposed or excessive heat such as sunshine and fire. • The apparatus shall not be exposed to liquid or objects filled with liquids, such as vases, shall not be placed on the apparatus. WARNING: DANGER OF RADIATION CLASS 1 LASER PRODUCT These labels tell you that the unit contains a laser component. Opening the CD compartment lid and defeating the safety interlocks will expose the user to radiation from the laser beam. Do not stare into the laser while it is opening. 3 PANELS AND CONTROL FRONT PANEL 1 2 3 4 5 6 7 8 9 10 STOP/MENU 11 12 AUDIO IN REAR PANEL 14 13 1. 2. 3. 4. 5. 6. 7. 8. 9. 10. 11. 12. Indicator STANDBY mode Display PLAY/PAUSE button SOURCE button STOP/MENU button CD loading drawer EJECT button IR sensor VOLUME knob PREVIOUS/NEXT button AUDIO input 13. FM antenna 14. Speaker connectors 15. Power supply 8 15 MC-148 DAB+ CD Micro System with PLL FM and DAB+ AC 220-240V 50Hz 40W AC 220-240V 50Hz Input: Made in China REMOTE CONTROL 16 27 17 18 19 20 21 22 28 29 30 31 32 23 33 24 34 35 25 26 - 36 37 16. STANDBY button 17. CD mode button 18. DAB/FM button 19. PLAY/PAUSE button 20. STOP/MENU button 21. NEXT button 22. FAST REWIND button 23. PREVIOUS button 24. NUMBER button 0-9 25. TONE button 26. VOLUME +/- button 27. EJECT button 28. AUX IN mode button 29. REPEAT button 30. INFORMATION button 31. ENTER button 32. FAST FORWARD button 33. PROGRAM button 34. SHUFFLE button 35. LOUD button 36. DSP button 37. MUTE button 4 PREPARATION FOR USE CONNECT WITH SPEAKERS PEAR PANEL LEFT SPEAKER ANTENNA SPEAKERS(8Ω) RIGHT SPEAKER 1. Unwarp the speaker wires. 2. Place a speaker on either side of the main unit, preferably at the same height, and with at least 150mm between each speaker and the main unit. 3. Connect the speaker plugs to rear of the unit. Take care to match the speaker placed to the LEFT output on the rear of the unit. Repeat for the RIGHT speaker. 4. When connecting ensure the RED wire connects to the RED terminal and the BLACK wire to the BLACK terminals. CONNECT THE POWER 1. Check the voltage marked on the rear rating plate is the same as the voltage in your area. 2. Connect the main plug to the wall socket and power on. FITTING THE REMOTE CONTROL BATTERIES 1. Remove the battery cover (as shown). 2. Insert 2 x AAA batteries, taking note that the polarities match up. 3. Replace the battery cover, in the same manner as you removed it. DISPOSAL OF BATTERIES Dispose of used batteries with regard to the recycling regulations in your area. Do not short circuit batteries or throw them into water, the general rubbish or in a fire. Weak batteries can leak and damage the remote control. Replace them in good time! 5 GENERAL OPERATION STANDBY MODE Press the STANDBY button on the unit or the remote control to turn on the system or to put the system into standby mode. To resume normal operation, press either button again. VOLUME CONTROLS Rotate the VOLUME control clockwise or press the VOLUME+ button to increase the volume level. Rotate the VOLUME control anti-clockwise or press the VOLUME- button to decrease the volume level. MUTE FUNCTION Press the MUTE button at any time to silence the output. Press again to resume. DSP EFFECTS Press the DSP button repeatedly to alter the sound field: Jazz, Rock, Classic, Pop, Live, Dance and off. LOUDNESS FUNCTION This function will add a rounder bass sound at low levels. Press the LOUD button on the remote control to enable the effect. Press again to disable the effect. SWITCHING MODES To switch between the mode: CD, FM, DAB+, and AUX IN. Press SOURCE button on the unit to cycle through the modes or press the relevant button on the remote control from CD, DAB/FM, and AUX IN. Press DAB/FM button repeatedly to switch between DAB+ and FM mode. TONE CONTROLS Adjust the Bass and Treble tone controls. 1. Press the TONE button on the remote control. 2. The first adjustment is Bass. Use the VOL+/- buttons to adjust. 3. Press the TONE button again to edit Treble. Use VOL+/- buttons to adjust. 4. Press the TONE button once more to edit Volume. Use the VOL+/buttons to adjust. 6 CD OPERATION PLAYBACK 1. Make sure you are in CD mode, if not press the CD button on the remote or press the SOURCE button until you reach CD. 2. Press the EJECT button, when the disc drawer pops out insert a disc (label side facing upwards), press the EJECT button again to close. 3. When the door is closed “LOADING DISC” will appear on the display as the unit detects compatible audio tracks. 4. Playback will begin automatically from Track 01. 5. To stop playback, press the STOP/MENU button once. Press PLAY/PAUSE button to resume. If press the STOP/MENU button twice, it will start from beginning. 6. To pause playback, press the PLAY/PAUSE button during playback. To resume playback, press once more. NOTE: The playback of CD Mp3 disc is the same as a standard CD. SKIPPING TRACKS 1. To skip to the next track on a disc press . 2. To skip to the previous track press . FAST SEARCHING TRACKS To fast forward a track during playback press the button. Each press of the button increases the search speed e.g.: 2x & 4x, the next press will resume normal playback. To fast rewind a track during playback, press the button. REPEAT OPERATION 1. During playback pressing the REPEAT button will flag the current track to repeat indefinitely. You will see 'REPEAT:One' on the display. 2. Pressing the REPEAT button again will repeat all tracks on the disc. You will see 'REPEAT:All' on the display. 3. To cancel the repeat function, press the REPEAT button for a third time. You will see 'REPEAT:Off' on the display. NOTE: The REPEAT function is available on CD Mp3. 7 NUMERIC BUTTONS 0-9 While listening to a CD a specific track number can be played by pressing the relative digit on the number buttons. e.g.: track 6 would be 06. To play track 12 you would press the 1 button then 2. CD OPERATION PROGRAM PLAYBACK You may wish to play back tracks of a CD in a different order than the original disc was recorded in. 1. Press the PROGRAM button to enter the program setup function. 2. Use the / buttons to skip between the play order numbers. 3. Set the play order track numbers using the numeric keys. Play Order Track Number For example: the diagram on the right would play track 02 as the first track and track 14 as the second track. 4. When tracks 1-2 are set, use the / buttons to access further play order screens. Repeat steps 2-3 for the remainder of the program play list. 5. When complete, use the / buttons to scroll across to the arrow on the right of the display and press the ENTER or PLAY/PAUSE button to begin playback. 6. To cancel the program sequence, press the STOP/MENU button twice. (The first press is to stop the playback, and the second is to cancel.) NOTE: The program function is not supported with CD MP3. RANDOM CD OPERATION 1. Press the SHUFFLE button on the remote control. The CD contents will be played once in a random order. You will see 'SHUFFLE' on the display. 2. To cancel the random operation, press the SHUFFLE button again. You will see 'OFF' on the display. 8 NOTE: The SHUFFLE play is only available on standard music Cds, not Mp3 Cds. 9 DAB+ OPERATION Switch to DAB+ mode by pressing SOURCE button on the unit or DAB/FM button on the remote control. AUTO SCAN MODE 1. To activate the full scan press the STOP/MENU button. 2. When you see the <Autoscan> option, press the PLAY/PAUSE or ENTER button. The unit will search for all available DAB+ stations that can be tuned. MANUAL TUNING As well as an auto tune function, you can manually tune the receiver. 1. Press the STOP/MENU button in DAB+ mode, and use either / on the unit, / on the remote to find <Manual tune>. Press the PLAY/PAUSE button on the main unit or ENTER button on the remote to activate the manual tune options. 2. Now use the / on the unit, / on the remote to cycle through the DAB+ ensembles/multiplexes, which are numbered from 5A to 13F. 3. Press the ENTER or PLAY/PAUSE button to view the ensemble/multiplex details. Press the ENTER or PLAY/PAUSE button again to enter the multiplex. 4. To see what stations are present in the found ensemble/multiplex, just press either / on the unit, / on the remote. When you've located a station that you would like to listen to, press the ENTER or PLAY/PAUSE button. 5. Any stations found during the manual tune operation will be added to your station list. STORING STATION PRESETS It is possible to store up to 10 of your favorite stations. This will enable you to access your favorite stations quickly & easily. 1. To store a preset, you must first be listening to the station that you would like to save. 2. Then press & hold one of the numeric buttons from 1-0 to store the station under that number. You will see Preset X Stored appear on the display with X being the number you stored the station under. 10 DAB+ OPERATION RECALLING A STATION PRESET To select a preset, just press the required numeric button while in DAB+ mode to activate the station you stored. DISPLAY MODES Every time you press the INFO button on the remote control, the display will cycle through the following display modes: The information is displayed on the lower segment of the LCD display. DLS (scrolling text) Channel Frequency Signal Strength Signal Error Programme Type Bitrate Ensemble Name DLS (Dynamic Label Segment) Dynamic label segment is a scrolling message that the broadcaster may include with their transmissions. This message usually includes information, such as program detail etc. Signal strength Displays how strong the current signal being received is. Program type This describes the “Style” or Genre” of music that is being broadcast e.g. “Rock “or “Classical”. Ensemble/Multiplex (Group name) A multiplex/ensemble is a collection of radio stations that are bundled and transmitted on one frequency. There are national and local multiplexes. Local ones contain stations that are specific to that area e.g. MXR West. NOTE: DAB+ unlike normal radio, groups together several radio stations and transmits them on one frequency. 11 DAB+ OPERATION Channel Frequency Displays the frequency information for the current station. Signal Error Displays information regarding the error rate in the signal. Bit Rate This displays the type of broadcast you are receiving e.g. mono or stereo and what bit rate is being used. SECONDARY SERVICES On some occasions you will see a “>>” symbol directly after the name of the station. This indicates that there are secondary services available to that station. These secondary services contain extra services that relate to the primary station, e.g. a sports station may want to add extra commentaries. The secondary services are inserted directly after the primary station. 1. To activate a secondary service press the FFWD on the remote. You will see that the >> has changed to a << to indicate you have selected the secondary service. 2. Press the ENTER or PLAY/PAUSE button to begin playback of the service. 3. To return to the original service, press the FRWD and then ENTER or PLAY/PAUSE. PRUNING When the radio has performed a scan in several locations, you may find there are stored stations that you can no longer receive. This function automatically removes them from the stored station list. 1. Press the STOP/MENU button in DAB+ mode, and use either / on the unit, / on the remote to find <Prune>. Press the PLAY/PAUSE button on the main unit or ENTER button on the remote. 2. Use the / buttons on the remote to select YES and press ENTER or PLAY/PAUSE to select. 12 DAB+ OPERATION DRC (DYNAMIC RANGE CONTROL) This causes the radio to reduce the dynamic range of the audio signal. The purpose of this is to adapt the dynamic range of the audio signal to listening in a noisy environment. NOTE: this is not available on some DAB+ stations. 1. Press the STOP/MENU button in DAB+ mode, and use either / on the unit, / on the remote to find <DRC>. Press the PLAY/PAUSE button on the main unit or ENTER button on the remote. 2. Choose between DRC off, DRC high and DRC low using either / on the unit, / on the remote control. 3. Press the ENTER or PLAY/PAUSE button to save the setting. FACTORY RESET Follow the below steps to restore to factory settings. 1. Press the STOP/MENU button. Use / buttons on the unit or /on remote control to find <System>, press ENTER button. 2. When you see <Factory reset>, press ENTER button. 3. Select <YES> using / buttons, then press ENTER to reset process. NOTE: Once the reset has been taken place, you will lose all the stored presets both on DAB+&FM mode, and the internal DAB+ registry. SELECT LANGUAGE Follow the below steps to select the language of the system. 1. Press the STOP/MENU button. 2. Use / buttons on the remote control to find <System>, press ENTER button. 3. When you see <Language>, press ENTER button. 4. Use / buttons to select one of the system languages, press ENTER button to confirm selection. 13 FM OPERATION Switch to the FM mode. SCANNING FOR STATIONS 1. You can scan up or down the frequency range manually by pressing the / buttons on the remote or pressing / buttons on the unit to increase or decrease the frequency in 0.05MHZ increments. To scan through the frequency range quickly press and hold the / buttons on the unit or press the / buttons on the remote control. 2. Once a station has been found, the scanning will stop automatically. If no station is found, then the tuning will stop once it has cycled through the entire FM band (87.5-108MHz). SCAN MODES When performing a scan you can set the sensitivity level of the stations to be found. E.g.: strong signals only or all stations. 1. In FM mode, press the STOP/MENU button, when <Scan Setting> appears on the display press the ENTER or PLAY/PAUSE button to view the submenu. 2. Use either / on the unit, / on the remote to select either <All Stations> (which will detect any station, even with a weak signal) or <Strong Station only> (which will only detect stations with a good signal strength). Press the ENTER or PLAY/PAUSE button to select the required option. 3. When you perform a scan as described in above, only stations fitting the applied setting will be detected. STORING STATION PRESETS It is possible to store up to 10 of your favorite stations. This will enable you to access your favorite stations quickly and easily. 1. To store a preset, you must first be listening to the station that you would like to save. 2. Then press and hold one of the numeric buttons from 1-0 to store the station under that number. You will see Preset X Stored appear on the display with X being the number you stored the station under. 14 FM OPERATION RECALLING A STATION PRESET To select a preset, just press the required numeric button while in FM mode to activate the station you stored. DISPLAY MODES Every time you press the INFO button on the remote control, the display will cycle through the following display modes: The information is displayed on the lower segment of the LCD display. Audio Mode (Stereo/Mono) PTY Radio Text Name Audio Mode This denotes whether the stations is in stereo or mono. Radio text As with DAB+, the broadcaster can include a scrolling text that displays information about the current program. If Radio text information is not available, then the display will show <No Radio Text>. PTY (Program type) This describes the “Style” or “Genre” of music that is being broadcast e.g. “Rock” or “Classical”. If no program type has been set then <No PTY> will be displayed. Name (Program name) This will display the frequency of the current station. If no program name, <No Name> will be displayed. AUDIO MODE Press STOP/MENU button repeatedly on the remote control, the display will cycle through the display modes. When shows <Audio setting>, press ENTER button to select between <Stereo allowed> and <Forced mono>. 15 EXTERNAL INPUT CONNECTING AN EXTERNAL AUDIO DEVICE External audio sources such as iPod's & MP3 players can be connected using a 3.5mm to 3.5mm audio cable (not supplied). Mp3 player 1. Connect one end of the cable to the AUDIO devices headphone/Line output and the other end to the AUDIO IN input on the front of the unit. 2. Press the SOURCE button until you reach the AUX IN option or press the AUX IN button on the remote control. 3. Adjust the volume to your desired level. NOTE: When connecting via the headphone output the volume of the Micro system is affected by the volume control on the player. Ensure that the player is set to about 70-80% to avoid distortion. SPECIFICATIONS Power Supply AC 220-240V 50Hz Max. Power Consumption 40W Speaker Power 2 x 5W FM 87.5-108MHz DAB+ 174.928-239.200MHz Unit Size 170 x 220 x 140 mm 16 Speaker Size 130 x 186.5 x 125 mm Net Weight 3.0kg(Approximate) TROUBLESHOOTING In the unlikely event of difficulties with your appliance please follow the trouble shooting guide below. Problem Reason(s) Solution(s) No Power Power cable not Make sure the plug is connected to wall connected. socket. Power socket is Switch the power on. not switched on. No Sound CD/AUX/RADIO. No Sound from AUX input. Volume is too low. AUX source volume is too low. Sound is distorted. Sound is distorted from AUX input. Volume is too high. AUX Reduce the volume. Reduce source volume is too the output volume of the high. AUX source. Unable to Play No disc in the tray. Disc not loaded properly. Disc is dirty. Insert a compatible disc. Check the disc loaded. Clean the disc. Static Sound Poor reception Re-locate the antenna (FM). Desired station not found. Weak signal Station not available in your area. Weak or no DAB + signal DAB+ not available in your area. Use the manual tune function. See DAB+ availability website: http://www.getdigital radio.com/ I can hear a burbling noise on some stations. Weak signal. Try re-positioning the aeria (earphones). Unit switches off after 20 minutes of inactivity. Auto standby mode in operation. This unit is designed to enter STANDBY mode automatically after 20 17 Increase the volume. Increase the output volume of the AUX source. minutes of inactivity. Press the STANDBY button to wake the unit. SERVICE AND SUPPORT For information: www.lenco.com Lenco offers service and warranty in accordance to European law, which means that in case of repairs (both during and after the warranty period) you should contact your local dealer. Important note: It is not possible to send products that need repairs to Lenco directly. Important note: If this unit is opened or accessed by a non-official service center in any way, the warranty expires. This device is not suitable for professional use. In case of professional use, all warranty obligations of the manufacturer will be voided. Products with the CE marking comply with the EMC Directive (2004/108/EC) and the Low Voltage Directive (2006/95/EC) issued by the Commission of the European Community. The declaration of conformity may be consulted at https://lencosupport.zendesk.com/forums/22413161-CE-Documents This symbol indicates that the relevant electrical product or battery should not be disposed of as general household waste in Europe. To ensure the correct waste treatment of the product and battery, please dispose them in accordance to any applicable local laws of requirement for disposal of electrical equipment or batteries. In so doing, you will help to conserve natural resources and improve standards of environmental protection in treatment and disposal of electrical waste (Waste Electrical and Electronic Equipment Directive). ®All rights reserved 18