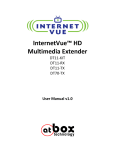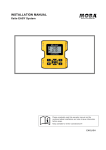
1
EW-7438RPn User Manual 11-2011 / v1.0 COPYRIGHT Copyright © Edimax Technology Co., Ltd. all rights reserved. No part of this publication may be reproduced, transmitted, transcribed, stored in a retrieval system, or translated into any language or computer language, in any form or by any means, electronic, mechanical, magnetic, optical, chemical, manual or otherwise, without the prior written permission from Edimax Technology Co., Ltd. Edimax Technology Co., Ltd. makes no representations or warranties, either expressed or implied, with respect to the contents hereof and specifically disclaims any warranties, merchantability, or fitness for any particular purpose. Any software described in this manual is sold or licensed as is. Should the programs prove defective following their purchase, the buyer (and not this company, its distributor, or its dealer) assumes the entire cost of all necessary servicing, repair, and any incidental or consequential damages resulting from any defect in the software. Edimax Technology Co., Ltd. reserves the right to revise this publication and to make changes from time to time in the contents hereof without the obligation to notify any person of such revision or changes. The product you have purchased and the setup screen may appear slightly different from those shown in this QIG. For more information about this product, please refer to the user manual on the CD-ROM. The software and specifications are subject to change without notice. Please visit our website www.edimax.com for updates. All brand and product names mentioned in this manual are trademarks and/or registered trademarks of their respective holders. Edimax Technology Co., Ltd. Add: No. 3, Wu-Chuan 3rd Rd., Wu-Ku Industrial Park, New Taipei City, Taiwan Tel: +886-2-77396888 Email: [email protected] Notice According to GNU General Public License Version 2 This product includes software that is subject to the GNU General Public License version 2. The program is free software and distributed without any warranty of the author. We offer, valid for at least three years, to give you, for a charge no more than the costs of physically performing source distribution, a complete machine-readable copy of the corresponding source code. Contents Contents ............................................................................................................. 1 Chapter I: Product Information ...................................................................... 2 1-1 Introduction and safety information ................................................................ 2 1-2 Safety Information ........................................................................................... 3 1-3 Package Contents ............................................................................................. 4 1-4 Familiar with your new wireless repeater........................................................ 5 Chapter II: Repeater mode .............................................................................. 8 2-1 Repeater mode Quick Installation Guide......................................................... 8 2-1-1 Hardware WPS button setup ................................................................ 9 2-1-2 Web browser quick setup ................................................................... 12 2-2 Repeater mode Advanced Settings ................................................................ 17 2-2-1 Connect to web configuration menu .................................................. 17 2-2-2 Home .................................................................................................. 19 2-2-3 WPS Setting ....................................................................................... 21 2-2-4 Advanced Settings .............................................................................. 24 2-2-5 MAC Address Filtering ...................................................................... 28 2-2-6 System Utility..................................................................................... 35 2-2-7 Configuration ..................................................................................... 38 Chapter III: Appendix .................................................................................... 41 3-1 Configuring TCP/IP on PC ............................................................................ 41 3-1-1 Windows XP IP address setup: ........................................................... 41 3-1-2 Windows Vista/Windows 7 IP address setup: .................................... 42 3-2 Specifications................................................................................................. 45 3-3 Glossary ......................................................................................................... 46 1 Chapter I: Product Information 1-1 Introduction and safety information Thank you for purchasing this mini 802.11b/g/n wireless repeater! The ultra-compact design with power built-in allows you to install this repeater everywhere, and still providing excellent network performance to extend the Wi-Fi signal and wireless coverage. Other features of this wireless repeater including: Extend the wireless signal inside your home or office. Ultra-compact design while maintaining excellent network performance. LED signal indicator to easily realize the best location placement to extend WiFi signal and secure better wireless performance. The device can support Repeater mode, AP mode and AP client mode Hardware switch button for user to change operation mode quickly without logging into web firmware. WPS (Wi-Fi Protected Setup) hardware button for easy installation and secure wireless security. 2 1-2 Safety Information In order to keep the safety of users and your properties, please follow the following safety instructions: 1. This wireless repeater is designed for indoor use only. DO NOT expose this device to direct sun light, rain, or snow. 2. DO NOT put this at or near hot or humid places, like kitchen or bathroom. Also, do not left this Wireless repeater in the car in summer. 3. Do not allow kids to put any small parts of this wireless repeater in their mouth, and it could cause serious injury or could be fatal. If they throw this wireless repeater, it will be damaged. PLEASE KEEP THIS WIRELESS REPEATER OUT THE REACH OF CHILDREN! 4. This Wireless repeater will become hot when being used for long time (This is normal and is not a malfunction). DO NOT put the Wireless repeater on a paper, cloth, or other flammable objects after the Wireless repeater has been used for a long time. 5. There’s no user-serviceable part inside the Wireless repeater. If you found that the Wireless repeater is not working properly, please contact your dealer of purchase and ask for help. DO NOT disassemble the Wireless repeater by yourself, warranty will be void. 6. If the Wireless repeater falls into water, DO NOT USE IT AGAIN BEFORE YOU SEND THE CARD TO THE DEALER OF PURCHASE FOR INSPECTION. 3 1-3 Package Contents Before you start to use this wireless repeater, please check if there’s anything missing in the package, and contact your dealer of purchase to claim for missing items: z z z z z 1 x Wi-Fi extender 1 x Ethernet cable 1 x Access key card 1 x Quick installation guide 1 x CD with user manual and multi-language QIG 4 1-4 Familiar with your new wireless repeater Interface Descriptions A B C Item A Item Name LAN B Reset / WPS C ON/OFF Description 10/100M Ethernet LAN Port with Auto-MDI/MDI-X. Connecting to computer, switch or hub for local network sharing. Reset the repeater to factory default settings (clear all settings) or start WPS function. Press this button and hold for 10 seconds to restore all settings to factory defaults, and press this button for less than 5 seconds to start WPS function. This is power on/off slide switch. If you want to switch off the repeater, switch it to Off mode. 5 LED Definitions LED Name LED Status Description Excellent signal reception On (Signal strength 50 – 100%) Flashing Signal Strength Flashing Rapidly Off Flashing Wi-Fi Off On Power Flashing Off Good signal reception (Signal strength 25 – 50%) Poor signal reception (Signal strength < 25%) No signal detected, disconnected, or in LED off mode Connected to existing Wi-Fi network (transferring data) Wi-Fi not activated or in LED off mode Device switched on and correctly powered Resetting to factory defaults Device not powered, not correctly powered, or in LED off mode 6 On Flashing WPS Flashing Rapidly Off LAN On Flashing Off WPS connection established WPS in progress (waiting for another WPS device’s connection) WPS error No WPS connection established or in LED off mode LAN port connected LAN activity (transferring data) LAN port not connected 7 Chapter II: Repeater mode Repeater mode is your Wi-Fi range extender! It can extend your wireless signal and coverage and help you to solve wireless dead zone problem. This chapter will show you how to quickly install this device by using quick setup and show you the each detailed setting on web UI page of repeater mode. 2-1 Repeater mode Quick Installation Guide For the first time setup and easy installation, you can move this device close to the Wireless Broadband Router or Access point you wish to connect, after installation done and wireless connection is built, you can move this repeater device to the place you wish to use. Insert this device into power outlet on the wall, and switch wireless repeater’s power switch to ‘ON’ (1). You should see ‘Power’ LED light up in few seconds (2). If not, please check if the power outlet you’re using is working. (2) (1) You can build wireless connection via ‘Hardware WPS button’ or ‘Software web browser’. If your broadband router or access point also supports ‘WPS button’, we recommend you to use WPS button to establish connection, it is the fast and secure way without computer. Using WPS button Using Web browser - please go to section 2-1-1 - please go to section 2-1-2 8 2-1-1 Hardware WPS button setup (1) Press and hold WPS button on repeater for 2 seconds, ‘WPS’ LED will start flashing. WPS button WPS LED (2) Press WPS button on the wireless broadband router or access point you wish to connect within 2 minutes. NOTE: this WPS button position on access point is for example, different device may have different9WPS button position. TIP: If the access point you wish to connect does not have hardware WPS button, you can also use its web configuration menu’s WPS function to establish connection. Or you can login this repeater web UI to have quick setup (detailed setup refers to ‘2-1-2 Web browser quick setup’ manual) manual) (3) If WPS connection is successfully established, ‘WPS’ LED will light for 5 minutes; if ‘WPS’ LED flashes fast, there’s something error, please wait for 2 minutes until ‘WPS’ LED off, and try from step(1) again. WPS LED When quick installation is successfully done, ‘Signal” LED will turn on. Signal LED (4) Please move repeater to the place you wish to use (a better place will be the center of your house) and insert this repeater into power outlet on the wall, the wireless connection will be established automatically. You can check ‘Signal’ LED status to understand signal reception level. Steady light: Excellent, Flash: Good, Fast flash: poor. 10 NOTE: If the Signal LED is off, it means this place is out of wireless signal of your wireless broadband router or access point, please move this repeater closer to broadband router until repeater device can receive signal from broadband router and extend its signal. The quick installation setup is completely done, you can refer to ‘2-2 Repeater mode Advanced Settings’ to login in web UI for other advanced settings. 11 2-1-2 Web brrowser quick setup c connecct to the reepeater an nd start connfigurationn procedu ures, Beffore you can youur computer must bee able to get g an IP address a auttomaticallly (use dynnamic IP address). a I it’s set too use statiic IP addreess, or youu’re unsure, If please refer to t ‘Chapteer X: Appeendix, 5-1 Configuring TCP/IIP on PC’ to mputer to use u dynam mic IP addrress. set your com mputer’s Ethernet E pport and 1. Use Etherrnet cable to connecct your com wireless repeater’s r Ethernet port. p y compputer to thee extenderr through a wireless connectio on Or connect your n in i the areaa and connnect to (seaarch for thhe available Wi-Fi networks “Eddimax_Exxtender”). Importan nt notice: If you aree using Wiindows 7 and a the following apppears, pleease click k “Connect the netwoork withouut setting it i up”. Pleease do noot click “O OK”. 12 If you haave accideentally cliccked “OK K”, you willl see the ffollowing.. Please cllick “Canccel”. 2. Now you should haave conneccted to thee Wi-Fi exxtender. Oppen your wser and innput the acccess key in addresss bar to logg in the web brow extender’s web connfigurationn interfacee. Note: The access N a key can be found f on the t access s key card d in the bo ox an nd on the Wi-Fi exte ender. 13 http://exteenderxxxxxxx httpp://extendeerxxxxxx t be prrompted too log in. The T defaultt usernamee is “admiin” 3. You will then and the deefault passsword is “1234”. “ Cllick “OK”” to continnue. w start detecting d available Wi-Fi W netw works auttomatically y. 4. iQ Setup will All the deetected Wii-Fi netwoorks will be b displayeed in the liist. Select the one to whhich you wish w to connnect and click “Next” to conntinue. If th he Wi-Fi nettwork to which w you wish to co onnect doees not apppear, click “Refresh”” to detectt again or try t to mov ve the exteender closser to the root r wireless access a poinnt. 14 Note: If you have seet the SSID N D on yourr root AP to t be hiddden, pleasee t type in thee informattion manuually. Setup exxtender man nually b promptted to inpuut access point’s p wirreless secuurity key. 5. You will be Input the same passsword as the t existin ng Wi-Fi network n inn the “KEY Y” field and click “Nexxt” to conntinue. W passw word as thhe root Notte: The exxtender muust have thhe same Wi-Fi wirreless acceess point. EXT’ the Wi-Fi W Exttender willl start to vverify the 6. After youu click “NE wireless key k with your y associated acceess point and a show yyou result within 2 minutes. m P Please folloow the insstruction to continuee setup. 15 7. When keyy is correcct, wirelesss repeater will displlay the connnection informatioon for youu. If everyything’s co orrect, pleaase click ‘APPLY’ button to get conneected. SID is the same as thhe root acccess pointt’s 8. By defaullt, the exteender’s SS SSID. Youu can channge the exxtender’s SSID S if yoou want. C Click “APPLY”” to compllete the settup. w seconds for f wirelesss repeater to rebooot. 9. Please waait for few b will w login repeater’s r hhome pag ge 10. After rebooot complete, web browser of Web UI. U You cann close broowser and d use your computerr to connecct to wirelesss access point p by thhe SSID you set in last l step annd start ussing network. 16 NO OTE: After wireless coonnection off this repeatter and wireeless broadbband router is buuilt, repeaterr is DHCP client c and will w get IP ad ddress from m broadbandd router auutomaticallyy. If you wannt to login Web W UI of repeater, r pleease refer too ‘2-2 Reepeater modde Advanced Settings’ for more fu unctions or learn l how too login web b UII again. 2-22 Repeaterr mode Addvanced Seettings 2-22-1 Connecct to web configuraation menu u w brow wser (IE, firefox, chrrome etc.) and inputt Pleease open web httpp://extenderXXXXX XX in adddress bar th hen press ENTER kkey: http://extende h rXXXXXX ut usernam me and password. Wirreless repeeater will prompt yoou to inpu Deffault usernname is ‘aadmin’ and passworrd is ‘12344’. Click ‘OK’ butto on to continue. c 17 You should be able to see the configuration manual of Wireless repeater in very short time: Detailed operation instructions will be given to following manual. 18 2-2-2 Home The status and information of this wireless repeater will be displayed here. To access ‘Home’ menu, click ‘Home’ on the left. You should see the screen looks like this (the contents will vary depending on your actual setting): 19 You can click ‘Show Active Clients’ button to show all connected wireless clients. Please note: By clicking ‘Show Active Clients’ button, a new browser window will appear. If your browser prevents pop-up window from appearing, please disable this function or you will not be able to use ‘Show Client’ function. 20 2-2-3 WPS Setting You can configure WPS (Wi-Fi Protected Setup) here. By using WPS, you can establish secure connection between this wireless repeater with other wireless devices which also support WPS in a fast and secure manner. To access ‘WPS Setting’ menu, click ‘WPS Settings’ on the left. 21 The following setup page will appear: The description of every setup item is listed as follow: Item Enable WPS WPS Status Self PinCode SSID Description You can enable or disable WPS function. Disabling WPS function is included hardware WPS button function. Default is ‘enable WPS’. Shows the security setting status of WPS. You must setup the security setting of this wireless repeater manually and the WPS status will become ‘Configured’. Currently only WPA encryption is supported, if you select other encryption method, WPS status will remain ‘Unconfigured’. Here displays an 8-digit number for WPS PIN-style configuration. When other WPS-compatible device wish to connect to this wireless repeater and supports Self-PIN type WPS, input this number to the wireless device to establish connection. Shows the SSID of this wireless repeater. 22 Authentication Mode Passphrase Key Config Mode Start PBC Start PIN Shows the authentication mode of this wireless repeater. Here shows asterisks (*) to indicate wireless security is properly set. There are ‘Registrar’ and ‘Enrollee’ modes for the WPS connection. When ‘Registrar’ is enabled, the wireless clients will follow the repeater’s wireless settings for WPS connection. When ‘Enrollee’ mode is enabled, the repeater will follow the wireless settings of wireless router for WPS connection. Click ‘Start PBC’ to start Push-Button style WPS setup procedure. This wireless repeater will wait for WPS requests from another wireless device for 2 minutes. The ‘WPS’ LED on the wireless repeater will be blinking for 2 minutes when this wireless repeater is waiting for incoming WPS request. Please input the PIN code of the wireless client you wish to connect, and click ‘Start PIN’ button. The ‘WPS’ LED on the wireless repeater will be blinking when this wireless repeater is waiting for incoming WPS request. NOTE: For WPS2.0 compliance specification, WEP and WPA-PSK can’t support WPS connection, some of wireless devices may follow this latest WPS2.0 specification, so we recommend you not to use WEP and WPA-PSK to avoid WPS interoperability problem. 23 2-2-4 Advanced Settings You can configure advanced wireless settings in this page. Please note that these settings are not safe to be configured by novice users. Configure these settings only when you understand what you’re doing. To access ‘Advanced Setting’ menu, click ‘Advanced Setting’ on the left. The following setup page will appear: 24 The description of every setup item is listed as follow: Item Description Fragment Threshold Set the Fragment threshold of wireless radio. Threshold. Do not modify default value if you don’t know what it is, default value is 2346. RTS Threshold Set the RTS threshold of wireless radio. Do not modify default value if you don’t know what it is, default value is 2347. Beacon Interval Set the beacon interval of wireless radio. Do not modify default value if you don’t know what it is, default value is 100. DTIM Period Configures DTIM (Delivery Traffic Indication Message) send period. Default value is 3. Data Rate Select wireless data transfer speed. When you select a value here, this repeater will refuse to establish connection with wireless clients by other speed. It’s recommended to select ‘Auto’ and this wireless repeater will adjust the speed automatically. N Data Rate Select wireless data transfer speed by MCS0 to MCS7. MCS stands for Modulation and Coding Scheme, which represents different speed when bandwidth is 20MHz or 40MHz. Channel Width Preamble Type It’s recommended to select ‘Auto’ and this wireless repeater will adjust the speed automatically. Select the wireless channel width, 20MHz or 40MHz. 40MHz provides better network speed for 802.11n wireless clients. However, if there’re 802.11b / g clients connecting to this wireless repeater, it will switch to 20MHz mode automatically. Set the type of preamble of wireless radio, Do not modify default value if you don’t know what it is, 25 Broadcast ESSID WMM CTS Protect TX Power Enable LED off mode default setting is ‘Short Preamble’. When set to ‘enabled’, every wireless devices can scan and found this wireless repeater; when set to ‘disabled’, only wireless clients who know exact SSID can get connected with this wireless repeater. Set to disabled will help to improve security. Enable or disable Wireless Multi-Media. When enabled, wireless repeater will give priority to multimedia related network applications so they will have better performance. This function provides CTS (Clear to Send) protection when transferring data. It’s recommended to select ‘Auto’ for this option. Select wireless transmitting power level, from 10% to 100%. When wireless clients are not too far from this wireless repeater, you don’t have to select a higher power level, since this may cause some people to try to break into your wireless network when you have a bad password or no password. You can enable or disable LED lights Check ‘Enable LED OFF’ mode to setup LED behavior: Turn off all LED: disabled all LED lights Turn off all LED except POWER LED: all LED lights will be disabled, except ‘POWER’ LED When you finish settings in this page, click ‘Apply’ button. You’ll see the following message: If you still need to configure this wireless repeater, click ‘CONTINUE’ 26 button; if you want to save changes and make it work now, click ‘APPLY’ button. You’ll be prompted to wait for 30 seconds before you can reconnect to this wireless repeater. 27 2-2-5 MAC Address Filtering Besides using wireless security to only allow permitted wireless users to use this wireless repeater, you can also use MAC address filter to allow wireless users with certain MAC address to use this wireless repeater. This will enhance security because you can make a ‘white list’ to allow users on the list to use this wireless repeater only in advance. For those clients who don’t list on this white list can’t get connected, even he or she know the password. To access ‘MAC Filtering’ menu, click ‘MAC Filtering’ on the left. The following setup page will appear: 28 The description of every setup item is listed as follow: Item Enable Wireless Access Control MAC Address Comment Add Clear Delete Selected Delete All Reset Select Description Check this box to enable MAC filtering. If you didn’t check this box, anyone who knows the wireless password can get connected to this wireless repeater. Input the MAC address of the clients you wish to deny or accept to access the repeater into the MAC address list. Please input 12 HEX characters here, and you don’t have to add : (colon) or - (dash) characters every 2 characters. If you don’t know how to get the MAC address of a network client, see tips below. Input any descriptive text about this rule, so you can remember the purpose of this rule. You can input up to 20 alphanumerical characters in this field. Add this MAC address to the list. Clear ‘MAC Address’ and ‘Comment’ field. Delete MAC address(es) you selected which ‘Select’ box is checked. Delete all MAC addresses in the list. You’ll be prompted to confirm deletion first. Uncheck all checked boxes. All existing MAC addresses will be listed here. To delete a MAC address from the list, check the box of the MAC address you wish to delete first. You can select more than one MAC addresses here. When you finish settings in this page, click ‘Apply’ button. You’ll see the following message: 29 If you still need to configure this wireless repeater, click ‘CONTINUE’ button; if you want to save changes and make it work now, click ‘APPLY’ button. You’ll be prompted to wait for 30 seconds before you can reconnect to this wireless repeater. TIPS: If you don’t know the MAC address of your computer or wireless device, you can follow the following procedure: For wireless devices and computers which are connected to this wireless repeater already, you can click ‘Show Active Clients’ button in ‘Home’ setting page. Their MAC address will be displayed at ‘MAC Address’ field. If you still can’t identify the MAC address of computer, you can follow the following procedure: Click the network icon located at the lower-right corner, then click ‘Open Network and Sharing Center’. 30 31 Click the connection that you’ll be used to connect the wireless repeater (in this example, ‘Local Area Connection’): Click ‘Details…’ button. 32 The MAC address of selected network connection will be displayed here as ‘Physical Address’. 33 34 2-2-6 System Utility You can change the settings of several system-level parameters in this page, including administrator’s password, and IP address. To access ‘System Utility’ menu, click ‘System Utility’ on the left. 35 The following setup page will appear: The description of every setup item is listed as follow: Password Settings Default password of this repeater is 1234, and it’s displayed on the login prompt when accessed from web browser. There’s a security risk if you don’t change the default password, since everyone can see it. This is very important when you have wireless function enabled. Here are descriptions of every setup items: Item Current Password New Password Re-Enter Password Description To change password, you have to input current password first. Input new password here. You can use the combination of alphabets, number, and symbols for up to 20 characters. Input new password again for conformation. 36 Management IP To set up the IP address of this wireless repeater, please see the following description. Item IP Address Subnet Mask Gateway Address Description Input the IP address of LAN / Wi-Fi port of this wireless repeater. NOTE: Please remember this IP address. If you forget this IP address and you didn’t use DHCP server function to assign IP address to clients, you’ll not be able to connect to this wireless repeater and you’ll need to clear all settings and password to reset the IP address back to default value ‘192.168.2.254’.( Press WPS button and hold for 10 seconds to restore all settings to factory defaults) Input the subnet mask of the IP address you’re using. Input the gateway’s IP address of your network. Generally you can use ‘0.0.0.0’ (default value) since this wireless repeater will access Internet via WAN port. When you finish settings in this page, click ‘Apply’ button. You’ll see the following message: If you still need to configure this wireless repeater, click ‘CONTINUE’ button; if you want to save changes and make it work now, click ‘APPLY’ button. You’ll be prompted to wait for 30 seconds before you can reconnect to this wireless repeater. 37 2-2-7 Configuration You can backup and restore the configuration of this wireless repeater, so you can recall all settings back in very short time, without doing configuration again. This function is especially useful when you need to use this mini Wi-Fi repeater in different places, like home and hotel. To access ‘Configuration’ menu, click ‘Configuration’ on the left. Configuration Tool The following setup page will appear: The description of every setup item is listed as follow: Item Backup Settings Description Click ‘Save’ button to save the current settings to a file on your computer. 38 Restore Settings Reset to Factory Default If you want to upload a saved configuration file to wireless repeater, please click ‘Browse’ button to select a saved configuration file on your computer. Then click ’Upload’ button to restore the current settings to new one. To reset all settings of this wireless repeater to factory defaults, including password. You’ll be prompted to confirm the settings reset: Click ‘OK’ if you really want to restore all settings, or click ‘Cancel’ to abort. WEB Upgrade The software running in this wireless repeater (i.e. ‘Firmwre’) can be upgraded to improve the functionality of this wireless repeater. You can access our website to look for latest firmware file. Then download the latest firmware file and save on your computer and upload to this wireless repeater. 39 The description of every setup item is listed as follow: Item Description Browse Select a firmware file saved on your computer. When you are ready, click ‘Apply’ button to start firmware upgrade procedure. Reset When you think this wireless repeater is not working properly, resetting it may help. To reset this wireless repeater, click ‘Apply’ button. You’ll be prompted to confirm reset: Click ‘OK’ button to reset wireless repeater, or click ‘Cancel’ to abort. 40 Chapter III: Appendix 3-1 Configuring TCP/IP on PC 3-1-1 Windows XP IP address setup: 1. Click ‘Start’ button (it should be located at lower-left corner of your computer), then click control panel. Double-click Network and Internet Connections icon, click Network Connections, then double-click Local Area Connection, Local Area Connection Status window will appear, and then click ‘Properties’ 2. Select ‘Obtain an IP address automatically’ and ‘Obtain DNS server address automatically’, then click ‘OK’. 41 3-1-2 Windows Vista/Windows 7 IP address setup: 1. Click ‘Start’ button (it should be located at lower-left corner of your computer), then click control panel. Click View Network Status and Tasks, and then click Manage Network Connections. Right-click Local Area Network, then select ‘Properties’. Local Area Connection Properties window will appear, select ‘Internet Protocol Version 4 (TCP / IPv4), and then click ‘Properties’ 42 2. Select ‘Obtain an IP address automatically’ and ‘Obtain DNS server address automatically’, then click ‘OK’. 43 44 3-2 Specifications SoC + RF: Realtek RTL8196CS+ RTL8192CE Flash: 2MB SDRAM: 16MB LAN Port: 10/100M UTP Port x 1 Power: 5VDC, 1A Switching Power Module Inside Dimension: 46.5(W) x 73(H) x 41(D) mm excluding power plug Transmit Power: 11n: 13dBm±1.5dBm, 11g: 14dBm±1.5dBm, 11b: 17dBm±1.5dBm Temperature: 32~104°F (0 ~ 40°C) Humidity: 10-90% (NonCondensing) Certification: FCC, CE 45 3-3 Glossary 1. What is the IEEE 802.11g standard? 802.11g is the new IEEE standard for high-speed wireless LAN communications that provides for up to 54 Mbps data rate in the 2.4 GHz band. 802.11g is quickly becoming the next mainstream wireless LAN technology for the home, office and public networks. 802.11g defines the use of the same OFDM modulation technique specified in IEEE 802.11a for the 5 GHz frequency band and applies it in the same 2.4 GHz frequency band as IEEE 802.11b. The 802.11g standard requires backward compatibility with 802.11b. The standard specifically calls for: A. A new physical layer for the 802.11 Medium Access Control (MAC) in the 2.4 GHz frequency band, known as the extended rate PHY (ERP). The ERP adds OFDM as a mandatory new coding scheme for 6, 12 and 24 Mbps (mandatory speeds), and 18, 36, 48 and 54 Mbps (optional speeds). The ERP includes the modulation schemes found in 802.11b including CCK for 11 and 5.5 Mbps and Barker code modulation for 2 and 1 Mbps. B. A protection mechanism called RTS/CTS that governs how 802.11g devices and 802.11b devices interoperate. 2. What is the IEEE 802.11b standard? The IEEE 802.11b Wireless LAN standard subcommittee, which formulates the standard for the industry. The objective is to enable wireless LAN hardware from different manufactures to communicate. 3. What does IEEE 802.11 feature support? The product supports the following IEEE 802.11 functions: z z z z z z CSMA/CA plus Acknowledge Protocol Multi-Channel Roaming Automatic Rate Selection RTS/CTS Feature Fragmentation Power Management 4. What is Ad-hoc? An Ad-hoc integrated wireless LAN is a group of computers, each has a Wireless LAN card, Connected as an independent wireless LAN. Ad hoc wireless LAN is applicable at a departmental scale for 46 a branch or SOHO operation. 5. What is Infrastructure? An integrated wireless and wireless and wired LAN is called an Infrastructure configuration. Infrastructure is applicable to enterprise scale for wireless access to central database, or wireless application for mobile workers. 6. What is BSS ID? A specific Ad hoc LAN is called a Basic Service Set (BSS). Computers in a BSS must be configured with the same BSS ID. 7. What is WEP? WEP is Wired Equivalent Privacy, a data privacy mechanism based on a 40 bit shared key algorithm, as described in the IEEE 802 .11 standard. 8. What is TKIP? TKIP is a quick-fix method to quickly overcome the inherent weaknesses in WEP security, especially the reuse of encryption keys. TKIP is involved in the IEEE 802.11i WLAN security standard, and the specification might be officially released by early 2003. 9. What is AES? AES (Advanced Encryption Standard), a chip-based security, has been developed to ensure the highest degree of security and authenticity for digital information, wherever and however communicated or stored, while making more efficient use of hardware and/or software than previous encryption standards. It is also included in IEEE 802.11i standard. Compare with AES, TKIP is a temporary protocol for replacing WEP security until manufacturers implement AES at the hardware level. 10. Can Wireless products support printer sharing? Wireless products perform the same function as LAN products. Therefore, Wireless products can work with Netware, Windows 2000, or other LAN operating systems to support printer or file sharing. 11. Would the information be intercepted while transmitting on air? WLAN features two-fold protection in security. On the hardware side, as with Direct Sequence Spread Spectrum technology, it has the inherent security feature of scrambling. On the software side, WLAN series offer the encryption function (WEP) to enhance security and Access Control. Users can set it up depending upon 47 their needs. 12. What is DSSS? What is FHSS? And what are their differences? Frequency-hopping spread-spectrum (FHSS) uses a narrowband carrier that changes frequency in a pattern that is known to both transmitter and receiver. Properly synchronized, the net effect is to maintain a single logical channel. To an unintended receiver, FHSS appears to be short-duration impulse noise. Direct-sequence spread-spectrum (DSSS) generates a redundant bit pattern for each bit to be transmitted. This bit pattern is called a chip (or chipping code). The longer the chip is, the greater the probability that the original data can be recovered. Even if one or more bits in the chip are damaged during transmission, statistical techniques embedded in the radio can recover the original data without-the need for retransmission. To an unintended receiver, DSSS appears as low power wideband noise and is rejected (ignored) by most narrowband receivers. 13. What is Spread Spectrum? Spread Spectrum technology is a wideband radio frequency technique developed by the military for use in reliable, secure, mission-critical communication systems. It is designed to trade off bandwidth efficiency for reliability, integrity, and security. In other words, more bandwidth is consumed than in the case of narrowband transmission, but the trade off produces a signal that is, in effect, louder and thus easier to detect, provided that the receiver knows the parameters of the spread-spectrum signal being broadcast. If a receiver is not tuned to the right frequency, a spread –spectrum signal looks like background noise. There are two main alternatives, Direct Sequence Spread Spectrum (DSSS) and Frequency Hopping Spread Spectrum (FHSS). 14. What is WPS? WPS stands for Wi-Fi Protected Setup. It provides a simple way to establish unencrypted or encrypted connections between wireless clients and access point automatically. User can press a software or hardware button to activate WPS function, and WPS-compatible wireless clients and access point will establish connection by themselves. There are two types of WPS: PBC (Push-Button Configuration) and PIN code. 48 49