1
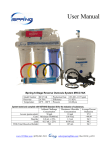
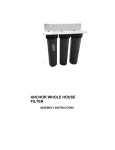
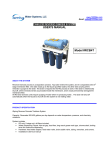
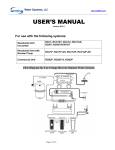
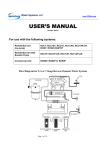
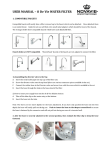
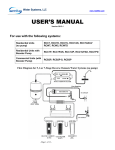
iSpring Whole House Water Filter Systems
USER’S MANUAL
Version 2014-5
Introduction
Congratulations on your purchase of the iSpring Whole House Water Filter system. Featuring a
three-stage filtration process, it was designed with your comfort and convenience in mind. The
iSpring Whole House Water filter treats: sediment, turbidity, iron, manganese, sulfur smell,
pesticides, herbicides, and other chemicals. The main purpose of the ISpring whole house water
filter is to deliver clean, clear water to every faucet and bath in your home without drawing down
water pressure.
The cartridges in the water filter system must be replaced on a regular basis to maintain efficiency
and to ensure high water quality. These cartridges work together, and must be replaced every 6-12
months or after 100,000 gallons per 1 ppm iron. Any significant change in performance of the
system should be promptly investigated to avoid the deterioration of water quality.
CAUTION: Improperly installed systems could result in water damage due to leaks or flooding.
Proper installation of this system requires familiarity with standard sink plumbing, and proper use of
common hand and power tools. If you are not familiar with standard sink plumbing and proper use
of common hand and power tools or have any difficulty with the installation of this system, consult a
licensed professional, such as a contractor or plumber.
NOTE: This system has been designed for installation by licensed professionals, such as a
contractor or plumber.
System Operating Conditions
Feed water pressure: 45 – 80psi (or 30 – 80psi for systems with built-in booster pump).
Feed water temperature: 40 – 100 degrees F (4 – 37 degrees C)
Install the system in a sheltered environment; avoid exposure to hot and cold weather or under
direct sunlight
Once installed, move the system with caution, and avoid dragging the tubings.
www.123filter.com | (678) 261-7611
[email protected]
page 1
Installation of Whole House Filtration System (1-stage, 2-stage, or 3-stage)
USE A LICENSED PLUMBER TO INSTAL THIS PRODUCT
Tools required
Safety glasses
Hacksaw
Towels
Soldering iron or torch
Flat head screwdriver
Power drill
Medium Crescent wrench
Teflon tape
Monkey wrench
Parts required (not included)
●
●
●
●
●
(2) shut off valves
(2) hex nipples or pipe nipples
(2) pipe unions pressure regulator (as needed)
(1) ground jumper cable
Optional: pressure gauge(s), bypass valve(s), pipe hangers
Preliminary Notes
●
●
This installation guide provides a step by step, start to finish procedure for installing your
ISpring water filter. .
All steps provided herein are for typical installations only. Your application may be different.
www.123filter.com | (678) 261-7611
[email protected]
page 2
Pre-Installation
●
●
●
●
●
●
●
●
●
The filter should be protected from freezing, direct sunlight, or extreme temperatures, and
kept dry and level.
Make a list of all the plumbing fittings and tools you will need to completely install the system
according to your application.
Turn the water off to your house while installing the system
Turn off the electricity to your electric water heater during installation. .After the system is
installed and pressurized, turn on a few hot and cold water faucets, and let them run until
there is no more air in your lines, and then turn the electricity back on to your water heater.
Use Teflon tape on threaded fittings.
Be sure to note inlet and outlet markings. The sediment filter is the first stage of the water
filter.
A three valve bypass valve and loop may be installed to loop the entire system, which
makes servicing easier.
Hard copper pipe generally comes in two types. Use the thicker "L" type copper pipe, rather
than thinner "M" type copper pipe.
Follow all local plumbing and building codes.
Installation
1. Turn off the main line water shutoff valve to the house.
2. Next, open all plumbing fixtures in the house in order to drain the lines of as much water as
possible.
3. The filter should be placed on the main water supply line near where it enters the house, at
any point past the main shutoff valve for the whole house, but before pipes branch off into
multiple directions. However, you may choose to locate the filter after the line branches to
the inside and outside plumbing, depending on your desire for filtered water in your outdoor
plumbing.
4. Measure, cut, and remove a section of the main incoming water line near where the system
is to be installed. When determining the length of pipe to cut, account for filter width, shut off
valves, union fittings, nipple fittings, pressure gauges (if used) and bypass valve (if used).
Allow this line to drain thoroughly. Smooth the newly cut ends down to avoid jagged points
or edges. Your filter should be located in a dry, level area and protected from freezing,
and direct sunlight.
5. Place a shutoff valve and/or a pressure gauge immediately on either side of the filter for
future ease of service.
6. Securely mount the whole house filter using the supplied mounting bracket and bolts.
Ensure that the system is level.
7. You may now need to adjust the pipe length or distance. Fit a pipe union onto the cut
section of the main Water Line IN. (see diagram).
8. Fit together the pipe union and shut off valve. Use Teflon tape on the threaded fittings.
9. Simultaneously fit together the shut off valve and whole house filter using the pipe nipple or
hex nipple to draw them together on the FEED side of the filter.
10. Fit the pipe hanger on the water IN side for additional support.
11. Simultaneously fit together the filter and the shut off valve on the OUTLET side of the filter.
Fit the pipe union to the shut off valve on the OUTLET side.
www.123filter.com | (678) 261-7611
[email protected]
page 3
12. Check the pipe length and pipe union length to see if an additional pipe length or union is
required. Join the pipe union and pipe.
13. Fit the pipe hanger on the water OUTLET side for additional support. Connect the ground
jumper cable (if necessary).
Turn the water back on
Turn your water on slowly. In a few minutes, the sound of water entering the system will stop. After
the unit is installed, it is necessary to flush the unit thoroughly. Do this at the nearest COLD water
faucet. DO NOT USE A HOT WATER FAUCET TO PERFORM THE INITIAL SYSTEM FLUSH. The
water will be blackish in color for some time. This is normal carbon dust. Continue to run water until
it runs clear and all air has been purged. Shut the water off, let the unit sit for a while, and then
flush it again. It is not unusual for the water to appear "cloudy" for a day or so following installation.
This cloudiness is actually tiny air bubbles being purged from the carbon. This is normal, harmless,
and will clear up in a day or two.
Notes
●
●
●
●
Even though there is filtered water in the cold water lines, the hot water heater is still full of
raw water. Through normal use, this water will be replaced with filtered water in about 2 or 3
days.
This filter system should not be used with water that is microbiologically unsafe or of
unknown quality without adequate disinfection before and/or after the system.
Water filter systems should never be exposed to freezing temperatures, since severe
damage to the filter and housings could result. Such damage is not covered under any
warranty.
After prolonged periods of nonuse (such as a vacation), it is recommended that the system
be flushed thoroughly for at least 10 minutes before using the water.
Filter Change Instructions
1. Turn off the water supply to the system. Depress the red pressure release button on the top
of the filter housing to relieve system pressure. If your system was not equipped with a
pressure relief valve, leave open a nearby faucet. This will make removing the filter housing
easier.
2. Unscrew the housing from the cap using the filter wrench included with your system, or a
commercially available “strap” type wrench.
3. Locate and remove the large o-ring using a small, clean flat head screw driver. Try not to
remove any of the lubricant. Set aside a clean, safe place.
4. Remove and discard the old filter cartridge.
5. Scrub the housing and cap with warm water mixed with about 2 tablespoons of household
bleach, using a sponge or soft rag. Wear rubber gloves. Rinse all parts very thoroughly!
6. Lubricate the o-ring with clean silicon grease if needed. DO NOT USE PETROLEUM JELLY.
Insert the o-ring in the groove and press it into place. Make sure the o-ring is seated level.
7. Remove the filter packaging and insert the new filter cartridge into the housing, making sure
that it slips over the standpipe in the bottom of the housing.
8. Fit the bottom of the housing into the cap and hand tighten. Then use the filter wrench to fit
snug. Do not over tighten.
www.123filter.com | (678) 261-7611
[email protected]
page 4
9. Close any open valves. Slowly turn on the water supply to allow the system to fill with water.
Inspect carefully for leaks. If a leak is found, first remove the housing and inspect the oring to ensure that it is seated properly. Then retighten.
10. Flush the system by turning on a few cold-water faucets. Allow the water to run until the air
and carbon has been purged. Water may initially be cloudy. New activated carbon filter
cartridges may contain loose carbon and air bubbles after installation.
iSpring Warranty Registration Form
Visit www.123filter.com to complete the warranty registration form online.
Or email to [email protected] or mail this Warranty Registration Form to validate your
warranty.
iSpring Water Systems, LLC
3020 Trotters Pkwy, Suite B
Alpharetta, GA 30004
Phone: 1 (678) 261-7611
iSpring Warranty Registration Form
Your Name:
Your Address:
Your E-Mail:
Your Phone:
Order#:
Order From:
Model#:
Order Date:
Reviewer ID:
Notes:
Plumber’s Information (optional)
We like to recommend good plumbers throughout the U.S.A., If you were happy with your installer,
please give us their information so that we can pass it on as a courtesy. Thank you for your time.
Name of Plumbing Company or individual plumber used to install system:
_____________________________________
Phone #: (_____)-__________________ of the Plumbing installer.
www.123filter.com | (678) 261-7611
[email protected]
page 5
Limited Warranty
This Limited Warranty extends only to the original purchaser of the system. This warranty covers only all
Manufacturer-supplied items that prove to be defective in material, workmanship or factory preparation. This
warranty covers only parts; all labor is excluded from this warranty, including, but not limited to, services
related to the removal, replacement, installation, adjustment, maintenance and/or repair of the unit or its
components items. It excludes all non-Manufacturer labor required for any servicing of the unit, including, but
not limited to, servicing related to installation, adjustment, maintenance and repair of the unit. This warranty
applies only to the first full calendar year from the date of purchase. The following items are excluded from
this warranty: membranes, filters, O-rings, and all other parts or components that require regular replacement
as a result of ordinary usage.
Disclaimers: This Limited Warranty applies only if the system is installed, used, and maintained in compliance
with all instructions and requirements enclosed with the system. This warranty will be void for failure to
observe the following conditions:
1. The system is to be used with potable water supply only.
2. Feed water pressure to the unit is no less than 45 PSI (30 PSI for systems with built-in booster pump)
and no greater than 80 PSI.
3. The system is to be used on water supplies with chlorine concentrations of 1.0 mg/L (ppm) or less.
4. Feed water temperature to the unit must be no less than 40°F and no more than 100°F.
5. Feed water must have a pH between 4 and 8.
6. Turbidity must be less than 1.0 NTU.
7. SDI must be less than 5.
8. Feed water must be completely free of iron, manganese, or hydrogen sulfide.
The Manufacturer does not know the characteristics of your water supply. The quality of water supplies may
vary seasonally or over a period of time. Your water usage may vary as well. Water characteristics can also
change if the drinking water appliance is moved to a new location. The Manufacturer assumes no liability for
the determination of the proper equipment necessary to meet your requirements, and we do not authorize
others to assume such obligation on our behalf.
This Limited Warranty does not cover any Manufacturer-supplied items that are defective as a result of the
use of improper parts, equipment, or materials. This warranty does not cover alterations or modifications of
the unit, or failure of a unit caused by such alterations and modifications.
This Limited Warranty does not cover malfunctions of the unit due to tampering, misuse, alteration, lack of
regular maintenance, misapplication, fouling due to hydrogen sulfide, manganese or iron, scaling from
excessive hardness, turbidity greater than 1.0 NTU, Silt Density Index (SDI) greater than 5.0 SDI, or
excessive membrane hydrolysis due to chlorine levels in excess of 1.0 mg/L (ppm). In addition, damage to the
unit due to fire, accident, negligence, act of God, or events beyond the control of the Manufacturer are not
covered by this warranty.
Incidental and Consequential Damages Limitation: The Manufacturer will not be responsible for any incidental
or consequential damages as a result of the failure of this unit to comply with express or implied warranties or
any defect in the unit, including but not limited to, lost time, inconvenience, damage to personal property, loss
of revenue, commercial losses, postage, travel, telephone expenditures, or other losses of this nature. In case
some states do not allow the exclusion or limitation of incidental or consequential damages, you may choose
to return the system. If you choose to keep it, you agree that this exclusion STILL apply to you.
Owner’s Warranty Responsibilities: As a condition of this Limited Warranty, the owner must ensure that
periodic maintenance of the system is performed as described in the literature enclosed with the system.
Neglect, improper maintenance, abuse, or modification or alteration of the unit will invalidate this Warranty.
Should your unit develop a defect or otherwise fail to perform in accordance with this warranty, you should
contact the retailer from whom the product was originally purchased.
www.123filter.com | (678) 261-7611
[email protected]
page 6
Service Record
Date of Purchase: ___________
Purchased from: ________________
Reference Order #: ______________________
Date of Installation: _________
Installed by: _______________
Date
1st Stage
Sediment
2nd Stage Carbon
3rd Stage Carbon
4th Stage
UV/UF
Copyright ©2005-2015 ISPRING WATER SYSTEMS, LLC. All rights reserved.
www.123filter.com | (678) 261-7611
[email protected]
page 7