1
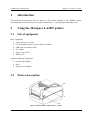
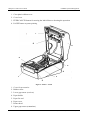
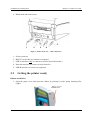
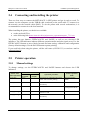
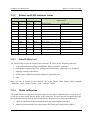
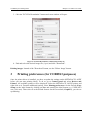
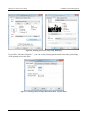
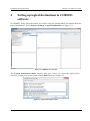
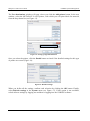
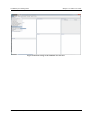
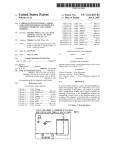
COBISS System Management Metapace l-42DT User Guide V1.0 VIF-NA-25-EN © IZUM, 2015 COBISS, COMARC, COBIB, COLIB, IZUM are registered trademarks owned by IZUM. CONTENTS 1 Introduction ......................................................................................................... 1 2 Using the Metapace L-42DT printer ................................................................... 1 2.1 2.2 2.3 2.4 2.5 List of equipment ............................................................................................................. 1 Printer description ............................................................................................................ 1 Getting the printer ready .................................................................................................. 3 Connecting and installing the printer ............................................................................... 6 Printer operation ............................................................................................................... 6 2.5.1 Manual settings ..................................................................................................... 6 2.5.2 Printer and LED indicator status........................................................................... 7 2.5.3 Label Utility tool ................................................................................................... 7 2.5.4 Media calibration .................................................................................................. 7 2.5.5 Network configuration with the use of the enclosed tool ..................................... 9 2.5.6 Uploading images (library logo) to the printer ................................................... 10 3 Printing preferences (for COBISS3 purposes) .................................................. 11 4 Setting up logical destinations in COBISS3 software ....................................... 13 FIGURES Figure 1: METAPACE L-42DT printer – outside .......................................................................... 1 Figure 3: Printer – inside ................................................................................................................. 2 Figure 4: Printer back view – cable connections............................................................................. 3 Figure 5: Unified Label Utility-II tool ............................................................................................ 8 Figure 5: Net configuration tool ...................................................................................................... 9 Figure 5: Selecting printer for network configuration .................................................................... 9 Figure 5: Network parameters (data is fictional) .......................................................................... 10 Figure 8: Unified Label Utility-II tool (image is symbolic) .......................................................... 10 Figure 9: PCX File Downloader (Unified Label Utility-II) .......................................................... 11 Figure 9: Printing preferences (Page Setup, Dithering) ................................................................ 12 Figure 10: Printing position settings (Horizontal Offset, Vertical Offset) .................................... 12 Figure 11: COBISS3 user interface ............................................................................................... 13 Figure 12: Logical destinations editor ........................................................................................... 13 Figure 13: Setting up logical destinations ..................................................................................... 14 Figure 14: Detailed settings........................................................................................................... 14 Figure 15: Refresh settings in the COBISS3 user interface .......................................................... 15 © IZUM, 25. 5. 2015, VIF-NA-25-EN, V1.0 i COBISS System Management Metapace L-42DT User Guide Introduction 1 The document demonstrates how the printer is used when working in the COBISS system (installing and connecting the printer, printer maintenance – replacing paper and ribbon, etc.). 2 Using the Metapace L-42DT printer 2.1 List of equipment Basic equipment: printer (blue-grey, white) CD containing software, drivers and user manual USB cable (or another cable) AC adapter Power cord (220 V) Ribbon core Optional additional equipment: external label holder knife label peel-off module 2.2 Printer description 4 1 3 2 Figure 1: METAPACE L-42DT printer – outside © IZUM, 25. 5. 2015, VIF-NA-25-EN, V1.0 1/15 Metapace L-42DT User Guide COBISS System Management 1. Clear plastic ribbon cover 2. Cover lever 3. FEED/CANCEL button for moving the label ribbon or aborting the operation 4. PAUSE button to pause printing 7 8 6 9 5 4 3 1 2 Figure 2: Printer – inside 1. Cover for accessories 2. Rubber roller 3. Lower gap sensor (receiver) 4. Paper holder 5. Paper fix tool 6. Paper cover 7. Printer head 8. Upper gap sensor (transmitter) 2/15 © IZUM, 25. 5. 2015, VIF-NA-25-EN, V1.0 COBISS System Management Metapace L-42DT User Guide 9. Black mark and notch sensor 5 1 2 3 4 Figure 3: Printer back view – cable connections 1. Power connector 2. RS232C serial cable (to connect to computer) 3. USB-A interface (only to connect to wireless network interface) 4. Network interface (to connect to local network) 5. USB-B interface (to connect to computer) 2.3 Getting the printer ready Ribbon installation 1. Open the paper cover and insert the ribbon by placing it to the spring fastening first (right). Printer cover © IZUM, 25. 5. 2015, VIF-NA-25-EN, V1.0 3/15 Metapace L-42DT User Guide COBISS System Management 2. Open the clear plastic ribbon cover by pulling in the direction indicated by the arrow on the cover and insert the core. clear plastic ribbon cover 3. Insert the ribbon and attach it to the core. tape end 4. Use the cog to apply the blank part of the tape to the coiling portion of the ribbon. 5. Close both the ribbon cover and the paper cover. Label installation 1. Use the buttons on both sides of the printer to open the paper cover. 4/15 © IZUM, 25. 5. 2015, VIF-NA-25-EN, V1.0 COBISS System Management Metapace L-42DT User Guide paper cover 2. Spread the paper holder and insert label roll. paper holder 3. When inserting the label roll, also push the end of the label roll under the label roll guides. label roll guide 4. Close the paper cover. © IZUM, 25. 5. 2015, VIF-NA-25-EN, V1.0 5/15 Metapace L-42DT User Guide 2.4 COBISS System Management Connecting and installing the printer There are four ways to connect the METAPACE L-42DT printer and get it ready to work. To connect it to the computer, use the USB-B cable (enclosed) or the serial cable. To connect it to the network, use the network cable (RJ45). To use the printer with several workstations, it is recommended to connect it to the local network. When installing the printer, use the drivers available: on the enclosed CD or at the following link: home.izum.si/cobiss/priporocena_oprema/metapace_7.3.8.exe. The printer has two buttons: FEED/CANCEL and PAUSE, as well as two tricolour LED indicators. The LED indicators indicate different operation modes and also signal errors. Use the FEED/CANCEL button to move labels forward and start testing, calibration and configuration (factory default settings). Use the PAUSE button to pause printing. If you need help when using the printer, call the call centre (02/2520 333) or send an e-mail to [email protected]. 2.5 Printer operation 2.5.1 Manual settings To change settings, use the FEED/CANCEL and PAUSE buttons and observe the LED indicators: Printer state before operation Button Power OFF FEED/ CANCEL Press Stand by Press Stand by During printing During printing 6/15 Operation procedure PAUSE - - Press Press - Press Printer operation mode Turn printer on. Hold the button until printer starts self-test printing. Self-test Printing Mode Press the button and release immediately. Press the button for two seconds. Feed Mode Press the button for two seconds and continue to hold. Press the button and release immediately. Print Cancel Mode Entry to Configuration Mode Print Pause Mode © IZUM, 25. 5. 2015, VIF-NA-25-EN, V1.0 COBISS System Management 2.5.2 Metapace L-42DT User Guide Printer and LED indicator status LED 1 LED 2 Printer Status Colour Status Colour Status Green On Green On Standby mode Standby mode Red On Red On Error mode Ribbon is not detected Red On Orange On Error mode Labels – gap not detected Red On Green Blink Error mode Printer head overheating Red On Red Blink Error mode Paper cover open Red On Orange Blink Error mode No labels Red On - Off Error mode Media calibration failure Red Blink Red Blink Error mode Auto-Cutter error Orange On Orange On Warning Switch settings Green Blink Red On Wait for input Print is paused temporarily. Green Blink Green Blink Wait for input Cover Close Mode Green On Red Blink Wait for input Print Cancel Mode 2.5.3 Label Utility tool The Label Utility tool can be found on the enclosed CD. Use it for the following functions: 1. serial communication settings (HandShake, Stop bit, Data bit, print rate), 2. basic printer settings (paper size, printing speed and density, paper type, use of ribbon), 3. language settings (code tables), 4. media sensor calibration (manual settings for materials), and 5. other. More tips can be found on the enclosed CD in the United Label Printer Utility Manual ("Metapace_Label_Unified_Utility") in the "Utilities" folder. 2.5.4 Media calibration The printer has been designed to recognise gaps between labels automatically. In order to do so, it will use up three labels when it prints for the first time. If it still does not recognise the gaps, the calibration function must be activated manually. During this procedure, the printer will: 1. adjust the label detection sensor and measure the actual length of the label; 2. adjust the gap detection sensor and measure the actual gap length between labels. © IZUM, 25. 5. 2015, VIF-NA-25-EN, V1.0 7/15 Metapace L-42DT User Guide COBISS System Management Media calibration is required when the printer is installed for the first time, when changing the label format and when the printer does not print in the designated printing space (print positioning is off). How to run media calibration: 1. Enter manual calibration mode: when the printer is on, hold the PAUSE button for two seconds. Both LED indicators change colour from green to orange. 2. The colours of the LED indicators start to change and the required operation (i.e. calibration) is started when pressing the FEED button (LED 1 is orange, LED blinks green four times). To learn more about calibration, consult the original user manual, chapter "5. Detailed features", page 20. 2.5.4.1 Media calibration with the use of the enclosed tool Procedure: 1. Connect the printer via the desired interface (serial, USB or Ethernet). 2. Run “Unified Label Utility-II.exe” from the enclosed CD or download it from the website1. 3. Select the installation interface and click the "Connect" button. Figure 4: Unified Label Utility-II tool 1 http://www.jarltech.de/2007/support.php?gotoartikel=metapace_l42dt&sort=kategorie&language=en&kat_id=2200&link=2&supportdata=metapace_l-42dt-en 8/15 © IZUM, 25. 5. 2015, VIF-NA-25-EN, V1.0 COBISS System Management 2.5.5 Metapace L-42DT User Guide Network configuration with the use of the enclosed tool Procedure: 1. Connect the printer via the Ethernet interface. 2. Run “Net Configuration Setup V1.0.1.exe” from the enclosed CD or download it from the website2. 3. Run the software and click the "Ethernet Configuration" button. Figure 5: Net configuration tool 4. Click the "Search" button. If the printer and the computer with the installed tool are in the same local network, the program will detect the printer. The printer will appear on the list. Figure 6: Selecting printer for network configuration 2 http://www.jarltech.de/2007/support.php?gotoartikel=metapace_l42dt&sort=kategorie&language=en&kat_id=2200&link=2&supportdata=metapace_l-42dt-en © IZUM, 25. 5. 2015, VIF-NA-25-EN, V1.0 9/15 Metapace L-42DT User Guide COBISS System Management 5. Select the printer and click "Setting". The window containing the net configuration will appear. You will receive the data for the printer from the local network administrator. Figure 7: Network parameters (data is fictional) 2.5.6 Uploading images (library logo) to the printer Procedure of uploading images to the printer: 1. Run “Unified Label Utility-II.exe” from the enclosed CD or download it from the website3. 2. Select the installation interface and click the "Connect" button. Figure 8: Unified Label Utility-II tool (image is symbolic) 3 http://www.jarltech.de/2007/support.php?gotoartikel=metapace_l42dt&sort=kategorie&language=en&kat_id=2200&link=2&supportdata=metapace_l-42dt-en 10/15 © IZUM, 25. 5. 2015, VIF-NA-25-EN, V1.0 COBISS System Management Metapace L-42DT User Guide 3. Click the "PCX File Downloader" button and a new window will open: Figure 9: PCX File Downloader (Unified Label Utility-II) 4. Find and select the desired image file (*.pcx) and click "Download". Deleting images: Instead of the "Download" button, use the "Delete Image" button. 3 Printing preferences (for COBISS3 purposes) Once the printer driver is installed, you have to update the settings on the METAPACE L-42DT before you can start printing labels. To do so, go to Control panel and select Devices and Printers. All available printers will be displayed. Select the METAPACE L-42DT printer and right-click on it. From the additional options, select Printing preferences. On the first tab (Page Setup) set the label format by clicking on New and entering the label format (e.g. USER (60.0 mm x 40.0 mm). Then select it as the default format. On the second tab (Graphics), you can set up dithering. © IZUM, 25. 5. 2015, VIF-NA-25-EN, V1.0 11/15 Metapace L-42DT User Guide COBISS System Management Figure 10: Printing preferences (Page Setup, Dithering) If you click "Advanced Options…" you can set the printing position and correct the positioning of the printed text on the label. Figure 11: Printing position settings (Horizontal Offset, Vertical Offset) 12/15 © IZUM, 25. 5. 2015, VIF-NA-25-EN, V1.0 COBISS System Management 4 Metapace L-42DT User Guide Setting up logical destinations in COBISS3 software In COBISS3, firstly select the printer you will be using for printing labels for material from the logical destinations. Select System / Settings / Logical destinations (see Figure 11). Figure 12: COBISS3 user interface The Logical destinations editor window will open, where you select the option Label – material: [default local printer] and click the Edit button (see Figure 12). Figure 13: Logical destinations editor © IZUM, 25. 5. 2015, VIF-NA-25-EN, V1.0 13/15 Metapace L-42DT User Guide COBISS System Management The User destinations window will open, where you click the Add printer button. In the new window, select the METAPACE L-42DT printer, with which you will print labels for material, from the drop-down list (see Figure 13). METAPACE L-42DT Figure 14: Setting up logical destinations Once you select the printer, click the Details button to check if the detailed settings for this type of printer are correct (Figure 14): Figure 15: Detailed settings When you define all the settings, confirm each selection by clicking the OK button. Finally, select Refresh settings in the System menu (see Figure 15). If this option is not available, refresh all new settings by logging out and then re-logging into the COBISS3 software. 14/15 © IZUM, 25. 5. 2015, VIF-NA-25-EN, V1.0 COBISS System Management Metapace L-42DT User Guide Figure 16: Refresh settings in the COBISS3 user interface © IZUM, 25. 5. 2015, VIF-NA-25-EN, V1.0 15/15