1
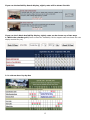
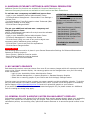
Availability Online User Manual Additional Support: [email protected] or 802-774-1124 1- Logging into your Account 2- Updating Availability Manual Updating Change Room/Unit Order Auto Updating Page 2 8- Maximum Occupancy & Additional Person Fees Page 3 Page 3 Page 4 Page 5 GENERAL SETTINGS: Collecting Guest Contact Information Page 6 Collecting Additional Guest Names Page 6 Check-in / Check-out Page 6 Collecting Room/Unit Choice from Guest Number of Guests Children Settings Payment/Credit Card Settings Displaying Comments Box Unit / Room Labels Page Page Page Page 6 6 7 7 10- General Notes Display on Availability Calendars 11- Changing your Username or Password Page 20 Page 20-21 Page 21 12- Reservation & Gift Certif. Pick-Up Pending Reservations/Orders Archived Reservations/Orders Page 21 Page 22 13- Availability Display Visual Settings 2-Week Calendar Availability Search Page 22 Page 22-23 Page Page Page Page Monthly Calendars Page 23 7 8 8 8 Page 9 Page 9 Page 10 Page 10 Color & Visual Settings Credit Card Type Settings Reservation Confirmation Setup Page 11 Page 11 Page 11 Date Select Tool Bar Show-Only Mode 9- No-Vacancy Graphics Page 20 Page 7 Page 7 Auto-Booking After Reservation No-Vacancy Booking Cancellation Policies & Disclaimers Proof of Policy Agreement Notification Setup Custom Questions A la Carte Items & Packages 4- Availability Display Options Two Week Calendar Grid Search & Display Monthly Calendars Page 18 Page 18-19 Page 19 Page 19 Page 2-3 Enhanced Form Style Classic Form Style Arrival & Departure Dates First Allowable Booking Date Last Allowable Booking Date Requesting Guest's Arrival Time Activate Mode & Surcharge Options Default Stay Set Up Assigning Stay Requirements Page 2 Page 2 3- Reservation Forms Confirmed Booking Form Reservation Inquiry/Request Form 7- Minimum Night Stay Requirements Page 8 Page 8 Page 9 14- Room/Unit Management Room names, links, photos & descriptions Calendar Labels Groups & Room/Unit Types Room Order Adding a new Room/Unit Deleting a Room/Unit Temporarily Deactivate a Room/Unit Page 23 Page 23-24 Page 24 Page 24 Page 24 Page 25 Page 25 15- Gift Certificate Order Forms General Settings Color & Visual Settings Notification Setup Page 25 Page 25-26 Page 26 Credit Card Settings Page 26-27 Page 11 Page 12 Page 12-13 16- General Settings/Property Information Page 13 Page 13-14 17- Event Management 1 Page 27 Page 27-28 5- Room/Unit Rates Nightly Rates Yearly Rates (display only) Monthly Rates (display only) Calculated Week RatesCalculated Month Rates- 6- Fees, Taxes & Deposits 18- Adding Availability Online to Your Website Two Week Calendar Grid Page 14-16 Page 16 Page 17 Availability Search Page Monthly Calendars coming soon coming soon Date Select Tool Bar Show-Only Mode Reservation Form Gift Certificate Order Form Page 17-18 Page 28 Page 29 Page 29 Page 29-30 Page 30 Page 30 Page 30 1- HOW TO LOGIN TO YOUR AVAILABILITY ONLINE ACCOUNT To login to your Availability Online account go to the Administration Center Login screen: https://availabilityonline.com/admin/index.php To save time in the future we recommend bookmarking this link into your Favorites list. For full access to your account, including guest's credit card information, login to your Administration Center with your Availability Online username and Master Password. You may choose to restrict the viewing of sensitive credit card information to certain staff and/or your web developer. Logging in with your Availability Online username and Developer Password will hide all of your guest's reservation information. If you are unsure of your username and/or passwords please contact us: mailto:[email protected] 2- UPDATING AVAILABILITY There are two ways to update your room/unit availability: 1- Manually, through the Availability Online Administration Center. 2- Automatically, through a compatible guest management software. Both options are explained below. Manually Updating Your Availability is for users who do not have compatible desktop guest management software. Manual updating is quick and easy to do with only a few clicks of your mouse. To update your Room Availability: - Login to your Availability Online Administration Center - Click Quick Links > Update Availability For complete instructions on how to manually update your availability, click this link: http://ao4.availabilityonline.com/help/ao4help_manualupdate.html Change Order of Rooms/Units on Update Availability Screen To change the order of your room/units that appear on your manual update screen: - Login to your Availability Online Administration Center - Click Calendar Management > Update Availability > Manual Update Order - Follow the instructions given on the page. NOTE: These instructions will only change the room/unit order on the Update Availability screen in your Administration Center. To change the room/unit order on the availability display, seen by your guests, refer to the Room Management portion of this user manual. Auto-Updating Your Availability is for users who use compatible desktop guest management software (see list of compatible software vendors below). Auto updating allows property owners to instantly update their unit vacancy from their guest management software. 2 Updating your Availability Online calendar can be made less time consuming with automatic uploads from your guest management software. With a click of a button in your desktop software, your entire property's vacancy (some of the below vendors have the ability to send room rates and min. night stay requirements as well) will instantly appear on your Availability Online availability calendar. We currently support automatic uploads from the following software vendors: www.BnBManager.com www.HotelMaster-Software.com www.iMagicHotelReservation.com www.InnKontrol.com InnOvation www.InnTime.biz www.ReservationKey.com www.Compu_Reservations.com RezOvation Desktop www.RezStream.com www.GuestTracker.com www.VacationRentPro.com MunsenWare's Guest Tracker In addition to uploading availability information, your Availability Online reservation requests can be automatically downloaded and inserted directly- per your approval, into your guest management software. This saves you and your staff time from re-typing your guest's reservation and credit card information. Currently Availability Online reservation downloads are supported by the following software vendors: www.BnBManager.com www.HotelMaster-Software.com www.iMagicHotelReservation.com InnOvation www.InnTime.biz www.Compu_Reservations.com RezOvation Desktop www.Rezstream.com www.GuestTracker.com www.VacationRentPro.com MunsenWare's Guest Tracker Please contact the software vendor directly for instructions on how to upload/download to your Availability Online account. 3- RESERVATION FORMS Availability Online offers two types of reservation forms. Confirmed Booking Form and Reservation Inquiry Form. Confirmed Booking Form A Confirmed Booking Form has the ability to give your guests a complete reservation total and send them an auto reply confirmation email after the reservation has been submitted. After submitting the form, your guests are assuming they have just made a confirmed booking. Although your guest does receive an auto reply confirmation email, many property owners choose to send their guests a second confirmation email that may include more check-in info, directions and general details. To Activate the Confirmed Booking Form - Login to your Availability Online Administration Center - Click Reservation Management > Reservation Form Settings > Activate Form - Click both the 'Activate Reservation Requesting' and 'Activate Confirmed Reservation' check boxes - Click the Save Changes button Reservation Inquiry/Request Form A Reservation Inquiry/Request Form allows your guests to Request a reservation. Your guests will expect to hear from you with final confirmation. The reservation request form does have the ability to give your guests a complete reservation total if you choose to display one. After your guests submit a reservation request, they will receive an auto reply email which includes a copy of the reservation information they submitted. This is not a confirmation email. To Activate the Reservation Inquiry/Request Form - Login to your Availability Online Administration Center - Click Reservation Management > Reservation Form Settings > Activate Form - Click the 'Activate Reservation Requesting' check box - Click the Save Changes button 3 Enhanced Reservation Form Style The Enhanced Reservation Form Style gives the following functionalities: - Guests select unit and arrival date before contact and payment info is added. This prevents guests from filling out the entire form THEN finding out their reservation does not meet certain requirements. - Set your Maximum Occupancy settings for total guests, adults and/or children. - Set the Occupancy Level to which the Base Nightly Rate is set at. - Set Additional Person Fees (this is a Premium service feature only). - Set Under Occupancy Costs. To Activate the Enhanced Reservation Form Style - Login to your Availability Online Administration Center - Click Reservation Management > Reservation Form Settings > Activate Form - In the Reservation Form Style section select 'Enhanced (With Occupancy & Rates on first page)' and click the Save Changes button SPECIAL NOTE: The following options must be in place in your General Reservation Settings for Enhanced Reservations to function properly: - Room Choice 1 Selection must be enable - Room Choice 2 Selection must be disabled - Number of Adults must be enabled 4 Classic Reservation Form Style Our Classic Reservation Form Style is ideal for innkeepers looking for a straight forward and simple method to take reservation requests. As seen in the sample image below, guests are given a standard form to submit their contact and booking information. Guests are asked to confirm their information on the second page of the reservation process before submission. SPECIAL NOTES: The Classic Reservation Form style works best for those looking to take Reservation Requests/Inquiries, vs. Confirmed Bookings. The Classic Reservation From Style will show Nightly Rates and a reservation subtotal if you choose. The rates and subtotal are shown to the guest on the second page of the reservation form process. If you want to enforce minimum night stay requirements, we recommend using the Enhanced Style Reservation Form. Additional person charges and/or occupancy settings are not available in the Classic Reservation Mode. To Activate the Classic Reservation Form Style - Login to your Availability Online Administration Center - Click Reservation Management > Reservation Form Settings > Activate Form - In the Reservation Form Style section select 'Classic' and click the Save Changes button 5 Reservation Form General Settings Most of your reservation form fields and settings can be controlled from the Reservation Form's General Settings page of your Availability Online Administration Center. To Access ALL OF THE BELOW Reservation Settings: - Login to your Availability Online Administration Center - Click Reservation Management > Reservation Form Settings > General Settings - Collecting Guest Contact Information All guest contact fields (ie: Name, Address, Email, Phone, etc.) on your reservation form can be de-activated, made required or optional. You can also choose to have your guests verify their email address to prevent email communication failures. Above Highlighted: Screen shot of the Email Address setting portion of the Administration Center If you are using our Classic Reservation Form Mode, contact fields are found on the first page of the reservation form process. If you are using our Enhanced Reservation Form Mode, contact fields are found on the second page of the reservation form process. - Collecting Additional Guest Names Many smaller Inn’s and Bed and Breakfasts like to know the names of all guests in the reservation party. You can easily add a field to your reservation form asking for this information. When activated, an open text field will display on your form, just below the contact information entry section. - Check-In / Check-Out Time This setting allows you to display your check-in / check-out times. When activated, the times will be shown on your reservation form, just above the Arrival Date fields. - Arrival & Departure Date The arrival and departure fields are set by default to be active. You can choose to de-activate these fields from the General Settings portion of your Reservation Form Settings. NOTE: Deactivating one or both of these fields will prevent your system from calculating nightly rates and minimum night stay requirements. - First Allowable Booking Date Many property owners may not want to accept same-day online bookings. With the first allowable date modifier you can choose how many days out you want to accept online bookings. Entering ‘0’ in this field means you allow same day bookings. Entering ‘1’ means tomorrow is the first bookable day, etc. Your system is set on default at ‘1’. If the First Allowable Booking Modifier is set to ‘1’ or more, your phone number is automatically displayed on the reservation, asking guests to call you directly to book. 6 To Access ALL OF THE BELOW Reservation Settings: - Login to your Availability Online Administration Center - Click Reservation Management > Reservation Form Settings > General Settings - Last Allowable Booking Date Many property owners may only want to take reservations one year in advance. Using the last allowable date modifier you can choose the number of days from today that is the last day you allow to be booked. Entering ‘365’ means you allow bookings up to one year in advance. Entering ‘180’ means you allow bookings up to 6 months in advance, etc. Your system is set by default at ‘365’. - Requesting Guest's Arrival Time If you have strict arrival / check-in times you may want to request your guests to choose their estimated time of arrival. Using the drop down menus provided select your check-in range. When activated, your guests will be able to select from this time range when making their reservation. The Arrival Time field on your reservation form can be optional or required. Above: Arrival Time settings section of your Administration Center - Collecting Room/Unit Choice from Guest This field allows guests to select which unit or unit type they want to reserve. You can choose to deactivate this field or make this field optional. IMPORTANT NOTE: Deactivating or marking this field optional will prevent your system from calculating nightly rates and minimum night stay requirements. A room/unit choice is necessary for the system to tally this information. - Number of Guests This field allows guests to enter how many people are in their party. By default, this field is ‘active’. You can choose to de-activate this field or make this field optional. IMPORTANT NOTE: Deactivating or marking this field optional will prevent your system from calculating nightly rates and additional person fees. The Number of Guests is information necessary to tally this information. - Children Settings This field is set by default to be ‘OFF’. When activated your reservation form will ask for the Number of Adults AND Number of Children. You can choose to require the Number of Children field on your reservation form and/or display your Children’s Policy on the form as well. If you show a reservation total on your reservation form, and charge a different nightly rate for children, you can add this rate in the Room Management portion of your Administration Center. 7 To Access ALL OF THE BELOW Reservation Settings: - Login to your Availability Online Administration Center - Click Reservation Management > Reservation Form Settings > General Settings - Payment/Credit Card Settings Your Availability Online reservation form can securely collect your guest’s credit card information. This can include not only the credit card number, but the card’s expiration date, CVV Number and mailing address associated with that card. Keep in mind that Availability Online does not process the credit card and does not have any direct interfaces to payment gateways. The reservation form credit card fields are ‘ON’ and ‘Required’ by default. These fields can easily be adjusted from the General Settings portion of your Reservation Form Settings. To manage which cards you accept click Reservation Form Settings > Credit Card Settings from your Administration Center. - Displaying Comments Box on your Reservation Form By default, your reservation form displays an optional text field asking your guests if they have any additional Comments/Requests. This field can be turned off or made required. If you are using our Classic Reservation Form Mode, this field is found on the first page of the reservation form process. If you are using our Enhanced Reservation Form Mode, this field is found on the second page of the reservation form process. - Unit / Room Labels The Unit/Room Label section allows you to display text on your reservation form that describes what type of unit you are renting. The default unit label that appears on your reservation form is 'Room'. If you rent condos, you may want to change the unit label to ‘Condo’. If renting vacation rentals, you may want to change the label to ‘Rental’. Whatever text you choose will show throughout the reservation form, as in the highlighted example below: Above Highlighted: Unit Label found on the Reservation Form seen by your guest - Immediately mark rooms as not-available when a reservation is made You can choose to immediately take a room out of your inventory (mark ‘booked’ on your availability calendar) after a reservation is submitted. This setting is best used with manual availability updating. If you use automated updating via Guest Management Software this feature will work but your software may quickly overwrite the room status depending on your settings. This setting is ‘OFF’ by default. - No-Vacancy Booking This setting allows a guest to book a room even if your Availability Online system shows novacancy for the room/dates the guest selects. This setting is ‘OFF’ by default. 8 Cancellation Policies & Disclaimers To Edit your Cancellation Policies and other Disclaimers that appear on your Reservation Form - Login to your Availability Online Administration Center - Click Reservation Management > Reservation Form Settings > Policies & Disclaimers There are four different items you can change from the Policies & Disclaimers portion of your Administration Center: 1- Cancellation, Deposit & Booking Policies: Text you enter can display on one or all of the pages within the reservation process. When text is entered, guests will be required to 'Agree' to your policy before they can submit the reservation. You can also choose to include this information to the auto reply email that is sent to the guest immediately after they submit the reservation form. Below: Screenshot of Cancellation, Deposit & Booking Policies section of your Administration Center. 2- Custom 'Thank You' Message: Text entered in this field displays on the last page of the reservation form process. 3- Miscellaneous Message: Text entered in this field displays at the bottom of the first page of the reservation form process. 4- Subtotal Policies: Displays on the second page of the reservation form process. A Subtotal Policy is only necessary if you are displaying nightly rates. An example of your subtotal policy might be: "Subtotal does not AAA discount or other misc. charges." Proof of Policy Agreement Sometimes it becomes necessary to prove to your guests or your credit card merchant that the guest did in fact 'agree' to your cancellation or other policies. When such a dispute arises you can print a copy of the guest's actual reservation that includes the policy they agreed to, as well as a date and time stamp of when they agreed to it. To Print a Reservation Which Includes Proof of Policy Agreement: - Login to your Availability Online Administration Center with your Master password - Click on the Reservation ID# to view details. - Scroll down to the bottom of the reservation and click to expand/view the policy info. - Click Print Policy Notification Setup When a reservation has been submitted by your guest you have the option to be notified via four different ways: 1- Email. Multiple emails can be used 2- Text Message (premium subscriber feature only) 3- Fax (premium subscriber feature only) 4- Pager (premium subscriber feature only) 9 Note that Availability Online staff needs to be contacted to activate Fax and/or Pager Notification services. Faxes and text messages are not guaranteed with all makes/models of fax machines and phone carrier services. Email, by nature, is never 100% reliable due to various virus protection systems and spam filters. We always recommend periodically checking the Pending Reservation page of your Administration Center for new reservations. To Edit your Reservation Notification Methods - Login to your Availability Online Administration Center - Click Reservation Management > Reservation Form Settings > Notification Setup Custom Questions Display up to four Custom Questions on your reservation form. Choose to display a Text Box or Drop Down Menu for your guests to answer your question. If displaying a drop down menu, you can enter up to 9 drop down menu options. You can also choose to Require guests to answer your Custom Questions. Example of Custom Questions: To Edit / Add Custom Questions to your Reservation Form - Login to your Availability Online Administration Center - Click Reservation Management > Reservation Form Settings > Custom Questions A La Carte Items & Packages An A La Carte Item or Package may be added to your reservation form at any point. This feature is typically used to up-sell certain items or services. For example, giving the guest an option to add a 'Bottle of Wine' or 'Healthy Spa Package' to their reservation. If you use nightly rates to give you guests a reservation total, you can choose to include the cost of your a la carte items or packages within that total. Sample image: 10 To Add A La Carte Items & Packages to your Reservation Form - Login to your Availability Online Administration Center - Click Reservation Management > Reservation Form Settings > A La Carte Items & Packages Reservation Form Colors & Visual Settings You may alter the font type, text color, background color and foreground color of your reservation form. Premium users may also add a static page header or logo to the top of their reservation form. Adding a header to the reservation form is a free service that needs to be done by the Availability Online staff. Please mailto:[email protected] for information. To Edit your Reservation Form Colors - Login to your Availability Online Administration Center - Click Reservation Management > Reservation Form Settings > Colors & Visual Settings Our staff is always happy to help you alter the colors of your Availability Online pages to match your website. Credit Card Type Settings Tell our system which types of credit cards you accept. Your selection(s) will appear as payment options on your reservation and/or gift certificate order form. To Edit your Credit Card Type Settings - Login to your Availability Online Administration Center - Click Reservation Management > Reservation Form Settings > Credit Card Settings Reservation Confirmation Setup You have the option to send a reservation confirmation to your guest through the Availability Online interface. Default Email addresses, Email subject and email text you enter will automatically appear when you compile the confirmation email from your Pending Reservation Pick Up Center. To Edit Reservation Confirmation Setup Type Settings - Login to your Availability Online Administration Center - Click Reservation Management > Reservation Form Settings > Confirmation Setup Unless you are familiar with HTML code, you will want to select 'Plain Text' as your email type. Plain Text allows you to copy and paste a confirmation letter from a Word or Text document. 4- AVAILABILITY DISPLAYS Two Week Calendar Grid Available to both Basic and Premium subscribers. One of our most commonly used display options. Shows the availability of all rooms in your account in two week intervals. You may choose to allow guests to search your availability up to 1 or 2 years in advance. Colors and vacancy graphics can be customized to match the theme of your website. Our staff is happy to customize the calendar for you. Rates can be shown on this availability display. See the Rates portion of this user manual for more information. Working Example: 11 http://ao4.availabilityonline.com/availtable.php?un=demo Available for both Basic and Premium subscribers. Availability Search & Display Available to both Basic and Premium subscribers. The Availability Search & Display shows only rooms available for the dates searched by your guests. This display method includes the option to display room photos and descriptions. Working Example: http://ao4.availabilityonline.com/availability _search.php?un=demo Colors can be customized to match the theme of your website. Our staff is happy to customize this page for you. Nightly Rates can be shown on this availability display. See the Rates portion of this user manual for more information. Monthly Calendars Monthly calendars displays are available to Premium Subscribers only. There are two different monthly calendar display options. Monthly Calendar Option #1 Show 1-24 months of availability on your web page(s ). Monthly Calendars can show availability for a single room/unit or your entire property. All of our monthly calendar displays can be used solely on your website, or in conjunction with other availability displays. Working Example: http://ao4.availabilityonline.com/images/aodemo_monthlycal.htm 12 Monthly Calendar Option #2 Show a single monthly calendar on your web page(s) that will allow guests to view multiple months using a simple 'Next' link. These calendars can show availability for a single room/unit or your entire property. Date Select Tool Bar The Date Select Tool Bar is available to both Basic and Premium subscribers. The Date Select Tool Bar allows your guests to choose which type of availability they'd like to see. Selecting one button in the tool bar takes your guests to the Availability Search page. Selecting the other takes your guest to the 2-week calendar. You may configure the date select tool bar to only point your guest to one availability display page. Your web designer can change the layout and colors of the Date Select Tool Bar. Here are a couple of ways you could show the date select tool bar on your website: Working Example: http://ao4.availabilityonline.com/images/room_images/c ombodemo.html In the working example, clicking 'View All' will send guests to the 2-Week Display. Clicking 'Search Availability' sends guests to the Search & Display page. Show-Only Mode Available for Premium subscribers only. Our Show-Only display mode gives you the ability to show availability for a single unit/room. Links to a Show-Only calendar can be placed on your website for each unit/room. This display option can be solely used on your website, or in conjunction with other availability displays. Show-Only calendars can also show a group of specific units at one time. For example, lets say you have a total of 24 vacation rentals available. With a show-only calendar you could choose to display three different calendars: One showing rentals with 3 bedrooms, one showing rentals with 2 bedrooms, the other showing rentals with 1 bedroom. 13 You can choose to place a Show All Rooms button on each Show-Only calendar which would allow your guests to view all units/rooms. The Show-Only method can be used within the 2-Week Calendar (example below) or the Availability Search formats. Working Example of a Show Only Two-Week Calendar: http://ao4.availabilityonline.com/availtable.php?un=demo&show_only=92167&show_only_mode_view_all _button=true&submit4=Show+Less+Properties Working Example of a Show Only Availability Search: http://ao4.availabilityonline.com/availability_search.php?un=demo&show_only=92167&show_only_mode _view_all_button=true&submit4=Show+Less+Properties 5- ROOM/UNIT RATES Availability Online gives you the option to show rates 3 different ways: 1- Nightly Rates (is calculated to show a reservation total) 2- Monthly Rates (for display only, does not get included in reservation total) 3- Yearly Rates (for display only, does not get included in reservation total) Nightly Rates When Nightly Rates are entered into your account they will automatically be used to calculate a subtotal for your guests' reservations. Nightly are shown on the reservation form as your guest completes their booking. Nightly Rates are also shown on your availability displays. 14 If you use the Availability Search display, nightly rates will be shown like this: If you use the 2-Week Availability display, nightly rates can be shown one of two ways 1- Within the calendar grid (Please contact the Availability Online support staff to activate this rate display method for you) 2- In a Mouse Over Pop Up Box 15 SPECIAL NOTES: Vacation RentPro, BnBManager and HotelMaster updaters: Nightly Rates can be sent automatically from your reservation software. However, you do need to Activate nightly rates in your Availability Online account. Other Auto Data Updaters: To prevent data loss you must send your first PMS update BEFORE entering ANY nightly rate information into our system. Manual Data Updaters: If at any point you decide to start updating your Availability Online account with property management software please contact us before you send your first auto update. To Activate Nightly Rates - Login to your Availability Online Administration Center - Click Room Rates > Rate Settings - From the 'Rate Display Type:' drop down menu choose Nightly - Click the Submit button To Create and Assign Nightly Rates For detailed instructions on how to create and assign your nightly rates please following this link: http://ao4.availabilityonline.com/help/ao4help_nightlyrates.html Yearly Rate Display Yearly rate display allows you to show a single nightly (see example image below) rate or a rate range for the entire year on the 2-week availability calendar display. A rate range typically represents your low midweek rate to your high weekend/holiday rate. Yearly rates are for display only and are not calculated in the reservation form total. SPECIAL NOTE: Yearly Rates are available for display on the 2-week availability calendar only and are not displayed on the Availability Search page. above: Rate range which shows for the entire year. To Activate Yearly Rates - Login to your Availability Online Administration Center - Click Room Rates > Rate Settings - From the 'Rate Display Type:' drop down menu choose Yearly - Click the Submit button - In the left-side navigation click Set Monthly/Yearly Rates - Click the Pencil (edit) icon next to the room to assign a rate - In the Rates section enter your Yearly rate range in the High and Low fields. If you only have a single rate enter that in the "High Rate' field. - Click the Save Changes button - Repeat for each room/unit. 16 Monthly Rate Display Monthly rate display allows you to show a single nightly rate or a rate range (see example image above) that can change for each month viewed on the 2-week availability calendar display. For example: You can show a rate for Room 1 in August for $145. But, in January the rate for Room 1 can be shown as $115. A rate range typically represents your low midweek rate to your high weekend/holiday rate. Monthly rates are for display only and are not calculated in the reservation form total. SPECIAL NOTE: Monthly Rates are available for display on the 2-week availability calendar only and are not displayed on the Availability Search page. Above: Single rate which can change depending on the month viewed by guest To Activate Monthly Rates - Login to your Availability Online Administration Center - Click Room Rates > Rate Settings - From the 'Rate Display Type:' drop down menu choose Monthly - Click the Submit button - In the left-side navigation click Set Monthly/Yearly Rates - Click the Pencil (edit) icon next to the room to assign a rate - In the Rates section enter your Monthly rate range in the High and Low fields. If you only have a single rate enter that in the "High Rate' field. - Click the Save Changes button - Repeat for each room/unit. 6- FEES, TAXES & DEPOSITS The Fees & Taxes feature is available to Premium subscribers. The Fees & Taxes function can be used to include taxes, cleaning fees or any other misc. charge to your reservation subtotal. You can also show a deposit amount which will be charged to your guest's credit card. You can add an unlimited number of fees and/or taxes to your account. A percentage or static dollar amount can be added to your reservation subtotal on a per-unit or a per-stay basis. Adding fees and/or taxes to your reservation subtotal may benefit you and your guests, as it can provide your guest with a final total of their stay. To Add Fees & Taxes To Your Reservation Form: - Login to your Availability Online Administration Center - Click Reservation Management > Reservation Form Settings > Fees & Taxes - Follow the set up instructions given on the page 17 Left: Sample of fee, tax and deposit display on reservation form To Show a Deposit Amount on Your Reservation Form: - Login to your Availability Online Administration Center - Click Reservation Management > Reservation Form Settings > Fees & Taxes - Click the Add New Tax button - In the Tax Name field enter how you want to label the deposit on the reservation. The Tax Name in the example above is "20% Deposit Due Today' - Make the below changes in the fields provided: Activate: select 'Yes' Applied to: Select 'Unit and Non-Unit Taxable Subtotal' Percentage: type in the percentage of your deposit Behavior: Select 'Display Only' Display Order: enter '1' Applies to Rooms: Click 'Check All' Click the Save Changes button 7- MINIMUM NIGHT STAY REQUIREMENTS There are four modes you can choose from when deciding how to handle your minimum night stay requirements on your reservation form. 1- Allow Mode: Minimum night stay requirements are displayed but not enforced. A guest can submit a reservation that does not meet your minimum night stay requirements. 2- Alert Mode: Minimum night stay requirements are displayed and guests are warned if their reservation does not meet requirements. A guest can still submit a reservation that does not meet your requirements. 3- Surcharge Mode: Minimum night stay requirements are displayed and guests are warned if their reservation does not meet requirements. The warning will notify the guest that an additional surcharge must be paid if they proceed with the reservation. 18 4- Stop Mode: Minimum night stay requirements are displayed and enforced. Guests will be alerted that they have not met your requirements and will not be able to complete the reservation until changes are made. Activate Minimum Night Stays & Select Your Mode Option Step 1: To Activate Nightly Rates - Login to your Availability Online Administration Center - Click Minimum Night Stays > Minimum Night Stay Settings - Select 'Yes' from the Activate Minimum. Night Stay settings section Step 2: Altering the Availability Search 'Nights' Start and End Values - Using the drop down menus provided assign an availability search Start and/or End value. ** YOU SHOULD KEEP THE DEFAULT SETTINGS IF YOU DO NOT HAVE THE SAME MIN. NIGHT STAY REQUIREMENT FOR ALL TIMES ** Altering the availability search 'Nights' Start and End Values will change the values found in the Nights drop down menu located on the Availability Search and Display page. The Availability Search 'Nights' Start and End Values can restrict guests from searching for availability for stays that don't meet your minimum night stay requirements. It can also prevent guests from searching for large multi-night stays in which you would rather book by phone. For example (see image below), if you ALWAYS enforce a 3 night minimum, you can remove the 1 and 2 Nights options from the Availability Search tool bar by setting "Nights" Start Value to 3. SPECIAL NOTES: Vacation RentPro, BnBManager and HotelMaster updaters: Min. Night Stay information can be sent automatically from your reservation software. However, you do need to follow steps 1-3 to the left. Other Auto Data Updaters: To prevent data loss you must send your first PMS update BEFORE entering ANY min. night stay information into our system. Manual Data Updaters: If at any point you decide to start updating your Availability Online account with property management software please contact us before you send your first auto update. Step 3: Select Your Minimum Night Stay Mode - Using the information on the page, select how you want the reservation form to handle your min. night stay requirements. - Click the Save Changes button To Create and Assign Minimum Night Stay Requirements For detailed instructions on how to create and assign your minimum night stay requirements please following this link: http://ao4.availabilityonline.com/help/ao4help_minnightstay.html 19 8- MAXIMUM OCCUPANCY SETTINGS & ADDITIONAL PERSON FEES Additional Person Fee functions are available for Premium Subscribers only Maximum Occupancy functions are available to both Premium and Basic Subscribers To activate max. occupancy and additional person fees: - Login to your Availability Online Administration Center - Click Reservation Management > Reservation Form Settings > Activate Form - In the Reservation Form Style section select 'Enhanced (With Occupancy & Rates on first page)' - Click the Save Changes button The set your additional activate max. occupancy and additional person fees:: (NOTE: The Enhanced reservation form style must be activated to access these settings) - Login to your Availability Online Administration Center - Click Room Management > Manage Your Rooms - Click the Pencil (edit) icon next to any unit to adjust max. occupancy and/or additional person settings - Click the Blue ? next to any field for explanations - Click the Save Changes button ATTENTION Vacation Rent Pro and HotelMaster users: The following settings can be sent directly from your Vacation RentPro or HotelMaster software systems. - Base Rate Occupancy (Guests) Max Occupancy (Adults) Max Occupancy (Children): Max Occupancy (Total Guests) Additional Adult Occupant Fee* Additional Child Occupant Fee* Under Occupancy Fee* * Available for HotelMaster users ONLY SPECIAL NOTES: The following options must be in place in your General Reservation Settings for Enhanced Reservation features to function properly: - Room Choice 1 Selection must be enable - Room Choice 2 Selection must be disabled - Number of Adults must be enabled 9- NO VACANCY GRAPHICS Both basic and premium users can choose from over 80 no-vacancy images which will represent a booked room on the 2-week calendar display. No-vacancy graphics can be changed when ever you'd like using these instructions: - Login to your Availability Online Administration Center - Click Calendar Management > Vacancy Graphics > Standard Vacancy Graphics - Select the no-vacancy graphic of your choice and click the Apply Changes button Premium users can choose to show a custom no-vacancy graphic on their availability calendar. To do this ask your web designer to create a custom graphic that is 25 x 25 pixels. Email the graphic to Availability Online Support [email protected] and we'll upload the graphic to your account. If you would like Availability Online to create a customized graphic for you please contact us. Additional fees for creating this image may apply. 10- GENERAL POLICY & MONTHLY NOTES ON AVAILABILITY DISPLAYS Information provided in your General Policy & Monthly Note section appears directly below your availability display. This section can be used any way you choose. Many use Policies & Monthly Notes to explain cancellation policies, non-smoking rules, special off-season discounts or to announce special events in the area. 20 To Activate Policies & Monthly Notes - Login to your Availability Online Administration Center - Click Calendar Management > Policies & Monthly Notes - Text entered in the 'Policy #0' field will appear for all twelve months. - Text entered in the 'Policy #1-12' fields will display for individual months. - Click the Apply Changes button when finished. SPECIAL NOTE: HTML is allowed in these fields. 11- HOW TO CHANGE YOUR PASSWORD Your availability Online account has two passwords. 1- Master Password: Allows full access to account including credit card information. 2- Developer Password: Restricts viewing of sensitive reservation information. To Change Your Master or Developer Password - Login to your Availability Online Administration Center - Click Password Administration > Change Developer Password or Change Master Password - Follow the password changing instructions given on the page To Change Your Username Please contact us at [email protected] with the username you would like to change to. In rare cases additional fees to change your username may apply. 12- RESERVATION & GIFT CERTIFICATE ORDER PICK-UP When a new reservation or gift certificate order has been submitted you are immediately sent an email notification alerting you of the guest's submission. All information the guest submitted in the form is included in this email notification MINUS the credit card information. This is for security purposes. To View Pending Reservations / Gift Certificates & to Retrieve Credit Card Info - Login to your Availability Online Administration Center with your Master password - Click on the Reservation or Certificate ID# to view details. When viewing Reservation Details you have the option to email your guest a confirmation. To do this, click the Send Confirmation Email button at the bottom of the page where you will then be prompted to complete & send an email form to your guest. After Confirmation has been sent(optional) it is recommended that you click the Archive button found at the bottom of the Reservation or Certificate Detail page. Archived reservations/gift certificates are saved 6 months for further viewing. SPECIAL NOTE: If you use desktop reservation software such as Vacation RentPro, iMagic, GuestTracker, etc, reservations can be automatically downloaded into your software. This will save you and your staff time from re-typing your guests' information. Please contact your reservation software provider directly for information on how to activate Availability Online reservation downloads. HELPFUL HINT-- Sorting Reservations: Reservations and Gift Certificate orders on the Pending page can be sorted by Date Taken, numerically by the Reservation ID#, Customer Name or by the Arrival Date, by clicking on the column header text. 21 To View Archived Reservations / Gift Certificates Archived reservations/gift certificates are reservations that have been moved from your Pending Reservation page either manually or by your desktop reservation software. Once archived, reservations are saved 6 months for further viewing. - Login to your Availability Online Administration Center with your Master password - Select Reservation Management > Reservation Pick Up > Archived Reservations - Choose one of the four search methods provided to find the Archived Reservation - Once found, click on the Reservation or Certificate ID# to view details. 13- AVAILABILITY DISPLAY VISUAL SETTINGS 2-Week Calendar General Visual Settings & Colors To change the colors of the 2-week calendar grid: - Login to your Availability Online Administration Center - Click Calendar Management > Visual Settings > Traditional Calendar Display - Choose the portion of the calendar you would like to edit and the Edit Visual Settings button - Using the color pickers provided edit the colors to the settings of your choice - Click the Submit button to save your changes - You can view your changes by clicking Quick Links > Preview 2-Week Calendar Header & Footer Customization (available for Premium subscribers only.) HTML/CSS knowledge is required to update the header and footer customization for Premium accounts. Please contact us to alter your availability page layout. Visual setting changes are usually done at no charge to you. Alternatively, your web designer can make these changes using the following instructions: - Login to your Availability Online Administration Center Click Calendar Management > Visual Settings > Traditional Calendar Display Choose Premium Header & Footer and click the Edit Visual Settings button Edit the HTML in the Custom Header / Footer fields and click the Submit button to save changes. SPECIAL NOTE: When adjusting the Custom Header / Footer be sure to keep the Availability Online style sheets in tact. These style sheets are noted. Availability Search General Visual Settings & Colors To change the colors of the Availability Display page: - Login to your Availability Online Administration Center - Click Calendar Management > Visual Settings > Search & Display - Choose the portion of the calendar you would like to edit and the Edit Visual Settings button - Using the color pickers provided edit the colors to the settings of your choice - Click the Submit button to save your changes - You can view your changes by clicking Quick Links > Preview Search & Display Header & Footer Customization (available for Premium subscribers only.) HTML/CSS knowledge is required to update the header and footer customization for Premium accounts. Please contact us to alter your availability page layout. Visual setting changes are usually done at no charge to you. Alternatively, your web designer can make these changes using the following instructions: - Login to your Availability Online Administration Center - Click Calendar Management > Visual Settings > Search & Display - Choose Premium Header & Footer from the drop down menu provided and click the Edit Visual Settings button - Edit the HTML in the Custom Header / Footer fields and click the Submit button to save changes. 22 SPECIAL NOTE: When adjusting the Custom Header / Footer be sure to keep the Availability Online style sheets in tact. These style sheets are noted. Monthly Calendars (Monthly Calendars are available to Premium subscribers only.) To change the colors of the Monthly Calendars: - Login to your Availability Online Administration Center - Click Calendar Management > Visual Settings > Monthly Calendars - Using the color pickers provided edit the colors to the settings of your choice - Click the Submit button to save your changes 14- ROOM / UNIT MANAGEMENT As you come to your Room Management center you will see several editing options. Use the below key to help manage your room/unit information. SPECIAL NOTES: Attention Vacation RentPro and HotelMaster software users: Room/unit names, links, thumbnail images and descriptions can be sent from your Vacation RentPro or HotelMaster software. Contact their support staff directly for set up instructions. Attention CompuRes (aka Reservations v. 6, 7, 8) users: Room/unit names are sent from your CompuRes software. Room names can not be edited from your Availability Online administration center. Editing Room names, links, photos & descriptions To edit room/unit names, links, thumbnail photos and descriptions: - Login to your Availability Online Administration Center - Click Room Management > Manage Your Rooms - Click the Pencil (edit) icon next to the room/unit you need to edit. - Enter the room URLs, photos, names and/or description in the fields provided - Click the Save Changes button SPECIAL NOTE: Photos and Descriptions ONLY appear on the Availability Search page. They do NOT appear on the 2-week calendar grid. Calendar Labels Labels can be added to any 2-week availability calendar display and are typically used to divide the calendar grid into labeled sections. The example below shows two labels separating B&B Rooms from Private Cabins. Labels can also be used to display other misc. text. 23 To add a new Label(s) to your 2-week availability display: - Login to your Availability Online Administration Center - Click Room Management > Manage Your Rooms - Select the Add Label button and follow the instructions given on the page You can then re-order the rooms/labels to the correct location on the calendar grid using the Reorder tab on the main Room Management admin. page. See Room & Label Order below. Groups & Room/Unit Types Groups are made up of any number of individual rooms/units of a single type. For example: You may have 15 identical rooms with 2 Double Beds. Instead of listing all 15 rooms individually in your booking engine, you may combine all 15 rooms into a single Group. Only the single group will appear to your guests. To Create a Group - Login to your Availability Online Administration Center - Click Room Management > Manage Your Rooms - Select the Add Group tab - Add the Group's name (ie: Rooms w/ 2 Double Beds) and other appropriate info and click the Save Changes button - Select the individual rooms/units that should be included in the group and click the Save Group button - After a new group is created, you can change which rooms are associated with a group at any point using the blue Assign Groups icon shown below. Room & Label Order The order your rooms/units appear on your availability display (viewed by your guests) can be changed to any order you choose. To re-order the room/unit listings as they appear on your availability display: - Login to your Availability Online Administration Center - Click Room Management > Manage Your Rooms - Select the Reorder Chart tab - Follow the instructions given on the page to reorder the room/unit listing - Click the Save Order button Adding a New Room/Unit To add a new room to your availability display/booking engine: - Login to your Availability Online Administration Center - Click Room Management > Manage Your Rooms - Select the Add Room button - Enter the appropriate room information and click the Save Changes button SPECIAL NOTE: Auto updaters need to add new rooms/units in their reservation management software. Doing so will automatically add the room/unit to your Availability Online account upon the next update. InnKontrol users need to add the new room/unit to BOTH their InnKontrol software and Availability Online account. 24 Permanently Deleting a Room/Unit To permanently delete a room from your availability display/booking engine: - Login to your Availability Online Administration Center - Click Room Management > Manage Your Rooms - Click the red 'X' next to the room/unit you need to delete (you will be asked to confirm this decision) SPECIAL NOTE: Auto updaters need to also remove the rooms/units from their reservation management software. Temporarily De-Activating a Room - Login to your Availability Online Administration Center - Click Room Management > Manage Your Rooms - Click the green flag found in the Actions column until the flag turns red 15- GIFT CERTIFICATE / GIFT CARD ORDER FORMS Secure Gift Certificate Order Forms are available for Premium users only. Your Availability Online Gift Certificate Order form will securely collect orders directly from your own website. You will be responsible for any correspondence with the buyer and/or guest using the certificate. You are also responsible for mailing/e-mailing the actual certificate or gift card. Credit card numbers found in the order will be processed by you using your current processing method. When a new gift certificate order has been made you are sent an e-mail notification. All order information is included in the notification email minus the credit card number. Credit card numbers can be retrieved using these instructions: - Login to your Availability Online Administration Center with your Master password - Click on the pending Certificate ID# to view credit card details General Settings The Gift Certificate General Settings portion of your Administration Center will allow you to: Activate the order form Select a Gift Certificate or form OR a Gift Card order form Add your gift certificate policies and disclaimers Edit which payment fields will display on the order form Add a custom question to your order form To access the Gift Certificate General Settings: - Login to your Availability Online Administration Center - Click Gift Certif. Management > Gift Certificate Form Settings > General Settings Color & Visual Settings You may alter the font type, text color, background color and foreground color of your gift certificate order form. Premium users may also add a static page header or logo to the top of their order form. Adding a header to the reservation form is a free service that needs to be done by the Availability Online staff. Please mailto:[email protected] for information. 25 To Edit your Gift Certificate Order Form Colors: - Login to your Availability Online Administration Center - Click Gift Certif. Management > Gift Certificate Form Settings > Colors & Visual Settings Our staff is always happy to help you alter the colors of your Availability Online pages to match your website. above: sample gift certificate order form Notification Setup When a gift certificate order has been submitted you have the choice to be notified via four different options. 1- Email. Multiple emails can be used 2- Text Message (premium subscriber feature only) 3- Fax (premium subscriber feature only) 4- Pager (premium subscriber feature only) Note that Availability Online staff needs to be contacted to activate Fax and/or Pager Notification services. To Edit your Gift Certificate Notification Methods - Login to your Availability Online Administration Center - Click Gift Certif. Management > Gift Certificate Form Settings > Notification Setup Credit Card Settings Tell our system which types of credit cards you accept. Your selection(s) will appear as payment options on your gift certificate order form and/or your reservation form. 26 To Edit your Credit Card Type Settings - Login to your Availability Online Administration Center - Click Gift Certif. Management > Gift Certificate Form Settings > Credit Card Settings 16- GENERAL SETTINGS / PROPERTY INFORMATION The Property Information section of your Administration Center allows you to change the info which appears within the Standard Header of a Basic Availability Online calendar display (shown below with red arrow). This section is also used to change the property link found on your reservation and gift certificate order form. SPECIAL TIP: Misc. text can be added to the Date Row portion of your 2-week availability calendar from the Property Information section of your Admin. Center (shown left with yellow arrow). To do this: click the 'Check to enable the Date Row Message' box then add the text in the 'Date Row Message Text' field provided. To Change your General Property Information - Login to your Availability Online Administration Center - Click General Settings > Property Information - Edit your property information in the fields provided. Click the Submit button to save changes 17- EVENT MANAGEMENT Event Display for Premium Subscribers only. An events display can be shown above the 2-week calendar or the availability search display pages as shown below. You have ability to edit all header and description text within this display. You can also select when to display each event. Specifically choose to show each event: During Event Date Range Only Until Event has expired Always show event Add as many events as you'd like! To Access Your Event Management Center - Login to your Availability Online Administration Center - Click Calendar Management > Event Management - Click the Add Event tab to create a new event or - Click the Pencil (edit) icon next to any event to make changes 27 SPECIAL TIP: Many use the Events Display for other purposes, such as displaying seasonal specials or packages.. 18- ADDING AVAILABILITY ONLINE TO YOUR WEBSITE Availability Online will need to be implemented into your site by your web designer. If you do not have a designer, our sister company VTweb can add Availability Online to your website for a one-time hourly fee. Please contact Ruthellen Weston or Julie Niles at VTweb if you need someone to add Availability Online to your site. 802-774-1124 [email protected] You have several different options when deciding how to display Availability Online on your website. If you need help deciding which option is best for you please contact us: [email protected] Most properties choose to show an availability display and reservation form. However you can show one OR the other. IMPORTANT TIP: There are several different ways to add Availability Online to your site. Below are just a select few examples of the easiest methods. For more examples and code on how to add Availability Online to your website: - Login to your Availability Online Administration Center - Click Your Website and select the display option of your choice OR if you don't see the display option you are looking for please contact us ([email protected]) and we can email you or your web designer the appropriate code and instructions. Two Week Calendar Grid A visual example of the 2-week calendar can be seen in Section #4 of this help document. Use the below URL to add a simple text link to your site pointing to the two-week calendar. Replace the 'XXXX' with your Availability Online username. http://availabilityonline.com/availtable.php?un=XXXX 28 Availability Search Page A visual example of the Availability Search page can be seen in Section #4 of this help document. Use the below URL to add a simple text link to your site pointing to the Availability Search page. Replace the 'XXXX' with your Availability Online username. http://ao4.availabilityonline.com/availability_search.php?un=XXXX Monthly Calendars Monthly Calendar displays are available to Premium subscribers There are 4 different types of Monthly Calendar displays. 1- Simple Static Monthly Image Calendar 2- Dynamic Monthly Image Calendar with a javascript "Next" button View 3- Dynamic Monthly Image Calendar with a javascript "Next" button and jQuery affects View 4- Multiple Monthly Image Calendars that change Automatically when the Month Changes Visual examples of the Monthly Calendars can be seen in Section #4 of this help document. Below are code and instructions on how to implement Multiple Monthly Calendars, the most common monthly calendar display option. Copy and paste the below image URLs into your html document. Each URL represents one month. Replace the 'XXXX' with your Availability Online username. Replace the 'YYYYY" with each room/unit ID#. Room ID#s can be found in the Room Management portion of your Administration Center or can be provided to you via email from the Availability Online support staff. [email protected] <img id="aoCalendarImageStatic" src="http://images.availabilityonline.com/api/gcal/index.php?un=XXXXX&month=plus0&roomId=YYYYY" /> <img id="aoCalendarImageStatic" src="http://images.availabilityonline.com/api/gcal/index.php?un=XXXXX&month=plus1&roomId=YYYYY" /> To show additional months, use the same URL replacing the 'month=plus' variable. 0= current month 1= next month 2= third month, etc You can display 1-12 months for a single property. Date Select Tool Bar Visual examples of the date select tool bar can be seen in Section #4 of this help document. Your web designer can alter the layout, colors, text and overall appearance of the tool bar. Standard code of the date select tool bar can be found using these instructions: - Login to your Availability Online Administration Center - Click Your Website > Interactive Calendars - Scroll down to Option #6 - Using the instructions provided, copy and paste the given code into your website The code in the Your Website portion of our administration center gives only one way you can display the tool bar. We can customize the following elements within the tool bar: - Include ONLY the 'View All' button (points only to the 2-week calendar) - Include ONLY the 'Search Availability button' (points to the Availability Search page) - Configure tool bar to point to an indivual room/unit, vs. ALL units - Pre-select the #Nights field to a specific number. For example if you ALWAYS have a 7 night min., we can adjust the tool bar so guests can search for stays less than 7 nights. 29 If you would like any of these customizations please contact us - [email protected], and we can send you/your designer the appropriate code. Show-Only Mode Show-Only displays are available to Premium subscribers. Visual examples of the Show Only displays can be seen in Section #4 of this help document. Show-Only Two Week Display Use the below URL to add a simple text link to your site pointing to the Show-Only Two-Week Display. Replace the 'XXXX' with your Availability Online username. Replace the 'YYYYY" with each room/unit ID#. Room ID#s can be found in the Room Management portion of your Administration Center or can be provided to you via email from the Availability Online support staff. [email protected] http://ao4.availabilityonline.com/availtable.php?un=XXXX&show_only=YYYYY&show_only_mode_view_all _button=true&submit4=Show+Less+Properties Show-Only Availability Search Use the below URL to add a simple text link to your site pointing to the Show-Only Availability Search page. Replace the 'XXXX' with your Availability Online username. Replace the 'YYYYY" with each room/unit ID#. Room ID#s can be found in the Room Management portion of your Administration Center or can be provided to you via email from the Availability Online support staff. [email protected] http://ao4.availabilityonline.com/availability_search.php?un=XXXX&show_only=YYYYY&show_only_mode_ view_all_button=true&submit4=Show+Less+Properties Reservation Form If you would like to add a link to your website pointing directly to the secure reservation form (bypassing the availability displays) you can add this link to your website: https://www.availabilityonline.com/reservation.php?un=XXXX Replace the 'XXXX' with your Availability Online username. Other reservation form linking options can be found using these instructions: - Login to your Availability Online Administration Center - Click Your Website > Reservation Request Form Gift Certificate Order Form The secure gift certificate order form is available to Premium subscribers. If you would like to add a link to your website pointing directly to the secure gift certificate order form you can add this link to your website: https://ao4.availabilityonline.com/gift_certificate.php?un=XXXX Replace the 'XXXX' with your Availability Online username. Other gift certificate form linking options can be found using these instructions: - Login to your Availability Online Administration Center - Click Your Website > Gift Certificate Order Form 30