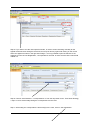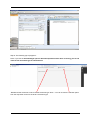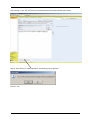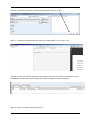
1
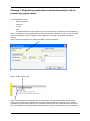
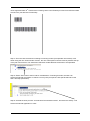
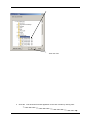
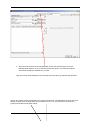
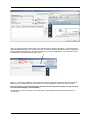
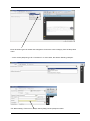
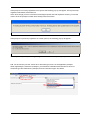
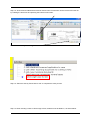
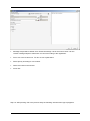
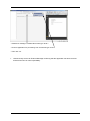
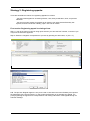
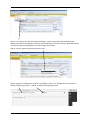
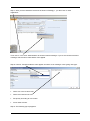
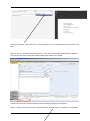
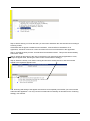
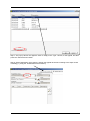
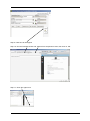
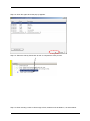
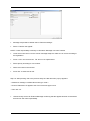
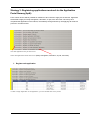
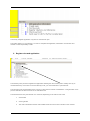
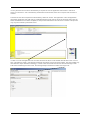
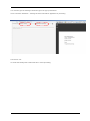
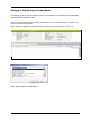
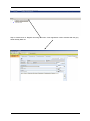
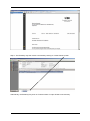
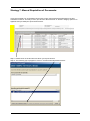
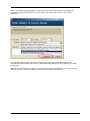
eCase Functionality in Norvis(eCase) Author: Division: Version: Date: Robin Keyte/Tore Oraug AEF/Fagdata 1.1 October 12th, 2015 Introduction: .......................................................................................................................................... 3 Purpose of the document .............................................................................................................. 3 For whom is the document intended? .......................................................................................... 3 Relaterte dokumenter ...............................................................Feil! Bokmerke er ikke definert. Strategies employed in registering and transferring eCases: ....................................................... 3 Practical preparations before registering cases: ........................................................................... 3 Strategy 1: Registering applications sent electronically to udi for processing (paper cases): ........ 5 Strategy 2: Registering appeals: ........................................................................................................ 16 First routine: Registering appeal in existing eCase. ................................................................... 16 Second routine: Registering appeal ordinary visa case (paper case).......................................... 21 Strategy 3: Registering applications received via the Application Portal Norway (ApN): .......... 27 1. Register web application ................................................................................................... 27 2. Register visa web application ............................................................................................ 28 Strategy 4: Bundling of eCases............................................................ Feil! Bokmerke er ikke definert. 1. In Which Processes May Bundling be Employed? .........Feil! Bokmerke er ikke definert. 2. How to Transfer Case Responsibility for Several Cases Using Bundling... Feil! Bokmerke er ikke definert. Strategy 5: Registering correspondence:........................................................................................... 31 Strategy 6: External Messages received by the Embassy: ............................................................... 38 Strategy 7: Manual Requisition of Documents: ................................................................................ 42 Strategy 8: Tips.................................................................................................................................... 44 Side 2 av 44 Introduction: Purpose of the document This document is an updated version of the former user manual “eCase functionality in Norvis”. It includes eCase functionality developed for Norvis. Please note that existing Norvis processes that function independently of eCase is not included in this document. For whom is the document intended? The manual is meant as a reference document for all users of Norvis. Strategies employed in registering and transferring eCases: There are three main strategies for registering eCases in NORVIS: 1. one applies for applications that are to be scanned and sent electronically to udi for processing; family reunification, study, work, au pair and visa applications not to be first processed by the embassy (‘paper’ applications) 2. one applies for registering appeals (‘paper’ applications) 3. one applies for applications received via the Application Portal Norway (‘electronic applications) The majority of visa cases will be registered in NORVIS by the embassy following the usual routine. Only visa appeal cases or visa cases sent to UDI for consideration must be scanned, whilst all applications concerning family reunification, study, au pair and work are to be scanned. In addition to the three strategies named above, the manual includes four other eCase strategies that are to be employed in order to optimise case flow and processing. They are also described in detail in this document. Practical preparations before registering cases: The scanner and scanning software is provided by the foreign ministry, and the setup is preprogrammed.. When controlling the scanner software setup, make sure to verify that The Embassy should have at least two different scanner profiles related to the two different strategies mentioned above. It is also recommended to have at least one additional dedicated folder for the scanning of incoming correspondence. Use of the scanning software Pixedit, is described in a separate document. Scanning strategies are also described in a separate document. Side 3 av 44 Preparations before scanning: 1. Sort out cases according to profile e.g. family reunification and education. 2. Make sure to remove all staples and correct any folds in the documents. 3. Documents containing stapled or glued on photographs, must be colour copied. 4. Travel documents should be copied in colour where possible, as black and white copies give reduced readability after scanning. As it is the applicant him/herself that delivers the copies when he/she appears at the allotted time, it depends on whether it is possible for the applicant to copy in colour. 5. All documents must be on an A4 or similar format. Documents diverging from this format must be photocopied before scanning. 6. Order the case documents according to the different document categories. Make sure to place the case-specific barcode separator sheet on top, followed by the document type specific barcode sheet in front og each categorie, before gathering the documents together. (See ‘Scanning strategy’ user manual for further details) When using the barcode separator sheets, it is possible to scan several cases at the same time. Consult the PixEdit user documentation before scanning. Side 4 av 44 Strategy 1: Registering applications sent electronically to udi for processing (paper cases): These applications are for: - family immigration - education - au pair - work - visa applications where the embassy is not the first authority of decision (see also Strategy 3) Step 1: Register the incoming application for family reunification, education, work or au pair according to ordinary NORVIS routine for registering work applications, through the “Register application” process. In this example an application for family immigration is being registered. Step 2: Select “Create case’. Step 3: Print barcode is an optional step in the processes. It is intended to simplify attachment of documents to cases after all documents in the case have been scanned (see step 8).This is made possible through automatic localising of the relevant catalogue/files when attaching documents to the case. An example of the new barcode is displayed below. N.B. this functionality is only be available for Side 5 av 44 th cases registered after 18 October 2010. Existing cases in the Embassy’s innbox from before this date will not have ‘print barcode’ functionality. Step 4: Scan the case documents according to scanning routine (see separate user manual). N.B. When using the new ‘Print barcode’ function, the new case-specific barcode must be placed at the top of the pile of documents. The ‘attachment’ barcodes enable different documents to be separated. Step 5: Select ‘Send case to udi for further considerations’. Following from this, the task ‘Link electronic/scanned documents’ is created. You may also print put the case specific barcode in this task’s first step (see below). Step 6: Activate the work process “Link electronic/scanned documents”, and select the activity “Link electronic/scanned application to case”. Side 6 av 44 Step 7: Fill inn the correct registration type, in this case ‘Family immigration’. Step 8: When linking the documents for the first time, you must choose the level 2 catalogue where the Embassy has saved the files. (For subsequent linking of scanned documents using the ‘Print barcode’ functionality you need only click here, as the level 2 catalogue has already been activated earlier.) 1. click on the folder icon: 2. Find the catalogue where all scanned cases are saved on the Embassy G disk. Click on the Level 2 catalogue name, not the individual cases. Side 7 av 44 Then click ‘OK’. 3. Close the ‘Link electronic/scanned application to the case’ window by clicking here: Side 8 av 44 4. Open the Link electronic/scanned application to the case’ window again. Fill in the relevant fields and then click on ‘Scanned documents’ button. The relevant scanned documents will then be available in the viewer. They will now be made available for the relevant case each time you perform this operation. Step 9: The viewer window now displays the scanned documents. The application is shown first, and should be attached to the application using the button arrow. You may remove the document by pressing the bottom arrow button below. Side 9 av 44 Step 10: After pressing the arrow button, the “add document” window will appear. The first document added will always be locked as “main document”. All other documents, added in the same registration, will be added as attachments. The main document here is set to ‘Application’. You must then choose the application type from the drop-down menu. Step 11: After having added the main document continue adding the remaining case documents as attachments, by pressing the top arrow button in the post registration window, as done in step 8. Note: If you have use the documenttype specific barcode separation sheets, you will not need to select documenttype as shown below. Attachments must then be given a ‘document type’; either ‘Residence/visa document received’ or ‘Travel docs’. Side 10 av 44 Each document type has several sub categories. Choose the correct category from the drop-down menu. …or the correct passport type for “Travel docs”. In most cases, this will be ‘Ordinary passport’. TIP: When adding “Travel docs”, always start by filling out the passport number. Side 11 av 44 If the passport is correctly registered on the person the following pop up will appear, and all previously registered information will be filled out. Note: Even though you have used the documenttype specific barcode separation sheets, you will still need to fill in the passport number when adding travel documents. If the passport is previously registered on another person, the following pop up will appear: Answer yes if the person you are registering is a child introduced in parents passport. N.B. You should only use the ‘Travel docs’ document type level 1 for the applicant’s passport. When registering the reference’s passport, you should use ‘Residence/visa document’ as level 1 document type and ‘Reference’s passport’ as level 2 document type. See below Side 12 av 44 Step 12: All documents added will be listed as shown below. Documents can be removed from the list by marking the document and pressing the bottom arrow button. Press “Ok” to complete the registration Step 13: Select the activity “Send case to UDI” to complete the work process. Step 14: When sending a case to UDI through eCase, all areas must be filled inn, as shown below. Side 13 av 44 Message subject will be default set to “External message. Hover the mouse cursor over the chosen message subject to make sure it is correct according to the registration. Fill in “udi” in the receiver box. TIP: Do not use capital letters Select priority according to own routines. Write cover letter in the text box Press “Ok” Step 15: After pressing ‘OK’ in the previous step, the following ‘add document’ pop-up appears: Side 14 av 44 - ‘Residence message’ is default ‘Document type’ level 1. - Choose ‘Application for processing’ from ‘Document type’ level 2. - Then click ‘ok’. UDI will shortly receive an External Message confirming that the application has been received and that udi now has case responsibility. Side 15 av 44 Strategy 2: Registering appeals: There are two different routines for registering appeals for eCases. - the first routine applies for all existing eCases, visa, family reunification, work, au pair and education. - the second routine applies for appeals in all ordinary visa cases that the Embassy has rejected, and will convert the ordinary ‘paper’ case into an eCase. First routine: Registering appeal in existing eCase. Step 1: Look up the person in Norvis using quick search if you have the DUF number, or search if you only have the name the applicant. Step 2: Select the “Register correspondence” process by pressing the star button, or (Ctrl + T). N.B. The process ‘Register appeal’ is only to be used in visa cases where the Embassy has rejected the application (see ‘Second routine’). In this routine the Embassy is not handling the appeal, it is purely registering the appeal as a correspondence and making UDI aware of the appeal through an external message. Side 16 av 44 Step 3: Double-click on ‘Register incoming document’. Post registration is then activated with the grey fields already filled out. Side 17 av 44 Step 4: If you wish to use the case-specific barcode in order to avoid searching manually for the appeal document when linking the document (recommended), this may be done by right-hand clicking on the mouse above the applicant’s name in the right hand margin. Step 5: Choose ‘Appeal’ from the drop-down menu. Step 6: Register correspondence as shown in Strategy 1 steps 7-12. ‘Residence/visa document’ is default document type level 1. ‘Appeal’ is default document type level 2. Side 18 av 44 Step 7: After you have linked the document as shown in Strategy 1, you then click on ‘Add registration’. Then click on ’Yes’ when asked whether to send an internal message. If you do not send an electronic message, UDI will not be made aware of the appeal. Step 8: Choose ‘Transfer residence case appeal’ and write ‘cover message’ in box giving case type. Write “udi” in the receiver field. Write cover letter text in here. Set priority according to own routine. Press “Add” to finish. Step 9: The following pop-up appears: Side 19 av 44 Choose ‘Cover letter’, then click on ‘ok’. This is because the cover letter itself is now a document in the case. Step 10: Click on ‘Complete archiving and finish’. You have now electronically attached the appeal to the case and sent udi an external message making them aware of the appeal. Udi will now receive an external message from the embassy informing of the appeal. Step 11: Finally, you must return to the task and click on ‘Finish this task’. The task is now completed. Side 20 av 44 Second routine: Registering appeal ordinary visa case (paper case). Step 1: Register the incoming visa appeal according to ordinary Norvis routine (by creating ‘Register appeal’ task). Step 2: After clicking on the ‘Register appeal’ step, the appeal is now registered. Side 21 av 44 Step 3: Before clicking on ‘Finish this task’ you must scan and attach the case documents according to scanning routine. Remember that an appeal or additional documentation, received after the admittance of an application, should be scanned as a main document and not as an attachment to the application. Step 4: Activate the work process “Link electronic/scanned documents”. This process should already exist under ‘Tasks’. Step 5: Attach all documents to the case in the activity ‘Link electronic/scanned application to case’, except the appeal itself, following the same routine as described in strategy 1. Step 6: Select the activity “Link other incoming documents to existing events” to link the scanned appeal to the registered appeal event. N.B. Scanning and linking of the appeal must be done as a separate process after you have scanned and linked the application. You may use the ‘Print barcode’ functionality as described in the ‘Scanning strategy’ user manual. Side 22 av 44 Step 7: The pop-up above now appears. Click on “Klag” in the “Type” column, for the appeal, and then press the “Add document” button. Step 8: Select Registration type ‘Appeal’, and link the appeal document according to the steps shown in Strategy 1 (using the ‘Scanned documents button). Side 23 av 44 Step 9: Click here to link appeal Step 10: Choose ‘Residence/visa’ and ‘Appeal’ from drop-down menus, then click on ‘OK’. Step 11: Click ‘OK’ again here. Side 24 av 44 Step 12: Click ‘OK’ again when this pop-up appears. Step 13: Select the activity “Send case to UDI” to complete the work process. Step 14: When sending a case to UDI through eCase, all areas must be filled inn, as shown below. Side 25 av 44 Message subject will be default sett to “External message”. Select “Transfer visa appeal”. NOTE: If case responsibility is already in UDI select “Message visa case” instead. Hover the mouse cursor over the chosen message subject to make sure is correct according to the registration. Fill inn “udi” in the receiver box. TIP: Do not use capital letters Select priority according to own routines. Write cover letter in the text box Press “Ok” to send case to UDI Step 15: After pressing ‘OK’ in the previous step, the ‘add document’ pop-up appears. - ‘Residence message’ is default ‘Document type’ level 1. - Choose ‘Submission of appeal to udi’ from ‘Document type’ level 2. - Then click ‘ok’. UDI will shortly receive an External Message confirming that the appeal has been received and that udi now has case responsibility. Side 26 av 44 Strategy 3: Registering applications received via the Application Portal Norway (ApN): From autumn 2010 it will be possible for residents of all countries to apply via the internet. Applicants will be able to apply for family immigration, education, au pair, work and visas. Once they have completed the application on the internet, the embassy through which they are applying will receive a process in it’s Norvis inbox. Visa web applications may be found here Other web applications will be found here (family immigration, education, au pair, and work) 1. Register web application In order to begin registration of the application, you must double-click on the person. Side 27 av 44 The activity ‘Register application’ may then be commenced upon. Then follow steps 2 to 15 in Strategy 1 in order to complete the registration, attachment of documents and transfer of case responsibility to UDI. 2. Register visa web application The embassy case processor registers the application following the usual routine (this is usually done by an unauthorised user). If the case is to be sent directly to udi, you must remember to ‘print barcode’. The last step for the unauthorised user is to click on ‘Send case for further considerations’. This generates a new process ‘Examine the facts at issue’ for an authorised user. The authorised user may then decide on 3 outcomes, depending on the nature of the case: 1. Visa refusal 2. Visa is granted 3. The case is borderline and the case handler sends the case to UDI to decide on the outcome Side 28 av 44 It is only the third outcome where the Embassy is required to scan the application and transfer to UDI as an eCase. For Outcome 1 and 2 the Embassy should follow usual routines; these do not require that an eCase is created. The third outcome above requires that the Embassy creates an eCase. The registration of the visa application (both paper application and ApN case) is completed following usual routines. Once the final step ‘Send case for further considerations’ has been completed, a new process ‘Examine the facts at issue’ is created. This process may only be accessed by authorised users. In order to convert the application into an eCase and send to UDI, the case handler should click on the ‘udi’ icon here. This will then create a ‘Link electronic/scanned documents’ process as shown earlier. The case handler may then follow the steps described in Strategy 1 in order to link documents and send an external message to UDI. N.B. When transferring the case to UDI, the message subject should be ‘Transfer visa case to udi’. Side 29 av 44 You must then give the message a document type in the pop-up that follows. Level 1 should be ‘Residence – message’ and level 2 should be ‘Application for processing’ Then click on ‘Ok’. An eCase has thereby been created and sent to udi for processing. Side 30 av 44 Strategy 5: Registering correspondence: This strategy should be used for registering a new correspondence in a case where case responsibility has already been transferred to UDI. Step 1: Look up the person in Norvis using quick search if you have the DUF number, or search if you only have the name the applicant. Step 2: Select the “Register correspondence” process by pressing the star button, or (Ctrl + T). Step 3: Select ‘Register correspondence. Side 31 av 44 Step 4: Double-click on ‘Register incoming document’. Post registration is then activated with the grey fields already filled out. Side 32 av 44 Step 5: If you wish to use the case-specific barcode, in order to avoid ‘searching manually for the appeal document when linking the document, this may be done by right-hand clicking on the mouse above the applicant’s name in the right hand margin. It is only possible to print the barcode if the applicant is active in Post Registration, ‘correspondence received’ is active and the case number field is filled out. Step 6: Choose ‘Visa/residence – correspondence in’ from the drop-down menu. Then follow Strategy 1 steps 7-12 for electronically linking the correspondence to the case. Step 7: After linking the correspondence document(s) to the case, click on ‘Add registration’. Side 33 av 44 Step 8: The following pop-up appears.: Note: If you use the documenttype specific barcode separation sheet when scanning, you do not need set the document type as shown below. ‘Residence/visa document is set as default document type level 1. You can choose the relevant option from the drop-down menu for the level 2 document type. Side 34 av 44 After clicking on ‘Ok’, the document is now transferred to the left-hand window (see below). Step 9: After clicking on ‘Add registration’, the following pop-up appears: Click on ‘Yes’. Side 35 av 44 Step 10: A new pop-up appears. Fill out the relevant fields and click on ‘Add’. Step 11: A new pop-up appears with document type already filled out. Then click on ‘ok’. Step 12: You are now about to register two documents in the case; one is the correspondence in from the applicant, and the other is the message to udi (this message is in itself a document). Step 13: Click on ‘Complete archiving and finish’. Side 36 av 44 Step 14: Finally, go back to the activity and click on ‘Finish this task’. You have now sent a message to udi informing them of the correspondence in the case. Side 37 av 44 Strategy 6: External Messages received by the Embassy: The Embassy will also receive external messages from UDI, UNE or, in some cases, the Norwegian police. It is important that the Embassy regularly checks it’s inbox for messages, as these must be read and followed according to internal routines. The following is an example of how the embassy may organise it’s inbox, read a message and follow up the message according to internal routines. Step 1: Right-hand click on the ‘Description’ category and drag and drop into the area above. Step 2: Click on the ’+’ icon in order to open the list of internal messages the Embassy has received. Step 3: By double-clicking on a message, the process is now active. Side 38 av 44 Step 4; Double-click on ’View message’. Step 5: In this case UDI has sent the Embassy an external message with two documents attached. After clicking on ‘view message’, the documents are shown in the document list below. In order to open the documents the Embassy must select them (using ‘Select all’ button) and then request to view the documents using ‘Requisition selected items’ Step 6: After clicking on ‘Requisition selected items’, the pop-up below appears. A reason for the requisition must be given. In this case it is due to notification of the decision. Side 39 av 44 The documents now appear with PDF icons and can be directly opened by clicking on each icon individually, or by clicking on ‘Select all’, then ‘View selected documents’ The document is now available. Side 40 av 44 Step 7: The Embassy may then create a new task by clicking on ‘Create follow-up task’ Alternatively, the Embassy may click on ’Finish this task’ if a spin-off task is unnecessary. Side 41 av 44 Strategy 7: Manual Requisition of Documents: It may be necessary for an Embassy Norvis user to open a document that he/she does not have automatic access to. This may occur if you have the ‘Document list’ or ‘Events’ category open for an applicant and you attempt to open the document. Step 1: Double click on the document to which you require access. Step 2: The following pop-up appears. Click on ‘Continue with selected document’. Side 42 av 44 Step 3: The following pop-up appears. Here you must choose a valid reason for requesting the document from the drop-down list, or choose ‘other’ and write another reason. Then click on requisition. The requisition has now been sent electronically to udi. A case processer will respond to the requisition and the Embassy will receive an Internal Message after a short time granting or refusing the request. N.B. You should only send a request if access to the document is essential for you to carry out your duties in the case. UDI will only grant access if the reason given is a valid one. Side 43 av 44 Strategy 8: Tips It is also possible to ‘Print barcode for scanning’ from the history window. You must first make the applicant and case active in the window, and then right hand click on the case number you wish the ‘print barcode’ to be attached to. You may then print the barcode. Side 44 av 44