1
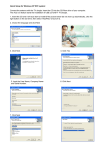
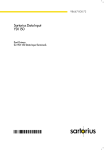
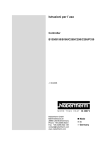
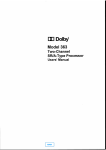
98646-000-60
Data Input
YDI 50 Z
Dedicated Keyboard Rated to IP 65 with LCD
Installation and Operating Instructions
6
7
1
8
2
9
10
3
11
12
4
13
5
14
1 LCD
LCD Anzeige
Affichage LCD
8 Numeric keypad
Zahlenblock
Bloc numérique
2 DIP switches and screw for adjusting
the contrast of the LCD
DIP-Schalter und Stellschraube
für den Kontrast der LCD-Anzeige
Commutateurs DIP et vis de réglage
pour le contraste de l'affichage LCD
9 Function keys
Funktionstastenfeld
Touches de fonctions
3 COM B
COM B
COM B
4 COM A
COM A
COM A
5 Manufacturer’s label
Typenschild
Plaque signalétique
6 CF key (clear function)
CF-Taste (Clear-Funktion)
Touche CF (Clear-Function)
7 CE key (clear entry)
CE-Taste (Clear Entry)
Touche CE (Clear Entry)
2
10 PRINT key
PRINT-Taste
Touche d'impression PRINT
11 ON/OFF switch
EIN/AUS-Schalter
Commutateur Marche/Arrêt
(ON/OFF)
12 Fuse
Netzsicherung
Fusible de secteur
13 Interface for connecting
the balance/scale
Waagenschnittstelle
Interface balance
14 Voltage selector
Spannungswähler
Sélecteur de voltage
Contents
Page
About the Product (Warranty)
Storage and Shipping Conditions
4
4
Equipment Supplied
5
How to Set Up the
YDI 50 Z Data Input Keyboard
How to Adjust the Voltage Selector to Your
Local Line Voltage
How to Connect the Data Interface Cable
and the Power Cord
Adjusting the Data Transmission Rate
of the Balance/Scale Interface
Turning the YDI 50 Z Data Input Keyboard
On and Off
6
6
6
7
7
Overview of the DIP Switch Settings
8
How to Adjust the Contrast of the LCD
8
Keypad Description
9
Adapting the YDI 50 Z Data Input Keyboard
to Individual Requirements
9
Configuration Options
10
Additional Literature
12
Specifications
13
C Marking
14
3
About the Product (Warranty)
The YDI 50 Z Data Input dedicated keyboard
is a programmable terminal that can be connected
to all MP-8 and MC1 Balances and Scales that
are equipped with an interface (MC1 Balances and
Scales must have a YDO 01 interface).
Read these “Installation and Operating Instructions”
carefully before operating your Data Input keyboard.
Do not miss out on the benefits of our full warranty.
Please complete the warranty registration card,
indicating the date of installation, and return the card
to your Sartorius dealer.
Storage and Shipping Conditions
Storage temperature: –40°C ...+70°C
–40°F ... +158°F
After unpacking the Data Input keyboard,
please check it immediately for any visible damage
as a result of rough handling during shipment.
Save all parts of the packaging and the box
because you may need to ship your equipment.
Before you pack your equipment to ship it,
unplug all connected cables to prevent damage.
4
Equipment Supplied
– Power cord
– Interface cable for connection to an
MP-8 balance/scale
– Fuse
– Keyboard overlays (for the function keys)
5
How to Set Up the YDI 50 Z
Data Input Keyboard
Set up the Data Input dedicated keyboard
in a suitable area.
If you plan on connecting peripherals (such as
a balance or scale with an interface, a printer, etc.),
make sure that the ambient conditions are also
suitable for these devices.
How to Adjust the Voltage Selector to Your Local
Line Voltage
The Data Input keyboard has been factory-set
to 220 volts.
To adjust the voltage selector to the local line voltage
rating that you use, unscrew the cover plate from
the base of the YDI 50 Z keyboard. Then adjust the
voltage selector to your local line voltage rating.
Write the new voltage setting on the
manufacturer’s label.
Whenever you change the operating voltage
to 100/120 V, make sure to exchange the installed
T 80 mA fuse for the T 160 mA fuse that comes
with the Data Input keyboard.
The fuse (12) is located on the side panel of the
Data Input keyboard.
How to Connect the Data Interface Cable
and the Power Cord
Connect the data interface cable to the
balance/scale first (with the unit unplugged),
then to the YDI 50 Z Data Input keyboard.
Plug the power cord of the Data Input keyboard
into a properly installed wall outlet.
6
Important Note:
If you connect your Data Input keyboard to a power
supply which does not have a protective grounding
conductor, be sure to ground the unit.
For information on startup of the balance/scale,
please refer to the installation and operating
instructions supplied with it.
Adjusting the Data Transmission Rate
of the Balance/Scale Interface
To adapt the Data Input keyboard and the
balance/scale, it is necessary to change the data
transmission rate in the balance/scale operating
program from 1,200 baud to 9,600 baud (see the
installation and operating instructions of the balance
or scale you are using). For this purpose:
change code 224 to 227.
Turning the YDI 50 Z Data Input
Keyboard On and Off
You can turn the YDI 50 Z on and off using the
ON/OFF switch (11).
“0”: no power
“|”: power is on
Important Note:
Always unplug the Data Input keyboard and the
balance/scale from line power before you connect
or disconnect devices to or from the interface ports.
7
Overview of the DIP Switch Settings
The DIP switches (2) are located behind a cover plate
on the left side of the Data Input keyboard.
– DIP switch S1.1 = OFF (V24 mode)
– DIP switch S1.2 = OFF (V24 mode)
– DIP switch S1.1 = ON (Sartonet)
– DIP switch S1.2 = ON (Sartonet)
– DIP switch S1.3 = not assigned
– DIP switch S1.4 = not assigned
– DIP switch S2.1 =
(program-dependent switch setting*)
– DIP switch S2.2 =
(program-dependent switch setting*)
– DIP switch S2.3 =
(ON = data can be transmitted to the LCD)
– DIP switch S2.3 =
(OFF = data cannot be transmitted to the LCD)
– DIP switch S2.4 =
(program-dependent switch setting*)
How to Adjust the Contrast of the LCD
Located between the DIP switches (2) is a small screw
which you can use to adjust the contrast of the LCD.
* Please refer to the program description for
information on the switch setting.
8
Keypad Description
The keypad consists of the CE key, CF key, numeric keys, function keys and the
ENTER key (PRINT key on some models)
In addition, each function key has an LED which can be activated or deactivated
by the program.
Keys
Function
CF
Clear Function
Press this key to end a program.
Clear Entry
This key deletes digits;
a zero is displayed.
CE
7
8
9
4
5
6
1
2
3
0
.
+/–
F1
F2
F3
F4
F5
F6
ENTER
Numeric keys
Use these keys to enter digits
and decimal points.
Function keys
You can insert different keyboard
overlays for the software programs.
The ENTER key has functions which
change based on the program.
The functions are described in the
user’s manual for each set of programs.
Adapting the YDI 50 Z Data Input
Keyboard to Individual Requirements
Additional devices can be connected to
the two additional interfaces (3/4).
9
Configuration Options
COM A and COM B in the Sartonet Mode
In the SARTONET mode, up to 32 units can be connected in parallel to one data
interface cable (SARTONET system for networking). A YDI 50 Z Data Input
keyboard functions as the “MASTER,” and all other connected devices are referred
to as “SLAVES” (please see “Additional Literature” on page 12).
data interface
balance/scale interface
RS232
(SLAVE)
balance/scale
YDI50Z
SARTONET
peripheral 1
(SLAVE)
SARTONET
balance/scale interface
RS232
(MASTER)
balance/scale
YDI50Z
COM B
COM A
SARTONET
peripheral 2
(SLAVE)
balance/scale interface
RS232
(SLAVE)
balance/scale
YDI50Z
SARTONET
data interface
10
COM A and COM B in the RS-232C Mode
If you operate COM A and COM B in the RS-232C mode, you can directly
connect other devices, such as a computer, a printer, a floor scale, a recorder
or a spectrometer (please see “Additional Literature” on page 12).
printer
RS 232C
COM B
balance/scale
YDI50Z
Data Input keyboard
COM A
RS 232C
floor scale
11
COM A in the Sartonet Mode and COM B in the RS-232C Mode
You can connect a printer to COM B and simultaneously work with COM A
in the Sartonet mode.
printer
RS 232C
COM B
balance/scale
YDI50Z
(MASTER)
Data Input keyboard
COM A
SARTONET
peripheral 2
balance/scale
YDI50Z
(SLAVE)
Data Input keyboard
SARTONET
data interface
Additional Literature:
SARTONET – Description and User’s Manual
Interface Description for Sartorius Balances and Scales (MP 8-4)
12
98647-000-03
Specifications
Model
Power requirements
YDI 50 Z
110/120/220/240 V (selectable),
approx. 30 VA, 50–60 Hz
Fuse
T 80 mA (160 mA for 110/120 V)
Dimensions of the housing W 260 mm,
D 160 mm (210 mm incl. plug),
H (max.) 110 mm
Weight
3 kg
Temperature range
+10° C to +40° C
ROM for programs
64 KB
Data memory
32 KB
LCD
20 characters, 2 lines, backlit
Protection rating
IP 65
13
C-Marking
C
The C marking affixed to the equipment indicates that
the equipment meets the requirements of the following Directive(s) issued
by the Council of the European Union:
89/336/EEC “Electromagnetic compatibility (EMC)”
Applicable European Standards:
Limitation of
emissions:
EN 50081-1 Residential, commercial and
light industry
EN 50081 -2 Industrial environment
Defined immunity to EN 50082- 1 Residential, commercial and
interference:
light industry
EN 50082-2 Industrial environment
Important Note:
The operator shall be responsible for any modifications to Sartorius
equipment and for any connections of cables or equipment
not supplied by Sartorius and must check and, if necessary, correct
these modifications and connections. On request, Sartorius will
provide information on the minimum operating specifications
(in accordance with the Standards listed above for defined immunity
to interference).
73/23/EEC
“Electrical equipment designed for use
within certain voltage limits”
Applicable European Standards:
EN 60950
Safety of information technology equipment
including electrical business equipment
EN 61010
Safety requirements for electrical
equipment for measurement, control and
laboratory use
Part 1: General requirements
If you use electrical equipment in installations and under ambient
conditions requiring higher safety standards, you must comply
with the provisions as specified in the applicable regulations for
installation in your country.
14
Sartorius AG
b 37070 Goettingen, Germany
p Weender Landstrasse 94–108, 37075 Goettingen, Germany
t (+49/551) 308-0, f (+49/551) 308-32 89
Internet: http://www.sartorius.com
Copyright by Sartorius AG, Goettingen, Germany.
All rights reserved. No part of this publication
may be reprinted or translated in any form or by any means
without the prior written permission of Sartorius AG.
The status of the information, specifications and
illustrations in this manual is indicated by the date
given below. Sartorius AG reserves the right to
make changes to the technology, features,
specifications and design of the equipment
without notice.
Status: May 1997, Sartorius AG, Goettingen, Germany
Printed in Germany on paper that has been bleached without any use of chlorine · W1A000 · KT
Publication No.: WYD6068-t97054