1
Wireless Remote Sensor Communication Loss
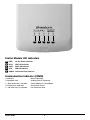
If communication between the remote sensor and thermostat is lost, the red indicator on the remote sensor
will begin to flash once every 10 seconds. The sensor will attempt to reconnect to the thermostat several
times automatically.
NOTE: To attempt to reconnect manually, press and hold the CONNECT button for 3 seconds.
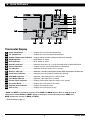
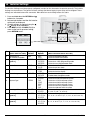
The thermostat display will also indicate which wireless remote sensor has lost communication by flashing
COMM LOSS along with the remote sensor that has lost communication (see Table 2).
Wireless Remote Sensor Low Battery
If the batteries in a wireless remote sensor are low, the red indicator will flash 3 times every 30 seconds. The
thermostat display will also indicate which wireless remote sensor has a low battery by flashing LOW BATT
along with the remote sensor that has the low battery condition (see Table 2). Replace the remote sensor
batteries immediately.
NOTE: After replacing batteries, allow up to 15 minutes for the wireless connection to re-establish.
IDS1, IDS2, IDS3 or IDS4
HMS ODS Remote Indoor Sensor 1-4
Remote Humidity Sensor
Remote Outdoor Sensor
Table 2
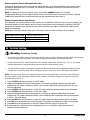
6 System Testing
Warning Read Before Testing
• Do not short (or jumper) across terminals on the gas valve or at the heating or cooling system control board to test the thermostat installation. This could damage the thermostat and void the warranty.
• Do not select the COOL mode of operation if the outside temperature is below 50º F (10º C). This could possibly damage the controlled cooling system and may cause personal injury.
• This thermostat includes an automatic compressor protection feature to avoid potential damage to the compressor from short cycling. When testing the system, make sure to take this delay into account.
NOTE: The compressor delay can be bypassed by pressing the reset button on the front of the thermostat.
All user settings will be returned to factory default, however all Installer settings will remain as originally
programmed in section 4.
1
2
3
4
5
6
7
8
9
Press SYSTEM until the thermostat is in HEAT mode.
Using the SpeedBar® raise the set temperature a minimum of 3 degrees above the current room temperature. The system should start within a few seconds. With a gas heating system, the fan may not start right away.
Press SYSTEM until the thermostat is in the OFF mode. Allow the heating system to fully shut down.
Press SYSTEM until the thermostat is in the COOL mode.
Using the SpeedBar lower the set temperature a minimum of 3 degrees below the current room temperature. The system should start within a few seconds (unless compressor short cycle protection is active – See note above).
Press SYSTEM until the thermostat is in the OFF mode. Allow the cooling system to fully shut down.
Press FAN until the thermostat is in FAN ON mode. The system fan should start within a few seconds.
Press FAN until the thermostat is in FAN AUTO mode. Allow the system fan to turn off.
If the thermostat is controlling auxiliary equipment such as a humidifier, adjust the thermostat
settings to test these devices.
17
Installer Guide