1
subArctic User's Manual
http://www.cc.gatech.edu/gvu/ui/sub_arctic/sub_arctic/doc/users_manual.htm
SubArctic UI Toolkit User's Manual
St. Paul Release (Beta version 0.8e)
by Scott E. Hudson and Ian Smith
Graphics, Visualization, and Usability Center, and
College of Computing
Georgia Institute of Technology
Atlanta, GA 30332-0280
September 29 1996
Table of Contents
1. Introduction
2. Interface Building Basics
Basic Terminology
A Simple Interface
Simple Interface Code Walk-Through
3. User Interface Concepts and Organization
General Control Flow
Geometry Management
Hierarchy Management
Layout
Drawing
Input
Picking
4. A Larger Example
5. The interactor Interface and base_interactor Class
Constructors and Init Routines
Geometry Management
Coordinate System Transformations
Hierarchy Management
Traversal Support
Layout
Picking
Object Status
Output
Support for Common Input Protocols
Application Data Support
Debugging Support
6. Supporting Classes
1 of 63
9/7/00 8:29 PM
subArctic User's Manual
http://www.cc.gatech.edu/gvu/ui/sub_arctic/sub_arctic/doc/users_manual.htm
Events
Drawable
Loaded_image
7. Constraints
Background
Specifying Constraints
Common Usage Examples
Cycles
8. Animation
Animation as Input
The Animatable Interface
Transitions
Time Intervals
Trajectories and Pacing Functions
9. The manager Class
Input Policies and Agents
Output Support
Constraint Support
Interface with AWT
Debugging and Exception Handling
General Utility Functions
10. A Custom Interactor Example
11. Thread-Safe Access to the Interactor Tree
Background and Design Rationale
Thread Nuts-and-Bolts
12. The Style System
The style Class
The style_manager Class
The color_scheme Class
13. Conclusions and Additional Resources
References
A. Platform Issues
1.Introduction
SubArctic -- the subset of the Advanced Reusable Constraint-oriented Toolkit for Interface Construction -- is a
new Java(tm)-based UI toolkit being developed in the Graphics, Visualization, and Usability Center at Georgia
Tech by Scott Hudson and Ian Smith. SubArctic is written entirely in Java and hence should be very portable.
(In practice, however, we have found that there are still significant bugs in the major Java implementations out
there, and these vary a lot, so practical portability may still be more limited than one would expect. See the
Platform Issues Section for a discussion of what is known to work and not work at this point.) Please note that
subArctic is currently still under active development. The system is in a beta release stage only, and the API
may still change in some areas.
SubArctic is designed to work with AWT[1] -- the standard Sun provided user interface toolkit. It can run along
side of, or even inside of, AWT interfaces if you desire. You can also very easily use subArctic alone without
AWT components other than an enclosing Applet, Canvas, Frame object. SubArctic builds on the lowest levels
of AWT for basic input and output. In particular, it makes use of AWT output primitives (the Graphics, Font,
Color, etc. classes) as well as AWT Event objects. However, it handles most aspects above that level much
2 of 63
9/7/00 8:29 PM
subArctic User's Manual
http://www.cc.gatech.edu/gvu/ui/sub_arctic/sub_arctic/doc/users_manual.htm
differently. By design, subArctic does not use components from native toolkits. This means that your interface
will look the same on every platform, rather than having components specialized to that platform (if you want or
need those, use AWT for the static parts of the interface, and subArctic for the specialized "content" areas).
The system is a conceptual successor to the Artkit toolkit [2,3]. Both Artkit and subArctic have extensibility -especially for input -- as their central goal. We believe that most interfaces need interactive objects (interactors)
that are tuned to the semantics of the application objects they represent and manipulate. As a result, most
interfaces need some customized interaction. SubArctic provides a number of advanced features designed to
make creation of new interactors easy enough that you will want to do this for many of the interfaces you build.
If you are having trouble finding an interactor in the standard library that does what you need, think about
specializing an existing class, or even building a new interactor class. Unlike system such as Motif or AWT that
you might have used before, its not difficult to do in subArctic. A lot of carefully planned infrastructure exists to
make it easy, even if you are doing something unusual.
In the next section basic subArctic terminology will be introduced and a quick example program will be
considered. Section 3 will give an overview of the concepts and architectural organization of the system and the
interfaces it supports. Section 4 will provide a larger example program with detailed comments. Section 5 will
consider two central classes of the system: interactor and base_interactor. Section 6 will describe a
number of other important supporting classes. Next, Section 7 will consider the constraint system used for
expressing and maintaining layout relationships. Section 8 will describe the animation facilities of the toolkit
and Section 9 will consider the miscellaneous facilities encapsulated in the manager class. Section 10 will
provide an example of building a new custom interactor class. Section 11 will describe how to access the
system from independent threads, Section 12 will talk about the style system, and finally, Section 13 will
provide brief conclusions.
2.Interface Building Basics
Basic Terminology
SubArctic interfaces are built from a series of objects called interactors (these are what are sometimes called
widgets). Every subArctic object that appears on the screen, or accepts input, is an interactor object and
implements the interactor interface (and at present all of them are also derived from the base_interactor
base class).
Interactors are organized into hierarchies with parent interactors containing and composing a set of child
objects. For example, a column object might serve to organize a series of button objects to create a palette. A
subArctic user interface consists of a tree of interactor objects rooted by a top_level object. Top_level objects
may be placed inside applets, AWT Canvas objects, or AWT frame objects (see interactor_applet,
interactor_canvas, and interactor_frame respectively).
A Simple Interface
The following applet implements a variation on the common "Hello World" user interface. In this case, since
applets cannot "quit", as most versions of this program do, when the button is pressed it simply disappears (to
get the button back restart the applet by reloading this page) A better version of this interaction that uses
animation, can be found on the demo page.
3 of 63
9/7/00 8:29 PM
subArctic User's Manual
http://www.cc.gatech.edu/gvu/ui/sub_arctic/sub_arctic/doc/users_manual.htm
Simple Interface Code Walk-Through
The complete source code for the hello_world interface can be found here. This section will consider each part
of the source as an introduction to various parts of the toolkit.
package sub_arctic.test;
/* import various pieces of the sub_arctic toolkit that we need */
import sub_arctic.lib.*;
import sub_arctic.input.*;
import sub_arctic.constraints.std_function;
The code begins with a standard Java package declaration and a set of imports. In this case we import from
several of the major sub-systems of subArctic, each of which is implemented in a separate package. (Note: on
most platforms using specific imports rather than the ".*" form will result in faster compiles.) SubArctic
subsystems include:
sub_arctic.lib
The interactor library and supporting infrastructure.
sub_arctic.input
Input handling, including input policies, agents, and protocols (see below), as well as commonly used
classes such as event and callback_object.
sub_arctic.output
Drawing support.
sub_arctic.constraints
Value propagation and update support for automatic layout and other tasks (see below).
sub_arctic.anim
Animation support.
public class hello_world extends interactor_applet
implements callback_object {
The next section of code begins the declaration of a class that will implement the user interface. This class is a
subclass of interactor_applet which is in turn a subclass of java.applet.Applet -- the normal superclass
for applet objects. As a result, our user interface will be an applet that can be directly embedded in a web page.
Interactor_applet objects form the interface between AWT and subArctic. In particular, they host a
subArctic interactor tree and arrange for event delivery and redraw to be performed in harmony with the rest of
4 of 63
9/7/00 8:29 PM
subArctic User's Manual
http://www.cc.gatech.edu/gvu/ui/sub_arctic/sub_arctic/doc/users_manual.htm
AWT. If you wish to use both AWT and subArctic interface components, you should host your interface object
inside an instance of the interactor_canvas class (which is a subclass of java.awt.Canvas), and place that
canvas object inside your normal AWT interface.
The hello_world class implements the interface: callback_object. Like many toolkits subArctic is based on
callbacks -- entities which are notified when significant user actions (such as a button press or a menu selection)
occur. However, in subArctic, callbacks are done in terms of objects rather than simple procedures. Any object
which implements the callback_object interface may receive callbacks. In this case, the applet itself will
receive callbacks from the single button object.
/* initialization of sub_arctic interface when applet starts */
public void build_ui(base_parent_interactor top)
{
The next section of code overrides the interactor_applet build_ui() method. This method is called
whenever the applet has been loaded and is about to begin operation. It creates the subArctic interactor tree
which implements the user interface. This tree will have two interactor objects in it: a button object, and the
system supplied parent object that roots the interactor tree (this object will already be installed and initialized
before build_ui() is called). Note: In general, subArctic interactor trees are always rooted by a special
top_level object. However, in certain cases other objects can be passed to build_ui() for "special effects"
(such as the debug lens below), so in general we can only assume that the object is capable of supporting
children.
Interactor trees are central to subArctic user interfaces. Every subArctic interface is created, controlled, and
modified in terms of an interactor tree rooted in a top_level interactor object. Modifying the appearance or
behavior of an interface involves modifying some part of an interactor tree.
Note that the subArctic system needs to do a significant amount of setup work in the init() routine of the
Applet, so you should not override this method. Instead, several new methods have been provided to allow you
to include your initialization code at various points. The startup sequence in init() is:
basic toolkit initialization
pre_build_ui(); // early application initialization
create and install top_level interactor
build_ui(top); // build your interactor tree here
more internal toolkit work
post_build_ui(top); // additional application initialization
The routines pre_build_ui(), build_ui(), and post_build_ui() may be overridden to perform your
initializations.
/* create a button centered in the top level interactor */
button goodbye = new button("Goodbye", this);
goodbye.set_x_constraint(std_function.centered(PARENT.W(), 0));
goodbye.set_y_constraint(std_function.centered(PARENT.H(), 0));
The next step in creating the interactor tree is to create a button object and arrange for it to be centered within
the available space. We first create a button providing two parameters, a string to create a standard button label
with, and an object to receive callbacks when the button is pressed (in this case the applet itself receives the
callback).
5 of 63
9/7/00 8:29 PM
subArctic User's Manual
http://www.cc.gatech.edu/gvu/ui/sub_arctic/sub_arctic/doc/users_manual.htm
Once the button has been created, we establish constraints which control its positioning on the screen (its
layout). Constraints are a powerful and general mechanism for controlling object layout in both static and
dynamic situations. In general, they declare an equation which governs the size and/or position of an object. In
this case, constraints have been provided which position the object so that it is centered horizontally and
vertically within its parent (the full details of declaring and using subArctic constraint objects are covered in the
constraints section). Once these constraints have been established, the system will automatically (and
efficiently!) maintain them in the face of changes. In this case, if the parent should change size in any way, the
system will automatically reposition the button object to stay in the center of the parent (the system will also
automatically cause the screen image to be updated, etc.). In general, constraints provide a very powerful and
flexible, but still easy to use, mechanism for implementing interactor layout.
/* make the button a child of the top level */
top.add_child(goodbye);
The final section of code within the build_ui() method completes construction of the small interactor tree for
this interface by making the button object a child of the top interactor. All objects which appear on the screen
or accept input, must be placed somewhere within in an interactor tree. Again, interactor trees form the heart of
any subArctic interface and most processing of input and output is done through recursive walks of these trees
(which can easily be customized to create sophisticated effects).
Debugging hint: If you have just added code to create an interactor, but it doesn't appear on the screen, check to
see that it has been added to the tree with add_child(). Because all the nitty details are in the creation of the
object, one often forgets that step, then starts down the wrong debugging path by looking at the object's
position, visibility, etc., not realizing that it was never placed in the interactor tree to begin with.
/* handle callback from the button. */
public void callback(interactor from, event evt, int cb_num, Object cb_parm)
After the build_ui() method which creates the interactor tree implementing the interface, a callback method is
provided. Recall that the hello_world object itself implements the callback_object interface and was
designated to receive callbacks from the button object by passing this as the last parameter to its constructor.
Implementing the callback_object interface involves implementation of the callback() method shown
above. This method, accepts four parameters: a reference to the interactor object making the callback (in this
case this will always be the goodbye button object), the event which "caused" the callback, a parameter
indicating what kind of callback is being made (some objects provide multiple callbacks, however, in the case
of buttons, this value is always 0), and an object which provides additional information about the callback (the
actual type of this information depends on the interactor type and callback being performed -- in the case of
buttons, no additional information is provided and null is passed).
{
/* remove the button from the interface (since we can't exit) */
if (from.parent() != null)
from.parent().remove_child(from);
}
The body of the callback method implements the desired action for a button press. In this case, since applets
cannot exit per se, we simply remove the button object from the interface. The toolkit will then automatically
redraw (only) the portions of the screen that are affected by this change.
6 of 63
9/7/00 8:29 PM
subArctic User's Manual
http://www.cc.gatech.edu/gvu/ui/sub_arctic/sub_arctic/doc/users_manual.htm
Debugging hint: To see more information about the interactor objects in your interface for debugging purposes,
you can create applets using debug_interactor_applet instead of interactor_applet (just temporarily put
the extra "debug_" in the extends clause). If you do this, a special debugging lens is made available. To bring up
this debugging aid, hold down the shift and control keys and click the mouse button in the background of the
applet (the lens can be removed the same way). The lens displays debugging information about objects it covers.
A debug_interactor_applet version of hello_world is shown below.
To see the debugging lens: hold down the shift and control keys, then click the mouse button inside the
applet.
Most interfaces follow the same general pattern as the simple hello_world applet. The interface is initialized
by building and installing an interactor tree. Once this tree is installed, actions that affect the appearance and
operation of the interface are performed by modifying objects in the interactor tree (adding, deleting, and
restructuring objects, as well as modifying individual object properties). The subArctic system takes care of
performing event distribution and (optimized) redraw as needed. Interfaces never draw directly on the screen,
and never handle events outside the normal event processing framework. Further, once initialized,
manipulations of the interactor tree normally occur only in either callbacks, or code called from callbacks.
(Important Note: if interactor trees need to be manipulated by "outside" threads, this manipulation must be
performed in special work procedures which have been synchronized with the rest of the toolkit -- see the
threads section for details.)
3.User Interface Concepts and Organization
Now that a simple example illustrating each major part of the toolkit has been presented, we will consider in
more detail the various activities of a user interface and how these are supported by the toolkit.
General Flow of Control
SubArctic (like most toolkits) employs event driven control flow. That means that after initialization, the toolkit
waits to receive the next input event from the user (or a request to redraw part of its screen appearance). When a
new event arrives, the system translates this event into a higher level form (as described in detail below), and
then delivers it to one or more interactor objects using a method call. An interactor object receiving an event
may act by modifying itself, its parent, its children, etc., and/or by invoking a callback. Callback objects may
also modify parts of the interface by manipulating parts of the interactor tree. Important Note: Objects never
draw directly on the screen at this point -- they only manipulate the interactor tree. Drawing occurs later based
on changes to this tree. If necessary, objects can "leave themselves notes" about what drawing is needed and act
7 of 63
9/7/00 8:29 PM
subArctic User's Manual
http://www.cc.gatech.edu/gvu/ui/sub_arctic/sub_arctic/doc/users_manual.htm
on those "notes" later when drawing is performed.
Each time part of the interactor tree is modified, the toolkit carefully tracks what, if any, part of the current
screen image needs to be updated. Once an input event has been fully handled (i.e., interactors and/or callbacks
have completed their work and returned) the toolkit checks to see if it needs to redraw any part of its screen
appearance. If it does, it informs the AWT toolkit that it needs to be scheduled for redrawing, then goes back to
wait for the next event or redraw request.
When a redraw request is received, the toolkit initiates a redraw process. (Note: redraw happens
asynchronously, so it is possible that the toolkit will process two or more events before updating the screen).
Redraw occurs in two parts. First layout -- the sizing and positioning of each object on the screen -- is
performed. Once the size and position of each interactor object has been established, the actual images
associated with each visible interactor object are drawn. Drawing, like many activities in subArctic, is handled
with a recursive tree walk -- each object draws itself and recursively requesting its children to draw themselves.
In order to avoid flicker, subArctic always draws objects off-screen, then updates the screen image with a single
image draw. In addition, the toolkit always maintains an accounting of which areas of the screen may need to be
changed (so calleddamaged regions), and only draws objects falling within the damaged region (or more
correctly the smallest rectangle enclosing all damaged regions). Once the damaged portion of the offscreen
image has been redrawn, the on-screen image is updated, and the toolkit again goes back to waiting for the next
event or redraw request.
This basic cycle of waiting for and processing an event, responding to the event with modifications to the
interactor tree, and in turn responding to modifications to the tree by redrawing screen appearance, forms the
basic control flow of every interface.
Geometry Management
The subArctic system uses a simple pixel based coordinate system (which it inherits from AWT). As is
customary for raster based drawing systems, x coordinate values increase from left to right, but y coordinates
increase to the top to bottom. A hierarchical coordinate system is used whereby each object introduces a new
coordinate system. The position 0,0 in each coordinate system refers to the top-left corner of the object. Use of
hierarchical coordinates allows for more convenient drawing, picking, layout, etc., since all operations are
expressed relative to the object itself. Operations are provided for translating a point from a child's coordinate
system into its parent's coordinates, and vice versa. In addition, operations are provided for translating a point
into global coordinates and back into the coordinates of a particular object (in this case, global coordinates are
the coordinates of the root top_level interactor object, not those of the overall screen).
Each interactor object maintains information about its own basic geometry. In particular, it records its position
(within its parent's coordinate system) and its size. Operations are provided to query and modify the x,y position
as well as the width and height of each object. However, the width or height of some objects are determined
internally or intrinsically (e.g., the size of an icon object is determined by the image it displays). Attempts to
modify a size value that is determined intrinsically, will result in an exception. In addition, both size and
position of objects can be controlled automatically by declaring constraints. If a size or position value is
currently determined by a constraint, attempting to set that value will also result in an exception (methods are of
course provided for determining in advance when this could occur).
Hierarchy Management
Trees of interactor objects form the basis of all subArctic interfaces. Interactor objects which are derived from
the base_parent_interactor class (or have had parenting functionality added to them separately -- see below)
can act as parents and support child objects. Operations are provided for determining the current parent object
8 of 63
9/7/00 8:29 PM
subArctic User's Manual
http://www.cc.gatech.edu/gvu/ui/sub_arctic/sub_arctic/doc/users_manual.htm
of any interactor, for finding the root of an interactor tree, for determining the child index of any object, and for
querying and accessing child lists. Operations are also provided for iterating over children, for querying and
setting children at particular ordinal positions, and for inserting and removing children (moving others "over" to
make room or fill in gaps). Finally, operations are provided for reordering children (moving them up or down
one position, or to the front or back of the child list).
By default, child lists expand and contract as needed and children may be reordered to modify their drawing
order (typically the parent object is drawn first, followed by the first child, etc.). However, some interactors
place restrictions on the number of children they can support, or place very specific interpretations on the
meaning of placing a child at a particular location in a child list. These interactors have the option of supporting
only fixed children. An object with fixed children always has the same size child list (possibly with null
children) and does not support insert and delete operations, or reordering of its children. If these operations are
invoked on a fixed child parent object, an exception is thrown. Objects which only support fixed children return
true from the fixed_children() method.
Layout
Recall that when a request for screen update arrives, the toolkit first calculates the size and position of each
visible interactor object, then does actual redraw. The process of calculating the proper size and position of each
object is layout. Layout, like many other operations, is performed with a recursive tree walk. The configure()
method of each object is used to implement this walk, consequently the process is begun by calling
configure() on the root interactor of each interface tree being redrawn. The configure()method of each
object is responsible for calculating its own size and position, and for calling the configure() method on each
of its children.
Layout calculations in subArctic are normally done automatically by means of constraints. A constraint is a
declaration of a relationship that is to hold between two or more values -- in this case the values that control the
size and position of interactor objects. A typical constraint might say that an object's left edge is to always be 5
pixels past its previous siblings right edge. Such a constraint could be written as an equation such as: "right =
prev_sibling.left +5" (or in terms of x position and width as "x = prev_sibling.x + prev_sibling.width + 5"). As
fully described in the constraints section, most common constraints are easily established -- typically with a
single line of code. Once a set of constraints are established which describe the size and position of various
objects, the system is responsible for updating values as required whenever something changes.
This document will not cover the algorithms used to update values (see [4,5] for full details). However, value
update is done in a very efficient and transparent way. In particular, the interactor interface provides a set of
standard parts which are conveniently accessible to the constraint system. These include values controlling the
size and position of the object, its visibility, and its input enabled status. In addition, two special parts for
subclass specific values (part_a and part_b) are provided. These values export things such as the value of a
scrollbar. The methods x(), y(), w(), h(), visible(), enabled(), part_a(), and part_b()are provided for
accessing these standard parts. The normal implementation for these methods (provided by base_interactor)
works with the constraint system to ensure that values are always updated with respect to any constraints that
are currently attached to them before they are returned by these methods. Similarly, the set_x(), set_y(), etc.
methods are coordinated with the constraint system. As a result, once constraints have been established, values
are transparently updated simply by setting and using them in the normal way.
This arrangement makes the use of constraints very convenient. For example, the default configure() method
provided in base_interactor works simply by requesting the x, y, w, and h values of the object, then calling
configure() on each child object. This ensures that all size and position values are up to date before drawing
takes place. The system automatically tracks screen damage regions whenever an object's size and/or position is
changed. Consequently, after the layout phase, the system knows exactly which region of the screen needs to be
updated without additional programmer intervention (the programmer can also "manually" declare damaged
9 of 63
9/7/00 8:29 PM
subArctic User's Manual
http://www.cc.gatech.edu/gvu/ui/sub_arctic/sub_arctic/doc/users_manual.htm
regions by invoking the damage_self() method on any interactor object).
Drawing
Once layout is complete, actual redraw is begun. To avoid flicker, all drawing is initially done off-screen, then
the off-screen image is transferred on-screen in one operation. The drawing process is begun by creating a
drawable object (a subclass of java.awt.Graphics) which refers to the offscreen image, and which has its
clipping region set to the smallest rectangle that encloses all damage. This drawable object is then passed to the
draw_self() method of the root interactor to begin the recursive tree walk used for drawing.
At each level in the tree walk, the draw_self() method of an object is called. This method (normally defaulting
to the one supplied in base_interactor) is responsible for reducing the clipping region of the drawable object
it received to cover at most its own area, establishing the translation needed to enter its own local coordinate
system, then calling its own draw_self_local() method -- passing in the properly prepared drawable object.
(In addition, the method also normally does a quick trivial reject test that indicates whether the object could
produce output within the current clipping region. If an object is guaranteed to be entirely clipped away, actual
drawing of the subtree is skipped.) The draw_self_local() method is normally specialized by each particular
interactor subclass. Draw_self_local() is responsible for carrying out any drawing needed for its own
appearance, and for a calling draw_self() for each of its visible children.
This recursive tree walk process for drawing allows a number of different effects to be implemented by
modifying the way drawing is performed. For example, while most parent objects produce output first, then
draw their children (hence, produce output under their children's output), parent objects can also draw their
output last (over their children), or produce part of their output, then draw the children, then produce the rest of
their output. Similarly, some interactors draw only some of their children, or may draw different children
depending on their current state. This is used for example, by the hierarchy_parent class demonstrated below.
This class produces hierarchical displays with a tag object (first child) that is always displayed, and a body
(remaining children) which is displayed only when the object is "open".
As long as an object supplies a pick() method (see below) which matches its drawing behavior it has free rein to
manipulate the drawing of itself and its children as needed. This allows sophisticated composition operators to
be constructed which compose larger displays out of smaller components. One of the more sophisticated
instances of this in the current interactor library are the shadow_caster, and shadow_drag_container classes.
As illustrated in the Applet below, these classes accept an arbitrary interactor subtree and produce a simulated
shadow under them.
10 of 63
9/7/00 8:29 PM
subArctic User's Manual
http://www.cc.gatech.edu/gvu/ui/sub_arctic/sub_arctic/doc/users_manual.htm
This effect is achieved by first drawing the subtree with a special drawable object which has been modified to
turn all colors to gray and to offset all drawing by a small amount in x and y (this produces the shadow). Then
by drawing the subtree again, with the normal drawable object (this produces the normal image over the top).
Since interactor objects all simply draw with the drawable object passed to their draw_self() method, the
shadow_caster and shadow_drag_container classes do not need to know anything special about the objects
they cast shadows for. Similarly, the objects being shadowed do not need to do anything other than their normal
drawing.
Input
The final major task of a user interface is processing input. The subArctic system provides substantial support to
make normal input handling easy, and to allow the system to be extended with sophisticated new input effects.
Note: it is not necessary to understand the full input dispatch process described below to use interactor objects
within the existing interactor library -- for the most part you can simply put them in the interactor tree and they
will work (i.e., provide feedback and produce callbacks in response to inputs). However, the subArctic
philosophy is that many interfaces need customized interactors and you do typically need to understand the
input process to create your own interactors. (Press here to skip to the next section.)
At the most general level, the process of input handling is one of delivering input events to appropriate objects
in the interactor tree. Those events are then interpreted by the objects to initiate actions (e.g., through callbacks)
which carry out the user's apparent intent. There are two primary methods (policies) for deciding which objects
to send (or dispatch) input events to. One policy is to dispatch events to the object(s) which appear on the
screen under the current cursor position (as determined by a picking process described below). This is
appropriate for example to deliver mouse button press events to a button. This kind of event delivery is a
positional policy since it depends on the position of the pointing device at the time the event occurs. The second
major policy for event delivery is a focus policy. This policy dispatches events to an object which has
established a focus indicating that all events of a certain type should go to it regardless of position. This kind of
event dispatch is appropriate, for example, to deliver keyboard events to the current text input object.
Although positional and focus policies are the two primary methods by which a system can determine which
objects should receive events, more specialized policies are also useful. For example, if a modal dialog box is
being displayed one may wish to use a hybrid policy which limits delivery of events to objects within a certain
subtree (representing the dialog box), but then dispatch positionally within that subtree. In order to provide
flexibility in the input process, subArctic provides a set of common input policies, but also allows individual
interfaces to add new policies for special circumstances. Each input policy is implemented by an object. Adding
new input policies involves simply adding an object to a prioritized policy list. The manager class holds the
standard policy lists and a full list of standard policies is found in the manager section.
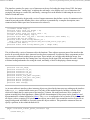
In order to properly respond to events, most interactive objects maintain state information, and change how they
respond to events based on that state. For example, a simulated button object might normally ignore mouse
movement events. However, if a mouse button press event is received inside the object it might begin tracking
11 of 63
9/7/00 8:29 PM
subArctic User's Manual
http://www.cc.gatech.edu/gvu/ui/sub_arctic/sub_arctic/doc/users_manual.htm
movements to determine when to highlight and unhighlight itself. Once a mouse button release event (either
inside or outside the object) has been received, movement events would again be ignored. These kinds of
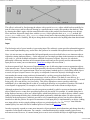
interaction patterns are easily described and controlled by finite state machines. For example, the sequence of
pressing a mouse button, and tracking movement until the button is released (i.e., a "drag" sequence), is
described by the following finite state machine:
By executing the proper action for each event transition, button highlighting behavior as well as many other
behaviors involving "drag" sequences can be implemented. Rather than force each new interactor to write the
code equivalent to this state machine (again), the toolkit implements this state machine (and others like it
describing other common interaction fragments) as a part of its infrastructure. Then instead of delivering raw
low-level events, the toolkit provides a series of method calls which represent just the important transitions in
these machines. For example, the toolkit can translate low level events for press, move, and release into calls to
drag_start(), drag_feedback(), and drag_end(). This way, the interactor object does not have to maintain
state or implement a finite state controller. Further, the system can automatically provide additional commonly
needed information. For example, in drag_feedback() and drag_end(), the offset of the initial "grab"
position, along with the initial point of the drag, and the x,y position needed to place the object properly during
drag are all provided.
In general, the system provides a translation from a series of low-level events, into a series of higher level
method calls. This translation process is handled by an object called a dispatch agent . Each agent in the system
accepts certain kinds of events, maintains some local state based on those events, and delivers a series of
method calls corresponding to those events to various objects. For example, the move_press_drag agent
accepts mouse press, movement, and release events, maintains the state machine above, and calls the
drag_start(), drag_feedback(), and drag_end() methods of objects interested in receiving dragging input.
The set of methods used to deliver inputs from a particular agent is called the input protocol of the agent (so
drag_start(), drag_feedback(), and drag_end() make up the input protocol for the move_press_drag
agent).
Note that different agents might interpret the same low-level inputs differently and produce method calls under
a different input protocol. For example, the inout_press_drag agent, also accepts mouse press, movement,
and release events. However, rather than using the start-feedback-end protocol of the move_press_drag agent,
it instead tracks whether the mouse has moved into or out of the bounds of an object during the drag and
delivers methods calls using the protocol of: inout_drag_start(), inout_drag_enter(),
inout_drag_exit(), and inout_drag_end(). This agent is more appropriate for implementing a button object
for example, and, since both inout_drag_start()and inout_drag_end() deliver a Boolean value indicating
whether the mouse is currently inside the object receiving the input, that object typically does not have to
maintain any additional state for the interaction.
Each input protocol is represented by a Java interface. That interface lists the methods of the protocol and their
parameters. In order to receive input under a given protocol, an interactor object must implement the interface
for the protocol (i.e., list the protocol in the implements clause of the class definition and provide an
implementation for each of its methods). For example, to receive drag input for moving, an object must
implement the move_press_draggable interface.
Each input dispatch agent works in conjunction with an input policy. In addition to implementing the proper
protocol interface, an object also needs to arrange for input to be delivered under some policy. For example,
agents which are under the positional policy will deliver input to objects which implement their input protocol,
12 of 63
9/7/00 8:29 PM
subArctic User's Manual
http://www.cc.gatech.edu/gvu/ui/sub_arctic/sub_arctic/doc/users_manual.htm
and which are currently under the cursor. For objects to receive inputs from focus based agents, they need to
establish themselves as the focus of that agent (normally by calling the set_focus method of the agent).
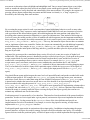
Since the same input might be interpreted in several different ways, the toolkit needs a mechanism for
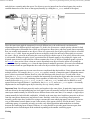
arbitrating between different policies and agents. To do this, the system uses a simple priority scheme for both
policies and agents as illustrated above (Note: not all agents are shown here, and some agents shown separately
here, are actually implemented as one object). There is a system-wide list of policy objects (which is accessible
via the manager class). Inputs are passed in turn to each policy in this list until one of these policies consumes
the event -- that is, succeeds in delivering the event to an object which accepts it. If no policy delivers the event,
it is discarded. Within each policy object, a prioritized list of dispatch agents is also employed. Again, each
dispatch agent is tried in order until one of them consumes the event. (A full list of dispatch agents is given in
the manager class section.) Note: when an event is dispatched to an object it has the option of rejecting the
event (this is done by returning false from the input protocol method in question). An event is not considered
to be consumed until an agent dispatches the event to an object and the object actually accepts the event.
Note that dispatch agents may in some cases be more complicated than depicted here. Some agents interact with
multiple policies. For example, the move_press_drag agent is actually a composite agent. It dispatches mouse
press events in a positional fashion. However, once the initial press has been receive, it works with a focus
agent (the move_drag_focus agent) to complete the interaction (by making the object under the cursor the "drag
focus" since it must receive the remaining events regardless of where they occur). The move_drag_focus agent
actually delivers the drag_start(), drag_feedback(), and drag_end() method calls. In addition, several
agents which are logically distinct -- in particular, the press, click, and double_click agents -- are actually
implemented as one dispatch agent object since they are very closely related.
Important Note: Not all input protocols can be used together in the same object. In particular, input protocols
with are driven by the same underlying low-level input events will normally conflict with each other (since the
same input cannot normally be delivered in two different forms at the same time). For example, a single object
cannot normally be both clickable, and double_clickable at the same time since both these protocols are driven
from the same mouse button press and release events. Similarly each of the several drag related protocols
normally conflict since they would all be trying to consume the same underlying inputs, but the system has no
way to differentiate between them (except via the priority of the agents, which is fixed in advance). To use
conflicting agents, it is normally necessary to create a new hybrid agent that understands how to mediate
between the conflicting forms of input. With care, it is also possible to reject the input from one agent, then
perform the action for both inputs in the methods responding to the another conflicting agent.
Picking
13 of 63
9/7/00 8:29 PM
subArctic User's Manual
http://www.cc.gatech.edu/gvu/ui/sub_arctic/sub_arctic/doc/users_manual.htm
Part of the input distribution process is determining which (if any objects) are under the cursor. This process is
called picking. Picking, like other processes in the toolkit, is performed by a recursive tree walk. When a pick is
needed (for example to perform a positional dispatch), the pick() method is invoked for the root object of the
interactor tree installed in the applet or other object that the event occurred in. This initiates a recursive walk of
the tree. At each level of the tree, the point passed to pick() is compared against the extent of the object. If the
point is outside the extent, pick() simply returns, since neither the object, nor any of its children can be "under"
the point. If the point is within the extent of the object then the object and/or some of its children may be
picked. In that case, the picked_by() method of the object is consulted. If this method indicates that the given
point is to be considered "on top of" the object, then the object is added to the end of a special pick_collector
list object passed to the pick() method. Next, the pick() method is recursively invoked for each child object.
Once this process is complete, pick_collector list will contain the set of all objects picked in back-to-front
drawing order (events are then dispatched in the reverse order of this list so that objects "on top" receive
dispatches in preference to those "behind").
If objects do not use the conventional drawing order of parent, then child 0, then child 1, etc., the object will
override the pick() method to ensure objects are placed on the pick list in drawing order. In addition, by
overriding the default picked_by() method supplied by base_interactor, which simply tests the rectangular
bounds of the object, it is possible to properly support picking of non-rectangular objects (For a full discussion,
see the picking subsection of the base_interactor section).
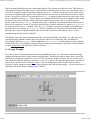
4. A Larger Example
Now that we have been through most of the concepts behind the system, we will consider a somewhat larger
example that illustrates how a typical interface might be built. This interface reads an image from a given URL
and allows a rectangular section to be cut out of it. This sub-image can then be written out as a section of Java
code which will statically initialize a subArctic loaded_image object. This interface appears below and the full
source for the interface can be found here. (Note: if you are running this interface inside a browser such as
Netscape, security settings may prevent you from writing out the result from this applet -- you may need to use a
stand-alone tools such as Sun's Appletviewer to do that.)
14 of 63
9/7/00 8:29 PM
subArctic User's Manual
http://www.cc.gatech.edu/gvu/ui/sub_arctic/sub_arctic/doc/users_manual.htm
This interface contains five parts: a set of interactors at the top for loading the image from a URL, the image
itself along with some "cutting lines" to indicate the sub-image, a size display area, a set of interactors for
saving the sub-image to a named file, and finally, a message area at the bottom for indicating the success or
failure of loads and writes.
The code for the interface begins with a series of import statements, then defines a series of constants used to
control layout and provide defaults (Note: since code here is surrounded by a complete description, some
comments and/or white space have been removed or reduced.):
/** Border around image */
protected static final int border = 40;
/** Cutter inset from border */
protected static final int cutter_inset = 10;
/** Font for coord display tags */
protected static Font tag_font = new Font("Helvetica", Font.PLAIN, 9);
/** Default URL for the image */
protected static final String default_url =
"http://www.cc.gatech.edu/gvu/ui/sub_arctic/sub_arctic_logo.gif";
/** Default save name */
protected static final String default_save = "image.code";
This is followed by a series of interactor object declarations. These objects represent parts of the interface that
need to be accessed after the basic interactor tree has been constructed. In particular, these components need to
be accessed in a callback resulting from user input. These include, an icon object that holds the image, four
objects used to represent the four cutting lines, text edit areas for the input URL and output file name, a button
to initiate loading and another for saving the result, and finally, a label for displaying a status message.
protected
protected
protected
protected
protected
protected
protected
protected
protected
protected
icon the_image;
interactor cut_x1;
interactor cut_y1;
interactor cut_x2;
interactor cut_y2;
oneline_text_edit load_name;
oneline_text_edit save_name;
button load_button;
button save_button;
label message;
As in most subArctic interfaces, these interactor objects are placed in the interactor tree making up the interface
in the build_ui() method which comes next. The body of this method begins by building a column object
which will contain the five major parts of the interface. Columns, like many interactors, have a number of
options to modify their final appearance. (Note: full API documentation for the system can be found here and
documentation for column in particular is here.) This column is configured to have a border of 10 pixels around
all objects, to have a spacing of 10 pixels between objects, not to draw a box around the result or to provide an
opaque background, and finally to vertically center the objects within it. This particular constructor does not
specify a position, so the column defaults to 0,0.
public void build_ui(base_parent_interactor top)
{
column whole_ui;
15 of 63
9/7/00 8:29 PM
subArctic User's Manual
http://www.cc.gatech.edu/gvu/ui/sub_arctic/sub_arctic/doc/users_manual.htm
...
whole_ui = new column(10,10, false, false, column.CENTER_JUSTIFIED);
top.add_child(whole_ui);
After creating the column object that lays out the major components of the interface, we create each of these
components. The first is a row object which holds the interactors for specifying the URL to load the image from.
This is constructed with the following code:
row
a_row;
label tag;
...
a_row = new row(0,5, false, false, row.CENTER_JUSTIFIED);
whole_ui.add_child(a_row);
tag = new label("Image URL:");
a_row.add_child(tag);
load_name = new oneline_text_edit(0,0, 400, default_url, null, false);
a_row.add_child(load_name);
load_button = new button("Load", this);
a_row.add_child(load_button);
This code creates a row which centers its child objects providing a 0 pixel border and 5 pixel spacing between
objects, with no bounding box, and no opaque background. After creating the row it is added to the overall
column of the interface. Then 3 children of the row are created. A simple textual label to serve as a prompt, a
one-line text edit area for entering a URL, and a button to initiate loading from that URL. Note that the final
parameter to the button constructor provides the callback object which is informed when the button is pressed.
Again in this example, the applet object itself receives the callbacks.
After creating the top portion of the interface, we next create the area to hold the image itself along with the
cutting lines which specify the sub-image. This will be done with the image_holder object which is a
base_parent_interactor. This class provides a simple container object which does not do any particular
layout of its children or supply any additional input behavior.
base_parent_interactor image_holder;
...
image_holder = new base_parent_interactor();
image_holder.set_w_constraint(std_function.offset(FIRST_CHILD.W(), 2*border));
image_holder.set_h_constraint(std_function.offset(FIRST_CHILD.H(), 2*border));
whole_ui.add_child(image_holder);
In general, there are 3 ways in which object's are sized and positioned in a subArctic interface. They can simply
be placed at particular locations or given particular sizes (for example, the overall column object is placed at
0,0), they can be placed within parent objects which are responsible for providing a particular type of layout
(which we have seen here with simple row and column container objects), or finally, they can be laid out using
constraints which provide a simple declarative specification of a particular size or position. This final method is
used to specify the size of the image_holder object.
In this case, we place constraints on the width and height of the image_holder object, creating constrains that
follow the size of the image that it contains. In particular, we place a constraint on the width that constrains it to
always be the width of its first child plus an offset corresponding to twice the border size, and place a similar
constraint on the height. The constraints used here are created with the std_function class (which creates
constraints from a standard set of lightweight constraints -- see the constraint section for full details) and refer
indirectly to a particular part of an object in the "local neighborhood" (i.e., the width or height of the first child
16 of 63
9/7/00 8:29 PM
subArctic User's Manual
http://www.cc.gatech.edu/gvu/ui/sub_arctic/sub_arctic/doc/users_manual.htm
of this object). As shown below, the first child of the image_holder will be an icon object which displays the
image we are cutting.
the_image = new icon(border,border, new loaded_image(16,16));
load_image(default_url);
image_holder.add_child(the_image);
The icon object is placed at a position providing the left and top borders, while the extra size in the parent
provides the bottom and right borders. We initially provide the icon with a small dummy image, then we use our
load_image() method load an initial default image. Finally, the icon is placed in the image_holder object as
the first child.
Next we build the 4 cutter lines for specifying the sub-image and add them to the image_holder object. The
cutter lines are themselves created as composite objects. This is done with the built_vert_cutter() and
build_horiz_cutter() methods that we will return to shortly. For now we simply note that these methods
return an interactor object and that these objects are added as the 2nd through 5th child of the image_holder.
cut_x1 = build_vert_cutter(true);
cut_x2 = build_vert_cutter(false);
cut_y1 = build_horiz_cutter(true);
cut_y2 = build_horiz_cutter(false);
image_holder.add_child(cut_x2);
image_holder.add_child(cut_x1);
image_holder.add_child(cut_y2);
image_holder.add_child(cut_y1)
Next we build the dynamic size display and place this in the overall column layout for the interface. This will
again be a composite object. In this case, we create the object with the build_size_display() method we will
see shortly.
whole_ui.add_child(build_size_display());
Next we create another row which contains a label, a one-line text edit area, and a button. This grouping
supports saving our result to a named file.
a_row = new row(0,5, false, false, row.CENTER_JUSTIFIED);
whole_ui.add_child(a_row);
tag = new label("Save As:");
a_row.add_child(tag);
save_name = new oneline_text_edit(0,0, 400, default_save, null, false);
a_row.add_child(save_name);
save_button = new button("Save", this);
a_row.add_child(save_button);
Finally, for the last component of the overall interface we add a single label (initialized to the empty string)
which will serve as a status message.
17 of 63
9/7/00 8:29 PM
subArctic User's Manual
http://www.cc.gatech.edu/gvu/ui/sub_arctic/sub_arctic/doc/users_manual.htm
message = new label("");
whole_ui.add_child(message);
For the "cutter" lines used to specify a sub-image we need an interactor which provides a horizontal or vertical
line which can be dragged (horizontally or vertically only), and which provides a textual display that echoes the
position of the line. Needless to say, there is no interactor in the library which does exactly these things. One
way to overcome this problem would be to build a new interactor object class which does exactly what we need.
In subArctic, unlike most other toolkits, this is relatively easy to do. However, at this stage in the user's manual
we wish to stick to the standard library and demonstrate how the standard components can be combined in
powerful ways to build new interaction techniques.
The cutter interaction techniques are composed of several objects constructed in the
build_horiz_cutter()and build_vert_cutter() methods (we will only consider the first of these). In
particular, it will be composed of an hv_line object (a line display that is always either horizontal or vertical)
and a label, that are placed inside of a drag_container object. The line and label objects provide only
outputs, while the container object they are placed inside of provides the dragging input behavior we need.
takes one parameter indicating whether we are creating the near line (which starts at
the left of the image and has its coordinate display tag placed at the top of the line), or the far line (which is
initially at the right of the image and has its coordinate tag placed at the bottom end of the line).
Build_horiz_cutter()
The method begins by building a vert_drag_container object initially positioned correctly for its type.
protected interactor build_horiz_cutter(boolean near_line)
{
drag_container drag;
int
xloc, yloc;
xloc = cutter_inset;
yloc = near_line ? border : border + the_image.h()-1;
drag = new vert_drag_container(xloc, yloc, false, this);
This object provides no output of its own and conforms to the size of its children (it is a subclass of
shink_wrap_container). It does however, add dragging behavior -- it allows itself, and hence also the children
placed within it, to be dragged in a vertical direction (this is a subclass of the drag_container class which
allows its children to be dragged in both dimensions). The last parameter to the drag container is a callback
which is again set to the applet object itself.
Once the drag container has been created we create a line and label object to go in it.
hv_line
the_line;
int_label the_tag;
...
the_line = new hv_line(true);
the_line.set_w_constraint(
std_function.offset(OTHER.OBJ(the_image).W(),2*(border-cutter_inset)-1));
drag.add_child(the_line);
The line object is created as a horizontal line and its width is constrained to fit a small inset inside the border
around the image. Note that in this case we use the same standard offset constraint. However, we refer directly
to an object which is not in the local neighborhood of this object using a slightly different notation than the
18 of 63
9/7/00 8:29 PM
subArctic User's Manual
http://www.cc.gatech.edu/gvu/ui/sub_arctic/sub_arctic/doc/users_manual.htm
previous constraint (which referred indirectly to the first child of an object without providing a direct reference
to it).
The coordinate display is provided with an int_label object. This subclass of label displays a single integer
value. This value is tied to the special "part_a" component of the object and hence can be the subject of a
constraint. In this case, we constrain part_a of the label to be related to the y position of the drag container,
hence it will always display the integer value of the cutter within the image.
the_tag = new int_label(0, tag_font);
the_tag.set_opaque(true);
the_tag.set_boxed(true);
the_tag.set_part_a_constraint(std_function.offset(OTHER.OBJ(drag).PART(Y),-border));
[Note that a third form of object reference is used in the constraint here. This form again provides a direct
reference to an object, but names the part of that object differently (i.e., uses PART(Y) rather than Y()). This will
be discussed fully in the constraint section. However to give a brief explanation of this here, the reason for this
is that the form of reference used here provides a raw value, whereas normal references such as Y() transform
the value into the coordinate system of the parent of the object using the value -- which is usually what you
want. However, in this case since the drag object is the parent, it's y value is always 0 in its own coordinate
system, so the raw value (in this case in the parent's coordinate system) is what we want.]
Next we need to place the label at the appropriate spot. In both the near and far line cases, the y coordinate will
be 0 to place the label against the line. For the near line, the x coordinate also stays at 0 (the left of the line). For
the far case, we constrain the x position to align its right edge with the right end of the line. This is done with a
"far_edge_just" constraint. Finally, the label object is added to the drag container, and the container is
returned.
if (!near_line)
{
the_tag.set_x_constraint(std_function.far_edge_just(PREV_SIBLING.W(),0));
}
drag.add_child(the_tag);
return drag;
After build_horiz_cutter() a similar method, build_vert_cutter() is provided for building the vertical
cutter lines. The final part of creating the overall interface is to build a small display that indicates the current
size of the selected sub-image. This is done using a row of four labels. The second and last are int_label
objects whose text is constrained to the difference between the x (or y) cutter lines.
protected interactor build_size_display()
{
row
result;
label tag;
/* build a row to put it in */
result = new row(0,0, false, false, row.CENTER_JUSTIFIED);
/* build leading label */
tag = new label("Image size: "); tag.set_opaque(true);
result.add_child(tag);
/* build int_label constrained to x size */
19 of 63
9/7/00 8:29 PM
subArctic User's Manual
http://www.cc.gatech.edu/gvu/ui/sub_arctic/sub_arctic/doc/users_manual.htm
tag = new int_label(0); tag.set_opaque(true);
tag.set_part_a_constraint(
std_function.subtract(OTHER.OBJ(cut_x2).X(), OTHER.OBJ(cut_x1).X(), 1));
result.add_child(tag);
/* add separator label */
tag = new label("x"); tag.set_opaque(true);
result.add_child(tag);
/* build int_label constrained to y size */
tag = new int_label(0); tag.set_opaque(true);
tag.set_part_a_constraint(
std_function.subtract(OTHER.OBJ(cut_y2).Y(), OTHER.OBJ(cut_y1).Y(), 1));
result.add_child(tag);
return result;
}
We have now seen all of the code which builds the interactor tree for the interface. Next we turn to the code that
responds to user inputs. Recall that the two buttons and each of the four drag container objects for the cutter
lines were initialized to send their callbacks to the applet itself. The applet object responds to these callbacks
with the callback() method. All callback methods takes four parameters: the interactor object the callback
comes from, the event which "caused" the callback, the callback number (identifying which type of callback this
is for objects that provide more than one type of callback), and an object that provides parameters (if any) to the
callback.
The callback routine first clears any old message text. This ensures that the message is current and only displays
the status of the immediately previous action. Next the routine determines which object sent the callback so that
it can perform the appropriate action. Each of these responses is handled by either one or two method calls as
shown below:
public void callback(interactor from, event evt, int cb_num, Object cb_parm)
{
message.set_text("");
if (from instanceof drag_container)
fix_cut_bounds(from);
else if (from == load_button)
{
load_image(load_name.text());
fix_cut_bounds(null);
}
else if (from == save_button)
save_image(save_name.text());
}
Callbacks come from the drag_container objects both on each movement (cb_num ==
drag_container.MOVE_CALLBACK) and when the container is released at the end of a drag (cb_num ==
drag_container.END_MOVE_CALLBACK). In our case we respond to both callbacks in the same way, by calling
fix_cut_bounds(). This method ensures that the cutter lines stay within the image (and move them back
inside if the drag has moved them out) and that the moving cutter line does not cross beyond its mate to create a
negative area.
If the load button is pressed, we invoke the load_image() method to load a new image into the the_image
icon object, then we call fix_cut_bounds() again to ensure that the cutter lines are within the new image size.
Finally, if the save button is pressed we call save_image() to write out the specified sub-image as initialization
20 of 63
9/7/00 8:29 PM
subArctic User's Manual
http://www.cc.gatech.edu/gvu/ui/sub_arctic/sub_arctic/doc/users_manual.htm
code. (The full code for each of the support methods named above can be found here.)
As we have seen again in this example, subArctic interfaces follow an overall pattern. In build_ui() (and
routines called from it) an interactor tree is constructed. This represents the initial state of the interface. The
remaining work of the interface is either handled automatically by declared constraints (as in update of various
coordinate displays) or handled in code invoked from callbacks. These callbacks act by manipulating various
parts of the interactor tree (for example, placing a new image in the icon or moving one of the cutter lines to a
new position) and/or calling application code (for example, the method to write out the result as Java code).
5. The interactor Interface and base_interactor Class
The sub_arctic.lib.interactor interface defines the API that all objects appearing on the screen and/or
accepting input must provide. As such it defines all the basic operations of interactive objects. The
sub_arctic.lib.base_interactor class provides the default implementation for all the methods defined by
the interactor interface as well as a number of additional support routines. Understanding the basic operations
defined in these APIs is central to using interactive objects in subArctic.
Methods found in base_interactor (and interactor) can be grouped into 12 categories: Constructors and
init routines, geometry, coordinate system transformations, hierarchy management, traversal support, layout,
output, picking, object status, support for common input protocols, application data support, and debugging
support. Each of these topics is considered in a sub-section below.
Constructors and Init Routines
The base_interactor class provides several constructors. The full constructor has four parameters. These
provide the initial x, y position of the interactor (expressed in the coordinate system of the interactor's parent) as
well as its initial width and height. For interactors which will have constraints applied to define a size, a
constructor is also provided with only the position (this causes the size to default to a small temporary value).
Finally, a constructor is provided with no parameters. This defaults to a position of 0,0 and a small temporary
default size. This constructor is useful in cases where the object will have both its size and position controlled
by constraints.
In addition to the constructors, the base_interactor class also provides several support routines. These
include setup_for_children() and setup_for_fixed_children(). These routines are used for adding
parenting capability to a subclass in cases where the superclass did not support children. Normally, classes
which wish to support child objects inherit from base_parent_interactor which provides full parenting
support. However, in some cases, it is desirable to add parenting capability to an interactor class that did not
originally intend to support children. In these cases, either setup_for_children() or
setup_for_fixed_children() can be called within the constructor of the new subclass to add parenting
capability. These routines add normal parenting capability (optionally with a size hint used in allocation of a
child list) or parenting limited to a fixed set of children, respectively.
Geometry Management
Each interactive object maintains a record of its size and position. Positions are expressed in the object's parent
coordinate system and indicate where the object's top-left corner will appear relative to the parent's top-left
corner. The drawing of all objects (and their children) is clipped to the bounding rectangle formed by their
position and size (nothing drawn by the object or its children outside this rectangle appears on the screen).
An interactor's position, returned as a Point object is provided by pos(), while individual coordinates can be
accessed by the x() and y() methods. Similarly, size as a Dimension is returned by size(), and separate
values can be obtained with w() and h(). In addition, the full bounding rectangle can be obtained by bound()
21 of 63
9/7/00 8:29 PM
subArctic User's Manual
http://www.cc.gatech.edu/gvu/ui/sub_arctic/sub_arctic/doc/users_manual.htm
and individual components can be accessed by a part code constant using the get_part() method. (Component
codes are defined in sub_arctic.lib.interactor_consts.) All geometry routines are coordinated with the
constraint system (see the constraints section). If a defining constraint is attached to a coordinate, that constraint
is always evaluated before the corresponding value is returned.
In addition to inquiry routines, geometry components can also be set using the set_pos(), set_x(), set_y(),
set_size(), set_w(), and set_h() methods. Note that not all sizes and positions can be assigned to. Some
objects, such as icons and buttons, define their own size internally (this is what we call an intrinsic constraint).
Other sizes and positions may be controlled by constraints. In either of these cases, an attempt to assign to a
constrained value will result in an exception.
In certain cases, for example inside the constraint system itself, it is necessary to assign directly to geometry
values bypassing the constraint system. This can be done with the set_raw_x(), set_raw_y(), set_raw_w(),
and set_raw_h() methods. In addition, if an object's size is determined internally -- for example based on the
size of an image -- its constructor should use the set_intrinsic_size(), set_intrinsic_w(), or
set_intrinsic_h() methods to establish that size. Further the object's intrinsic_constraints() method
must report each intrinsically constrained coordinate. Note: all these routines are protected methods of
base_interactor and are not accessible outside interactor classes. In addition, the set_raw_*() methods
should be used with caution, since they bypass the constraint system (and in fact are rarely needed outside the
constraint system).
Coordinate System Transformations
As mentioned above, each interactor object defines a local coordinate system. This coordinate system places its
top-left corner at 0,0. This provides a convenient basis for drawing and manipulating objects, since it makes
objects independent of their final locations. The toolkit provides a number of routines for querying and
manipulating coordinate systems.
For each object, there are three coordinate systems of potential interest: its local coordinates, the coordinate
system of its parents (or simply parent coordinates) and the coordinate system of the root object of its interactor
tree (which we call global coordinates). Methods are provided for transforming points and individual
coordinate values between these coordinate systems. These include: local_to_global() and
global_to_local() for going to and from global coordinates, as well as into_local(), x_into_local(), and
y_into_local() for going from parent to local coordinates, and into_parent(), x_into_parent(), and
y_into_parent() for going from local to parent coordinates.
In addition the event class provides the methods: into_local(), into_parents(), global_to_local(),
reset_to_global() to modify which coordinate system its local_x and local_y instance variables are
expressed in (its global_x and global_y instance variables always remain in global coordinates).
and
Hierarchy Management
As should be clear by now, the parent-child hierarchy is an essential part of a subArctic interface. As a result a
number of routines are provided for accessing and manipulating this hierarchy. These include parent() which
returns the parent object of any interactor (orphaned and top_level interactors have null parents) and
child() which will return the ith child object of a parent. Note: child() may return null. This indicates a
null child in the child list and is useful for certain interactors which places specific interpretations on specific
children. Requests for negative children, or children past the end of the current child list (as indicated by the
num_children() method) result in an exception.
Iterating over the children of an object obj would typically be done with code such as:
22 of 63
9/7/00 8:29 PM
subArctic User's Manual
http://www.cc.gatech.edu/gvu/ui/sub_arctic/sub_arctic/doc/users_manual.htm
for (int i = 0; i < obj.num_children(); i++)
{
interactor a_child = obj.child(i);
...
}
The index of any (non-orphaned) child interactor within its parent is returned by child_index(). Finally, each
object's previous and next siblings (if any) can be accessed using the prev_sibling() and next_sibling()
methods (which return null if there is no such sibling).
Although the API to child manipulation is part of all interactors, not all objects are actually capable of
supporting children. Objects which support children return true from their supports_children() method.
Attempts to actually access or manipulate children of non-parent objects will result in an exception. However, it
is always safe to ask an object how many children it has.
As described in the concepts and organization section, parent objects come in two flavors. By default, parent
objects allow full manipulation of their children including support for arbitrary numbers of children, reordering
within the child list, etc. However, certain interactors are designed for a specific number of children, or assign
very specific roles to their children. For these interactors, adding arbitrary numbers of children or reordering
them would cause problems. To avoid this, parent interactors can be declared as fixed parents. This implies that
they have a fixed size child list which cannot be expanded and that child reordering is not allowed (operations
which would enlarge or shrink the child list, or which would reorder children will result in an exception).
Objects which support only fixed children return true from their fixed_children() method.
Child manipulation routines include: (operations marked with [*] are not available for fixed parent interactors).
set_child()
set the child at a specific index,
[*]
add a child to the end of the child list,
insert_child() [*]
insert a child in the child list at a given index, moving other children over to make space if
needed ,
remove_child() [*]
remove a child, moving other children over to fill the gap if needed,
add_child()
find_child()
return the index of a given child or -1 if the object is not in the child list,
[*]
move a child to the top of the drawing order (which is the end of the child list!) ,
move_child_to_bottom() [*]
move a child to the bottom of the drawing order (first of the child list),
move_child_upward() [*]
move a child up one in the drawing order (to one lower index in the child list), and
move_child_downward() [*]
move a child down one in the drawing order (to one higher index in the child list).
move_child_to_top()
All of the methods listed above are invoked on a parent object to manipulate its children. In addition, several
convenience operations are provided that can be invoked from the child object itself. These include:
[*]
move the child to the top of its parent's drawing order (end of it parent's child list),
move_to_bottom() [*]
move the child to the bottom of its parent's drawing order (beginning of its parent's child list),
move_to_top()
23 of 63
9/7/00 8:29 PM
subArctic User's Manual
http://www.cc.gatech.edu/gvu/ui/sub_arctic/sub_arctic/doc/users_manual.htm
[*]
move the child up one in its parent's drawing order (one lower index in its parent's child list),
and
move_downward() [*]
move the child down one in its parent's drawing order (one higher index in its parent's child
list).
move_upward()
Objects which support children are normally subclasses of base_parent_interactor (which is in turn a
subclass of base_interactor). This subclass adds the storage for a child list and sets proper bookkeeping flags
in its constructor However, since Java only supports single inheritance, and it is sometimes useful to add
parenting capability to an object which was not originally set up to support children. This can be done using one
of two special routines which have been provided base_interactor for this purpose: either
setup_for_children(), for a normal parent, or setup_for_fixed_children() if a fixed child list is desired.
These routines should be called in the constructor of the object.
Finally, several methods are provided for finding out about the tree that an interactor is contained in. The
method get_top_level() will return the top_level object that roots the tree an interactor is contained in (or
null if the interactor is not currently rooted). The method get_awt_component() will return the AWT
component (applet, canvas, or frame) that the root object is hosted by (or null if the tree is not currently rooted
or hosted in an AWT component). This is useful for inter-operating with AWT.
Traversal Support
In addition to individual operations for moving from parent to child, the system also supports a general
mechanism for performing traversals within an interactor tree. This mechanism can be used to find all
interactors that have certain properties, or to perform operations on some or all interactors.
The full details of traversal support are not critical for everyday use of the toolkit. If you wish to skip to the next
subsection, press here.
Traversal is performed by the base_interactor method traverse_and_collect(). This method is highly
parameterized to allow a wide range of different traversals to be implemented with this one routine. The
traversals are primarily designed for collecting a set of interactors that meet a certain criteria (such as all button
interactors, or all interactors whose bounds overlap a certain rectangle). However, they can also be used to
execute an action on every qualifying interactor.
The traverse_and_collect()method has 7 parameters that control its action. These include:
int traversal_kind
This integer is designed to uniquely identify the type of traversal being performed. Proper use of this
identifier allows custom interactors to override the behavior of particular kinds of traversals while
allowing others to proceed normally. Integers used for this parameter should be allocated using
manager.unique_int() and stored in a static variable accessible to all interactors that care about a
particular kind of traversal.
int traversal_order
This parameter indicates which order the traversal should proceed in. It should be one of the following
values (which are defined in sub_arctic.lib.interactor_consts):
TRAV_DRAW
Indicating drawing order. This is normally parent first, then child sub-trees from first to last child.
However, this order can be overridden by subclasses (in which case they should also override
traverse_and_collect() to reflect this),
TRAV_PICK
24 of 63
9/7/00 8:29 PM
subArctic User's Manual
http://www.cc.gatech.edu/gvu/ui/sub_arctic/sub_arctic/doc/users_manual.htm
Indicating pick order, which is the reverse of draw order.
TRAV_PRE
Indicating a left-to-right pre-order traversal (parent first, then first to last child sub-trees). This is
the same as the default drawing order. However, it is not overridden by subclasses which use a
custom drawing order.
TRAV_POST
Indicating a left-to-right post-order traversal (first to last child sub-trees, then parent).
interactor_predicate inclusion_test
This object implements a predicate which determines whether the interactor being visited is to be
considered part of the result collection or not. This predicate object may also implement actions on
interactors if desired.
interactor_predicate continue_test
This object implements a predicate which determines whether the children of a given interactor should be
visited or skipped.
traversal_xform xform_parent_to_child
Both the inclusion_test and continue_test objects take a single Object parameter (in addition to the
interactor being tested). The actual type of this object is traversal type specific. For some traversals, this
parameter object needs to be transformed from the value suitable for the parent, into one suitable for its
children. For example, in a traversal that tests for objects whose bounds intersect a rectangle, the
rectangle is passed as the parameter, and it must be transformed from parent to child coordinates as it
moves down the tree. Transformations such as this are done by the xform_parent_to_child object.
Object parameters
This argument contains additional parameters to the test predicates that control the traversal. The actual
type of this object is traversal dependent (if an improper typed parameter is passed to a predicate object,
an exception is thrown). This value is passed to both the inclusion_test and continue_test objects, and is
the one transformed by the xform_parent_to_child object.
pick_collector collection_result
This object is used to accumulate interactor objects that are included in the result collection. Objects
which are visited and pass the inclusion_test predicate are added to the end of this object by calling its
report_pick() method (this is done automatically by the traversal code). Once the overall
traverse_and_collect() method returns, the elements of the collection can be accessed in order using
a loop such as:
for (int i = 0; i < collection_result.num_picks(); i++)
{
interactor selected = collection_result.pick(i);
...
}
The predicate objects used for inclusion_test and continue_test must implement the
interactor_predicate interface. This interface requires one method:
public boolean test(interactor obj, Object parameters)
This method performs the predicate test against the given object using the additional parameters as needed.
Each particular predicate object will expect its parameters to be a particular type (or may ignore its parameters).
If the test function receives parameters of the wrong actual type it will throw an exception.
Layout
25 of 63
9/7/00 8:29 PM
subArctic User's Manual
http://www.cc.gatech.edu/gvu/ui/sub_arctic/sub_arctic/doc/users_manual.htm
Recall that on each request to redraw part of the interface two actions occur. First the layout of the interface
(that is the size and position of each visible interactor object) is computed, then the interface is (partially)
redrawn. This section considers layout, the next will describe routines for actual output.
The layout portion of this task is handled with a recursive traversal via the configure() method. This method
takes no parameters and is responsible for insuring that the given object as well as its children have been laid
out -- specifically, that the size and position of the object is correct and that configure() has been called on all
child objects. Important Note: it must be the case that the size and position of the object have been fully
established, and that all damaged portions of the object's image have been declared (see damage_self() below)
by the time the configure() method returns. No size or position changes can be done in the drawing code.
The reason for this is that the clipping rectangles used for drawing must be established before the drawing starts.
Changing the size or position of an object may change the clipping rectangle that needs to be used when
drawing it. However, for various reasons this can't be done during the drawing itself, so changes at that point
could result in incorrect or incomplete updates.
Most layout in subArctic is performed using constraints. As a result, for a typical object layout can be
performed simply by requesting (hence updating if necessary) each of the values that control the size and/or
position of the object. In base_interactor the configure() method first calls visible() to determine if the
object will be visible at all. If it is, then each of the x, y, w, h, enabled, part_a, and part_b values (all of which
could effect appearance) is requested. If any of these values changes they will normally declare any associated
damage.
Some subclasses determine part or all of their own size or position internally. For example, the size of icon
objects is determined by an image, and the size of label objects is determined by a current string and font.
Values which are determined internally, said to be intrinsically constrained. Objects which have intrinsic
constraints may need to update those values in configure() (in other cases this update occurs it the set routines
associated with various values such as the current string, font, or image). If update is performed in
configure() then normally values particular to the subclass need to be computed (and damage declared), then
the superclass configure() needs to be invoked.
Standard parts of objects (that is x, y, w, h, visible, enabled, part_a, or part_b) which are intrinsically
constrained need to be declared as intrinsically constrained via the intrinsic_constraints() method. This
method returns a small bitset indicating which parts are currently intrinsically constrained. Subclasses adding or
removing intrinsic constraints need to override this routine to add or remove bits from the set returned by their
superclass.
The full set of standard parts which currently have constraints applied to them (including intrinsic constraints) is
returned by the active_constraints() method (which should not normally be overridden). In addition,
individual parts may be queried using the is_constrained() method. Any part which is currently constrained
may not be directly assigned a value (since it might conflict with the constraint). If an assignment is attempted,
an exception will be thrown. In order to set an intrinsically constrained size internally when it changes, one of
the routines set_intrinsic_w(), set_intrinsic_h(), or set_intrinsic_size() should be used.
A constraint object which describes the constraint currently attached to an object part can be retrieved with
constraint_on(), or one of the routines: x_constraint(), y_constraint(), w_constraint(),
h_constraint(), visible_constraint(), enabled_constraint(), part_a_constraint(), or
part_b_constraint(). Note that this constraint object can represent the fact that no constraint is currently
applied (this can be determined most easily by using active_constraints() or is_constrained() in
advance).
Constraints on standard parts can be set using the set_constraint() routine or one of: set_x_constraint(),
26 of 63
9/7/00 8:29 PM
subArctic User's Manual
http://www.cc.gatech.edu/gvu/ui/sub_arctic/sub_arctic/doc/users_manual.htm
set_y_constraint(), set_w_constraint(), set_h_constraint(), set_visible_constraint(),
set_enabled_constraint(), set_part_a_constraint(), or set_part_b_constraint(). Details on
how to
construct constraint objects are discussed in the constraints section.
Output
Each time an object is moved or resized (i.e., during layout), or some other property that affects its appearance
is modified, the system must be informed of this so that redrawing of the appropriate areas (what we call
damaged areas) can be scheduled. Declaration of damage is typically done by calling the damage_self()
method of the object being modified. Damage_self() with no parameters indicates that the full bounding
rectangle of the object should be considered damaged. In addition, it is also possible to supply a more specific
rectangle (expressed in the local coordinates of the object) as a parameter to damage_self(). Damage_self()
is normally called automatically by toolkit routines that modify appearance or layout (such as set_pos(),
set_visible(), etc.), so it is not usually necessary to call it explicitly from outside the object itself.
Damage regions reported to damage_self() are handled internally by calling damage_from_child() on the
object's parent (passing the damaged region transformed into the parent's coordinates). This has the effect of
passing the damage up the tree. At the top_level object rooting the tree, the overall damage region (the
smallest rectangle enclosing all damage) is collected. This is used to limit the area of the next redraw to cover
only things which might have changed since the last redraw. The image for areas outside the damage area are
simply taken from backing store.
Once the size and position of each visible object has been established, and final damage areas determined, a
recursive traversal is performed to redraw any damaged portions of the screen. All drawing is done off screen.
Once the complete current image of the interface has been established off screen, it is placed on the screen in
one operation to avoid flicker. (As a result, if you improperly attempt to draw directly on the screen, your output
will almost immediately disappear.)
The output traversal is initiated by calling the draw_self() method on the top_level object which forms the
root of each damaged interactor tree. The draw_self() method sets up local coordinates and clipping for its
interactor object (using the enter_local_coordinate() method), then calls the draw_self_local() method
of the object to perform actual output. (Because of this arrangement, the draw_self() method should almost
never be overridden. All output for the object should be created in the draw_self_local() method.) In
addition to its other duties, draw_self() also does a quick trivial reject test to compare the object's extent with
the current clipping rectangle. If it determines that none of the object's output could appear, it will avoid
drawing the subtree entirely.
The draw_self_local() method is responsible for creating output for each object, and its children. Each
interactor subclass overrides this method to produce its own appearance. By default, parent output would be
performed first, then children would be drawn first to last. Drawing of children can be performed by calling the
draw_children() utility method provided by base_interactor (if all children are being drawn in default order),
or by calling their draw_self() methods directly (if a custom output scheme is used). Note that if custom
output is performed, the exact order of drawing should also be reflected by customization of the pick() and
traverse_and_collect() methods.
The draw_self_local() method receives a drawable object. Drawable is a subclass of java.awt.Graphics
and provides a drawing context which allows graphical operations to be performed. The drawable object
passed to the draw_self_local() method will already have a translation installed which places 0,0 at the
top-left of the object, and have its clipping region set to the intersection of the object, its ancestors, and the
damage region being repaired. As a result, the draw_self_local() method, can simply draw the current image
of the object.
27 of 63
9/7/00 8:29 PM
subArctic User's Manual
http://www.cc.gatech.edu/gvu/ui/sub_arctic/sub_arctic/doc/users_manual.htm
Picking
In order to properly deliver input events, the system needs to be able to determine what input sensitive interactor
objects appear "under" a given position on the screen. This search process is called picking. Picking like many
other operations is performed with a recursive traversal of the interactor tree -- in this case using the pick()
method. The default pick() routine first checks for a pick within its children in reverse child list order (since
the object drawn last will appear on top). This is done by calling the pick_within_children() utility routine
(if a custom child drawing order is used, the pick() or pick_within_children() methods should be
overridden to reflect this order).
Once child picking is completed, pick() tests whether the point in question (expressed in the local coordinate
of the object) should be considered a pick of the object itself by calling the picked_by() method. The default
behavior of this method is to in turn call inside_bounds() which does a simple rectangular bounds test. For
non-rectangular objects, or objects which can only be picked using certain parts (such as special drag handles),
the picked_by() method should be overridden to do a more specialized picking test (inside_bounds() should
not normally be overridden, since other parts of the system may use this for a bounds test).
Whenever an object determines that it has been picked by the point passed to it as a parameter, it should add
itself to the pick result list (a pick_collector object) by calling report_pick() on that object (this is the
same procedure used in traverse_and_collect() described above). In addition to passing the picked object
(normally this) to the pick_collector, it is also possible to attach additional information to the pick (what we
call user information, since the toolkit does not process it). This is done by passing an extra parameter value
(anything which is an Object) to the report_pick() method. This additional user info, will then be passed
back to the object when and if input is delivered based on this pick, but will not otherwise be processed or
modified. All input protocol methods include such a user info parameter. This can be used, for example to
determine which of several different drag handles was selected, or to record information such as an initial
position.
Object Status
Each interactive object maintains various pieces of information about its state. Most important of these pieces of
information include the visibility and enabled status of the object which can be manipulated via the visible(),
enabled(), set_visible(), and set_enabled() methods. Objects which are not marked visible are not
drawn (this test is performed in draw_self()). Objects which are not enabled do not accept input. (Note, at
present, the toolkit interactor library does not yet provide good disabled feedback in most cases. This should be
rectified soon).
In addition to visibility and enable status, a number of other pieces of information are kept such as an object's
ability to handle children, whether it is a fixed child parent, and a number of pieces of bookkeeping for the
constraint maintenance system. All this information is gathered together as a group of bits in a special flag word
(a 32 bit integer) in each object. Bits in this object which have not been used by the core system may be used by
interactor subclasses. Each allocated bit has a constant defined for it in sub_arctic.lib.interactor_consts.
The first available bit is denoted by the FIRST_FREE_FLAG constant (each subclass should also determine if any
bits have been used by their super classes).
Flag bits can be queried and manipulated by the flag_is_set(), set_flag_bit(), and clear_flag_bit()
methods.
Support for Common Input Protocols
Several sets of methods are included in interactor or base_interactor to support common input protocols.
28 of 63
9/7/00 8:29 PM
subArctic User's Manual
http://www.cc.gatech.edu/gvu/ui/sub_arctic/sub_arctic/doc/users_manual.htm
These include the methods focus_set_enter() and focus_set_exit(), which are called when an object is
placed in or removed from a focus-based input dispatch agent's focus set (a full list can be found in the manager
section). In addition, specific support is provide for dragging and snapping interactions.
For dragging and snapping the notion of feature points is introduced. A feature point is a location within an
object which is interesting for alignment with, or connection to, an object. By default, base_interactor provides
five feature points including the four corners and the center. Subclasses may provide additional feature points,
or an entirely different set which is appropriate to their particular semantics. Feature points are used in the
move-drag and snap-drag input protocols. The number of feature points supported by an object is returned by
the num_feature_points() method and the actual location of the ith feature point (in the object's local
coordinates) is returned by feature_point().
In move-dragging (i.e., the move_draggable input protocol controlled by the move_drag_focus agent) feature
points are used to control filtering or limiting the positions that an object can take while being moved. A
particular feature point is selected as the current feature point (as returned by drag_feature_point()). While
dragging, the position at which this feature point appears can optionally be limited or filtered. For, example, one
can insure that the center point of the object does not go outside the bounds of an object's parent, or could create
a filter to double the speed of a drag.
Limiting or filtering is performed by objects implementing the move_drag_filter protocol. For convenience,
base_interactor implements the move_drag_filter protocol and by default objects will act as their own
move-drag filters. To apply a particular move-drag filter to an object, override the filter_pt() method (by
default, base_interactor provides a no-op filter).
In the snap-dragging (i.e., the snap_draggable input protocol controlled by the snap_drag_focus agent)
feature points represent positions for snapping. Snapping, some times called gravity fields, is a general
interaction technique where objects being dragged are pulled to (snap to) positions of interest (see [6,7]). For
example, in a diagram editor, objects would be pulled to legal connection points (when they were dragged near
them), but not pulled towards non-connection points. Feature points provide that set of locations within an
dragged object which are eligible for snapping. Snapping is done from feature points within objects that
implement the snap_draggable interface, to target objects which implement the snap_targetable interface.
For snapping purposes, each feature point is considered to be enabled (eligible for snapping) or disabled
(ineligible). This status information is provided by the feature_point_enabled() method.
Application Data Support
In order to allow the application programmer to easily associate application data with interface components,
each interactor object supports a single user_info object. This object (of type Object) can be set and retrieved
by the set_user_info() and user_info() methods. Other than maintaining the reference to this object, the
toolkit does not otherwise interpret or process this information.
Debugging Support
Finally, each interactor object provides several routines for producing debugging output. These include
flag_string() which will produce a human readable string corresponding to a particular set of flag bits,
toString() which will produce a human readable string of vital statistics about an interactor, and tag_str()
which will produce a small tag which identifies an interactor's type and provides an integer (its hashCode) for
identification during debugging.
6. Supporting Classes
29 of 63
9/7/00 8:29 PM
subArctic User's Manual
http://www.cc.gatech.edu/gvu/ui/sub_arctic/sub_arctic/doc/users_manual.htm
In addition to the core classes of interactor and base_interactor, several other supporting classes are
widely used, and important to understand. This section considers each of these classes including: event,
drawable, and loaded_image.
Events
Like all modern toolkits, subArctic uses an event-oriented model for input handling. Under this model,
significant input actions initiated by the user (or sometimes other parts of the system) are recorded in event
records and placed in a queue for asynchronous processing. These events are then removed from the queue and
processed to carry out user initiated actions. This results in the classic "wait for event, process event, redraw
screen" basic processing loop that subArctic shares with most systems.
Since subArctic is layered on top of AWT, it uses AWT's event encoding and low level event delivery
mechanisms. However, AWT events (the java.awt.Event class) expose nearly all their internal state as public
instance variables. This makes it very difficult to robustly specialize events with new behavior. To overcome
this problem, and to add new behavior needed to support hierarchical coordinates, the subArctic system places a
wrapper around AWT events, rather than using them directly. This wrapper object (of class
sub_arctic.input.event) provides access to all the instance variables of a normal AWT event, but does so
through a pair of access methods rather than directly. In particular, for each original AWT Event instance
variable "v" two methods are provided: "v()" and "set_v()" which provide read and write access to the
instance variable, respectively. One exception to this is that the Event fields x and y have been renamed
global_x and global_y in the event wrapper class to better reflect their meaning in subArctic.
The following subArctic event class fields may be of interest (documentation on additional fields replicating
those of AWT Event fields can be found in Sun's API documentation for Event):
when
A long timestamp value indicating when the event occurred. This field is probably generated by
java.lang.System.currentTimeMillis() and expressed in units of milliseconds. Unfortunately, the
units and exact semantics of this field (like many aspects of AWT) has not really been documented by
Sun, so that is only a guess.
id
An integer code for the type of event that occurred. Codes of interest include the following. KEY_PRESS
and KEY_RELEASE: Press and release of a "normal" keyboard key. KEY_ACTION and
KEY_ACTION_RELEASE: The press and release of a special key such as a cursor or function key.
MOUSE_DOWN and MOUSE_UP: A mouse button press and release. MOUSE_MOVE and MOUSE_DRAG: Movement
of the mouse without and with a button held down. See the AWT Event documentation for a complete list
of possible values for this field.
key
An integer indicating what key was pressed for keyboard events. This can be an ASCII character value or
a special key code indicating cursor, function, or other keys. See the AWT Event documentation for a list
of special key codes.
modifiers
An integer containing a series of bits indicating the state of the modifier keys at the time the event
occurred. These bits can include zero or more of values: SHIFT_MASK, CTRL_MASK, META_MASK, ALT_MASK,
Ored together to indicate that the shift, control, meta or alt keys were being held down, respectively.
root_interactor
The top_level interactor
global_x, global_y
object that the event occurred within (that is that AWT delivered the event to).
The global position (position in the root_interactor object) of the event. This is the position of the
cursor at the time the event occurred. These values are not normally modified during the lifetime of the
event.
30 of 63
9/7/00 8:29 PM
subArctic User's Manual
http://www.cc.gatech.edu/gvu/ui/sub_arctic/sub_arctic/doc/users_manual.htm
local_x, local_y
The position of the event expressed in the local coordinates of the object the event is being delivered to.
These positions are automatically updated by the system whenever the event is delivered to an object.
To help manipulate coordinates in events, the following methods are provided:
void into_local(interactor of_obj)
Change an event currently expressed in the coordinates of the given object's parent, into those of the
given object.
void into_parents(interactor of_obj)
Change an event currently expressed in the given object's coordinates, into its parent's coordinates.
void global_to_local(interactor of_obj)
Change an event into the local coordinates of the given object regardless of what coordinates it is
currently in.
void reset_to_global()
Put an event into global coordinates. That is, set the local coordinates to correspond to the root object it
was delivered under.
Loaded_image
AWT allows (and in fact defaults to) drawing of images before their size and contents are known (with
asynchronous redraw requests being performed as parts of the image arrive or are created). This works for
relatively simple systems that do not use images as an integral part of interactive objects, but would cause a
great deal of difficulty for subArctic which includes images, for example, in scrollbars, menus, and other
objects which affect layout. To overcome this problem subArctic employs a wrapper object for images:
loaded_image. This class guarantees that the image is loaded before it is needed (in particular, before it is
drawn or its width or height is returned).
Operations methods by loaded_image include:
image()
Returns the java.awt.Image object being encapsulated, but ensures that it is fully loaded into memory
first. (See the Sun API documentation for the Image class for full details on Image methods.)
raw_image()
Directly returns the java.awt.Image object being encapsulated regardless of its load status.
width(), height()
Return the size of the image, first waiting to ensure that the size is known and valid.
image_from_intensity_map()
Creates a new image from an existing intensity map, base color, and transparency value. The intensity
map is a grayscale image. Values in this image below a transparency value are mapped to transparent.
Values above the transparency value are replaced with a color having the same intensity, but a hue taken
from the base color.
In addition, constructors are provide for creating loaded_image objects in memory, in memory from
initialization data, and from existing java.awt.Image objects.
Drawable
The drawable class provides a drawing context which can be used to create output on a drawing surface. A
drawable object encapsulates a reference to the drawing surface, as well as current drawing parameters, such as
the current font, color, and clipping region.
31 of 63
9/7/00 8:29 PM
subArctic User's Manual
http://www.cc.gatech.edu/gvu/ui/sub_arctic/sub_arctic/doc/users_manual.htm
forms a wrapper around (and is also a subclass of) java.awt.Graphics and it provides the same
drawing operations used by AWT (Sun's documentation for the java.awt.Graphics API can be found here). In
addition, drawable implements a tiled image drawing operation, provides support for drawing with the
loaded_image class, and provides alternate subArctic-style names for all operations.
Drawable
Drawables,
use a current setting model for drawing attributes. In addition to a (hidden) reference to the actual
drawing surface, each drawable maintains information about the current drawing state. This information
includes a current color, font, drawing mode (XOR or normal paint), origin location, and clipping rectangle.
The following operations are provided for manipulating the state of drawable objects:
create()
Create a new drawable object.
copy()
Copy an existing drawable object. Note that drawables refer to, but are not themselves, drawing surfaces.
As a result, the original and the copy will still produce output on the same drawing surface. This
operation is provided so that drawable attributes such as the clipping rectangle can be modified without
disturbing the original.
translate()
Apply a translation that changes the origin of the drawable. If translate(10,15) is called, then the pixel
position that used to be 10,15 will now be at 0,0 (and what used to be 0,0 will now be at -10,-15).
getColor(), get_color()
Return the current drawing color of the drawable. This is used for the foreground color of drawing. Color
objects are provided by AWT (i.e., objects of the class java .awt.Color).
setColor(), set_color()
Set the current drawing color of the drawable.
setPaintMode(), set_paint_mode()
setXORMode(), set_XOR_mode()
Place the drawable in either normal paint mode, or the special XOR drawing mode. In XOR mode, any
pixels that are already the current drawing color are replaced by a specified color, and pixels of the
specified color are replaced by the current drawing color. Pixels which are some other color are "changed
in an unpredictable, but reversible manner".
getFont(), get_font()
Return the current font of the drawable. Fonts are provided by AWT (i.e., objects of class java.awt.Font).
setFont(), set_font()
Set the current font of the drawable.
getFontMetrics(), get_font_metrics()
Return a font metrics object that provides sizing information for the current font, or a specified font. Font
metrics are provided by AWT (i.e., objects of class java.awt.FontMetrics).
getClipRect(), get_clip_rect()
Return the current clipping rectangle. Output which would fall outside the current clipping rectangle is
"clipped away" and does not appear.
clipRect(), clip_rect()
Set the clipping rectangle to the intersection of the current clipping rectangle, and a specified rectangle.
Note that there is no way to make the clipping rectangle larger in AWT. If you need to temporarily make
the clipping rectangle smaller, then revert to the original size, you should make a copy of the drawable,
reduce its clipping rectangle, draw using it, then revert to the original.
Drawable objects provide all the drawing operations of normal AWT Graphics objects. These include:
copyArea(), drawLine(), fillRect(), drawRect(), clearRect(), drawRoundRect(), fillRoundRect(),
draw3DRect(), fill3DRect(), drawOval(), fillOval(), drawArc(), fillArc(), drawPolygon(),
fillPolygon(), drawString(), drawChars(), drawBytes(), and drawImage(). In addition, versions of all of
32 of 63
9/7/00 8:29 PM
subArctic User's Manual
http://www.cc.gatech.edu/gvu/ui/sub_arctic/sub_arctic/doc/users_manual.htm
these routines are provided with subArctic style names (so you don't have to remember to switch naming styles
for just these routines). So for example, the routines: fill_round_rect() and draw_3D_rect() are provided.
In addition to the standard AWT drawing methods, subArctic adds several new operations as well. these include
tileImage() (and tile_image()) which tile a pattern image to fill a given rectangle, as well as additional
versions of drawImage() (and draw_image()) which accept loaded_image parameters instead of
java.awt.Image parameters, and do not require an ImageObserver.
7. Constraints
Background
In general, constraints are a mechanism for declaring (and establishing or maintaining) a set of relationships
between values. In subArctic, a limited form of constraints is used to support layout of interactors. Constraints
of the form used by subArctic allow equations to be attached to values -- in this case values that control the size,
position, visibility, enable status, and potentially other aspects of interactors. For example, it is common to want
to place an object a fixed distance to the right of the right edge of its previous sibling object. This can easily be
expressed declaratively using an equation such as:
x = prev_sibling.x + prev_sibling.w + 5
Once such a relationship has been declared, a constraint maintenance system built into subArctic can take over
responsibility for actually updating values when parts of the system change. For example, once a constraint
corresponding to the equation above has been attached to an object's x value, the system will automatically
update that value (and automatically schedule the required screen updates) whenever the position or width of
the object's previous sibling changes, whether that value is assigned to directly, or changed because it is further
constrained to another value (and that value perhaps to another, and so on). Further, the system can do this in an
efficient incremental fashion (if you are interested in the specific algorithms used see [4,5]).
Defining layout declaratively with constraints rather than with static sizes and placements allows your interfaces
to be much more dynamic -- responding appropriately to changes in the size, position, and other aspects of
various parts of your interface (for example the size of an enclosing frame). They allow you to easily give more
control to the end user by providing resizable components without major programming headaches, and for
example, allow you to include animation effects without worrying about how changing sizes might effect
layout. Finally, because of their automatic nature, they are in general much easier to work with than custom
code for doing layout.
Predefined composition objects (or "layout managers" in AWT terms) are generally the easiest way to do layout,
and if there is a composition object which does exactly what you need, you should probably use it. However,
constraints are much more flexible than typical composition objects. Further constraints are easy enough to use
that you can consider them as a kind of basic layout building block (in fact most of the layout composition
objects in subArctic are implemented with constraints). Consequently, rather than use a predefined layout that is
not quite right, or attempt to fit the layout you really want into layouts that are available, constraints make it
possible and practical to create a new layout customized to your particular needs whenever you need it. For
example, if you need a column which centers all of its objects except the first two, which are laid out
horizontally and right justified, this is easy to do with constraints.
Specifying Constraints
The type of constraints used in the subArctic system are called one-way constraints. This is because information
only flows in one direction. For example, in the equation above, new values can be provided for
prev_sibling.x and/or prev_sibling.w and the system will automatically find an appropriate value for x.
33 of 63
9/7/00 8:29 PM
subArctic User's Manual
http://www.cc.gatech.edu/gvu/ui/sub_arctic/sub_arctic/doc/users_manual.htm
However, you cannot change x and have the system find new values for prev_sibling.x and/or
prev_sibling.w. Although there is some debate about this in the user interface software community, we
believe that one-way constraints, although more limited in some respects than multi-way constraints, offer some
important advantages. These include greater understandability and predictability (since acyclic one-way
constraints are never under or over constrained, hence the system never makes arbitrary choices), the ability to
modify any number of values before an update (which is critical to the operation of a typical toolkit), and the
existence of efficient lazy update algorithms.
As indicated in the interactor subsection on layout, each interactor implements a standard set of parts that can be
the subject of constraints. In addition it is possible to define additional custom parts which can also be
constrained and provide values to constraints. Standard parts for each object include: x, y, w, and h which
control the position and size of the object, as well as visible and enabled, which control the visibility of the
object and whether it is currently enabled to accept input. Finally, two parts: part_a and part_b are provided to
allow subclass specific values, such as the value of a slider, to be easily made the subject of constraints. Each
standard part has methods to assign and retrieve its constraint. These methods are of the form
set_*_constraint() and *_constraint() (where * is one of the standard part names).
Constraints are described by constraint objects. A constraint object has two conceptual parts: the function that is
to be computed, and references to the values that the function is applied to (normally parts of objects). The
std_function class provides a series of static methods which will construct constraint objects computing a
standard set of functions (other constraint functions can be used, but they require more work to specify). For
example, perhaps the most used constraint function is offset. This function simply adds a constant to another
value and is typically used for placing an object a fixed distance away from something else. To create an offset
constraint the static method std_function.offset() is used.
Like the other constraint factory methods, offset takes a set of parameters which specify the second part of the
constraint -- the set of values it operates over. These values come from the parts of other objects (and from
explicit constants). The subArctic constraint system provides several ways to indicate which values should be
the parameters to a constraint function. The most common of these is a symbolic reference to nearby objects in
the interactor tree. Objects that may be referred to include:
SELF
The object being constrained,
PARENT
The parent of the object being constrained,
FIRST_CHILD
The first child of the object,
LAST_CHILD
The last child of the object,
MAX_CHILD
The child which has the largest value for the requested part,
MIN_CHILD
The child which has the smallest value for the requested part,
PREV_SIBLING
The previous sibling of the object, and
NEXT_SIBLING
The next sibling of the object.
Each of these predefined objects provides a series of methods for finishing a reference by indicating a part
within the object. These methods are:
X(), X1(),
34 of 63
or LEFT()
9/7/00 8:29 PM
subArctic User's Manual
http://www.cc.gatech.edu/gvu/ui/sub_arctic/sub_arctic/doc/users_manual.htm
to denote the x coordinate of the object's position (its left edge),
Y(), Y1(), or TOP()
to denote the y coordinate of the object's position (its top edge),
X2(), or RIGHT()
to denote the right edge of the object (computed from x+w),
Y2(), or BOTTOM()
to denote the bottom edge of the object (computed from y+h),
W()
to denote the width of the object,
H()
to denote the height of the object,
HCENTER()
the horizontal center of the object (computed from x + w/2),
VCENTER()
the vertical center of the object (computed from y + h/2),
VISIBLE()
the value of the "visible" part of the object (which controls its visibility),
ENABLED()
the value of the "enabled" part of the object (which controls whether it accepts inputs),
PART_A()
the value of the "part_a" part of the object (used to export a subclass specific value), and
PART_B()
the value of the "part_b" part of the object (used to export a subclass specific value).
All standard values are integers. For the enabled and visible parts of an object, integers which obey C
programming language conventions are used. That is, zero denotes false while any non-zero value denotes true.
However, the value of the part will always return zero or one.
Position values (that is X(), X1(), LEFT(), Y(), Y1(), TOP(), X2(), RIGHT(), Y2(), BOTTOM(), HCENTER(), and
VCENTER()) which come from parent or sibling objects are provided in the same coordinate system that the
object's own position is expressed in (i.e., the object's parent's coordinates). Position values that come from
children, however, are expressed in the local coordinate system of the object being constrained. Size and other
values are coordinate system independent and are always returned without being transformed. These coordinate
system transformations turn out to provide the most useful values in almost all case, but it is also possible to get
any value in its original coordinate system (see the use of PART() below.)
There are two potentially subtle consequences of these coordinate system transformations. First, requests for
or PARENT.Y() will always return zero since they represent the origin of the coordinate system they
are expressed in (in fact there is a special designator ZERO which internally expands to one of these parts).
Second, position values coming from children can safely be used as size values in the parent. For example, one
often constrains the width of the parent to be an offset from the right edge of the last child. Finally, to help
avoid a common error, the standard functions do not allow orientation mixing, that is, you may not constrain a
horizontal value such as x to a vertical value such as h. If mixed orientation is really required use the more
general OTHER.OBJ() form of designator described below.
PARENT.X()
If objects are missing, for example, PREV_SIBLING has been specified, but when the constraint is evaluated,
there is no previous sibling, then zero is returned in most cases. The only exception to this is that if a position
value of the next sibling is requested and the object is the last child, the value for the right or bottom edge of the
parent is supplied instead.
In addition to allowing references to neighboring objects in the interactor tree -- which are the most common
objects to base layout on -- the system also provides a way to refer directly to any object. This is done by coding
35 of 63
9/7/00 8:29 PM
subArctic User's Manual
http://www.cc.gatech.edu/gvu/ui/sub_arctic/sub_arctic/doc/users_manual.htm
OTHER.OBJ(other_obj)
where other_obj is the object being referred to. Like the symbolic local neighborhood
references described above, OTHER.OBJ() provides all the same methods for designating parts (i.e., X(), Y(),
W(), H(), etc.). All positional values are provided in the coordinate system of the parent of the constrained
object, while all other values are provided untransformed.
Note that an expressions using direct references such as OTHER.OBJ(child(0)).W() are not exactly the same as
symbolic references, such as FIRST_CHILD.W(), because the first (direct reference) form will always refer to the
same object (even if it is removed from the child list or reordered), while the second (symbolic reference) form
always refers to the first child (even if that is a different object at different times).
Finally, OTHER.OBJ() also provides an additional method: PART(). This method allows standard or
non-standard parts of an object (provided by subclass extensions) to be referred to using an integer part number.
Numbers for standard parts are provided by the constants X, Y, W, H, VISIBLE, ENABLED, PART_A, and PART_B.
Values referred to by PART() are always provided untransformed. Consequently, the use of
OTHER.OBJ().PART() for standard parts allows access to untransformed values if needed.
Note: there is an internal implementation difference between forms of constraints and object references. If you
look at the source code implementing constraints you will see references to lightweight constraints as well as
heavyweight or "external" constraints. The lightweight constraints are used for all standard constraint functions
not using OTHER.OBJ(). These constraints are very compact and are essentially already built into every object.
Heavyweight constraints are used if OTHER.OBJ() or the extension mechanisms supplied by the system are
employed. These require additional bookkeeping objects that use more space. This distinction is unimportant for
most users and only becomes a concern if very large numbers of interactors -- in the 5,000 and above range -are employed.
Now that we have considered the ways in which objects and parts of objects may be referred to in constraints,
we return to the standard functions provided by the system. All of these functions can handle any of the forms of
object reference described above. The following tables describe each of the current standard functions. Note:
this list is still subject to change. New functions may be added and existing functions may be changed or
removed. Some of these functions have implicit parameters. The parts of these parameters may be described as
"xy" or "wh". In that case, the actual part (either x or y, or w or h) is picked at run-time to match the orientation
of the object being constrained (i.e., if the constraint is applied to an x value then "xy" would mean x, while
"wh" would mean w). Finally, most functions include a constant value (denoted by K in all cases). This value is
limited to certain sizes in order to allow for highly compact encoding of constraints. For 3 operand constraints
this is an unsigned 8 bit value. For 2 operand constraints, a signed 15 bit value is allowed (that is a value
between -2^14 and 2^14-1). Zero and one operand constraints support a signed 16 bit value.
36 of 63
9/7/00 8:29 PM
subArctic User's Manual
http://www.cc.gatech.edu/gvu/ui/sub_arctic/sub_arctic/doc/users_manual.htm
Two Operand Standard Constraint Functions
Operation Name
add(A,B,K)
Equation Computed
A+B+K
Description
Simple addition.
subtract(A,B,K)
A-B+K
Subtraction.
mult(A,B,K)
A*B+K
Multiplication.
div(A,B,K)
A/B+K
Integer division. Returns 0 when B is 0.
mod(A,B,K)
A%B+K
Integer modulus. Returns 0 when B is 0.
and(A,B,K)
(A & B) & (K | 0xffff8000) Bitwise AND.
or(A,B,K)
(A | B) & (K | 0xffff8000)
xor(A,B,K)
(A ^ B) & (K | 0xffff8000) Bitwise XOR.
min(A,B,K)
min(A,B) + K
Minimum value plus a constant.
max(A,B,K)
max(A,B) + K
Maximum value plus a constant.
ave(A,B,K)
(A + B) / 2 + K
Average value plus a constant.
if_visible(A,B,K)
(self.visible() ? A : B) + K
Value selected based on visibility (currently not
implemented).
if_enabled(A,B,K)
(self.enabled() ? A : B) + K Value selected based on enabled status (currently not
implemented).
fill(A,B,K)
A-B-K
This is typically used to set a size to fill an available space,
for example setting width to be fill(PARENT.X2(),
SELF.X()).
self_fun2(A,B,K)
fun2(A,B,K)
This calls the method custom_fun2() on the object being
constrained. That method is designed for subclass specific
extensions. It defaults to returning A + B + K. Note: for the
constraint system to function properly, this function must
compute its value only from its parameters, and not from
any stored information.
parent_fun2(A,B,K) parent().fun2(A,B,K)
37 of 63
Bitwise OR.
This calls the method custom_fun2() on the parent of the
object being constrained. That method is designed for
subclass specific extensions. It defaults to returning A + B
+ K. Note: for the constraint system to function properly,
this function must compute its value only from its
parameters, and not from any stored information.
9/7/00 8:29 PM
subArctic User's Manual
http://www.cc.gatech.edu/gvu/ui/sub_arctic/sub_arctic/doc/users_manual.htm
One Operand Standard Constraint Functions
Operation Name
offset(A,K)
Equation Computed Description
A+K
Addition of a constant
eq(A)
A
Equality (copy the given value).
mask(A,K)
A & (K | 0xffff0000)
AND with a constant.
not_mask(A,K)
~A & (K | 0xffff0000) Negated AND with a constant.
centered(A,K)
(A - self.wh)/2 - K
This is typically used to set the position of something being
centered in its parent (where A is the width of the parent).
far_edge_just(A,K) A - self.wh - K
This is typically used to set the position of an object to align its
left or bottom edge with another object (i.e., the position given by
A).
self_fun1(A,K)
fun1(A,K)
This calls the method custom_fun1() on the object being
constrained. That method is designed for subclass specific
extensions. It defaults to returning A + K. Note: for the constraint
system to function properly, this function must compute its value
only from its parameters, and not from any stored information.
parent_fun1(A,K)
parent().fun1(A,K)
This calls the method custom_fun1() on the parent of the object
being constrained. That method is designed for subclass specific
extensions. It defaults to returning A + K. Note: for the constraint
system to function properly, this function must compute its value
only from its parameters, and not from any stored information.
Three Operand Standard Constraint Functions
Operation Name Equation Computed Description
clip(A,B,C,K)
clip(A,B,C,K)
This function clips the value A so that it falls within the range +K
<= A <= C-K. (not implemented yet).
wrap(A,B,C, K)
wrap(A,B,C,K)
This function wraps the value A around so that it falls within the
range B+K <= A <= C-K. (not implemented yet).
Zero Operand Standard Constraint Functions
Operation Name Equation Computed Description
konst(K)
K
Set constraint value to a constant.
NONE
--
This special constraint value indicates that no constraint is currently
being applied to the given object part.
Common Usage Examples
In this subsection we consider a series of example layouts built with constraints. These each represent a
common pattern of use that recurs in many different settings. Below, we give a very terse description of a
common placement or sizing of an interactor, followed by the constraint that implements it. In addition, a small
applet that allows each of these constraints to be instantiated interactively is provided [Note: the full set of
examples here is still under construction.]
Common Placements
Next to sibling
obj.set_x_constraint(std_function.offset(PREV_SIBLING.X2(), off));
38 of 63
9/7/00 8:29 PM
subArctic User's Manual
http://www.cc.gatech.edu/gvu/ui/sub_arctic/sub_arctic/doc/users_manual.htm
Stick to left edge of parent
obj.set_x_constraint(std_function.offset(PARENT.X(), off));
Stick to right edge of parent
obj.set_x_constraint(std_function.far_edge_just(PARENT.X2(), off));
Center in parent
obj.set_x_constraint(std_function.centered(PARENT.W(), 0));
Common Sizings
Expand to fill rest of space in parent
obj.set_w_constraint(std_function.fill(SELF.X(), PARENT.X2(),off));
Expand to fill space to next sibling
obj.set_w_constraint(std_function.fill(SELF.X(), NEXT_SIBLING.X(),off));
Shrink wrap
parent_obj. set_w_constraint(std_function.eq(MAX_CHILD.X2()));
Size controlled by a slider
obj.set_w_constraint(std_function.eq(OTHER.OBJ(a_slider).PART_A()));
Cycles
39 of 63
9/7/00 8:29 PM
subArctic User's Manual
http://www.cc.gatech.edu/gvu/ui/sub_arctic/sub_arctic/doc/users_manual.htm
Constraints which form cyclic definitions -- for example, where an object's x is computed from its w, but its w
is computed from its x -- can occur in subArctic. For example, several of the combinations in the demonstration
applet above cause this to happen. In the applet above try, for example, pressing "x <= [Parent right edge]" and
"w <= [Fill to parent]". This is a cycle because we are establishing constraints equivalent to the equations:
self.x = (parent.x + parent.w) - self.w -5
self.w = self.x - (parent.x + parent.w) - 5
Although it is possible to use cycles for useful effects, because they are not well formed definitions (i.e., the
only general interpretation of their meaning -- a fixed point equation -- is not guaranteed to terminate), they
normally represent an error. In order to allow constraint evaluation to proceed in all cases, subArctic employs a
simple default strategy to recover from (break) cycles. This strategy, some times call the once-around approach,
works by using an old (out-of-date) value to break the cycle at the point that it is first detected. So for example,
if there is a cycle between x and w, and x is requested first, it will request w, which will in turn request x. At
that point a cycle would be detected. By default, to break the cycle, the system would at that point return the old
value of x to the code computing w. At this point, w's value would be computed based on the old x, and that
would be returned to the code computing x.
Note that using the old value may not give a sensible result. Hence, cycles most often represent errors. If you
find that your layout constraints "suddenly stop working" or otherwise provide strange or inconsistent results, a
good first place to start looking for the bug (after checking that you coded the constraint you thought you did,
and that its attached to the parts it was supposed to be) is to see if you have a cycle.
SubArctic provides a mechanism for finding, reporting, and acting on cycles. Whenever a cycle is detected
manager.handle_cycle() is invoked. That routine performs one of several possible actions that you can set up
in advance with the manager.handle_cycle_with() method. Each of these actions has a constant defined for
it. These include:
EXCEPTION_IGNORE
Use the default cycle breaking strategy, but do not print a message, exit, or carry out any other action
when a cycle is detected. This is the default action.
EXCEPTION_STACK_CRASH
Print a stack trace, then call System.exit() with a non-zero return code.
EXCEPTION_PRINT_STACK
Print a stack trace, then continue execution using the default cycle breaking strategy.
EXCEPTION_MESSAGE_CRASH
Print a brief message, then call System.exit() with a non-zero return code.
EXCEPTION_PRINT_MESSAGE
Print a brief message, then continue execution using the default cycle breaking strategy.
EXCEPTION_CUSTOM
Handle the cycle in a custom (user supplied) way. This is done via an object implementing the
cycle_handler interface which was previously supplied to handle_cycle_with() as a second
parameter. This object should provide the handle_cycle() method which is passed an interactor object
and a part number within that object indicating where the cycle was detected. This routine returns a
boolean which currently should always be returned as true (indicating that the value found in the given
part upon return should be used to break the cycle).
Custom cycle handlers can do a number of things such as provide additional or different debugging information
(for example, the applet above uses a custom handler to put up a "cycle detected message") or compute new
values, possibly by extracting the cycle and doing an iterative numerical computation on it.
Important Note: manager.handle_cycle() is only invoked when a cycle is actually exercised, that is when a
40 of 63
9/7/00 8:29 PM
subArctic User's Manual
http://www.cc.gatech.edu/gvu/ui/sub_arctic/sub_arctic/doc/users_manual.htm
value is requested indirectly as a part of its own evaluation. It is possible to have cycles which remain
undetected for some time. This can happen if there are values within the cycle that are already up-to-date. In that
case, when the system reaches the up-to-date value it will immediately return it rather than needlessly evaluating
it again. In this way, the cycle may not be "completed" and hence may not be detected.
Debugging hint: While debugging, if you suspect that a cycle may exist, but is not being detected, values can be
forced out-of-date (hence requiring them to be recomputed and exposing cycles) using one of the
mark_*_ood() methods (e.g., mark_x_ood()). This is done for example in the applet above.
8. Animation
Animation is a part of subArctic in a way that may not be familiar to most people; SubArctic's support for
animation is intended to provide a high-level model for describing time-based events that occur in your
interface (the full model was first introduced in [3]). Once you have supplied such a description, subArctic
causes that activity to occur without significant intervention by the animation developer. It is intended to be a
general mechanism to support time-based transitions from one state of the interface to another. In addition to
traditional multiple image (or page-flipping style) animations, these capabilities allow objects in the interface to
smoothly move about on the screen, modify their color over time, etc.
Animation as Input
Control of animation in subArctic is handled as a kind of input representing the passage of time. It is handled in
the same fashion as other input protocols such as clickable and grow_draggable that have been presented
elsewhere in this document. Thus, each object expecting to be animated implements the animatable input
protocol which provide methods for the start, stepping through time, and end of an animated sequence.
To make the common operation of animating the movement of objects along a path easy, the toolkit provides
the anim_mover_container interactor. This interactor serves as a parent object which moves its children along
a path based on a timed and paced schedule. Thus to make a normally static object move, one needs only to
place it within a anim_mover_container object, then schedule what we call a transition for it. As will be
described fully below, a transition describes an interval of time across which the animation will occur, a set of
values which it is to cover in that time (often this will be a line or curve in screen space, but it could also be a
set of colors, or indexes to a group of prepared images), and a pacing function which allows movement through
the values to be non-uniform if desired.
Thus to create a moving button, one might use code such as:
/* Create a button inside a sprite container */
button
a_button = new button("Moving Button", this);
anim_mover_container container = new anim_mover_container(20,20, button, this);
top.add_child(container);
/* Create a transition along a curved path from 20,20 to 200,100,
* over the next 3 seconds */
long
now
= time_interval.now();
time_interval next3 = new time_interval(now, now + 3000/*ms*/);
trajectory
path = new anticipation_line(20,20, 200,100);
transition
trans = new transition(container, next3, path);
/* schedule the transition */
container.set_transition(trans);
Note that anim_mover_container objects make callbacks at the start and end of each transition.
The Animatable Interface
41 of 63
9/7/00 8:29 PM
subArctic User's Manual
http://www.cc.gatech.edu/gvu/ui/sub_arctic/sub_arctic/doc/users_manual.htm
As mentioned above, each interactor which expects to receive animation input must implement the animatable
input protocol. Animatable requires three methods, start_transition(), transition_step(), and
end_transition(). The first and last of these functions always gets called for any transition whose start time
and end time passes (and which is not cancelled). The transition_step() function gets called during the
course of the animation to tell the animation to proceed to its next point. The transition_step() method is
called with several parameters, but primarily it considers the interval of time it gets passed. This interval, and
the values associated with it, indicate the position, appearance, or other feedback that the object should provide.
The intervals of time are not necessarily uniform. If you are on a fast system with many resources and little user
input, these intervals of time will be quite small and your transition step function will get called frequently. If
the system becomes overloaded, the size of these intervals automatically increases. The set of intervals passed to
transition_step() and the last interval which is passed to end_transition() always covers the entire
interval of time of the animation. Note that for very short overall intervals, or on highly loaded machines, it is
possible to have a duration is so small that only start_transition() and end_transition() are called with
no steps in between.
The transition_step() method receives the following parameters (these same parameters are also passed to
start_transition() and end_transition() except that start_transition() does not get an end time or
object):
transition trans
The transition object which is controlling this input. (See below.)
trajectory traj
The trajectory that the transition is operating over. (See below.)
double start_pos
A value from 0.0 to 1.0 indicating the start position within the trajectory of this animation interval.
Object start_obj
The data value corresponding to the start position. This is often a Point object, but could also be a color,
an image from an animated sequence of images, or any other value from the domain of the transition.
double end_pos
A value from 0.0 to 1.0 indicating the end position within the trajectory of this animation interval.
Object end_obj
The data value corresponding to the end position.
event evt
The event which "caused" the animation step. This is a special internal event type generated by the system
based on the passage of time.
Object user_info
"User information" associated with this transition. This is not modified by the system.
The reason that intervals rather than points of time are passed is that the animation may be doing some type of
display which requires understanding not just the instant it is at but also what part of the whole it is animating.
A good example of this might be a motion-blur type of animation which needs to know what type of "trail" to
leave behind a moving object. If you only need the current point in time, you can always disregard the beginning
point of the interval and use only the end point.
Transitions
objects are the primary abstraction for describing to how animations are to proceed in subArctic.
As indicated above, a transition is a combination of the animation's logical path (what does the animation
do?), an optional pacing function associated with that path (does the object move uniformly among the values of
the path, or non-uniformly?), and the animation's time interval (how long does it take and when does it start?).
Transition
42 of 63
9/7/00 8:29 PM
subArctic User's Manual
http://www.cc.gatech.edu/gvu/ui/sub_arctic/sub_arctic/doc/users_manual.htm
The constructor for a transition object takes three parameters:
animatable interactor_obj
The object to be animated,
time_interval time_int
The time interval over which animation is to occur (as described in the next subsection, this may be
expressed in terms of absolute times or relative to another transition), and
trajectory traj
The logical path (set of values) which the animation covers. This object can optionally contain a pacing
function to allow non-uniform movement along that path over time.
As an example to illustrate how the system works, suppose we have constructed a transition that will begin
immediately and will last 1 second. (Time is expressed in milliseconds, so this would be expressed by the time
interval from time_interval.now() to time_interval.now()+1000.) This transition is set up to move an
object from the point 0,10 on the screen to the point 100,10 along a straight line (which would be specified
using a line_trajectory object).
After calling the transition_start() method, the animation system would begin animating the object. It
might note that 100 milliseconds of the time interval has passed since the indicated start time. Thus the
normalized interval of time in question is [0.0 to 0.1). Each endpoint of this interval is passed through the
trajectory function which returns Point objects which are in this case: (0,10) and (10,10). These points are then
passed to the animatable object via its transition_step() method. This process of converting a time
interval as a real number from 0.0 to 1.0 continues throughout the animation's progression. The last step of the
animation will be passed to the transition_end() of the animatable object. This last step always contains
the far endpoint of the time interval in question. It is important to keep in mind that although this particular
trajectory object maps the points in time into Point objects in space, this is not required. The trajectory object
may do any mapping that it wishes-- providing the animatable object will accept the resulting objects.
Time Intervals
The first part of a trajectory is the time interval over which it occurs. The time intervals can be created in either
absolute or relative form using one of the constructors below:
public time_interval(long start, long end)
Establishes an absolute time interval expressed in milliseconds. The static method
time_interval.now() can be used to access the current time.
public time_interval(int how, transition trans, long time_offset)
Establishes a time interval relative to another transition. The how parameter indicates the relationship to
the given transition. Valid values are: AFTER_START_OF and AFTER_END_OF which denote the start or end
of the other transition, respectively. The final parameter provides an additional offset in time (this number
must be positive). So for example, to schedule a transition 1/2 second after the end of another one would
use: new time_interval(AFTER_START_OF, other, 500).
Trajectories and Pacing Functions
A trajectory object specifies a mapping from time to a set of values. The most common domain for these
values is screen space, in which case a trajectory maps time to a Point object along some path of travel.
Trajectory objects provide two methods:
public Object object_for_parm(double parm)
This method is the "mapping" function. This function will be called with a value from 0.0 to 1.0 and
should return an object which is mapped to that point in time. You can look at the sample trajectory
43 of 63
9/7/00 8:29 PM
subArctic User's Manual
http://www.cc.gatech.edu/gvu/ui/sub_arctic/sub_arctic/doc/users_manual.htm
to see one which maps 0.0 to 1.0 onto a point along a line. In general, the trajectory
object can produce any type of object it finds useful. For example, a traditional, "page-flipping" animation
might want to produce loaded_image objects so the animatable object which gets them can simply
display the new image.
line_trajectory
public pacer pacing_function()
This method returns a pacing function object (which is an object implementing the interface pacer). This
object is used to allow a non-linear behavior for the mapping which is done in object_for_parm().
An example pacer is the slow_in_slow_out class which moves an object through its logical path slower at the
beginning and end, and faster in the middle. This "slow in and out" behavior is a classical animation effect that
is designed to subtly draw attention to significant events in the animation [8]. If you wish a uniformly paced
trajectory, you can use the linear_pacer.
To summarize the operation of the trajectory and pacing function together, consider the following example.
Suppose the animation system wishes to inform an animatable object that some interval A to B (in the range
0.0 to 1.0 with B larger) has occurred. It does this using a calculation like:
/* do the pacing */
start_t = the_trans.traj().pacing_function().pace(A);
end_t = the_trans.traj().pacing_function().pace(B);
/* compute the object values */
start_obj = the_trans.traj().object_for_parm(start_t);
start_end = the_trans.traj().object_for_parm(end_t);
/* send the animation step to the target object */
the_trans.target().transition_step(the_trans, the_trans.traj(),
start_t, start_obj, end_t, end_obj,
evt, user_info);
9. The manager Class
A number of general utility and management functions have been consolidated in the manager class. This class
contains only static methods and is designed as a central location for general operations as well as providing the
overall input dispatch, damage, and redraw control flow for the system. Operations supported by manager fall
into 6 categories (each considered in a subsection below): input policies and agents, output support, constraint
support, interface with AWT, debugging and exception handling, and general utility functions. Only methods
which are generally useful and safe to call directly are discussed here. Additional methods are supplied by the
class for "internal" use of the system. These should typically not be called directly (at least not without a
thorough understanding of the system and the specific methods involved).
Input Policies and Agents
As previously described in the concepts and organization section, input is dispatched to interactors through a
series of input policies (which provide a general way of delivering input such as positionally) each of which
maintains a series of input agents (which translate raw input events into higher level concepts such as dragging).
The manager class maintains the lists of standard policies and agents that handle input translation and dispatch
in subArctic.
At present, there are three standard input policies represented by three static variables in the manager class:
monitor_focus_policy
This policy is a focus policy -- that is it delivers input to objects which have established themselves as the
current focus for a particular kind of input. However, events delivered under this policy are never
44 of 63
9/7/00 8:29 PM
subArctic User's Manual
http://www.cc.gatech.edu/gvu/ui/sub_arctic/sub_arctic/doc/users_manual.htm
consumed, they are only monitored, then passed on for additional processing.
focus_policy
This policy is a conventional focus policy. It delivers events to objects (such as the current text focus)
which establish themselves as the current focus for certain kinds of input.
positional_policy
This policy delivers inputs on the basis of their position. In particular, it delivers inputs to objects "under"
the cursor, where "under" is determined a picking process (described above in the concepts and
organization section and more specifically in the base_interactor section).
Recall that policies, and the agents within them are consulted in a priority order, with the input being delivered
by the first agent to successfully dispatch and consume the input event. Policy priority is
monitor_focus_policy (which never actually consumes events), followed by the focus_policy, followed by
the positional_policy. Agent priority is in the order listed below (with the first listed policy getting the first
opportunity to dispatch an event).
For each of the three input policies, a series of standard agents is provided. These include:
Agents under the monitor_focus_policy:
event_tracer
This agent does not directly dispatch inputs, but instead serves as a debugging aid by printing a human
readable trace of events (to System.err) as they arrive. By default, trace printing is off. To start tracing
invoke manager.event_tracer.do_trace(true).
raw_monitor
This agent delivers raw input events without further translation. This serves as a "hook" for very quickly
implementing new kinds of input. This agent dispatches the raw_input_acceptor input protocol.
click_tracker
This agent monitors press and release events for objects that need to be notified about changes in mouse
button state outside areas where they would normally receive input. This is used for example by one of
the positional agents to monitor release events that match previously dispatched press events, but which
are not over the same object. This agent dispatches the click_tracking input protocol.
animation
This agent captures internally generated animation events and dispatches them under the animatable input
protocol. (See the animation section for a full discussion.)
Agents under the focus_policy:
raw_focus
This agent delivers raw input events without further translation. This serves as a "hook" for very quickly
implementing new kinds of input. This agent dispatches input using the raw_input_acceptor protocol.
simple_drag_focus
This agent accepts mouse movement and button release events and translates them into a simple drag
(without the specialized semantics and extra state keeping of the other drag agents). This agent dispatches
inputs under the simple_draggable protocol.
move_drag_focus
This agent accepts mouse movement and button release events and translates them into a drag that is
intended to move an object's position within its parent. This agent dispatches inputs under the
move_draggable protocol. Also, see above for a description of feature points and drag filtering
performed by this agent.
grow_drag_focus
This agent accepts mouse movement and button release events and translates them into a drag that is
intended to change the size of an object. This agent dispatches inputs under the grow_draggable
45 of 63
9/7/00 8:29 PM
subArctic User's Manual
http://www.cc.gatech.edu/gvu/ui/sub_arctic/sub_arctic/doc/users_manual.htm
protocol.
snap_drag_focus
This agent extends the move_drag_focus agent with support for snapping, a technique in which objects
are moved from their normal drag positions to nearby positions which are semantically and/or
geometrically interesting. This agent dispatches the snap_draggable input protocol. See above for a
more complete description of feature points and snapping.
inout_drag_focus
This drag agent accepts mouse movement and button release events and translates them into a
notifications of the entry and exit of a focus object. This is used for example to provide feedback for
buttons. This agent dispatches input under the inout_draggable protocol.
text_focus
This agent handles keyboard input. It processes both normal keystrokes and special action keys such as
cursor keys, as well as delete and line kill characters. It also provides the ability to establish character
filters for a particular focus object. These filters allow certain characters to be rejected or translated before
being dispatched as input. Standard filters are provides for such things as mapping to all upper or lower
case, removal of all whitespace, acceptance of only digits, etc.
Agents under the positional_policy:
raw_positional
This agent delivers raw input events without further translation. This serves as a "hook" for very quickly
implementing new kinds of input. This agent dispatches input using the raw_input_acceptor protocol.
move_press_drag
This agent is a hybrid agent which accepts a mouse button down event over an appropriate object, then
makes it the move drag focus object. This sequence is the most common use of that drag and this agent
provides a convenience for objects which do not need to do special processing on the initial press. This
agent dispatches input only to objects implementing the move_press_draggable protocol (which is
derived from the move_draggable protocol but adds no new input dispatches).
grow_press_drag
This agent is a hybrid agent which accepts a mouse button down event over an appropriate object, then
makes it the grow drag focus object. This agent provides a convenience for objects which do not need to
do special processing on the initial press. This agent dispatches input only to objects implementing the
grow_press_draggable protocol (which is derived from the grow_draggable protocol but adds no new
input dispatches).
inout_press_drag
This agent is a hybrid agent which accepts a mouse button down event over an appropriate object, then
makes it the inout drag focus object. This agent dispatches input only to objects implementing the
inout_press_draggable protocol (which is derived from the inout_draggable protocol but adds no
new input dispatches).
simple_press_drag
This agent is a hybrid agent which accepts a mouse button down event over an appropriate object, then
makes it the simple drag focus object. This agent dispatches input only to objects implementing the
simple_press_draggable protocol (which is derived from the simple_draggable protocol but adds no
new input dispatches).
press_click_agent
This agent manages several related input protocols dealing with press and release of a mouse button.
These include: press (a protocol which also dispatches for button releases), click (a press and release
within a small area), and double_click (two clicks in rapid succession).
selection_agent
This agent accepts mouse button presses used for the purpose of creating a currently selected set of
objects. It implements additions to the selection set when the shift key is held down, and replacement of
the selection set with a single selected object if a normal press in received. This agent dispatches input
46 of 63
9/7/00 8:29 PM
subArctic User's Manual
http://www.cc.gatech.edu/gvu/ui/sub_arctic/sub_arctic/doc/users_manual.htm
under the selectable protocol. This protocol includes notifications both for entry and removal from the
currently selected object set.
The manager class provides a set of standard input policies and agents as listed above. In addition, it is possible
to install custom policies or agents on a per-interface basis, or for new custom interactor objects which need
them. New policies can be installed at any priority position using the install_policy_before() and
install_policy_after() methods. In addition, each policy object allows agents to be installed in its
prioritized list using the add_agent_before() and add_agent_after() methods.
Output Support
In addition to support for input, the manager class also provides utility routines for output. These include:
boolean wait_for_image(Image img)
Waits for an AWT Image object to be fully loaded into memory (this is used internally by the
loaded_image class).
loaded_image load_image(URL from_url)
Fetch an image from the given location (potentially across the network).
loaded_image load_doc_image(Applet host_ap, String image_file_name)
Fetch an image (potentially across the network) from a location relative to the "document base" of a given
applet. Unfortunately, not all implementations seem to agree on exactly where the "document base" is, so
your mileage may vary until this is standardized (i.e., until Netscape gets their act together).
loaded_image load_code_image(Applet host_ap, String img_file_name)
Fetch an image (potentially across the network) from a location relative to the "code base" of a given
applet. Again, not all implementations agree on exactly where the "code base" is.
loaded_image broken_image_icon()
Returns a statically allocated, in memory, image that is suitable for use when an image couldn't be found,
or created.
FontMetrics get_metrics(Font for_font)
Returns a metrics object (which provides various measurements such as height and character or string
widths) for a given font.
color_pair default_color_pair()
Returns the current default color_pair object. This object is provides a style specific foreground and
background color suitable for drawing in harmony with the style currently being used for all standard
interactors.
Constraint Support
In addition to several internal routines for associating constraint bookkeeping with interactor objects, the
manager class also provides support for establishing a global policy for reporting and handling cycles in
constraints. As described in the constraint section above, the policy employed for dealing with detected cycles
in the constraint system is established by the handle_cycles_with() method. This method has two forms:
void handle_cycles_with(int handling_type, cycle_handler handler)
void handle_cycles_with(int handling_type)
Where the handling_type parameter must be one of the following constants:
EXCEPTION_IGNORE
Use the default cycle breaking strategy (the once-around approach), but do not print a message, exit, or
carry out any other action when a cycle is detected.
EXCEPTION_STACK_CRASH
Print a stack trace, then call System.exit() with a non-zero return code. This is the default action.
47 of 63
9/7/00 8:29 PM
subArctic User's Manual
http://www.cc.gatech.edu/gvu/ui/sub_arctic/sub_arctic/doc/users_manual.htm
EXCEPTION_PRINT_STACK
Print a stack trace, then continue execution using the default cycle breaking strategy.
EXCEPTION_MESSAGE_CRASH
Print a brief message, then call System.exit() with a non-zero return code.
EXCEPTION_PRINT_MESSAGE
Print a brief message, then continue execution using the default cycle breaking strategy.
EXCEPTION_CUSTOM
Handle the cycle in a custom (user supplied) way.
For custom cycle handling, the cycle handler object passed as the second parameter is used. This object must
implement the method:
public boolean handle_cycle(interactor in_obj, int part_code);
where the parameters indicate the object and part within that object where the cycle was first detected. This
routine may do extra reporting or diagnostics, or may compute a new value for the given part, or some other part
in the cycle. Currently, true should be returned from this routine in all cases (this indicates that evaluation
should proceed with the values currently stored -- later enhancements will use this value for other effects).
Interface with AWT
Although interfaces can easily be built without using AWT facilities, the manager class provides several
methods designed to make interaction with AWT interface components easier. In particular the following
routines provide access to useful AWT objects:
java.awt.Toolkit default_toolkit()
Returns a handle to the default Toolkit object (basically an encapsulation of the native toolkit that AWT
uses on the current platform). Sun API documentation for this object can be found here.
java.awt.image.ImageObserver an_observer()
Returns a special ImageObserver object which ignores image notifications. This is useful if AWT Image
objects need to be drawn without causing extra Applet redraw notifications (which are not useful for
subArctic interfaces). This is used internally by the drawable class for handling the drawing of
loaded_images. Sun's API documentation for java.awt.image.ImageObserver can be found here.
java.awt.Component an_awt_component()
Return an AWT Component object which is currently hosting a subArctic interface. If several
Components are active the system picks one arbitrarily. Note: this routine can return null if it is called
before any top_level interactors are instantiated and installed. Sun's API documentation for
java.awt.Component can be found here.
java.applet.Applet an_applet()
Return an Applet object which is currently hosting a subArctic interface (if any). If several Applets are
active the system picks one arbitrarily. Note this routine can return null if there are no active Applets
and/or if it is called before any top_level interactor are instantiated and installed. Sun's API
documentation for java.applet.Applet can be found here.
Debugging and Exception Handling
The manager class also provides some facilities for support of debugging and exception handling. For
debugging, the method manager.print_stack_trace() can be called at any point to produce a human
readable trace of the current call stack, either on System.err, or on a given PrintStream.
Manager also provides a standardized method for dealing with unexpected exceptions. When an exception is
caught which cannot be easily recovered from it should be passed to
48 of 63
9/7/00 8:29 PM
subArctic User's Manual
http://www.cc.gatech.edu/gvu/ui/sub_arctic/sub_arctic/doc/users_manual.htm
manager.handle_unexpected_exception().
This routine will provide a standard and uniform response based
on a current response policy. Several standard policies are available to choose from, and custom policies can be
constructed and installed. The policy for handling exceptions can be established by calling
handle_exceptions_with(). This routine takes one or two parameters. The first parameter indicates a
particular policy for dealing with unexpected exceptions. Valid codes for these policies include:
EXCEPTION_STACK_CRASH
Print a stack trace and then call System.exit(). This is the default.
EXCEPTION_PRINT_STACK
Print a stack trace, but then continue execution.
EXCEPTION_MESSAGE_CRASH
Print a brief message and then call System.exit().
EXCEPTION_PRINT_MESSAGE
Print a brief message, but then continue execution.
EXCEPTION_IGNORE
Completely ignore the exception. This is generally not a good idea.
EXCEPTION_CUSTOM
Handle the exception with a custom exception_handler object. In this case the second parameter to
handle_exceptions_with() should be the handler object. Handler objects must implement the
exception_handler interface which contains one method:
void handle_exception(Exception ex). This method may not itself throw another exception, but it
may exit or throw an Error.
The exception handling policy currently in effect can be found by calling manager.handling_mechanism()
and the current custom exception_handler object (if any) can be found by calling
manager.handle_object().
General Utility Functions
The manager class currently supports one general utility function: int unique_int(). This routine returns a
unique non-negative integer in each call that can be used to assign unique identifiers. Note: this does not check
for overflow, so it is not suitable, for example, for generating a new value every few milliseconds.
10. A Custom Interactor Example
In this section we consider a more extensive example that requires a custom interactor class. The class we create
(shade) is a composition object which lays out two children and supplies an interaction technique for switching
between them using a pull-down window shade metaphor. Child 0 is displayed over the fixed background of the
object, while child 1 is displayed on the movable window shade that can be pulled up and down. This provides a
nice alternative for interactions that you might do with a pop-up (modal) dialog box. This interactor class is
demonstrated in the applet below (the HTML layout and buttons -- which in this demo do not do anything -- as
well as the font size buttons, are not part of the shade object, but are the child objects composed by the
interactor).
49 of 63
9/7/00 8:29 PM
subArctic User's Manual
http://www.cc.gatech.edu/gvu/ui/sub_arctic/sub_arctic/doc/users_manual.htm
To build this custom class we begin by inheriting from base_parent_interactor. In addition we will need to
accept mouse button presses, and will be using animation, so we declare that we implement those interfaces.
(Full source for this class is located here, while the applet itself is found here).
public class shade extends base_parent_interactor
implements pressable, animatable {
We next define several constants, instance variables, and instance variable access methods (again, for this
example we have removed some comments and white space for brevity, since the code is surrounded by a
description).
protected final int
string_length
= 30;
protected final int
handle_size
= 10;
protected final int
pane_borders
= 3;
protected final long
anim_length
= 1500;
protected boolean anim_in_progress = false;
protected double _percent_down
= 0.9;
public double percent_down() {return _percent_down;}
public void set_percent_down(double v)
{
if (_percent_down != v)
{
_percent_down = v;
damage_self();
}
}
These constants indicate the length of the line representing the shade's "string", the size of the handle ring at the
end of that string (in both x and y), the extra border space found around the children, and finally a value for how
long the shade movement animation will run (in milliseconds). The instance variables provide the percentage
that the shade is currently pulled down (0.0 to 1.0), and a flag indicating whether the animation is currently in
progress.
50 of 63
9/7/00 8:29 PM
subArctic User's Manual
http://www.cc.gatech.edu/gvu/ui/sub_arctic/sub_arctic/doc/users_manual.htm
Next we provide a simple constructor for the class.
public shade()
{
super(0,0,100,100);
setup_for_fixed_children(2);
}
This constructor provides a default size and position -- assuming the object will either be given an explicit size
and position, or laid out with constraints. Next, it calls setup_for_fixed_children() to establish the object
as supporting exactly two children.
When building a new interactor there are normally two groups of tasks to be performed: those associated with
output, and those associated with input. We begin with the output task. Actual drawing is normally performed
by draw_self_local(). In our case we begin by declaring the method and some local variables:
public void draw_self_local(drawable d) {
color_scheme cs = style_manager.default_color_scheme();
int
center_x, center_y;
int
shade_boundary,bottom_boundary;
The local variables provide a color scheme for drawing (initialized to the default color scheme currently in
effect), and a number of position and size values that will be computed as we draw.
The method then draws its zeroth child (the background child), and clears a small area below it where the shade
"string" and handle will be drawn when the shade is fully down.
if (child(0) != null) child(0).draw_self(d);
d.setColor(cs.base());
d.fillRect(0,h()-(string_length + handle_size), w(),
string_length + handle_size);
Next we draw the shade "string" and handle ring, and clear the area for the shade.
shade_boundary=(int)(percent_down() * ((double)(h()-(string_length + handle_size))));
d.setColor(cs.foreground());
d.drawLine(w()/2,shade_boundary,w()/2,shade_boundary+string_length);
d.drawArc((w()/2)-(handle_size/2),shade_boundary+string_length,
handle_size, handle_size, 0, 360);
d.setColor(cs.base());
d.fillRect(0,0,w(),shade_boundary);
Next, we draw the second child (which is already positioned to align with the current position of the shade as
we will see below in configure()) and finally draw a border over the top of that child.
if (child(1) != null) child(1).draw_self(d);
d.setColor(cs.foreground());
d.fillRect(0,0,w(),pane_borders); /* top */
d.fillRect(0,0,pane_borders,bottom_boundary); /* left */
d.fillRect(w()-pane_borders,0,pane_borders,bottom_boundary); /* right */
51 of 63
9/7/00 8:29 PM
subArctic User's Manual
http://www.cc.gatech.edu/gvu/ui/sub_arctic/sub_arctic/doc/users_manual.htm
d.fillRect(0,bottom_boundary,w(),pane_borders); /* bottom */
d.fillRect(0,shade_boundary-(pane_borders-1),w(),pane_borders-1);
}
The other important part of the output process is layout. This is done in the configure() method.
public void configure()
{
int space, shift;
super.configure();
space = h()-(string_length+ handle_size);
shift =(int) (((double)space)*percent_down());
if (child(1) != null)
child(1).set_y(shift - child(1).h());
}
The configure method first calls super.configure(). This is an important step which should be done by
almost all classes that override configure() (one essential task that the superclass takes care of is recursively
configuring the child objects). Next, we compute the position for child one so that it will be placed with its
bottom edge at the bottom of the shade area.
After arranging to configure and draw our children and the various parts of "window dressing" correctly, we
next turn to handling input. We begin by overriding the default method for picking. We begin by declaring the
method and some local variables. Next we cull out picks that are on our drawn borders (they pick neither us or
our children).
public void pick(int pt_x, int pt_y, pick_collector pick_list)
int shade_boundary;
Point child_point;
{
if ((pt_x < pane_borders) || (pt_x > (w()-pane_borders)) ||
(pt_y < pane_borders) || (pt_y > (h()-pane_borders)))
return;
Next, we calculate the position of the handle and pick (only) ourselves if the point is within the bounding box of
the handle. Note that to pick ourselves, we invoke report_pick() on the pick_collector object given to us as a
parameter.
shade_boundary = (int)(percent_down()*((double)(h-(string_length + handle_size))));
if ((pt_x >= (w/2)-(handle_size/2))&& (pt_x <= (w/2)+(handle_size/2)) &&
(pt_y >= (shade_boundary+string_length)) &&
(pt_y <= (shade_boundary+string_length+handle_size)))
{
pick_list.report_pick(this);
return;
}
Next we disallow picks in the buffer region at the bottom of the interactor. Then, we direct any points in the
shade area to a recursive pick of child number 1. Finally, points which fall in any remaining areas are directed to
a pick of child zero.
52 of 63
9/7/00 8:29 PM
subArctic User's Manual
http://www.cc.gatech.edu/gvu/ui/sub_arctic/sub_arctic/doc/users_manual.htm
if (pt_y >= (h()-(string_length+handle_size))) return;
if (pt_y <= shade_boundary)
{
child_point = child(1).into_local(new Point(pt_x,pt_y));
child(1).pick(child_point.x, child_point.y, pick_list);
}
else
{
child_point = child(0).into_local(new Point(pt_x,pt_y));
child(0).pick(child_point.x, child_point.y, pick_list);
}
}
Once we have established a picking routine which properly reports picks in our various regions, we turn to
handling input from mouse button presses. We will receive mouse button press and release input because we
implement the interface of the pressable input protocol. This protocol requires two methods press() and
release() (the second of which we ignore). Note that because press is delivered as a positional input dispatch,
we will only receive this input if we were picked. Since we have overridden the pick routine, this will only
occur if the user has pressed the mouse button over the handle, and we need not make any other tests in
press() to determine how to respond.
public boolean release(event evt, Object user_info)
{
/* ignore all releases */
return false;
}
public boolean press(event evt, Object user_info)
{
long now = time_interval.now();
time_interval ti;
transition trans;
shade_trajectory traj;
As usual, we begin the press() method by declaring local variables. In this case, the variables will be used to
establish the animation transition that results from clicking on the handle.
if (anim_in_progress)
return false;
else
anim_in_progress = true;
if (percent_down() <= 0.1)
traj=new shade_trajectory(percent_down(),0.9); /* at the top, go down */
else
traj=new shade_trajectory(percent_down(), 0.03); /* at the bottom, go up */
ti=new time_interval(now,now+anim_length);
trans=new transition(this,ti,traj);
manager.animation.schedule_transition(trans);
return true;
}
The first step in responding to the press is to make certain that we are not already in the middle of an animation
transition. If we are, then we simply ignore the press. If we are not already doing an animation transition, then
we schedule one, moving either from the top to the bottom, or the bottom to the top depending on the current
position of the shade. To schedule an animation we first create a trajectory. This represents the path that will be
taken during the animation, and the pace that various parts of that path will be taken at. In this case, we have
53 of 63
9/7/00 8:29 PM
subArctic User's Manual
http://www.cc.gatech.edu/gvu/ui/sub_arctic/sub_arctic/doc/users_manual.htm
used a special purpose trajectory (shown later) which mimics the action of a window shade. The final steps in
creating the animation are to specify a time interval and use this, along with the trajectory to create a transition
object. Finally, that transition is scheduled. This will result in delivery of animation step "inputs" over time.
These are handled with the next set of methods.
public void start_transition(transition trans, trajectory traj,
double start_t, Object start_obj, event e,
Object user_info)
{
/* nothing to do here */
}
public void transition_step(transition trans, trajectory traj,
double start_t, Object start_obj,
double end_t, Object end_obj,
event e, Object user_info)
{
Float f=(Float) end_obj;
set_percent_down(f.doubleValue());
}
public void end_transition(transition trans, trajectory traj,
double start_t, Object start_obj,
double end_t, Object end_obj,
event e, Object user_info)
{
Float f=(Float) end_obj;
set_percent_down(f.doubleValue());
anim_in_progress=false;
}
As described in the animation section, animation input comes in three parts, a start, a series of steps, and an end.
In our case we don't need to perform any actions at the start, and the transition directly provides a percentage
value for each step (in this case we simply use the end position of the interval the step covers). The end of
animation simply does the work for a step, then resets the flag indicating that an animation is in progress.
The final component to our interactor implementation is a custom animation trajectory that simulates the motion
of a window shade. In particular, when moving up it first moves down a small amount (simulating release of the
blind winding mechanism) before traveling up.
class shade_trajectory implements trajectory {
protected static final double down_percent_of_time=0.2;
protected static final double down_shift=0.1;
protected double start;
protected double stop;
protected pacer pace;
public pacer pacing_function() {return pace;}
We begin the specialized trajectory class with several constants providing the amount of travel time devoted to
opposing motion (20%) and the distance of that motion (10%). These are followed by instance variables to
record start and stop values for the trajectory (this is a one dimensional trajectory that returns a single Float
value) and a pacing function along with a method to provide the pacing function to the animation agent. The
pacing function determines how fast the animation progresses over different parts of the trajectory. As we see in
the constructor below, a uniform (linear) pacing function is used for downward motion, while a non-uniform
(slow-in-slow-out) function is used to exaggerate the upward motion (see [3, 8] for an explanation of why such
54 of 63
9/7/00 8:29 PM
subArctic User's Manual
http://www.cc.gatech.edu/gvu/ui/sub_arctic/sub_arctic/doc/users_manual.htm
pacing is used).
public shade_trajectory(double start_pos, double stop_pos)
{
start=start_pos;
stop=stop_pos;
if (start>stop)/* going up */
pace=new slow_in_slow_out(down_percent_of_time,2*down_percent_of_time);
else /* going down */
pace=new linear_pacer();
}
public Object object_for_parm(double t)
{
double delta,extra,real_start, scale;
if (start > stop) /* moving up */
{
if (t < down_percent_of_time) /* doing opposing motion */
{
extra = start*down_shift;
extra *= (t/down_percent_of_time);
return (new Float(start+extra));
}
else /* doing normal upward travel */
{
extra = start*down_shift;
real_start = start+ extra;
delta = real_start-stop;
scale = (t-down_percent_of_time)/(1.0-down_percent_of_time);
delta *= scale;
return (new Float( (real_start-delta)));
}
}
else /* we are going down */
{
delta=stop-start;
return (new Float((delta*t)+start));
}
}
}
After the constructor, the object_for_parm() method is given. This method translates from a parameter value
in a 0 to 1 range into a value within the trajectory. In this case the trajectory produces Float objects which have
a value starting at start and ending with stop, but which may go outside that range during the transition. In the
case of a downward motion, we simply provide a proportional value between start and stop. For upward
motion, we divide the motion into two parts, an initial downward motion below start (for input values from 0
to down_percent_of_time) followed by an upward motion terminating at stop.
With the conclusion of our specialized trajectory class we now have all the parts necessary for the shade
interactor.
11. Thread-Safe Access to the Interactor Tree
It is our basic belief that extreme caution is warranted when designing and building multi-threaded applications,
particularly those which have a GUI component. Use of threads can be very deceptive. In many cases they
appear to greatly simplify programming by allowing design in terms of simple autonomous entities focused on a
single task. In fact in some cases they do simplify design and coding. However, in almost all cases they also
55 of 63
9/7/00 8:29 PM
subArctic User's Manual
http://www.cc.gatech.edu/gvu/ui/sub_arctic/sub_arctic/doc/users_manual.htm
make debugging, testing, and maintenance vastly more difficult and sometimes impossible. Neither the training,
experience, or actual practices of most programmers, nor the tools we have to help us, are designed to cope with
the non-determinism. For example, thorough testing (which is always difficult) becomes nearly impossible
when bugs are timing dependent. This is particularly true in Java where one program can run on many different
types of machines and OS platforms, and where each program must work under both preemptive or
non-preemptive scheduling.
As a result of these inherent difficulties, we urge you to think twice about using threads in cases where they are
not absolutely necessary. However, in some cases threads are necessary (or are imposed by other software
packages) and so subArctic provides a thread-safe access mechanism. This section describes this mechanism
and how to use it to safely manipulate the interactor tree from an independent thread.
Background and Design Rationale
Thread-safe access for a truly extensible user interface toolkit is very difficult. One of the central reasons for
this is that the toolkit implementors don't get to write all the code. Instead new interactor subclasses will be
written by many different individuals. As a result, while we would prefer to create a fully thread-safe interactor
tree which could simply be accessed normally and at any time, with synchronization happening transparently
"under the covers", it is not really possible to do this reliably. In particular, it would be very difficult to set up a
system that was both easy to extend, and which provided the necessary synchronization guarantees even for
arbitrary user supplied code.
As a result, we have chosen not to try to create a thread-safe data structure, but instead to create a
synchronization mechanism for code. To use this mechanism it is necessary to encapsulate your interactor tree
manipulation code in a method, and schedule a call to that method using the system supplied API. This API will
block until it is safe to access the interactor tree, then call the user supplied method giving it exclusive access to
the interactor tree until it returns.
This synchronization technique is not quite as clean as a synchronized data structure approach. However, it has
the distinct advantage that it can be encapsulated strictly within toolkit routines that are implemented once, and
does not rely on numerous interactor subclass authors to "do the right thing" (which would inevitably lead to
hidden mistakes and an interactor library that was not completely thread-safe).
Thread Nuts-and-Bolts
As indicated above, a subArctic program may not perform arbitrary manipulations of the interactor tree or other
toolkit data structures at arbitrary times. In particular, threads other than those created by the toolkit itself must
ask the toolkit infrastructure for "permission" to modify toolkit data structures before beginning such an
operation (or set of operations). In the case of a "normal" program (one which doesn't create new, extra threads),
subArctic automatically grants this "permission" to its own threads whenever they drop into the application
program -- such as when they handle events or perform redraws of the screen.
If you wish to create your own threads in a subArctic program, you may do so but when these threads seek to
modify the interactor tree, set values of interactors, or perform other toolkit actions they must do this via a
particular API we have specified. This API performs the work to insure that the toolkit is locked appropriately
and that your action(s) can happen atomically with respect to other activities in the system. As an example,
assume you have a user-created thread which wants to update the value of a text field on the screen. It is
certainly possible that the user could be typing into that field or selecting text in that field at the same time your
thread wishes to update the field. If you use the multi-threaded API of subArctic your update will be guaranteed
to happen completely "between" any two user inputs, insuring that both your update and the user inputs will be
handled with the system in a consistent state.
56 of 63
9/7/00 8:29 PM
subArctic User's Manual
http://www.cc.gatech.edu/gvu/ui/sub_arctic/sub_arctic/doc/users_manual.htm
The primary interface used in the subArctic multi-threading APIs is work_proc which is in the package
sub_arctic.input. This interface specifies exactly one method:
public interface work_proc {
public void run_safely(Object obj);
}
This is the interface which should be implemented by the object which wishes to perform the update of
subArctic data structures. We assume that most of the time this interface is going to be implemented by the
thread object itself, which in many cases is an implementation of the interface runnable. Hence the name
run_safely() is intended to be analogous to the main runnable method run().
When your thread wishes to perform a modification of any part of an interactor tree (or perform another toolkit
operation) it should make a call to the manager of this form
manager.perform_work(my_obj, my_arg);
where my_obj is an instance of an object implementing the work_proc interface. This call to the manager may
be made at any time and is synchronous -- that is it will not return until the work has been completed. It will
result in the caller's thread of control being passed to my_obj's run_safely() method, with the given my_arg
object passed as the parameter. It is simplest to think of this call to the manager as a "bridge" which connects
the unsafe world of the thread's run() method (which may perform any non-subArctic computations) with the
safe world of run_safely() which performs subArctic computations. It is important to realize that the system's
data structures are locked during this call and that long lived computations should not be performed in
run_safely(); indeed, these long lived computations may well be the reason that new thread was forked and
run separately from the interface in the first place.
Implementation Notes
The toolkit locks the interactor tree each time an event is dispatched or a redraw request is received. When the
event handling is complete it examines the interactor tree to determine if a screen update is necessary. This
allows subArctic to automatically force screen redraws whenever they are necessary. If one allowed the
interactor tree to be modified at any time, it would most likely require that the toolkit have a call to inform it to
reexamine its data structures and determine if a screen redraw is necessary. We found this a highly unacceptable
outcome from an aesthetic standpoint and it is our suspicion that the problematic AWT call validate() may in
fact be this call in the case of the AWT toolkit.
Based on this strategy of locking the tree during event handling and examining the tree after the event handling
is complete, the implementation of the perform_work() method should be clear. SubArctic is locking the
toolkit in the same way it does when events are handled, dispatching the call to run_safely() and then making
a determination if a screen update is necessary.
Problems And Future Directions
The toolkit's event dispatch mechanism is not reentrant. One must not call manager.perform_work()
within any event handling code or within a call to run_safely(). This is not as serious a drawback as it
might appear at first glance, since there is no reason to call perform_work() in these cases, you can just
do the work!
This is primarily an issue for the user's of the RMI infrastructure which might receive an incoming call on
a remote object from the network at any time and such calls are handled on an RMI-created thread. Such
calls in general may need to be protected with a call to perform_work since they need to be properly
synchronized with respect to user input. However, if such a call is received on a remote object in response
to local user input, one should not make the call to perform_work() since the toolkit is already locked in
57 of 63
9/7/00 8:29 PM
subArctic User's Manual
http://www.cc.gatech.edu/gvu/ui/sub_arctic/sub_arctic/doc/users_manual.htm
response to the user input. If one were to call perform_work(), deadlock would result.
The best way to avoid this scenario as a user of RMI is to insure that any use of the RMI system is not
made in response to user input. This avoids the entire problem but has the unfortunate side-effect of
forcing the RMI user into the creation his or her own mechanism which can allow the subArctic
event-handling thread to return normally in response to the user input and then have the application
perform its RMI-related work. This "solution" does not make the authors particularly happy and we are
working to improve it.
The run_safely() method should be given an event object as a parameter. This would make it
substantially easier to interact with focus-based agents inside of run_safely(). Again, we hope to
correct this soon.
In the future we also plan to provide the user with more general purpose infrastructure for avoiding the
need to create threads. The system already provides a general purpose timing mechanism via its animation
subsystem. This should be extended to other common uses of threads in Java such as network I/O and
background (idle) computations. This infrastructure would allow most users to not need a special
thread-safe API at all.
12. The Style System
Important Note: This section describing the subArctic style system is terse. It is provided primarily to allow
persons interested in how the style system works to get a feel for how it is implemented and why the decisions
behind it were made. However, the reader should be aware that the current system will be changed in substantial
ways before the beta-2 release of subArctic (Edmonton). These changes are based on our experience
implementing the supplied Motif-like style system and the experiences of one of our alpha-test users who
partially implemented a NextStep-like style. We are actively seeking users interested in implementing new
styles who can help us in the design and implementation of the new system. We are particularly interested in
users who would like to implement styles which mimic the current Microsoft Windows '95 and/or Apple
Macintosh UI style. If you are interested in such a project, please contact the authors.
The style system of subArctic allows the separation of the behavior of common UI interactors from their display
characteristics. Examples of such common interactors are buttons, scrollbars, and checkboxes. Although these
interactors have different appearances in different UI toolkits, their behavior is substantially the same. It is our
belief that one can implement a system which allows the drop-in replacement of new style systems which
modify the look and feel of an interface without modifying the application itself. We believe that this is possible
not only "on the fly" during the run-time of the application, but also with styles which are loaded dynamically
from the network and were not available to the author of the application in which they used.
The style class
The style system is implemented by subclassing the abstract class style. This class is part of the package
sub_arctic.output and a sample subclass is supplied in that same package called motif_style. The class
style provides the "contract" that the style must implement to behave properly with the subArctic interactors
it
functions on behalf of. (Users who wish to "get their feet wet" might want to try subclassing the class
motif_style and selectively overriding functions to see what they do.)
The way most of the methods work in the style system is that the interactor finds the currently installed style
object and then calls a method on it to retrieve a "look" for its display. This look is returned to it as an instance
or array of the class loaded_image. As an example, consider the button interactor. When it needs to generate
the two actual images for its display (one for the button when it is up and one for when it is down) it makes a
call on the style object like this:
58 of 63
9/7/00 8:29 PM
subArctic User's Manual
http://www.cc.gatech.edu/gvu/ui/sub_arctic/sub_arctic/doc/users_manual.htm
img = cs.button_make_images(_text,font(),_x_border,_y_border,false);
This call asks the current style system (cs -- obtained from the style manager as described below) to make an
array of two loaded_images. The button supplies some parameters which affect the resulting images, such as
what text to put on the button image, the font to use for the text, the amount of border to use in x and y, and
whether or not this button is one which pops up a menu. This last bit of information is supplied so the style
system may use the same code for generating the images for standard buttons and for menubuttons, although
menubuttons are decorated slightly differently. The style system may choose to ignore any or all of the
information supplied; it may be enforcing rules about what fonts may be used on buttons, what the system's
spacing should be or other things of its own devising. The button itself does not know what the resulting images
look like and does not care.
Most of the APIs that are part of the style object are similar to the one above. These include generating the set
of images for scrollbars, checkboxes, radiobuttons, and other objects. There are two other types of calls that are
present in the style object: calls which give the interactor information about input behavior and those which
prepare display areas for further processing. The calls which give the system input behavior information are the
least developed in the current system, but they are intended to allow the style system to select from a set of
options about how input is processed for its style to work "properly." The calls which prepare objects for further
work by the interactors are used to allow interactors to have some of the "look" of the current style system but
still have flexibility in how they are drawn.
As an example of a method on the style object which supplies input information to the interactor, consider this
method:
public abstract boolean menu_pop_right();
This function is called by the menu subsystem when displaying popup menus from a button. If this method
returns true, when the user presses on the menubutton the resulting menu is placed even with the button in the Y
dimension and to the right of the right edge of the button in X. If this method is false, the menu is placed even
with the button in X and just below the bottom of the button in Y. This allows different styles to get a different
feel from the same interactor with minimal (if any) changes to application code. We hope that in the future we
can sufficiently parameters the style object to support most of the common input styles that users are familiar
with.
Note: This area of the style system is the one which we feel will be the one that will change the most in the next
release. We hope to at least be able to have a system which can mimic most (if not all) of the "feel" of the Motif,
Windows '95, and Apple Macintosh input styles.
The methods which prepare objects for further drawing are generally those which provide interactors with
"prepared" drawables for further drawing by the interactor without style system intervention. There are also a
series of calls related to this process to let an interactor know what parts of the prepared image are "off limits"
for its own drawing; these are generally areas used for beveling or other edge effects of the style system.
The most common example of this type of a method is the method :
public abstract void drawable_prepare_rect(drawable d, int x, int y,
int w, int h, boolean up,
boolean fill);
If an interactor makes this call, it is asking the style system to create a rectangular image on a drawable (d), at a
certain location (x, y) and of a certain size (w, h). The style system should attempt to create an image on the
drawable which will "mesh" with the rest of the style in use. The other parameters to this method ask the style
system to bevel the area up or down (up) and if the style system should fill the area with the appropriate
background color (fill). As an example, the button interactor uses this call when the button is not in autosize
59 of 63
9/7/00 8:29 PM
subArctic User's Manual
http://www.cc.gatech.edu/gvu/ui/sub_arctic/sub_arctic/doc/users_manual.htm
mode the user wants to make a button of an arbitrary size. After this call is made the resulting image may be
processed by the caller in any way it desires.
The style_manager Class
The style_manager object in the package sub_arctic.output is tasked with coordinating access to the style
system for all the other parts of the system. All methods on the style_manager are static. Thus, it is through
the style_manager that an interactor gets a reference to the current style system (a subclass of the style class)
in use. This is the call to access the current style system:
style cs = style_manager.current_style();
This also insures that interactors may not take advantage of specific information that they know about the
current style system in use without an explicit cast (this type of cast is generally a bad move). The
style_manager also has a method which sets the current style system in use. It is with such a call that a user
may install his or her own style system.
Note: At the current time, there is no infrastructure in place to allow already constructed interactors to become
aware that the current style has been changed. This means that once interactors are created they may never
regenerate their images with the newly installed style system. (However, many interactors do regenerate their
images when they are resized, adding further confusion to this situation.) At the present time, the only way to
insure that an interface has been constructed using a given style system is to insure that such a style system is
put in place before the interactors are constructed. Thus, if one dynamically changes style systems, one must
currently rebuild all the current interface elements. The astute observer may notice that all the interactors which
use the style system create their images in a method called style_changed(). This was put in place as the
starting point for new infrastructure which could notify interactors that the style system has been changed.
The style manager has two other responsibilities besides allowing access to the current style system. It
coordinates access in a very similar way to the current color_scheme and the current default font. Like the
current style system, there is no notification to interactors when these values change. We wanted to provide a
central place for holding a reference to a system-wide choice for a font. This would allow applications to easily
change their overall font and have all other fonts in use (derived from this default font) change accordingly.
The color_scheme Class
SubArctic's notion of a color scheme is basically that of a set of colors that work well together. This notion is
based on a philosophical belief that most people (including the authors!) don't know that much about color, its
perception, and how color should be used in user interfaces to make interfaces more usable rather than more
difficult to use. The current state of the Web with its frequent pages which are completely unreadable due to the
choice of colors which don't contrast well or are difficult to perceive should be sufficient proof this claim. We
hope that most users of the toolkit can simply use the color_scheme provided with the system (or other ones
designed by color professionals) and don't need to be terribly concerned with how color works in subArctic.
The current color_scheme can be retrieved from the style_manager with this code:
style_manager.default_color_scheme()
This call returns an object which has several method which return colors (java.awt.Color). These calls are:
base()
The base color is the color that is used as the "dominant" color for graphical objects. For example, a
button's text is drawn on top of this color when the button is "up".
60 of 63
9/7/00 8:29 PM
subArctic User's Manual
http://www.cc.gatech.edu/gvu/ui/sub_arctic/sub_arctic/doc/users_manual.htm
highlight()
A lighter rendition of the base color used to create a highlight in pseudo 3D effects.
shadow()
A darker rendition of the base color used to create a shadow in pseudo 3D effects.
background()
The color used for background (or inset) items in a drawing scheme (rather than as a typical background
area per se). For example, the background of a slider (the "groove" that the thumb slides in) is drawn in
this color.
Note: the colors: base, highlight, shadow, and background are designed to be related, typically appearing
to be the same material but with different lighting.
foreground()
The color normally drawn over the base color for foreground items such as textual labels. This color
needs to contrast with, but not clash with the base color.
text_background()
The color that serves as the background for text editing areas.
splash()
A color which is designed to contrast with, and be significantly different from, the base, highlight,
shadow, and background color scheme. This is used for indicators such as found inside a selected radio
button or check box.
The current default color_scheme used by default was simply constructed by copying the one used by Netscape
Navigator.
13. Conclusions and Additional Resources
This manual has described the use of the subArctic toolkit, its structure, and each of its main parts. We believe
that you will find that the features of subArctic make it both possible and practical to build interfaces that go
beyond the usual static collections of widgets to provide the kind of highly dynamic interfaces your user's need.
While this manual covers most aspects of the toolkit, obviously not every detail can be covered, and some of the
finer points may not have been covered completely. If you find you need additional help with some aspect of the
system, we suggest you subscribe to the subArctic mailing list. To do this send a message to
[email protected] which contains the line "subscribe subarctic-announce" in the body of the
message (the subject of the message is ignored.) You can also obtain a list of other majordomo commands using
a body line of "help".
References
[1]
Mary Campione and Kathy Walrath, "The Java Tutorial", (on-line draft of a book to be published by
Addison-Wesley), http://www.javasoft.com/java.sun.com/tutorial/index.html.
[2]
Tyson R. Henry, Scott E. Hudson, Gary L. Newell, "Integrating Snapping and Gesture in a User Interface
Toolkit", Proceedings of the ACM Symposium on User Interface Software and Technology, pp. 112-122,
October 1990.
[3]
Scott E. Hudson, John T. Stasko, "Animation Support in a User Interface Toolkit: Flexible, Robust, and
Reusable Abstractions", Proceedings of the ACM Symposium on User Interface Software and
Technology, pp. 57-67, November 1993.
[4]
Scott E. Hudson, "Incremental Attribute Evaluation: A Flexible Algorithm for Lazy Update", ACM
Transactions on Programming Languages and Systems, v13, n3, pp. 315-341, July 1991.
61 of 63
9/7/00 8:29 PM
subArctic User's Manual
http://www.cc.gatech.edu/gvu/ui/sub_arctic/sub_arctic/doc/users_manual.htm
[5]
Scott E. Hudson, Ian Smith, "Ultra-Lightweight Constraints", to appear in Proceedings of the ACM
Symposium on User Interface Software and Technology, November 1996. A preliminary draft is available
on the web as: http://www.cc.gatech.edu/gvu/people/Faculty/hudson/constraints/ulc_paper.html.
[6]
Eric Bier and Maureen C. Stone, "Snap-Dragging", Proceedings of SIGGRAPH '86, v20, n4, August
1986, pp. 233-240.
[7]
Scott E. Hudson, "Semantic Snapping: A Technique for Semantic Feedback at the Lexical Level",
Proceedings of the 1990 SIGCHI Conference, pp. 65-70, April 1990.
[8]
John Lassiter, "Principles of Traditional Animation Applied to 3D Computer Animation", Proceedings of
SIGGRAPH '87, July 1987, pp. 35-44.
Appendix A. Platform Issues
SubArctic is written entirely in Java with no native code and no expectations beyond the existence of AWT. In
theory this should provide a very high degree of portability across platforms. However, at present there are a
number of serious bugs in the major platforms, and these bugs differ widely. In addition, there are at least a few
places deep in the system which do not have clearly documented semantics, and seem to have varying
interpretations across platforms. This section describes what we know about cross platform issues. Part of the
goal of our early releases will be to work out cross-platform incompatibilities, so information about problems
with platforms we do not have would be greatly appreciated.
We have recently (very reluctantly) added infrastructure for determining what platform the code is running on
and selectively enabling work-arounds for known bugs on those platforms. If you are able to isolate platform
specific bugs and provide work-arounds that you would like to share, please let us know.
Development of the system has been done under Sun JDK 1.02 under Solaris. We have done testing with both
JDK 1.02 appletviewer and with Netscape 2.01 and later 3.0 (all under Solaris) and these are known to (mostly)
work with the system. Here is what is known about various platforms:
Sun JDK prior to 1.02
Versions prior to 1.02 have significant problems and should be avoided.
Sun JDK 1.02 Appletviewer on Solaris
Most of the development and testing of the system has been done on this platform. The only serious
known problem with this platform is that on black and white machines all images appear as all white
(color machines seem to work fine). This is the "recommended" platform.
Sun JDK 1.02 Appletviewer on Macintosh
JDK on the Mac appears less stable. It crashes hard on pretty much every subArctic test program and is
currently unusable.
Netscape prior to 2.01
Versions prior to 2.01 have serious problems with images and image loading. These should be avoided.
Netscape 2.01 and 3.0 on Solaris
These have been used as a secondary testing platform. There is a significant problem with
URL.getContent() on this platform (it throws an IOException on any fetch of an image). However, a work
around for this has been included in the system. The Netscape Java interpreter is fairly slow.
Netscape 3.0 on Macintosh
3.0 is partially functional on the Mac. It does not seem to crash (which all prior versions did), but has
some significant problems with clipping. This effects, for example, all the lens code. This is the only
platform we currently know of on the Macintosh that works at all.
HotJava (tm)1.0 preBeta 1 on Solaris
62 of 63
9/7/00 8:29 PM
subArctic User's Manual
http://www.cc.gatech.edu/gvu/ui/sub_arctic/sub_arctic/doc/users_manual.htm
This version of HotJava does not deliver keystroke events. As long as you don't want to use the keyboard
it works great :-) (it is significantly faster than Netscape).
Symantec Cafe and Code Warrior 9 on Macintosh
Both these crash hard on most test cases.
Windows and NT
We have not tested any of the Java implementations on these platforms, but there are some users of Sun
JDK 1.02 and Netscape 3.0 on these platforms and we have heard that subArctic appears to work there.
Subset?
SubArctic stands for the "subset of the Advanced Reusable Constraint-oriented Toolkit for Interface
Construction". It was originally conceived as a small initial subset of a larger toolkit we had been planning on
building for some time. As it happened, it quickly evolved past the initial subset and is now a full featured
toolkit. The subArctic name, however, stuck.
Java and HotJava are trademarks of Sun Microsystems, Inc., and refers to Sun's Java programming language
and HotJava browser technologies. subArctic is not sponsored by or affiliated with Sun Microsystems, Inc.
Last revision: September 29 1996
63 of 63
9/7/00 8:29 PM