Transcript
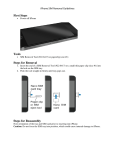
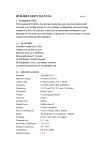
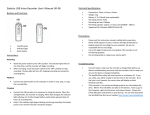
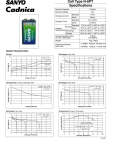
USB Voice Recorder User’s Manual
●Appearance and Buttons
1. Turn on/off button
2. Status light
3. Reset hole
● Instructions:
◆ One button recording
Push the power button to “ON” position, the status light becomes red, then to blue, the recorder starts recording.
◆ Stop recording
When recording, switch the button to “OFF” position or connect it to the computer, the blue light will turn off, then it stops and
save the recording.
◆ Playback
Connect the USB Voice Recorder to a computer. Since the USB Voice Recorder does not require a driver, the computer will
recognize it. A pop up window should appear and now you can play the recordings on your computer.
◆ Charging
Plug the USB Voice Recorder into a computer’s USB port. The status light will begin to blink meaning that it is now charging.
When fully charged, the status light remains red. After a full charge the USB Voice Recorder can operate for around 15 hours.
(NOTE: If the battery is low during a use, the red status light will blink. Please stop recording and charge until the red status light
remains lit.)
◆ Reset
If the Recorder experiences any difficulties or does not function normally it may need to be reset. Please insert a
pointed object such as a toothpick or an edge of a paperclip into the hole until the reset button is pressed.
Now the
unit has been reset. Please note that any recordings that are on the recorder will be erased when the reset button is
pressed.
● Technical Specifications:
Specifications
Size:70mm×21mm×9.4mm
Internal Battery:3.7V 110mAh
Weight:0.46 ounces
( lasting about 15 hours when full charged )
Recording format:WAV
Recording bit rate:128K bps
Recording Time: 4GB:about 70hours
Support system: Windows2000/XP/vista/7/8.1 or newer