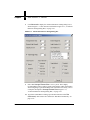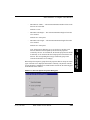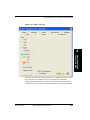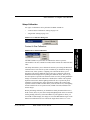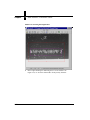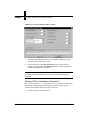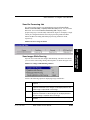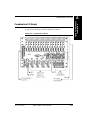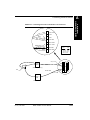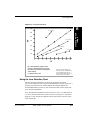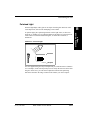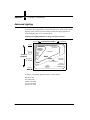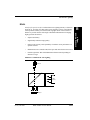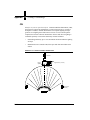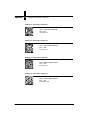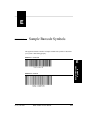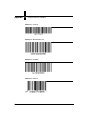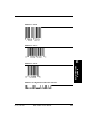
1
DMx AutoID+™ User Manual
v2.1.0, Feb 2009
EM-20171-1V210
Copyright and Disclaimer
Copyright ©2009 by Microscan Systems, Inc.
1201 S.W. 7th Street, Renton, WA, U.S.A. 98057
(425) 226-5700 FAX: (425) 226-8682
All rights reserved. The information contained herein is proprietary and is provided solely for the purpose of allowing
customers to operate and/or service Microscan manufactured equipment and is not to be released, reproduced, or used
for any other purpose without written permission of Microscan.
Throughout this manual, trademarked names might be used. Rather than place a trademark (™) symbol at every
occurrence of a trademarked name, we state herein that we are using the names only in an editorial fashion, and to the
benefit of the trademark owner, with no intention of infringement.
Disclaimer
The information and specifications described in this manual are subject to change without notice.
Latest Manual Version
For the latest version of this manual, see the Download Center on our web site at: www.microscan.com.
Technical Support
For technical support, email: [email protected].
Microscan Systems, Inc.
1201 S.W. 7th Street
Renton, WA 98057
U.S.A.
Tel: 425 226 5700
Fax: 425 226 8250
[email protected]
Microscan Europe
Tel: 31 172 423360
Fax: 31 172 423366
Microscan Asia Pacific
R.O. Tel: 65 6846 1214
Fax: 65 6846 4641
Microscan Limited Warranty Statement and Exclusions
What Is Covered?
Microscan Systems Inc. warrants to the original purchaser that products manufactured by it will be free from defects in
material and workmanship under normal use and service for a period of one year from the date of shipment. This
warranty is specifically limited to, at Microscan’s sole option, repair or replacement with a functionally equivalent unit
and return without charge for service or return freight.
What Is Excluded?
This limited warranty specifically excludes the following: (1) Any products or parts that have been subject to misuse,
neglect, accident, unauthorized repair, improper installation, or abnormal conditions or operations; (2) Any products or
parts that have been transferred by the original purchaser; (3) Customer mis-adjustment of settings contrary to the
procedure described in the Microscan Systems Inc. owners manual; (4) Upgrading software versions at customer request
unless required to meet specifications in effect at the time of purchase; (5) Units returned and found to have no failure
will be excluded; (6) Claims for damage in transit are to be directed to the freight carrier upon receipt. Any use of the
product is at purchaser’s own risk. This limited warranty is the only warranty provided by Microscan Systems Inc.
regarding the product. Except for the limited warranty above, the product is provided “as is.” To the maximum extent
permitted by law, this express warranty excludes all other warranties, express or implied, including but not limited to,
implied warranties of merchantability and. Technical support questions may be directed to: [email protected]
Register your product with Microscan: www.microscan.com/register fitness for a particular purpose. Microscan Systems
Inc. does not warrant that the functions contained in the product will meet any requirements or needs purchaser may
have, or that the product will operate error free, or in an uninterrupted fashion, or that any defects or errors in the product
will be corrected, or that the product is compatible with any particular machinery.
Limitation of Liability
In no event shall Microscan Systems Inc. be liable to you or any third party for any special, incidental, or consequential
damages (including, without limitation, indirect, special, punitive, or exemplary damages for loss of business, loss of
profits, business interruption, or loss of business information), whether in contract, tort, or otherwise, even if Microscan
Systems Inc. has been advised of the possibility of such damages. Microscan Systems Inc.’s aggregate liability with
respect to its obligations under this warranty or otherwise with respect to the product and documentation or otherwise
shall not exceed the amount paid by you for the product and documentation. Some jurisdictions do not allow the
exclusion or limitation of incidental or consequential damages or limitations on an implied warranty, so the above
limitation or exclusion may not apply to you. This warranty gives you specific legal rights, and you may also have other
rights which may vary from state to state.
Tel: 425.226.5700 | Fax: 425.226.8250 | [email protected]
Contents
PREFACE
Welcome!
xv
Purpose of This Manual xv
Manual Conventions xv
CHAPTER 1
DMx AutoID+™
Overview 1-1
System Components
1-1
1-2
Standard 1-2
Optional 1-2
Configuration 1-3
Minimum Host PC Requirements 1-3
DMx AutoID+™ Specifications 1-4
Physical 1-4
Symbologies 1-4
Operational 1-5
Environmental 1-5
CHAPTER 2
DMx AutoID+™ Installation
2-1
Software Installation 2-1
Hardware Installation 2-2
Basic Setup Procedures 2-2
General Location Considerations
v2.1.0, Feb 2009
DMx AutoID+™ User Manual
2-2
v
Contents
Environmental Requirements 2-2
Recommended Tools 2-3
Installing the 0300 Board 2-3
Installing the Internal Camera Power Cable 2-4
Connecting the Camera Cable 2-5
Camera Mount 2-6
Checklist 2-6
Ensuring Optimum Field Of View 2-7
Adjusting the Camera Position 2-8
Clamping the Lens 2-8
Optional Hardware Assembly 2-9
Starting DMx AutoID+™
CHAPTER 3
2-10
DMx AutoID+™ Tutorials
3-1
Tutorial #1 — Reading Sample Data Matrix from File 3-2
Tutorial #2 — Reading Sample Data Matrices from File List 3-10
Tutorial #3 — Reading Actual Data Matrix via Live Camera 3-12
CHAPTER 4
DMx AutoID+™ Reference Guide
Launching the DMx AutoID+™ 4-1
DMx AutoID+™ Graphic User Interface
4-1
4-3
File Menu 4-3
File>Open 4-4
File>Open List 4-4
File>Grab 4-4
File>Live 4-4
File>Save As 4-5
File>Password 4-5
File>Start Options 4-6
File>Jobs 4-7
File>Exit 4-7
Setup Menu 4-8
Setup>System Configuration 4-9
Throughput Estimation Guidelines 4-12
Setup>Com Port 4-13
Setup>Digital I/O 4-15
Implementation 4-15
Standard I/O Settings 4-16
vi
DMx AutoID+™ User Manual
v2.1.0, Feb 2009
Contents
Setup>Parameters 4-17
Setup>Parameters>General 4-18
Setup>Parameters>Data Matrix 4-20
Setup>Parameters>Barcode 4-27
Setup>Parameters>OCR Fixed Font 4-31
Setup>Parameters>Formatting 4-37
Output Formatting 4-38
Symbology/OCR Debug Report 4-39
OCR Debug Report 4-42
Setup>Parameters>Verifier 4-44
AIM Verification Parameters 4-46
IAQG Verification Parameters 4-48
ISO 15415 Verification Parameters 4-49
DPM Verification Parameters 4-50
Verification Status 4-54
Verification Results Display 4-56
Setup>Parameters>Fiducial 4-60
Setup>Parameters>Barcode Verification 4-62
Grading Criteria 4-64
Barcode Verification 4-65
Reporting Verification Results 4-66
Setup>Image Saving 4-70
Setup>Output Messages 4-72
Setup>Checking Modes 4-72
Setup>Retry Modes 4-74
Setup>Ethernet TCP/IP 4-76
Setup>Lighting Control 4-78
Setup>PLC Communication 4-79
DDE Protocol 4-80
Profibus Protocol 4-82
Configuring the Profibus Network 4-83
Profibus Data Exchange Protocol 4-88
Profibus Command Set 4-89
Profibus Communication Examples 4-90
Protocol Error Handling 4-92
Working with Multiple Input Modules 4-94
Setup>Wedge Target 4-94
Setup>Calibration 4-95
Contrast & Size Calibration 4-95
Calibration Setup 4-96
Calibration Check 4-96
Target ROI 4-97
Set ROI Menu 4-98
Set ROI>Data Matrix 4-98
v2.1.0, Feb 2009
DMx AutoID+™ User Manual
vii
Contents
Set ROI>Barcode 4-98
Set ROI>OCR Fixed Font 4-98
Set ROI>Fiducial 4-98
Set ROI>Clear ROI 4-99
Learn Menu 4-99
Learn>Data Matrix 4-99
Data Matrix Assisted Learn Example 4-101
Learn>Barcode 4-105
Learn>OCR Fixed Font 4-110
Reading OCR-A with Separator (Example 1) 4-116
Learn>Fiducial 4-120
Run Menu 4-125
Important Settings Prior to Run 4-125
Run>Run Once 4-126
Run>Run All Once 4-126
Run>Run Continuously 4-127
Run>Stop 4-127
Run>Com 1 or Com 2 4-127
Run>Beeper 4-127
Run>Ethernet TCP/IP 4-128
Run>Log Data 4-128
Run>Keyboard Wedge 4-128
Run>PLC 4-129
View Menu 4-129
View>Frame Grabber 4-129
View>Camera 4-130
View>Contrast Enhancement 4-130
View>Additional Menus>Pre Process 4-130
View>Additional Menus>PLC Interface 4-130
View>Additional Menus>Keyboard Wedge 4-130
View>Watch Window 4-131
View>Reading Statistics 4-131
View>PLC Status 4-131
View>Camera Status 4-132
View>Pre Processing Job 4-133
View>Images While Running 4-133
View>Graphics While Running 4-134
View>Status Bar While Running 4-134
View>Reading Statistics While Running 4-134
Pre Process Menu 4-135
Pre Process>Undo 4-137
Pre Process>Invert 4-137
viii
DMx AutoID+™ User Manual
v2.1.0, Feb 2009
Contents
Pre Process>Zoom x 1.5 4-138
Pre Process>Rotate 4-138
Pre Process>Erode 4-138
Pre Process>Dilate 4-138
Pre Process>Open 4-138
Pre Process>Close 4-138
Pre Process>Top Hat 4-138
Pre Process>Well 4-139
Pre Process>Max+Min 4-139
Pre Process Example 4-139
Help Menu 4-141
Help>About 4-141
Tool Bar 4-142
Status Bar 4-143
CHAPTER 5
DMx AutoID+™ Command Set
5-1
BARCODE {COUNT} [number] 5-2
BARCODE ENABLEMASK [mask] 5-2
BCVERIFY [NONE | OVERALL | SCANx] 5-2
CAMERA [number] 5-2
CAMERA COUNT 5-2
CAMERA ENABLEMASK 5-2
CELL SIZE [value] 5-3
CHECK STRING {1D | 2D | OCR} [ON | OFF | str] 5-3
CHECK STRING {1D | 2D | OCR} READ 5-3
COLS [value | AUTO] 5-4
DEL {jobfile} 5-4
DIR 5-4
FORMAT {PREFIX | SUFFIX | STATUS | LABEL} [str] 5-4
GRAB [filepath] 5-5
HEIGHT [value | AUTO] 5-5
HELP 5-5
INVERT 5-5
LEARN {1D | 2D} 5-5
LIGHT {axis, intensity} 5-6
LOAD [jobfile] 5-6
LOCK [ON | OFF] 5-6
MATRIX COUNT [number] 5-6
MINIMIZE [ON | OFF] 5-6
v2.1.0, Feb 2009
DMx AutoID+™ User Manual
ix
Contents
MORPH {ERODE | DILATE | OPEN | CLOSE | TOPHAT | WELL |
MAX+MIN} [number] 5-6
OPTO INPUT {point} [board] 5-6
OPTO IOEVENT {input enablemask} [state] [0-3] 5-7
OPTO IOMASK {value} [board] 5-8
OPTO OUTPUT {point} {1 | 0} [board] 5-8
POL [DL | LD | AUTO] 5-8
READ [number | ALL | ON | OFF] 5-9
RETRY NONE 5-9
RETRY SUPERMARKET {time limit} 5-9
RETRY TIME {time limit} 5-9
ROI {1D | 2D | OCR | FIND} [CLEAR | left, top, width, height] 5-10
ROWS [value | AUTO] 5-10
SAVE {jobfile} 5-10
SAVEIMAGE [filepath] 5-10
SHUTDOWN 5-10
STATS [RESET] 5-11
TCPIP {host ID, port number} [, in prefix, in suffix, out prefix, out
suffix] 5-11
TEMPLATE {filepath} 5-11
UNDO 5-11
VER 5-11
VERIFY ENABLEMASK [mask] 5-11
VERIFY MODE [NONE | CUSTOM | AIM | IAQG | ISO15415] 5-12
WIDTH [value | AUTO] 5-12
CHAPTER 6
DMx AutoID+™ Visual Basic Support
6-1
TCP/IP Support 6-2
TCP/IP Support with OLE 6-3
ActiveX Control Support 6-4
DMx AutoID Custom Control 6-5
DMx AutoID Custom Control Properties 6-5
ApplicationPath Property 6-6
AssistedLearnEnable Property 6-7
BarcodeCount Property 6-8
BarcodeEnableMask Property 6-9
BCVerify Property 6-10
Camera Property 6-11
CameraCount Property 6-12
CameraEnableMask Property 6-13
CameraResol Property 6-14
x
DMx AutoID+™ User Manual
v2.1.0, Feb 2009
Contents
CameraType Property 6-15
CellSize Property 6-16
Cols Property 6-17
FormatLabel Property 6-18
FormatOCR Property 6-19
FormatPrefix Property 6-20
FormatStatus Property 6-21
FormatSuffix Property 6-22
FormatSymbol Property 6-23
GrabEnableMask Property 6-24
Height Property 6-25
ImageControl Property 6-26
Initialize Property 6-27
KeyCode Property 6-28
MatrixCount Property 6-29
PanelClick Property 6-30
Pol Property 6-31
Rows Property 6-32
VerifyEnableMask Property 6-33
VerifyMode Property 6-34
Width Property 6-35
DMx AutoID Custom Control Methods 6-36
FileNameQuery Method 6-36
CheckString Method 6-37
DisableImageSaving Method 6-38
GetImageSize Method 6-39
Grab Method 6-40
Learn Method 6-41
Light Method 6-42
Live Method 6-43
Load Method 6-44
OptoInput Method 6-45
OptoIOEvent Method 6-46
OptoIOMask Method 6-47
OptoOutput Method 6-48
Read Method 6-49
ROI Method 6-50
Save Method 6-51
SaveImage Method 6-52
SetROI Method 6-53
ShowOption Method 6-54
Stats Method 6-55
DMx AutoID Custom Control Events 6-56
Error Event 6-56
ImageSizeChange Event 6-57
v2.1.0, Feb 2009
DMx AutoID+™ User Manual
xi
Contents
CamEnableMaskChange Event 6-58
CamIndexChange Event 6-59
GrabIndexChange Event 6-60
ReadData Event 6-61
DMx ImageView Control 6-62
DMx ImageView Control Properties 6-62
AutoResize Property 6-63
MinHeight Property 6-64
MinWidth Property 6-65
MouseEnable Property 6-66
StatusBarVisible Property 6-67
DMx ImageView Control Methods 6-68
GetImageRECTAOI Method 6-68
SetImageSize Method 6-69
DMx ImageView Control Events 6-70
KeyDown Event 6-70
MoveAOI Event 6-71
PanelClick Event 6-72
ResizeView Event 6-73
APPENDIX A
Optional Hardware Installation
Mini Opto I/O Board
A-1
A-2
Sensor/Strobes A-3
Digital I/O A-4
Combination I/O Board
A-7
Installing the Combination I/O Board & Ribbon Cable A-8
Strobe/Sensors A-8
Digital I/O A-9
Connecting Sensor & Strobe
A-12
Mini Opto I/O High Speed Sensor And Strobe Connections A-12
Combination I/O High Speed Sensor & Strobe Connections A-14
Strobe Unit Example A-15
APPENDIX B
Creating A Good Image
B-1
Overview B-1
Determining the Field Of View (FOV) B-2
Selecting Lens B-2
Using the Lens Selection Chart
Illuminating the Part
xii
B-3
B-4
DMx AutoID+™ User Manual
v2.1.0, Feb 2009
Contents
Lighting Considerations B-5
Types of Lighting B-5
Fluorescent Versus Incandescent Lighting B-6
Lasers B-7
Strobe Lights B-7
Diffuse Versus Point-Source Lighting B-7
Placement of Light Sources B-9
Front Lighting B-9
Side Lighting (Dark Field) B-9
Back Lighting B-10
Polarized Light B-11
Advanced Lighting
B-12
DOAL B-13
CDI B-14
SCDI B-15
MVi Imager B-16
Aperture B-16
Depth Of Field B-16
Lighting Tips B-17
APPENDIX C
Data Matrix Symbology
C-1
Data Matrix Certification C-1
What Is Data Matrix C-1
Data Matrix Components C-3
Data Matrix Error Correction C-5
Bit Versus Code Word C-6
Data Matrix Encodation Schemes
C-7
ECC 000-140 C-7
ECC 200 C-8
Data Matrix Specification Details C-11
Summary of Additional Features C-12
Symbol Structure C-13
APPENDIX D
Sample Data Matrix Symbols
APPENDIX E
Sample Barcode Symbols
v2.1.0, Feb 2009
DMx AutoID+™ User Manual
D-1
E-1
xiii
Contents
APPENDIX F
IO Matrices
Index
xiv
F-1
Index-1
DMx AutoID+™ User Manual
v2.1.0, Feb 2009
Preface
Welcome!
PREFACE
Purpose of This Manual
This manual is a comprehensive guide for setting up, installing, and using the
DMx AutoID+™ software and related hardware. It also includes information on
Data Matrix symbology and image acquisition.
Manual Conventions
The following typographical conventions are used throughout this manual.
v2.1.0, Feb 2009
•
Items emphasizing important information is bolded.
•
Menu selections, menu items and entries in screen images are indicated as:
Run (triggered), Modify..., etc.
DMx AutoID+™ User Manual
xv
Preface
xvi
DMx AutoID+™ User Manual
v2.1.0, Feb 2009
1
CHAPTER 1
DMx AutoID+™
1
DMx AutoID+™
This chapter provides an overview of the DMx AutoID+™, including product
description and components, system requirements and specifications.
Overview
The DMx AutoID+™ is an advanced, high-performance symbology reader,
capable of reading barcodes including all common 1D, PDF-417, Data Matrix,
and QR Code, and performing Optical Character Recognition (OCR) for SEMI,
OCR-A and OCR-B font. The optional inline verification supports all public
print quality standards for 1D barcodes and Data Matrix and also offers the
Microscan patented DPM Verification technology. Powerful, state-of-the-art
image processing algorithms and the Microsoft Windows software interface
allow the DMx AutoID+™ to solve the most demanding shop-floor automatic
identification and data collection problems.
The DMx AutoID+™ supports up to four 0300 boards. Each board supports up to
four cameras, which can be triggered individually or synchronously via the
optional Mini Opto I/O board or Combination I/O board. The versatile system
auto-discriminates between major 2D and 1D Barcodes, and can read multiple
barcodes, Data Matrix, and OCR in the same Field of View (FOV). The DMx
AutoID+™ performs up to 1800 reads/minute in high-resolution mode, and
achieves 3600 reads/minute in low-resolution modes.
The DMx AutoID+™ provides on-screen images and data display for each
camera input in its easy-to-use Windows-based GUI. Supporting a variety of
marking techniques, the system decodes damaged and low-contrast codes
v2.1.0, Feb 2009
DMx AutoID+™ User Manual
1-1
Chapter
1
DMx AutoID+™
robustly and verifies barcode/Data Matrix quality at high speed with accurate and
repeatable results. The decode and verification results can be sent to other
devices or applications via RS-232, TCP/IP, or as input to Windows applications
via keyboard emulation (wedge), or logged to files for further data processing.
Utilizing the ActiveX controls provided by DMx AutoID+™, the user can
quickly introduce barcode reading and verification capabilities into custom
Windows programs written in Microsoft Visual Basic.
System Components
Standard
•
DMx AutoID+™ software
•
Single-slot 0300 board with interface to RS-170 and CCIR cameras and
onboard digital I/O
•
An I/O Port Connector bezel that replaces a blank port access cover
•
Internal cabling for connecting:
–
I/O connector on the 0300 board to the I/O port connector
–
PC power to the 0300 board camera power connector
Optional
1-2
•
Camera, stand, lens, light source
•
Mini I/O or Combination I/O board
DMx AutoID+™ User Manual
v2.1.0, Feb 2009
Configuration
•
0300 board
•
Camera Cables
•
DMx AutoID+™ Software (CD only)
•
DMx AutoID+™ License Key
–
–
•
If the 0300 board is installed:
•
You need a License Key for OCR
•
You need a License Key for inline verification
If no 0300 board is installed:
•
You need a License Key for Barcode/Data Matrix
•
You need a License Key for OCR
•
You need a License Key for inline verification
DMx AutoID+™ User Manual
Minimum Host PC Requirements
v2.1.0, Feb 2009
•
Pentium III class CPU (350 MHz or higher)
•
128 MB memory required
•
2 GB hard disk (Enhanced IDE)
•
SVGA display (800x600 with 256 colors)
•
Disk Space — Approximately 20 MB free to install the software
•
One open PCI slot (necessary for 0300 board installation only)
•
Microsoft Windows 2000/XP with Service pack 2
DMx AutoID+™ User Manual
1
DMx AutoID+™
Configuration
1-3
Chapter
1
DMx AutoID+™
DMx AutoID+™ Specifications
Physical
Half-length PCI board
Symbologies
1-4
•
Data Matrix
•
PDF-417
•
Code 39
•
Codabar
•
Code 128
•
Code 93
•
Interleaved 2 of 5
•
UPC/EAN
•
UPC-E
•
UPC Supplementals
•
RSS
•
QR Code
•
Postnet
•
Pharmacode
•
Optical Character Recognition (SEMI, OCR-A, B)
DMx AutoID+™ User Manual
v2.1.0, Feb 2009
Operational
•
Up to 30 reads per second with full 640x480 resolution or 25 reads per
second with full 768x572 resolution
•
Up to 60 reads per second with 320x240 resolution or 50 reads per second
with 384x286 resolution
•
RS-170 or CCIR video inputs
•
Reading results with debugging outputs
•
Methods to reformatting the reading results
•
Simple and effective learn mode
•
Four-camera asynchronous or synchronous image acquisition with strobe
output per 0300 board
•
Continuous mode with retry upon failure
•
16 programmable digital I/O
•
Multiple image display options
•
Ethernet TCP/IP connectivity
•
Fiducial finding capability
•
Code quality verification
•
Password protection mode
•
Support for up to four 0300 boards
•
Windows GUI with ActiveX control programming support
Environmental
v2.1.0, Feb 2009
•
Operating Temperature:
+32o to 104o F (0o to 40o C)
•
Storage Temperature:
-4o to 149o F (-20o to 65o C)
•
Humidity:
Up to 95% non-condensing
DMx AutoID+™ User Manual
1-5
1
DMx AutoID+™
DMx AutoID+™ Specifications
Chapter
1-6
1
DMx AutoID+™
DMx AutoID+™ User Manual
v2.1.0, Feb 2009
2
CHAPTER 2
DMx AutoID+™
Installation
2
DMx AutoID+™ Installation
This chapter explains the complete software and hardware installation
procedures. For first time installations, you must install the software prior to
installing the 0300 board.
Software Installation
Before installing the DMx AutoID+™ software, exit from other applications and
disable any virus protection software you are running. You may re-enable the
virus protection software after installation is complete.
The DMx AutoID+™ software can run on Windows 2000 and XP platforms.
To install or upgrade to DMx AutoID+™ 2.0, double click the setup.exe icon in
the Install folder in the installation CD. Reboot as required. For upgrading, there
is no need to uninstall any previous version prior to upgrading to the new version.
If you are upgrading from previous versions of DMx AutoID+™ with a 0300
board already installed, you only need to perform the Software Installation
section to upgrade the software to version 2.0. When you need to install a new
0300 board, follow the Hardware Installation section after first installing the
software.
v2.1.0, Feb 2009
DMx AutoID+™ User Manual
2-1
Chapter
2
DMx AutoID+™ Installation
Hardware Installation
Basic Setup Procedures
The setup and installation procedure for your DMx AutoID+™ involves:
•
Unpacking the 0300 board
•
Installing the 0300 board
•
Installing the Camera Power cable
•
Mounting the cameras
•
Connecting all cables and power
•
Installing the Software Protection Key (also called Dongle) to your PC’s
parallel or USB port
•
Optionally installing the Mini Opto I/O or Combination I/O Board and
associated hardware (see Appendix A, “Optional Hardware Installation,” for
more information)
General Location Considerations
You can situate the 0300 board in most environments without any concern for
special enclosures or cabinets.
Consider the following when determining site selection:
•
Ensure that the camera cable is long enough to reach your PC.
•
Avoid severe vibrations.
•
Locate the components to avoid accidental bumping.
•
Protect your PC and components against dust, humidity, extreme
temperatures, and extremely harsh environments.
Environmental Requirements
The environment of your PC is important for maintaining a reliable system. You
should consider the humidity, temperature, foot traffic, and fresh air-flow before
permanently mounting your system.
2-2
DMx AutoID+™ User Manual
v2.1.0, Feb 2009
Hardware Installation
Fan Performance — 38 CFM minimum
•
Typical Temperature Rise — 6.0oC, on every component on the 0300 board
Recommended Tools
You will need the tools listed below for the basic installation. However, you may
need additional tools for custom installations.
•
Small straight-edge screwdriver
•
Small Phillips screwdriver
•
Microscan-provided ESD ground strap
Installing the 0300 Board
v2.1.0, Feb 2009
1.
Remove the cover of your PC.
2.
Locate an open PCI slot.
3.
Unscrew the Port Access Covers on the PC.
4.
Install the 0300 board by aligning the gold fingers and pressing the module
firmly into the slot.
5.
Fasten the 0300 board with port access screws.
DMx AutoID+™ User Manual
2-3
2
DMx AutoID+™
Installation
•
Chapter
2
DMx AutoID+™ Installation
Installing the Internal Camera Power Cable
1.
Connect the small connector of the internal Camera Power Cable to the
Camera Power connector on the 0300 Board, as shown in Figure 2–1.
FIGURE 2–1.
Internal Cabling
Hard
Drive
Power Supply
JIO
Camera Power Cable
0300 Board
I/O Ribbon Cable
Red Stripe
PCI BUS
2.
2-4
Connect the middle connector to an unused Hard Drive power cable in the
PC.
DMx AutoID+™ User Manual
v2.1.0, Feb 2009
Hardware Installation
Connecting the Camera Cable
FIGURE 2–2.
Camera Cabling
5.6
11
5.6
11
5.6
11
5.6
11
0.7
0.7
0.7
0.7
16
0.4
8
1.5
0.5
4
4
2.8
16
0.4
8
1.5
0.5
4
4
2.8
16
0.4
8
1.5
0.5
4
4
2.8
16
0.4
8
1.5
0.5
4
4
2.8
Rear Panel
Note: For detailed information about analog cameras, refer to the 0300 Board
User Manual.
Figure 2–3 shows an example of an RS170 factory-modified CM4000 camera.
The connectors at the rear of the camera supply power and sync to the camera,
and send video from the camera to the 0300 board. The IRIS and VIDEO
v2.1.0, Feb 2009
DMx AutoID+™ User Manual
2
DMx AutoID+™
Installation
For analog camera operation, connect the multiple-camera cable to the camera
port on your PC and connect the camera cable from the camera to the other end
of the multiple-camera cable, as shown in Figure 2–2.
2-5
Chapter
2
DMx AutoID+™ Installation
connectors are not used for normal operations. Set the switches to 1.0, MGC, and
FRM.
CM4000 Camera
FIGURE 2–3.
IRIS
GAMMA
GAIN1.0 ASGFLD
0.45MGCFRM
VIDEO
POWER
CM4000
Camera Mount
The camera mount holds the camera in a fixed position. If the camera moves, the
results of the inspection may not be valid. Refer to Appendix B, “Creating A
Good Image,” for more information.
Note: Mount the camera in a low-vibration environment. Otherwise, use a strobe
in low ambient light.
Checklist
•
Ensure that the camera is grounded only by the camera cable back to the
camera port on the PC.
The CM4000 camera case is connected to the camera’s return circuit. This
means that a camera affixed to an earth-grounded metallic fixture has the
potential for creating a ground loop. A ground loop is an undesirable circuit
created when grounds are connected at two or more locations. Return signals
tend to flow through both ground circuits which results in noise and/or
distortion in the camera’s video signal.
Isolate the camera’s body from grounded fixtures. You could use plastic
mounting bolts in conjunction with an insulating pad or mount the camera to
a non-metallic mount and then install the camera/mount assembly as a unit.
2-6
DMx AutoID+™ User Manual
v2.1.0, Feb 2009
Hardware Installation
Position the camera to get the best Field of View (FOV), e.g., optimum
viewing of the part and features. Please refer to Appendix B, “Creating A
Good Image,” for more information.
•
If the camera needs to be adjusted in the X, Y, or Z axis, the mount must be
able to adjust in those directions.
•
Provide a way to clamp the lens to minimize image movement.
•
Provide strain relief for the camera cable.
•
Build a shroud to prevent accidental damage to the camera and to prevent
dirt or dust from getting on the lens.
•
Ensure that the camera mount is strong enough to prevent bending if
accidentally hit. Ensure that you minimize or eliminate vibrations.
Ensuring Optimum Field Of View
It is best to mount the camera assembly so that its centerline is as perpendicular
as possible to the desired Field Of View, as shown in Figure 2–4.
11
16
0.4
8
1.5
0.5
The camera centerline is
perpendicular to the object.
5.6
4
4
0.7
Camera Centerline
2.8
FIGURE 2–4.
CM-4000
This reduces the chance of errors due to:
•
v2.1.0, Feb 2009
Poor Depth of Field — The range of distance with acceptably sharp focus at
the front and back of the subject, is improper for the application.
DMx AutoID+™ User Manual
2-7
2
DMx AutoID+™
Installation
•
Chapter
2
•
DMx AutoID+™ Installation
Foreshortening — One axis of the image appears shorter than the another.
The decision of where to mount your camera is important because it influences
which lens you will use.
Adjusting the Camera Position
After you determine the best FOV for your application and determine the type of
lens and its distance from the object being viewed, determine whether it is
necessary to move the camera. For example, you may be viewing different parts
on one line and each part may require a different X (horizontal), Y (vertical), or Z
(in and out) position. Refer to Appendix B, “Creating A Good Image,” for more
information.
The most common change is in the X and Y position. A screw-adjusted slide on
the camera mount allows the best camera adjustment.
Clamping the Lens
Any lens movement, either by changing the focus or the f-stop, can seriously
affect the results of the inspection. Ensure that the lens cannot move once it has
been set. The best method to inhibit movement is to clamp the lens, as shown in
Figure 2–5. This ensures that the focus and f-stop will not change, and should
also prevent mechanical stress from being transferred to the camera.
2-8
DMx AutoID+™ User Manual
v2.1.0, Feb 2009
Hardware Installation
FIGURE 2–5.
Lens Clamp
CM-4000
DMx AutoID+™
Installation
2
Camera
16
11
0.4
5.6
8
1.5
0.5
2.8
4
4
0.7
Lens
Lens Clamp
Optional Hardware Assembly
Refer to Appendix A, “Optional Hardware Installation,” to install the I/O board
and related hardware.
v2.1.0, Feb 2009
DMx AutoID+™ User Manual
2-9
Chapter
2
DMx AutoID+™ Installation
Starting DMx AutoID+™
Note: Prior to launching the software, if needed, securely attach the optional
License Key to the PC’s parallel or USB port. For more information about the
optional License Key, see “Configuration” on page 1-3
To launch the DMx AutoID+™:
2-10
1.
Click the Start button from the Windows taskbar.
2.
Select Program Files, the DMx AutoID+™ folder, then the DMx
AutoID+™ program.
DMx AutoID+™ User Manual
v2.1.0, Feb 2009
3
DMx AutoID+™ Tutorials
3
This chapter provides three DMx AutoID+™ tutorials that demonstrate setting
parameters, learning a Data Matrix (samples vs. actual), and running inspection.
Use these tutorials to become better acquainted with the DMx AutoID+™
program prior to full operation.
Note: This chapter serves as a guide. Your results may vary. Refer to Chapter 4,
“DMx AutoID+™ Reference Guide,” for comprehensive descriptions of the
DMx AutoID+™ GUI.
To launch the DMx AutoID+™ from your Windows desktop, click the Start
button, choose Programs, and then select DMx AutoID+™. This displays the
DMx AutoID+™ main menu (GUI), as shown in Figure 3–1.
FIGURE 3–1.
v2.1.0, Feb 2009
DMx AutoID+™ Main Menu (GUI)
DMx AutoID+™ User Manual
3-1
DMx AutoID+™
Tutorials
CHAPTER 3
Chapter
3
DMx AutoID+™ Tutorials
Tutorial #1 — Reading Sample Data Matrix from File
1.
From the main menu, open the File menu and select Open. This displays the
Open dialog box, as shown in Figure 3–2.
FIGURE 3–2.
3-2
Open Dialog Box
DMx AutoID+™ User Manual
v2.1.0, Feb 2009
Tutorial #1 — Reading Sample Data Matrix from File
2.
Select sample1 and click Open. The image is displayed, as shown in
Figure 3–3.
FIGURE 3–3.
Sample 1
DMx AutoID+™
Tutorials
3
v2.1.0, Feb 2009
DMx AutoID+™ User Manual
3-3
Chapter
3
3.
DMx AutoID+™ Tutorials
Open the Learn menu and select Data Matrix. The Data Matrix will be
learned immediately with results displayed in the Status Bar, as shown in
Figure 3–4. This menu item is detailed in “Learn>Data Matrix” on
page 4-99.
FIGURE 3–4.
3-4
Shows Learned Data Matrix
DMx AutoID+™ User Manual
v2.1.0, Feb 2009
Tutorial #1 — Reading Sample Data Matrix from File
5.
v2.1.0, Feb 2009
Notice the Status Bar panel.
–
The first field displays the time taken to learn the Data Matrix which, in
this example, is 6 milliseconds.
–
The next three fields display the current coordinate values of the mouse
pointer. In this example, the panel shows pixel coordinates of x: 73,
y: 324, with a grayscale value of l: 89.
–
The last field displays the decoded result of the Data Matrix which, in
this example is Data Matrix Sample 1.
3
The DMx AutoID+™ is configured to read one Data Matrix of similar size
and orientation in the entire Field Of View (FOV). To view these settings,
open the Setup menu and select Parameters. This displays the Parameter
Setup — General dialog box, as shown in Figure 3–5. This menu item is
detailed in “Setup>Parameters>General” on page 4-18.
DMx AutoID+™
Tutorials
4.
DMx AutoID+™ User Manual
3-5
Chapter
3
DMx AutoID+™ Tutorials
FIGURE 3–5.
3-6
Parameter Setup — General Dialog Box
6.
Notice that the setting for Number of Data Matrices to Decode in the
Multi-Code Setup box has been configured to read 1 Data Matrix.
7.
To display the Learned Data Matrix settings, click the Data Matrix tab. This
displays the Parameter Setup — Data Matrix dialog box, as shown in
Figure 3–6.
DMx AutoID+™ User Manual
v2.1.0, Feb 2009
Tutorial #1 — Reading Sample Data Matrix from File
FIGURE 3–6.
Parameter Setup — Data Matrix Dialog Box
DMx AutoID+™
Tutorials
3
v2.1.0, Feb 2009
DMx AutoID+™ User Manual
3-7
Chapter
3
8.
DMx AutoID+™ Tutorials
Click Advanced to display the Advanced Parameter Tuning dialog box, as
shown in Figure 3–7. This menu item is detailed in Figure 4–13, “Advanced
Parameter Tuning Dialog Box,” on page 4-23.
FIGURE 3–7.
3-8
Advanced Parameter Tuning Dialog Box
9.
Notice that Average Element Size is set to 5 pixels. This is highly
recommended in order to achieve fastest speed and most robust performance
when configuring a typical Data Matrix size in the FOV. If necessary, refer to
a complete description of Average Element Size in Figure 4–13,
“Advanced Parameter Tuning Dialog Box,” on page 4-23.
10.
To perform a Data Matrix reading, open the Run menu and select Run
Continuously. This menu item is detailed in “Run>Run Continuously” on
page 4-127.
DMx AutoID+™ User Manual
v2.1.0, Feb 2009
Tutorial #1 — Reading Sample Data Matrix from File
11.
The same Data Matrix is repeatedly decoded and the total number of reads is
displayed in the second field along the Status Bar panel. Our example, as
shown in Figure 3–8, displays 102 reads.
FIGURE 3–8.
Status Bar Showing Number of Decode Reads
DMx AutoID+™
Tutorials
3
Displays number of Data Matrix decode reads
12.
v2.1.0, Feb 2009
During the running sequence, you are allowed only one action: to stop the
execution. To do so, click the Stop button on the Toolbar.
DMx AutoID+™ User Manual
3-9
Chapter
3
DMx AutoID+™ Tutorials
Tutorial #2 — Reading Sample Data Matrices from File List
1.
From the main menu (Figure 3–1 on page 3-1), open the File menu and
select Open List. This displays the Open List dialog box, as shown in
Figure 3–9.
FIGURE 3–9.
2.
3-10
Open List Dialog Box
Press and hold Ctrl, and then left-click to select the first three sample image
files. Click Open to access and display the first image (sample3.bmp, in our
example). The image window showing Sample 3 Data Matrix is in
Figure 3–10.
DMx AutoID+™ User Manual
v2.1.0, Feb 2009
Tutorial #2 — Reading Sample Data Matrices from File List
FIGURE 3–10.
Sample 3 Data Matrix Image Window
DMx AutoID+™
Tutorials
3
3.
v2.1.0, Feb 2009
Since the Data Matrices in our 3 sample images contain similar properties to
the Data Matrix learned in Step 3 on page 3-4, it is not necessary to repeat
another Learn. Instead, to read all three consecutively, open the Run menu
and select Run Continuously. This menu item is detailed in “Run>Run
Continuously” on page 4-127.
DMx AutoID+™ User Manual
3-11
Chapter
3
DMx AutoID+™ Tutorials
Tutorial #3 — Reading Actual Data Matrix via Live Camera
1.
From the main menu (Figure 3–1 on page 3-1), open the File menu and
select Live to display live images. This selection is detailed in “File>Live”
on page 4-4.
2.
Place an actual Data Matrix label in the Field of View (FOV). Center it
properly in the FOV. Focus accordingly. Refer to Appendix B, “Creating A
Good Image,” for additional guidance.
3.
Open the File menu and select Live again to stop the Live Mode. Notice that
the Data Matrix image has been captured and displayed in the DMx
AutoID+™ GUI.
4.
Open the Learn menu and select Data Matrix. This allows you to learn the
Data Matrix. This menu item is detailed in “Learn>Data Matrix” on
page 4-99.
5.
To perform a Data Matrix reading on your live sample, open the Run menu
and select Run Continuously. This menu item is detailed in “Run>Run
Continuously” on page 4-127.
6.
To achieve the fastest reading speed, you should stop the run first by clicking
along the Toolbar. Then perform these steps:
a.
Open the Setup menu and select Parameters. Click the Data Matrix
tab to display the Parameter Setup — Data Matrix dialog box, as shown
in Figure 3–6 on page 3-7. This menu item is detailed in
“Setup>Parameters>Data Matrix” on page 4-20.
b.
Click the Advanced button to display the Advanced Parameter Tuning
box, as shown in Figure 3–7 on page 3-8. This menu item is detailed in
Figure 4–13, “Advanced Parameter Tuning Dialog Box,” on page 4-23.
c.
Ensure that Average Element Size is set to a value of 5 if possible, as
this is an optimum setting for the FOV. If not, change the FOV and
repeat Step 1 through Step 5 in order to achieve a value as close as
possible to 5.
d.
Ensure that the following settings have also been made in the Advanced
Parameter Tuning box. These help to optimize the fastest, yet somewhat
less robust, reading performance:
•
3-12
Samples per Cell — 1 (when Data Matrix cells are solid)
DMx AutoID+™ User Manual
v2.1.0, Feb 2009
Tutorial #3 — Reading Actual Data Matrix via Live Camera
Fine Tune Method — No Quiet Zone Clutter (when Data Matrix
background is clean)
•
Search Speed — Turbo
•
Warp Method — Fast
The display of images and Status Bar uses up significant PC resources. You
have the option to disable them in order to achieve maximum throughput. To
do so, select View, Images While Running and Status Bar While
Running, respectively.
These menu items are detailed in “View Menu” on page 4-129. Notice that,
when you make these selections, the check marks are toggled off, as shown
in Figure 3–11.
FIGURE 3–11.
View Menu with Display Items Disabled
Selected again
to disable viewing
(no check marks)
v2.1.0, Feb 2009
DMx AutoID+™ User Manual
3-13
3
DMx AutoID+™
Tutorials
7.
•
Chapter
3-14
3
DMx AutoID+™ Tutorials
DMx AutoID+™ User Manual
v2.1.0, Feb 2009
4
CHAPTER 4
DMx AutoID+™ Reference
Guide
This chapter provides a complete reference guide for DMx AutoID+™ operation.
It explains the menu items, toolbar buttons, dialog boxes, and image windows
provided in this product.
Launching the DMx AutoID+™
During the installation, the DMx AutoID+™ can be installed under the DMx
AutoID+™ Program Group (default), or the StartUp Program Group. If you wish
to run the DMx AutoID+™ program automatically every time you power up the
computer, then use the StartUp Program Group. If the DMx AutoID+™ Program
Group is selected in the installation, then you need to manually launch the DMx
AutoID+™ program. You can either select Windows Start, DMx AutoID+™
(folder), and DMx AutoID+™ (program), to run the program, or select Windows
Start, and Run, and then click OK.
v2.1.0, Feb 2009
DMx AutoID+™ User Manual
4-1
DMx AutoID+™
Reference Guide
4
Chapter
4
DMx AutoID+™ Reference Guide
FIGURE 4–1.
Run Dialog Box
When the application is launched either manually or automatically upon powerup, the main menu and toolbar of the DMx AutoID+™ Graphic User Interface
(GUI) is displayed, as shown in Figure 4–2.
FIGURE 4–2.
DMx AutoID+™ Main Menu & Toolbar
Camera 4
Camera 3
Camera 2
Camera 1
Stop
Run>Run Continuously
Run>Run Once
View>Watch Window
Set ROI>Clear ROI
Set>Parameters
File>Save As
File> Live
File> Grab
File>Open List
File>Open
4-2
DMx AutoID+™ User Manual
v2.1.0, Feb 2009
DMx AutoID+™ Graphic User Interface
DMx AutoID+™ Graphic User Interface
This section contains complete details on menu items, dialog boxes, image
windows, and toolbar buttons that are available in the DMx AutoID+™ GUI.
The remainder of this chapter describes the following menus:
“File Menu” starting on page 4-3
•
“Setup Menu” starting on page 4-8
•
“Set ROI Menu” starting on page 4-98
•
“Learn Menu” starting on page 4-99
•
“Run Menu” starting on page 4-125
•
“View Menu” starting on page 4-129
•
“Pre Process Menu” starting on page 4-135
•
“Help Menu” starting on page 4-141
4
DMx AutoID+™
Reference Guide
•
File Menu
Figure 4–3 displays the File Menu:
FIGURE 4–3.
v2.1.0, Feb 2009
File Menu
DMx AutoID+™ User Manual
4-3
Chapter
4
DMx AutoID+™ Reference Guide
File>Open
This menu item opens an image file (.BMP, .TIF, .RAW, or ALL of these) from
disk, display it and then decode it.
File>Open List
This menu item opens a list of image files (.BMP, .TIF, .RAW, or ALL of these)
from disk, displays them and decodes them one by one, interactively or
continuously.
File>Grab
This menu item captures an image from the 0300 board.
•
If the Hardware Trigger option is not checked, an image will be captured
immediately and displayed.
•
If the Hardware Trigger option is checked, “Waiting for a Trigger” will be
displayed in the Status Bar telling you that a new image will be captured
after the first image is captured. No more images will be captured after the
first image is captured.
The Grab mode can be cancelled by selecting it again before the hardware trigger
occurs.
File>Live
This menu item displays live images from the 0300 board.
•
If the Hardware Trigger option is not checked, the DMx AutoID+™
displays live images at the rate of up to 30 frames per second.
•
If the Hardware Trigger option is checked, “Triggered Grab” will be
displayed in the status bar telling you that new images will be captured
whenever a hardware trigger occurs.
When live images are displayed, selecting Live again will stop the live image
display mode.
For applications with hardware trigger enabled, anytime you want to display live
images without having to send hardware triggers, you need to temporarily select
the Hardware Trigger in Setup>System Configuration to uncheck it.
Remember to re-enable the hardware trigger after you exit the live image display.
4-4
DMx AutoID+™ User Manual
v2.1.0, Feb 2009
DMx AutoID+™ Graphic User Interface
File>Save As
This menu item saves the image captured from the 0300 board as a .BMP image
file.
File>Password
The Run Continuous mode can be protected by password so that barcode or OCR
reading will not be interrupted. To use this capability, select File > Password to
display two drop-down menu items, as shown in Figure 4–4.
FIGURE 4–4.
Password Menu
FIGURE 4–5.
Password Setting Dialog Box
To enter a new password, you need to enter the password, select OK, and then
reenter the same password, then select OK again. When the password is accepted
by the system, you can select Password > Enable Password Protection to
v2.1.0, Feb 2009
DMx AutoID+™ User Manual
4-5
DMx AutoID+™
Reference Guide
4
When there is no password stored in the system, Enable Password Protection is
grayed out unless Set Password is selected for entering a new password, as
shown in Figure 4–5:
Chapter
4
DMx AutoID+™ Reference Guide
enable the password protection mode by entering the correct password, as shown
in Figure 4–6.
FIGURE 4–6.
Password Setting Dialog Box
If you need to have access to the Run Continuously menu to start the reading
(with or without hardware trigger), do not check the Lock GUI option. If DMx
AutoID+™ is triggered by serial or TCPIP command, then Lock GUI can be
checked to ensure there is no unauthorized access to the Run menu.
If the system is configured properly (e.g., after Learn), you can select Run > Run
Continuously to perform continuous reading or decoding with password
protection enabled. The only way to stop the continuous reading is to type in the
password from the keyboard. The password mode is not disabled when the
continuous reading is stopped. This way you do not need to enable the password
protection again before restarting the Run Continuously mode.
To disable the password mode, select File > Password > Disable Password
Protection to display a password box. Enter the password then select OK. When
the Password Protection is disabled, you can change the password by selecting
File > Password > Change Password and following the dialog boxes step by
step. Remember that once the password mode is disabled, you must re-enable it
before you can resume the password protected mode.
File>Start Options
•
4-6
Auto Start — When this mode is enabled (checked), the system will
automatically enter Run Continuous mode as soon as the DMx AutoID+™
program is launched. When Auto Start is disabled (or unchecked), you can
DMx AutoID+™ User Manual
v2.1.0, Feb 2009
DMx AutoID+™ Graphic User Interface
enable it by selecting it. When Auto Start is enabled (or checked), you can
disable it by selecting it.
•
Minimized — When this mode is enabled, DMx AutoID+™ will run with
the GUI minimized.
File>Jobs
Load>Default — Reset all configuration parameters except password,
number of cameras enabled, and Com port settings (baud rate, data bits, stop
bits, parity, and flow control) to default factory settings.
•
Load>Job — Load a previously saved job that contains all configuration
parameters. This is useful for restoring previously configured parameters. To
view the loaded job name, select File > Jobs if the system is not in Run
Continuously mode. In Run Continuously mode, the job name is
automatically displayed in the title bar of the program.
•
Save — Save the current configuration parameters to a job file in the disk.
•
Delete — Delete a job file from the disk.
•
Boot — Specify a saved job to be used by the DMx AutoID+™ program
when it is launched. After the job is selected, it can be viewed by displaying
the Jobs menu item. To remove the Boot job or change to a different one,
select Boot again to display the dialog box.
Note: We recommend (although not required) that all jobs be stored in
\DMx AutoID+™\jobs directory, which is normally under C:\Program Files.
File>Exit
This menu item exits the program.
v2.1.0, Feb 2009
DMx AutoID+™ User Manual
4-7
4
DMx AutoID+™
Reference Guide
•
Chapter
4
DMx AutoID+™ Reference Guide
Setup Menu
The Setup menu (Figure 4–7) allows you to configure various DMx AutoID+™
system parameters.
FIGURE 4–7.
Setup Menu
The remainder of this section describes the following Setup Menu selections:
4-8
•
“Setup>System Configuration” starting on page 4-9
•
“Setup>Com Port” starting on page 4-13
•
“Setup>Digital I/O” starting on page 4-15
•
“Setup>Parameters” starting on page 4-17
•
“Setup>Image Saving” starting on page 4-70
•
“Setup>Output Messages” starting on page 4-72
•
“Setup>Checking Modes” starting on page 4-72
•
“Setup>Retry Modes” starting on page 4-74
•
“Setup>Ethernet TCP/IP” starting on page 4-76
DMx AutoID+™ User Manual
v2.1.0, Feb 2009
DMx AutoID+™ Graphic User Interface
•
“Setup>Lighting Control” starting on page 4-78
•
“Setup>PLC Communication” starting on page 4-79
•
“Setup>Wedge Target” starting on page 4-94
•
“Setup>Calibration” starting on page 4-95
Setup>System Configuration
This menu item displays the System Configuration dialog box, as shown in
Figure 4–8.
FIGURE 4–8.
System Configuration Dialog Box
DMx AutoID+™
Reference Guide
4
•
v2.1.0, Feb 2009
Cameras Enabled — Click to select a camera(s) in the system. If a camera
is enabled (checked), you can further enable or disable its corresponding
Strobe Light option and select its corresponding camera resolution. For
example, if the corresponding Strobe Light is enabled (checked) for camera
DMx AutoID+™ User Manual
4-9
Chapter
4
DMx AutoID+™ Reference Guide
1, then, whenever camera 1 acquires an image of the specified resolution, the
strobe signal for the camera will be output from the digital I/O board.
•
Single Capture Settings — Click to enable appropriate features to be
employed during the image capture (grab) sequence:
–
Hardware Trigger — When enabled, the capture sequence starts with
the presence of a signal at each trigger input for the selected camera(s).
The Asynchronous/Synchronous mode is used when more than one
camera is enabled
•
In Asynchronous mode, each camera is independently triggered by
its own trigger.
•
In Synchronous mode, all cameras are triggered at the same time by
one trigger, which corresponds to the first camera (the camera with
smallest index) in the list of enabled cameras.
–
Internal Sync — This option allows the DMx AutoID+™ to work with
an internal sync camera. Check this option if the camera does not
support external sync signal. Since the 0300 board has to sync with the
camera’s internal sync signal, only one internal sync camera is allowed
to work with the 0300 board. Furthermore, more frames are needed
before the 0300 board can sync with the camera when image acquisition
starts or changes. Due to these limitations, you should always avoid
internal sync cameras when possible.
–
Grab New
–
•
List mode — When a list of image files is selected and the Grab
New is not selected, Run Once will operate on the currently
displayed image in the list. If the Grab New is selected, Run Once
will operate on the next image in the list.
•
Live Camera mode — If Grab New is not selected, Run Once will
operate on the currently displayed image. If Grab New is selected,
Run Once will acquire a new image and operate on it.
Cameras Type — Both RS170 and CCIR are supported.
•
4-10
RS170 — All four cameras can have (mixed) resolution settings of
high res (640x480), low res (640x240x2 or 320x240). The
maximum reading speed is 30 reads per second for high res and 60
DMx AutoID+™ User Manual
v2.1.0, Feb 2009
DMx AutoID+™ Graphic User Interface
reads per second for low res (see “Throughput Estimation
Guidelines” on page 4-12).
Note: You can use strobe or shuttering to freeze the motion. Using
strobe can freeze the motion in both high res and low res settings.
When camera shuttering is desired, however, only low res images
can be obtained. The low res setting 640x240x2 preserves the high
resolution in horizontal direction but achieves interpolated full
resolution (480 pixels) in vertical direction. This mode is
particularly useful for shuttered applications in which full
horizontal resolution (640 pixels) is needed.
CCIR — All four cameras can have (mixed) resolution settings of
high res (768x572), low res (768x286x2 or 768x286). The
maximum reading speed is 25 reads per second for high res and 50
reads per second for low res. Using strobe can freeze the motion in
both high res and low res settings. When camera shuttering is
desired, however, only low res images can be obtained. The low res
setting 768x286x2 preserves the high resolution in horizontal
direction but achieves interpolated full resolution (572 pixels) in
vertical direction. This mode is particularly useful for shuttered
applications in which full horizontal resolution (768 pixels) is
needed.
In setup mode with Synchronous trigger enabled, when camera x is selected to
acquire an image, the strobes connected to both camera x and camera 1 will fire
at the same time. Therefore, if you always want to fire the strobe no matter which
camera is selected, connect the strobe to camera 1.
To achieve consistent image quality in asynchronous or synchronous mode with
strobe, we recommend that you use a shroud to block out the ambient light to
ensure the camera sees only the strobe light.
When Strobe Light is checked, an advanced button allows the access to the
“dead-zone” settings. The settings control when the strobe can or cannot fire.
You should not change them for the CM4000 (RS170) and CM4001 (CCIR)
cameras. For other types of cameras, please contact Microscan Technical Support
(see the inside front cover for more information).
v2.1.0, Feb 2009
DMx AutoID+™ User Manual
4-11
4
DMx AutoID+™
Reference Guide
•
Chapter
4
DMx AutoID+™ Reference Guide
Throughput Estimation Guidelines
The DMx AutoID+™ is capable of performing up to 3,600 reads per minute. To
estimate the maximum throughput for a given application, first obtain the
shortest Inspection Time-out Value that is sufficient for each decode to complete
successfully. In milliseconds, the total cycle time will be:
n1 + n2 + n3 + n4
Where:
•
n1 is the greater of (10 + Inspection Time-out Value) and image acquisition
time.
•
n2 is 20 ms when View>Images while Running is set to 1.
•
n3 is 10 ms when View>Status Bar while Running is checked.
•
n4 is the time needed for Ethernet TCP/IP and/or serial transmission.
The image acquisition time is:
•
33~50 ms for high resolution RS170 camera.
•
17~33 ms for low resolution RS170 camera.
•
40~60 ms for high resolution CCIR camera.
•
20~40 ms for low resolution CCIR camera.
The low values for the image acquisition time can be used when hardware trigger
and strobe are used.
Assume that you can optimize the decode such that the Inspection Time-out
Value of 7 ms is sufficient. Also assume that you are using only an opto I/O board
for communicating read results without displaying images, status, or using
serial/Ethernet. Then, you can achieve the 17 ms cycle time, which gives you 60
read per second or 3,600 reads per minute.
Note: The extra 10 ms per cycle added on top of the Inspection Time-out Value is
needed for Windows Operating System.
4-12
DMx AutoID+™ User Manual
v2.1.0, Feb 2009
DMx AutoID+™ Graphic User Interface
Setup>Com Port
This menu item displays the Serial Communications Setup dialog box, as shown
in Figure 4–9.
FIGURE 4–9.
Serial Communications Setup Dialog Box
DMx AutoID+™
Reference Guide
4
Make appropriate settings for Baud Rate, Data Bits, Stop Bits, Parity and Flow
Control for Com 1 Serial Communications and/or Com 2 Serial
Communications, as applicable.
By default, both the Output and Input boxes are checked to allow DMx
AutoID+™ to send the read result to the COM port (e.g., output) and to receive
serial commands from the COM port (e.g., input). You can specify prefixes and
suffixes to be used when presenting data:
v2.1.0, Feb 2009
DMx AutoID+™ User Manual
4-13
Chapter
4
DMx AutoID+™ Reference Guide
•
Output Prefix/Suffix — Any output message transmitted from the COM
port to other serial devices will be prepended by the Output Prefix and
appended by the Output Suffix.
•
Input Prefix/Suffix — DMx AutoID+™ can receive serial commands from
other serial devices such as terminals or Programmable Logic Controllers
(PLC). By specifying Prefix and Suffix, the DMx AutoID+™ will recognize
the input messages from other devices formed by appending Prefix and
Suffix to serial commands supported by DMx AutoID+™. For DMx
AutoID+™ to accept the supported commands, an input suffix is always
required.
Note: The Communications option configures the DMx AutoID+™ ports.
The communication setup cannot be changed when it has been selected from
the Run menu. To change it, you must de-select the communication port,
configure the port, and then select the port again. Refer to the Run Menu for
more information.
The above setup box varies with the number of COM ports in your PC.
If the reading application does not require full duplex serial communication
(e.g., only Input or Output is required), then disabling the unused mode will
improve system performance. If Output is unchecked, DMx AutoID+™ will
not output decode data. If Output is unchecked and Input checked, the
command Read to DMx AutoID+™ will not receive a response from the
serial port. However, all other configuration commands will receive a
command response over the serial port.
4-14
DMx AutoID+™ User Manual
v2.1.0, Feb 2009
DMx AutoID+™ Graphic User Interface
Setup>Digital I/O
This menu item displays the Digital I/O Settings dialog box, as shown in
Figure 4–10. This dialog box configures the Digital I/O for the DMx AutoID+™.
FIGURE 4–10.
Digital I/O Settings Dialog Box
DMx AutoID+™
Reference Guide
4
Implementation
•
Standard I/O — Select this to use the Combination Opto I/O board that has
16 General Purpose IO points (GPIO). DMx AutoID+™ determines all 16
GPIO as output points and controls them according to the Standard I/O
Settings table.
When Standard I/O is selected, there are four digital outputs per camera in
the pre-defined Standard I/O settings. For camera 1, the I/O points 1, 5, 6,
and 7 are used for Data Valid, Read, Match, and System Overrun. The I/O
points 2, 8, 9 and 10 are used for Data Valid, Read, Match, and System
Overrun for camera 2. The I/O points 3, 11, 12, and 13 are used for camera 3.
The I/O points 4, 14, 15, and 16 are used for camera 4.
Note: A high (+5V) indicates Success and a low (0V) indicates Failure.
v2.1.0, Feb 2009
DMx AutoID+™ User Manual
4-15
Chapter
4
DMx AutoID+™ Reference Guide
•
Mini Opto I/O — Select this to use the Mini Opto I/O board that has four
outputs and two inputs. DMx AutoID+™ controls all 4 output points
according to the Standard I/O Settings table.
•
Custom — When this is selected, the DMx AutoID+™ stops controlling the
I/O signal. The user can write program to control the I/O through DMx
AutoID+™ via serial/TCP/IP commands or DMx ActiveX control.
Standard I/O Settings
•
Data Valid — The I/O points 1, 2, 3, and 4 represent the data-valid pulses
indicating that the data in I/O points 5-16 are valid.
•
System Overrun — Consists of Process Overrun and Trigger Overrun,
which can only happen in Run Continuously with hardware trigger enabled.
When a hardware trigger occurs, a new image is acquired and placed into
one of several pre-allocated image buffers as long as the image to be
overwritten is no longer needed by the reading process.
–
Process Overrun (also called Buffer Overrun) occurs when the system
cannot process the images fast enough and release the buffers, thus
leaving no buffer available for a newly acquired image. Process Overrun
is represented by System Overrun being set to high and the Match
output set to low.
–
Trigger Overrun occurs when a new hardware trigger is received for a
camera while it is still acquiring the previous image. Trigger Overrun is
represented by System Overrun being set to high and the Match output
set to high. In either case, Read output is always held at low.
•
Verifier Failure — Indicates when a Data Matrix is successfully read but its
print quality does not meet the specified grade. When this happens, the Read
output is set to high and System Overrun output is set high. (See Verifier
section under Parameter Setup for more information)
•
Data Valid Pulse Width (ms) — Enter the width of the data valid pulse. It
is limited to between 8 and 125 ms.
When Mini Opto I/O is selected, the pre-defined I/O behavior depends on the
number of cameras used. If only one camera is used, it controls all four output
points. When more than one camera is used, the camera numbers must be
contiguous starting from camera 1. Each of the first two cameras controls two
output points.
4-16
DMx AutoID+™ User Manual
v2.1.0, Feb 2009
DMx AutoID+™ Graphic User Interface
Setup>Parameters
The camera configuration parameters can be set independently of one another
among all enabled cameras. When the caption of a dialog box contains a camera
number, it means the parameters shown in the dialog box are applicable to that
camera only. When there is more than one camera enabled, the parameters
displayed in the dialog box correspond to current camera. The current camera is
shown as checked in the View>Camera menu. It is also shown as the one that
appears to be pushed down on the tool bar. To display the parameters belonging
to a certain camera, you need to set that camera to be the current camera from the
tool bar or from the View>Camera menu. This selection allows you to set up the
following functions:
Configure the DMx AutoID+™ to perform the image processing and data
reduction tasks such as reading different types of symbologies, performing
OCR, Data Matrix verification, and locating fiducial.
•
Setup the Run parameters for each task in order to run faster or more
robustly.
•
Format the output data and select debug reporting information.
The remainder of the Setup>Parameters section discusses:
v2.1.0, Feb 2009
•
“Setup>Parameters>General” on page 4-18
•
“Setup>Parameters>Data Matrix” on page 4-20
•
“Setup>Parameters>Barcode” on page 4-27
•
“Setup>Parameters>OCR Fixed Font” on page 4-31
•
“Setup>Parameters>Formatting” on page 4-37
•
“Setup>Parameters>Verifier” on page 4-44
•
“Setup>Parameters>Fiducial” on page 4-60
•
“Setup>Parameters>Barcode Verification” on page 4-62
DMx AutoID+™ User Manual
4
DMx AutoID+™
Reference Guide
•
4-17
Chapter
4
DMx AutoID+™ Reference Guide
Setup>Parameters>General
This menu item displays the Parameter Setup dialog box (General tab), as shown
in Figure 4–11.
FIGURE 4–11.
Parameter Setup (General Tab) Dialog Box
Use this dialog box to set up symbology or OCR algorithms to search for the
selected symbols or text. The Number of Barcodes, Data Matrices, and OCR
Rows to Decode/Read tell the system how many symbol(s) should be decoded in
the field of view.
4-18
DMx AutoID+™ User Manual
v2.1.0, Feb 2009
DMx AutoID+™ Graphic User Interface
•
Number of Barcodes to Decode — Setting the number to 0 disables
barcodes reading. The supported barcodes are listed in Barcode group. Only
the enabled (checked) barcodes will be decoded.
Range: 0 to 5
•
Number of Data Matrices to Decode — Setting to 0 disables Data Matrix
reading.
Range: 0 to 5
•
Number of OCR Rows to Read — Setting to 0 disables OCR (Optical
Character Recognition).
Range: 0 to 4
To ensure that the Barcode/Data Matrix reading completes within a pre-defined
time limit, the Inspection Time-out Value can be set to the time limit in
milliseconds. Setting the value to 0 indicates that no limit is set. See “Important
Settings Prior to Run” on page 4-125 for suggestions on how to set the time limit.
v2.1.0, Feb 2009
DMx AutoID+™ User Manual
4-19
4
DMx AutoID+™
Reference Guide
The system will in turn search Barcode items first, Data Matrix next, and OCR
last, as defined in this dialog box and based on the respective quantities in Multi
Code Setup.
Chapter
4
DMx AutoID+™ Reference Guide
Setup>Parameters>Data Matrix
This menu item displays the Parameter Setup dialog box (Data Matrix tab), as
shown in Figure 4–12.
FIGURE 4–12.
4-20
Parameter Setup (Data Matrix Tab) Dialog Box
•
Height — The height of non-rotated Data Matrix in pixels. When the Height
value is specified and checked, the algorithm will attempt to locate a Data
Matrix of the specified height, plus/minus the percentage value in Size
Variation in Advanced Parameter Tuning below. If unchecked, the algorithm
attempts to find a Data Matrix of arbitrary size.
•
Width — The width of non-rotated Data Matrix in pixels. When Width value
is specified and checked, the algorithm will attempt to locate a Data Matrix
of the specified width, plus/minus the percentage value in Size Variation in
DMx AutoID+™ User Manual
v2.1.0, Feb 2009
DMx AutoID+™ Graphic User Interface
Advanced Parameter Tuning below. If unchecked, the algorithm attempts to
find a Data Matrix of arbitrary size.
No. of Rows — The number of rows of non-rotated Data Matrix. When
checked, the algorithm uses the value specified without having to
re-compute it from image to image.
•
No. of Cols — The number of columns of non-rotated Data Matrix. When
checked, the algorithm uses the value specified without having to
re-compute it from image to image. Both Rows and Cols should be checked
or unchecked at the same time.
•
Polarity — The number of columns of non-rotated Data Matrix. When
checked, the algorithm attempts to locate a Data Matrix with the specified
polarity, Light on Dark, or Dark on Light. When unchecked, the algorithm
locates either polarity.
•
Format ID — The informational value displayed when a Non-ECC200 Data
Matrix is learned. It cannot be set or changed and does not apply to ECC 200
Data Matrix.
•
ECC Level — The Error Correction Level. ECC 200 employs ReedSolomon error correction and is recommended for new applications. Other
ECC levels (000, 050, 080, 100, 140) use the convolutional error encoding.
ECC250 is customer-specific coding. The default value SPEC allows the
algorithm to decode ECC000, 050, 080, 100, 140, and 200 that are included
in the AIM/ISO Data Matrix Specification. If left unchecked, the older
nonstandard Data Matrix such as ECC120 can also be decoded.
•
Orientation — The angle formed by the bottom of the solid border “L” and
the horizontal axis. Setting this to a fixed angle helps the algorithm locate
the Data Matrix quicker but cannot be used to consistently reject a Data
Matrix having a different orientation angle. If unchecked, the algorithm can
find a Data Matrix of any orientation.
•
Image Style — The Normal image or Mirror image of the Data Matrix.
Normally, the parameters in the Data Matrix dialog box are automatically set by
the DMx AutoID+™ system when a successful Learn is performed. These
parameters generally will provide satisfactory Data Matrix reading performance
in Run mode. In certain situations, some of the parameters can be adjusted or
fine-tuned to improve the performance.
v2.1.0, Feb 2009
DMx AutoID+™ User Manual
4-21
4
DMx AutoID+™
Reference Guide
•
Chapter
4
DMx AutoID+™ Reference Guide
Fine-tuning serves two main purposes. Parameter fine-tuning after a successful
Learn can accelerate the normal Run process, and/or make the Run process more
robust. In the case when the Learn is not successful for a certain symbol,
parameter fine-tuning may provide the DMx AutoID+™ program more
information about the symbol, thus improving symbol decoding in the Run
mode.
In Run mode, if any of the Data Matrix properties no longer applies to the Data
Matrix to be read, such as Height, Width, No. of Rows, No. of Cols, ECC Level,
Polarity, and Image Style, then the property should be disabled (unchecked). For
example, if matrix height/width may change significantly during the inspection,
leave Height and Width de-selected (unchecked). Always de-select (uncheck)
Orientation if 360o reading is required.
Click the Advanced button on the Data Matrix dialog box to display the
Advanced Parameters Tuning dialog box, as shown in Figure 4–13. This allows
you to enter more information for parameter fine-tuning.
4-22
DMx AutoID+™ User Manual
v2.1.0, Feb 2009
DMx AutoID+™ Graphic User Interface
FIGURE 4–13.
Advanced Parameter Tuning Dialog Box
DMx AutoID+™
Reference Guide
4
•
Average Element Size — Normally, the Field of View for the Data Matrix
should be set such that, after a successful Learn, the cell size is reported at a
value between 5 and 10. The element size reported reflects the actual cell
size of the Data Matrix and is most suitable for the Run mode to perform
robustly. When the quality of the Data Matrix is high, reducing the cell size
value slightly will not affect the read rates but will accelerate the read cycle.
When the element size drops below 4 pixels, however, the locate/decode
time will increase, and the robustness of the algorithm may degrade.
Range: 2 to 20
•
v2.1.0, Feb 2009
Minimum Edge Strength — For extremely low contrast images, the edge
strength value can be set between 5 and 18 gray scale values. The edge
strength can be raised to higher values when the Data Matrix is of relatively
DMx AutoID+™ User Manual
4-23
Chapter
4
DMx AutoID+™ Reference Guide
high contrast and the background clutter is of relatively low contrast. With
higher edge strength, the DMx AutoID+™ program will ignore most of the
low contrast objects and get to the higher contrast matrix area quicker. A
value of 18 allows the program to read the Data Matrix with contrast as low
as 10%. If the label’s contrast is unlikely to change (e.g., when a stable
lighting source is employed), the level can be raised to 36 to produce the
optimum run performance. The value can be set between 5 and 100.
•
Samples Per Cell — Select a different cell sampling method to overcome
some print quality issues. The DMx AutoID+™ program samples and
averages portions of each cell to determine whether the cell is light or dark.
•
Border Integrity — This is a percentage value.
Default: 80% (20% border mismatch or damage is tolerated)
Range: 75 to 100
•
Angle Variation (±) — The orientation of a Data Matrix is set after a
successful Learn. By default, the angle variation factor is set to ±23o (i.e.,
half of 45°). This means the Data Matrices in the inspection (READ) mode
can rotate up to 23° from the Learned orientation. The variation value is
ignored if the Orientation parameter in Data Matrix tab is unchecked. When
the Data Matrices do not change their orientation by more than ±10o, the
angle variation factor can be set to 10.
Note: With today’s fast CPUs, we suggest that you keep the default value of
23 for the angle variation for maximum robustness.
•
4-24
Size Variation (%) — The size, representing the height and width of a Data
Matrix, is set after a successful Learn. When the Data Matrices in
subsequent inspections (READ) have similar size, the size learned applies to
these matrices. The size variation factor default is 10%, which means the
size can vary up to 10% from the nominal values determined from the Learn,
regardless of the cell size used in the setup. The maximum size variation
allowed is 25%. If the variation exceeds 25%, both Height and Width should
be de-selected (unchecked).
DMx AutoID+™ User Manual
v2.1.0, Feb 2009
DMx AutoID+™ Graphic User Interface
•
Width/Height Ratio — This tells the program to only search for a Data
Matrix symbol with the specific aspect ratio when either Height or Width is
unchecked. The value has no effect on the program when both Height and
Width are specified. When neither Height, Width, nor Ratio is selected, the
system will look for Data Matrix of any size and aspect ratio.
Range: 0.3 to 5.0
Fine Tune Method — You have the following options:
–
Position Enhance — Enabling this option instructs the algorithm to
locate the four corners of the Data Matrix more precisely and, in
general, reduce the number of error correction used for severely
underprinted or overprinted symbols. The default is Off.
–
Intensity Enhance — Designed to overcome dramatic intensity variation
over the matrix border area. For example, certain poorly marked Data
Matrix may have some cells that are almost invisible compared to the
rest of the cells. Without enabling the option, the system may issue a
status code indicating a certain edge cannot be found. Enabling the
option will help read this type of Data Matrix more consistently. The
default is Off.
Note: Refer to the Formatting tab for a description of DMx AutoID+™
status codes.
v2.1.0, Feb 2009
–
No Quiet Zone Clutter — Enabling this option will speed up the reading
process when Data Matrix has sufficient quiet zone. With sufficient
quiet zone, a Data Matrix with irregular, curved, or distorted border(s)
can be read more efficiently with the option checked. Typically, the
border problem is associated with low quality inkjet or dot peen marks
or when the Data Matrix is imaged at an angle.
–
Allow Steep Angle — In some Data Matrix reading applications, it is
not possible to set up the camera such that the focal plane is in parallel
with the surface of the Data Matrix label. When the focal plane and the
label surface form a steep angle, the Data Matrix in the image will have
severe geometrical distortion. The following steps can be used in order
to read severely distorted Data Matrix in any orientation:
1.
Select File > Jobs > Load > Default to clear Data Matrix
configuration parameters.
2.
Select Setup > Parameters > General.
DMx AutoID+™ User Manual
4-25
4
DMx AutoID+™
Reference Guide
•
Chapter
4-26
4
DMx AutoID+™ Reference Guide
3.
Set Number of Data Matrices to Decode to be at least 1.
4.
Select Setup, Parameters, Data Matrix, and finally Advanced to
get to the Advanced Parameter Tuning box.
5.
In Fine Tune Method, enable (check) Allow Steep Angle.
6.
Select OK to exit Advanced Parameter Tuning.
7.
Select OK to exit Parameter Setup. Now the system is ready to read
distorted Data Matrix in Run mode.
–
Allow Severe Damage — Enabling this option will increase the
robustness of the software in reading Data Matrix with severe border
damages. To use it, first perform a successful Learn on a less damaged
label. Then, enable (check) the option to read labels with more damages
in Run mode.
–
Ensure ROI — Enabling this option ensures that no Data Matrix is
located unless it is fully inside the ROI.
–
Cell Outline — Enabling the option helps the algorithm decode a Data
Matrix with outlined cells only. In this case, the On and Off cells have
little or no contrast but they are separated by edges of the cells.
•
Search Speed — The default for this setting is Normal, which is the most
robust search speed. For a high contrast well formed Data Matrix, selecting
Overdrive or Turbo mode may reduce the total locate/decode time.
•
Search Direction — The default is Criss-cross, which causes the DMx
AutoID+™ program to search horizontally and vertically at the same time.
The search direction Hori->Vert causes the program to search horizontally
for the Data Matrix first in the entire ROI. When no Data Matrix is found or
decoded, the algorithm searches vertically for the Data Matrix. Selecting
Vert->Hori causes the opposite search process.
•
Warp Method — The default is Fast. Fast typically produces satisfactory
read rates with much higher speed, although Slow sometimes can be more
robust than Fast for very poor images
DMx AutoID+™ User Manual
v2.1.0, Feb 2009
DMx AutoID+™ Graphic User Interface
•
Threshold —
Threshold Options
Description
Adaptive, Global, Local
Default
Adaptive
When the background of the Data Matrix is uneven
due to poor marking or lighting, Adaptive may
produce better decode results
Global
Local or Adaptive methods cannot replace the
Global method because each is slower and less
stable than Global when reading high quality marks
Local
For dot-peen marks or inkjet printer marks, the
spacing between cells may not be even, in which
case, Local may yield less error used in the error
correction algorithm
4
This menu item displays the Parameter Setup dialog box (Barcode tab), as shown
in Figure 4–14.
v2.1.0, Feb 2009
DMx AutoID+™ User Manual
4-27
DMx AutoID+™
Reference Guide
Setup>Parameters>Barcode
Chapter
4
DMx AutoID+™ Reference Guide
FIGURE 4–14.
•
Parameter Setup (Barcode Tab) Dialog Box
Probe Spacing — Defines the distance between barcode scanning probes
in pixels. You must enter a value for Horizontal and Vertical.
Default: 16 pixels
•
Search Direction — Sets the direction of the search, such as Horizontal,
Vert-> Horiz, etc.
•
Barcode Properties — The barcodes to be decoded should meet the
dimensional requirements described by the following properties.
–
Max/Min Bar Width — The maximum/minimum width of bars in
pixels.
Default: 1 to 100 pixels
4-28
DMx AutoID+™ User Manual
v2.1.0, Feb 2009
DMx AutoID+™ Graphic User Interface
–
Max/Min No. of Bars — The maximum/minimum number of bars in the
barcodes to be decoded.
Default: 2 to 256
–
Max/Min Code Height — The maximum/minimum height of barcodes
to be decoded.
Default: 20 to 1024 pixels
–
Max/Min Code Length — The maximum/minimum length of barcodes
to be decoded.
Default: 20 to 1024 pixels
Barcode Specific Properties group allows the properties that are unique to certain
types of barcode to be displayed and modified. Currently, only BC412 contains
special parameters. When BC412 is enabled in the General tab, the following part
of the Barcode tab is enabled:
FIGURE 4–15.
v2.1.0, Feb 2009
Barcode Specific Properties Dialog Box
DMx AutoID+™ User Manual
4-29
4
DMx AutoID+™
Reference Guide
Note: If barcodes of different type or size need to be decoded, each
barcode should be learned separately and its barcode properties
recorded by the user. To read them all, the barcode properties list should
be manually set to contain all the barcode properties learned from each
barcode. The corresponding barcode type in Barcode group in the
General tab should be set accordingly.
Chapter
4
DMx AutoID+™ Reference Guide
•
Barcode Type — Sets parameters that apply only to a given barcode
symbology. Selecting a barcode type from the drop-down list allows you to
enable the barcode parameters. BC412 symbology is supported and the
following parameters are only applicable to BC412 barcode.
•
Start/Stop Enabled — Enabling this item requires that the BC412 barcode
contains a start and stop pattern.
•
Check Sum Enabled — Enabling this item requires that the BC412
barcode contains a checksum character.
•
Decode Left to Right — Enables left-to-right decoding of data. When
de-selected, the data will be decoded from right to left.
Note: This mode is only useful when Start/Stop Enabled is de-selected. This
mode should not be used for SEMI BC412 barcode which contains both
Start/Stop and Check Sum.
•
Polarity — When the polarity is known, select either Dark on Light, or
Light on Dark from the drop-down list. When polarity is not known, leave
Polarity de-selected.
Clicking the Advanced button displays the Barcode Specific Advanced
Parameter dialog box, as shown in Figure 4–16:
FIGURE 4–16.
Barcode Specific Advanced Parameter Dialog Box
The three parameters listed above are applicable to all barcode types enabled in
the General tab.
4-30
DMx AutoID+™ User Manual
v2.1.0, Feb 2009
DMx AutoID+™ Graphic User Interface
Minimum Edge Strength — When the contrast of the barcodes is low,
especially for low contrast BC412 images, the edge strength value can be set
between 5 and 18 gray scale values. The edge strength can be raised to a
higher value when the barcode has very high contrast. With higher edge
strength, the DMx AutoID+™ program will ignore most of low contrast
objects and get to the barcode area quicker. If the barcode’s contrast is
unlikely to change (e.g., when a stable lighting source is employed), the
level can be raised to 36 to produce the optimum run performance. The value
can be set between 5 and 100.
•
Minimum Quiet Zone — The default minimum barcode quiet zone length
is 12 pixels. If for any reason the quiet zone is less in the image due to
camera setup restrictions, the Minimum Quiet Zone parameter can be
lowered in order for the algorithm to accept shorter space as quiet zone. On
the other hand, if the barcode is big in the FOV such that some space
between two adjacent bars exceeds the value specified in the Minimum
Quiet Zone, then there is a possibility that this space will be detected as
possible quiet zone. To avoid this situation, the Minimum Quiet Zone can be
increased. The value can be set between 5 and 100.
Note: Do not adjust Minimum Edge Strength or Minimum Quiet Zone
unless you understand how the change will affect the system performance.
Since Learn Barcode uses the parameter values specified in the above dialog
box, setting these values inappropriately may render the Learn Barcode to
fail. If this happens, select File > Job > Load Default to reset the
parameters to factory settings before attempting to perform Learn Barcode.
•
Confidence Threshold — For barcodes that do not use checksum such as
Code 39, I 2 of 5, Codabar, and BC412, the threshold value can help reduce
potential mis-decode. When the value is raised, a certain number of decodes
must agree before the decode is declared successful. On the other hand, if the
value is set too high, then a normally decodable but imperfect barcode may
not be decoded.
Default: 0 (Any possible decode is accepted)
Range: 0 to 100
Setup>Parameters>OCR Fixed Font
This menu item displays the Parameter Setup dialog box (OCR Fixed Font tab),
as shown in Figure 4–17.
v2.1.0, Feb 2009
DMx AutoID+™ User Manual
4-31
4
DMx AutoID+™
Reference Guide
•
Chapter
4
DMx AutoID+™ Reference Guide
FIGURE 4–17.
Parameter Setup (OCR Fixed Font Tab) Dialog Box
The OCR Fixed Font program can read up to four lines of character strings
having the same font. Only three standard fixed fonts are supported, namely,
SEMI, OCR-A, and OCR-B. Each line can have up to 30 characters. When the
Number of OCR Rows to Read in the General tab is set to a positive value (up to
4), the number of characters in each available row in the Number of Characters
group will be enabled for editing.
Note: The Degraded OCR method only works with one line of text.
4-32
•
Primary Character — The single character selected during the Learn OCR
process. The character should be chosen such that the size of the character
reflects the average size of the characters in the string.
•
Font Type — Indicates the font of characters in the text string. Options
include SEMI, OCR-A, and OCR-B. Default is SEMI font. The SEMI font
contains 0 ~ 9, A ~ Z, and five special characters such as “.”, “-”, “/”, “#” ,
DMx AutoID+™ User Manual
v2.1.0, Feb 2009
DMx AutoID+™ Graphic User Interface
and the space. The currently supported OCR-A and B fonts contain 0 ~ 9 and
A ~ Z. They are illustrated as follows:
–
SEMI: A~Z, 0~9, and five separators: ., -, /, #, and the space.
–
OCR-A: A~Z, 0~9.
–
DMx AutoID+™
Reference Guide
4
OCR-B: A~Z, 0~9
Note: If the OCR-A or OCR-B string contains one of the separators used in
the SEMI font and the position of the separator is fixed, then the string can
still be read by specifying the separator in the fielding. An example in the
Learn > Fixed Font OCR illustrates how this can be done.
v2.1.0, Feb 2009
DMx AutoID+™ User Manual
4-33
Chapter
4
•
DMx AutoID+™ Reference Guide
OCR Method — Indicates which method is to be used in locating and
decoding the characters. The default is Degraded. Options include:
–
Standard — This method works on clean characters with no significant
background noise. The method allows the text string to rotate up to 15°
from the horizontal or vertical orientation. The speed of the method is
relatively fast. The number of characters to be read during the run is
allowed to vary from the number used in Learn.
–
Dot Matrix — This method is the Standard method optimized for Dot
Matrix characters. It has the similar performance as the Standard
method except that it is more tolerant of background noise.
–
Degraded — This method is the most robust of all three methods and
should be used whenever possible. It is capable of reading characters
with damages and noise. It allows minor rotation from the horizontal or
vertical orientation. The speed of the OCR reading is slower than the
above two methods.
•
Text Polarity — Indicates whether the characters are Dark on Light or Light
on Dark. With Degraded OCR method, if the text polarity may vary from
image to image in the Run mode after the Learn, then select Unknown.
Since using Unknown Polarity reduces the robustness in locating characters,
this mode should be avoided whenever possible. The Unknown polarity is
only available for Degraded OCR method.
•
Text Orientation — Indicates whether the character string(s) is placed
Normal, Top to Bottom, Upside Down, or Bottom to Top.
•
Train String — During the Learn OCR process, one row of characters in the
image should be entered in the Train String box.
Clicking the Advanced button displays the Advanced OCR Parameter Tuning
dialog box, as shown in Figure 4–18:
4-34
DMx AutoID+™ User Manual
v2.1.0, Feb 2009
DMx AutoID+™ Graphic User Interface
FIGURE 4–18.
Advanced OCR Parameter Tuning Dialog Box
•
Confidence Threshold — This confidence threshold value is useful in
rejecting the decoded character string in which the minimum confidence of
all characters is below this value. The confidence value measures how well a
character matches its ideal shape. Raising the threshold value will reduce the
ability to read poorly formed or damaged characters and also reduces the
possibility of mis-decoding characters (e.g., substitution error).
Default: 60
Range: 0 to 100
Note: If the OCR string is successfully read but the minimum confidence
value is less than the threshold value, then the status code 6001 will be
reported, indicating OCR confidence checking failure. To see the status
code, select Formatting tab and check OCR Debug Report: Status Code.
•
v2.1.0, Feb 2009
% String Length Variation — Can be set to up to ±10% variation from the
string length used in Learn. This parameter is only applicable to Degraded
OCR Method. The default value 0 is adequate from most of the OCR
applications in which the text string length (in pixels) does not vary from
part to part. A positive percentage number should be used when the length
does vary significantly, up to 10%.
DMx AutoID+™ User Manual
4-35
DMx AutoID+™
Reference Guide
4
Chapter
4
•
•
4-36
DMx AutoID+™ Reference Guide
Fine Tune Method — Indicates which options should be used in Run mode
after a successful Learn. Some of the options are set automatically by the
Learn process. You set the rest based on the OCR application.
–
Detect Space — Allows a ‘space’ character to be found. This option is
automatically set by the Learn process if there is at least one space
character in the Train String.
–
Number of Characters Vary — Allows the number of characters to vary
in Run after Learn. This option is supported by Standard and Dot Matrix
OCR methods.
–
Disable Prefilter — Disables certain filtering steps to prevent the
prefilter from removing too much image detail in certain applications.
–
Character Size/Space Vary — Allows the character size and spacing
between characters to vary from the image used in Learn. It also enables
the software to handle character size and/or spacing nonuniformity.
–
Speed Enhance — Uses a fast but less robust version of the OCR
algorithm.
–
Remove Noise — Uses a fast but less robust version of the OCR
algorithm. This option is automatically enabled by Learn process in
degraded method. If the image is clean and no noise is present, then you
can remove the option to reduce the read time.
–
SEMI M-Checksum — Tells the program to verify if the read text string
passed the SEMI Checksum test.
Character Dimensions — When Learn is successful, the learned
parameters such as Character Width, Character Height, Character Spacing,
and Stroke Width (thickness), in pixels, are displayed. Using the character 0
as an example, Character Width is the horizontal distance between the center
of the left stroke and that of the right stroke, and Character Height is the
vertical distance between the center of the top stroke and that of the bottom
stoke. Using the character dimensions obtained from the OCR learn, the
nominal character width and the nominal character height can be computed.
The nominal character width is the horizontal distance between the leftmost
pixel and the rightmost pixel of a character and is obtained as the sum of
Character Width and Stroke Width. The nominal character height is the
vertical distance between the topmost pixel and the bottommost pixel of a
character and is the sum of Character Height and Stroke Width. To assure the
DMx AutoID+™ User Manual
v2.1.0, Feb 2009
DMx AutoID+™ Graphic User Interface
most reliable and efficient reading, the recommended nominal character
width and height are 20 (±5) pixels and 35 (±15) pixels respectively.
Custom Fielding — Allows the user to specify to which fielding option
each character position belongs. The Fielding Option group is enabled only
after the OCR Fixed Font parameters have been learned. By default, each
character position uses Alphanumeric fielding represented by ‘*’. To set
certain position to be either Alpha only, or Numeric only, or other custom
combination, click the ‘*’ to display the Fielding Options section and then
select the expected option by pressing down its corresponding radio button.
When the Other option is selected, the possible character(s) that can appear
in that position can be entered in the box following the ‘Other’ option. For
example, 123A can be entered if certain character position can be either 1 or
2 or 3, or A. If certain character position corresponds to a character that will
never change in Run mode, you can enter that character in the ‘Other’
fielding option for that position. This is typically done for separators such as
‘space’ character, ‘-’, ‘.’ for Semi font. When only one character is entered in
the ‘Other’ fielding option for certain position, the reading result will always
output that character in that position with confidence value of 100. In
particular, if a certain character position always corresponds to the 'space'
character, then enter 'space' in the 'Other' fielding option for that position and
disable Detect Space in Finetune method. Detect Space is necessary when a
certain character position can be both the space character and other
characters.
Setup>Parameters>Formatting
This menu item displays the Parameter Setup dialog box (Formatting tab), as
shown in Figure 4–19. It defines the data output format and reported debug
information.
v2.1.0, Feb 2009
DMx AutoID+™ User Manual
4-37
4
DMx AutoID+™
Reference Guide
•
Chapter
4
DMx AutoID+™ Reference Guide
FIGURE 4–19.
Parameter Setup (Formatting Tab) Dialog Box
Output Formatting
4-38
•
Prefix — Defines the prefix string that will be prepended to the
symbology/OCR data string for each camera read.
•
Suffix — Defines the suffix string that will be appended to the
symbology/OCR data string for each camera read.
•
Label Separator — Character that delimits the data from different symbols
when multiple symbols are decoded in the same image.
DMx AutoID+™ User Manual
v2.1.0, Feb 2009
DMx AutoID+™ Graphic User Interface
Status Separator — Character that delimits the Status code and other
debug data from each other.
•
Symbology/OCR Debug Report
Report data that is formatted down the left column, then down the right column,
and is separated by a Status Separator Character. Data may be enabled for
reporting or disabled (unchecked) as follows:
Status Code for Data Matrix, Barcode (excluding QR Code) and
OCR:
TABLE 4–1. Status
v2.1.0, Feb 2009
Code For Data Matrix, Barcode & OCR
Numeric Code
Description
0
Read Success, No Verification Enabled
1
Read Success, Verification Status Poor
2
Read Success, Verification Status Fair
3
Read Success, Verification Status Good
3048
Symbology Decode Failed
4301
Trigger Overrun
4303
String Mismatch
4304
Angle Match Failed
4305
Excessive Damage
4310
Process Overrun
4601
No Edge Candidate Found
4604
First Edge Not Found or Too Small
4605
Second Edge Not Found
4611
Third Edge Not Found
4612
Fourth Edge Not Found
4620
Symbology Corner Out of Image
4621
Size Test Failed
4622
Unable to Find Row/Column
4630
Inspection Timed Out
4633
Border Match Failed
4700
Read Success but Verification Process Error
4701
Read Success but Verification Unsupported
DMx AutoID+™ User Manual
4
DMx AutoID+™
Reference Guide
•
4-39
Chapter
4
DMx AutoID+™ Reference Guide
TABLE 4–1. Status
Code For Data Matrix, Barcode & OCR (continued)
Numeric Code
Description
4702
Read Success but Verification Timed Out
4710
Read Success but ISO Requires ECC200
4711
Read Success but ISO Aperture Too Small
4712
Read Success but ISO Aperture Too Large
4713
Read Success but ISO Insufficient Space
4714
Read Success but ISO Fails RDA_Step_F1
4715
Read Success but ISO Fails RDA_Step_F2
4716
Read Success but ISO Fails RDA_Step_F3
4717
Read Success but ISO Fails RDA_Step_AE
6001
OCR Conformance Failure
6002
OCR General Error
9999
Dongle Missing
Note: 4700 is reported when at least one of the Data Matrix borders is less
than one cell size (1X) from the image border or the damage to the border is
too severe; 4702 is reported when a barcode is read but the verification is not
supported, or Data Matrix DPM or IAQG verification is attempted on a NonECC200 Data Matrix that is greater than 26x26; 4702 is reported when the
Data Matrix is read but the verification cannot be completed before the
Inspection Timeout Value is reached.
•
Status Code for QR Code:
TABLE 4–2. Status
4-40
Code for QR Code
Numeric Code
Description
6001
QR IP General Error
6002
QR IP Ratio Error
6003
QR IP Finder Error
6004
QR IP Line Fit Error
6005
QR IP Line Geometry Error
6006
QR IP Line Corner Error
DMx AutoID+™ User Manual
v2.1.0, Feb 2009
DMx AutoID+™ Graphic User Interface
•
Code for QR Code (continued)
Numeric Code
Description
6020
QR DEC General Error
6021
QR Invalid RS Level
6022
QR Format Info Failed
6023
QR Version Info Failed
6024
QR Invalid Rows or Columns
6025
QR Invalid Data Codeword
6026
QR Invalid Total Codeword
6027
QR Invalid Mode Indicator
6028
QR Mode Unimplemented
6029
QR RS Dec Failed
6030
QR BCH15 Decode Error
6031
QR Invalid Model
4
Symbol Angle — Angle formed by the bottom solid side of each Data
Matrix symbol with the horizontal (x) axis, or Angle formed by the
barcode/OCR string orientation with the horizontal (x) axis.
Range: 0° to 359° in increments of 1°
v2.1.0, Feb 2009
•
Symbol Corners — Contains the coordinates of the four corners of each
Data Matrix/Barcode found.
•
Symbol Contrast — Symbol contrast from 0% through 100% in each Data
Matrix symbol.
•
Total Error Bits — Number of error bits found in each decoded Data
Matrix. For ECC200, this is obtained by multiplying the number of
codewords corrected by 8.
•
Damage Percent — Number of error bits/number of total bits in each Data
Matrix symbol.
•
Border Match Percent — Measures how good the border of each Data
Matrix is, when compared to ideal.
•
Threshold Value — Value used in determining the color of cells in each
Data Matrix.
DMx AutoID+™ User Manual
4-41
DMx AutoID+™
Reference Guide
TABLE 4–2. Status
Chapter
4
•
DMx AutoID+™ Reference Guide
Timing — Total time to decode all barcodes, then all Data Matrix symbols,
in an entire image, or total time to perform OCR.
OCR Debug Report
•
Char Confidence — OCR confidence level for each read character.
•
String Confidence — OCR confidence for the read text string. This is the
minimum of all char confidence.
•
Char Corners — Contains the coordinates of four corners of each character
found in OCR.
Clicking the Advanced button inside the Output Formatting displays the
Advanced Formatting dialog box, as shown in Figure 4–20:
FIGURE 4–20.
•
Date/Time Stamp — The date and time stamp will be appended to the
decoded data string for each camera read when checked.
•
Show Verifier Tags — When this is checked, tags are inserted before each
type of the parameters measured in Data Matrix and barcode verification
results.
–
4-42
Advanced Formatting Options (Formatting Tab) Dialog Box
The tags for Data Matrix verification are:
•
ad — angle of distortion
•
an — axial nonuniformity
•
bm — border match
DMx AutoID+™ User Manual
v2.1.0, Feb 2009
DMx AutoID+™ Graphic User Interface
v2.1.0, Feb 2009
cf — cell fill rate
•
cm — cell modulation
•
co — center offset
•
cs — cell size
•
pg — print growth
•
sc — symbol contrast
•
so — size offset
•
uec — unused error correction
4
The tags for barcode verification are:
•
1X — one X dimension
•
dc — decodability
•
df — defects
•
ec — min. edge contrast
•
ed — edge determination
•
md — modulation
•
qz — quiet zone
•
rd — reference decode
•
rf — reflectance (max and min)
•
sc — symbol contrast
•
sg — scan grade
DMx AutoID+™
Reference Guide
–
•
•
Hex Result String — Check this to report decode data containing nonprintable ASCII characters. Each character of the decode data will be
displayed as its ASCII value in hexadecimal representation. A space is
inserted between two adjacent hex values for better readability.
•
Partial Result String — You can report a portion of the decode data by
specifying the Data Length and Data Start. For example, to send out 10 bytes
DMx AutoID+™ User Manual
4-43
Chapter
4
DMx AutoID+™ Reference Guide
of the decode string starting at position 4, set Data Length to 10 and Data
Start to 4.
Setup>Parameters>Verifier
You can use the verifier to measure the Data Matrix mark quality as it is decoded.
The inline verifier is a useful tool for grading and monitoring the Data Matrix
marking process such that poorly marked or marginally decodable Data Matrix
marks can be identified. If the Data Matrix code is not decodable, no mark
quality measurement results can be obtained. To achieve accurate and repeatable
verification results, the nominal cell size reported from each verification method
(except for AIM) should be at least 5 pixels. It is recommended that 10 pixels be
achieved whenever possible.
Nominal cell size is the average value of the two values: X Nominal Cell Size
and Y Nominal Cell Size. X Nominal Cell Size is the Data Matrix width in pixels
divided by the number of columns; Y Nominal Cell Size is the Data Matrix
height in pixels divided by the number of rows.
Click the Verifier tab and select the DPM mode to display the in-line verification
dialog box, as shown in Figure 4–21.
4-44
DMx AutoID+™ User Manual
v2.1.0, Feb 2009
DMx AutoID+™ Graphic User Interface
FIGURE 4–21.
In-line Verification Dialog Box
DMx AutoID+™
Reference Guide
4
•
v2.1.0, Feb 2009
Mode — The options are None, DPM, AIM, IAQG, ISO 15415. The default
option is None, indicating no verification is performed after reading the Data
Matrix. When AIM is selected, the verifier will perform mark quality
measurements based on the AIM specifications on Data Matrix. In addition
to displaying the reading results specified in the formatting tab, the
measurement results and AIM grading will be displayed. When IAQG is
selected, the verifier will perform mark quality measurement based on the
AS9132 specifications on Data Matrix. If the Mode is set to ISO 15415, then
the verification is performed based on the ISO/IEC 15415 specification. The
AIM/IAQG/ISO 15415 Status Configuration is enabled when the mode is set
to AIM, IAQG, or ISO 15415. When DPM is selected, the verifier will
perform mark quality measurement for the Direct Part Marks (DPM) and the
DPM Status Configuration will be enabled.
DMx AutoID+™ User Manual
4-45
Chapter
4
DMx AutoID+™ Reference Guide
•
Show Status Only — When this is checked, only the verification status
value is reported. The verification grades and values are not sent out in the
report. Note that the Status Code must be checked first in the Formatting tab
in order to report the verification status.
•
Validate Inspection — Defines how the verification failure affects the
inspection result. When verification fails and Validate Inspection is checked,
the inspection will fail even if the Data Matrix was decoded. In this case, the
Read I/O will not be raised in and the Read failure is indicated. When
verification fails and Validate Inspection is unchecked, the inspection will
not fail, both the Read I/O and Overrun I/O will be raised.
•
Target Print Growth — When Mode is set to DPM and Print Growth Grade
is checked in the DPM Status Configuration, the Advanced button will be
enabled. Clicking Advanced button displays the Target Print Growth
Advance Setup box. Target Print Growth represents the best print growth
value required for the marking application, and it defaults to 0. For dot peen
marks, you may choose to mark the dot size to be a certain percentage
smaller than the nominal cell size. A target print growth value of -0.10
indicates that the best print growth should be 10 percent smaller than the
nominal cell size.
AIM Verification Parameters
The following parameters are measured based on AIM Uniform Symbology
Specification - Data Matrix, or ISO 16022 document. The method described in
the document parallels in many ways the ANSI X3.182-1990 guideline for
assessing print quality of linear bar code symbols. The parameters are mostly
applicable to high contrast printed labels or certain laser marks on clean surfaces.
•
Symbol Contrast (SC) — Contrast of the Data Matrix measured from the
image. The grade is:
A if SC >= 75
B if SC >= 55
C if SC >= 40
D if SC >= 20
F if SC < 20
•
4-46
Axial Nonuniformity (AN) — Check if the spacing between Data Matrix
rows and the spacing between Data Matrix columns are similar to each other.
The smaller the score the better the quality. The grade is:
DMx AutoID+™ User Manual
v2.1.0, Feb 2009
DMx AutoID+™ Graphic User Interface
A if AN <= 0.06
B if AN <= 0.08
C if AN <= 0.10
D if AN <= 0.12
F if AN > 0.12
Print Growth (PG) — Measures how much the cells comprising the Data
Matrix have grown or shrunk from nominal cell size. Two measurements are
made by sampling the centerline of two alternating patterns or timing
borders independently to arrive at X Print Growth and Y Print Growth. For
example, if the cell size has grown 20% over the nominal cell size in the X
direction, then the X Print Growth is 0.20. If the cell size has shrunk 20%
from the nominal cell size in Y direction, then the Y Print Growth is -0.20.
The closer the score is to 0 the better the quality. The Print Growth is the X
and Y print growth that has the larger absolute value. The grade is:
A if |PG| <= 0.15
B if |PG| <= 0.21
C if |PG| <= 0.26
D if |PG| <= 0.30
F if |PG| > 0.30
Note that, in the Data Matrix Spec, a D' value was introduced as the Print
Growth. In fact, D' = 3.3 x PG. Therefore, the above grading criteria can also
be written as:
A if |D'| <= 0.50
B if |D'| <= 0.70
C if |D'| <= 0.85
D if |D'| <= 1.00
F if |D'| > 1.00
•
Unused Error Correction (UEC) — The Error Correction Used measures
how many cells (for ECC050, ECC080, ECC100, and ECC140) or
codewords (each consisting of eight cells for ECC200) have been corrected
in order to decode the Data Matrix. The UEC is the full error correction
capacity (normalized to 1) minus the Error Correction Used. The greater the
score the better the quality. The grade is:
A if UEC >= 0.62
B if UEC >= 0.50
C if UEC >= 0.37
v2.1.0, Feb 2009
DMx AutoID+™ User Manual
4-47
4
DMx AutoID+™
Reference Guide
•
Chapter
4
DMx AutoID+™ Reference Guide
D if UEC >= 0.25
F if UEC < 0.25
•
Overall Grade — Lowest of the parameter grades achieved from above four
parameters.
IAQG Verification Parameters
The following parameters are measured based on AS 9132 (Rev A), Data Matrix
(2D) Coding Quality Requirements for Parts Marking, International Aerospace
Quality Group.
•
Dot Size — Check how much the size of all modules varies. The value Dot
Size Count1 is the percentage of the modules that are either smaller than
70% or greater than 90% of the nominal module size. The value Dot Size
Count2 is the percentage of modules that are either smaller than 60% or
greater than 105% of the nominal module size. The Dot Size Grade is:
A (Excellent) if Dot Size Count1 is no more than 2%
B (Acceptable) if Dot Size Count2 is no more than 2%
F (Fail) if Dot Size Count2 is greater than 2%
•
Dot Center Offset — Check if modules are marked in the correct locations.
The value Dot Center Offset Count1 is the percentage of modules whose dot
center offset exceeds 10% of the nominal module size. The value Dot Center
Offset Count2 is the percentage of modules whose dot center offset exceeds
20% of the nominal module size. The Dot Center Offset Grade is:
A (Excellent) if Dot Center Offset Count1 is no more than 2%
B (Acceptable) if Dot Center Offset Count2 is no more than 2%
F (Fail) if Dot Center Offset Count2 is greater than 2%
•
Angle of Distortion — Measure the angular deviation of 90° plane between
the two solid borders. The Angle of Distortion Grade is:
A (Excellent) if the Angle of Distortion is no more than ±3.5°
B (Acceptable) if no more than ±7°
F (Fail) if more than ±7°
4-48
•
Nominal Module Size — Same as Nominal Cell Size on page 4–44.
•
Module Fill Rate — Average module size divided by the nominal module
size in both X and Y direction; provided as a reference only.
DMx AutoID+™ User Manual
v2.1.0, Feb 2009
DMx AutoID+™ Graphic User Interface
•
Ovality — A module has poor ovality if the width and height of the module
differ by more than 20% of the nominal module size. The Ovality Value is
the percentage of modules that have poor ovality. The Ovality Grade is:
A and B if Ovality Value is no more than 2%
F if Ovality Value is greater than 2%
•
Symbol Contrast — Defined as the gray density difference between the
marking and its substrate. For image based contrast measurement, the
camera system first must be calibrated to match the Scale of Gray Density
chart shown in AS9132. The contrast is then measured as the difference in
reflectance (measured by grayscale values) between the light and dark
modules of the symbol. The arithmetic mean of the darkest 10% of the pixels
and that of the lightest 10% pixels within the Data Matrix area are computed.
Symbol Contrast is the difference of the two means divided by the full gray
scale range. This parameter is not graded but provided as a reference.
Overall Grade — Lowest grade of all graded parameters.
ISO 15415 Verification Parameters
The following parameters are measured based on ISO/IEC 15415, Bar code
symbol print quality test specification - Two-dimensional symbols, using the
measuring aperture 05. To correctly apply the aperture 05, the camera must be
calibrated first using Setup > Calibration menu.
•
Reference Decode — Use the symbology Reference Decode Algorithm to
decode the Data Matrix. Reference Decode is graded as:
A if the Data Matrix is successfully decoded
F if the Data Matrix cannot be decoded
•
Symbol Contrast (SC) — Difference between the highest and lowest
reflectance values in the Data Matrix area including the quiet zone. It is
graded as:
A if SC >= 70%
B if SC >= 55%
C if SC >= 40%
D if SC >= 20%
F if SC < 20%
•
v2.1.0, Feb 2009
Axial Nonuniformity — Same as AIM Verification.
DMx AutoID+™ User Manual
4-49
4
DMx AutoID+™
Reference Guide
•
Chapter
4
•
DMx AutoID+™ Reference Guide
Grid Nonuniformity (GN) — Measures and grades the largest vector
deviation of the grid intersections from their ideal theoretical position. The
grid intersections are determined by the reference decode algorithm from the
binarized image of the Data Matrix from the cells within the alternating
patterns only. Grid Nonuniformity is graded as:
A if GN <= 0.38
B if GN <= 0.50
C if GN <= 0.63
D if GN <= 0.75
F if GN > 0.75
•
Unused Error Correction — Same as AIM Verification.
•
Fixed Pattern Damage — Measured based on modules in each of the four
fixed patterns (two solid borders and two alternating patterns or timing
borders) and its corresponding quiet zone, and when present, modules in or
around the internal alignment patterns. Up to five segments are individually
graded and then the average grade is determined. Finally, the grade for Fixed
Pattern Damage is chosen to be the lowest of the segment grades and the
distributed damage grade. There is no final value for Fixed Pattern Damage
that corresponds to the grade for reporting.
•
Modulation — Measure the uniformity of reflectance of the dark and light
modules, respectively. First, Modulation for each codeword is computed and
graded based on the reflectance value of each module in the codeword.
Then, the modulation grade is determined using codeword based modulation
grades by applying an overlay procedure. Only the modulation grade is
reported. There is no final value for Modulation to report.
•
Print Growth — Measured the same way as in the AIM Verification but is
not graded. It is reported as an informative measure for the purposes of
process control.
•
Overall Grade — Lowest grade of all ISO 15415 parameters described in
this section except for Print Growth.
DPM Verification Parameters
The following parameters are measured based on Microscan’s extensive
experience in Data Matrix reading and verification of Direct Part Marks (DPM).
•
4-50
Cell Size (CS) — Test if Nominal Cell Size exceeds the minimum
requirement. To ensure accurate and repeatable measurement results, it is
DMx AutoID+™ User Manual
v2.1.0, Feb 2009
DMx AutoID+™ Graphic User Interface
recommended that nominal cell size be no less than 10 pixels. For good
quality images, a minimum of 5 pixels may be sufficient. The grade is:
A if CS >= 10
B if CS >= 9
C if CS >= 7
D if CS >= 5
F if CS < 5
Note that, for calibrated system, the cell size is reported in Mils (0.001 inch)
instead of Pixels but the grading is always based on the pixel values.
Center Offset (CO) — Check if On cells are precisely placed according to
the nominal Data Matrix grid. If a cell is out of alignment, its center offset
error is computed as the distance from the center of the cell to its nominal
location (in pixels) divided by the nominal cell size. The Center Offset of the
Data Matrix is the average of center offset errors for all the On cells
normalized to achieve the proper range between 0 and 10. The measurement
is most useful for gauging the quality of dot peen or inkjet marks. The
smaller the score the better the quality. The grade is:
A if CO <= 2.5
B if CO <= 5
C if CO <= 7.5
D if CO <= 10
F if CO > 10
•
Size Offset (SO) — Check if all matrix On cells have similar size. The size
offset is computed as the standard deviation of the cell area for all On cells,
normalized to achieve the proper range between 0 and 10. The measurement
is most useful in detecting the matrix cell size variation. The smaller the
score the better the quality. The grade is:
A if SO <= 2.5
B if SO <= 5
C if SO <= 7.5
D if SO <= 10
F if SO > 10
•
v2.1.0, Feb 2009
Cell Modulation (CM) — Measures the spread of the gray scale values of
cells of the same polarity. On Cell Modulation is computed for all On cells
and Off Cell Modulation for all Off cells. A high On Cell Modulation
indicates that all On cells have similar gray scale values and the spread is
DMx AutoID+™ User Manual
4-51
4
DMx AutoID+™
Reference Guide
•
Chapter
4
DMx AutoID+™ Reference Guide
small. A high Off Cell Modulation indicates all Off Cells (background cells)
have similar gray scale values. The Cell Modulation is the smaller of the On
and Off Cell Modulation. The cell modulation value ranges from 0 to 100.
The grade is:
A if CM >= 90
B if CM >= 80
C if CM >= 70
D if CM >= 60
F if CM < 60
•
Border Match (BM) — Check if all border cells are present. The border
match is 100 % for a Data Matrix with perfect borders. The grade is:
A if BM >= 95
B if BM >= 90
C if BM >= 85
D if BM >= 80
F if BM < 80
•
Symbol Contrast (SC) — Contrast of the Data Matrix measured from the
image. The value is sensitive to the lighting change; thus, uncalibrated value
has little meaning. To use this parameter properly, contrast calibration must
be performed first. The range is from 1 to 100. The grade is:
A if SC >= 75
B if SC >= 55
C if SC >= 40
D if SC >= 20
F if SC < 20
•
Axial Nonuniformity (AN) — Check if the spacing between matrix rows
and the spacing between matrix columns are similar to each other. The
smaller the score the better the quality. The grade is:
A if AN <= 0.06
B if AN <= 0.08
C if AN <= 0.10
D if AN <= 0.12
F if AN > 0.12
•
4-52
Print Growth (PG) — Measures how much the Data Matrix cells are over
or under printed/marked in both X and Y directions. X Print Growth (XPG)
is computed as the difference between the average width of all On cells and
DMx AutoID+™ User Manual
v2.1.0, Feb 2009
DMx AutoID+™ Graphic User Interface
the X Nominal Cell Size, divided by the X Nominal Cell Size. Y Print
Growth (YPG) is computed as the difference between the average height of
all On cells and the Y Nominal Cell Size, divided by the Y Nominal Cell
Size. Print Growth (PG) is defined as the larger value of |XPG - TPG| and
|YPG - TPG| where TPG is the Target Print Growth. Target Print Growth
represents the best print growth value required for the marking application
and is default to 0. For dot peen marks, you may choose to mark the dot size
to be a certain percentage smaller than the nominal cell size and set the TPG
to be a negative value such as -0.10 or -0.20. Print Growth is graded as:
•
Unused Error Correction (UEC) — The Error Correction Used measures
how many cells (for ECC050, ECC080, ECC100, and ECC140) or
codewords (each consisting of eight cells for ECC200) have been corrected
in order to decode the Data Matrix. The UEC is the full error correction
capacity (normalized to 1) minus the Error Correction Used. The greater the
score the better the quality. The grade is:
A if UEC >= 0.62
B if UEC >= 0.50
C if UEC >= 0.37
D if UEC >= 0.25
F if UEC < 0.25
•
Angle of Distortion (AD) — Measures how much the “L” angle (the angle
formed by the two solid borders) deviates from the right angle. The grade is:
A if |AD| <= 2
B if |AD| <= 4
C if |AD| <= 6
D if |AD| <= 7
F if |AD| > 7
•
v2.1.0, Feb 2009
Overall Grade — The overall grade is the lowest grade received by all
enabled verification parameters. By default, all parameters except Cell Size
and Symbol Contrast are enabled. Since it is not always possible to achieve
the recommended 10 pixels per cell or good contrast for DPM parts, and the
two parameters Cell Size and Symbol Contrast are usually less important,
DMx AutoID+™ User Manual
4-53
4
DMx AutoID+™
Reference Guide
A if PG <= 0.10
B if PG <= 0.20
C if PG <= 0.30
D if PG <= 0.40
F if PG > 0.40
Chapter
4
DMx AutoID+™ Reference Guide
they are disabled in order to avoid lowering the overall grade of an otherwise
good Data Matrix mark. Sometimes, you may also find other parameters that
receive low grades due to the improper camera setup. These parameters have
to be disabled so that the overall grade is determined by the remaining
important parameters more suitable for the application. For example, a laser
mark that has perfect center offset and size offset may report a low grade for
both parameters if the camera has to be mounted at an angle that is not
perpendicular to the mark surface. Based on the assumption that both the
center and size offset are not contributing factors to the low quality of the
mark, the verification can be done after disabling the two parameters.
Verification Status
The Verification Status is used to indicate Verification Pass/Fail or Verification
Good/Fair/Poor. It is configured based on the individual parameter grade for
DPM verification or the Overall Grade for AIM, IAQG, and ISO 15415
verifications. The verification status is such that the grade A is always Good and
grade F is always Poor, and that grade B, C, or D can be configured to be any of
the Good, Fair, and Poor status as long as no lower grade is assigned a better
status. If the Fair status is not used, then the verification status has two outcomes
only, Good (or Pass) and Poor (or Fail).
For AIM, IAQG, and ISO 15415 Data Matrix verification, the verification status
is configured using the Overall Grade. The default configuration is that grade B
is Good, grade C and D are Fair.
4-54
DMx AutoID+™ User Manual
v2.1.0, Feb 2009
DMx AutoID+™ Graphic User Interface
FIGURE 4–22.
IAQG Verification
DMx AutoID+™
Reference Guide
4
For DPM verification, the verification status is not configured using the Overall
grade. Instead, the verification status for each parameter is individually
configured and determined by its grade. The verification status for the DPM
verification is chosen as the lowest verification status of all enabled parameters.
v2.1.0, Feb 2009
DMx AutoID+™ User Manual
4-55
Chapter
4
DMx AutoID+™ Reference Guide
FIGURE 4–23.
DPM Verification
Verification Results Display
Verification results are sent to serial port, TCP port, or log file the same way as
they appear in the status bar of DMx AutoID+™. In the following, we use
Decode Data to refer to the Data Matrix decode string and the Symbology Debug
Report specified in the formatting tab. When the Data Matrix is not decoded, the
decoded string will be substituted with the default LOCATE FAILURE or
DECODE FAILURE message. When the Data Matrix is decoded, the verification
results are displayed in the following ways:
–
AIM Mode (ISO 16022):
•
4-56
Decode Data (decode string and debug output when specified)
DMx AutoID+™ User Manual
v2.1.0, Feb 2009
DMx AutoID+™ Graphic User Interface
v2.1.0, Feb 2009
Symbology/Verification Status Code (if Status Code is checked in
Formatting tab)
•
Symbology/Verification Timing (if Timing is checked in
Formatting tab)
•
Overall Grade
•
Symbol Contrast Grade
•
Symbol Contrast
•
Axial Nonuniformity Grade
•
Axial Nonuniformity
•
Print Growth Grade
•
X Print Growth
•
Y Print Growth
•
UEC Grade
•
Unused Error Correction
4
DMx AutoID+™
Reference Guide
–
•
IAQG Mode (AS9132):
•
Decode Data (decode string and debug output when specified)
•
Symbology/Verification Status Code (if Status Code is checked in
Formatting tab)
•
Symbology/Verification Timing (if Timing is checked in
Formatting tab)
•
Overall Grade
•
Dot Size Grade
•
Dot Size Count1
•
Dot Size Count2
•
Dot Center Offset Grade
•
Dot Center Offset Count1
DMx AutoID+™ User Manual
4-57
Chapter
4
DMx AutoID+™ Reference Guide
–
4-58
•
Dot Center Offset Count2
•
Angle of Distortion Grade
•
Angle of Distortion
•
Nominal Module Size
•
Module Fill Rate X
•
Module Fill Rate Y
•
Ovality Grade
•
Ovality Value
•
Symbol Contrast
ISO 15415 Mode:
•
Decode Data (decode string and debug output when specified)
•
Symbology/Verification Status Code (if Status Code is checked in
Formatting tab)
•
Symbology/Verification Timing (if Timing is checked in
Formatting tab)
•
Overall Grade
•
Reference Decode Grade
•
Symbol Contrast Grade
•
Symbol Contrast Value
•
Axial Nonuniformity Grade
•
Axial Nonuniformity Value
•
Grid Nonuniformity Grade
•
Grid Nonuniformity Value
•
UEC Grade
•
UEC Value
DMx AutoID+™ User Manual
v2.1.0, Feb 2009
DMx AutoID+™ Graphic User Interface
v2.1.0, Feb 2009
Fixed Pattern Damage Grade
•
Modulation Grade
•
Print Growth Value X
•
Print Growth Value Y
•
Nominal Cell Size Value
DPM Mode:
•
Decode Data (decode string and debug output when specified)
•
Symbology/Verification Status Code (if Status Code is checked in
Formatting tab)
•
Symbology/Verification Timing (if Timing is checked in
Formatting tab)
•
Overall Grade
•
Nominal Cell Size Grade
•
Nominal Cell Size
•
Center Offset Grade
•
Center Offset
•
Size Offset Grade
•
Size Offset
•
Cell Modulation Grade
•
On Cell Modulation
•
Off Cell Modulation
•
Border Match Grade
•
% Border Match
•
Symbol Contrast Grade
•
Symbol Contrast
DMx AutoID+™ User Manual
4
DMx AutoID+™
Reference Guide
–
•
4-59
Chapter
4
DMx AutoID+™ Reference Guide
•
Axial Nonuniformity Grade
•
Axial Nonuniformity
•
Print Growth Grade
•
X Print Growth
•
Y Print Growth
•
UEC Grade; UEC
•
Distortion Angle Grade
•
Angle of Distortion
Setup>Parameters>Fiducial
To use the fiducial finder, you first need to perform a Learn. For more
information, see “Learn>Fiducial” on page 4-120
The Fiducial tab allows you to configure the correlation based fiducial finder to
search for a target in the image.
4-60
DMx AutoID+™ User Manual
v2.1.0, Feb 2009
DMx AutoID+™ Graphic User Interface
FIGURE 4–24.
Parameter Setup (Fiducial Finder) Dialog Box
DMx AutoID+™
Reference Guide
4
•
v2.1.0, Feb 2009
Mode — Allows you to select one of the following:
–
Select None if you want to keep the learned target but do not want to
enable the fiducial finder in Run mode yet.
–
Select Fast if you want to enable the fiducial finder to run a fast but
somewhat less robust algorithm.
–
Select Standard to select the more robust algorithm. Sometimes, the
Standard mode may take less time to find the target than the Fast mode.
This happens when the less robust Fast mode fails to find the target
quickly and extra algorithm steps are performed. Therefore, you need to
experiment with the template you choose to determine whether the Fast
mode is consistently faster than the Standard mode.
DMx AutoID+™ User Manual
4-61
Chapter
4
DMx AutoID+™ Reference Guide
•
Report — Enabled for editing only when the fiducial finder is enabled.
Report the Finder result as Xout: b; (x, y, score, intensity) where b is 1
(found) or 0 (not found), (x, y) are the coordinates of the found target that are
specified by Upper left corner or Center, score is the correlation score,
intensity is the average intensity of the target.
•
Score >= — Enabled for editing only when the fiducial finder is enabled.
You can set the threshold for correlation score here. The higher the score, the
better the template match. If you want to allow a less perfect fiducial mark to
be found, then you might need to lower the threshold.
Default: 70
Range: 20 to 100
•
Angle (±) — Enabled for editing only when the fiducial finder is enabled. If
you need to allow up to 5° rotation angle in the fiducial search, set the angle
here accordingly.
Default: 0 (No rotation is allowed)
•
Template — This is the golden template needed in the correlation search
algorithm. It is a bitmap image of the target learned in the Learn>Fiducial
step and saved in the job folder under the DMx AutoID+™ application
folder. You can use Browse to select a different template.
•
Validate Inspection — The fiducial finder can be enabled to work together
with regular inspection, e.g., reading Data Matrix, and/or barcode, and/or
OCR. When Validate Inspection is unchecked, the status of the inspection is
not affected by the success or failure of the fiducial finder. When Validate
Inspection is checked, the status of the inspection will fail whenever the
fiducial finder fails to find a target, regardless of whether the correct number
of Data Matrices, and/or barcodes, and/or OCR strings have been read or
not.
•
Report Target Intensity — If checked, the average intensity of the found
target is reported after the correlation score.
Setup>Parameters>Barcode Verification
The implementation of barcode print quality verification is based on the ANSI
X3.182-1990 Bar Code Print Quality - Guideline (or ISO15416). A total of 10
scans are made to get 10 scan reflectance profiles of the barcode. The scans are
approximately equally spaced within the barcode and are made parallel to the
length of the barcode.
4-62
DMx AutoID+™ User Manual
v2.1.0, Feb 2009
DMx AutoID+™ Graphic User Interface
For each scan reflectance profile, these parameters are graded:
Decodability
•
Defects
•
Edge Determination
•
Minimum Edge Contrast
•
Minimum Reflectance
•
Modulation
•
Quiet Zone
•
Reference Decode
•
Symbol Contrast
4
Each parameter is given a grade (A, B, C, D, F) that corresponds to a numeric
value of 4, 3, 2, 1, or 0, respectively. The lowest grade received from these
parameters is used as the Overall Profile Grade for the scan profile. The Final
Symbol Grade Score is the simple average of all the overall profile grades using
the standard weighting:
•
4=A
•
3=B
•
2=C
•
1=D
•
0=F
The average is converted to the Final Symbol Grade:
v2.1.0, Feb 2009
•
3.5 <= A <= 4.0
•
2.5 <= B < 3.5
•
1.5 <= C < 2.5
•
0.5 <= D < 1.5
•
F < 0.5
DMx AutoID+™ User Manual
4-63
DMx AutoID+™
Reference Guide
•
Chapter
4
DMx AutoID+™ Reference Guide
The BC Verification dialog box (Figure 4–25) allows you to enable barcode
verification and report either the overall results or each individual scan results
(but not both at the same time).
FIGURE 4–25.
Parameter Setup (Barcode Verification) Dialog Box
Grading Criteria
The following information describes briefly how each parameter is graded based
on a scan reflectance profile.
•
Decodability is graded as:
A — At least 0.62
B — At least 0.50
C — At least 0.37
D — At least 0.25
F — Otherwise
•
4-64
Defects is graded as:
DMx AutoID+™ User Manual
v2.1.0, Feb 2009
DMx AutoID+™ Graphic User Interface
A — At most 0.15
B — At most 0.20
C — At most 0.25
D — At most 0.30
F — Otherwise
•
Edge Determination is graded as A (pass) or F (fail) depending on whether
all element edges are correctly identified.
•
Minimum Edge Contrast is graded as:
A if it is at least 15%
F otherwise
•
Minimum Reflectance is graded as:
4
•
DMx AutoID+™
Reference Guide
A if max reflectance value is at least twice min reflectance value
F otherwise
Modulation is graded as:
A — At least 0.70
B — At least 0.60
C — At least 0.50
D — At least 0.40
F — Otherwise
•
Reference Decode is graded as A or F depending on whether the reference
decode passes or fails. Both Start and Stop Quiet Zone must be at least 10X
for the reference decode to pass.
•
Symbol Contrast is graded as:
A — At least 70%
B — At least 55%
C — At least 40%
D — At least 20%
F — Otherwise
Barcode Verification
Currently, DMx AutoID+™ supports barcode print quality verification for Code
128, Code 39, Code 93, I 2 of 5, UPC-A, EAN13, EAN8, and RSS. To ensure the
verification to be accurate and consistent, you need to set the barcode in the FOV
v2.1.0, Feb 2009
DMx AutoID+™ User Manual
4-65
Chapter
4
DMx AutoID+™ Reference Guide
such that the 1X dimension is between 2.5 to 4 pixels. The barcode needs to be
evenly illuminated with good contrast and no image saturation.
Once a good image is obtained:
1.
Select Learn > Barcode to configure the barcode reading first.
2.
Once the Learn is successful, use Setup > Parameters… to display the
Parameter Setup dialog.
3.
Select BC Verification tab, and then select Overall mode.
4.
To exit the dialog box, click OK.
5.
Click Run Once to view the verification results following the decode data.
Alternatively, you can configure the DMx AutoID+™ to verify all types of
barcodes listed above by following these steps:
1.
Use File > Jobs > Load > Default to clear the existing barcode
configuration.
2.
In Setup > Parameters > General, check Code 128, Code 39, Code 93, I 2
of 5, UPC/EAN, UPC-E, and all types of RSS. Set the Number of Barcodes
to Read to be 1 or up to the number of the barcodes in the same FOV.
3.
Select BC Verification tab and check Overall in Mode. Click OK to exit the
dialog.
4.
Click Run Once to view the verification results.
Reporting Verification Results
By setting the Mode to Overall or Scan, full ANSI barcode verification is
performed once the barcode in the image is decoded. The verification results are
reported differently depending on the mode chosen. Typically, you only need to
use Overall to report the final grade and the overall grade for each scan profile.
Alternatively, you can select Scan to examine a certain scan line in order to get
detailed results on all measured parameters.
Numeric Grading — Checking this will report the grade:
4-66
•
A=4
•
B=3
DMx AutoID+™ User Manual
v2.1.0, Feb 2009
DMx AutoID+™ Graphic User Interface
•
C=2
•
D=1
•
F=0
Show Status Only — Checking this will only display the verifier status. See
Verification Results Display below for the verifier status.
Validate Inspection — Defines how the verification failure affects the
inspection result. When verification fails and Validate Inspection is checked, the
inspection will fail even if the barcode was decoded. In this case, the Read I/O
will not be raised signaling the Read failure. When verification fails and Validate
Inspection is unchecked, the inspection will not fail; both the Read I/O and
Overrun I/O will be raised.
Verification Results Display — The results are sent to serial ports, via TCPIP,
or logged to a log file the same way as they appear in the status bar of DMx
AutoID+™. In the following description, we use Decode Data to refer to the
decoded string and the debug items checked in Symbology Debug Report of the
formatting tab. When the barcode is not decoded, the decoded string will be
substituted with the default LOCATE FAILURE or DECODE FAILURE
message. When the barcode is decoded, the verification results are displayed in
the following ways:
•
v2.1.0, Feb 2009
Overall Mode
–
Decode Data (decode string and debug output when specified)
–
Symbology/Verification Status Code (if Status Code is checked in
Formatting tab)
–
Symbology/Verification Timing (if Timing is checked in Formatting
tab)
–
Final Symbol Grade
DMx AutoID+™ User Manual
4-67
4
DMx AutoID+™
Reference Guide
Verification Status — Can be configured to indicate Verification Pass/Fail or
Verification Good/Fair/Poor. It is configured based the Final Grade. The
verification status is such that the grade A is always Good and grade F is always
Poor, and that grade B, C, or D can be configured to be any of the Good, Fair, and
Poor status as long as no lower grade is assigned a better status. If the Fair status
is not used, then the verification status has two outcomes only, Good (or Pass)
and Poor (or Fail).
Chapter
4
•
4-68
DMx AutoID+™ Reference Guide
–
Final Symbol Grade score (Range: 0.0 to 4.0)
–
scan 0 overall grade
–
scan 1 overall grade
–
scan 2 overall grade
–
scan 3 overall grade
–
scan 4 overall grade
–
scan 5 overall grade
–
scan 6 overall grade
–
scan 7 overall grade
–
scan 8 overall grade
–
scan 9 overall grade
–
1X dimension (Note: Average width of the narrow bar widths, in pixels)
–
ratio 1 (Note: Average wide bar width to 1X dimension)
–
ratio 2 (Note: Next widest bar to 1X dimension, applicable to multiwidth barcode only)
–
ratio 3 (Note: Widest bar to 1X dimension, applicable to multi-width
barcode only)
Scan Mode (You need to specify a scan number from 0 to 9)
–
Decode Data (decode string and debug output when specified)
–
Symbology/Verification Status Code (if Status Code is checked in
Formatting tab)
–
Symbology/Verification Timing (if Timing is checked in Formatting
tab)
–
overall scan grade
–
edge determination grade
–
min reflectance grade
DMx AutoID+™ User Manual
v2.1.0, Feb 2009
DMx AutoID+™ Graphic User Interface
v2.1.0, Feb 2009
–
% max reflectance (Note: Percentage value of reflectance of lightest
space)
–
% min reflectance (Note: Percentage value of reflectance of darkest bar)
–
ref decode grade
–
min edge contrast grade
–
% min edge contrast (Note: Percentage value of minimum edge
contrast)
–
symbol contrast grade
–
% symbol contrast (Note: Percentage value of symbol contrast)
–
modulation grade
–
modulation (Note: 0.00 ~ 1.00)
–
defects grade
–
defects (Note: 0.00 ~ 1.00)
–
decodability grade
–
decodability (Note: 0.00 ~ 1.00)
–
start quiet zone (0.0 ~ 10.0)
–
stop quiet zone (0.0 ~ 10.0)
DMx AutoID+™ User Manual
DMx AutoID+™
Reference Guide
4
4-69
Chapter
4
DMx AutoID+™ Reference Guide
Setup>Image Saving
This menu item displays the Image Saving dialog box, as shown in Figure 4–26.
FIGURE 4–26.
•
•
Image Saving Dialog Box
Save Failed Images — Enable to save the images that cannot be
located/decoded to the Directory for saved images, described below. Images
are saved as FAILxnnn.BMP, where:
–
x — Represents the zero-based index of the camera from which the
image was taken.
–
nnn — Represents the 3-digit numbering index for each image. The
allowable range for nnn is from 000 to 1 less than the Maximum count
(as described next), not to exceed 999.
Maximum count — Since each image requires approximately 300K of disk
space in 640x480 resolution, this parameter limits the number of camera
images that are saved when enabled.
Range: 1 to 999
4-70
DMx AutoID+™ User Manual
v2.1.0, Feb 2009
DMx AutoID+™ Graphic User Interface
v2.1.0, Feb 2009
Delete Old Images at Startup — Enable this item to delete all the failed
images stored in the Directory for failed images at system startup.
•
Overwrite Old Images — Enable this item to overwrite images when the
image name already exists. When the DMx AutoID+™ program is not
configured to overwrite old images, it will stop saving failed images once the
maximum count is reached.
•
Save Image Before Decoding — Enable to save each image before the
symbology or OCR decoding algorithms are performed. Each camera saves
its image to a single file BEFORE_x.BMP, where x is the zero-based index of
the camera. These files are always overwritten. Do not use this option unless
you suspect a serious decoding software problem and attempt to debug it.
•
Directory for Saved Images — The failed images are normally saved in
the folder Save under the application directory DMx AutoID+™. You can
change the directory by selecting the Browse button to display a dialog box
and entering the new directory in the dialog box. If the directory does not
already exist, it will be created.
DMx AutoID+™ User Manual
4-71
4
DMx AutoID+™
Reference Guide
•
Chapter
4
DMx AutoID+™ Reference Guide
Setup>Output Messages
This menu item displays the Customized Output Messages dialog box, as shown
in Figure 4–27.
FIGURE 4–27.
Customized Output Messages Dialog Box
The strings in the edit boxes can be modified. All enabled cameras report the
same string for the same error condition. To add prefix, select Setup, then
Parameters, and finally Formatting to indicate the camera number.
Setup>Checking Modes
The String, Angle, and Damage Checking are performed only when enabled. To
perform the checking, the barcode, Data Matrix, or OCR should be successfully
decoded. Each camera has separate checking parameters for Barcode, Data
Matrix, and OCR, that can be enabled or disabled.
•
4-72
String Checking Mode — Data decoded from an inspection is compared to
a defined string. You can enter the check string in uppercase and/or
lowercase characters, but the entry must match the data being read (e.g.,
string length and case of each character in the string). Wild card can be used.
That is, if you want to ignore part of the string in checking mode, replace
each character of that part with a question mark ‘?’.
DMx AutoID+™ User Manual
v2.1.0, Feb 2009
DMx AutoID+™ Graphic User Interface
•
Angle Checking Mode — Use this mode to verify that the matrix/barcode
being decoded is at a specified angle with a specified tolerance. The angle
and deviation are specified in degrees, with the angle increasing as the
matrix is rotated counter-clockwise.
•
Damage Checking Mode — Use this mode to make sure that the Data
Matrix being decoded contains less than the specified percent of damage to
the data cells. The maximum allowed damage ranges from 0% to 99%.
Open the Setup menu and select Checking Modes to display the Data Matrix
Checking Mode dialog box, as shown in Figure 4–28.
FIGURE 4–28.
Checking Modes Setup (Data Matrix Tab) Dialog Box
DMx AutoID+™
Reference Guide
4
You can either manually enter the match string, angle, deviation, and damage
percent, or set them automatically by checking the Auto Set option before Learn
is performed. To enable a certain type of checking, check its corresponding
On/Off box.
In Barcode Checking Mode, the Damage Checking is not supported. Only String
Checking is supported in OCR Checking Mode.
Note: The Checking Mode can only be enabled when the DMx AutoID+™
program is configured to read one Data Matrix, one barcode, or one row of OCR
text. It is not allowed to work with Retry Supermarket mode.
v2.1.0, Feb 2009
DMx AutoID+™ User Manual
4-73
Chapter
4
DMx AutoID+™ Reference Guide
Setup>Retry Modes
Retry Modes define the inspection (Run) cycle. Several retry modes are
available. This menu item displays the Retry Modes Setup dialog box, as shown
in Figure 4–29.
FIGURE 4–29.
4-74
Retry Modes Setup Dialog Box
•
No Retry — This is the default Retry mode. In this mode, no retry is
attempted upon failure.
•
Timed Retry — When this option is selected, you must enter the time limit
for the retry process and the Inspection Time-out Value specified in the
General Tab of the Parameter box. The time limit should be at least twice the
Inspection Time-out. A retry cycle usually consists of several read cycles. A
DMx AutoID+™ User Manual
v2.1.0, Feb 2009
DMx AutoID+™ Graphic User Interface
read cycle includes acquiring a new image and reading the symbology or
OCR according to the configuration parameters. A trigger (hardware trigger
or serial/TCPIP command READ) is required to start the first read cycle of
the retry cycle. When a trigger is received, the system performs the first read
cycle. If the reading is successful, no further read cycles are needed. If the
reading is not successful and if there is enough time remaining, the next read
cycle is performed. The retry cycle will terminate as soon as the reading is
successful or until the corresponding retry time limit is reached. The reading
results are reported when the retry cycle ends. Before the retry cycle ends,
the system will ignore any new triggers for any cameras. We recommend
that you set the retry time limit to be significantly less than the duration
between two triggers. When there are more than one camera enabled in the
system, you can enable Timed Retry for specific camera(s) up to all enabled
cameras. It is important to set the retry time limit long enough to allow
several read cycles to be performed.
4
v2.1.0, Feb 2009
–
Send a software trigger to DMx AutoID+™ for a specified camera using
serial/TCPIP command READ. Usually, a serial command is generated
from a PLC (Programmable Logic Controller). A TCP/IP command is
generated from another Windows program communicating with DMx
AutoID+™ through TCP/IP protocol. If hardware trigger is unchecked
in Setup>System Configuration box, then the retry cycle for the
specified camera is started as soon as the command READ is received
by DMx AutoID+™. If hardware trigger is checked, then the retry
cycles will not start until a hardware trigger for the specified camera is
received after the command READ is received by DMx AutoID+™.
–
Start the Run Continuous mode with Timed Retry mode. If the hardware
trigger is unchecked in System Configuration box, the system will cycle
through all enabled and configured cameras and perform timed retry for
each camera that has the timed retry mode checked. If the hardware
trigger is checked and the trigger mode is set to asynchronous, then the
retry cycle for a camera that has the retry mode enabled will start only
when a hardware trigger arrives for that camera. Once the camera enters
retry cycle, any new triggers from the same camera or other enabled
cameras will be ignored. Therefore it is essential that no trigger be
generated before a retrying camera completes its retry cycle. This also
means that the triggers for multiple cameras are not truly asynchronous
although the trigger mode needs to be set to asynchronous in the System
DMx AutoID+™ User Manual
4-75
DMx AutoID+™
Reference Guide
There are two main trigger configurations:
Chapter
4
DMx AutoID+™ Reference Guide
Configuration. The retry mode is not entered (not implemented) when
the trigger mode is set to synchronous.
•
Supermarket Retry — In this mode, the inspections are continuously
performed and only successful attempts are reported. In order not to report
duplicate data decoded from the same image, a time limit must be specified.
The time limit ensures that the duplicate data will not be reported until the
specified time has elapsed since the last decode output. This mode is only
applicable to reading one Data Matrix or one barcode.
Setup>Ethernet TCP/IP
You can set up DMx AutoID+™ as either TCP/IP server or client to
communicate with another Windows program running TCP/IP protocol (see
Figure 4–30).
FIGURE 4–30.
4-76
Retry Modes Setup Dialog Box
•
Protocol — If you need to set up DMx AutoID+™ to communicate with
another program that’s configured as a TCP/IP server, select Client here. If
another program is configured as a TCP/IP client, select Server here.
•
Remote Host Identification — If the Protocol is set to Client, you need to
enter the Server computer’s name or IP address in the Remote Host
Identification. If the Server program communicating with DMx AutoID+™
DMx AutoID+™ User Manual
v2.1.0, Feb 2009
DMx AutoID+™ Graphic User Interface
is running on the same PC, enter the default value 127.0.0.1. If the program
is running on a different PC, enter the name or IP address of that PC.
•
Remote Port — Enter the port number to match the Local Port number used
in the Server program on which the Server is listening.
Default: 8510
Range: 0 to 32000
•
Local Port — This Local Port is available when the Protocol is set to Server.
Select a Local Port number on which the DMx AutoID+™ Server will be
listening.
Default: 8500
Range: 0 to 32000
Timeout (minute) — Setting this to a positive value will ensure the DMx
AutoID+™ will attempt to reconnect to the other program within the
specified Timeout limit should the connection be terminated for any reason.
•
Input Prefix/Suffix — DMx AutoID+™ can receive TCP/IP commands
from other programs running TCP/IP protocol. By specifying Prefix and
Suffix, the DMx AutoID+™ will recognize the commands from other
programs by searching for the Prefix and Suffix in the TCP/IP buffer. For the
DMx AutoID+™ to recognize the supported commands, an input suffix is
always required.
•
Output Prefix/Suffix — Any output message transmitted from the DMx
AutoID+™ TCP/IP port to other programs will be prepended by the Output
Prefix and appended by the Output Suffix. An output suffix is required if the
output data needs to be processed by a Windows program, for example, a
custom VB program.
Note: To establish a TCP/IP connection, you need to check Run>Ethernet
TCP/IP. Before a connection is established, if DMx AutoID+™ is
configured as a client, the icon
is displayed in the status bar; if DMx
AutoID+™ is configured as a server, the icon
is displayed. Both icons
change
when a connection is established.
The Ethernet TCP/IP setup parameters cannot be changed when it has been
selected from the Run menu. To change, you must de-select Run>Ethernet
v2.1.0, Feb 2009
DMx AutoID+™ User Manual
4-77
4
DMx AutoID+™
Reference Guide
•
Chapter
4
DMx AutoID+™ Reference Guide
TCP/IP, configure the TCP/IP settings, and then select Run>Ethernet
TCP/IP again. Refer to Run Menu for more information.
Setup>Lighting Control
The Lighting Control dialog box (Figure 4–31) allows you to control a multi-axis
imager from NER. For each axis (currently limited to five), you can set the light
intensity from 0 (darkest) to 100 (brightest). Out of the 16 I/O points available
from the 0300 board, the last point (i.e., IO 16) is used as the Sense (i.e., intensity
Up/Down control), IO 15 is used for the first axis, IO 14 for the second axis, IO
13 for the third axis, IO 12 for the fourth axis, IO 11 for the fifth axis. To change
the intensity of a certain axis (from 1 to 5), select the axis number, and then check
the intensity check box and adjust the intensity value.
FIGURE 4–31.
Retry Modes Setup Dialog Box
Note: By default, the First Axis IO# is set to 15. This cannot be changed unless a
custom cable is made. To change it, always set the Axis to #1 to enabled the edit
box.
4-78
DMx AutoID+™ User Manual
v2.1.0, Feb 2009
DMx AutoID+™ Graphic User Interface
Setup>PLC Communication
This menu item is visible only when the PLC Interface is checked in
View>Additional Menus. Selecting it displays the PLC Communication dialog
box (Figure 4–32) that can be used for configuring the DMx AutoID+™ to
communicate with PLC software via DDE or Profibus protocol.
FIGURE 4–32.
PLC Communication Dialog Box
DMx AutoID+™
Reference Guide
4
Transfer Protocol — You can select either DDE or Profibus.
PLC Service — Set to RsLinx for DDE protocol or Profibus for PROFIBUS
protocol.
Note: The PLC Communication setup parameters cannot be changed when it has
been selected from the Run menu. To change the parameters, de-select PLC
Communication from the Run menu, change the PLC setup parameters, and then
select PLC Communication again.
v2.1.0, Feb 2009
DMx AutoID+™ User Manual
4-79
Chapter
4
DMx AutoID+™ Reference Guide
DDE Protocol
FIGURE 4–33.
PLC Communications Dialog Box — DDE
When DDE is selected and Run>PLC is checked, DMx AutoID+™
continuously attempts to establish a DDE hot link to the PLC software for
receiving DMx AutoID+™ commands. Decode data from DMx AutoID+™ is
sent across a manual DDE link to the PLC software. If the DDE connection is
broken (by exiting the PLC software for instance), DMx AutoID+™ attempts to
reconnect.
PLC to DMx AutoID+™ Transfers — For the PLC software to send commands
to DMx AutoID+™, both Read Data and Read Length are required. Read Data is
the starting data table element in the PLC registers from which the commands to
the DMx AutoID+™ will be sent. Read Length is the maximum amount of words
that the PLC will be sending to the DMx AutoID+™.
DMx AutoID+™ to PLC Transfers — For the PLC software to receive the
decode data from the DMx AutoID+™, both Write Data and Write Length are
required. Write Data is the starting data table element in the PLC registers where
the decode data will be sent. Write Length is the maximum amount of words that
the PLC can receive from the DMx AutoID+™. If the decode data is less than the
Write Length, then spaces will be added at the end.
4-80
DMx AutoID+™ User Manual
v2.1.0, Feb 2009
DMx AutoID+™ Graphic User Interface
•
Transfer Format — Supported for DDE protocol. Each PLC word or
register has two bytes. You have the option to use one character per word or
two characters per word. For each word, the data can be stored with or
without the byte swap. The command packet format from the PLC to DMx
AutoID+™ is:
length (1 word), transaction # (1 word), command (multiple words)
The decode data packet format from DMx AutoID+™ to the PLC is:
length (1 word), echoing transaction # (1 word), decode data (multiple
words)
–
–
–
v2.1.0, Feb 2009
1 char / no byte swapping: 06 01 82 69 65 68
•
06 is the total number of words
•
01 is the transaction #
•
82, 69, 65, 68 are ASCII representations of characters R, E, A, D,
respectively
2 char / no byte swapping: 04 01 21061 16708
•
04 is the total number of words
•
01 is the transaction #
•
21061 = 82 x 256 + 69
•
16708 = 65 x 256 + 68
1 char / byte swapped: 1536 256 20992 17664 16640 17408
•
1536 = 6 x 256, 6 is the total number of words
•
256 = 1 x 256, 1 is the transaction #
•
20992 = 82 x 256
•
17664 = 69 x 256
DMx AutoID+™ User Manual
4-81
4
DMx AutoID+™
Reference Guide
The first word/register value is the number of “applicable” words/registers
that are updated by the read/write, which is the total number of words in the
packet format. We use the DMx AutoID+™ command READ as an example
to describe the packet format:
Chapter
4
DMx AutoID+™ Reference Guide
–
•
16640 = 65 x 256
•
17408 = 68 x 256
2 char / byte swapped: 1024 256 17746 17473
•
1024 = 4 x 256, 4 is the total number of words
•
256 = 1 x 256, 1 is the transaction #
•
17746 = 69 x 256 + 82
•
17473 = 68 x 256 + 65
DDE Topic — This is displayed when you select DDE in Transfer Protocol. Set
the topic to match the DDE element defined at the PLC software.
Profibus Protocol
FIGURE 4–34.
PLC Communications Dialog Box — Profibus
DMx AutoID+™ functions as a slave device on a Profibus DP network through a
slave interface card. The current supported card is Hilscher CIF 50-DPS
(Communication Interface PCI Profibus-DP Slave). A Board Number of 0
indicates one such board is used for the Profibus communication purpose.
4-82
DMx AutoID+™ User Manual
v2.1.0, Feb 2009
DMx AutoID+™ Graphic User Interface
DMx AutoID+™ can either receive a command trigger from a master (typically a
PLC) or be triggered independently of a master (typically via a sensor/hardware
trigger). A simple handshaking data-exchange protocol is implemented to ensure
the decode data from DMx AutoID+™ is received by the master.
Configuring the Profibus Network
Follow the steps below to configure DMx AutoID+™ as a slave on a Profibus
network using the CIF 50-DPS slave card.
Note: The Windows administrator privilege is required
Install the DMx AutoID+™ software and the 0300 board. Refer to the
Readme file on the DMx AutoID+™ Installation CD for more details.
2.
Install the Hilscher CIF50-DPS according to the manufacturer’s instructions.
Make sure the correct driver is installed.
3.
Run CIF Device Driver programs from the Windows Start>Programs
menu to ensure the CIF50-DPS functions properly.
4.
Install the SyCon program supplied by the board manufacturer for
configuring the DMx AutoID+™ as a slave device.
Note: No license code is required by the manufacturer for installing SyCon
for configuring a single slave device.
5.
v2.1.0, Feb 2009
Use the SyCon program to configure the DMx AutoID+™ slave device.
Configure the station address for the DMx AutoID+™ and the input and
output modules for date exchange. Create a dummy master and slave
network as follows:
a.
Use File>New to select PROFIBUS as the fieldbus.
b.
Select Insert>Master… then left click in the client area of the SyCon
program to display the Insert Master dialog box, as shown in
Figure 4–35. Double-click on CIF50-PB in Available masters so that
CIF50-PB is displayed in Selected masters. Click OK to exit the dialog.
DMx AutoID+™ User Manual
4-83
4
DMx AutoID+™
Reference Guide
1.
Chapter
4
DMx AutoID+™ Reference Guide
FIGURE 4–35.
c.
Select Insert>Slave… then left click in the client area of the SyCon
program to display the Insert Slave dialog box, as shown in
Figure 4–36. Double-click on CIF50-DPS in Available slaves to show
CIF50-DPS in Selected slaves. Suppose we choose 5 as the Station
address. The default value is 1, and the value must be between 1 and
125. We can also change the Description to be something more
meaningful, such as DMxAutoID. Click OK to exit the dialog.
FIGURE 4–36.
d.
4-84
Insert Master Dialog Box
Insert Slave Dialog Box
The SyCon program now displays the network shown in Figure 4–37.
DMx AutoID+™ User Manual
v2.1.0, Feb 2009
DMx AutoID+™ Graphic User Interface
FIGURE 4–37.
Sycon Window
e.
v2.1.0, Feb 2009
Right click on the DMxAutoID text inside SyCon to display a dropdown menu and select Slave Configuration… to display the Slave
Configuration dialog box, as shown in Figure 4–38. Scroll-down to find
64 byte input con module and double-click on it. Scroll down further to
find 64 byte output con and double-click on it. Now, both the input and
output modules are configured for data exchange as follows:
DMx AutoID+™ User Manual
4-85
DMx AutoID+™
Reference Guide
4
Chapter
4
DMx AutoID+™ Reference Guide
FIGURE 4–38.
Slave Configuration Dialog Box
Click OK to exit the dialog.
f.
With DMxAutoID slave highlighted by a rectangle, select
Online>Download… to download the new slave configuration to the
CIF-50 DPS board. Answer Yes to confirm that you really want to
download. The slave board is now configured with a Station Address of
5 and an input module (to the master) of 64 bytes and an output module
(from the master) of 64 bytes.
Note: Once the configuration is downloaded to the board, it will remain
unchanged until it is modified/downloaded again with the SyCon
program.
The input module of 64 bytes is used for transferring the decode data
4-86
DMx AutoID+™ User Manual
v2.1.0, Feb 2009
DMx AutoID+™ Graphic User Interface
from DMx AutoID+™ to the Profibus master. The output module of 64
bytes is used for getting a command or an acknowledgement from the
Profibus master. Two bytes out of the 64 bytes are used as the protocol
header, so a maximum of 62 bytes of decode data can be transfer in a
single packet. When the decode data is greater than 62 bytes, multiple
packets will be sent to the master. The master must acknowledge the
receipt of every packet sent by DMx AutoID+™ with a two-byte
acknowledgement packet. For more details, see “Profibus Data
Exchange Protocol” on page 4-88.
Configure the Profibus (master) network with DMx AutoID/CIF50-DPS
functioning as a slave on the network. Follow the steps below:
a.
Obtain the GSD for the CIF50-DPS board, HIL_049F.GSD, from the
Hilscher CD, and install in the appropriate directory of the Profibus
configuration tool. For example, when SyCon is installed and used, the
GSD file is already installed in the folder:
\Program Files\HilScher\SyCon\Fieldbus\PROFIBUS\GSD
b.
Obtain the DIB files, C50DPS_S.DIB, C50DPS_R.DIB, and
C50DPS_D.DIB, and install them in the appropriate directory of the
Profibus configuration tool. For example, when SyCon is installed and
used, the DIB files are already installed in the folder:
\Program Files\HilScher\SyCon\Fieldbus\PROFIBUS\BMP
v2.1.0, Feb 2009
c.
Using the Profibus configuration tool, add and configure the
DMxAutoID/CIF50-DPS on the logical network as a slave. Make sure
the Station address is set to the value previously chosen in Step 5c.
Configure the input and output modules of DMxAutoID/CIF50-DPS to
be the same as those already downloaded to the CIF50-DPS board in
Step 5e, in this case, 64 byte input con for data packets coming from
DMxAutoID to the master and 64 byte output con for commands from
the master to the slave, respectively.
d.
Generate the configuration file for loading to the Profibus master. For
example, when SyCon is used, select Online>Download to download
the master/slave configuration.
7.
Physically connect the DMxAutoID/CIF50-DPS to the Profibus network
using appropriate cables and terminator settings.
8.
Start Profibus communication.
DMx AutoID+™ User Manual
4-87
4
DMx AutoID+™
Reference Guide
6.
Chapter
4
DMx AutoID+™ Reference Guide
9.
10.
Launch DMx AutoID+™ program.
a.
Check View>Additional Menus>PLC Interface if it is not already
checked.
b.
Use Setup>PLC Communication… to display the PLC
Communication dialog.
c.
Select PROFIBUS as the Transfer Protocol.
d.
Click OK to exit the dialog.
In the DMx AutoID+™ program, select Run>PLC to check it. A small icon
showing two connected monitors is displayed in the status panel of the
program. Communication is established when both monitors have the same
light blue color. The data exchange can now begin. You can also use
View>PLC Status to display the communication status.
Profibus Data Exchange Protocol
A simple data exchange protocol is implemented to ensure that a data packet sent
from DMx AutoID+™ is always delivered and processed by the master before
DMx AutoID+™ can send a new packet of data. Every time DMx AutoID+™
sends a new data packet to the master, it must wait for the master to acknowledge
the packet with an acknowledgement packet. DMx AutoID+™ will not send a
new data packet to the master until it receives acknowledgment on the previously
sent packet from the master.
The size of the data packet sent from DMx AutoID+™ to the master is the input
module size of 64 bytes configured in Step 6c. If the data to be sent to the master
exceeds 62 bytes, then another or more data packets will be needed for sending
the remaining data. The size of the data packet sent from the master to DMx
AutoID+™ is the output module size of 64 bytes.
Table 4–3 shows the data packet format.
TABLE 4–3. Data
4-88
Packet Format
Byte
Meaning
Byte 1
Packet or Transaction number (0~ 255)
Byte 2
Length of valid data in the packet starting from byte 3, in bytes
Byte (3-64)
Data section starting from byte 3 whose length is specified in
byte 2
DMx AutoID+™ User Manual
v2.1.0, Feb 2009
DMx AutoID+™ Graphic User Interface
The second byte in the data packet can be between 0 and 62 so that the receiver
can extract the valid data portion correctly.
A data packet sent from the master to DMx AutoID+™ can be either a one-byte
acknowledgement packet or a command packet. An acknowledgement packet
from the master to DMx AutoID+™ is a one-byte data packet consisting of the
same packet number as the data packet it is acknowledging. Only in the
acknowledgement packet may the same packet number be used. A command
packet contains a single command that is up to 62-byte long. For example, if the
command READ 2 triggers a read on camera 2 with packet number 5, the
command packet should be 05 06 82 69 65 68 32 50.
On the other hand, a single packet from the master is required for sending a
complete command from the DMx AutoID+™. Therefore, the output module
size must be chosen to be large enough to accommodate the longest commands
supported. Typically, the size of 64 byte input is sufficient for all the commands.
Profibus Command Set
The DMx AutoID+™ Profibus command set is identical to the serial command
set. This means that every serial command can be issued from the Profibus
master. The most commonly used commands are READ n and READ ON/OFF.
When the master sends a command to DMx AutoID+™, it will receive a
command response from the DMx AutoID+™. This is true for all the commands
except the commands READ ON and READ OFF. The commands READ ON
and READ OFF enable/disable the Run Continuously mode when hardware
trigger is used. When READ ON is sent to DMx AutoID+™, DMx AutoID+™
starts the Run Continuously mode and displays Wait for a Trigger status. No
response is sent to the master from the DMx AutoID+™. The command READ
OFF disables the Run Continuously mode. If DMx AutoID+™ receives the
v2.1.0, Feb 2009
DMx AutoID+™ User Manual
4-89
4
DMx AutoID+™
Reference Guide
In a packet sent from DMx AutoID+™, the valid data can be as long as 62 bytes.
When DMx AutoID+™ is ready to send the data to the master, if the data is no
more than 62 bytes, then byte 2 of the packet will contain the data length up to
62. If the data to be sent exceeds 62 bytes, then byte 2 of the packet will contain
63 instead of 62 to indicate to the master that a new data packet will be sent for
the remaining data. Once the master gets the value 63, it extracts 62 bytes of
valid data, acknowledges the packet, and prepares itself for processing the
subsequent packet from DMx AutoID+™. Once the master receives all the data
from the DMx AutoID+™, it can identify the beginning and the end of data from
each read by using the Prefix and/or Suffix specified in the Formatting tab of
DMx AutoID+™ under the Setup>Parameters… menu.
Chapter
4
DMx AutoID+™ Reference Guide
command READ OFF when it has no more data to send, it stops the Run
Continuously mode and replies to the master with the command response READ
OFF SUCCESS. If it receives the command READ OFF when it still has more
data to send, it stops the Run Continuously mode and continues to send out the
remaining data without sending the command response READ OFF SUCCESS.
Profibus Communication Examples
Example 1
A two-camera DMx AutoID+™ is triggered by the PLC via command READ.
Camera 1 decodes Data Matrix 1 and returns 35 bytes of data including prefix
and suffix. Camera 2 decodes Data Matrix 2 and returns 80 bytes of data
including prefix and suffix.
1.
PLC sends command READ 1 to trigger a read from camera 1:
00 06 82 69 65 68 32 49
2.
DMx AutoID+™ receives the command, successfully reads the Data Matrix
1, and replies with:
01 35 xx xx xx … xx
3.
PLC extracts 35 bytes of data and acknowledges with 01. The PLC is now
ready to send the next command.
4.
DMx AutoID+™ receives the acknowledgement and does nothing since
there is no more data to send.
5.
PLC sends command READ 2 to trigger a read from camera 2:
02 06 82 69 65 68 32 50
6.
DMx AutoID+™ receives the command, successfully read Data Matrix 2,
and replies with:
03 63 xx xx xx … xx
7.
4-90
PLC extracts 62 bytes of data and acknowledges with 03. Since the value 63
was received, the PLC must prepare itself to receive the next packet from
DMx AutoID+™. The PLC is not allowed to send a new command before
the final packet is received containing 62 or less in byte 1.
DMx AutoID+™ User Manual
v2.1.0, Feb 2009
DMx AutoID+™ Graphic User Interface
8.
DMx AutoID+™ receives the acknowledgement and sends the next packet
with the remaining data:
04 18 xx xx xx … xx
PLC extracts the 18 bytes of data and acknowledges with 04.
10.
DMx AutoID+™ receives the acknowledgement and does nothing since
there is no more data to send.
Note: The PLC is allowed to send a command immediately after it acknowledges
the receipt of the data packet from the DMx AutoID+™ only when the second
byte of data packet contains a value of 62 or less. This means that DMx
AutoID+™ has no more data to send out. For example, if Step 5 happens
immediately after Step 3, then there is a possibility that Step 4 will not happen in
the sense that the DMx AutoID+™ sees the command instead of the
acknowledgement. This will not affect the normal communication.
Example 2
A single camera DMx AutoID+™ is triggered with hardware triggers in Run
Continuously mode to decode a Data Matrix containing 40 bytes of data. The
Run Continuously mode can be enabled/disabled using the Profibus command
READ ON | OFF.
1.
The PLC sends the command READ ON with packet:
01 07 82 69 65 68 32 79 78
2.
DMx AutoID+™ receives the command and enables the Run Continuously
mode that displays Waiting for a trigger in the status bar.
3.
DMx AutoID+™ receives a trigger, successfully reads the Data Matrix, and
sends the data packet:
01 40 xx xx … xx
4.
PLC extracts 40 bytes of data and acknowledges with packet:
01
5.
v2.1.0, Feb 2009
DMx AutoID+™ receives the acknowledgment and does nothing if there is
no more data to send.
DMx AutoID+™ User Manual
4-91
4
DMx AutoID+™
Reference Guide
9.
Chapter
4
6.
DMx AutoID+™ Reference Guide
DMx AutoID+™ receives a new hardware trigger, reads the Data Matrix,
and sends the data packet:
02 40 xx xx … xx
7.
Assume PLC is busy and does not acknowledge before DMx AutoID+™ is
triggered consecutively twice; two new reads are performed and a total of 80
bytes of new data will be kept in DMx AutoID+™ but will not be sent
pending the acknowledgement from the PLC.
8.
PLC gets a chance to acknowledge with packet:
02
9.
DMx AutoID+™ receives the acknowledgement and sends the data packet:
03 63 xx xx … xx
The remaining 12 bytes of data need to be sent in the next packet.
10.
If DMx AutoID+™ receives the acknowledgement packet 03 before it is
triggered again, the data packet 04 12 xx xx … xx will be sent. If DMx
AutoID+™ received the acknowledgement packet 03 after it is triggered
again and the Data Matrix is decoded, then the data packet 04 52 xx xx … xx
will be sent instead.
11.
To disable the Run Continuously mode, PLC sends command READ OFF
with packet:
05 08 82 69 65 68 32 79 70 70.
Protocol Error Handling
Table 4–4 and Table 4–5 show how DMx AutoID+™ responds to various inputs
from a PROFIBUS master including possible erroneous inputs. The protocol
allows the communication to resume without compromising the data integrity in
the presence of erroneous inputs from the PROFIBUS master program.
Error Handling in Run Once Mode
In the Run Once mode (i.e., the Run Continuously mode is not entered), DMx
AutoID+™ receives the READ command from the master (a PLC) and sends the
decode data back to the PLC.
4-92
DMx AutoID+™ User Manual
v2.1.0, Feb 2009
DMx AutoID+™ Graphic User Interface
Handling in Run Once Mode
When DMx AutoID+™ Receives...
DMx AutoID+™ Responds With...
A valid command (other than READ, READ
ON/OFF) with packet number n
Command response with packet n+1
Command READ
Decode data or failure message
Command READ ON
No response is sent but it enters the Run
Continuously mode
Acknowledgement
Data up to 62 bytes with no more data left to
send, or data of 62 bytes with more data to be
sent
An unexpected command with packet
number m (A valid command is unexpected
when it is received while DMx AutoID+™
has more data to send)
Information packet consisting of two bytes:
A packet m containing an invalid command
(PLC packet that is none of the three types
above: a misspelled command or incorrect
command length in byte 1
Data packet consisting of the words Invalid
command:
m+1 15 73 110 118 97 108 105 100 32 67 111
109 109 97 110 100
4
m+1 0
Error Handling in Run Continuously Mode
The master (a PLC) sets the Run Continuously mode of DMx AutoID+™ by
sending the command READ ON. DMx AutoID+™ is then triggered by
hardware triggers and sends the decode data back to the master.
TABLE 4–5. Error
Handling in Run Continuously Mode
When DMx AutoID+™ Receives...
DMx AutoID+™ Responds With...
Command READ OFF with packet number n
while there is no more data to send.
Command response READ OFF SUCCESS with
packet n+1.
Command READ OFF with packet number n
while there are more data to send.
A new packet n+1 for the remaining data.
Anything else from the master is treated as
an acknowledgement packet. These
include: A true acknowledgement packet; A
valid or invalid command with an arbitrary
number that is different from the previous
one.
Data up to 62 bytes with no more data left to
send, or data of 62 bytes with more data to be
sent.
v2.1.0, Feb 2009
DMx AutoID+™ User Manual
4-93
DMx AutoID+™
Reference Guide
TABLE 4–4. Error
Chapter
4
DMx AutoID+™ Reference Guide
Working with Multiple Input Modules
The previous sections have shown how to choose 64 byte input con and 64 byte
output con in configuring the data exchange modules. It has been stated
previously that 64 byte output con is sufficient to handle all command or
acknowledgement packet. You can also choose smaller input and/or output
modules if your application requires sending much less than 64 bytes of data
and/or receiving short commands such as READ n. For example, you can choose
32 byte input con and 8 byte output con if the master needs to receive a 32 byte
packet and send a 8 byte command packet.
Note: You should do the same in SyCon for both the master and the slave.
On the other hand, when your application requires reading high density Data
Matrices and/or performing print quality verification, then you will need to
transfer far more than 64 bytes for each read. Multiple data packets of 64-byte
long will have to be sent to the master and to be acknowledged.
To improve the efficiency and reduce the number of acknowledgement packets,
you can also configure multiple input modules to arrive at a larger packet number
between 64 and 244 bytes. The Profibus protocol allows up to 244 bytes of data
to be transferred as input or output; the sum of input and output modules should
not exceed 368 bytes.
For example, you can configure multiple input modules of 64, 64, 64, 32, and 20
bytes in the exact same order in Steps 5e and 7c plus an output module of 64
bytes. Doing so will allow up to 242 bytes to be sent to the master in a single
packet.
Setup>Wedge Target
This menu item is visible only when the Wedge option is checked in
View>Additional Menus. You can have the output data sent from DMx
AutoID+™ to a target text-processing program as though the data were typed in
from the PC keyboard. Typical text-processing programs are Microsoft Notepad,
WordPad, Word, Excel, etc. You can open a custom program by specifying the
name of the .EXE program using Other… and then select Run>Keyboard
Wedge to check it.
To reconfigure the Wedge program, you need to de-select Run>Keyboard
Wedge first.
4-94
DMx AutoID+™ User Manual
v2.1.0, Feb 2009
DMx AutoID+™ Graphic User Interface
Setup>Calibration
Two types of calibrations can be performed for DMx AutoID+™:
•
“Contrast & Size Calibration” starting on page 4-95
•
“Target ROI” starting on page 4-97
FIGURE 4–39.
Calibration Dialog Box
Contrast & Size Calibration
4
Contrast Calibration
The DMx AutoID+™ system must be calibrated in order to report the
cell/module size in mil (1/1000th of an inch) and the contrast as a NIST traceable
value.
The Setup menu allows you to calibrate the camera system using the Microscan
Calibration Test Card. Once the system is calibrated, you should not change the
camera's FOV, focus, aperture, or lighting. The Check menu allows you to
determine if the current calibrated setup needs to be re-calibrated. The menu
Enabled should be displayed for reporting the calibrated values, however you
have the option to report the non-calibrated values as well by clicking Enabled to
change it to Disabled. If the calibration is disabled, the contrast value reported
depends on and varies with the lighting and the cell size is reported in pixels
rounded to one decimal place. If the calibration is enabled, the contrast value
reported is based on NIST traceable density scale and will not vary with lighting
and the nominal cell size is reported in mil (1000th of an inch) rounded to the
nearest integer.
Before performing calibration, you should have already determined the correct
Field of View (FOV) of your camera setup and lighting based on the size and the
surface/marking reflectivity of the Data Matrix in your application. Then, you
select File > Live to display live images of one of the Data Matrix targets on the
Microscan Calibration Test Card. Choose the target that is about 1/3 to 1/2 of
v2.1.0, Feb 2009
DMx AutoID+™ User Manual
4-95
DMx AutoID+™
Reference Guide
FIGURE 4–40.
Chapter
4
DMx AutoID+™ Reference Guide
FOV size. It is important that the same target be used in both Setup and Check
processes.
Calibration Setup
1.
Select File > Live. Place a Data Matrix target of suitable size near the center
of the FOV. If necessary, adjust the lighting, the camera's f-stop (aperture),
or focus to obtain good images. The images should not look too dark or
saturated (i.e., the value of light pixels should not reach 255). Select File >
Live to exit the live mode and capture an image.
2.
Select Setup > Calibration > Contrast Calibration, and then select Setup. The
following box is displayed for you to enter the contrast of the target shown
on the Microscan Calibration Test Card. Enter it then hit OK.
3.
If the calibration is successful, the following message will be displayed in
the Status bar:
Calibration succeeded and enabled
You can verify that Calibration Mode is now enabled by selecting Setup >
Calibration > Contrast Calibration to see that Enabled is displayed. If the
calibration is unsuccessful, then one of the following messages will be
displayed instead:
–
Calibration failed. No Data Matrix found
–
Calibration failed. Invalid calibration target
–
Calibration failed. Adjust image
Calibration Check
For a calibrated system, you can check if it has changed from the last calibrated
state such that it may require re-calibration. To do this, place in the center of the
FOV the same target that was used in the calibration setup process, then select
Setup > Calibration > Contrast Calibration > Check. If no re-calibration is
necessary, you will get this message:
Calibration OK. No need to re-calibrate
Otherwise, you may be getting one of the following messages if incorrect target
was used, or the light intensity or FOV has changed:
•
4-96
Please use original calibration target
DMx AutoID+™ User Manual
v2.1.0, Feb 2009
DMx AutoID+™ Graphic User Interface
•
Image too dark. Please re-calibrate
•
Image too bright. Please re-calibrate
•
Cell Size too small. Please re-calibrate
•
Cell Size too large. Please re-calibrate
•
Failed to decode. Please adjust image
Target ROI
FIGURE 4–41.
Target ROI Dialog Box
1.
Select Target ROI>Setup to display the target ROI view finder box.
2.
Left click and drag the small red squares to resize the target ROI to the
desired size. The target ROI menu is enabled and the target ROI will be
displayed in the live image.
To display the target ROI view finder, select Target ROI>Enabled to change it
to Disabled.
v2.1.0, Feb 2009
DMx AutoID+™ User Manual
4-97
DMx AutoID+™
Reference Guide
4
The Setup in Target ROI allows you to set up a target ROI window (i.e., view
finder) to be displayed with live images. Typically a Data Matrix mark placed in
the image center area can be illuminated more uniformly. The use of the target
ROI helps guide the user to place the Data Matrix marks of the same size in the
center area so that more accurate and repeatable measurement results can be
obtained. The following are the steps for setting up the target ROI:
Chapter
4
DMx AutoID+™ Reference Guide
Set ROI Menu
FIGURE 4–42.
SetROI Menu
The Define ROI (Region of Interest) menu, as shown in Figure 4–42, allows you
to specify a Region of ROI within the selected camera’s Field Of View by
drawing a rectangular area using the mouse cursor.
Set ROI>Data Matrix
This menu item modifies the ROI containing the Data Matrix or matrices to
decode. The default ROI for Data Matrix is the full FOV (Field of View). If no
ROI is explicitly set by using this menu prior to Learn Data Matrix, then the
default ROI is used for Data Matrix Learn and Run.
Set ROI>Barcode
This menu item modifies the ROI containing the barcode(s) to decode. The
default ROI for barcode is the full FOV (Field of View). If no ROI is explicitly
set by using this menu prior to Learn Barcode, then the default ROI is used for
barcode Learn and Run.
Set ROI>OCR Fixed Font
This menu item modifies the ROI containing the text to read. The default ROI for
OCR is the full FOV (Field of View). We recommend that the ROI for OCR be
set to as small an area as possible for speed and robustness. The ROI is normally
set during the Learn OCR Fixed Font process. After the Learn and prior to Run,
select Set ROI and then OCR Fixed Font to modify the ROI, if necessary.
Set ROI>Fiducial
This menu item modifies the ROI for the fiducial target to find. The default ROI
for Fiducial is the full FOV (Field of View). We recommend that you set the ROI
for Fiducial to as small an area as possible for speed and robustness. The ROI is
4-98
DMx AutoID+™ User Manual
v2.1.0, Feb 2009
DMx AutoID+™ Graphic User Interface
normally set during the Learn Fiducial process. After the Learn and prior to Run,
you can use Set ROI>Fiducial to modify the ROI, if necessary.
Set ROI>Clear ROI
This menu item removes the currently selected ROI. To clear Data Matrix ROI,
first select Set ROI and then Data Matrix to display the ROI. Then, select Set
ROI and Clear ROI to remove it, e.g., to set it to the full image size. Use the
same process to Clear ROI for barcode, OCR, or Fiducial.
Learn Menu
The Learn menu, as shown in Figure 4–43, allows you to set up the parameters
for reading Barcode, Data, OCR, or Fiducial.
4
Learn Menu
DMx AutoID+™
Reference Guide
FIGURE 4–43.
Learn>Data Matrix
To learn the Data Matrix parameters, you need to have an image containing a
Data Matrix. Use the following steps to capture a Data Matrix image from
Camera 1:
1.
Select Camera 1 by pushing down the Camera 1 icon on the tool bar (this is
not needed if only one camera is configured in the System Configuration
box).
2.
From the File menu, select Live to enable live camera display.
3.
Put the Data Matrix label in Camera 1’s FOV and capture the image by
stopping the Live display.
In the following sections, we use saved sample images under the DMx
AutoID+™ application directory.
1.
v2.1.0, Feb 2009
Open sample4.bmp.
DMx AutoID+™ User Manual
4-99
Chapter
4
DMx AutoID+™ Reference Guide
2.
If you choose to use a smaller ROI than the full FOV, you can set the ROI
now. Otherwise, the full ROI will always be used as the ROI for Data Matrix
or barcode reading.
3.
From the Learn menu, select Data Matrix to learn the Data Matrix
parameters.
FIGURE 4–44.
4.
4-100
Data Matrix Image
When Learn is successful, the decoded data will be displayed on the right
hand side of the status bar of the program, as shown in Figure 4–45.
DMx AutoID+™ User Manual
v2.1.0, Feb 2009
DMx AutoID+™ Graphic User Interface
FIGURE 4–45.
Example — When Learn is Successful
DMx AutoID+™
Reference Guide
4
5.
Now the DMx AutoID+™ program is ready to decode the same type of Data
Matrix as indicated in Setup>Parameters>General and Data Matrix tab.
Sometimes, when the Data Matrix image quality is too poor, the learn process
fails. The DMx AutoID+™ goes into the Assisted Learn mode. The following
two examples demonstrate how this is done.
Data Matrix Assisted Learn Example
If Learn is not successful due to the poor quality of the Data Matrix image, such
as in Figure 4–46, then instead of displaying the decoded data, the program
displays the message “Learn Failed… Draw The Four Corners ROI”.
v2.1.0, Feb 2009
DMx AutoID+™ User Manual
4-101
Chapter
4
DMx AutoID+™ Reference Guide
FIGURE 4–46.
Example of Poor Quality Data Matrix Image
Use the mouse to draw a box specifying the four corners of the Data Matrix.
Adjust the corner positions to indicate the precise locations of the corner points,
as shown in Figure 4–47. When you are satisfied with the drawing, left click the
panel with the mouse in the status bar displaying “Whenever Ready, Click this
Panel”.
4-102
DMx AutoID+™ User Manual
v2.1.0, Feb 2009
DMx AutoID+™ Graphic User Interface
FIGURE 4–47.
Example — Specifying Four Corners of the Data Matrix
DMx AutoID+™
Reference Guide
4
The Data Matrix Parameters tab will be displayed after you click the mouse. At
this time, however, only Number of Rows and Columns, and Polarity are enabled
for editing. The rest are all disabled. Make sure you enter the correct information.
In the example in Figure 4–48, we enter 14 for number of rows and column, and
Light on Dark for the matrix polarity.
v2.1.0, Feb 2009
DMx AutoID+™ User Manual
4-103
Chapter
4
DMx AutoID+™ Reference Guide
FIGURE 4–48.
Parameter Setup for Camera 1
Select OK, and the matrix parameters will be learned afterwards, as shown in
Figure 4–49:
4-104
DMx AutoID+™ User Manual
v2.1.0, Feb 2009
DMx AutoID+™ Graphic User Interface
FIGURE 4–49.
Matrix Parameters After Being Learned
DMx AutoID+™
Reference Guide
4
Learn>Barcode
v2.1.0, Feb 2009
1.
Open sample7.bmp.
2.
From the Learn menu, select Barcode, as shown in Figure 4–50.
DMx AutoID+™ User Manual
4-105
Chapter
4
DMx AutoID+™ Reference Guide
FIGURE 4–50.
Example — Learn Barcode
When the Learn Barcode is successful, the decoded data is displayed in the status
bar. The barcode reading is now enabled, as shown in Figure 4–51 and
Figure 4–52:
4-106
DMx AutoID+™ User Manual
v2.1.0, Feb 2009
DMx AutoID+™ Graphic User Interface
FIGURE 4–51.
Parameter Setup Dialog Box (General Tab)
DMx AutoID+™
Reference Guide
4
v2.1.0, Feb 2009
DMx AutoID+™ User Manual
4-107
Chapter
4
DMx AutoID+™ Reference Guide
FIGURE 4–52.
Parameter Setup Dialog Box (Barcode Tab)
The Learn Barcode auto-discriminates the type of barcodes presented in the
image among the following barcode types: Code 128, 39, 93, I 2 of 5, Codabar,
UPC/EAN, UPC-E, UPC Supplemental, PDF417, RSS-14, RSS Limited, RSS
Expanded, RSS Stacked, Composite, and QR code.
Note: To read BC412, Postnet, or Pharmacode, you need to check the barcode
type in General tab before performing Learn Barcode.
For reading the same type of barcode, the Learn Barcode process sets up the
barcode parameters in the Barcode tab to increase the barcode reading robustness
4-108
DMx AutoID+™ User Manual
v2.1.0, Feb 2009
DMx AutoID+™ Graphic User Interface
in Run mode. If reading different types of barcodes is necessary, then the learned
parameters for Bar Width, No. of Bars, Code Height, Code Width should be
adjusted to cover all types of barcodes to ensure the maximum robustness. On the
other hand, simply resetting the parameters to default values will allow barcodes
of different type to be read. For example, select File > Jobs > Load Default to
reset the barcode parameters.
Open images Sample7.bmp for Code 39, Sample8.bmp for I 2 of 5, and
Sample9.bmp for Code 128. Select Code 128, Code 39, and I 2 of 5 in
Parameter Setup>General tab and set Number of Barcodes to Decode to 1.
Select OK. Select Run and then Run Once (or Run Continuously) to verify all
three types of barcodes are decoded.
DMx AutoID+™
Reference Guide
4
v2.1.0, Feb 2009
DMx AutoID+™ User Manual
4-109
Chapter
4
DMx AutoID+™ Reference Guide
Learn>OCR Fixed Font
We use image Sample10.bmp to illustrate how to Learn OCR parameters.
1.
Open sample10.bmp.
FIGURE 4–53.
2.
4-110
Opening sample10.bmp
From the Learn menu, select the OCR Fixed Font. The DMx AutoID+™
program will instruct you to draw the ROI for OCR reading, as shown in
Figure 4–54:
DMx AutoID+™ User Manual
v2.1.0, Feb 2009
DMx AutoID+™ Graphic User Interface
FIGURE 4–54.
Drawing the ROI
DMx AutoID+™
Reference Guide
4
3.
v2.1.0, Feb 2009
After drawing the ROI with the mouse, the program instructs you to draw the
Train String Bounding box. Draw a rectangular box, starting precisely from
the left side of the first character and ending precisely with the right side of
the last character of the string, as shown in Figure 4–55. You can leave some
space on the top and bottom of the text string.
DMx AutoID+™ User Manual
4-111
Chapter
4
DMx AutoID+™ Reference Guide
FIGURE 4–55.
4.
4-112
Drawing Rectangular Box
Draw a tight bounding box indicating the size of one character. In
Figure 4–56, we select the character 0 to be the primary character.
DMx AutoID+™ User Manual
v2.1.0, Feb 2009
DMx AutoID+™ Graphic User Interface
FIGURE 4–56.
Drawing the Tight Bounding Box
DMx AutoID+™
Reference Guide
4
5.
Left click the status bar to display the OCR parameters tab to enter more
information.
Note: Before left clicking the mouse, you can further adjust the three boxes
by placing the cursor near the smaller squares on the rectangular boxes and
resize them by either moving the mouse or pressing the arrow keys on the
keyboard.
After left clicking the status bar, the Parameter Setup dialog box is
displayed, as shown in Figure 4–57. You need to enter all relevant
information correctly.
v2.1.0, Feb 2009
DMx AutoID+™ User Manual
4-113
Chapter
4
DMx AutoID+™ Reference Guide
FIGURE 4–57.
6.
4-114
Parameter Setup Dialog Box
Click OK to finish the Learn process. It may take a while before the
successful results are displayed, as shown in Figure 4–58:
DMx AutoID+™ User Manual
v2.1.0, Feb 2009
DMx AutoID+™ Graphic User Interface
FIGURE 4–58.
Finishing the Learn Process
DMx AutoID+™
Reference Guide
4
When the training is successful, the string confidence value, character width,
height, and spacing are displayed behind the decoded text string in the Status
Bar. The learned parameters can be seen from Advanced OCR Parameter
Tuning box as well.
v2.1.0, Feb 2009
DMx AutoID+™ User Manual
4-115
Chapter
4
DMx AutoID+™ Reference Guide
FIGURE 4–59.
Advanced OCR Parameter Tuning
7.
To test the OCR reading after the Learn, select File > Open List to open
files sample10.bmp and sample11.bmp.
8.
From the Run menu, select Run Continuously. You can speed up the
reading by selecting (checking) Speed Enhance in Fine Tune Method in
Advanced OCR Parameter Tuning box.
Note: No separator characters can be recognized in the OCR-A or OCR-B font.
The following example illustrates how to read the OCR-A font containing
separators.
Reading OCR-A with Separator (Example 1)
Since the five separators (., -, #, / and space) are not recognizable in OCR-A and
OCR-B font, reading a string containing these separators requires special
attention. This example illustrates how this can be done.
1.
4-116
Set ROI, string box and character box.
DMx AutoID+™ User Manual
v2.1.0, Feb 2009
DMx AutoID+™ Graphic User Interface
FIGURE 4–60.
2.
Click the panel to enter the following information, as shown in Figure 4–61.
FIGURE 4–61.
DMx AutoID+™
Reference Guide
4
v2.1.0, Feb 2009
DMx AutoID+™ User Manual
4-117
Chapter
4
3.
DMx AutoID+™ Reference Guide
Since the hyphen sign '-' is not recognizable in OCR-A, Learn will not
succeed unless the Fielding is set for it. To do so, click the Fielding button to
display the Custom Fielding dialog box, as shown in Figure 4–62:
FIGURE 4–62.
4.
Click on the * sign below the - sign (see Figure 4–62) to display the Fielding
Options dialog box, as shown in Figure 4–63. In the Fielding Options area,
select the “$ other” radio button and enter the - sign in the edit box:
FIGURE 4–63.
4-118
Custom Fielding Dialog Box
Fielding Options Dialog Box
DMx AutoID+™ User Manual
v2.1.0, Feb 2009
DMx AutoID+™ Graphic User Interface
5.
Click OK to go back to the Parameter Setup box, and then OK to complete
the Learn process.
FIGURE 4–64.
6.
4
Run Once.
DMx AutoID+™
Reference Guide
FIGURE 4–65.
v2.1.0, Feb 2009
DMx AutoID+™ User Manual
4-119
Chapter
4
DMx AutoID+™ Reference Guide
Learn>Fiducial
1.
Open image file Sample17.bmp. From the Learn menu, select Fiducial. The
status bar will display the instruction “Draw the Region of Interest”. Use the
mouse to select the ROI, as shown in Figure 4–66:
FIGURE 4–66.
Drawing ROI
After the ROI is drawn, the status bar issues the instruction to Draw the
Target Box INSIDE the ROI. This target will be the template used in the
correlation search. Be careful to draw the target precisely the way it will
appear in other images.
Note: You can adjust the drawing by dragging the borders with the mouse or
you can place the mouse cursor on top of the border you want to adjust and
then press the arrow keys on the keyboard.
4-120
DMx AutoID+™ User Manual
v2.1.0, Feb 2009
DMx AutoID+™ Graphic User Interface
FIGURE 4–67.
Drawing the Target Box
DMx AutoID+™
Reference Guide
4
A small target has less data for the correlation algorithm. When the target is
too small, a warning box will be displayed to tell you a small target is
chosen. You can proceed to use the target or to re-select the target (you may
need to reconfigure your FOV to make the feature larger in the FOV). When
you are satisfied with the target selection, click the status bar panel to bring
up the Save As dialog box for you to save the target portion of the image as
the golden template used in the correlation search algorithm. See
Figure 4–68.
v2.1.0, Feb 2009
DMx AutoID+™ User Manual
4-121
Chapter
4
DMx AutoID+™ Reference Guide
FIGURE 4–68.
Save As Dialog Box
A file name will be generated automatically for you. You can modify it to a
more meaningful name or you can accept the name as is.
2.
4-122
Click Save to save the target image in the job folder under the DMx
AutoID+™ application folder. Then, Figure 4–69 will be displayed to allow
you to configure the fiducial finder parameters (for details, see page 4–60):
DMx AutoID+™ User Manual
v2.1.0, Feb 2009
DMx AutoID+™ Graphic User Interface
FIGURE 4–69.
Parameter Setup — Finder Window
v2.1.0, Feb 2009
3.
Configure the parameters as shown in Figure 4–69.
4.
Select Run Once; you should see Figure 4–70:
DMx AutoID+™ User Manual
DMx AutoID+™
Reference Guide
4
4-123
Chapter
4
DMx AutoID+™ Reference Guide
FIGURE 4–70.
After Selecting Run Once
The output of the fiducial finder has the following syntax:
Xout: single digit; (x coordinate, y coordinate, score, intensity)
If a target is found, the single digit is 1, and the x, y coordinates of the upperleft corner, correlation score, and average intensity of the target will be
displayed. Otherwise, the single digit is 0, indicating that no target is found.
No valid coordinates are displayed either.
Instead of reporting the upper left corner, you can also choose to report the
center of the target.
5.
4-124
To test the fiducial finder on a different image, open image file
Sample18.bmp and perform Run Once. You can also use File>Open List to
open files Sample17.bmp and Sample18.bmp and select Run>Run
Continuously.
DMx AutoID+™ User Manual
v2.1.0, Feb 2009
DMx AutoID+™ Graphic User Interface
Run Menu
The Run menu, as shown in Figure 4–71, allows you to perform various
inspection sequences.
FIGURE 4–71.
Run Menu
Before select Run Once or Run Continuously, always ensure that the settings in
the Multi-Code Setup box in Setup>Parameters>General Tab are configured
correctly.
By design, when a Learn Data Matrix is successful, the Number of Data Matrices
to Decode is automatically set to 1 to read one Data Matrix, and the Number of
Barcode to Decode and Number of OCR Rows to Read are both set to 0 to
disable those readings. Consequently, when a Learn Barcode is performed, the
Data Matrix parameters are retained but only the Barcode will be allowed to run.
The same strategy applies to OCR reading. In order to read Data Matrix,
Barcode, and OCR, you must set each parameter - Number of Data Matrix to
Decode, Number of Barcode to Read, and Number of OCR Rows to Read to a
value greater than 0.
Important Settings Prior to Run
Refer to Search Direction in Setup>Parameters>Data Matrix tab and Inspection
Time-out Value in Setup>Parameters>General tab. The setting for Search
Direction determines how Inspection Time-out Value must be set.
•
v2.1.0, Feb 2009
When Search Direction is set to the default Criss-cross or Horizontal only or
Vertical Only, set Inspection Time-out Value based on the following
DMx AutoID+™ User Manual
4-125
DMx AutoID+™
Reference Guide
4
Chapter
4
DMx AutoID+™ Reference Guide
scenario: If the Data Matrix and Barcode reading takes x amount of
milliseconds to complete, set Inspection Time-out Value to at least 1 times
the amount of time in milliseconds.
•
When Search Direction is set to Hori>Vert or Vert>Hori, you must set
Inspection Time-out value based on the following scenario. If the Data
Matrix and Barcode reading takes x amount of milliseconds to complete, set
Inspection Time-out Value to at least 2 times the amount of time in
milliseconds.
Run>Run Once
If the DMx AutoID+™ program is configured to receive hardware trigger, then
after Run Once is selected, the program will acquire an image when the next
trigger occurs and perform Data Matrix/Barcode/OCR reading if they are enabled
in Setup>Parameters>General tab under Multi Code Setup group. All other
subsequent triggers will be ignored. Figure 4–72 displays the status bar, which
indicates that the program is waiting for a hardware trigger.
FIGURE 4–72.
Status Bar — Waiting for Hardware Trigger
The Run Once mode can be cancelled by clicking the Run Once button before
the trigger occurs.
If the Hardware Trigger option is not checked in Setup>System Configuration
box, then Run Once will acquire one image immediately and perform Data
Matrix/Barcode/OCR reading.
If you use File>Open List to store a list of images for DMx AutoID+™ program
to perform the reading, then Run Once will take the next image in the list if the
Grab New box in checked in Setup>System Configuration. If the box is
unchecked, then Run Once will read the currently displayed image from the file
list.
Run>Run All Once
When more than one camera is enabled and configured with the Learn, the Run
All Once menu is enabled to run all cameras once. If the Hardware Trigger option
is not checked, then Run All Once will acquire one image from each configured
camera immediately and perform Data Matrix/Barcode/OCR reading. When
4-126
DMx AutoID+™ User Manual
v2.1.0, Feb 2009
DMx AutoID+™ Graphic User Interface
hardware trigger is used, Run All Once is completed when each of all configured
cameras has been triggered at least once.
The Run All Once option is now allowed for image files. It is disabled once an
image file is loaded.
Run>Run Continuously
If the DMx AutoID+™ program is configured to receive hardware triggers, then
after Run Continuously is selected, the program will acquire a new image
whenever the trigger occurs and perform Data Matrix/Barcode/OCR reading.
The “Waiting for a Trigger” message will be displayed in the status bar before the
first trigger occurs.
If you use File>Open List to open a list of images saved before, then Run
Continuously will read the images one by one and cycle through the list.
Run>Stop
The Stop menu and tool bar will be displayed during Run Continuously mode to
allow you to stop the running.
Run>Com 1 or Com 2
Open the Run menu and select Com1 (or Com2), as applicable. When either
option is checked (enabled), the respective serial port (Com1 or Com2) is
subsequently initialized. Decode data is sent from that Com serial port along with
any associated prefix and/or suffix.
Run>Beeper
FIGURE 4–73.
v2.1.0, Feb 2009
Beeper Window
DMx AutoID+™ User Manual
4-127
4
DMx AutoID+™
Reference Guide
If no hardware trigger is used, then Run Continuously will acquire an image and
then perform Data Matrix/Barcode/OCR reading. In the reading process, a new
image will be acquired and read as soon as the reading process of the current
image is finished.
Chapter
4
DMx AutoID+™ Reference Guide
The beeper has two tones indicating success or failure. Selecting Beeper>Fail
(checked) enables the PC to beep when the inspection (reading) fails. Similarly,
selecting Beeper>Read (checked) enables the PC to beep when the inspection
(reading) succeeds.
Run>Ethernet TCP/IP
Enable Ethernet TCP/IP by checking this option. Once checked, DMx
AutoID+™ will attempt to establish the TCP/IP connection with the parameters
specified in Setup>Ethernet TCP/IP box. Once connected, you can terminate
the connection by unchecking the option.
Run>Log Data
Select Run>Log Data>Log to check the option if you want to log the data to the
file \DMx AutoID+™\job\mxAutoID.log. Selecting this again will uncheck it to
disable logging data. If the file already exists on the system, the Delete menu will
be enabled. If you want to delete the log file, select Delete and click OK in the
“Delete Current Log File” box, as shown in Figure 4–74.
FIGURE 4–74.
Delete Current Log File Dialog Box
When the file is removed, and the Run>Log Data>Log is checked, any newly
decoded data from Run Once or Run Continuously will be logged starting from
the first line of the file. If the file already exists and Run>Log Data>Log is
checked, any newly decoded data will be appended to the end of the file.
Note: You should not access the Log file during the Run Continuously process.
If Log Data is enabled in List mode with image files, then Run Continuously will
go through the list of image files only once.
Run>Keyboard Wedge
This menu is available when View>Additional Menus>Wedge is checked.
When Run>Keyboard Wedge is enabled (checked), output data, such as
4-128
DMx AutoID+™ User Manual
v2.1.0, Feb 2009
DMx AutoID+™ Graphic User Interface
decode results, is sent to an open Windows program that has the focus. This
enables DMx AutoID+™ to send the data to a program such as Microsoft Excel,
Word, Notepad that is specified in Setup>Wedge Target.
Run>PLC
This menu is available when View>Additional Menus>PLC Interface is
checked. To enable DMx AutoID+™ to communicate with PLC software, you
must first configure the parameters in Setup>PLC Communication and then
select Run>PLC to check it. The communication is ended when Run>PLC is
unchecked.
View Menu
The View menu, as shown in Figure 4–75, contains the options to configure the
Run Time display behavior.
View Menu
DMx AutoID+™
Reference Guide
FIGURE 4–75.
View>Frame Grabber
The menu is visible only when more than one 0300 board is installed. The menu
can display up to four 0300 boards that are supported by DMx AutoID+™. The
checked 0300 board item is the current 0300 board, which corresponds to the
current camera. Use this menu to select the desired 0300 board first in order to
access the cameras connected to that 0300 board.
v2.1.0, Feb 2009
DMx AutoID+™ User Manual
4
4-129
Chapter
4
DMx AutoID+™ Reference Guide
View>Camera
Use this menu to select the current camera among the list of cameras enabled in
Setup>System Configuration.
View>Contrast Enhancement
When the image displayed in the DMx AutoID+™ GUI is too dark or to bright to
see the details of the Data Matrix, barcode, or the OCR text, you can select
(check) Contrast Enhancement to display the contrast enhancement slider in the
Status Bar area. You can click inside the slider or press arrow keys to adjust the
image display. This feature only affects the image display and does not change
the actual image used by the decoding software.
View>Additional Menus>Pre Process
Sometimes, for poor symbology or OCR images, a properly chosen
preprocessing step can enhance the image quality and reduce the noise and,
hence, improve the reading robustness. The Pre Process menu can be displayed
by selecting Pre Processing under Additional Menus. When this is done, the Pre
Process menu is inserted between the Learn and Run menus. You can hide the Pre
Process menu by selecting View>Additional Menus>Pre Process again to
uncheck it. The Pre Process menu is explained in the next section.
FIGURE 4–76.
Pre Process Menu Item Displayed
View>Additional Menus>PLC Interface
DMx AutoID+™ can communicate with a PLC (Programmable Logic
Controller) through the PLC software. You can select and check PLC Interface to
display the PLC Communication in the Setup menu, the PLC option in the Run
menu, and the PLC Status in the View menu.
View>Additional Menus>Keyboard Wedge
DMx AutoID+™ can send output data to an open Windows program that has the
focus. You can select and check Keyboard Wedge to display the Wedge Target in
the Setup menu and the Keyboard Wedge option in the Run menu.
4-130
DMx AutoID+™ User Manual
v2.1.0, Feb 2009
DMx AutoID+™ Graphic User Interface
View>Watch Window
When Watch Window is selected (checked), a text window will be displayed.
This will allow you to see the full decoded data in Run Once or Run
Continuously mode. To save the data to a file, use the Run>Log Data option.
View>Reading Statistics
When Reading Statistics is selected (checked), the reading statistics results will
be displayed, as shown in Figure 4–77:
FIGURE 4–77.
Reading Results Statistics Displayed
You can change the Refresh Rate from 1 to 50 to reduce the results updating
frequency. The default Refresh Rate is to update every 10 inspections. Clicking
Reset All will clear the statistics results.
View>PLC Status
This is available when View>Additional Menus>PLC Interface is checked.
When PLC Status is checked, the PLC Communication status is displayed, as
shown in Figure 4–78:
FIGURE 4–78.
PLC Status Window
When PROFIBUS is chosen as the transfer protocol, the Data from PLC
displays the command or the acknowledgement packet it has received from the
v2.1.0, Feb 2009
DMx AutoID+™ User Manual
4-131
DMx AutoID+™
Reference Guide
4
Chapter
4
DMx AutoID+™ Reference Guide
master. The Data from DMx AutoID+™ displays the data that is being sent in
the current packet. The Profibus Send Status typically shows <send complete>
when there is no more data left to send or <more data to send > when there is
more data in the buffer to be sent. In Run Once mode, when an unexpected
command is received, the information packet containing no data is sent and no
data is shown in Data from DMx AutoID+™, and the Profibus Send Status
shows <Unexpected Command>. When an invalid command is received, the
Data from DMx AutoID+™ shows <Invalid Command> and a 17-byte data
packet consisting of the same message is sent to the master. In Run Continuously
mode, since DMx AutoID+™ is triggered by the hardware, not the software
command, it is less important to filter out incorrect command. Therefore, any
message other than the command READ OFF received by the DMx AutoID+™
from the Master is treated as an acknowledgement. There is no concept of
unexpected or invalid command.
View>Camera Status
This menu item displays the cameras that are connected and working properly, as
shown in Figure 4–79.
FIGURE 4–79.
4-132
Camera Status Window
DMx AutoID+™ User Manual
v2.1.0, Feb 2009
DMx AutoID+™ Graphic User Interface
View>Pre Processing Job
If a certain preprocessing step is applied during a successful Learn>Data
Matrix, Learn>Barcode, or Learn>Fixed Font OCR process, it is used in the
Run mode. You can use View>Pre Processing Job to display which
preprocessing step is used internally in Run mode. Figure 4–80 displays a single
camera job configuration that has Zoom In preprocessing enabled for Data
Matrix and Barcode reading and Dilate preprocessing enabled for OCR,
respectively.
FIGURE 4–80.
Processing Job Status
View>Images While Running
Open the View menu and select Images while Running. This menu item allows
you to view the current image during a Run sequence, as shown in Figure 4–81.
FIGURE 4–81.
Images While Running Window
You have the following options for displaying images in Run time:
v2.1.0, Feb 2009
1
Display image in full resolution one at a time in the order it is
acquired.
4
Display image in one fourth of the full resolution in the order it is
acquired. A maximum of four images can be displayed before the
oldest image is replaced with a new image.
16
Display image in one sixteenth of the full resolution in the order it is
acquired. A maximum of sixteen images can be displayed before
the oldest image is replaced with a new image.
Quad
Display images from camera 1, 2, 3 and 4 in the corresponding
quadrant.
DMx AutoID+™ User Manual
4-133
DMx AutoID+™
Reference Guide
4
Chapter
4
DMx AutoID+™ Reference Guide
Since image display uses a significant amount of the computer resources, for
high speed/high throughput application, try to display images in lower resolution
or disable the image display whenever possible. To disable the image display,
simply select the checked display option to uncheck it.
View>Graphics While Running
Open the View menu and select Graphics while Running. This menu item allows
you to view the reading graphics during a Run sequence. Enabling graphics
display will add very little overhead to each read cycle.
View>Status Bar While Running
Open the View menu and select Status Bar while Running. This menu item
updates the status bar display. Enabling Status Bar update will add significant
overhead to each read cycle. For high-speed application, disable the Status Bar
while Running.
View>Reading Statistics While Running
Open the View menu and select Reading Statistics while Running. This menu
item allows you to see the reading statistics in Run mode.
4-134
DMx AutoID+™ User Manual
v2.1.0, Feb 2009
DMx AutoID+™ Graphic User Interface
Pre Process Menu
Figure 4–82 displays the Pre Process Menu.
FIGURE 4–82.
Pre Process Menu
The Pre Process menu can be displayed by checking View>Pre Processing.
Any Pre Process step can be used for reading Data Matrix, barcode, OCR, or
performing Data Matrix in-line verification, but is not applicable to the fiducial
finder so far.
For challenging Data Matrix or OCR reading applications, sometimes utilizing a
proper Pre Process step to enhance the image quality before reading can actually
make the reading more consistent and robust. For example, when the cell size of
a dot peen mark is much smaller than the nominal cell size, you can perform a
dilation or erosion to make the cells larger to improve the reading performance. If
reading a light on dark barcode is needed, you can use Invert to change the
barcode polarity to dark on light for decoding. The Zoom x 1.5 pre-processing
step can actually resample the image to be 150% larger in case the Data Matrix,
barcode or OCR characters are too small to read in the image.
We use Data Matrix as an example in the following instructions. The same
instructions can be applied to both barcode and OCR reading.
To use the Pre Process for reading Data Matrix, you need to follow these steps in
order to embed the pre processing:
v2.1.0, Feb 2009
DMx AutoID+™ User Manual
4-135
DMx AutoID+™
Reference Guide
4
Chapter
4-136
4
DMx AutoID+™ Reference Guide
1.
Acquire a Data Matrix image via File>Grab, File>Open List, or
File>Open. This image is called the original image.
2.
Set the Data Matrix ROI inside the image. The preprocessing step and Data
Matrix reading step use this ROI. The smaller the ROI, the faster the
preprocessing.
3.
Select an appropriate option from the Pre Process menu. The original image
now changes to the processed image.
4.
Perform Learn>Data Matrix. Make sure the Learn is successful and fast. If
not, select Pre Process>Undo to go back to the original image and then
perform steps 2 through 4 with a different ROI and/or a different
preprocessing option.
5.
You can now test with Run Once/Continuously mode. In Run Once mode,
with each of the three image modes described in (1), the image and decode
graphics can be displayed differently depending on whether Run Once
operates on a new image (i.e., whether the Grab New flag in Setup>System
Configuration is checked or not). If no new image is acquired in Run Once
mode, then the Data Matrix reading is based on the already processed image
and the decode graphics is displayed in the usual green color. If a new image
is acquired, then Run Once applies the preprocessing step and read the Data
Matrix based on the processed image. The decoded graphics is displayed in
light blue color. Since Run Continuously mode is not affected by the Grab
New flag, the image and decode graphics are displayed the same way as the
Run Once with Grab New checked. The following explains the design more
specifically:
–
File>Grab — The original image was acquired from the 0300 board. In
this mode, if Grab New is checked, then Run Once acquires a new
image, perform the preprocessing step, then read the Data Matrix. The
new image (before the preprocessing) is displayed with the decode
graphics in light blue color. If Grab New is unchecked, then Run Once
does NOT acquire a new image. Instead, it performs the preprocess step
on the original image then reads the Data Matrix. This time however,
the preprocessed image and the decode graphics are displayed.
–
File>Open List — You need to have at least two files. To test this
mode, use File>Open List to open image files Sample1.bmp and
Sample2.bmp. Assume Sample1.bmp is displayed in DMx AutoID+™
as the original image and you have performed steps 1 through 4. If Grab
New is checked, then Run Once acquires the next image in the list,
DMx AutoID+™ User Manual
v2.1.0, Feb 2009
DMx AutoID+™ Graphic User Interface
performs the preprocessing step, then reads the Data Matrix. The image
before the preprocessing is displayed with the decode graphics. If Grab
New is unchecked, then Run Once operates on the same image
Sample1.bmp and the preprocessed image and the decode graphics are
displayed.
File>Open — There is only one file available and Grab New has no
effect. Run Once performs the preprocess step on the original image,
reads the Data Matrix, and displays the preprocessed image along with
the decode graphics. To display the original image with the decode
graphics, you need to open the same (or a new) image again then do Run
Once.
Note: When no ROI is chosen for Data Matrix or barcode before the Learn, the
full image is used as the ROI. You can always use Set ROI then Clear ROI to set
the full image as the ROI for Data Matrix, Barcode, or OCR. Although it is not
required to use an ROI smaller than the full image for all the preprocessing
options except for the Zoom x 1.5 and Rotate, we recommend that you set an
ROI as small as possible to reduce the time required for performing the
preprocessing step. An ROI is required for enabling the Zoom x1.5 or Rotate
option.
The decode graphics can be displayed in two different colors, depending on
whether preprocess is used or not. Green color is used for reading without
preprocess while light blue color indicates that preprocess is used.
You can perform multiple erosion or dilation steps before performing the Learn.
You can also perform a certain number of erosion steps followed by a different
number of dilation steps (or vice versa) before performing the Learn.
Pre Process>Undo
Select this to undo any preprocessing step(s) to go back to the original image.
Pre Process>Invert
This is useful for inverting a light on dark barcode to dark on light for barcode
decoding.
v2.1.0, Feb 2009
DMx AutoID+™ User Manual
4-137
4
DMx AutoID+™
Reference Guide
–
Chapter
4
DMx AutoID+™ Reference Guide
Pre Process>Zoom x 1.5
This is useful for enlarging the image to increase the resolution for reading small
Data Matrix, barcode, or OCR characters. To use this option, you are required to
draw the corresponding ROI first. (The ROI can be drawn as large as the full
image but can not be set by Set ROI>Clear ROI) When the ROI is drawn, the
Zoom x 1.5 option is enabled in the Pre Process drop down menu. Check the
option by selecting it. An enlarged image of the ROI area is then displayed.
Perform the Learn based on the image and ensure the Learn is successful. Use
Run Once/Continuously to test the reading that has the preprocessing done
internally.
Pre Process>Rotate
This is mainly useful for OCR applications. To use this option, you are required
to draw the corresponding ROI first. When the ROI is drawn, the Rotate option is
enabled in the Pre Process drop down menu. Once you select the Rotate option,
the message “Use Arrow to Rotate the Image” is displayed in the status bar. Use
the Up or Down arrow to rotate the image counterclockwise or clockwise 5°
every time the key is pressed. Alternatively, use the Left or Right arrow for finer
adjustment. Once the OCR string is leveled, perform the Learn>OCR and
ensure the Learn is successful. Use Run Once/Continuously to test the reading
that has the preprocessing done internally.
Pre Process>Erode
This menu item increases the dark cell size (of dark on light Data Matrix).
Pre Process>Dilate
This menu item increases the light cell size (of light on dark Data Matrix).
Pre Process>Open
This menu item removes minor light defects of dark cells.
Pre Process>Close
This menu item removes minor dark defects of light cells.
Pre Process>Top Hat
This menu item removes uneven background.
4-138
DMx AutoID+™ User Manual
v2.1.0, Feb 2009
DMx AutoID+™ Graphic User Interface
Pre Process>Well
This menu item removes uneven background.
Pre Process>Max+Min
This menu item removes high frequency noise and defocuses the image.
Pre Process Example
1.
Open sample12.bmp.
2.
From the Pre Process menu, select Erode to display the DMx AutoID+™
Size dialog box. You can enter 1 or 2 and then click OK. In this example,
size 2 will produce a better image than size 1 but take more time to do the
processing.
Size Dialog Box
4
DMx AutoID+™
Reference Guide
FIGURE 4–83.
3.
v2.1.0, Feb 2009
From the Learn menu, select Data Matrix to ‘memorize’ the preprocess step
and learn the Data Matrix.
DMx AutoID+™ User Manual
4-139
Chapter
4
DMx AutoID+™ Reference Guide
FIGURE 4–84.
4.
Memorize Pre-Process Step
From the Run menu, select Run Continuously to decode the Data Matrix
with preprocessing embedded.
The preprocess step Invert or Max+Min can be applied only once with no
configurable parameter. The rest of the preprocess steps have the size parameter,
which can be set from 1 to 16. You should begin with size 1 and gradually
increase the size to see which one produces the most satisfactory reading
performance. For Erode and Dilate, you are allowed to perform certain size of
Erode followed with certain size of Dilate, or vice versa.
4-140
DMx AutoID+™ User Manual
v2.1.0, Feb 2009
DMx AutoID+™ Graphic User Interface
Help Menu
Help>About
This menu item displays the About the DMx AutoID+™ dialog box, as shown in
Figure 4–85:
FIGURE 4–85.
About DMx AutoID+™ Dialog Box
DMx AutoID+™
Reference Guide
4
This provides critical information about your system including software versions,
serial number, and your PC’s system information. Use the information provided
in this dialog box to expedite any technical questions you may have about the
product.
v2.1.0, Feb 2009
DMx AutoID+™ User Manual
4-141
Chapter
4
DMx AutoID+™ Reference Guide
Tool Bar
Figure 4–86 displays the DMx AutoID+™ tool bar.
FIGURE 4–86.
DMx AutoID+™ Tool Bar
Camera 4
Camera 3
Camera 2
Camera 1
Stop
Run>Run Continuously
Run>Run Once
View>Watch Window
Set ROI>Clear ROI
Set>Parameters
File>Save As
File> Live
File> Grab
File>Open List
File>Open
4-142
DMx AutoID+™ User Manual
v2.1.0, Feb 2009
DMx AutoID+™ Graphic User Interface
Status Bar
Figure 4–87 shows what’s displayed when DMx AutoID+™ stops:
What’s Displayed When DMx AutoID+™ Stops
•
9 ms — Duration of last decode (not including image capture).
•
376 — Total number of inspections.
•
9 — Total number of inspection failures. If system overrun occurs, the
number of overruns will be displayed, within parentheses, after the total
failure. The total number of inspection failures includes system overrun.
•
x:323 — The x-coordinate of mouse location in the image.
•
y:132 — The y-coordinate of mouse location in the image.
•
I:141 — The gray scale value of the pixel at (x, y).
•
xdsfcgbxdz — The decoded data.
During Running, the pixel coordinates and gray value will not be displayed. The
rest will be updated and displayed at the end of each inspection cycle, if
View>Status Bar while Running is checked. If View>Status Bar while
Running is not checked, then only total number of inspections and failures will
be displayed to minimize the CPU load.
v2.1.0, Feb 2009
DMx AutoID+™ User Manual
4-143
4
DMx AutoID+™
Reference Guide
FIGURE 4–87.
Chapter
4-144
4
DMx AutoID+™ Reference Guide
DMx AutoID+™ User Manual
v2.1.0, Feb 2009
5
DMx AutoID+™ Command
Set
The DMx AutoID+™ commands are designed to enable a custom program to
configure and control the DMx AutoID+™ system via serial communication or
Ethernet TCP/IP. The same set of commands can also be used by PLC in order to
control DMx AutoID+™ via RsLinx or Profibus. To ensure proper
communication, each time the custom program sends a serial/TCP/IP command,
it must wait for the command to respond. The next command cannot be sent
before the event is acknowledged that notifies the previous command has been
completed.
Most of the commands are tied to the current camera; you should always ensure
the current camera is set correctly using the command CAMERA n. Commands
that are only applicable to the current camera are said to be camera dependent.
Commands that are not tied to a specific camera are called camera independent
and are specifically noted.
v2.1.0, Feb 2009
•
Items in ALL CAPS represent a system command or keyword.
•
Items in italics should be replaced with a value or keyword corresponding to
the parameter range specified.
•
Curly brackets { } indicate that an item is required.
•
Square brackets [ ] indicates that an item is optional.
DMx AutoID+™ User Manual
5-1
5
DMx AutoID+™
Command Set
CHAPTER 5
Chapter
5
DMx AutoID+™ Command Set
BARCODE {COUNT} [number]
Use this command to set/change the Number of Barcodes to decode in the
General parameter tab. The Number of Barcodes to Decode in the current camera
configuration is returned if the optional number is not entered. The valid range
for number is 0 - 5.
BARCODE ENABLEMASK [mask]
Use this command to set/change the type of barcodes to be checked in the
General parameter tab. The barcode types that are checked in the current camera
configuration are returned as a bitwise mask if the optional mask is not entered.
The valid range for mask is 0 - &H2FFFF.
BCVERIFY [NONE | OVERALL | SCANx]
Use this command to set the Barcode verifier mode. The value x in SCANx mode
is the scan line number from 0 to 9. If the optional parameter is omitted, the
verifier mode in the current camera configuration is returned.
CAMERA [number]
Use this command to set the current camera from 1 to 16. Once the current
camera is set, all camera dependent commands will refer to this camera. Since the
DMx AutoID+™ may support up to four 0300 boards in one PC, the number of
camera supported can be from 1 to 16.
Use this command without options to return the index of the current camera.
CAMERA COUNT
Use this command to return the number of cameras enabled.
CAMERA ENABLEMASK
Use this command to return the camera enabled mask. For example, if cameras 1
and 2 are enabled, the mask is &H03.
5-2
DMx AutoID+™ User Manual
v2.1.0, Feb 2009
CELL SIZE [value]
Use CELL SIZE value to set the matrix cell size. The value ranges from 2 to 20
pixels.
Use CELL SIZE without a parameter to get the value.
CHECK STRING {1D | 2D | OCR} [ON | OFF | str]
The first (required) parameter selects the symbology type (barcode, Data Matrix,
OCR).
The second (optional) parameter enables/disables match string mode, or sets
up/changes the match string using str.
For example, to set up match string “1234567890” for Data Matrix, first enter the
match string by typing:
CHECK STRING 2D 1234567890<Enter>
Then, enable the check string mode by typing:
5
CHECK STRING 2D ON<Enter>
DMx AutoID+™
Command Set
To disable check string, type:
CHECK STRING 2D OFF<Enter>
To get the check string, type:
CHECK STRING 2D<Enter>
CHECK STRING {1D | 2D | OCR} READ
The required parameter selects the symbology type. The command sets the match
string automatically on the next successful read. For example, to allow the
barcode match string to be “learned” on the next successful read, type:
CHECK STRING 1D READ <Enter>.
Then, type READ to read a barcode successfully. The decoded data will be used
as the match string data.
v2.1.0, Feb 2009
DMx AutoID+™ User Manual
5-3
Chapter
5
DMx AutoID+™ Command Set
COLS [value | AUTO]
Use this command to set/get the number of matrix columns. The value ranges
from 8 to 144. The AUTO should be used if the number of columns varies in
READ. To get the number of columns of Data Matrix, type:
COLS<Enter>
DEL {jobfile}
Use this command to delete a saved job. No path is required if the job is in the
default job folder. Otherwise, the complete path is required. This is camera
independent.
DIR
Use this command to return all job file(s) saved in the default job directory.
Return Invalid Command if there is no job. This is camera independent.
FORMAT {PREFIX | SUFFIX | STATUS | LABEL} [str]
Use this command to set/change the prefix, suffix, status separator, label
separator, symbology enablemask, or OCR enablemask to str when str is entered.
Only a single character is allowed as the str for FORMAT STATUS | LABEL.
The symbology enablemask is a bitwise mask of the options in Symbol Debug
Report. The first item, Status Code, corresponds to the LSB of the mask. The
OCR enablemask is a bit-wise mask of the options in OCR Debug Report with
Status Code being the LSB. When str is not entered, the current prefix, suffix,
status separator, label separator, symbology enablemask, or OCR enablemask is
returned.
5-4
DMx AutoID+™ User Manual
v2.1.0, Feb 2009
GRAB [filepath]
Use this command to acquire an image from the 0300 board. For example, if you
want to grab an image from camera 2, type:
CAMERA 2<Enter>
Then, type:
GRAB<Enter>
Load an image file when filepath is specified. The image is displayed and treated
as though it were captured from the current camera. For example, to open and
display a file named test.bmp on drive C:, type:
GRAB c:\test.bmp<Enter>.
HEIGHT [value | AUTO]
Use this command to set/get the height of the Data Matrix. The value ranges from
20 to 1024 pixels.
5
To allow the matrix height to vary in READ mode, type:
DMx AutoID+™
Command Set
HEIGHT AUTO<Enter>
To get the height of Data Matrix, type:
HEIGHT<Enter>
HELP
Use this command to display the list of serial commands. This is camera
independent.
INVERT
Use this command to invert the current image that is acquired with GRAB or
READ. Attempting to invert an already inverted image results in an error.
LEARN {1D | 2D}
Use this command to learn barcode or Data Matrix.
v2.1.0, Feb 2009
DMx AutoID+™ User Manual
5-5
Chapter
5
DMx AutoID+™ Command Set
LIGHT {axis, intensity}
Use this command to configure a multi-axis imager from NER.
Axis: 1-5; Intensity: 0-99.
LOAD [jobfile]
Use this command to load job settings of a saved job. No path is required if the
job is in the default job folder. Otherwise, the complete path is required. When
jobfile is not specified, the default factory settings are loaded. This is camera
independent.
LOCK [ON | OFF]
Lock the DMx AutoID+™ GUI so that it will not respond to mouse or keyboard
input. Remove the GUI lock with LOCK OFF. This is camera independent.
MATRIX COUNT [number]
Use this command to set/change the Number of Data Matrices to Decode in the
General parameter tab. The value in the current camera configuration is returned
if the optional number is not entered. The valid range for number is 0 - 5.
MINIMIZE [ON | OFF]
Use this command to minimize/restore the DMx AutoID+™ GUI. The default
for the optional value is ON. This is camera independent.
MORPH {ERODE | DILATE | OPEN | CLOSE | TOPHAT |
WELL | MAX+MIN} [number]
Use this command to perform morphological preprocessing. Operates on the
current acquired image. Use the optional number (from 1 to 8) to indicate the
number of iterations. The default is 1.
OPTO INPUT {point} [board]
Use this command to get the value of one input I/O point configured by OPTO
IOMASK command. The first parameter point is the input point; the second
optional parameter board is the board number from 0 - 3. The return value is 1
for I/O state high and 0 for I/O state low.
5-6
DMx AutoID+™ User Manual
v2.1.0, Feb 2009
OPTO IOEVENT {input enablemask} [state] [0-3]
Use this command to request the OPTO IOEVENT command response be sent
when a digital input state changes.
The input enablemask parameter enables all or a subset of the input points
configured by OPTO IOMASK. The enabled input points will generate the
command response OPTO IOEVENT n once the state of input point n changes.
For the Combo I/O, the input enablemask ranges from 1 - &H3FF.
For the Mini Opto I/O, the input enablemask ranges from &H10 to &H30.
The state parameter indicates the initial state before the input state change (see
Table 5–1).
Parameters
State
What It Means
0
An input state change from 0 to 1 generates the command
response.
1
An input state change from 1 to 0 generates the command
response.
2
Either a state change from 1 to 0 or from 0 to 1 generates the
command response. This is the default.
5
The board parameter is the board number (0 - 3).
Once the OPTO IOEVENT command is sent, the program must wait for the
OPTO IOEVENT n command response to be received before sending next
command to perform some action based on the input. To detect the next input,
OPTO IOEVENT must be sent again before the state change of the input is
generated.
This is camera independent.
v2.1.0, Feb 2009
DMx AutoID+™ User Manual
5-7
DMx AutoID+™
Command Set
TABLE 5–1. State
Chapter
5
DMx AutoID+™ Command Set
OPTO IOMASK {value} [board]
By default, the DMx AutoID+™ controls all 16 digital I/O points on the Combo
I/O board with Standard (i.e., predetermined) I/O mode. Using the OPTO
command, the I/O implementation can be set to Custom and the I/O behavior can
then be changed. This command sets the Custom I/O mode and must be used
once before any other OPTO commands can be used.
For Combo I/O, use parameter value between 0x0 and 0xFFFF to configure all
General Purpose IO points (GPIO 1-16) to be either input or output. The optional
parameter board from 0 - 3 indicates the 0300 boards. The default board number
is 0, indicating the first board. When more than one board is used, the optional
number tells DMx AutoID+™ to which 0300 board the Opto I/O board is
connected. If no optional board number is specified, DMx AutoID+™ uses the
current camera to determine which 0300 board the Opto I/O board is connected
to. The first 4 cameras belong to board number 0, the next 4 cameras belong to
board number 1, and so on. The following examples show how to program the
I/O points to be either output or input. To set all GPIO 1-16 as output, type OPTO
IOMASK 0<Enter>. To set GPIO 1 as input and GPIO 2-16 as output, type
OPTO IOMASK &H1<Enter>. To set GPIO 1-2 as input and 3-16 as output, type
OPTO IOMASK &H03<Enter>. To set GPIO 1 and 3 as input and the rest as
output, type OPTO IOMASK &H05<Enter>. To set all GPIO as input, type
OPTO IOMASK &HFFFF<Enter>
For Mini Opto I/O, the two inputs and four outputs cannot be changed. The first
four points are outputs and the next two points are input and the only acceptable
command is OPTO IOMASK &H30<Enter>. For description of the board
parameter, see the preceding paragraph.
OPTO OUTPUT {point} {1 | 0} [board]
Use this command to set the state of one output I/O point configured by OPTO
IOMASK command. The first parameter point is the output point; the second
value is the I/O state, 1 for high and 0 for low; the third optional parameter board
is the board number from 0 - 3.
This is camera independent.
POL [DL | LD | AUTO]
Use this command to set the matrix polarity to Dark on Light or Light on Dark.
To allow the polarity to vary in READ, use AUTO. Type POL<Enter> to get the
polarity.
5-8
DMx AutoID+™ User Manual
v2.1.0, Feb 2009
READ [number | ALL | ON | OFF]
•
READ: Run Once the current camera. The Run Once mode acquires a new
image when the Grab New option is checked in the System Configuration.
The Run Once operates on the already acquired image using GRAB
command when the Grab New is unchecked.
•
READ number: Run Once on camera specified by number from 1 to 16.
This is equivalent to combining two commands CAMERA number and
READ.
•
READ ALL: Run all enabled cameras once.
•
READ ON: Enter Run Continuously mode for all enabled cameras.
•
READ OFF: Stop Run Continuously mode for all enabled cameras.
RETRY NONE
Use this command to disable retry and reset the read cycle to single attempt
mode, i.e., one image acquisition per trigger.
Use this command to set the read cycle to supermarket mode, i.e., report only
successful attempts; upon duplicate data, report only if the time limit has elapsed
since last decode. The time limit ranges from 1 to 30000 milliseconds.
RETRY TIME {time limit}
Use this command to set the read cycle to multiple attempts within a specified
time limit ranging from 50 to 30000 milliseconds.
v2.1.0, Feb 2009
DMx AutoID+™ User Manual
5-9
DMx AutoID+™
Command Set
5
RETRY SUPERMARKET {time limit}
Chapter
5
DMx AutoID+™ Command Set
ROI {1D | 2D | OCR | FIND} [CLEAR | left, top, width, height]
Use this command to set ROI for barcode, Data Matrix, OCR, or Fiducial Finder.
The first parameter selects the type of symbology or tool.
The second parameter or the set of parameters specify the size of the ROI. The
values left, top, width, and height represent the x, y coordinates of the upper-left
corner and the width and height of the ROI in pixels. For example, to set ROI as
(10, 10, 300, 200) for Data Matrix, type:
ROI 2D 10,10,300,200<Enter>
To set ROI to the full image size, type:
ROI 2D CLEAR<Enter>
If the optional parameter is not entered, the command returns the ROI size in the
order of left, top, width, height. If the ROI size has not been set (from GUI or
using ROI command), the values -1, -1, 0, 0 are returned to indicate that the ROI
is the full image.
ROWS [value | AUTO]
Use this command to set/get the number of matrix rows. The value ranges from 8
to 144. The AUTO should be used if the number of rows varies in READ. Type
ROWS<Enter> to get the number of rows.
SAVE {jobfile}
Use this command to save current settings as a job. This is camera independent.
SAVEIMAGE [filepath]
Use this command to save the image acquired with GRAB or READ command to
an image file specified by filepath.
SHUTDOWN
Use this command to exit the DMx AutoID+™ program.
This is camera independent.
5-10
DMx AutoID+™ User Manual
v2.1.0, Feb 2009
STATS [RESET]
Use this command (STATS RESET) to reset the statistics.
Use this command ( STATS) to get the reading statistics.
TCPIP {host ID, port number} [, in prefix, in suffix, out
prefix, out suffix]
Use this command to set the parameters for TCP/IP protocol. The first required
parameter is the IP address or the friendly name of the computer to connect. The
second required parameter is the port number. You have the option to set/change
input prefix, input suffix, output prefix, and output suffix.
This command can be used as a serial or Profibus command. It is not available as
a TCP/IP command.
This is camera independent.
TEMPLATE {filepath}
UNDO
Use this command to undo Invert or Morph preprocessing.
VER
Use this command to display the version of the software.
This is camera independent.
VERIFY ENABLEMASK [mask]
Use this command to set/change the custom settings of the verifier. The range for
the mask is 0x01 - 0x3FF. If mask is omitted, the current custom settings are
returned as a bitwise mask.
v2.1.0, Feb 2009
DMx AutoID+™ User Manual
5-11
5
DMx AutoID+™
Command Set
Use this command to load a specified template image file for the fiducial finder.
In DMx AutoID+™, when the fiducial finder is configured using Learn Fiducial,
the configuration can be saved to a job file that contains the reference to the
template image file. After the job has been loaded, the template can then be
changed using the command TEMPLATE when needed.
Chapter
5
DMx AutoID+™ Command Set
VERIFY MODE [NONE | CUSTOM | AIM | IAQG | ISO15415]
Use this command to set the Data Matrix verifier mode. If the optional parameter
is omitted, the verifier mode in the current camera configuration is returned.
Note: When you choose CUSTOM, you are actually selecting DPM mode.
WIDTH [value | AUTO]
Use this command to set/get the width of the Data Matrix. The value ranges from
20 to 1024 pixels.
Type WIDTH AUTO<Enter> if you want to allow the matrix width to vary in
READ mode.
Type WIDTH<Enter> to get the width of Data Matrix.
5-12
DMx AutoID+™ User Manual
v2.1.0, Feb 2009
6
CHAPTER 6
DMx AutoID+™ Visual Basic
Support
Microsoft Visual Basic 6.0 is required for creating custom VB applications that
communicate with the DMx AutoID+™ application.
If you plan to write a VB program that uses the serial or TCP/IP command
support to communicate with the DMx AutoID+™ program that is running on
the same PC or a different PC, you can use the Microsoft ActiveX controls
MSComm or Winsock for connecting the two programs. In your VB program,
once a command is sent in one statement, it is your responsibility to ensure the
response of the command is available before its data can be used in your
program. In other words, you cannot assume the next statement immediately
following the statement for sending a command can use the command response
data without first ensuring the data is already available for use. The OLE TCPIP
sample code shows how to send a command and process the response data via the
function SendCommand.
v2.1.0, Feb 2009
DMx AutoID+™ User Manual
6-1
6
DMx AutoID+™ Visual
Basic Support
There are two approaches to adding DMx AutoID+™ functionality to a custom
VB application. If the VB program is to be written to control or monitor the
operation of the DMx AutoID+™ in the same PC or a remote PC, then the Serial
or TCP/IP command support should be used. If you want to have a custom
interface without DMx AutoID+™ running, then you should use the ActiveX
control support. Sample VB projects can be found on the CD in the DMx
AutoID+™ Visual Basic Support folder.
Chapter
6
DMx AutoID+™ Visual Basic Support
TCP/IP Support
To write a custom VB program to communicate with the DMx AutoID+™
running in the same or a different PC, you need to use the Microsoft Winsock
ActiveX control to enable the custom VB program to establish a TCP/IP
connection with the DMx AutoID+™. Once a connection is established, the VB
program can send a command to and receive the command response from DMx
AutoID+™. The supported TCP/IP commands are listed in Chapter 5, “DMx
AutoID+™ Command Set”.
Note: The command TCPIP is not supported as a TCP/IP command.
In the custom VB application, you have the option to set up the TCP/IP protocol
as either server or client. By default, the DMx AutoID+™ application is
configured as a TCP/IP client. We recommend that you configure the custom VB
application as a TCP/IP server. When you create a server application, select a
port (LocalPort property of the WinSock Control) on which to listen, and invoke
the Listen method. When the DMx AutoID+™ computer requests a connection
as a client, the ConnectionRequest event will occur. To complete the connection,
invoke the Accept method within the ConnectionRequest event. In DMx
AutoID+™, you need to set the Remote Host ID to be the server computer's
name or IP address, and the Remote Port to match the Local Port on which the
Server is listening.
On the other hand, if you need to configure the custom VB application as a
TCP/IP client, you must set the DMx AutoID+™ as a TCP/IP server and select
the Local Port on which the Server will be listening. In your client application,
you must enter the DMx AutoID+™ computer's name or IP address in the
RemoteHost property, and set the RemotePort property to match the Local Port
set in the DMx AutoID+™. Then invoke the Connect method.
Note: DMx AutoID+™, as a TCP/IP server, does not support more than one
client connection at the present time.
Once a connection has been made, either computer can send and receive data. To
send data, invoke the SendData method. Whenever data is received, the
DataArrival event occurs. Invoke the GetData method within the DataArrival
event to retrieve the data.
6-2
DMx AutoID+™ User Manual
v2.1.0, Feb 2009
TCP/IP Support with OLE
TCP/IP Support with OLE
It is not possible to start up the DMx AutoID+™ program from the custom VB
application itself using TCP/IP commands alone. DMx AutoID+™ must be
already running before the custom VB application can connect to it (or vice
versa) via TCP/IP commands. You can ensure the DMx AutoID+™ always starts
up automatically by installing it in the Windows Startup folder, or you can start
up the DMx AutoID+™ program from the custom VB application using the OLE
mechanism when both the DMx AutoID+™ and your VB application are to run
in the same PC.
The sample projects on the CD in the \DMx AutoID+™ Visual Basic
Support\OLE TCPIP folder use the OLE mechanism to start up and terminate the
DMx AutoID+™ application. The rest of communication between the VB
application and the DMx AutoID+™ are based on the TCP/IP command for
maximum robustness and efficiency.
Use the OLE mechanism to start up the DMx AutoID+™ from your VB
application. In Form_Load():
1.
Use GetObject to get a reference to the DMx AutoID+™ application object
and set it to the object variable m_DmxID.
Set m_DMxID = GetObject(, “DMxAutoID.Application”)
Set the TextOut property to a Text Box txtMessage so that the command
response data from DMx AutoID+™ will generate the txtMessage_Change
event.
Set m_DmxID.TextOut = txtMessage
3.
Use the CommandLine Property to send the OLE command TCPIP to
configure the TCP/IP settings of the DMx AutoID+™.
The response data of the TCPIP command is received by the VB application
through the txtMessage_Change event. Make sure you get the correct response
TCPIP SUCCESS before setting the TextOut property to Nothing. You can now
use the SendCommand function to communicate with DMx AutoID+™ in
TCP/IP for efficiency and robustness.
To terminate the DMx AutoID+™ program from your VB application, use
m_DmxID.Quit and release the reference by setting it to Nothing in
Form_Unload().
v2.1.0, Feb 2009
DMx AutoID+™ User Manual
6-3
6
DMx AutoID+™ Visual
Basic Support
2.
Chapter
6
DMx AutoID+™ Visual Basic Support
The function SendCommand should always be used for sending a command. If a
command is sent successfully and its response is received in time, the function
returns True and the response data can be further processed in your VB
application. If, for whatever reason, no response data is received by the TCP/IP
connection within the pre-specific timer timeout value, the function will return
False and appropriate actions should be taken in your VB application.
To write a VB application that communicates with DMx AutoID+™ on a remote
PC, you need to remove all above OLE references and ensure that DMx
AutoID+™ can automatically start up with the correct TCP/IP configurations.
ActiveX Control Support
The DMx AutoID+™ software provides support that allows ActiveX container
applications to access most of the DMx AutoID+™ functionality including the
interfaces. The ActiveX Control support consists of a DMx AutoID+™
configuration and runtime (DMx AutoID Custom) control and image acquisition
and display (DMx ImageView) control.
In the \VB Support\ActiveX folder of the DMx AutoID+™ installation CD, the
custom1.vbp sample project shows how to access all of the DMx AutoID+™
functionality supported by the two ActiveX controls. If you write your
application based on the custom1 model, your application will have full access of
all configuration parameters. The custom2.vbp is a simpler example showing
how to use load a configuration job to configure the system and use a few buttons
to modify some of the parameters. It also shows how to grab an image or open an
image file, learn Data Matrix, run once, and program I/O points. You can use
DMx AutoID+™ software to configure the system and generate a job
(configuration) file to be used in your custom2 type of application.
Most of the properties and methods are tied to the current camera and you should
always ensure the current camera is set correctly using the Camera property.
Properties or methods that are only applicable to the current camera are said to be
camera dependent. Properties or methods that are not tied to a specific camera are
called camera independent and are specifically noted.
In the following descriptions, the square brackets [ ] indicate that an item is
optional. A mask is a string of binary bit patterns in hex format. An enable mask
describes an array of check box options for enabled 0300 boards, cameras,
barcodes, custom verifier options, symbology debug information, and OCR
debug information. The topmost check box corresponds to the LSB and the
bottommost to the MSB of the bit mask. For a value over 9, the string format
6-4
DMx AutoID+™ User Manual
v2.1.0, Feb 2009
ActiveX Control Support
“&Hx” has to be used where x is the hex representation. For example, to
represent a bit pattern of 1010, enter “&HA”. If a string value for a mask is
between “&H0” and “&H9”, you can simply use a value between 0 and 9 for a
write property. The corresponding read property returns a variant which can be
retrieved as a string or long value.
DMx AutoID Custom Control
The DMx AutoID Custom Control is an ActiveX control that provides properties,
methods, and events for DMx AutoID+™ system and parameter configurations,
image acquisition, learn and read, image/job file open and save, digital I/O
control, lighting control, etc.
The remainder of this section describes the following:
•
“DMx AutoID Custom Control Properties” starting on page 6-5
•
“DMx AutoID Custom Control Methods” starting on page 6-36
•
“DMx AutoID Custom Control Events” starting on page 6-56
DMx AutoID Custom Control Properties
The properties exposed by the DMx AutoID Custom Control are listed in the
following pages.
DMx AutoID+™ Visual
Basic Support
6
v2.1.0, Feb 2009
DMx AutoID+™ User Manual
6-5
Chapter
6
DMx AutoID+™ Visual Basic Support
ApplicationPath Property
This property passes the current application path to the control. The application
path can be useful for opening or saving an image or a job file. This is a writeonly property that can be set only at runtime. This is camera independent.
Syntax
Object.ApplicationPath = path
Description
path: This is the file path that you want the DMx AutoID Custom Control to
know as the application path. Typically, you get path using App. Path in VB and
set it to the ApplicationPath property.
6-6
DMx AutoID+™ User Manual
v2.1.0, Feb 2009
ActiveX Control Support
AssistedLearnEnable Property
The property is a Boolean setting that determines if the assisted learn mode
(interactive learn mode) is allowed. This is a write-only property that can only be
set at runtime. This is camera independent.
Syntax
Object. AssistedLearnEnable = state
Description
state:
•
True — The interactive learn mode used in Data Matrix assisted learn and
learn Fixed Font OCR and Learn Fiducial is allowed.
•
False — The interactive learn mode is not allowed. This is the default.
DMx AutoID+™ Visual
Basic Support
6
v2.1.0, Feb 2009
DMx AutoID+™ User Manual
6-7
Chapter
6
DMx AutoID+™ Visual Basic Support
BarcodeCount Property
This property is the Number of Barcodes to Read in the Setup | Parameter |
General tab. This is a read/write property that can be retrieved and set in runtime.
Syntax
Object. BarcodeCount [= number ]
Description
number:
•
0 — No barcode is allowed to decode.
•
1 ~ 5 — Up to five barcodes can be decoded in the same field of view.
Return Value
A long value ranging from 0 to 5.
6-8
DMx AutoID+™ User Manual
v2.1.0, Feb 2009
ActiveX Control Support
BarcodeEnableMask Property
This property is the bit mask of the barcodes enabled in the Setup | Parameter |
General tab. This is a read/write property that can be retrieved and set in runtime.
Syntax
Object.BarcodeEnableMask [ = str ]
Description
str: To enable certain barcodes, set the bits for the corresponding checkbox
positions in the General tab accordingly. For example, to enable Code 128, Code
39, and PDF417, you need to set the binary bit mask to 100000011. Enter str in
the hex value as “&H103”. The str ranges from “&H0” to “&H2FFFF”.
Return Value
The mask of enabled barcodes as a string.
DMx AutoID+™ Visual
Basic Support
6
v2.1.0, Feb 2009
DMx AutoID+™ User Manual
6-9
Chapter
6
DMx AutoID+™ Visual Basic Support
BCVerify Property
This property configures barcode verifier mode in the Setup | Parameters | BC
Verifier tab. This is a read/write property that can be retrieved and set in runtime.
Syntax
Object. BCVerify [ = str ]
Description
str: String.
•
None — Do not perform barcode verification.
•
Overall — Perform ANSI verification and report the overall results.
•
Scanx — Perform ANSI verification and report detailed scan result for scan
line x, where x ranges from 0 to 9.
Return Value
A string of None, or Overall, or Scanx.
6-10
DMx AutoID+™ User Manual
v2.1.0, Feb 2009
ActiveX Control Support
Camera Property
This property indicates the current camera index that is checked in the View |
Camera menu. This is a read/write property that can be retrieved and set in
runtime.
Syntax
Object.Camera [ = index ]
Description
index: The current camera index ranges from 1 to 16.
Return Value
A long value ranging from 1 to 16.
DMx AutoID+™ Visual
Basic Support
6
v2.1.0, Feb 2009
DMx AutoID+™ User Manual
6-11
Chapter
6
DMx AutoID+™ Visual Basic Support
CameraCount Property
This property returns the total number of cameras that are checked in Setup |
System Configuration. This is a read-only property that can be retrieved in
runtime. This is camera independent.
Syntax
Object. CameraCount
Return Value
A long value ranges from 1 to 16.
6-12
DMx AutoID+™ User Manual
v2.1.0, Feb 2009
ActiveX Control Support
CameraEnableMask Property
This property returns in hex format the bit mask of enabled cameras in Setup |
System Configuration. This is a read-only property that can be retrieved in
runtime. This is camera independent.
Syntax
Object. CameraEnableMask
Return Value
The mask of enabled camera as a string ranging from “&H1” to “&HFFFF”.
DMx AutoID+™ Visual
Basic Support
6
v2.1.0, Feb 2009
DMx AutoID+™ User Manual
6-13
Chapter
6
DMx AutoID+™ Visual Basic Support
CameraResol Property
This property corresponds to Camera Resolution in Setup | System
Configuration. This is a read/write property that can be retrieved and set in
runtime.
Syntax
Object. CameraResol [ = index ]
Description
index:
•
0: 640x480 for RS170, or 768x572 for CCIR
•
1: 640x240x2 for RS170, or 768x286x2 for CCIR
•
2: 320x240 for RS170, or 384x286 for CCIR
Return Value
Long. Camera resolution index value of 0, 1, or 2.
6-14
DMx AutoID+™ User Manual
v2.1.0, Feb 2009
ActiveX Control Support
CameraType Property
This property corresponds to Cameras' Type in Setup | System Configuration.
This is a read/write property that can be retrieved and set in runtime.
Syntax
Object. CameraType [= str]
Description
str: RS170 or CCIR.
Return Value
String. Camera type of “RS170” or “CCIR”.
DMx AutoID+™ Visual
Basic Support
6
v2.1.0, Feb 2009
DMx AutoID+™ User Manual
6-15
Chapter
6
DMx AutoID+™ Visual Basic Support
CellSize Property
This property indicates the cell size of the Data Matrix in Setup | Parameters |
Data Matrix | Advanced box. This is a read/write property that can be retrieved
and set in runtime.
Syntax
Object. CellSize [= size ]
Description
size: The cell size value ranges from 2 to 20 pixels.
Return Value
A long value ranging from 2 to 20.
6-16
DMx AutoID+™ User Manual
v2.1.0, Feb 2009
ActiveX Control Support
Cols Property
This property indicates the number of columns of the Data Matrix in the Setup |
Parameters | Data Matrix tab. This is a read/write property that can be retrieved
and set in runtime.
Syntax
Object. Cols [= str ]
Description
str: The str is either AUTO or ranges from 8 to 144.
Return Value
A string value of AUTO or that is between 8 to 144.
DMx AutoID+™ Visual
Basic Support
6
v2.1.0, Feb 2009
DMx AutoID+™ User Manual
6-17
Chapter
6
DMx AutoID+™ Visual Basic Support
FormatLabel Property
This property describes the Label separator in the Setup | Parameters | Formatting
tab. This is a read/write property that can be retrieved and set in runtime.
Syntax
Object. FormatLabel [= str]
Description
str: The Label separator is a one-character string. The default value is “,”.
Return Value
The label separator as a one-character string.
6-18
DMx AutoID+™ User Manual
v2.1.0, Feb 2009
ActiveX Control Support
FormatOCR Property
This property is the bit mask in hex format corresponding to the check boxes in
the OCR Debug Report in the Setup | Parameters | Formatting tab. This is a
read/write property that can be retrieved and set in runtime.
Syntax
Object. FormatOCR [= str]
Description
str: You can have up to five bits enabled with Timing as the MSB. The str ranges
from “&H0” to “&H1F”.
Return Value
The mask of the OCR formatting as a string.
DMx AutoID+™ Visual
Basic Support
6
v2.1.0, Feb 2009
DMx AutoID+™ User Manual
6-19
Chapter
6
DMx AutoID+™ Visual Basic Support
FormatPrefix Property
This property is the Prefix in the Setup | Parameters | Formatting tab. This is a
read/write property that can be retrieved and set in runtime.
Syntax
Object. FormatPrefix [= str]
Description
str: String. Prefix string.
Return Value
The prefix as a string.
6-20
DMx AutoID+™ User Manual
v2.1.0, Feb 2009
ActiveX Control Support
FormatStatus Property
This property describes the Status separator in the Setup | Parameters |
Formatting tab. This is a read/write property that can be retrieved and set in
runtime.
Syntax
Object. FormatStatus [= str]
Description
str: The Status separator is a one-character string. The default value is “;”.
Return Value
The status separator as a single character string.
DMx AutoID+™ Visual
Basic Support
6
v2.1.0, Feb 2009
DMx AutoID+™ User Manual
6-21
Chapter
6
DMx AutoID+™ Visual Basic Support
FormatSuffix Property
This property is the Suffix in the Setup | Parameters | Formatting tab. This is a
read/write property that can be retrieved and set in runtime.
Syntax
Object. FormatSuffix [= str]
Description
str: String. Suffix string.
Return Value
The suffix as a string.
6-22
DMx AutoID+™ User Manual
v2.1.0, Feb 2009
ActiveX Control Support
FormatSymbol Property
This property is the hex format of the bit mask corresponding to the check boxes
in the Symbol Debug Report in the Setup | Parameters | Formatting tab. This is a
read/write property that can be retrieved and set in runtime.
Syntax
Object. FormatSymbol [= str]
Description
str: You can have up to nine bits enabled with Timing being the MSB. The str
ranges from “&H0” to “&H1FF”.
Return Value
The mask of the symbol formatting as a string.
DMx AutoID+™ Visual
Basic Support
6
v2.1.0, Feb 2009
DMx AutoID+™ User Manual
6-23
Chapter
6
DMx AutoID+™ Visual Basic Support
GrabEnableMask Property
This property is the binary bit mask in hex format of up to four 0300 boards
installed. This is a read/write property that can be retrieved and set in runtime.
Camera independent.
Syntax
Object. GrabEnableMask [= str]
Description
str: The frame grabber 1 is the LSB and the frame grabber 4 is the MSB. The str
ranges from “&H1” to “&HF”.
Return Value
The mask of the enabled 0300 boards as a string.
Remark
By default, the AutoID Custom Control tries to get the control on all 0300 boards
available in the system. If you have a good reason to override the default, set the
GrabEnableMask to the proper value before the Initialize property is set.
6-24
DMx AutoID+™ User Manual
v2.1.0, Feb 2009
ActiveX Control Support
Height Property
This property corresponds to the Height in the Setup | Parameters | Data Matrix
tab. This is a read/write property that can be retrieved and set in runtime.
Syntax
Object. Height [= str]
Description
str: String. The str is either AUTO or ranges from 20 to 1024.
Return Value
A string value of AUTO or that is between 20 to 1024.
DMx AutoID+™ Visual
Basic Support
6
v2.1.0, Feb 2009
DMx AutoID+™ User Manual
6-25
Chapter
6
DMx AutoID+™ Visual Basic Support
ImageControl Property
Set the property to the DMx ImageView ActiveX Control on your form so that
the display of image, graphics, and text can be done automatically by the Control.
For example, images obtained from the methods Grab and Live are shown
without having to use the ImageDisplay method of the ImageView control, and
default graphic drawing and text results are shown in the ImageView control as
well for the methods Learn and Read. This is a write-only property that can only
be set at runtime. This is camera independent.
Syntax
Object. ImageControl = control
Description
control: Set the control to the ImageView control on your form so that the image,
graphics, and text data are automatically displayed when needed. If this optional
property is not set, then no display is automatically done for you.
Remark
If there are more than one ImageView controls on your form, only one of them
can be assigned to the ImageControl property. To display images for the rest of
the controls, you need to use the ImageDisplay method explicitly.
6-26
DMx AutoID+™ User Manual
v2.1.0, Feb 2009
ActiveX Control Support
Initialize Property
This property retrieves the software protection key (dongle) status. This is a readonly property that can only be retrieved at runtime. This is camera independent.
Syntax
Object. Initialize
Return Value
A long value ranging from 1 to 7.
•
If the first bit (LSB) of the return value is 1, symbology (Data Matrix and
Barcode) decoding is enabled.
•
If the second bit is 1, OCR is enabled.
•
If the third bit is 1, the inline verifier is enabled.
DMx AutoID+™ Visual
Basic Support
6
v2.1.0, Feb 2009
DMx AutoID+™ User Manual
6-27
Chapter
6
DMx AutoID+™ Visual Basic Support
KeyCode Property
This property passes the KeyCode obtained by the DMx ImageView Control to
the AutoID Custom Control to signal a certain key has been pressed. This is a
write-only property that can only be set at runtime. This is camera independent.
Syntax
Object. KeyCode = KeyCode
Description
KeyCode: The KeyCode is generated by Windows when keyboard is pressed. It is
obtained by the DMx ImageView Control and passed to the DMx AutoID
Custom Control via the KeyDown event. Only the ESC and SPACE bar keys are
allowed.
6-28
DMx AutoID+™ User Manual
v2.1.0, Feb 2009
ActiveX Control Support
MatrixCount Property
This property is the Number of Matrices to Read in the Setup | Parameter |
General tab. This is a read/write property that can be retrieved and set in runtime.
Syntax
Object. MatrixCount [ = number ]
Description
number:
•
0 — No barcode is allowed to decode.
•
1 ~ 5 — Up to five Data Matrices can be decoded in the same field of view.
Return Value
A long value ranging from 0 to 5.
DMx AutoID+™ Visual
Basic Support
6
v2.1.0, Feb 2009
DMx AutoID+™ User Manual
6-29
Chapter
6
DMx AutoID+™ Visual Basic Support
PanelClick Property
This property passes the panel item from the DMx ImageView Control to the
AutoID Custom Control. This is a write-only property that can only be set at
runtime. This is camera independent.
Syntax
Object. PanelClick = item
Description
item: The item is obtained by DMx ImageView Control and passed via the
PanelClick event to the PanelClick property of the DMx AutoID Custom
Control. There are seven panel items and only the last panel generates a
PanelClick event for an item value of 7.
6-30
DMx AutoID+™ User Manual
v2.1.0, Feb 2009
ActiveX Control Support
Pol Property
This property corresponds to the Polarity in the Setup | Parameters | Data Matrix
tab. This is a read/write property that can be retrieved and set in runtime.
Syntax
Object. Pol [ = polarity ]
Description
polarity: String.
•
DL — Dark on light
•
LD — Light on dark
•
AUTO — Either dark on light or light on dark
Return Value
A string value of DL, LD, or AUTO.
DMx AutoID+™ Visual
Basic Support
6
v2.1.0, Feb 2009
DMx AutoID+™ User Manual
6-31
Chapter
6
DMx AutoID+™ Visual Basic Support
Rows Property
This property indicates the number of rows of the Data Matrix in the Setup |
Parameters | Data Matrix tab. This is a read/write property that can be retrieved
and set in runtime.
Syntax
Object. Rows [ = str ]
Description
str: String. The str is AUTO or ranges from 8 from 144.
Return Value
A string value of AUTO or that is between 8 and 144.
6-32
DMx AutoID+™ User Manual
v2.1.0, Feb 2009
ActiveX Control Support
VerifyEnableMask Property
This property is the bit mask in hex format corresponding to the check boxes in
the Custom Settings in the Setup | Parameters | Verifier tab. This is a read/write
property that can be retrieved and set in runtime.
Syntax
Object. VerifyEnableMask [ = str ]
Description
str: String. You can have up to 10 bits enabled with Cell Size check box option
being the LSB. The str ranges from “&H0” to “&H2FF”.
Return Value
The mask of enabled verification parameters as a string.
DMx AutoID+™ Visual
Basic Support
6
v2.1.0, Feb 2009
DMx AutoID+™ User Manual
6-33
Chapter
6
DMx AutoID+™ Visual Basic Support
VerifyMode Property
This property corresponds to the Mode in the Setup | Parameters | Verifier tab.
This is a read/write property that can be retrieved and set in runtime.
Syntax
Object. VerifyMode [ = str ]
Description
str: String.
•
None — Do not perform Data Matrix verification
•
Custom — Perform DPM verification
•
AIM — Perform AIM verification standard
•
IAQG — Perform IAQG verification standard
•
ISO 51415 — Perform ISO 51415 verification standard
Return Value
A string of None, or Custom, or AIM, or IAQG.
6-34
DMx AutoID+™ User Manual
v2.1.0, Feb 2009
ActiveX Control Support
Width Property
This property corresponds to the Width in the Setup | Parameters | Data Matrix
tab. This is a read/write property that can be retrieved and set in runtime.
Syntax
Object. Width [ = str ]
Description
str: String. The str is AUTO or ranges from 20 to 1024 pixels.
Return Value
A long value of AUTO or that is between 20 and 1024.
DMx AutoID+™ Visual
Basic Support
6
v2.1.0, Feb 2009
DMx AutoID+™ User Manual
6-35
Chapter
6
DMx AutoID+™ Visual Basic Support
DMx AutoID Custom Control Methods
The methods exposed by the DMx AutoID Custom Control are listed in the
following pages.
FileNameQuery Method
Use the FileNameQuery method to get the full file path including the file name
for image/job file opening or saving. Camera independent.
Syntax
Object. FileNameQuery [strPath], [bImage], [bSave]
Description
strPath: String. You have the option to set a file path so that the method will
display the file path in the query dialog box.
bImage: Boolean.
•
True — Image file. This is the default.
•
False — Job file.
bSave: Boolean.
•
False — Open file. This the default.
•
True — Save file.
Return Value
The full path of the file to be opened or saved as a string. If the Cancel button is
entered, an empty string is returned.
6-36
DMx AutoID+™ User Manual
v2.1.0, Feb 2009
ActiveX Control Support
CheckString Method
Use the CheckString method to set or get a match string.
Syntax
Object. CheckString “field1 [field2]”
Description
•
field1: Use 1D, 2D or OCR to indicate the match string is for barcode, Data
Matrix or OCR.
•
field2: The field2 can be ON, OFF, READ or str.
–
ON — Enable the match string checking.
–
OFF — Disable the match string checking.
–
READ — Automatically set the match string to the decode data with the
next Read method.
–
str — Set the match string by type in the match string as str here.
Return Value
The match string as a string when field2 is omitted.
DMx AutoID+™ Visual
Basic Support
6
v2.1.0, Feb 2009
DMx AutoID+™ User Manual
6-37
Chapter
6
DMx AutoID+™ Visual Basic Support
DisableImageSaving Method
The DisableImageSaving method can disable the image saving for failed images.
This is useful when you need to stop image saving in the custom program.
Syntax
Object. DisableImageSaving index
Description
index: Long. Camera index from 1 to 16.
6-38
DMx AutoID+™ User Manual
v2.1.0, Feb 2009
ActiveX Control Support
GetImageSize Method
The GetImageSize method can get the image width and height of the current
opened or grabbed image.
Syntax
Object. GetImageSize width, height
Description
width: Long. Image width. Declared as ByRef so that the width value will be
obtained.
height: Long. Image height. Declared as ByRef so that the height value will be
obtained.
DMx AutoID+™ Visual
Basic Support
6
v2.1.0, Feb 2009
DMx AutoID+™ User Manual
6-39
Chapter
6
DMx AutoID+™ Visual Basic Support
Grab Method
The Grab method can be used for acquiring an image, opening an existing image
file as a BMP, TIF, or RAW image files of certain sizes (640x480, 320x240), or
uploading an image from the handheld MXi. The method is camera independent
when str is specified.
Syntax
Object. Grab [path]
Description
str: String. If no str is provided, an image is acquired from the current camera.
The optional string is needed for opening an image or uploading an MXi image
from one of MXi’s four buffers via serial port.
To open an image file, set str to the file path including the file name.
To upload an MXi image, set str to “MXi port baud compress mode” in which:
port is 1 (default) or 2
baud is the baud rate up to 115200 (default)
compress is the approximate compression ratio of 0 (no compression), 4,
8 (default), 16, and 32
mode indicates the image buffer to be uploaded: 0 (captured, default),
1 (decoded), 2 (frozen), 3 (downloaded)
Return Value
The address of the image buffer as a long.
Remark
You can set the ImageControl property to the ImageView control so that the
image is displayed automatically.
6-40
DMx AutoID+™ User Manual
v2.1.0, Feb 2009
ActiveX Control Support
Learn Method
Use the Learn method to configure Data Matrix, barcode, OCR, or Fiducial
finder parameters from the image obtained from the Grab method.
Syntax
Object. Learn [ str ]
Description
str: String.
•
1D — learn barcode
•
2D — learn Data Matrix
•
OCR — learn OCR
•
FIND — learn Fiducial finder
Return Value
The results of the learn as a string.
Remark
To enable learn OCR, FIND or Data Matrix assisted learn, the
AssistedLearnEnable property must be set to True.
DMx AutoID+™ Visual
Basic Support
6
v2.1.0, Feb 2009
DMx AutoID+™ User Manual
6-41
Chapter
6
DMx AutoID+™ Visual Basic Support
Light Method
Use the Light method to control multi-axis light.
Syntax
Object. Light axis, level
Description
axis: Long. Select the axis to control. The axis ranges from 1 to 5.
level: Long. Set the light intensity level from 0 to 99.
6-42
DMx AutoID+™ User Manual
v2.1.0, Feb 2009
ActiveX Control Support
Live Method
Use the Live method to display live images.
Syntax
Object. Live
Return Value
Long. The address of the last acquired image when the live mode is stopped.
Remark
You must set the ImageControl property to the ImageView control so that the
image is displayed automatically. In your VB program, ensure the live mode is
stopped by invoking the Live method again before you allow other action.
DMx AutoID+™ Visual
Basic Support
6
v2.1.0, Feb 2009
DMx AutoID+™ User Manual
6-43
Chapter
6
DMx AutoID+™ Visual Basic Support
Load Method
The Load method loads a job file previously saved with the Save method. This is
camera independent.
Syntax
Object. Load [ jobPath ]
Description
jobPath: String. Specifies the full path of the job file with the extension INI. The
extension is not required. If only the file name with no path is supplied, the Load
method attempts to load the file with the path specified by the ApplicationPath
property. If no job file is supplied, the default configuration settings are loaded.
Return Value
An empty string if the job loaded does not contain a [Boot job] entry, or the full
path of the boot job if the loaded job contains a [Boot job] entry.
6-44
DMx AutoID+™ User Manual
v2.1.0, Feb 2009
ActiveX Control Support
OptoInput Method
Use the OptoInput method to get the state of an input point.
Syntax
Object. OptoInput point, [index]
Description
point: Long. The GPIO points from 1 to 16 that have been programmed as input
by the OptoIOMask method.
index: Long. The 0300 board index from 0 to 3. The default is 0, the first 0300
board.
Return Value
A long value of 0 for state Low or 1 for state high. Attempting to read a write
point will result in an error value of -1.
DMx AutoID+™ Visual
Basic Support
6
v2.1.0, Feb 2009
DMx AutoID+™ User Manual
6-45
Chapter
6
DMx AutoID+™ Visual Basic Support
OptoIOEvent Method
Use OptoIOEvent method to configure the input GPIO points so that an event is
generated when the state of a configured input point changes. Once the method is
invoked, it will not return until some input point changes state.
Syntax
Object. OptoIOEvent mask, [polarity], [index]
Description
mask: String. Specify the input GPIO points that will generate an input event.
This ranges from “&H0” to “&H3FF”.
Note: Only the first 10 bits can be configured as input points that can generate an
event.
polarity: Long. Transition polarity.
•
0 — Low to high.
•
1 — High to low.
•
2 — Either direction generates an event. This is the default.
index: Long. The 0300 board index from 0 to 3. The default is 0, the first 0300
board.
Return Value
A long value of the index of the input point whose state has changed. The value
ranges from 1 to 16.
6-46
DMx AutoID+™ User Manual
v2.1.0, Feb 2009
ActiveX Control Support
OptoIOMask Method
Use the OptoIOMask method to configure the GPIO points to be input or output.
This method must be invoked first before other methods OptoInput, OptoOutput,
OptoIOEvent can be called.
Syntax
Object. OptoIOMask mask, [index]
Description
mask: String. The mask is a 16 bit value whose LSB corresponds to the first
GPIO point. To configure a point to be input, set the corresponding point to 1.
For example, to configure all points as input, set mask to “&HFFFF”. To
configure all points as output, set mask to “&H0”. Only the first 10 points can
generate an event.
index: Long. The 0300 board index from 0 to 3. The default is 0, the first 0300
board.
Remark
The two input points and four output points are fixed on the Mini Opto I/O board
that cannot be re-assigned. The mask for Mini I/O board is “&H20”.
DMx AutoID+™ Visual
Basic Support
6
v2.1.0, Feb 2009
DMx AutoID+™ User Manual
6-47
Chapter
6
DMx AutoID+™ Visual Basic Support
OptoOutput Method
Use the OptoOutput method to set the state of an output point.
Syntax
Object. OptoOutput point, state, [index]
Description
point: Long. The GPIO points from 1 to 16 that have been programmed as output
by the OptoIOMask method.
state: Long. 0 — low, 1 — high
index: Long. The 0300 board index from 0 to 3. The default is 0, the first 0300
board.
Return Value
A long value that’s same as state for success or -1 when writing to an input point.
6-48
DMx AutoID+™ User Manual
v2.1.0, Feb 2009
ActiveX Control Support
Read Method
Use Read method to decode barcode, Data Matrix, OCR and/or locate Fiducial
depending on their configuration. The Read method without the option “On/Off”
is equivalent to Run Once while the Read “On” or “Off” are the same as Run
Continuously or Stop. If the custom VB program knows when to trigger a read,
then the Read method should be used. The method will return decode data
immediately if no hardware trigger is configured. When hardware trigger is
configured, the Read method will return decode data when the first trigger
occurs. The VB program can also perform custom image display, saving, and
processing. When continuous hardware triggers are received, and the custom
program does not know when a trigger can occur, then the Read “On” method
must be used. Once the Read “on” method is invoked, it won't return until the
method Read “Off” is used. During the period, whenever a hardware trigger
occurs, an image is acquired and decoded, and the decode data is reported using
the ReadData event. Camera independent.
Syntax
Object. Read [str]
Description
str: String. Use “On” to enter Run Continuously mode and use “Off” to stop Run
Continuously mode.
Return Value
Remark
The Read method may or may not acquire a new image depending on how the
Grab New in the system configuration is configured in the job that is loaded into
the custom VB program. If the Grab New is checked, then the Read method
acquires an image. If the Grab New is unchecked, then the Read method reads
the image acquired by the Grab method. The Grab New is checked by default.
The Grab New has no effect in Run Continuously mode.
v2.1.0, Feb 2009
DMx AutoID+™ User Manual
6-49
6
DMx AutoID+™ Visual
Basic Support
String. Results for barcode, Data Matrix, OCR decoding or output of the Fiducial
finder.
Chapter
6
DMx AutoID+™ Visual Basic Support
ROI Method
Use ROI method to set or retrieve the region of the interest for Data Matrix,
barcode, OCR, or Fiducial finder.
Syntax
Object. ROI “field1 [field2]”
Description
field1: Set field1 to 1D, 2D, OCR, and FIND for barcode ROI, Data Matrix ROI,
OCR ROI and Fiducial finder ROI, respectively.
field2: The field2 is optional. It can be set to CLEAR to configure the ROI to be
the full image size, or a string formed by values “left, top, width, height”. The
values left and top are the x and y coordinates of the upper-left corner,
respectively. The values width and height specify the width and height of the
ROI.
Return Value
When field2 is omitted, ROI field1 returns the ROI string corresponding to the
ROI specified by field1.
6-50
DMx AutoID+™ User Manual
v2.1.0, Feb 2009
ActiveX Control Support
Save Method
The Save method saves the configuration setting to a job file. This is camera
independent.
Syntax
Object. Save jobPath
Description
jobPath: String. Specifies the full path including the name of the job file. If only
file name with no path is specified, the file is saved in the application folder.
Return Value
Boolean: True for success, False for failure (for example, when accessing an
invalid path).
DMx AutoID+™ Visual
Basic Support
6
v2.1.0, Feb 2009
DMx AutoID+™ User Manual
6-51
Chapter
6
DMx AutoID+™ Visual Basic Support
SaveImage Method
Use the SaveImage method to save the image in the buffer to a BMP file. The
image can be acquired by the methods Grab, Live, or Read.
Syntax
Object. SaveImage path
Description
path: String. The path in the image file path can be obtained from the
FileNameQuery method. If only file name with on path is specified, the file is
saved in the application folder.
Return Value
Boolean. True for success, False for failure (when accessing an invalid path).
6-52
DMx AutoID+™ User Manual
v2.1.0, Feb 2009
ActiveX Control Support
SetROI Method
Use SetROI method to set the extra ROI(s) needed in the interactive learn mode.
Syntax
Object. SetROI type, [item]
Description
type: String. 2D, OCR, FIND.
item: Long.
•
0 — Regular rectangular ROI for 1D, 2D, OCR, or FIND.
•
1 — The Data Matrix outline box for 2D, the training box for OCR, or the
template box for FIND.
•
2 — The character box for OCR.
DMx AutoID+™ Visual
Basic Support
6
v2.1.0, Feb 2009
DMx AutoID+™ User Manual
6-53
Chapter
6
DMx AutoID+™ Visual Basic Support
ShowOption Method
Use the ShowOption method to display the dialog boxes in the Setup Menu of the
DMx AutoID+™.
Syntax
Object. ShowOption option
Description
option: String.
•
BARCODE — Parameters | Barcode tab.
•
BCVERIF — Parameters | BC Verification tab.
•
DIGITALIO — Digital I/O Settings dialog.
•
DMATRIX — Parameters | Data Matrix tab.
•
FINDER — Parameters | Fiducial tab.
•
FORMAT — Parameters | Formatting tab.
•
GENERAL — Parameters | General tab.
•
IMGSAVING — Image Saving dialog.
Note: Delete Old Images at Startup is not supported.
6-54
•
LIGHTING — Lighting Control dialog.
•
MATCHMODE — Checking Modes dialog.
•
OCRFIXED — Parameters | Fixed Font OCR tab.
•
OUTMESSAGES — Output Messages dialog.
•
RETRYMODE — Retry Modes dialog.
•
STATWINDOW — Reading Statistics window.
•
SYSCONFIG — System Configuration dialog.
•
VERIFIER — Parameters | Verifier tab.
DMx AutoID+™ User Manual
v2.1.0, Feb 2009
ActiveX Control Support
Stats Method
Use the Stats method to get or reset the reading statistics.
Syntax
Object. Stats [str]
Description
str: String. Use RESET to reset the statistics.
Return Value
When “RESET” is omitted, a string of the reading statistics is returned.
DMx AutoID+™ Visual
Basic Support
6
v2.1.0, Feb 2009
DMx AutoID+™ User Manual
6-55
Chapter
6
DMx AutoID+™ Visual Basic Support
DMx AutoID Custom Control Events
The events exposed by the DMx AutoID Custom Control are listed in the
following pages.
Error Event
Occurs when an error is detected. This is camera independent.
Syntax
Object_Error (ByVal nError As Long)
Description
nError:
6-56
•
eNCAMCONNECTED — Camera not connected.
•
eNCONFIGPRT — Pointer to global config not set.
•
eNCREATEIMAGE — Image memory allocation failure.
•
eNERROR — Software key not detected.
•
eNEXISTFILE — File does not exist.
•
eNGRABINSTANCE — 0300 board not instantiated.
•
eNSUPPORTFILE — File not supported.
•
eNSUPPORTIMG — Image not supported.
•
ePORTALRDYOPEN — Port not available, already open.
•
eWRONGEXT — Wrong file extension.
DMx AutoID+™ User Manual
v2.1.0, Feb 2009
ActiveX Control Support
ImageSizeChange Event
Occurs when an image of different size is loaded.
Syntax
Object_ImageSizeChange (ByVal width As Long, ByVal height As Long)
Description
width: Image width in pixels.
height: Image height in pixels.
DMx AutoID+™ Visual
Basic Support
6
v2.1.0, Feb 2009
DMx AutoID+™ User Manual
6-57
Chapter
6
DMx AutoID+™ Visual Basic Support
CamEnableMaskChange Event
Occurs when a camera is added or removed from the enabled list.
Syntax
Object_CamEnableMaskChange (ByVal camEnablemask As Long)
Description
camEnableMask: The bit mask formed by the enabled cameras.
6-58
DMx AutoID+™ User Manual
v2.1.0, Feb 2009
ActiveX Control Support
CamIndexChange Event
Occurs when the index of the current camera changes.
Syntax
Object_CamIndexChange (ByVal index As Long)
Description
index: The index of the current camera. It ranges from 1 to 16.
DMx AutoID+™ Visual
Basic Support
6
v2.1.0, Feb 2009
DMx AutoID+™ User Manual
6-59
Chapter
6
DMx AutoID+™ Visual Basic Support
GrabIndexChange Event
Occurs when the 0300 board index changes. The 0300 board index changes when
you change a camera index to a new camera that is attached to a different 0300
board.
Syntax
Object_GrabIndexChange (ByVal index As Long)
Description
index: This is the index to the current 0300 board. It ranges from 0 to 3.
6-60
DMx AutoID+™ User Manual
v2.1.0, Feb 2009
ActiveX Control Support
ReadData Event
Occurs when the Read “On” method is invoked. If hardware is enabled, the event
is fired when a hardware trigger occurs and the associated image acquired and
decoded. If hardware trigger is not enabled, the event is fired whenever a decode
cycle is completed and decode data is available.
Syntax
Object_ReadData (ByVal camItem As Long, ByVal strData As String)
Description
camItem: data is decoded from this camera. It ranges from 0 to 15 for cameras 1
to 16.
strData: decode data when barcode is decoded, or output messages programmed
in DMx AutoID+™. The output message can be Locate Failure, Decode Failure,
Match, MisMatch, Overrun, etc. When message Overrun is received, a number of
1 (for process/buffer overrun) or 2 (for trigger overrun) is also reported.
DMx AutoID+™ Visual
Basic Support
6
v2.1.0, Feb 2009
DMx AutoID+™ User Manual
6-61
Chapter
6
DMx AutoID+™ Visual Basic Support
DMx ImageView Control
The DMx ImageView ActiveX Control provides properties and methods for
managing the image display, user input from mouse and keyboard, and managing
the status panel. It also provides events so that the user inputs can be passed on to
the DMx AutoID Custom Control.
The remainder of this section describes the following:
•
“DMx ImageView Control Properties” starting on page 6-62
•
“DMx ImageView Control Methods” starting on page 6-68
•
“DMx ImageView Control Events” starting on page 6-70
DMx ImageView Control Properties
The properties exposed by the DMx ImageView Control are described in the
following pages.
6-62
DMx AutoID+™ User Manual
v2.1.0, Feb 2009
ActiveX Control Support
AutoResize Property
The AutoResize property determines if the ImageView Control can be resized.
This is a write-only property that can be set in the runtime. This is camera
independent.
Syntax
Object. AutoResize = state
Description
state: Boolean.
•
True — Allow ImageView Control to resize.
•
False — ImageView Control does not resize. This is the default.
DMx AutoID+™ Visual
Basic Support
6
v2.1.0, Feb 2009
DMx AutoID+™ User Manual
6-63
Chapter
6
DMx AutoID+™ Visual Basic Support
MinHeight Property
The MinHeight property sets the minimum height of the ImageView control.
This is used when AutoResize is set to True. This is a write-only property that
can be set in the runtime. This is camera independent.
Syntax
Object. MinHeight = height
Description
height: Long. The height of the view of the ImageView control. The height
cannot be less than 64 pixels.
6-64
DMx AutoID+™ User Manual
v2.1.0, Feb 2009
ActiveX Control Support
MinWidth Property
The MinWidth property sets the minimum width of the ImageView control. This
is used when AutoResize is set to True. This is a write-only property that can be
set in the runtime. This is camera independent.
Syntax
Object. MinWidth = width
Description
width: Long. The width of view of the ImageView control. The width cannot be
less than 64 pixels.
DMx AutoID+™ Visual
Basic Support
6
v2.1.0, Feb 2009
DMx AutoID+™ User Manual
6-65
Chapter
6
DMx AutoID+™ Visual Basic Support
MouseEnable Property
Use the MouseEnable property to enable/disable Windows Mouse Move event.
This is write-only property that can be set in runtime. This is camera
independent.
Syntax
Object. MouseEnable = state
Description
state: Boolean.
6-66
•
True — Enable MouseMove event.
•
False — Disable MouseMove event.
DMx AutoID+™ User Manual
v2.1.0, Feb 2009
ActiveX Control Support
StatusBarVisible Property
The StatusBarVisible property determines if the status bar in the DMx
ImageView Control is shown or not. This is a write-only property that can be set
in runtime. This is camera independent.
Syntax
Object. StatusBarVisible = state
Description
state: Boolean.
•
True — Status bar is shown.
•
False — Status bar is not shown. This is the default.
DMx AutoID+™ Visual
Basic Support
6
v2.1.0, Feb 2009
DMx AutoID+™ User Manual
6-67
Chapter
6
DMx AutoID+™ Visual Basic Support
DMx ImageView Control Methods
The methods exposed by the DMx ImageView Control are described in the
following pages.
GetImageRECTAOI Method
Use the GetImageRECTAOI method to retrieve the Region of Interest (ROI) set
by the user and store it into a RECTAOI type.
Syntax
Object. GetImageRECTAOI addr, [item]
Description
addr: Long. The address of the first element of the RECTAOI type.
item: Long. An item of 0 indicates the ROI for 1D, 2D, OCR, or FIND.
6-68
DMx AutoID+™ User Manual
v2.1.0, Feb 2009
ActiveX Control Support
SetImageSize Method
Use SetImageSIze method to set the size of the image display window. If the
AutoResize property is set to False, the display size will not change even when
an image of different size is loaded. If the AutoResize property is set to True, the
display size will automatically resize within the constraints set by MinWidth and
MinHeight properties. See also the ResizeView event and the GetImageSize
method of AutoID Custom Control.
Syntax
Object. SetImageSize width, height
Description
width: Long. Image width in pixels.
height: Long. Image height in pixels.
DMx AutoID+™ Visual
Basic Support
6
v2.1.0, Feb 2009
DMx AutoID+™ User Manual
6-69
Chapter
6
DMx AutoID+™ Visual Basic Support
DMx ImageView Control Events
The events exposed by the DMx ImageView Control are described in the
following pages.
KeyDown Event
Occurs when a key is pressed. Use the KeyDown Event to pass the key code to
AutoID Custom Control.
Syntax
Object_KeyDown (ByVal KeyCode As Integer, Shift As Integer)
Description
KeyCode: Only ESC and SPACE bar are allowed to generate an event.
Shift: Code for control characters. Not used.
6-70
DMx AutoID+™ User Manual
v2.1.0, Feb 2009
ActiveX Control Support
MoveAOI Event
Occurs when an ROI (Region of Interest) is drawn within the image display area.
You typically retrieve the ROI set by the user using the GetImageRECTAOI
method and pass the ROI to the AutoID Custom Control using the ROI method
of AutoID Custom Control.
Syntax
Object_MoveAOI (ByVal item As Long)
Description
item:
•
0 — Main ROI: Used as the ROI for Data Matrix, Barcode, OCR, and
Fiducial Finder.
•
1 — Extra ROI: Used for the OCR Train string box, or Data Matrix outline
box in assisted learn, or template box for Fiducial finder.
•
2 — Extra ROI: Used for the OCR character box.
DMx AutoID+™ Visual
Basic Support
6
v2.1.0, Feb 2009
DMx AutoID+™ User Manual
6-71
Chapter
6
DMx AutoID+™ Visual Basic Support
PanelClick Event
Occurs when the status panel in the ImageView control is clicked. You typically
pass the user click information to AutoID Custom Control when the event occurs.
Syntax
Object_PanelClick (ByVal item As Long)
Description
item: There are seven panel items on the status panel and only the last panel item
can generate a PanelClick event for an item value of 7.
6-72
DMx AutoID+™ User Manual
v2.1.0, Feb 2009
ActiveX Control Support
ResizeView Event
Occurs when a new image is acquired whose size is different than the previously
displayed image and the AutoResize property is set to True.
Syntax
Object_ ResizeView (ByVal width As Long, ByVal height As Long)
Description
width: width of the view in pixels.
height: height of the view in pixels.
DMx AutoID+™ Visual
Basic Support
6
v2.1.0, Feb 2009
DMx AutoID+™ User Manual
6-73
Chapter
6-74
6
DMx AutoID+™ Visual Basic Support
DMx AutoID+™ User Manual
v2.1.0, Feb 2009
A
APPENDIX A
Optional Hardware
Installation
A
Optional Hardware
Installation
Your DMx AutoID+™ system typically comes with the 0300 board for image
acquisition. The Combo I/O board interface connector is also included. In order
to use the sensor and strobe, you need to purchase the Mini Opto I/O board
and/or the Combination I/O board. This section shows the strobe, sensor, and
digital I/O connectors of the Mini Opto I/O board and the Combination I/O
board. It also illustrates how to connect the strobe/sensor for the two boards.
v2.1.0, Feb 2009
DMx AutoID+™ User Manual
A-1
Appendix
A
Optional Hardware Installation
Mini Opto I/O Board
The Mini Opto I/O board provides two sensor inputs, two strobes, two optoisolated input points, and four opto-isolated output points.
FIGURE A–1.
Sensor and Strobes
D15
1
JS
1
JS
8
1
1
JI
JI
1
FL1
FL2
FL3
FL4
FL5
FL6
FL7
JIO
R1
R2
R3
R4
R5
R6
U1
R7
R8
U2
R9
R10
U3
R11
R12
4
1
1
D1
D2
JO
JO
U4
R13
R14
U5
49
R15
R16
D3
U6
D4
R17
R18
8
A-2
DMx AutoID+™ User Manual
v2.1.0, Feb 2009
Sensor/Strobes
The Sensor/Strobe connector JS is supplied with an 8-position mating screw
terminal plug. It provides two non-isolated sensor inputs SENSOR1 on pin 3 and
SENSOR2 on pin 2, a sensor return on pin 4 and +12V for sensor power
SENSOR_PWR on pin 1. Each sensor input can operate from TTL to 30V DC.
FIGURE A–2.
JS Connector
1
Power (+12V to Sensors)
Part Sensor 2
Part Sensor 1
Part Sensor Gnd
Strobe Flash 2
Strobe Flash 1
Strobe Gnd
Chassis Gnd
1
JS
8
8
JS
The JS connector also provides two non-isolated TTL strobe outputs STROBE1
on pin 6 and STROBE2 on pin 5, a strobe return on pin 7 and a CHASSIS GND
on pin 8.
The internal voltage reference signal VREF is connected to SENSOR_PWR on
the board, and is used to properly bias the sensor inputs.
For 12V sensors, supply power to your sensor using the sensor power
SENSOR_PWR on pin 1 on the sensor strobe connector JS.
For 24V sensors (30 volts maximum), you must provide an external +24V power
supply, which also sets the internal reference voltage VREF. Connect external
+24V to sensor power SENSOR_PWR pin 1 on connector JS and supply power
to your sensor using the sensor power SENSOR_PWR pin 1 on connector JS.
v2.1.0, Feb 2009
DMx AutoID+™ User Manual
A-3
A
Optional Hardware
Installation
Mini Opto I/O Board
Appendix
A
Optional Hardware Installation
For TTL sensors, do not connect power to the sensor power SENSOR_PWR pin
1 on connector JS. You must remove jumper JMP1 on the Camera I/O Card. This
will properly bias the sensor inputs for TTL levels.
Note: Whenever the Sensor Power pin on JS is less than 12V, jumper JMP1 on
the Camera I/O Card MUST be removed.
Caution: If you connect an external power supply that is less than 12V to the
sensor power pin on the JS connector, you must remove jumper JMP1 on
the camera I/O card. Failure to remove the jumper may cause damage to the
mini opto I/O board and the camera I/O card.
Digital I/O
There are two dedicated input and four dedicated optically-isolated output points.
The field wiring is terminated on the two screw terminal connectors JI and JO.
FIGURE A–3.
JI Connector
1
Opto Input 2 A
Opto Input 2 B
Opto Input 1 A
Opto Input 1 B
1
JI
4
4
JI
A-4
DMx AutoID+™ User Manual
v2.1.0, Feb 2009
The digital input connector JI is supplied with a 4-position mating screw terminal
plug. It provides two bi-directional Opto inputs:
•
IN1 on pins 3 and 4
•
IN2 on pins 1 and 2
Each input can operate with non-polarized DC signals from 5 to 50 volts with DC
currents from 0.5 to 5ma.
FIGURE A–4.
JO Connector
1
Opto Output 4 A
Opto Output 4 B
Opto Output 3 A
Opto Output 3 B
Opto Output 2 A
Opto Output 2 B
Opto Output 1 A
Opto Output 1 B
1
JO
8
8
JO
The digital output connector JO is supplied with an 8-position mating screw
terminal plug. It provides four bi- directional opto outputs:
v2.1.0, Feb 2009
•
OUT1 on pins 7 and 8
•
OUT2 on pins 5 and 6
•
OUT3 on pins 3 and 4
•
OUT4 on pins 1 and 2
DMx AutoID+™ User Manual
A-5
A
Optional Hardware
Installation
Mini Opto I/O Board
Appendix
A
Optional Hardware Installation
Each output has a contact resistance of less than 20 ohms and can operate with
non-polarized AC or DC signals up to 50 volts at 100ma. Each output is
protected by a current limiting foldback circuit.
The I/O connector supplies the necessary +5 volts DC to operate the I/O board
via the I/O cable. There is no external power supply connector.
Note: Do not attempt to connect an external +5 volts DC power supply to the
Mini Opto I/O Board. There is no connector provided for this function. This
board receives its power via the I/O cable. Connecting an external power supply
will cause serious problems: the two power supplies will conflict with each other
to produce unpredictable results and the external power supply's ground may
cause ground loops to occur. Contact Customer Service at (603) 598-8400 for
assistance.
A-6
DMx AutoID+™ User Manual
v2.1.0, Feb 2009
Combination I/O Board
When more than 2 input or 4 output points are needed, the DMx AutoID+™
system uses the following external Combination I/O board.
FIGURE A–5.
v2.1.0, Feb 2009
Combination I/O Board
DMx AutoID+™ User Manual
A
Optional Hardware
Installation
Combination I/O Board
A-7
Appendix
A
Optional Hardware Installation
Installing the Combination I/O Board & Ribbon Cable
The Combination I/O board can be installed or placed anywhere within reach of
its ribbon cable and your opto connections. To install:
1.
Place the Combination I/O board on any flat surface. As an alternative, you
can permanently mount the board to any flat surface. Secure with four
customer-supplied # 4 x 1" screws.
2.
Connect one end of the ribbon cable into J1 of the Combination I/O Board
and the other end into the I/O Port Interface Connector at the rear of your
PC.
Note: Be careful not to bend the connector pins.
Strobe/Sensors
There are four Sensor/Strobe connectors, one for each camera, JSS1 thru JSS4.
Each connector is supplied with a 6-position mating screw terminal plug and
provides a strobe output labeled STROBE, a sensor input labeled SENSOR, and
+12V for sensor power labeled POWER.
There is a voltage reference connector JVREF. This connector is supplied with a
4-position mating screw terminal plug and provides a reference voltage input
labeled VREF, which is used to properly bias the sensor inputs and an input for
sensor power labeled POWER.
For 12V sensors, supply power to your sensor using the sensor power pin
POWER on the sensor strobe connectors JSS1 thru JSS4. You must connect the
+12V to the reference voltage pin VREF on connector JVREF. In order to
connect +12V to VREF, you must do either of the following:
•
Set jumper W2 to positions 1 and 2 (factory set)
•
Wire VREF to POWER on connector JVREF.
For 24V sensors, you must provide an external +24V power supply in one of two
ways:
•
A-8
Connect external +24V to sensor power pin POWER on connector JVREF
and supply power to your sensor using the sensor power pin POWER on the
sensor strobe connectors JSS1 thru JSS4. You must connect +24V to the
DMx AutoID+™ User Manual
v2.1.0, Feb 2009
reference voltage pin VREF on connector JVREF. In order to connect +24V
to VREF, you must do either of the following:
•
–
Set jumper W2 to positions 1 and 2 (factory set)
–
Wire VREF to POWER on connector JVREF.
Wire external +24V to your sensors. You must connect +24V to the
reference voltage pin VREF on connector JVREF. In order to connect 24V to
VREF, you must wire external +24V to VREF on connector JVREF.
For TTL sensors, set jumper W2 to positions 2 and 3, VREF will default to TTL
levels and remove jumper JMP1 on the Camera I/O Card.
Note: Whenever the External Reference Voltage or the Sensor Power pins on
JVREF are less than 12V, jumper JMP1 on the Camera I/O Card MUST be
removed. Removing this jumper will disable the analog outputs.
Caution: If you connect an external power supply that is less than 12V to the
sensor power pin or VREF pins on the JVREF connector, you must remove
jumper JMP1 on the camera I/O card. Failure to remove the jumper may
cause damage to the combination I/O board and the camera I/O card.
Digital I/O
Sixteen (16) positions are available for industry-standard G4 type, opticallyisolated input or output modules. The field wiring to these modules is terminated
on the barrier strip TB1. Ports 1 through 16 may be configured as either inputs or
outputs.
The Combination I/O Board accepts only 5-volt-logic solid-state relays (G4 Opto
modules). The I/O connector supplies the necessary +5 volts DC to operate the
I/O board through the I/O cable. There is no external power supply connector.
Note: Do not attempt to connect an external +5 volts DC power supply to the
Combination I/O Board. There is no connector provided for this function. This
board receives its power through the I/O cable. Connecting an external power
supply will cause serious problems: the two power supplies will conflict with
each other to produce unpredictable results and the external power supply's
v2.1.0, Feb 2009
DMx AutoID+™ User Manual
A-9
A
Optional Hardware
Installation
Combination I/O Board
Appendix
A
Optional Hardware Installation
ground may cause ground loops to occur. Contact Customer Service at
(603) 598-8400 for assistance.
In designing your reading application, you must decide which mix of input and
output modules and which voltage and current levels you require.
Each opto module has two associated screw terminals. Wire them according to
the manufacturer’s recommendations and your company's electrical standards.
Typically, one side of all input modules connect to the hot power terminal with
input devices (e.g., switches) wired between the other contact and the common
terminal. Output modules are often wired to the common terminal, with loads
returning to the hot terminal.
Four sample wiring diagrams for: Input AC, Output AC, Input DC, and Output
DC Opto modules are shown in the figure below. Note that correct polarity is
critical for DC modules. The odd-numbered terminals on the I/O board are
positive (+) and the even-numbered terminals are negative (-).
A-10
DMx AutoID+™ User Manual
v2.1.0, Feb 2009
FIGURE A–6.
Four Sample Wiring Diagrams
L1
L1
AC
LOOP
SUPPLY
SWITCH
L2
L2
1
1
2
2
3
AC
LOOP
SUPPLY
LOAD
3
Input DC
Output AC
4
4
5
INPUT AC
USING
STA NDARD
MOUNTING RACK
OUTPUT AC
USING
STANDARD
MOUNTING RACK
L1
L1
+
SWITCH
L2
-
DC
LOOP
SUPPLY
+
LOAD
L2
-
DC
LOOP
SUPPLY
+
+
1
1
2
2
3
Input DC
4
3
Output AC
4
5
INPUT AC
USING
STA NDARD
MOUNTING RACK
OUTPUT AC
USING
STA NDARD
MOUNTING RACK
This gives you access to a combination of up to 16 input or output modules.
v2.1.0, Feb 2009
DMx AutoID+™ User Manual
A
Optional Hardware
Installation
Combination I/O Board
A-11
Appendix
A
Optional Hardware Installation
Connecting Sensor & Strobe
For continuous motion or high-speed indexing applications, a sensor and strobe
will be required to freeze each part before the image can be acquired. The strobe
unit may include a fiber-optic light pipe.
When choosing your part sensor, you must consider the time interval between the
part passing into the sensing zone and an electrical signal being generated. When
there is a large variation in process speed, considerable apparent motion of the
part within the FOV may result. The DMx AutoID+™ Express system can
compensate for this motion over a considerable range. However the sensor
should be fast enough to minimize this apparent shift.
Mini Opto I/O High Speed Sensor And Strobe Connections
Figure A–7 illustrates how to connect a part sensor and strobe to the JS connector
of the Mini Opto I/O board.
A-12
DMx AutoID+™ User Manual
v2.1.0, Feb 2009
FIGURE A–7.
Connecting Part Sensor and Strobe to JS Connector
JS
n
Brow
V
10-30
1 Sensor Power
2 Sensor 2
White
Sink
Blue
DC Com
mon
3 Sensor 1
4 Sensor GND
5 Strobe 2 Flash
e* Flash
White/Orang
Black/Brown* Flash
GND
Clear
Shield
6 Strobe 1 Flash
7 Strobe GND
8 Chassis GND
Black (not used)
Sensor
SM312
For LED Strobes
JS Disc.
6
7
5
8
Color
Flash Ch.1 Brown
Flash Rtn. Black
Flash Ch.2 Blue
Not Connected
1
Sensor Cable
JS
AS-MP50-xxx (assy.)
Part
8
Strobe Cable
Red (not used)
Strobe
Light
Unit
Xenon Strobes
v2.1.0, Feb 2009
DMx AutoID+™ User Manual
A
Optional Hardware
Installation
Connecting Sensor & Strobe
A-13
Appendix
A
Optional Hardware Installation
Combination I/O High Speed Sensor & Strobe
Connections
This following figure illustrates how to connect a part sensor and strobe to the
JSS1 - JSS4 connectors of the Combination I/O board.
FIGURE A–8.
Connecting Part Sensor and Strobe to JSS1 - JSS4
JSS1 - JSS4
Flash
range*
White/O
sh
Black/Brown* Fla
GND
10-30V
Brown
White
Sink
Blue D
C Comm
on
Clear
Shield
1 Strobe Flash
2 Strobe GND
3 Sensor Power
4 Sensor
5 Sensor GND
JSS1 - JSS4 For LED Strobes
6 Chassis GND
JSS1 Disc.
1
2
1
6
Color
Flash Ch.1 Brown
Flash Rtn. Black
Flash Ch.2 Blue
Not Connected
JSS1 - JSS4
Sensor
SM312
Black (not used)
1
Sensor Cable
AS-MP50-xxx (assy.)
6
Part
Strobe Cable
Red (not used)
Strobe
Light
Unit
Xenon Strobes
A-14
DMx AutoID+™ User Manual
v2.1.0, Feb 2009
Strobe Unit Example
The following is a typical strobe light unit.
FIGURE A–9.
v2.1.0, Feb 2009
Strobe Unit
DMx AutoID+™ User Manual
A
Optional Hardware
Installation
Connecting Sensor & Strobe
A-15
Appendix
A-16
A
Optional Hardware Installation
DMx AutoID+™ User Manual
v2.1.0, Feb 2009
B
Creating A Good
Image
B
Creating A Good Image
APPENDIX B
This appendix provides guidance on creating a good image.
Overview
To successfully use your 0300 board, you must know how to obtain a clear,
precise image of the part and features you want to inspect. Factors that contribute
to obtaining a good image include:
v2.1.0, Feb 2009
•
Determining the Field of View (FOV)
•
Selecting a lens
•
Illuminating the part
•
Advanced lighting
•
Aperture
•
Depth of Field
•
Lighting tips
DMx AutoID+™ User Manual
B-1
Appendix
B
Creating A Good Image
Determining the Field Of View (FOV)
Determining the best Field of View, that is, the area viewed by the camera, is
your first consideration before setting up a camera for your application. The
object of interest should appear as large as possible in the Field of View. The
Field of View should clearly show the level of detail you want to see while
ensuring that the part to be inspected is always seen by the camera.
The general rule is to fill the Field of View with the part you are inspecting,
leaving enough space around the part to compensate for part positioning. This
provides a superior image of the part and regions of interest for the system to see.
In Figure B–1, the image on the left provides more detail, and thus a more
desirable image than the one on the right.
FIGURE B–1.
Fields of View
Selecting Lens
Selecting a lens is one of the most critical factors for obtaining a good image.
Lenses used for 35 mm SLR cameras are preferable for use with the 0300 board
camera than standard C-mount lenses when performing accurate measurements.
Lenses for 35 mm SLR cameras are more optically accurate and therefore, more
expensive. However, they are larger than C-mount camera lenses and may cause
a problem in mounting a camera in a particular enclosure.
To use a 35 mm SLR camera lens with your 0300 board camera, you need to use
a C-mount to F-mount adapter.
Use the Lens Selection Chart, Figure B–2, to determine the lens size. As a
general guideline, lenses that have a longer focal length make the object appear
closer (larger) and show less of the background. For example, a 50 mm lens has a
longer focal length than a 25 mm lens.
B-2
DMx AutoID+™ User Manual
v2.1.0, Feb 2009
Selecting Lens
Lens Selection Chart
7.0
F = 25 mm
F = 12.5 mm
6.0
1
FY
5.0
1
1
2
F = 35 mm
4.0
2
3.0
2
2.0
F = 50 mm
5
2
F = 75 mm
7
15
1.0
4
7
7
20
30
6
8
15
10
20
12
14
16
18
20
22
D
FY = Horizontal Field of View, inches
D = Part to Camera Distance, in inches
(from the part to the front mounting hole
on the camera)
F = Camera Lens in mm
Note: The number under a dot
indicates the size, in millimeters, of
the needed extension ring. If no
number appears under the dot, an
extension ring is not needed.
Using the Lens Selection Chart
The Lens Selection Chart helps you choose the appropriate lens using
approximate dimensions. For very precise measurements, you may need to use a
precision, low-distortion lens. Contact Microscan Technical Support for a
recommendation that is specific to your measurement task (see the inside front
cover for more information).
First, determine the required horizontal Field of View (FY). Use a dimension of
0.75 inches from the front of the camera to the first mounting hole, as shown in
Figure B–3. Next, measure the distance from the part to the first mounting hole
on the camera (D).
v2.1.0, Feb 2009
DMx AutoID+™ User Manual
B-3
B
Creating A Good
Image
FIGURE B–2.
Appendix
B
Creating A Good Image
Determining Lens Selection
0.7
FIGURE B–3.
.75 inches
0.4
First Mounting Hole
D
Part
FY
Select a lens using the Lens Selection Chart. The chart also indicates if you need
an extension ring. An extension ring decreases the distance from the lens to the
part and causes a smaller Field of View.
Illuminating the Part
Proper illumination of the part is a critical factor influencing the effectiveness of
the inspection operation. There is no absolute procedure to follow. However, the
following basic lighting concepts, combined with some experimentation, will
help you create good lighting.
Note: Never rely solely on ambient lighting. Always use task lighting designed
for your application.
B-4
DMx AutoID+™ User Manual
v2.1.0, Feb 2009
Illuminating the Part
Lighting Considerations
•
Surface Characteristics — Surface characteristics, as they relate to light, is a
critical element when selecting the correct lighting type. The type of surfaces
listed below and their color must be considered before purchasing your
illumination style.
–
Textured
–
Reflective
–
Diffuse
–
Absorptive
–
Color
•
Geometry — The geometry may determine the direction of the illumination.
Will the complete item require illumination?
•
Size — The size of the part will determine the size of the light.
•
Region of Interest (ROI) — How will the ROI compare to the rest of the
part.
Types of Lighting
The advent of advanced lighting has provided a wider assortment of effective
illumination types. This section summarizes some of these lighting
considerations, including: basic vs. advanced, diffused, and point-source lighting
option;, polarizers and light source placement. We highly recommend that you
contact an illumination authority for complex lighting applications.
•
v2.1.0, Feb 2009
Basic Illumination
–
Fluorescent
–
Incandescent
–
Laser
–
LED (Light Emitting Diode)
DMx AutoID+™ User Manual
B-5
B
Creating A Good
Image
The following features should be considered when selecting a lighting scheme to
illuminate a part for vision analysis.
Appendix
B
Creating A Good Image
–
•
•
Strobe
Accessories
–
Fiber Optics
–
Diffusers
–
Beam Splitters
Advanced Illumination
–
DOAL™
–
CDI™
–
SCDI™
–
MVi™
Fluorescent Versus Incandescent Lighting
Preference for using fluorescent lighting, as presented in Table B–1, or
incandescent lighting, as presented in Table B–2, depends on several factors.
However, the general rule should be to use fluorescent lighting whenever
possible.
TABLE B–1. Fluorescent
Lighting
Positive Features
Negative Features
Diffuse
Flickering light
Usually easy to mount
Lack of intensity
Long life
Light output decays with age
Inexpensive
Creates little heat
Note: Fluorescent lighting tends to be diffuse and not concentrated on a part. If
the part is being magnified by a lens or if the lens aperture is small (stopped
down), you may find the light level insufficient.
B-6
DMx AutoID+™ User Manual
v2.1.0, Feb 2009
Illuminating the Part
Lighting
B
Positive Features
Negative Features
High intensity
Shorter life than fluorescent
Inexpensive if you use home light
bulbs
Expensive if fiber-optic lights are used
No flicker
Source of infrared lighta
Light output constant over life of
bulb
Creates excessive of heatb
a. It is usually necessary to place an infrared filter in front of the camera lens when
using an incandescent light source. The camera has a high sensitivity to infrared light
which reduces the contrast and resolution found in an image.
b. If you use fiber optics, the part being illuminated is not heated. If you use
conventional bulbs, the part being inspected may get hot.
Lasers
A laser is an excellent source of light when you need to:
•
Illuminate a small area
•
Create a structured lighting effect
•
Create a three-dimensional simulation, for example, measure depth
Strobe Lights
Use a strobe light when you need to freeze the image of a moving part. Strobes
provide a very short-duration, high-intensity light. In most cases you should use
fiber optics to project the light to the required area.
Diffuse Versus Point-Source Lighting
Diffuse light, as shown in Figure B–4, casts no shadows, minimizes glare, and
appears to originate from no particular direction. Most inspection applications
work best with diffuse light.
v2.1.0, Feb 2009
DMx AutoID+™ User Manual
B-7
Creating A Good
Image
TABLE B–2. Incandescent
Appendix
B
Creating A Good Image
FIGURE B–4.
Diffuse Light
Fluorescent Bulb
Light Diffuser
Good sources of diffuse light include:
•
Fluorescent ring lights
•
Long fluorescent bulbs with or without diffusers
Point-source lighting, as shown in Figure B–5, casts very strong shadows. This is
desired when the presence or absence of a shadow can reveal information about
the presence of depth. Points sources are effective for revealing surface defects.
FIGURE B–5.
Point Source Light
Good point-source lights include:
B-8
•
Incandescent spot lights
•
Fiber-optic sources
DMx AutoID+™ User Manual
v2.1.0, Feb 2009
Illuminating the Part
Unfrosted incandescent light bulbs
•
Strobe lights
B
Placement of Light Sources
There are three basic light source positions: front, side, and back.
Front Lighting
Front lighting is good for the inspection of flat, two-dimensional surface features,
such as a label, as shown in Figure B–6.
FIGURE B–6.
Front Lighting
Exp.
1FEB95
65590AF21
Lot.
02-7250-8/R12
Store below 770F(250C.)
Side Lighting (Dark Field)
Side lighting helps to highlight three-dimensional features and surface
imperfections, and reveals subtle details, as shown in Figure B–7.
FIGURE B–7.
v2.1.0, Feb 2009
Side Lighting
DMx AutoID+™ User Manual
B-9
Creating A Good
Image
•
Appendix
B
Creating A Good Image
Back Lighting
Back lighting helps in the inspection of silhouettes, e.g., the outer edges of a part.
It enhances the contrast between the part and the background. Think of Contrast
refers to the grayscale variation between two areas. Back lighting is helpful in the
inspection of holes, cutouts, and outline dimensions, as shown in Figure B–8.
FIGURE B–8.
B-10
Back Lighting
DMx AutoID+™ User Manual
v2.1.0, Feb 2009
Illuminating the Part
Polarized Light
To polarize light, place polarizing material over the light source, as shown in
Figure B–9. Another piece of polarizing material (an analyzer) is placed in front
of the camera lens and rotated until the glare, or mirror-like reflection, is
minimized.
FIGURE B–9.
Polarized Light
0.4 1.5
0.5 4 0.7
1611 8 5.64 2.8
Polarizer
Acuity
Analyzer
For some applications glare may be helpful and you would not want to eliminate
it. For example, a hole in an object may be more easily detected on a surface that
has glare. In all cases, you will want to adjust the rotation of the polarizing
material to maximize the image contrast of the features you wish to inspect.
v2.1.0, Feb 2009
DMx AutoID+™ User Manual
B-11
B
Creating A Good
Image
Polarized light helps reduce glare on an object when the glare interferes with a
visual inspection, such as when attempting to read a label.
Appendix
B
Creating A Good Image
Advanced Lighting
NER is a recognized leading provider of lighting systems designed specifically
for machine vision applications, as shown in Figure B–10. These products allow
machine vision systems to perform reliably in difficult imaging applications
involving highly reflective or uneven surfaces.
FIGURE B–10.
Lighting Solutions for Image Absorptive Features
SURFACE SPECULARITY
DIFFUSE
MIRROR-LIKE
PLANAR
COPY PAPER
GEOMETRY
INDEPENDENT
LIGHTING
CURVED
SURFACE
GEOMETRY
WHITE
LABEL
ON
BOTTLE
SEMICONDUCTOR
WAFER/DIE
WHITEBOARD
DOAL
SCDI
UNDULATING
BEVERAGE
CONTAINER
CDI
(General Solution)
WRINKLED
PAPER
SURGICAL
INSTRUMENTS
SHRINK
WRAPPED
PLASTIC
FACETED
DIMPLED FOIL
To address your lighting application issues, contact NER at:
Microscan, Inc.
486 Amherst St.
Nashua, NH 03063
Tel. 603-598-8400
Fax 603-577-5976
B-12
DMx AutoID+™ User Manual
v2.1.0, Feb 2009
Advanced Lighting
DOAL
•
Superior uniformity
•
Significantly enhances image quality
•
Improves the accuracy and repeatability of machine vision performance on
specular surfaces
•
Illumination sources include LED, fiber-optic and micro-fluorescent sources
•
Flexible light-field / dark-field illumination characteristics depending on
distance to target
Diffused On-Axis Lighting
Acuity
FIGURE B–11.
Camera
0.4 1.5
0.5 4 0.7
1611 8 5.64 2.8
Light
Source
Object
v2.1.0, Feb 2009
DMx AutoID+™ User Manual
B-13
B
Creating A Good
Image
Ideal for flat specular surfaces. Diffused On-Axis Lighting (DOAL), as shown in
Figure B–11, provides more than 300% greater angular coverage of the lighting
envelope than a similarly sized fluorescent ring light. DOAL can be used at a
distance to provide uniform wide-angle colluminated illumination for imaging
highly specular flat surfaces.
Appendix
B
Creating A Good Image
CDI
Ideal for very uneven specular surfaces. Continuous Diffuse Illumination (CDI),
also known as Cloudy Day Illumination, as shown in Figure B–12, provides a
hemisphere of diffuse, uniform illumination. The complete lighting envelope
generates even lighting from all directions. The use of a curved beam splitter
completes the horizon-to-horizon illumination. On-axis and off-axis lighting is
controlled separately to ensure that uniformity remains in balance.
•
Outstanding uniformity up to ±10% maximum deviation within the lighting
envelope
•
Illumination sources include LED, fiber-optic and white microfluorescent
sources
FIGURE B–12.
Continuous Diffuse Illumination
Camera
0.4 1.5
0.5 4 0.7
1611 8 5.64 2.8
Beam
Splitter
Light Source (on-axis)
Light Source
(off-axis)
Object
B-14
DMx AutoID+™ User Manual
v2.1.0, Feb 2009
Advanced Lighting
SCDI
•
Excellent uniformity ±20% across the lighting envelope at close range
•
Extraordinary diffuse illumination
•
Illumination source include LED and microfluorescent sources
Square Continuous Diffuse Illumination
Acuity
FIGURE B–13.
Camera
0.4 1.5
0.5 4 0.7
1611 8 5.64 2.8
Beam
Splitter
Light
Source
Diffuser
Object
v2.1.0, Feb 2009
DMx AutoID+™ User Manual
B-15
B
Creating A Good
Image
Ideal for uneven specular surfaces. Square Continuous Diffuse Illumination
(SCDI), as shown in Figure B–13, increases the uniformity of on-axis
illumination by ensuring direct light from the diffuser is equally intense as light
coming from the beam splitter and the lighting cavity. Increasing the diffuser
width and elongating the chamber ensures any light directed to the object is
uniform.
Appendix
B
Creating A Good Image
MVi Imager
Integrated system for enhanced ease of use. The MVi Imager integrates camera,
lens, and light combination (machine vision imaging). As a result, these
consolidated components cannot be improperly adjusted by operators or line
technicians.
Aperture
The aperture is the adjustable opening in a lens that varies the amount of light
reaching a target.
The f-stop indicates the size of the opening. The larger the number, the smaller
the opening.
As you go from a smaller number to the next larger one, e.g., 11 to 16, the
amount of light reaching the target in the camera is reduced by one-half.
The best image is obtained at the higher f-stops settings however, the aperture is
smaller and less light enters the lens. You will have to experiment with the
aperture setting to obtain the best image for your application and lighting.
Depth Of Field
Depth of field is the size of the front-to-back distance that is in focus. The
aperture opening is the most important influence in determining the depth of
field:
B-16
•
When using a small aperture (high f-stop number), much of the area, both in
the foreground and background of the object, will be in focus. More light is
required when the aperture is small. This provides greater depth of field and
reduces the effects of ambient light.
•
When using a large aperture, the object is in focus, but the areas in the
foreground and background of the object are out of focus.
•
Many lenses are accompanied by an information sheet detailing depth of
field at various F-stop settings and working distances.
DMx AutoID+™ User Manual
v2.1.0, Feb 2009
Lighting Tips
Lighting Tips
To light a round part, try using a round light source which provides even
lighting on the inspected parts, such as CDI (Cloudy Day Illumination).
•
Experiment with different light positions and sources until you find the best
illumination for your part.
•
If you place a point-source light close to the part, you will likely produce a
harsh glare with black shadows.
•
To fill in (minimize) shadows, use lighting sources with a diffuser, such as
CDI.
•
Your lighting should be much brighter than the room in which the inspection
is taking place.
•
It is often best to light the environment, not the part.
•
An enclosure around the inspection station will minimize the impact of
ambient light as well as protect lights and cameras.
Lighting provides a clear image that is not too bright or too dark and enables the
0300 board to identify the desired features and characteristics. Refer to
Table B–3 for additional lighting information.
TABLE B–3. Additional
Lighting Type
Lighting Information
Hardware Required
Representative Applications
EVEN - FRONT (DIFFUSED)
Band
Fluorescent Tube - Straight or
Circular
Simplest general purpose lighting.
Always try first.
Zone
Diffuser Plate or Reflecting Panel
Detect broken microscope slides.
DOAL
CDI
SCDI
POINT - FRONT
Point Source
Fiberlight or Incandescent
DOAL
CDI
SCDI
v2.1.0, Feb 2009
Use where high intensity lighting is
required on small area. Also for
shadow fill-in and general lighting
touch-up.
DMx AutoID+™ User Manual
B-17
B
Creating A Good
Image
•
Appendix
B
Creating A Good Image
TABLE B–3. Additional
Lighting Information (continued)
Lighting Type
Hardware Required
Representative Applications
Multiple Point
Sources
Multiple Fiberlights or Incandescents
Symmerical high-intensity
illumination of microscopic fields-ofview such as electronic components.
DOAL
CDI
SCDI
EVEN - BACK
Backlighting
Light Box or Uniform Surface
Dimensioning highly reflective parts,
inspecting contours of parts with
highly variable surfaces.
DOAL
See flat dark reflective surfaces.
Front-light deep holes.
STRUCTURED
On-Axis
Beam - Splitter
Light Line
Laser with Cylinder Lens
Relative height measurements of
surfaces. Non-contact gaging.
SPECIAL EFFECTS
Polarizing
Polarizing on Light Sources and
Lens
Minimize glare and variable glints on
top-lit reflective surfaces
Color
Interference and Gelatin Filters
Discriminate copper and steel. Make
variable colored parts appear more
similar to camera.
Strobe
Strobe Source and Synch Box
Use wherever part moves more than
one pixel in 17 milliseconds.
B-18
DMx AutoID+™ User Manual
v2.1.0, Feb 2009
C
Data Matrix Symbology
C
Data Matrix
Symbology
APPENDIX C
This appendix describes the Data Matrix Symbology.
Data Matrix Certification
Data Matrix has been certified by AIM-USA and AIM-International as a fully
public-domain symbology. AIM stands for Automatic Identification
Manufacturers International, Inc. It is located on the Internet at
http://www.aimi.org/bib4.htm, which provides the complete specification.
Data Matrix has also been selected as a standard for 2D marking by a majority of
industry organizations such as Semiconductor Equipment & Materials
International (SEMI), Electronics Industries Association (EIA), Air Transport
Association (ATA), and Automotive Industry Action Group (AIAG).
What Is Data Matrix
The Data Matrix is a unique machine-readable symbol capable of storing a large
amount of information within a small physical size. Examples are shown in
Figure C–1.
v2.1.0, Feb 2009
DMx AutoID+™ User Manual
C-1
Appendix
C
Data Matrix Symbology
FIGURE C–1.
Data Matrix Examples
The Data Matrix symbology allows for two-dimensional encoding and decoding.
For the first time, users are no longer constrained by the limitations of a printed
symbol. Now, with the Data Matrix symbology, users have the ability to:
•
Select output size ranging from 0.001 square inches to 14 square inches,
regardless of the amount of data encoded.
•
Encode up to 3116 numeric characters or 2335 alphanumeric characters in a
single symbol.
•
Encode and read many supported international languages.
•
Easily integrate with existing computer systems.
Data Matrix symbols are capable of carrying 25 to 100 times more information
than the typical barcode. This range is directly related to the image quality that
the printer is capable of producing.
The following summarizes characteristics of 2D Data Matrix:
C-2
•
Both height and width encode data.
•
Works with contrast as low as 20%.
•
Readable through 360o of rotation.
•
Designed to survive harsh industrial environments.
•
Codes can be marked on the surface of a part, without using a paper label.
•
Every DM code is half black and half white to help ensure that cell damage
will not harm readability.
•
Several error correction schemes are available to optimize symbol damage
recovery.
DMx AutoID+™ User Manual
v2.1.0, Feb 2009
Data Matrix Components
•
Advanced image processing is used for higher read rates of cluttered and/or
damaged symbols.
Figure C–2 illustrates a Data Matrix on an actual part.
FIGURE C–2.
Data Matrix Example
Data Matrix
Symbology
C
Data Matrix Components
Data Matrix consists of a solid border, a broken border, a data storage area, and a
quiet zone, as shown in Figure C–3.
FIGURE C–3.
Data Matrix Components
Quiet Zone
Solid Border
Broken Border
Data Storage
v2.1.0, Feb 2009
DMx AutoID+™ User Manual
C-3
Appendix
C
Data Matrix Symbology
The DMx AutoID+™ uses the solid border to calculate the rotation of a Data
Matrix symbol. The DMx AutoID+™ uses the broken border to identify the
number of rows and columns in a symbol. The data storage area contains the
binary information that was encoded during the construction of the Data Matrix.
The data storage area is illustrated in Figure C–4, showing how data is stored in
8-bit format. Each encoded data character can be represented by an 8-bit binary
code. The character M, for example, is 01001101:
•
1 — Dark cell
•
0 — Light cell
•
M — Stored in the Data Matrix, as shown in Figure C–4
FIGURE C–4.
Data Matrix Storage
M = 01001101 =
The Quiet Zone is a clear white space surrounding the Data Matrix, without
clutter or text of any kind. The width of the quiet zone must be at least the size of
one cell. The quiet zone should be at least 10% of the width or height of the
symbol in order to achieve an optimum read rate.
C-4
DMx AutoID+™ User Manual
v2.1.0, Feb 2009
Data Matrix Error Correction
Data Matrix Error Correction
In Convolutional code, as the ECC level increases, data redundancy is added to
the Data Matrix symbol, as well as increased overhead (OVHD) in ECC 000-140.
Additionally, as the ECC levels increase, the physical marked area increases
proportionally. The redundant data is randomly placed (encoded) inside the data
storage area to increase the symbol’s ability to recover from damage.
In Reed-Solomon code, the OVHD varies and is based on the size of matrix.
Refer to Table C–4, “ECC 200 Symbol Attributes,” on page C-8 for more
information.
The examples in Figure C–5 illustrate Data Matrices with different ECC levels
and how ECC affects symbol density.
FIGURE C–5.
ECC00
Data Matrix Examples with Different ECC Levels
ECC50
ECC80
ECC100
ECC140
ECC200
Data = 123456789
Format = 1
v2.1.0, Feb 2009
DMx AutoID+™ User Manual
C-5
C
Data Matrix
Symbology
Error correction provides safeguards and additional capabilities for handling
poorly printed or damaged symbols. Error Correction Codes (ECC) are selected
by the user when encoding the Data Matrix symbol. Data Matrix is the only
symbology which offers both Reed-Solomon (ECC 200) and Convolutional error
correction codes (ECC 000-140). Reed-Solomon is a byte-correcting scheme
preferred for block damage recovery. Convolutional code is a bit correcting
scheme preferred for random damage recovery. With the proper choice of Error
Correction Code for a given environment, a high rate of decoding can be
achieved.
Appendix
C
Data Matrix Symbology
Refer to Table C–1 for a correlation between ECC levels and required overhead.
TABLE C–1. ECC
Levels vs. Required Overhead
Selected ECC Levels
Required Overhead (%)
00
0
50
25
80
33
100
50
140
75
200
Various
Bit Versus Code Word
The ECC200 Data Matrix uses a byte-oriented (one Code Word) error detection
and correction algorithm. The non-ECC200 uses a bit-oriented algorithm. Each
ECC200 Data Matrix consists of multiple code words. Each code word contains
8 bits (also called elements or cells), as shown in Figure C–6.
FIGURE C–6.
1 2
3 4 5
6 7 8
Shows 8 Bits as 1 Code Word
8 bits = 1 code word
The AIM Specification is designed for ECC200, which is code word-based. If
any cell within the code word is incorrectly identified, the code word is
subsequently affected by that bit and thus requires error correction. Since it is the
code word that matters in the error correction algorithm, one single bit can cause
the same amount of damage as the eight wrong bits in the same code word. For
example, if one bit within the code word is in error the entire code word is in
error. Likewise, if multiple bits within the same code word (e.g., 2-8 bits) are in
error, this still counts as one code word in error.
The DMx AutoID+™ is designed to cover both ECC200 and non-ECC200 Data
Matrices. As a result, the number of wrong cells or bits (not code words) is
displayed in the DMx AutoID+™. The code word affected by displayed bits can
also be displayed for the ECC200 Data Matrix.
C-6
DMx AutoID+™ User Manual
v2.1.0, Feb 2009
Data Matrix Encodation Schemes
Data Matrix Encodation Schemes
This section describes ECC 000-140 and ECC 200.
ECC 000-140
The data is encoded using one of six encodation schemes (format strings). The
encodation scheme is fixed for the entire symbol. As a result, the selection of the
most appropriate encodation scheme allows the user to compress the symbol to
its smallest form without wasting space on characters not used. Table C–2 Lists
the six encodation schemes and their outputs.
Encodation
Scheme
Schemes — Format Strings
Format Outputs and Description
Bits per Data
Character
Format 1
500 numeric characters (0-9) with spaces
3.5
Format 2
500 uppercase alphabetic characters with spaces and
punctuation
4.8
Format 3
500 uppercase alphanumeric characters with spaces,
commas, periods, slashes, and minuses
5.25
Format 4
500 uppercase alphanumeric characters with spaces
5.5
Format 5
500 characters with full 7-bit ASCII keyboard
7
Format 6
500 characters with full 8-bit ISO for international
languages
8
v2.1.0, Feb 2009
DMx AutoID+™ User Manual
Data Matrix
Symbology
TABLE C–2. Encodation
C
C-7
Appendix
C
Data Matrix Symbology
ECC 200
The data may be encoded using any combination of six encodation schemes
listed in Table C–3.
TABLE C–3. Encodation
Encodation
Scheme
Schemes — File Formats
Bits per Data
Character
Characters
ASCII
Double-digit numeric ASCII values 0-127
Extended ASCII values 128-255
4
8
16
C40
Primary upper-case alphanumeric
5.33
Text
Primary lower-case alphanumeric
5.33
X12
ANSI X12 EDI data set
5.33
EDIFACT
ASCII values 32-94
6
Base 256
All byte values 0-255
8
Table C–4 lists ECC symbol attributes.
TABLE C–4. ECC
Symbol
Size:1
Data
Region:
200 Symbol Attributes
Row
Col.
Size
N
o.
Interleaved
Block
s
10
10
8x8
1
12
12
10x10
Data Capacity:
Error
Correction
Overhead
%
Max.
Correctable
Percentage
%
Num.
Cap
Alphanu
m. Cap
Byt
e
Cap
1
6
3
1
62.5
25
1
1
10
6
3
58.3
25
14
14
12x12
1
1
16
10
6
55.6
28/39**
16
16
14x14
1
1
24
16
10
50.0
25/38
18
18
16x16
1
1
36
25
16
43.8
22/34
20
20
18x18
1
1
44
31
20
45.0
23/38
22
22
20x20
1
1
60
43
28
40.0
20/34
24
24
22x22
1
1
72
52
34
40.0
20/35
26
26
24x24
1
1
88
64
42
38.9
19/35
32
32
14x14
4
1
124
91
60
36.7
18/34
36
36
16x16
4
1
172
127
84
32.8
16/30
40
40
18x18
4
1
228
169
112
29.6
15/28
C-8
DMx AutoID+™ User Manual
v2.1.0, Feb 2009
Data Matrix Encodation Schemes
44
44
20x20
4
48
48
22x22
4
52
52
24x24
4
64
64
14x14
1
6
72
72
16x16
80
80
88
1
200 Symbol Attributes (continued)
288
214
142
28.0
14/27
1
348
259
172
28.1
14/27
2
408
304
202
29.2
15/27
2
560
418
278
28.6
14/27
1
6
4
736
550
366
28.1
14/26
18x18
1
6
4
912
682
454
29.6
15/28
88
20x20
1
6
4
1152
862
574
28.0
14/27
96
96
22x22
1
6
4
1392
1042
694
28.1
14/27
104
104
24x24
1
6
6
1632
1222
814
29.2
15/28
120
120
18x18
3
6
6
2100
1573
104
8
28.0
14/27
132
132
20x20
3
6
8
2608
1954
130
2
27.6
14/26
144
144
22x22
3
6
8*
3116
2335
155
6
28.5
14/27
25
C
Data Matrix
Symbology
TABLE C–4. ECC
2*
Rectangular
Symbols:
8
18
6x16
1
1
10
6
3
58.3
8
32
6x14
2
1
20
13
8
52.4
24
1
2
26
10x24
1
1
32
22
14
46.7
23/37
v2.1.0, Feb 2009
DMx AutoID+™ User Manual
C-9
Appendix
C
Data Matrix Symbology
TABLE C–4. ECC
200 Symbol Attributes (continued)
1
2
36
10x16
2
1
44
31
20
45.0
23/38
1
6
36
14x16
2
1
64
46
30
42.9
21/38
1
6
48
14x22
2
1
98
72
47
36.4
18/32
Note 1: Symbol size does not include a quiet zone.
Note*: In the largest symbol (144x144), the first eight Reed-Solomon blocks are 218 code words
long encoding 156 data code words. The last two blocks encode 217 code words (155 data code
words). All the blocks have 62 error correction code words.
Note**:The maximum correctable percentage can range between 28% and 39%.
C-10
DMx AutoID+™ User Manual
v2.1.0, Feb 2009
Data Matrix Specification Details
Data Matrix Specification Details
This section provides excerpts from the AIM International Technical
Specification – International Symbology Specification -- Data Matrix (1996).
Refer to the AIM Specification for the complete text.
For new applications, ECC 200 is recommended. ECC 000-140 should only be
used in closed applications where a single party controls both the production and
reading of the symbols and is responsible for overall system performance.
The characteristics of the code consist of:
Encodable character set:
a.
Values 0-127 in accordance with ANSI X3.4, i.e., all 128 ASCII
characters (equivalent to the US national version of ISO 646).
b.
Values 128-255 in accordance with ISO 8859-1; Latin Alphabet No. 1.
These are referred to as extended ASCII.
2.
Representation of data — A dark module is a binary 1 and a light module is
a binary 0. In a reversed image (reverse polarity), a light module is a binary 1
and a dark module is a binary 0.
3.
Symbol size in modules (not including the quiet zone):
ECC 000-140
9 by 9
to 49 by 49
Odd only
ECC 200
10 by 10
to 144 by 144
Even only
Note: Refer to Table C–4, “ECC 200 Symbol Attributes,” on page C-8 for
more information.
4.
v2.1.0, Feb 2009
Data characters per symbol (refers to maximum symbol size in ECC 200):
DMx AutoID+™ User Manual
C-11
Data Matrix
Symbology
1.
C
Appendix
C
Data Matrix Symbology
Alphanumeric data:
8-bit byte data:
Numeric data:
5.
up to 2335 characters
1556 characters
3116 digits
Selectable error correction:
ECC 000-140 — Four levels of convolutional error correction, plus the
option to apply only error detection.
ECC 200 — Reed-Solomon error correction.
6.
Code type: Matrix
7.
Orientation independence: Yes
Summary of Additional Features
The following summarizes additional Data Matrix features, including whether
inherent to the Data Matrix, or optional:
C-12
•
Reflectance reversal: (Inherent) Symbols are intended to be read when
marked such that the image is either dark on light or light on dark.
•
Extended Channel Interpretations: (ECC 200 only, optional). This
mechanism enables characters from other character sets (e.g., Arabic,
Cyrillic, Greek, Hebrew) and other data interpretations or industry-specific
requirements to be represented.
•
Rectangular symbols: (ECC 200 only, optional). Six symbol formats are
specified in a rectangular form.
•
Structured append: (ECC 200 only, optional). This allows files of data to be
represented in up to 16 Data Matrix symbols. The original data can be
correctly reconstructed regardless of the order in which the symbols are
scanned.
DMx AutoID+™ User Manual
v2.1.0, Feb 2009
Symbol Structure
Symbol Structure
Each Data Matrix symbol consists of data regions, which contain nominally
square modules, set out in a regular array. In larger ECC 200 symbols, data
regions are separated by alignment patterns. The data region is surrounded by a
finder pattern, and as a result is surrounded on all four sides by a quiet zone
border.
Regarding Symbol Sizes and Capacities, the ECC 000-140 symbols consist of an
odd number of rows and columns. Symbols are square with sizes from 9x9 to
49x49 (modules) not including quiet zones. These symbols can be recognized by
the upper-right corner module being dark. For an image of reversed polarity, it
would be light. Complete attributes for ECC 000-140 symbols are provided in the
AIM International Technical Specification, International Symbology
Specification — Data Matrix (1996).
ECC 200 symbols consist of an even number of rows and columns. Some
symbols may be square with sizes from 10x10 to 144x144 not including the quiet
zone. Other symbols may be rectangular with sizes from 8x8 to 16x48 not
including quiet zone. All ECC 200 symbols can be recognized by the upper right
corner being light dark. For an image of reversed polarity, it will be dark.
Complete attributes of ECC 200 symbols are provided in the AIM International
Technical Specification, International Symbology Specification — Data Matrix
(1996).
v2.1.0, Feb 2009
DMx AutoID+™ User Manual
C-13
C
Data Matrix
Symbology
The Finder Pattern is a perimeter to the data region and is one module wide. Two
adjacent sides (left and lower sides) forming the L-shaped boundary, are solid
dark lines. These sides primarily determine physical size, orientation and symbol
distortion. The two opposite sides are made up of alternating dark and light
modules. These are used primarily to define the cell structure of the symbol, but
can also assist in determining physical size and distortion.
Appendix
C-14
C
Data Matrix Symbology
DMx AutoID+™ User Manual
v2.1.0, Feb 2009
D
Sample Data Matrix Symbols
This appendix includes a number of sample Data Matrix symbols to ensure that
your system is functioning properly.
FIGURE D–1.
Data Matrix Sample #1
Data = “12345678901234567”
ECC = 0
Format ID = 1
FIGURE D–2.
Data Matrix Sample #2
Data = “ABCDEFGHIJKLMNOPQ”
ECC = 50
Format ID = 2
v2.1.0, Feb 2009
DMx AutoID+™ User Manual
D-1
D
Sample Data Matrix
Symbols
APPENDIX D
Appendix
D
Sample Data Matrix Symbols
FIGURE D–3.
Data Matrix Sample #3
Data = “A,B.C/D-EFGHIJKLM”
ECC = 80
Format ID = 3
FIGURE D–4.
Data Matrix Sample #4
Data = “A1B2C3D4E5F6G7H8I”
ECC = 100
Format ID = 4
FIGURE D–5.
Data Matrix Sample #5
Data = “AaBbCcDdEeFfGgHhI”
ECC = 140
Format ID = 5
FIGURE D–6.
Data Matrix Sample #6
Data = “AaBbCcDdEeFfGgHhI”
ECC = 200
Format ID = N/A
D-2
DMx AutoID+™ User Manual
v2.1.0, Feb 2009
E
APPENDIX E
Sample Barcode Symbols
This appendix includes a number of sample 1D Barcode symbols to ensure that
your system is functioning properly.
FIGURE E–1.
Code 128
FIGURE E–2.
v2.1.0, Feb 2009
Sample Barcode
Symbols
E
Code 93
DMx AutoID+™ User Manual
E-1
Appendix
E-2
E
Sample Barcode Symbols
FIGURE E–3.
Code 39
FIGURE E–4.
Interleaved 2 of 5
FIGURE E–5.
Codabar
FIGURE E–6.
EAN 13
DMx AutoID+™ User Manual
v2.1.0, Feb 2009
EAN 8
FIGURE E–8.
UPC A
FIGURE E–9.
UPC E
E
Sample Barcode
Symbols
FIGURE E–7.
FIGURE E–10.
5-Digit Postnet with Check Character
02021
v2.1.0, Feb 2009
DMx AutoID+™ User Manual
E-3
Appendix
E
Sample Barcode Symbols
FIGURE E–11.
SEMI BC412 with Both Start/Stop and Check Sum
AQQ45670
FIGURE E–12.
Pharmacode
399
FIGURE E–13.
RSS-14
(01)15012345678909
FIGURE E–14.
RSS Limited
(01)15012345678907
FIGURE E–15.
RSS Expanded
(01)98898765432106(3202)012345(15)991231
E-4
DMx AutoID+™ User Manual
v2.1.0, Feb 2009
FIGURE E–16.
RSS Stacked
(01)00012345678905
FIGURE E–17.
RSS Limited Composite
(01)13112345678906(17)010615(10)A123456
FIGURE E–18.
RSS-14 Stacked Composite
E
FIGURE E–19.
Sample Barcode
Symbols
(01)03412345678900(17)010200
QR Code
QR Code symbol
v2.1.0, Feb 2009
DMx AutoID+™ User Manual
E-5
Appendix
E-6
E
Sample Barcode Symbols
DMx AutoID+™ User Manual
v2.1.0, Feb 2009
F
IO Matrices
APPENDIX F
TABLE F–1. IO
Matrix — Camera 1
Camera Number
IO Point
Camera 1
5
6
7
ON
off
off
off
Data Valid, Good Read, Verifier Success (if enabled)
ON
ON
off
off
Data Valid, Good Read, No Match (if enabled)
ON
ON
off
off
Data Valid, Good Read, Good Match (if enabled)
ON
ON
ON
off
Data Valid, Process Overrun
ON
off
off
ON
Data Valid, Trigger Overrun
ON
off
ON
ON
Data Valid, Good Read, Verifier Failure (if enabled)
ON
ON
off
ON
F
IO Matrices
1
Data Valid, No Read
v2.1.0, Feb 2009
DMx AutoID+™ User Manual
F-1
Appendix
F
IO Matrices
TABLE F–2. IO
Matrix — Camera 2
Camera Number
IO Point
2
8
9
10
Data Valid, No Read
Camera 2
ON
off
off
off
Data Valid, Good Read, Verifier Success (if enabled)
ON
ON
off
off
Data Valid, Good Read, No Match (if enabled)
ON
ON
off
off
Data Valid, Good Read, Good Match (if enabled)
ON
ON
ON
off
Data Valid, Process Overrun
ON
off
off
ON
Data Valid, Trigger Overrun
ON
off
ON
ON
Data Valid, Good Read, Verifier Failure (if enabled)
ON
ON
off
ON
F-2
DMx AutoID+™ User Manual
v2.1.0, Feb 2009
TABLE F–3. IO
Matrix — Camera 3
Camera Number
IO Point
3
11
12
13
Data Valid, No Read
Camera 3
ON
off
off
off
Data Valid, Good Read, Verifier Success (if enabled)
ON
ON
off
off
Data Valid, Good Read, No Match (if enabled)
ON
ON
off
off
Data Valid, Good Read, Good Match (if enabled)
ON
ON
ON
off
Data Valid, Process Overrun
ON
off
off
ON
Data Valid, Trigger Overrun
ON
off
ON
ON
Data Valid, Good Read, Verifier Failure (if enabled)
ON
ON
off
ON
IO Matrices
F
v2.1.0, Feb 2009
DMx AutoID+™ User Manual
F-3
Appendix
F
IO Matrices
TABLE F–4. IO
Matrix — Camera 4
Camera Number
IO Point
4
14
15
16
Data Valid, No Read
Camera 4
ON
off
off
off
Data Valid, Good Read, Verifier Success (if enabled)
ON
ON
off
off
Data Valid, Good Read, No Match (if enabled)
ON
ON
off
off
Data Valid, Good Read, Good Match (if enabled)
ON
ON
ON
off
Data Valid, Process Overrun
ON
off
off
ON
Data Valid, Trigger Overrun
ON
off
ON
ON
Data Valid, Good Read, Verifier Failure (if enabled)
ON
ON
off
ON
F-4
DMx AutoID+™ User Manual
v2.1.0, Feb 2009
Index
Symbols
% String Length Variation 4-35
Numerics
0300 Board 1-3
internal cabling 2-4
number
of cameras supported by each 1-1
supported by dmx autoid+ 1-1
8-bit Binary Code C-4
A
Adjusting Camera Position 2-8
Advanced
button 4-22
parameter tuning dialog box 3-8
AIAG C-1
AIM C-1
international technical specification
excerpts C-11
parameters 4-46
specification C-6
Air Transport Association C-1
Allow
severe damage 4-26
steep angle 4-25
Angle
(+/-) 4-62
checking mode 4-73
of distortion 4-48, 4-53
v2.1.0, Feb 2009
variation 4-24
ANSI C-8
X3.4 C-11
Aperture B-16
ApplicationPath Property 6-6
ASCII C-8
AssistedLearnEnable Property 6-7
Asynchronous/Synchronous Mode 4-10
ATA C-1
Auto Start Mode 4-6
Automatic Identification Manufacturers
International C-1
Automotive Industry Action Group C-1
AutoResize Property 6-63
Average Element Size 3-8, 4-23
Axial Nonuniformity 4-46, 4-49, 4-52
B
Back Lighting B-10
Barcode
properties 4-28
reading
ensuring completed 4-19
sample symbols E-1
specific properties group 4-29
symbol
5-digit postnet E-3
codabar E-2
code 128 E-1
code 39 E-2
code 93 E-1
EAN 13 E-2
EAN 8 E-3
interleaved 2 of 5 E-2
pharmacode E-4, E-5
semi BC412 E-4
UPC A E-3
UPC E E-3
type 4-30
DMx AutoID+™ User Manual
Index-1
Index
verification 4-65
BARCODE Command 5-2
BARCODE ENABLEMASK Command 5-2
BarcodeCount Property 6-8
BarcodeEnableMask Property 6-9
Basic Setup Procedures 2-2
Baud Rate 4-13
BC412 4-29
properties 4-30
BCVERIFY Command 5-2
BCVerify Property 6-10
Binary Code C-4
Border
integrity 4-24
match 4-52
match percent 4-41
Broken Border C-4
Buffer Overrun 4-16
Byte-Oriented Error Detection and Correction
Algorithm C-6
C
Cable Connection 2-5
Calibration
contrast 4-95
CamEnableMaskChange Event 6-58
Camera
adjusting position 2-8
cable connection 2-5
cables 2-5
checklist 2-6
connection 2-5
enabled 4-9
f-stop B-16
lens clamping 2-8
mounting considerations 2-6
property 6-11
CAMERA Command 5-2
CAMERA COUNT command 5-2
CAMERA ENABLEMASK command 5-2
CameraCount Property 6-12
CameraEnableMask Property 6-13
CameraResol Property 6-14
Cameras Type 4-10
CameraType Property 6-15
CamIndexChange Event 6-59
Index-2
CCIR 4-11
CDI B-14
Cell
modulation 4-51
outline 4-26
size 4-50
value 4-23
CELL SIZE Command 5-3
CellSize Property 6-16
Center Offset 4-51
Certifications C-1
Char
confidence 4-42
corners 4-42
Character
dimensions 4-36
size/space vary 4-36
CHECK STRING Command 5-3
Check Sum Enabled 4-30
Checklist
camera 2-6
CheckString Method 6-37
Clamping the Lens 2-7
Cloudy Day Illumination B-14
CM4000 2-5, 2-6
COLS Command 5-4
Cols Property 6-17
Combination I/O Board
optional component 1-2
Components 1-2
Confidence Threshold 4-31, 4-35
Configuration
main trigger 4-75
Configuring the Profibus Network 4-83
Continuous Diffuse Illumination B-14
Contrast Calibration 4-95
Custom 4-16
fielding 4-37
Customized Output Messages Dialog Box 4-72
D
Damage
checking mode 4-73
percent 4-41
Dark on Light 4-30
DMx AutoID+™ User Manual
v2.1.0, Feb 2009
Index
Data
bits 4-13
regions C-13
storage area C-4
valid 4-16
valid pulse width (ms) 4-16
Data Matrix
8-bit binary code C-4
additional features C-12
assisted learn 4-101
checking mode dialog box 4-73
compared to barcode C-2
components C-3
dialog box 3-7
examples C-2
reading
ensuring completed 4-19
sample symbols D-1
what it is C-1
Date/Time Stamp 4-42
DDE
protocol 4-80
topic 4-82
Debug Report
ocr 4-39, 4-42
symbology 4-39
Decodability 4-64
Decode Left to Right 4-30
Defects 4-64
Define ROI Menu 4-98
Degraded Method 4-34
DEL Command 5-4
Delete Old Images at Startup 4-71
Depth of Field B-16
poor 2-7
Detect Space 4-36
Dialog Box
advanced parameter tuning 3-8
data matrix 3-7
digital i/o settings 4-15
general 3-6
parameter setup 4-18, 4-28, 4-32
system configuration 4-9
Diffuse Lighting B-7
Diffused On-Axis Lighting B-13
Digital I/O Settings Dialog Box 4-15
v2.1.0, Feb 2009
Dimensions
character 4-36
DIR Command 5-4
Directory for Saved Images 4-70, 4-71
Disable Prefilter 4-36
DisableImageSaving Method 6-38
DMx AutoID+
configuration 1-3
launching 4-1
main menu 3-1
number of reads per minute 1-1
to PLC transfers 4-80
DOAL B-13
Dot
center offset 4-48
matrix method 4-34
size 4-48
DPM
parameters 4-50
E
ECC
000-140 C-5, C-7, C-12, C-13
200 C-5, C-8, C-12, C-13
level 4-21, 4-22, C-5
Edge
determination 4-65
strength value 4-23
EIA C-1
Electronics Industries Association C-1
Encodation Schemes
file formats C-8
format strings C-7
Ensure ROI 4-26
Environmental Requirements 2-2
Error
correction codes C-5
event 6-56
Example
data matrix assisted learn 4-101
Extended Channel Interpretations C-12
Extension Ring B-4
F
Failed Images
saving 4-70
DMx AutoID+™ User Manual
Index-3
Index
Fan Performance 2-3
Field of View 2-7, 3-12
determining B-2
ensuring optimum 2-7
general rule B-2
horizontal B-3
Fielding
custom 4-37
File
formats C-8
menu 4-3
FileNameQuery Method 6-36
Finder Pattern C-13
Fine Tune
method 4-25, 4-36
purposes 4-22
Fixed
font
ocr-a 4-32
ocr-b 4-32
pattern damage 4-50
Flow Control for Com 1 Serial
Communications 4-13
Fluorescent Lighting B-6
Focal Length B-2
Focus 2-8
Font Type 4-32
ocr-a 4-33
ocr-b 4-33
semi 4-33
Foreshortening 2-8
Format
id 4-21
strings
encodation scheme C-7
FORMAT Command 5-4
FormatLabel Property 6-18
FormatOCR Property 6-19
FormatPrefix Property 6-20
FormatStatus Property 6-21
FormatSuffix Property 6-22
FormatSymbol Property 6-23
FOV 2-7, 3-12
general rule B-2
Front Lighting B-9
F-stop 2-8, B-16
Index-4
G
General Dialog Box 3-6
Geometry B-5
GetImageRECTAOI Method 6-68
GetImageSize Method 6-39
Grab
method 6-40
new 4-10
GRAB Command 5-5
GrabEnableMask Property 6-24
GrabIndexChange Event 6-60
Grading Criteria 4-64
Grid Nonuniformity 4-50
Ground Loop 2-6
GUI 3-1
Guidelines
throughput estimation 4-12
H
Hardware Trigger 4-10
Height 4-20, 4-22, 4-25
property 6-25
HEIGHT Command 5-5
HELP Command 5-5
Help Menu 4-141
Hex Result String 4-43
High-Resolution Mode
number of reads/minute 1-1
Horizontal Field of View B-3
I
I/O Settings
standard 4-16
IAQG
parameters 4-48
Illumination B-4
cloudy day B-14
Image
capture (grab) sequence 4-10
capturing 4-4
displaying 4-4
factors contributing to obtaining good B-1
opening 4-4
opening list of 4-4
saving 4-5
saving dialog box 4-70
DMx AutoID+™ User Manual
v2.1.0, Feb 2009
Index
style 4-21, 4-22
ImageControl Property 6-26
ImageSizeChange Event 6-57
Implementation 4-15
Incandescent Lighting B-6
Initialize Property 6-27
Inline Verification
license key required 1-3
Input
prefix 4-14, 4-77
suffix 4-14, 4-77
Inspection of Silhouettes B-10
Intensity Enhance 4-25
Internal
cabling 2-4
sync 4-10
INVERT Command 5-5
Iris Connector 2-5
ISO 15415
parameters 4-49
ISO 8859-1 C-11
K
Keyboard Emulation 1-2
KeyCode Property 6-28
KeyDown Event 6-70
L
Label Separator 4-38
Laser Lighting B-7
Latin Alphabet No. 1 C-11
Launching
DMx AutoID+ 4-1
Learn
barcode auto-discrimination 4-108
barcode process 4-108
menu 4-99
method 6-41
LEARN Command 5-5
Lens
35 mm B-2
adapter needed to mount B-2
aperture B-16
chart B-2
clamping 2-7, 2-8
distance B-4
v2.1.0, Feb 2009
extension ring B-4
focal length B-2
focus 2-8
f-stop B-16
selecting B-2
selection chart B-3
Light
method 6-42
on dark 4-30
polarized B-11
LIGHT Command 5-6
Lighting
back B-10
CDI B-14
cloudy day illumination B-14
continuous diffuse illumination B-14
diffuse B-7
flat specular surfaces B-13
fluorescent B-6
front B-9
geometry B-5
incandescent B-6
integrated system for enhanced ease of
use B-16
laser B-7
placement B-9
point-source B-7
polarized B-11
region of interest B-5
SCDI B-15
side B-9
size B-5
strobe B-7
surface characteristics B-5
tips B-17
uneven specular surfaces B-15
very uneven specular surfaces B-14
List Mode 4-10
Live
camera mode 4-10
method 6-43
LOAD Command 5-6
Load Method 6-44
Local
port 4-77
DMx AutoID+™ User Manual
Index-5
Index
N
Locate/Decode Time 4-23
Location Considerations 2-2
LOCK Command 5-6
M
Main
menu screen 3-1
trigger configuration 4-75
MATRIX COUNT Command 5-6
MatrixCount Property 6-29
Max/Min
bar width 4-28
code height 4-29
code length 4-29
no. of bars 4-29
Maximum Count 4-70
Menu
file 4-3
help 4-141
pre process 4-135
run 4-125
set ROI 4-98
setup 4-8
view 4-129
MinHeight Property 6-64
Mini Opto I/O 4-16
MINIMIZE Command 5-6
Minimized 4-7
Minimum
edge contrast 4-65
edge strength 4-23, 4-31
PC requirements 1-3
quiet zone 4-31
reflectance 4-65
MinWidth Property 6-65
Modes
overall 4-67
scan 4-68
Modulation 4-50, 4-65
Module Fill Rate 4-48
MORPH Command 5-6
MouseEnable Property 6-66
MoveAOI Event 6-71
Multi-Code Setup 3-6
Multiple Input Modules 4-94
Index-6
No
quiet zone clutter 4-25
retry 4-74
No.
of cols 4-21, 4-22
of rows 4-21, 4-22
Nominal Module Size 4-48
Number
of barcodes to decode 4-19
of characters vary 4-36
of data matrices to decode 3-6, 4-19
of ocr rows to read 4-19
Numeric Grading 4-66
O
OCR
debug report 4-39, 4-42
license key required 1-3
method 4-34
OCR-A 4-33
fixed font 4-32
OCR-B 4-33
fixed font 4-32
OPTO INPUT command 5-6
OPTO IOEVENT command 5-7
OPTO IOMASK command 5-8
OPTO OUTPUT command 5-8
OptoInput Method 6-45
OptoIOEvent Method 6-46
OptoIOMask Method 6-47
OptoOutput Method 6-48
Orientation 4-21
Orientation Parameter
relation to angle variation 4-24
Output
formatting 4-38
prefix 4-14, 4-77
suffix 4-14, 4-77
Ovality 4-49
Overall
grade 4-49, 4-50, 4-53
mode 4-67
symbol grade 4-48
Overdrive Mode 4-26
DMx AutoID+™ User Manual
v2.1.0, Feb 2009
Index
Overrun
process 4-16
trigger 4-16
Overwrite Old Images 4-71
OVHD C-5
P
PanelClick
event 6-72
property 6-30
Parameter Setup
data matrix dialog box 3-7
general dialog box 3-6
Parameter Setup Dialog Box 4-18, 4-28, 4-32
Parameters
aim 4-46
dpm 4-50
iaqc 4-48
iso 15415 4-49
Parity 4-13
Partial Result String 4-43
Password
run continuous mode 4-5
Performance
fan 2-3
PLC 4-14
service 4-79
to DMx AutoID+ transfers 4-80
Point-Source Lighting B-7
POL Command 5-8
Pol Property 6-31
Polarity 4-21, 4-22, 4-30
Polarized Light B-11
Poor Depth of Field 2-7
Position Enhance 4-25
Pre Process Menu 4-135
Prefix 4-38
Primary Character 4-32
Print Growth 4-47, 4-50, 4-52
Probe Spacing 4-28
Process Overrun 4-16
Profibus
command set 4-89
data exchange protocol 4-88
network
configuring 4-83
v2.1.0, Feb 2009
protocol 4-82
Protocol
client 4-76
dde 4-80
error handling 4-92
profibus 4-82
server 4-76
transfer 4-79
Q
Quiet Zone C-4
R
READ Command 5-9
Read Method 6-49
Reading
actual data matrix via live camera 3-12
sample data matrices from file list 3-10
sample data matrix from file 3-2
Reads/Minute
high-resolution mode 1-1
Rectangular Symbols C-12
Reed-Solomon Code C-5
Reference Decode 4-49, 4-65
Reflectance Reversal C-12
Region of Interest B-5
Relief
camera cables 2-7
Remote
host identification 4-76
port 4-77
Remove Noise 4-36
Report 4-62
target intensity 4-62
Reporting Verification Results 4-66
Requirements
minimum 1-3
ResizeView Event 6-73
RETRY
none command 5-9
supermarket command 5-9
time command 5-9
Retry Modes Setup Dialog Box 4-76
ROI B-5
method 6-50
ROI Command 5-10
DMx AutoID+™ User Manual
Index-7
Index
ROWS Command 5-10
Rows Property 6-32
RS170 4-10
Run
continuous mode
offset 4-51
variation (%) 4-24
Software Version 4-141
Solid Border C-4
Speed Enhance 4-36
Square Continuous Diffuse Illumination B-15
Standard
i/o 4-15
password protecting 4-5
continuously 3-8
menu 4-125
settings 4-16
S
Samples Per Cell 4-24
Save
failed images 4-70
images before decoding 4-71
method 6-51
SAVE Command 5-10
SAVEIMAGE Command 5-10
SaveImage Method 6-52
Scan Mode 4-68
SCDI B-15
Score 4-62
Search
direction 4-26, 4-28
speed 4-26
SEMI 4-33, C-1
BC412 4-30
font contents 4-32
M-checksum 4-36
Semiconductor Equipment & Materials
International C-1
Serial Number 4-141
Set ROI Menu 4-98
SetImageSize Method 6-69
SetROI Method 6-53
Setup
basic procedures 2-2
menu 4-8
Show
status only 4-46, 4-67
verifier tags 4-42
ShowOption Method 6-54
SHUTDOWN Command 5-10
Side Lighting B-9
Silhouettes B-10
Single Capture Settings 4-10
Size B-5
Index-8
method 4-34
Start/Stop Enabled 4-30
STATS Command 5-11
Stats Method 6-55
Status
bar 4-143
fields 3-5
separator 4-39
StatusBarVisible Property 6-67
Stop Bits 4-13
Strain Relief 2-7
String
checking mode 4-72
confidence 4-42
Strobe Light B-7
disabling 4-9
enabling 4-9
Structured Append C-12
Suffix 4-38
Supermarket Retry 4-76
Surface Characteristics B-5
Symbol
angle 4-41
contrast 4-41, 4-46, 4-49, 4-52, 4-65
corners 4-41
density C-5
ECC 200 attributes C-8
Symbologies Specified 1-4
Symbology C-1
debug report 4-39
Symbols D-1
System
components 1-2
configuration 4-141
dialog box 4-9
overrun 4-16
DMx AutoID+™ User Manual
v2.1.0, Feb 2009
Index
T
results
Target Print Growth 4-46
Target ROI 4-97
TCPIP Command 5-11
Temperature
typical rise 2-3
Template
golden 4-62
TEMPLATE Command 5-11
Text
orientation 4-34
polarity 4-34
Threshold 4-27
value 4-41
Throughput Estimation Guidelines 4-12
Timed Retry 4-74
Timeout (minute) 4-77
Timing 4-42
Tips
lighting B-17
Tool Bar 4-142
Tools 2-3
Total Error Bits 4-41
Train String 4-34
Transfer
format 4-81
protocol 4-79
Trigger
hardware 4-10
overrun 4-16
Turbo Mode 4-26
Tutorial
reading
display 4-56, 4-67
reporting 4-66
Verifier Failure 4-16
VERIFY
enablemask command 5-11
mode command 5-12
VerifyEnableMask Property 6-33
VerifyMode Property 6-34
Video Connector 2-5
View Menu 4-129
W
Warp Method 4-26
Wedge 1-2
Width 4-20, 4-22, 4-25
property 6-35
WIDTH Command 5-12
Width/Height Ratio 4-25
actual data matrix via live camera 3-12
sample data matrices from file list 3-10
sample data matrix from file 3-2
U
UNDO Command 5-11
Unused Error Correction 4-47, 4-50, 4-53
V
Validate Inspection 4-46, 4-62, 4-67
VER Command 5-11
Verification
inline
license key required 1-3
v2.1.0, Feb 2009
DMx AutoID+™ User Manual
Index-9