Download Alaris ® Auto-ID module/supports Guardrails ® Suite MX (v8)
Transcript
5405U
+
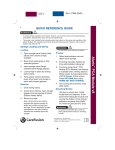
QUICK REFERENCE GUIDE
WARNINGS:
•
To ensure proper operation of the Alaris™ System, you must be familiar with
related features, disposables, administration sets,set-up and programming.
•
This guide is not intended to be comprehensive instructions for the setup and
operation of the Alaris™ System. For complete instructions along with Warnings
and Cautions, refer to Alaris™ System User Manual (v9).
1.
Attach handheld scanner to
connectionn port on Alaris™ AutoID module.
•
Associate PC Unit with Patient
ID while infusion in progress:
1.
2. Power On the PC unit.
3. Press Yes/No soft key to select
"New Patient?".
4. Press Yes soft key to accept
current Profile or NO to proceed
to profile selection screen and
confirm selection.
A green light in the Ready window
will be illuminated on the Alaris™
Auto ID module.
5. The Patient ID Entry Screen will
appear. Press SCAN/CANCEL key
on the Alaris™ Auto-ID module
or SCAN button on the handheld
scanner to scan barcode on
patient identification band.
•
If scan is successful, an audible
tone will sound and Patient
ID will display on the PC Unit
screen.
Verify Patient ID displayed on
the main display screen.
Attach handheld scanner to
connection port on Alaris™ Auto-ID
module.
2. Press SCAN button on handheld
scanner to scan barcode on
patient ID band.
3. Verify Patent ID displayed on the
Main screen is correct.
Authorized User Mode/Tamper
Resist Mode:
1.
Power On the PC Unit.
2. Press Yes/No soft key to select
"New Patient?".
3. Confirm correct profile selection.
4. Enter patient ID, Tamper Resist
feature will be enabled.
5. Press SCAN key and scan
clinician ID badge to unlock the
(programming) panel.
San Diego, CA, 800.854.7128
©2006-2014 CareFusion Corporation or one of its
affiliates. All rights reserved.
Alaris™ Auto-ID Module v8
Associate Alaris™ PC pointofcare unit (PC Unit) with a new
patient ID:
+
6. Program infusions on the Alaris™
System following the User Manual
for the appropriate infusion
module.
System will change to Tamper Resist
mode if idle for five minutes.
Notes:
Alaris™ Auto-ID Module v8
•
•
•
Authorized User Mode is only
enable if feature is enabled in
selected profile and if Alaris™ AutoID module is attached to the PC
Unit.
Whether Authorized User Mode is
enabled or disabled, it is possible
to associated a clinician ID to an
infusion event by either scanning
the clinician ID badge or by
manually inputting the clinician
ID number through the OPTIONS
menu.
If the system is configured to do so,
it is possible to disable Authorized
User Mode without scanning a
clinician's ID; Press and hold
Tampler Resist Switch (back of PC
Unit) for 3-4 seconds.
4. Program the infusion following
the User Manual for the module
selected.
Programming a Secondary Infusion:
Follow the Directions for Use for
the Alaris™ Pump module to start
Secondary Infusion while Primary
Infusion is in progress:
1.
Press SCAN/CANCEL key on
the Alaris™ Auto-ID module or the
SCAN button on handheld scanner
to scan barcode on secondary IV
container.
2. Press CHANNEL SELECT
key on the appropriate Alaris™
Pump module. Primary infusion
parameters will be displayed.
3. Press SECONDARY soft key on
the appropriate infusion module.
4. Program secondary infusion
following the Directions for Use for
the Alaris™ Pump module.
Programming a Primary Infusion:
1.
A green light in the READY
window will be illuminated on the
Alaris™ Auto-ID module.
2. Press SCAN/CANCEL key on
the Alaris™ Auto-ID module or the
SCAN button on the handheld
scanner to scan barcode on IV
container.
3. Press CHANNEL SELECT key on
the appropriate infusion module.
P00000063


