1
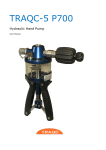
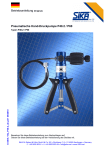
TRAQC-5 P Pneumatic Hand Pump Types P40 / P60 User Manual User Manual TRAQC-5 P40 / P60 Contents 1. 2. 3. 3.1 3.2 3.3 4. 4.1 4.2 4.3 5. 5.1 6. 7. 7.1 7.2 7.3 7.4 7.5 7.6 8. 8.1 8.2 9. 10. 10.1 10.2 10.3 11. 12. Warranty ............................................................................................ 3 About this operating manual .................................................................. 4 Device description ................................................................................ 5 Scope of delivery and accessories ...................................................... 5 Accessories (optional) ....................................................................... 6 Intended use ................................................................................... 6 Safety instructions ............................................................................... 7 Qualified personnel ........................................................................... 7 General safety instructions ................................................................ 7 Special safety instructions ................................................................. 8 Design and function .............................................................................. 9 Function .......................................................................................... 9 Initial setup ....................................................................................... 10 Operation .......................................................................................... 11 Creating pressure ........................................................................... 12 Increasing pressure with the fine adjustment valve ............................ 13 Creating vacuum ............................................................................ 14 Pressure / vacuum measurements .................................................... 15 Carrying out the pressure or vacuum measurements .......................... 15 Completing the pressure or vacuum measurements ............................ 15 Practical / usage guidelines ................................................................. 16 Setting the spring preload / stroke limitation ..................................... 16 Pumping process ............................................................................ 16 Problems ........................................................................................... 17 Maintenance/cleaning, storage and transportation .................................. 18 Maintenance .................................................................................. 18 Cleaning ....................................................................................... 18 Storage and transportation .............................................................. 18 Disposal ............................................................................................ 19 Technical data and accessories ............................................................ 20 TRAQC-5 P40 / P60 07/2014 E page : 2 User Manual TRAQC-5 P40 / P60 1. Warranty During the design and manufacturing of this instrument the at most attention has been given to quality and durability. This manual contains information needed for the safe and effective use of the capabilities of the instrument. Please read the manual carefully before operating the instrument. By doing so possible damage to the instrument or damage caused by the incorrect use of the instrument can be avoided. TRADINCO INSTRUMENTS warrantees the instrument in accordance with the Standard Terms and Conditions of the Instrument Trade as issued by the Association bearing the name "Federation Het Instrument" (The Instrument Federation, (filed with the Clerk of Utrecht District Court on 13 January 1993 under number 16/93 and with the Chamber of Commerce and Industry in Amersfoort on 18 January 1993. A copy is available on request. TRADINCO INSTRUMENTS warrantees that this product will be free from defects in materials and workmanship for a period of 5 years from the date of shipment. If any such product proves defective during this warranty period, TRADINCO INSTRUMENTS, at its option, will either repair the defective product without charge for parts or labour, or will provide a replacement in exchange for the defective product. In order to obtain service under this warranty, Customer must notify TRADINCO INSTRUMENTS of the defect before the expiration of the warranty period and make suitable arrangements for the performance of the service. Customer shall be responsible for packaging and shipping of the defective product to the service centre designated by TRADINCO INSTRUMENTS, with shipping charges prepaid. If no defect can be found Customer may be charged for costs of the investigation. This warranty does not apply to any defect, failure or damage caused by: a. b. c. d. Improper use of the instrument. Normal wear of the product. Modification or repair carried out by or on behalf of the owner or by a third party. Implementation of modifications to the product that are not supplied or implemented by TRADINCO INSTRUMENTS. TRADINCO INSTRUMENTS and its vendors will not be liable for any indirect, special, incidental or consequential damages irrespective of whether TRADINCO INSTRUMENTS or the vendor has advance notice of the possibility of such damages. The type number of the product, as listed on the instrument tag plate, should always be mentioned in any correspondence concerning the product. TRADINCO INSTRUMENTS Industrieweg 74 Postbus 37 2650 AA Berkel en Rodenrijs The Netherlands +31 (0)10 5112911 www.tradinco.com [email protected] TRAQC-5 P40 / P60 07/2014 E page : 3 User Manual TRAQC-5 P40 / P60 2. About this operating manual The operating manual is aimed at specialists and semi-skilled personnel. Before each step, read through the relevant advice carefully and keep to the specified order. Thoroughly read and understand the information in the section “Safety instructions”. If the term 'pressure' is used in a very general way, then both positive pressure and negative pressure (vacuum) are intended. If you have any problems or questions, please contact your supplier or contact us directly: Tradinco Instruments | Postbus 37 | 2650 AA | Berkel en Rodenrijs | The Netherlands T +31 105112911 | F +31 105115114 | [email protected] | www.tradinco.com Tradinco Instruments India Pvt. Ltd. | Plot No2, Suyog Co. Op. Hsg. Society |Cross Gokhale Road, Shivaji Nagar | Pune 411 016 | India | [email protected] | www.tradinco.com Hazard symbols and other symbols used: +p CAUTION! Crushing hazard! This symbol indicates hazards which could result in the crushing of fingers or hands. CAUTION! Risk of injury in the case of excessive pressure! This sign indicates dangers which could arise from excessive pressure in a piece of equipment. CAUTION! Material damage! This symbol indicates actions which could lead to possible damage to material or environmental damage. NOTICE! ADHERE TO OPERATING MANUAL! This symbol indicates important notices, tips or information. Pay attention to and comply with information that is marked with this symbol. Follow the specified instructions and steps. Adhere to the given order. TRAQC-5 P40 / P60 07/2014 E Check the specified points or notices. Reference to another section, document or source. • Item page : 4 User Manual TRAQC-5 P40 / P60 3. Device description The hand pump creates positive pressure or a vacuum for the inspection, adjustment or calibration of pressure devices of all kinds. The hand pump can be used for test items directly on location, thanks to its light weight and compact design. When the hand pump is used, it needs to be connected to a reference gauge and to the test item. Versions: The hand pump is available for two pressure ranges: Type Pressure range P40 -0,95 … 40 bar P60 -0,95 … 60 bar 3.1 Scope of delivery and accessories Check the delivered items. Hand pump. Pressure hose: The pressure hose is supplied from the factory already screwed onto the hand pump. The pressure hose should remain attached to the hand pump during operation, storage and transportation. Removing the pressure hose should be avoided. Operation manual. TRAQC-5 P40 / P60 07/2014 E page : 5 User Manual TRAQC-5 P40 / P60 3.2 Accessories (optional) Transportation cases, adapter sets, seal sets and reference gauges can be ordered as accessories. Transportation case (Item No.: HP40CASE01): The transportation case provides optimal protection for the hand pump and other accessories with its tight-fitting rigid foam inlay. A document compartment is located in the lid behind the burl foam inlay. Adapter set (Item No.: HP40ADAPT01): The adapter set comprises 11 adapters for all common pressure connections with or without pins. Seal set (item No.: HP40SEAL01): The seal set contains flat seals made of plastic and O-rings for all common pressure connections. Replacement pressure hose with seals (item No.: HP40HOSE01): The pressure hose is available separately as a replacement part with the necessary seals. 3.3 Intended use The P40 and P60 hand pumps may only be used for the creation of air pressure or air vacuum. Use with any other media, particularly hydraulic oil, will result in damage to the hand pump. The hand pump may not be attached to external pressure sources. The delivered appliance is only guaranteed to operate safely if used for the intended purpose. The specified limits may not be exceeded under any circumstances. Before ordering and installation, check that the hand pump is suitable for your needs. TRAQC-5 P40 / P60 07/2014 E page : 6 User Manual TRAQC-5 P40 / P60 4. Safety instructions Before you install the P40 / P60, read through this operating manual carefully. If the instructions contained within it are not followed, in particular the safety guidelines, this could result in danger for people, the environment, and the device and the system it is connected to. The P40 / P60 correspond to the state-of-the-art technology. This concerns the accuracy, the operating mode and the safe operation of the device. In order to guarantee that the device operates safely, the operator must act competently and be conscious of safety issues. TRADINCO provides support for the use of its products either personally or via relevant literature. The customer verifies that our product is fit for purpose based on our technical information. With this verification all hazards and risks are transferred to our customers; our warranty is not valid. 4.1 Qualified personnel The personnel who are charged for the installation and operation of the P40 / P60 must hold a relevant qualification. This can be based on training or relevant tuition. The personnel must be aware of this operating manual and have access to it at all times. 4.2 General safety instructions In all work, the existing national regulations for accident prevention and safety in the workplace must be complied with. Any internal regulations of the operator must also be complied with, even if these are not mentioned in this manual. Never use the hand pump together with an external pressure source. Do not attach an external pressure generator to the hand pump. Do not remove any attached components (test item, pressure hose, reference gauge) when the hand pump is under pressure: Open the pressure relief valve before removing any of the components. Do not use Teflon tape to seal the pressure connections. Surplus Teflon tape can enter the hand pump and damage it. Only use adapters and seals that are available as accessories. Non-pressurised storage: Only store the hand pump with the pressure relief valve open. This ensures that no pressure can be built up by unintentional pumping movements. Avoid external force of all kinds towards the hand pump and its operating elements. Do not use the hand pump if it is damaged or defective. TRAQC-5 P40 / P60 07/2014 E page : 7 User Manual TRAQC-5 P40 / P60 4.3 Special safety instructions Warnings that are specifically relevant to individual operating procedures or activities can be found at the beginning of the relevant sections of this operating manual. TRAQC-5 P40 / P60 07/2014 E page : 8 User Manual TRAQC-5 P40 / P60 5. Design and function Operating elements: Hand grips Fine adjustment valve (handwheel) Pressure relief valve (rotary knob) 'Pressure / vacuum' switch valve (rotary knob) Knurled nut (two parts with lock nut) Connectors: Connector reference gauge Pressure hose with cap screw (test item connection) Main components: Pump body Piston rod with internal spring 5.1 Function The test item respectively the pressure device to be tested (hereafter referred to as 'test item') is connected to the cap screw of the pressure hose. Pumping is carried out by repeatedly pushing the hand grips together (for a vacuum, by pulling them apart). An internal spring returns the hand grips to their start position. The pumping movements are transferred to the pistons in the pump body via the push rods. Pressure or vacuum is generated there, depending on the switch valve setting. The construction of the hand pump means that the same pressure/vacuum is generated for the test item as for the reference test gauge. The pressure or the vacuum is set to the necessary value using the fine adjustment valve. Using the pressure relief valve, the pressure or the vacuum can be reduced as needed or completely released. The generated pressure or vacuum is displayed on the reference test gauge and compared with the measurements of the test item. The knurled nut is used to set the spring preload settings and limit the pumping range. TRAQC-5 P40 / P60 07/2014 E page : 9 User Manual TRAQC-5 P40 / P60 6. Initial setup In order for the hand pump to be operated, it is vital that its connections with the reference gauge and the test item are pressure-resistant. The pressure hose is supplied already bolted on to the hand pump and should not be removed. CAUTION! Material damage! The test item must have absolutely nothing adhering to it (oil, grease, water ...). Impurities can be transported into the hand pump via the pressure hose, causing damage to the pump. Maximum torque of the pressure connections! Reference: 15 Nm Test item: 15 Nm Complete the following steps before use: Screw the reference gauge tightly to the top of the hand pump with the correct seal (Connector reference gauge G ¼). Clean the connection of the test item and ensure that no oil or other substances can enter into the pressure hose. Select the suitable adapters and seals for the test item's connection. Join the adapters and seals to the test item and the cap screw of the pressure hose (G ¼). Whilst doing this ensure that the O-ring is correctly positioned in the cap screw. FIRST PUMPING PROCESS The first pumping process can require a large amount of energy due to adhesive forces. Carry out the first pumping process with the pressure relief valve open. TRAQC-5 P40 / P60 07/2014 E page : 10 User Manual TRAQC-5 P40 / P60 7. Operation Generating pressure and generating vacuum not only differ in their operating procedures and their range of settings, but also in the amount of energy needed to work the operating elements. Adhere to the following safety guidelines when operating the hand pump: CAUTION! Crushing hazard! During the pumping procedure ensure that fingers or other body parts are kept away from the area between the hand grips and the piston rod. CAUTION! Damage to switch valve! Only operate the switch valve with the pressure relief valve open. Using the switch valve under pressure causes damage to the hand pump components. CAUTION! Damage to valve stop! If put under too much strain the stop and the hand pump will be damaged. Only continue to tighten the valves (the fine adjustment, pressure relief and switch valves) by hand, once the stop has been reached. Before creating pressure or vacuum consider: Before you create pressure or vacuum with the hand pump you should check for the following requirements: The reference gauge is connected to the hand pump. The test item is joined to the pressure hose with the correct adapters and seals. All pressure connections are correctly in place, so that they resist pressure. TRAQC-5 P40 / P60 07/2014 E page : 11 User Manual TRAQC-5 P40 / P60 7.1 Creating pressure As the counter pressure of the test item increases, more energy is needed for the pumping movements of the hand grips. CAUTION! Damage to test item! Adhere to the maximum pressure of the test item! Only create an admission pressure with the hand grips that is lesser than the necessary testing pressure. Following this carefully increase the pressure using the fine adjustment valve. In practical use the following operation methods have proved themselves to be useful: Operation with one hand: Operation with both hands: Pumping against a base: 20 bar can be built up safely and smoothly. Above 20 bar, creating pressure becomes progressively more difficult. 35 … 40 bar can be generated quite quickly. Above 40 bar the pressure should be increased with the fine adjustment valve. 50 ... 55 bar can be created in this way. In this process it is important that the lower hand grip is placed on a non-slip base. TRAQC-5 P40 / P60 07/2014 E page : 12 User Manual TRAQC-5 P40 / P60 Pressure creation - operating steps Switch on reference gauge and test item (if necessary). Close pressure relief valve: •Turn the knob of the valve in a clockwise direction until the stop is reached. Set the switch valve to 'pressure': •Turn the knob of the valve in a clockwise direction until the stop is reached. Create pressure: •Push the hand grips together: The pressure is built up. •Repeat the pumping movements until the necessary testing pressure has roughly been reached. Adjust the testing pressure. The necessary testing pressure is precisely adjusted with the fine adjustment valve: • Turn the handwheel in a clockwise direction to increase the pressure. • Turn the handwheel of the valve in an anti-clockwise direction to reduce the pressure. • Set the necessary testing pressure by turning the wheel as needed. 7.2 Increasing pressure with the fine adjustment valve Alternatively, above ~ 20 … 30 bar you can increase the pressure with the fine adjustment valve. Turn the handwheel in a clockwise direction in the direction of the 'pump body stop collar'. Depending on the pressure of the test item and the setting of the handwheel, pressure increases of max. 15 … 30 bar can be achieved quite easily. FINE ADJUSTMENT VALVE When it is not under pressure the fine adjustment valve moves very freely. The wide handwheel of the fine adjustment valve can be moved into the needed position very easily using with the palm of the hand. TRAQC-5 P40 / P60 07/2014 E page : 13 User Manual TRAQC-5 P40 / P60 7.3 Creating vacuum Vacuum creation - operating steps Switch on reference gauge and test item (if necessary). Close pressure relief valve: • Turn the knob of the valve in a clockwise direction until the stop is reached. Set the switch valve to 'vacuum': • Turn the knob of the valve in an anticlockwise direction until the stop is reached. Create vacuum: • Push the hand grips together: The springs create the first negative pressure, but cannot completely open the hand grips. • Now pull the hand grips apart until the stop is reached. • Push the hand grips together again: the vacuum is increased. • Repeat this process several times (depending on the volume of the test item) until the desired vacuum has been reached. Adjust the testing pressure. The necessary testing pressure is adjusted precisely with the fine adjustment valve: • Turn the handwheel of the valve in a clockwise direction to decrease the vacuum. • Turn the handwheel of the valve in an anti-clockwise direction to increase the vacuum. • Set the necessary testing vacuum by turning the wheel as needed. TRAQC-5 P40 / P60 07/2014 E page : 14 User Manual TRAQC-5 P40 / P60 7.4 Pressure / vacuum measurements For adjustments, calibrations or an inspection of accuracy, it is vital that the test item and the reference have the same pressure / vacuum. The pressure / vacuum needed for the test points is built up and adjusted with the hand pump ( § . 7.1 + 7.3). The pressure relief valve makes a regulated, continuous decrease in pressure possible, enabling measurements to be carried out accurately and simply even when the pressure is falling. The necessary procedures for measuring pressure or vacuum are configured by the operator. 7.5 Carrying out the pressure or vacuum measurements Carry out the necessary tests and measurements. Document your results. 7.6 Completing the pressure or vacuum measurements Once the pressure or vacuum measurements have been completed, the positive or negative pressure in the hand pump, the test item and in the pressure hose need to be brought into balance. +p CAUTION! Risk of injury through excessive pressure! Do not remove any connected components (test item, pressure hose, reference gauge) if the hand pump is under pressure. Open the pressure relief valve before removing any of the components. Releasing pressure / equalising vacuum: Turn the pressure relief valve knob 2-3 rotations in an anticlockwise direction and wait until there is no longer any positive or negative pressure. Remove the test item with adapters and seals from the pressure hose. Put the hand pump away along with any accessories which have been used. ( § 10: "Maintenance/cleaning, storage and transportation") REFERENCE GAUGE + PRESSURE HOSE The common reference models fit into the gaps in the transportation case and do not need to be removed. The pressure hose can also remain attached to the hand pump. It should generally never be removed. TRAQC-5 P40 / P60 07/2014 E page : 15 User Manual TRAQC-5 P40 / P60 8. Practical / usage guidelines Preloading the springs / stroke limitation: The preloading of the springs changes how much power the hand grips have to reset themselves. The stroke limitation changes the size of the pumping strokes and therefore the pumping volume of the hand pump. The spring preload settings and the stroke limitation are set with the knurled nut. KNURLED NUT The knurled nut is made up of two parts. The upper part is used to adjust the spring preload settings and the pumping stroke. The lower part is the lock nut and fixes the setting. 8.1 Setting the spring preload / stroke limitation Loosen the countering of the knurled nut. Set the desired spring preload / pumping stroke with the knurled nut. Turn to the upper stop: • the spring preload increases. • the pumping stroke decreases. Turn to the lower stop: • the spring preload decreases • the pumping stroke increases. Fix the setting with the lock nut of the knurled nut. 8.2 Pumping process The pressure increase per pump stroke can be set with the stroke limitation and the settings of the fine adjustment valve. Furthermore the pressure increase is dependent on the current counterpressure, the total volume of the test item and the energy of the pumping movements. The following diagram shows, as an example, the pumping process with the hand pump at different settings. Stroke limitation: max. pump stroke ( ) min. pump stroke ( ) Setting the fine adjustment valve: Pump body stop collar (▬▬) Storage / transportation (▬▬) Pressure relief valve stop collar (▬▬) TRAQC-5 P40 / P60 07/2014 E page : 16 User Manual TRAQC-5 P40 / P60 9. Problems CAUTION! Material damage! The hand pump cannot be repaired by the user. In case of a defect, the device must be replaced or returned to the manufacturer for repair. Never open up the hand pump and / or perform any repairs yourself. The following table details what problems you can solve yourself and how to solve them. Problem Pressure cannot be built up (creation of vacuum). Possible cause Remedy Defective / incorrect seal. Check seal (size / material / wear). Seal incorrectly positioned. Check positioning of seal. Pressure relief valve open. Close pressure relief valve. Switch valve in mid-position. Turn the switch valve to the desired position. Pressure / vacuum fades (unstable). Leakage in the test item. Check connections. The first pump stroke is stiff. Not a defect. Due to adhesive Carry out the first pumping forces the first pumping process with the pressure process requires a large relief valve open. amount of energy. Pumping stroke stiff. High counter pressure in the test item. TRAQC-5 P40 / P60 07/2014 E Check positioning of seals. Increase the pressure with the hand wheel of the fine adjustment valve. page : 17 User Manual TRAQC-5 P40 / P60 10. Maintenance/cleaning, storage and transportation 10.1 Maintenance No maintenance is required for the hand pump and it cannot be repaired by the operator either. In the case of a defect the appliance must be sent back to the manufacturer for repair. Check the seals and O-rings for fractures and wear before use. Replace defective or worn seals and O-rings. 10.2 Cleaning Clean the hand pressure pump with a dry or slightly damp lint-free cloth. Do not use sharp objects or aggressive cleaning agents to clean the pump. Avoid contact with fluid or aggressive media. 10.3 Storage and transportation For storage and transportation we recommend our transportation case, which is available as an accessory. The tight-fitting rigid foam inlay offers optimum protection for the hand pump with pressure hose and accessories. A reference gauge of a suitable size can be transported and stored in the case without being removed. Before storage, we recommend that you consider the following points: Clean the hand pump and the accessories. Turn the fine adjustment valve in a clockwise direction until the thread is no longer visible ( illustration). Check that the switch valve is at its usual setting (pressure/vacuum). Open the pressure relief valve. IMPORTANT! Do not store under pressure! Only store the hand pump with the pressure relief valve open. This ensures that no pressure can be built up by unintentional pumping movements. TRAQC-5 P40 / P60 07/2014 E page : 18 User Manual TRAQC-5 P40 / P60 11. Disposal The hand pump consists of various different materials and should not be disposed of with household waste. Take the hand pump to your local recycling plant or Send the hand pump back to your supplier or to TRADINCO. TRAQC-5 P40 / P60 07/2014 E page : 19 User Manual TRAQC-5 P40 / P60 12. Technical data and accessories Type Traqc-5 P40 Traqc-5 P60 40 bar 60 bar -0.95 bar -0.95 bar Pump with hose Pressure range: - Positive pressure - Vacuum Medium: Air Connection: - Reference G¼ - Test item Pressure hose (1 m) with cap screw G ¼ Dimensions: Weight: ~ 240 x 170 x 50 mm ~ 1,1 kg Accessories Adapter set: Item No.: Seal set: Item No.: Transportation case: - Lid - Main compartment - Dimensions G⅛ , G¼ , G⅜ , G½ NPT ⅛'' , NPT ¼'' , NPT ½'' M12x1,5 , M20x1,5 G⅛A , G¼A EPPM040ADAPT01 Flat seals made of plastic and O-rings EPPM040DICHT01 Burl foam with document compartment Tight-fitting rigid foam inlay for pump and accessories ~ 450 x 370 x 110 mm ~ 3,1 kg - Weight with pump and accessories Item No.: Pressure hose: Item No.: Illustration (example): Hand pump with accessories EPPM040KOFFE01 Replacement pressure hose with seals EPPM040SCHLA01 TRAQC-5 P40 / P60 07/2014 E Rev. 1 page : 20 User Manual TRAQC-5 P40 / P60 TRADINCO INSTRUMENTS Industrieweg 74 Postbus 37 2650 AA Berkel en Rodenrijs The Netherlands +31 (0)10 5112911 www.tradinco.com [email protected]