1
Restaurant Enterprise Series
MICROS e7 User’s Manual
Copyright 2004-2008
by MICROS Systems, Inc.
Columbia, MD USA
All Rights Reserved
MD0007-003
Declarations
Warranties
Although the best efforts are made to ensure that the information in this manual
is complete and correct, MICROS Systems, Inc. makes no warranty of any kind
with regard to this material, including but not limited to the implied warranties of
marketability and fitness for a particular purpose. Information in this manual is
subject to change without notice. No part of this manual may be reproduced or
transmitted in any form or by any means, electronic or mechanical, including
photocopying, recording, or information recording and retrieval systems, for any
purpose other than for personal use, without the express written permission of
MICROS Systems, Inc.
MICROS Systems, Inc. shall not be liable for errors contained herein or for
incidental or consequential damages in connection with the furnishing,
performance, or use of this manual.
Trademarks
CorelDraw is a registered trademark of Corel Corporation.
Crystal Reports is a registered trademark of Crystal Computer Services,
Inc.
FrameMaker is a registered trademark of Adobe Corporation.
Microsoft, Microsoft Excel, Win32, Windows, Windows®95, Windows
2000 (Win2K), and Windows NT are either registered trademarks or
trademarks of Microsoft Corporation in the U.S. and/or other countries.
Sybase SQL Anywhere is a registered trademark of Sybase Inc.
Visio is a registered trademark of Visio Corporation.
Printing History
New editions of this manual incorporate new and changed material since the
previous edition. Minor corrections and updates may be incorporated into reprints
of the current edition without changing the publication date or the edition number.
e7 USER’S MANUAL
Edition
Month
Year
Software Version
1st
May
2004
1.00
2nd
January
2005
1.50
3rd
July
2005
2.00
4th
June
2006
2.10
5th
March
2007
2.50
6th
May
2007
2.60
7th
August
2007
2.60 Patch 1
8th
February
2008
2.70
ii
Table of Contents
Chapter 1: Introduction
System Overview . . . . . . . . . . . . . . . . . . . . . . . . . . . . . . . . . . . . . . . . . . . . . . .
Peer-to-Peer Architecture . . . . . . . . . . . . . . . . . . . . . . . . . . . . . . . . . . .
MICROS e7 Hardware Components . . . . . . . . . . . . . . . . . . . . . . . . . . . . . . . .
The Workstation 4 and the Workstation 4 LX . . . . . . . . . . . . . . . . . . .
Cash Drawers . . . . . . . . . . . . . . . . . . . . . . . . . . . . . . . . . . . . . . . . . . .
Receipt Printers . . . . . . . . . . . . . . . . . . . . . . . . . . . . . . . . . . . . . . . . . .
Customer Displays . . . . . . . . . . . . . . . . . . . . . . . . . . . . . . . . . . . . . . . .
License Key . . . . . . . . . . . . . . . . . . . . . . . . . . . . . . . . . . . . . . . . . . . . .
MICROS e7 Software Components . . . . . . . . . . . . . . . . . . . . . . . . . . . . . . . . .
Point-of-Sale Application. . . . . . . . . . . . . . . . . . . . . . . . . . . . . . . . . . .
Manager Procedures. . . . . . . . . . . . . . . . . . . . . . . . . . . . . . . . . . . . . . .
MICROS e7 Configurator . . . . . . . . . . . . . . . . . . . . . . . . . . . . . . . . . .
Reports . . . . . . . . . . . . . . . . . . . . . . . . . . . . . . . . . . . . . . . . . . . . . . . . .
1-2
1-2
1-3
1-3
1-4
1-5
1-5
1-6
1-7
1-7
1-11
1-11
1-12
Chapter 2: Getting Started
Sign-In/Clock-In . . . . . . . . . . . . . . . . . . . . . . . . . . . . . . . . . . . . . . . . . . . . . . .
Signing In . . . . . . . . . . . . . . . . . . . . . . . . . . . . . . . . . . . . . . . . . . . . . . .
Clocking In. . . . . . . . . . . . . . . . . . . . . . . . . . . . . . . . . . . . . . . . . . . . . .
Using an Employee Card . . . . . . . . . . . . . . . . . . . . . . . . . . . . . . . . . . .
Set the Cash Drawers . . . . . . . . . . . . . . . . . . . . . . . . . . . . . . . . . . . . . . . . . . . .
Assign/Unassign a Cash Drawer . . . . . . . . . . . . . . . . . . . . . . . . . . . . .
Bank Loans. . . . . . . . . . . . . . . . . . . . . . . . . . . . . . . . . . . . . . . . . . . . . .
Bank Pick-ups . . . . . . . . . . . . . . . . . . . . . . . . . . . . . . . . . . . . . . . . . . .
No Sale . . . . . . . . . . . . . . . . . . . . . . . . . . . . . . . . . . . . . . . . . . . . . . . .
Select a Language . . . . . . . . . . . . . . . . . . . . . . . . . . . . . . . . . . . . . . . . . . . . . .
Changing the Default . . . . . . . . . . . . . . . . . . . . . . . . . . . . . . . . . . . . . .
Setting the Output Language . . . . . . . . . . . . . . . . . . . . . . . . . . . . . . . .
Take a Scheduled Break. . . . . . . . . . . . . . . . . . . . . . . . . . . . . . . . . . . . . . . . . .
Returning From a Scheduled Break . . . . . . . . . . . . . . . . . . . . . . . . . . .
Sign Out/Clock Out . . . . . . . . . . . . . . . . . . . . . . . . . . . . . . . . . . . . . . . . . . . . .
Signing Out . . . . . . . . . . . . . . . . . . . . . . . . . . . . . . . . . . . . . . . . . . . . .
Clocking Out . . . . . . . . . . . . . . . . . . . . . . . . . . . . . . . . . . . . . . . . . . . .
e7 USER’S MANUAL
2-2
2-2
2-3
2-3
2-4
2-4
2-5
2-5
2-6
2-7
2-7
2-7
2-8
2-8
2-9
2-9
2-9
iii
Chapter 3: User Operations
Basic Operations . . . . . . . . . . . . . . . . . . . . . . . . . . . . . . . . . . . . . . . . . . . . . . .
Begin a Guest Check . . . . . . . . . . . . . . . . . . . . . . . . . . . . . . . . . . . . . .
Ring Menu Items . . . . . . . . . . . . . . . . . . . . . . . . . . . . . . . . . . . . . . . . .
Apply Condiments . . . . . . . . . . . . . . . . . . . . . . . . . . . . . . . . . . . . . . . .
Repeat Menu Items . . . . . . . . . . . . . . . . . . . . . . . . . . . . . . . . . . . . . . .
Hold and Fire . . . . . . . . . . . . . . . . . . . . . . . . . . . . . . . . . . . . . . . . . . . .
Service Total a Check . . . . . . . . . . . . . . . . . . . . . . . . . . . . . . . . . . . . .
Fast Transactions . . . . . . . . . . . . . . . . . . . . . . . . . . . . . . . . . . . . . . . . .
Pick-Up a Check . . . . . . . . . . . . . . . . . . . . . . . . . . . . . . . . . . . . . . . . .
Apply a Discount . . . . . . . . . . . . . . . . . . . . . . . . . . . . . . . . . . . . . . . . .
Add a Service Charge . . . . . . . . . . . . . . . . . . . . . . . . . . . . . . . . . . . . .
Additional Check Features . . . . . . . . . . . . . . . . . . . . . . . . . . . . . . . . . . . . . . .
Guest Count . . . . . . . . . . . . . . . . . . . . . . . . . . . . . . . . . . . . . . . . . . . . .
Seat Handling . . . . . . . . . . . . . . . . . . . . . . . . . . . . . . . . . . . . . . . . . . .
Order Types . . . . . . . . . . . . . . . . . . . . . . . . . . . . . . . . . . . . . . . . . . . . .
Menus. . . . . . . . . . . . . . . . . . . . . . . . . . . . . . . . . . . . . . . . . . . . . . . . . .
Reference Entries . . . . . . . . . . . . . . . . . . . . . . . . . . . . . . . . . . . . . . . .
Combo Meals . . . . . . . . . . . . . . . . . . . . . . . . . . . . . . . . . . . . . . . . . . . .
Order Assignment . . . . . . . . . . . . . . . . . . . . . . . . . . . . . . . . . . . . . . . . . . . . . .
Merge Checks . . . . . . . . . . . . . . . . . . . . . . . . . . . . . . . . . . . . . . . . . . .
Transfer a Check . . . . . . . . . . . . . . . . . . . . . . . . . . . . . . . . . . . . . . . . .
Split a Check . . . . . . . . . . . . . . . . . . . . . . . . . . . . . . . . . . . . . . . . . . . .
Payment Transactions . . . . . . . . . . . . . . . . . . . . . . . . . . . . . . . . . . . . . . . . . . .
Cash or Check Payment . . . . . . . . . . . . . . . . . . . . . . . . . . . . . . . . . . . .
Credit Card Payments . . . . . . . . . . . . . . . . . . . . . . . . . . . . . . . . . . . . .
Stored Value Cards . . . . . . . . . . . . . . . . . . . . . . . . . . . . . . . . . . . . . . .
Loyalty Cards. . . . . . . . . . . . . . . . . . . . . . . . . . . . . . . . . . . . . . . . . . . .
Tax Exempt Status . . . . . . . . . . . . . . . . . . . . . . . . . . . . . . . . . . . . . . . .
Currency Conversions . . . . . . . . . . . . . . . . . . . . . . . . . . . . . . . . . . . . .
Order Adjustments. . . . . . . . . . . . . . . . . . . . . . . . . . . . . . . . . . . . . . . . . . . . . .
Cancel Orders. . . . . . . . . . . . . . . . . . . . . . . . . . . . . . . . . . . . . . . . . . . .
Void Items . . . . . . . . . . . . . . . . . . . . . . . . . . . . . . . . . . . . . . . . . . . . . .
Return an Item . . . . . . . . . . . . . . . . . . . . . . . . . . . . . . . . . . . . . . . . . . .
Reopen a Closed Check . . . . . . . . . . . . . . . . . . . . . . . . . . . . . . . . . . .
Refunds and Transaction Voids . . . . . . . . . . . . . . . . . . . . . . . . . . . . . .
Tip Handling . . . . . . . . . . . . . . . . . . . . . . . . . . . . . . . . . . . . . . . . . . . . . . . . . .
Declare Tips . . . . . . . . . . . . . . . . . . . . . . . . . . . . . . . . . . . . . . . . . . . . .
Indirect Tips . . . . . . . . . . . . . . . . . . . . . . . . . . . . . . . . . . . . . . . . . . . .
Receipt Printing . . . . . . . . . . . . . . . . . . . . . . . . . . . . . . . . . . . . . . . . . . . . . . . .
Automatic Versus On-Demand . . . . . . . . . . . . . . . . . . . . . . . . . . . . . .
Guest Checks Versus Customer Receipts . . . . . . . . . . . . . . . . . . . . . .
On-Demand Print Keys . . . . . . . . . . . . . . . . . . . . . . . . . . . . . . . . . . . .
e7 USER’S MANUAL
3-3
3-3
3-7
3-12
3-17
3-18
3-19
3-19
3-20
3-22
3-24
3-28
3-28
3-29
3-31
3-34
3-35
3-36
3-51
3-51
3-52
3-53
3-56
3-56
3-57
3-75
3-84
3-91
3-92
3-93
3-93
3-93
3-95
3-96
3-98
3-100
3-100
3-100
3-101
3-101
3-101
3-102
iv
Chapter 4: Manager Procedures
Introduction . . . . . . . . . . . . . . . . . . . . . . . . . . . . . . . . . . . . . . . . . . . . . . . . . . .
Accessing Manager Procedures . . . . . . . . . . . . . . . . . . . . . . . . . . . . . .
Edit Employees . . . . . . . . . . . . . . . . . . . . . . . . . . . . . . . . . . . . . . . . . . . . . . . .
Edit Employee ID . . . . . . . . . . . . . . . . . . . . . . . . . . . . . . . . . . . . . . . .
Increment Employee Shift . . . . . . . . . . . . . . . . . . . . . . . . . . . . . . . . .
Set Training Status . . . . . . . . . . . . . . . . . . . . . . . . . . . . . . . . . . . . . . .
Make Time Card Adjustment . . . . . . . . . . . . . . . . . . . . . . . . . . . . . . .
Edit Menu Items . . . . . . . . . . . . . . . . . . . . . . . . . . . . . . . . . . . . . . . . . . . . . . .
Edit Menu Item Prices . . . . . . . . . . . . . . . . . . . . . . . . . . . . . . . . . . . . .
Edit Menu Item Access . . . . . . . . . . . . . . . . . . . . . . . . . . . . . . . . . . . .
Locate a Menu Item . . . . . . . . . . . . . . . . . . . . . . . . . . . . . . . . . . . . . .
Printers . . . . . . . . . . . . . . . . . . . . . . . . . . . . . . . . . . . . . . . . . . . . . . . . . . . . . .
Redirect/Disable Printer. . . . . . . . . . . . . . . . . . . . . . . . . . . . . . . . . . . .
Change Default Language . . . . . . . . . . . . . . . . . . . . . . . . . . . . . . . . . .
Workstation Maintenance . . . . . . . . . . . . . . . . . . . . . . . . . . . . . . . . . . . . . . . .
Workstation Shifts . . . . . . . . . . . . . . . . . . . . . . . . . . . . . . . . . . . . . . .
Set Communication Status . . . . . . . . . . . . . . . . . . . . . . . . . . . . . . . . .
Set Date and Time . . . . . . . . . . . . . . . . . . . . . . . . . . . . . . . . . . . . . . . .
Retrieve Definitions . . . . . . . . . . . . . . . . . . . . . . . . . . . . . . . . . . . . . .
Retrieve Checks . . . . . . . . . . . . . . . . . . . . . . . . . . . . . . . . . . . . . . . . .
4-2
4-2
4-3
4-3
4-6
4-7
4-8
4-12
4-12
4-15
4-19
4-20
4-20
4-21
4-22
4-22
4-24
4-25
4-26
4-27
Chapter 5: Credit Card Batch Utility
About the Process . . . . . . . . . . . . . . . . . . . . . . . . . . . . . . . . . . . . . . . . . . . . . .
Electronic Draft Capture (EDC) . . . . . . . . . . . . . . . . . . . . . . . . . . . . .
Reconciliation and Settlement . . . . . . . . . . . . . . . . . . . . . . . . . . . . . .
About the Utility . . . . . . . . . . . . . . . . . . . . . . . . . . . . . . . . . . . . . . . . . . . . . . .
Accessing the Utility . . . . . . . . . . . . . . . . . . . . . . . . . . . . . . . . . . . . . .
Create . . . . . . . . . . . . . . . . . . . . . . . . . . . . . . . . . . . . . . . . . . . . . . . . . . . . . . .
Edit . . . . . . . . . . . . . . . . . . . . . . . . . . . . . . . . . . . . . . . . . . . . . . . . . . . . . . . . .
Settle . . . . . . . . . . . . . . . . . . . . . . . . . . . . . . . . . . . . . . . . . . . . . . . . . . . . . . . .
Reports . . . . . . . . . . . . . . . . . . . . . . . . . . . . . . . . . . . . . . . . . . . . . . . . . . . . . .
Batch Transfer Status Report . . . . . . . . . . . . . . . . . . . . . . . . . . . . . . . .
Batch Detail Report . . . . . . . . . . . . . . . . . . . . . . . . . . . . . . . . . . . . . . .
Diagnostics . . . . . . . . . . . . . . . . . . . . . . . . . . . . . . . . . . . . . . . . . . . . . . . . . . .
e7 USER’S MANUAL
5-2
5-2
5-2
5-3
5-3
5-4
5-6
5-8
5-9
5-9
5-11
5-13
v
Chapter 6: Reports
About Reports . . . . . . . . . . . . . . . . . . . . . . . . . . . . . . . . . . . . . . . . . . . . . . . . .
Standard Reports . . . . . . . . . . . . . . . . . . . . . . . . . . . . . . . . . . . . . . . . . . . . . . .
Run a Standard Report . . . . . . . . . . . . . . . . . . . . . . . . . . . . . . . . . . . . .
Run an Autosequence . . . . . . . . . . . . . . . . . . . . . . . . . . . . . . . . . . . . .
System Reports. . . . . . . . . . . . . . . . . . . . . . . . . . . . . . . . . . . . . . . . . . . . . .
System Balance . . . . . . . . . . . . . . . . . . . . . . . . . . . . . . . . . . . . . . . . . .
System Tax . . . . . . . . . . . . . . . . . . . . . . . . . . . . . . . . . . . . . . . . . . . . .
System Tip . . . . . . . . . . . . . . . . . . . . . . . . . . . . . . . . . . . . . . . . . . . . . .
System Status Report . . . . . . . . . . . . . . . . . . . . . . . . . . . . . . . . . . . . .
Sales Reports . . . . . . . . . . . . . . . . . . . . . . . . . . . . . . . . . . . . . . . . . . . . . . .
Family Group Sales Detail. . . . . . . . . . . . . . . . . . . . . . . . . . . . . . . . . .
Family Groups Sales . . . . . . . . . . . . . . . . . . . . . . . . . . . . . . . . . . . . . .
Major Group Sales Detail . . . . . . . . . . . . . . . . . . . . . . . . . . . . . . . . . .
Major Group Sales . . . . . . . . . . . . . . . . . . . . . . . . . . . . . . . . . . . . . . .
Menu Item Sales . . . . . . . . . . . . . . . . . . . . . . . . . . . . . . . . . . . . . . . . .
Menu Item Sales Details . . . . . . . . . . . . . . . . . . . . . . . . . . . . . . . . . . .
Menu Item Availability . . . . . . . . . . . . . . . . . . . . . . . . . . . . . . . . . . . .
Menu Item Price . . . . . . . . . . . . . . . . . . . . . . . . . . . . . . . . . . . . . . . . .
Menu Item Status . . . . . . . . . . . . . . . . . . . . . . . . . . . . . . . . . . . . . . . .
Time Period Sales . . . . . . . . . . . . . . . . . . . . . . . . . . . . . . . . . . . . . . .
Time Period Sales Detail . . . . . . . . . . . . . . . . . . . . . . . . . . . . . . . . . . .
Void . . . . . . . . . . . . . . . . . . . . . . . . . . . . . . . . . . . . . . . . . . . . . . . . . .
Tender Reports . . . . . . . . . . . . . . . . . . . . . . . . . . . . . . . . . . . . . . . . . . . . . .
Tenders. . . . . . . . . . . . . . . . . . . . . . . . . . . . . . . . . . . . . . . . . . . . . . . . .
Discounts . . . . . . . . . . . . . . . . . . . . . . . . . . . . . . . . . . . . . . . . . . . . . . .
Service Charges . . . . . . . . . . . . . . . . . . . . . . . . . . . . . . . . . . . . . . . . . .
Employee Reports . . . . . . . . . . . . . . . . . . . . . . . . . . . . . . . . . . . . . . . . . . .
Employee Balance . . . . . . . . . . . . . . . . . . . . . . . . . . . . . . . . . . . . . . .
Employee Shift. . . . . . . . . . . . . . . . . . . . . . . . . . . . . . . . . . . . . . . . . . .
Employee Tip. . . . . . . . . . . . . . . . . . . . . . . . . . . . . . . . . . . . . . . . . . . .
Employee Open Guest Checks. . . . . . . . . . . . . . . . . . . . . . . . . . . . . . .
Employee Closed Guest Checks . . . . . . . . . . . . . . . . . . . . . . . . . . . . .
Employee Listing . . . . . . . . . . . . . . . . . . . . . . . . . . . . . . . . . . . . . . . .
Labor Reports . . . . . . . . . . . . . . . . . . . . . . . . . . . . . . . . . . . . . . . . . . . . . . .
Clock-In Status . . . . . . . . . . . . . . . . . . . . . . . . . . . . . . . . . . . . . . . . . .
Time Clock Detail . . . . . . . . . . . . . . . . . . . . . . . . . . . . . . . . . . . . . . . .
Job Code Labor . . . . . . . . . . . . . . . . . . . . . . . . . . . . . . . . . . . . . . . . . .
Labor Availability . . . . . . . . . . . . . . . . . . . . . . . . . . . . . . . . . . . . . . . .
Employee Job Code Labor. . . . . . . . . . . . . . . . . . . . . . . . . . . . . . . . . .
Workstation Reports. . . . . . . . . . . . . . . . . . . . . . . . . . . . . . . . . . . . . . . . . .
Workstation Balance . . . . . . . . . . . . . . . . . . . . . . . . . . . . . . . . . . . . . .
Workstation Shift . . . . . . . . . . . . . . . . . . . . . . . . . . . . . . . . . . . . . . . . .
ReportsPlus . . . . . . . . . . . . . . . . . . . . . . . . . . . . . . . . . . . . . . . . . . . . . . . . . . .
About . . . . . . . . . . . . . . . . . . . . . . . . . . . . . . . . . . . . . . . . . . . . . . . . . .
Running an HTML Report . . . . . . . . . . . . . . . . . . . . . . . . . . . . . . . . .
Report Details . . . . . . . . . . . . . . . . . . . . . . . . . . . . . . . . . . . . . . . . . . . . . . . . .
e7 USER’S MANUAL
6-3
6-4
6-4
6-7
6-8
6-9
6-10
6-11
6-12
6-13
6-15
6-16
6-17
6-18
6-19
6-20
6-21
6-22
6-23
6-24
6-25
6-26
6-27
6-27
6-28
6-29
6-30
6-31
6-32
6-33
6-34
6-35
6-36
6-37
6-37
6-38
6-39
6-40
6-41
6-42
6-42
6-43
6-45
6-45
6-48
6-49
vi
Chapter 7: Key Commands
Key Categories . . . . . . . . . . . . . . . . . . . . . . . . . . . . . . . . . . . . . . . . . . . . . . . .
Key Functions . . . . . . . . . . . . . . . . . . . . . . . . . . . . . . . . . . . . . . . . . . . . . . . . .
7-2
7-3
Chapter 8: Troubleshooting
Operator Prompts. . . . . . . . . . . . . . . . . . . . . . . . . . . . . . . . . . . . . . . . . . . . . . .
Error Messages . . . . . . . . . . . . . . . . . . . . . . . . . . . . . . . . . . . . . . . . . . . . . . . .
Database Programming Errors . . . . . . . . . . . . . . . . . . . . . . . . . . . . . . . . . . . .
8-2
8-11
8-41
Index
e7 USER’S MANUAL
vii
CHAPTER 1
Introduction
This chapter contains general information about the hardware and software
components of the e7 POS System.
In This Chapter...
System Overview . . . . . . . . . . . . . . . . . . . . . . . . . .
• Peer-to-Peer Architecture . . . . . . . . . . . . . . . . . . .
1-2
1-2
• e7 Hardware Components . . . . . . . . . . . . . . . . . . . . . .
• The Workstation 4 and the Workstation 4 LX . . . .
• Cash Drawers . . . . . . . . . . . . . . . . . . . . . . . . . . . .
• Receipt Printers . . . . . . . . . . . . . . . . . . . . . . . . . . .
• Customer Displays. . . . . . . . . . . . . . . . . . . . . . . . .
• License Key . . . . . . . . . . . . . . . . . . . . . . . . . . . . .
1-3
1-3
1-4
1-5
1-5
1-6
• e7 Software Components . . . . . . . . . . . . . . . . . . . . . . .
• Point-of-Sale Application . . . . . . . . . . . . . . . . . . .
• Manager Procedures . . . . . . . . . . . . . . . . . . . . . . .
• e7 Configurator . . . . . . . . . . . . . . . . . . . . . . . . . . .
• Reports . . . . . . . . . . . . . . . . . . . . . . . . . . . . . . . . .
1-7
1-7
1-11
1-11
1-12
•
e7 USER’S MANUAL
1-1
System Overview
Peer-to-Peer Architecture
System Overview
The MICROS e7 Point of Sale (POS) System is designed to meet the needs of a
wide range of food service operations. It has the advantage of an extensive feature
set while still remaining easy to install, use, and maintain.
The MICROS e7 user interface offers an intuitive, user-friendly touchscreen
design that takes advantage of color, font, and an efficient screen layout to guide
servers through the order entry process. The simplicity of the design reduces
training time, improves speed of service to the customer, and lowers error rates for
daily operations.
With the MICROS e7, operators are not tied to a single workstation. Orders can be
entered or picked up at any of the POS terminals through a secure sign-in process.
Unless otherwise privileged, the only checks displayed are the ones assigned to
that employee.
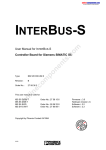
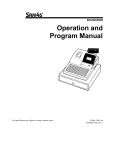
Peer-to-Peer Architecture
The MICROS e7 system consists of a peer-to-peer network of intelligent
terminals with network connected check and kitchen printers. Each of the
terminals can also drive up to 2 cash drawers and a single customer display per
terminal. An optional PC may be added to the system to store guest check transaction
detail for longer periods of time.
The following diagram shows an example of a MICROS e7 system.
e7 USER’S MANUAL
1-2
e7 Hardware Components
The Workstation 4 and the Workstation 4 LX
e7 Hardware Components
The e7 POS System includes the following hardware components:
•
•
•
•
•
WS4 or WS4 LX with Mag Stripe Readers
Cash Drawers
Receipt Printers
Pole Display
License Key
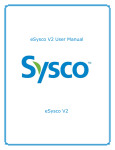
The Workstation 4 and the Workstation 4 LX
The e7 POS System uses two types of terminals, the Workstation 4 (WS4), and the
Workstation 4 LX (WS4 LX), that act as registers for customer sales and for
recording all time-keeping activity in the system.
The WS4 and the WS4 LX contain similar functionality and appearance; however
the WS4 LX provides increased processing power and speed.
Both workstations are highly reliable, solid state, 12.1" full color touchscreen
terminal running Microsoft Windows CE.NET. The Workstation 4 includes 2
USB ports, and the Workstation 4 LX includes 4 USB ports. Both workstations
contain 2 Cash Drawer ports, a serial port, and 2 IDN ports that may be converted
to serial ports (a separate adapter is required), an integrated magnetic card reader
and a customer display port.
The only difference between the appearance of the WS4 and the WS4 LX is when
the unit is turned on. The WS4 will display a green light in the bottom-right corner
of the unit where the WS4 LX will display a blue light in the bottom-right corner.
e7 USER’S MANUAL
1-3
e7 Hardware Components
Cash Drawers
Each terminal is connected to the system via an industry standard Ethernet TCP/
IP network. Each terminal contains a database which stores definition information
and guest check information. This database is synchronized on all terminals in the
system. Definition changes and Guest checks are updated immediately between
all of the terminals. Printer access is also shared via the TCP/IP network. The
peer-to-peer architecture gives the system built in resiliency capabilities. This
protects the operation from a single point-of-failure which would affect the ability
to service guests.
An e7 network may contain a mix of Workstation 4s and Workstation 4 LXs.
Touchscreens
The touchscreen on both the WS4 and the WS4 LX has a smooth, flat, touchsensitive liquid crystal display (LCD) surface. Touchscreen keys are fully
programmable and vary in size. They can be programmed to perform all functions
and operations offered by traditional keyboards.
The advantage of a touchscreen is that it can be tailored to the needs of the
business, displaying only those keys needed to complete a particular transaction.
Screen flow can be optimized for rapid order entry, with the system providing all
the necessary prompts for menu item preparation, side items, and up-sells.
Magnetic Stripe Reader (MSR)
The Magnetic Stripe Reader used by the e7 POS System is integrated into the
workstation. The MSR reads track 1 (alphanumeric) and 2 (numeric only) of the
magnetic card stripe on employee cards. Employee cards sign employees into the
PCWS and enter manager authorization ID numbers.
Cash Drawers
The e7 POS System currently supports the APG Series 4000 Cash Drawer
(MICROS PN 400018-026, -027, -028, and -029), which features an extra deep
cash till and a MICROS DIN connector. Programming determines which
employees will have privileges to open each drawer. These cash drawers are
constructed of a highly durable metal and can be locked or opened with a special
key.
e7 USER’S MANUAL
1-4
e7 Hardware Components
Receipt Printers
Receipt Printers
The e7 POS Printers are used to print customer receipts, kitchen chits, time card
chits, and reports. These printers are used as peripheral devices, connected to the
WS4 units or daisy-chained along a single cable. The e7 POS System can prompt
you to redirect print jobs to backup printers if a failure occurs, such as low paper,
paper jam, or open door. These printers also have autocut mechanisms for pre-cut
receipts.
The e7 POS System currently supports the following types of receipt printers:
• Epson TM-88III — A high-speed, low-noise, thermal printer that can print up
to 16.5 lines per second and can accommodate two different character sets, up
to 95 characters. This is the recommended local printer.
• Epson TM-U220 — A 9-pin, serial impact dot matrix printer that can print 3.5
lines per second and can accommodate three different character sets, up to 128
characters. Recommended as a low cost local or kitchen printer.
• Epson TM-U230 — A more robust version of the TM-220. Its sturdy, spillresistant design makes it an ideal choice for the site’s primary kitchen printer.
Customer Displays
The customer display shows transaction totals and status. When an order is paid,
the display shows the amount tendered and then any change due to the customer.
If the workstation is inactive, the display is blank. In addition to the integrated
workstation display, the e7 System supports a remote pole-mounted MICROS
display that plugs into the display port of the WS4 and the WS4 LX.
Both the workstation and the pole mounted display are built from a 240 x 64 dot
LCD panel. This pole display tilts and rotates for adjustable viewing.
e7 USER’S MANUAL
1-5
e7 Hardware Components
License Key
License Key
To access the full software package on the e7 System, a hardware license key
must be inserted into the USB slot on each workstation. License keys are
interchangeable and may be used with any e7/WS4 or WS4 LX unit.
If a hardware key is not present, or is inoperable, the user will be notified that a
valid key is required. At that point, the user will be granted an 8-day grace period
for using the software. Once the grace period expires, if a valid key is not
provided, the software will no longer be fully operational.
A standard USB e7 license key is also required in order to utilize full functionality
on the system PC. Although users may access the e7 Configurator and Manager
Procedures to build a database on a PC without the key, it must be present to run
Reports, Reports Plus, and the Credit Card utilities.
e7 USER’S MANUAL
1-6
e7 Software Components
Point-of-Sale Application
e7 Software Components
The e7 POS System software includes the following modules
•
•
•
•
•
Point-of-Sale Application
Manager Procedures
e7 Configurator
Credit Card Batch Utility
Reports
Point-of-Sale Application
The e7 Point-of-Sale (POS) application contains the software program to ring up
customer sales, perform various employee functions such as signing in and out,
ringing orders, and printing receipts. The e7 POS also provides manager functions
such as voiding checks, printing system reports, and assigning cash drawers.
Access to these features is available through the POS touchscreens.
System Touchscreens
Although the e7 POS System supports an unlimited number of touch keys, the
application arranges them using just a few basic screen layouts. Depending on
how your system was programmed, the number and location of the touch keys
may vary. The functionality remains the same, however.
e7 USER’S MANUAL
1-7
e7 Software Components
Point-of-Sale Application
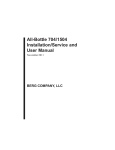
Employee Sign-In
This is the first user screen displayed after powering up the WS4 unit.
The Sign-In screen is the entry point for all e7 activities. Each time an employee
accesses the workstation, he/she must log into the system by entering an employee
ID via the touch keypad and pressing the [Sign In] button. Depending on the
setup, employees may or may not have to clock in at the beginning of their shift.
Also of note is the Workstation Communication Status Indicator. This is displayed
above the touch keys and to the right of the Date and Time. It is represented by as
a vertical bar, composed of seven squares. The first six indicators represent
Workstations 1 thru 6. The seventh indicator represents the system’s PC.
The squares are color-coded as follows to indicate the current status:
• Green = Configured and Active
• Red = Configured but Inactive
• Grey = Not Configured
e7 USER’S MANUAL
1-8
e7 Software Components
Point-of-Sale Application
Begin Transaction
The Begin Transaction screen is where all POS activities are initiated. The screen
is divided into three parts:
• Transaction Status Bar — Identifies who is currently signed into this
workstation, states the name of the server, the active serving period, and
prompts for the next action.
• Open Check List — Includes the check number, table number, amount due,
and server ID.
• Function Keys — The selection of keys will vary, but at a minimum, they
should allow a user to open the order entry screen, access other functions,
cancel the transaction, and sign-out of the system.
e7 USER’S MANUAL
1-9
e7 Software Components
Point-of-Sale Application
Order Entry Screen
The main Order Entry screen uses system-generated menu item keys to conserve
space and display only those choices required to complete the current transaction.
For example, if the server is ringing up Appetizers, only those appetizer touch
keys will be displayed in the menu item area.
This layout works well for organizations with a large or complex menu. Because it
is easy and intuitive to use, all samples in this manual will be based on this
template.
The Order Entry screen is divided into 6 parts:
• Check Status Bar — Provides information on the open check, including the
check number, time started, and employee assigned.
• Check Detail Area — Displays the current order. When an item is selected,
posts the quantity, description, and price. Maintains running subtotals and
totals at the bottom of the display.
• Generated Keys — Displays the touch keys generated for a selected menu
item category or system function (e.g., discounts, tenders, etc.).
e7 USER’S MANUAL
1-10
e7 Software Components
Manager Procedures
• Category Keys — Represents categories of menu items. When a category key
is selected (e.g., Beverages), the system generates and displays touch keys for
all of the menu items linked to that category.
• Function Keys — Provides space for up hard-coded function keys. Options
will vary, but should include (at a minimum) touch keys to void, cancel,
service total, and tender a check, as well as access to manager functions.
Custom Layouts
For users who want to exercise more control over their touchscreen layouts,
alternative templates and custom configuration is provided through the e7
Configurator.
For more information on managing the touchscreen layout and design, please
refer to the e7 Getting Started manual.
For assistance with touchscreen design, contact your e7 sales representative.
Manager Procedures
The Manager Procedures module provides privileged employees with an easy-touse interface for updating the system database. The module may be accessed from
any workstation device.
Although database tasks can also be handled through e7 Configurator, using
Manager Procedures offers the following advantages:
• Security — An employee must be specifically privileged to access the
Manager Procedures forms. Once opened, these forms provide a limited
number of options that may be affected.
• Simplicity — With it's streamlined functionality, an employee can easily
perform tasks that require more comprehensive training and system
understanding if handled through e7 Configurator.
For more detailed information, refer to Chapter 4, Manager Procedures.
MICROS e7 Configurator
The MICROS e7 Configurator is the user interface to programming the database.
It is used to define menu items, set prices, design touchscreen, and add
employees. Access to the e7 Configurator is limited to system administrators and
other privileged employees. For more information on programming the e7 POS
System, refer to the MICROS e7 Getting Started Manual.
e7 USER’S MANUAL
1-11
e7 Software Components
Credit Card Batch Utility
Credit Card Batch Utility
The MICROS e7 Credit Card Batch utility is a graphical tool that allows
privileged employees to easily verify (create & edit) and transfer (settle)
electronic draft data to the credit card processor. You can also view and print
detailed information about each record in a credit card batch and each batch
transfer. Additionally, diagnostics can be performed using a specific credit card
driver.
Reports
The MICROS e7 Reports module provides on-demand, real-time reports that
allow a manager to monitor and evaluate system performance from a number of
perspectives. Reports can be run for an employee, a workstation, or the entire
restaurant. They can be run at any time, for any business date or time period, from
any POS terminal or from an optional PC system. The results can then be
displayed on screen, saved to a file, printed to one of the system’s roll printers, or
printed to a Windows PC printer.
For more detailed information on using reports, refer to Chapter 6, Reports.
e7 USER’S MANUAL
1-12
CHAPTER 2
Getting Started
This chapter contains step-by-step instructions for accessing the MICROS e7 POS
System.
In This Chapter...
e7 USER’S MANUAL
• Sign-In/Clock-In . . . . . . . . . . . . . . . . . . . . . . . . . . . . .
• Signing In . . . . . . . . . . . . . . . . . . . . . . . . . . . . . . .
• Clocking In . . . . . . . . . . . . . . . . . . . . . . . . . . . . . .
• Using an Employee Card. . . . . . . . . . . . . . . . . . . .
2-2
2-2
2-3
2-3
• Set the Cash Drawers . . . . . . . . . . . . . . . . . . . . . . . . . .
• Assign/Unassign a Cash Drawer . . . . . . . . . . . . . .
• Bank Loans . . . . . . . . . . . . . . . . . . . . . . . . . . . . . .
• Bank Pick-ups . . . . . . . . . . . . . . . . . . . . . . . . . . . .
• No Sale . . . . . . . . . . . . . . . . . . . . . . . . . . . . . . . . .
2-4
2-4
2-5
2-5
2-6
• Select a Language . . . . . . . . . . . . . . . . . . . . . . . . . . . .
• Changing the Default. . . . . . . . . . . . . . . . . . . . . . .
• Setting the Output Language . . . . . . . . . . . . . . . . .
2-7
2-7
2-7
• Take a Scheduled Break . . . . . . . . . . . . . . . . . . . . . . . .
• Returning From a Scheduled Break . . . . . . . . . . .
2-8
2-8
• Sign Out/Clock Out . . . . . . . . . . . . . . . . . . . . . . . . . . .
• Signing Out . . . . . . . . . . . . . . . . . . . . . . . . . . . . . .
• Clocking Out . . . . . . . . . . . . . . . . . . . . . . . . . . . . .
2-9
2-9
2-9
2-1
Sign In/Clock In
Signing In
Sign In/Clock In
This section describes how to enter the MICROS e7 POS System for cashier
functions.
Signing In
Users are required to sign in at the start of every POS transaction. Sign-in allows
the system to identify employees, track their activities, and limit access to their
own checks and to those system-related functions for which they are privileged.
To sign-in:
1. Turn on the power to the MICROS e7 Workstation. The following Startup
screen will display:
2. Using the keypad, enter your employee ID number and press [Sign In].
3. If the authorization is accepted, sign-in is complete and the default transaction
screen is displayed.
e7 USER’S MANUAL
2-2
Sign In/Clock In
Clocking In
Clocking In
Depending on the site, some users may be required to clock-in at the start of the
current shift. If clock-in is required, the system will automatically direct the user
to the clock-in screen at the first attempt to sign in.
To clock-in:
1. Turn on the power to the MICROS e7 Workstation. The Startup screen will display:
2. When the Startup screen displays, use the
numeric keypad to enter your employee ID
number and press [Clock In/Out]. A list
of the jobs is provided.
3. Select a job and press [Ok].
4. If this is an authorized job, clock-in is
complete and the default transaction screen
is displayed. Sign-in is automatic for this
transaction.
5. If you are not authorized for this job, an
authorization screen will be displayed.
6. Using the numeric keypad, enter the job code to authorize the job assignment
and press [Enter].
Note
Depending on your status, this step may require a third-party (i.e.,
manager) permission.
7. If the authorization is accepted, clock-in is complete and the default transaction
screen is displayed. Sign-in is automatic for this transaction.
Using an Employee Card
Instead of entering an ID number, employees may be given a magnetic stripe card
for system identification. This card can be used whenever an employee ID or
password is required (e.g., to sign-in/clock-in, to a transfer checks, etc.).
To use the employee card, simply slide it through the Magnetic Card Reader on
the right-hand side of the MICROS e7 Workstation. If the card is authorized, the
system automatically goes to the next required screen.
e7 USER’S MANUAL
2-3
Set the Cash Drawers
Assign/Unassign a Cash Drawer
Set the Cash Drawers
Workstations may be configured to use one or two cash drawers to handle
payment transactions. Depending on the programming, cash drawers can be
shared by employees or assigned to a single server for the duration of the shift.
In most cases, managers will want to assign cash drawers. This protects all parties
concerned by limiting access to legitimate employees and reducing the potential
for theft.
This section describes how the process of assigning a cash drawer, adding and
removing monies from the cash balance, and accessing the drawer outside of a
transaction.
Assign/Unassign a Cash Drawer
Cash drawers are assigned when an employee sign onto a workstation. Only one
employee can be assigned to a cash drawer at a time. However, a manager with
higher level privileges may have access to any cash drawer in the system.
To assign a cash drawer:
1. Sign into the system at the workstation.
2. Navigate to the functions screen, where cash drawer keys are located. A
separate cash drawer key should be available for each cash drawer at that
workstation.
3. Select a [Cash Drawer] key. If the cash drawer is not in use, a confirmation
dialog box displays.
4. Select [Yes] to accept the cash drawer assignment.
At the end of their shift, employees should remember to release the cash drawer
before signing out/clocking out of the system. This will allow the next shift of
employees to use the cash drawer device.
To unassign a cash drawer:
1. Return to the function screen where the cash drawer keys are located. Again, a
separate key should be provided for clearing each drawer.
2. Select the appropriate [Clear Drawer] key.
3. At the prompt, select [Yes] to unassign the cash drawer.
e7 USER’S MANUAL
2-4
Set the Cash Drawers
Bank Loans
Bank Loans
Bank Loans record the amount of cash added to a cash drawer, often (but not
exclusively) at the beginning of a shift, to make change. This is also referred to as
“Opening a Bank.” At the end of the shift, the amount of the bank loan will be
added to the expected totals when the drawer is counted.
To make a media loan:
1. Sign into the system, but do not begin a check. Bank Loans must be entered
outside of an active transaction.
2. Use the [Functions] key to access the Tenders screen where the [Bank Loan]
key is located.
3. Press the [Bank Loan] key. A dialog box is displayed, prompting the user to
“Enter Bank Loan Amount.”
Note
If a check was started, an error message indicating that a
transaction was already in progress will be displayed. You must
complete or cancel the transaction before you will be allowed to
enter a bank loan amount.
4. Using the numeric keypad, enter the amount of the bank loan.
5. Press [OK] to accept.
A validation chit is printed to confirm the receipt of a cash loan to the drawer.
Bank Pick-ups
Bank Pick-ups decreases the amount of money in a cash drawer. Pick-ups may be
performed throughout the day to limit the amount of cash on-hand (and reduce the
risk of loss or theft). Pick-ups are also used to pay a vendor or supplier during the
day (also referred to as Paid Outs).
To make a bank pick-up:
1. Sign into the system, but do not begin a check. Bank Pick-ups must be entered
outside of an active transaction.
2. Use the [Functions] key to access the Tenders screen where the [Bank Pickup] key is located.
e7 USER’S MANUAL
2-5
Set the Cash Drawers
No Sale
3. Press the [Bank Pick-up] key. A dialog box is displayed, prompting the user to
“Enter Bank Pick-up Amount.”
Note
.If a check was started, an error message indicated that a
transaction is already in progress will be displayed. You must
complete or cancel the transaction before you will be allowed to
enter a bank loan amount.
4. Using the numeric keypad, enter the amount of the bank loan.
5. Press [OK] to accept.
Depending on the site, the system may be programmed to print a validation chit to
confirm the payment or transfer of a cash from the drawer.
No Sale
The cash drawer normally opens at the end of a transaction, when a tender key is
pressed. The [No Sale] key opens the cash drawer outside of a transaction.
Only employees assigned to a particular cash drawer (or managers with the
appropriate access permissions) will be able to open it using this function.
To open a cash drawer:
1. Begin a new check.
2. Go to the screen where the [No Sale] key is located and press.
• If the user is permitted to use this key, the words “No Sale” will be displayed
in the yellow status bar at the top of the screen and the cash drawer will open.
• If the user is not permitted to use the [No Sale] key, the system will prompt for
authorization. Enter an authorized employee’s ID (usually a manager’s) and
press the [Enter] key to continue.
e7 USER’S MANUAL
2-6
Select a Language
Changing the Default
Select a Language
The MICROS e7 POS System allows a site to configure touchscreens, dialog
boxes, and error messages in up to 4 different languages. When an employee is
added to the system, one of these defined languages is selected as the default for
all touchscreen transactions. During sign-in, the system checks the database and
automatically switches to the language configured for that employee.
Changing the Default
Occasionally during operations, a user may need to change from the default
language to another defined language. For example, in a multi-lingual restaurant,
an employee whose preferred language is English, may need assistance from
another who prefers German. Instead of struggling with translations, the German
co-worker can simply switch to his own language.
To change the default language:
1. Press the [Language] button displayed on one of the touchscreens. The system
will switch all text to the next language on the list.
2. Repeat Step 1 to cycle through the list until the touchscreens are displayed in
the preferred language.
Note
If changed, the system will remain in this selected language until the
transaction is complete. The next time the employee signs in, the
default language will again be displayed.
Setting the Output Language
In addition to controlling the language display at the workstations, MICROS e7
allows users to specify the language used when sending orders to the kitchen, to
another workstation, or to one of the system printers. This allows each member of
the staff to receive information in the language in which they are most
comfortable.
Language output options are programmed through the MICROS e7 Configurator.
For more information on using the MICROS e7 Configurator, refer to the
MICROS e7 Getting Started manual.
e7 USER’S MANUAL
2-7
Take a Scheduled Break
Returning From a Scheduled Break
Take a Scheduled Break
During a shift, an employee may be allowed one or more scheduled breaks. When
the break time arrives, the employee must temporarily clock out of the POS.
To take a scheduled break:
1. From the MICROS e7 Startup screen, use
the numeric keypad to enter your employee
ID number (or swipe your employee card
through the Mag Stripe Reader) and press
[Clock In/Out]. A user prompt is displayed.
2. Select [Yes] to begin the scheduled break period.
Returning From a Scheduled Break
Once the break period is over, an employee must clock back onto the system
before resuming operations.
From the MICROS e7 Startup screen:
1. Use the numeric keypad to enter your
employee ID number (or swipe your
employee card through the Mag Stripe
Reader) and press [Clock In/Out]. A user
prompt is displayed.
Note
Selecting the [Sign In] key triggers the same prompt to end a
scheduled break. In both cases, the system checks the employee’s
status, notes that he/she is on a break, and acts accordingly.
2. Select [Yes] to resume your shift.
Note
e7 USER’S MANUAL
Depending on set up (i.e., the amount of break time allowed versus
the amount taken), an employee may be prompted for an approval
code to clock back in.
2-8
Sign Out/Clock Out
Signing Out
Sign Out/Clock Out
At the end of a transaction (e.g., when the check is service totaled or paid), the
system automatically returns the user to the default transaction screen. From there,
the user is free to begin or pick-up another check, perform some administrative
function, run a report, or sign off of this particular workstation.
Signing Out
The Sign Out function allows a user to end an order session on a particular
workstation. This makes it possible for multiple users to work from a single
MICROS e7 unit.
To sign out:
1. From the default transaction screen, press [Sign Out].
2. The system automatically returns to the main screen.
Clocking Out
Clock out occurs at the end of the employee’s work day.
To clock out:
1. From the MICROS e7 Startup screen, use the numeric keypad to enter your
employee ID number (or swipe your employee card through the Mag Stripe
Reader) and press [Clock In/Out]. The following prompt is displayed:
2. Select [No]. A second system prompt is presented:
3. Select [Yes] to exit the MICROS e7 System.
e7 USER’S MANUAL
2-9
CHAPTER 3
User Operations
This chapter contains step-by-step instructions for handling common operator
procedures on the MICROS e7 POS System.
In This Chapter...
e7 USER’S MANUAL
• Basic Operations . . . . . . . . . . . . . . . . . . . . . . . . . .
• Begin a Guest Check . . . . . . . . . . . . . . . . . . . .
• Ring Menu Items . . . . . . . . . . . . . . . . . . . . . . .
• Apply Condiments. . . . . . . . . . . . . . . . . . . . . .
• Repeat Menu Items . . . . . . . . . . . . . . . . . . . . .
• Hold and Fire . . . . . . . . . . . . . . . . . . . . . . . . . .
• Service Total an Order. . . . . . . . . . . . . . . . . . .
• Fast Transactions . . . . . . . . . . . . . . . . . . . . . . .
• Pick-Up a Check . . . . . . . . . . . . . . . . . . . . . . .
• Apply a Discount . . . . . . . . . . . . . . . . . . . . . . .
• Add a Service Charge . . . . . . . . . . . . . . . . . . .
3-3
3-3
3-7
3-12
3-17
3-18
3-19
3-19
3-20
3-22
3-24
• Additional Check Functions. . . . . . . . . . . . . . . . . .
• Guest Count . . . . . . . . . . . . . . . . . . . . . . . . . . .
• Seat Handling . . . . . . . . . . . . . . . . . . . . . . . . .
• Order Types . . . . . . . . . . . . . . . . . . . . . . . . . . .
• Menus . . . . . . . . . . . . . . . . . . . . . . . . . . . . . . .
• Reference Entries. . . . . . . . . . . . . . . . . . . . . . .
• Combo Meals . . . . . . . . . . . . . . . . . . . . . . . . .
3-28
3-28
3-29
3-31
3-34
3-35
3-36
• Order Assignment . . . . . . . . . . . . . . . . . . . . . . . . .
• Merge Checks . . . . . . . . . . . . . . . . . . . . . . . . .
• Transfer a Check . . . . . . . . . . . . . . . . . . . . . . .
• Split a Check . . . . . . . . . . . . . . . . . . . . . . . . . .
3-51
3-51
3-52
3-53
• Payment Transactions . . . . . . . . . . . . . . . . . . . . . .
• Cash . . . . . . . . . . . . . . . . . . . . . . . . . . . . . . . . .
• Credit Cards. . . . . . . . . . . . . . . . . . . . . . . . . . .
• Stored Value Cards . . . . . . . . . . . . . . . . . . . . .
• Loyalty Cards . . . . . . . . . . . . . . . . . . . . . . . . .
• Tax Exempt Status . . . . . . . . . . . . . . . . . . . . . .
• Currency Conversion. . . . . . . . . . . . . . . . . . . .
3-56
3-56
3-57
3-75
3-84
3-91
3-92
3-1
e7 USER’S MANUAL
• Order Adjustments. . . . . . . . . . . . . . . . . . . . . . . .
• Cancel Order . . . . . . . . . . . . . . . . . . . . . . . . .
• Void Items . . . . . . . . . . . . . . . . . . . . . . . . . . .
• Return an Item . . . . . . . . . . . . . . . . . . . . . . . .
• Reopen a Closed Check . . . . . . . . . . . . . . . .
• Refunds and Transaction Voids . . . . . . . . . . .
3-93
3-93
3-93
3-95
3-96
3-98
• Tip Handling . . . . . . . . . . . . . . . . . . . . . . . . . . . .
• Declare Tips . . . . . . . . . . . . . . . . . . . . . . . . . .
• Indirect Tips . . . . . . . . . . . . . . . . . . . . . . . . .
3-100
3-100
3-100
• Receipt Printing . . . . . . . . . . . . . . . . . . . . . . . . . .
• Automatic Versus On-Demand . . . . . . . . . . .
• Guest Checks Versus Customer Receipts . . .
• On-Demand Print Keys . . . . . . . . . . . . . . . . .
3-101
3-101
3-101
3-102
3-2
Basic Operations
Begin a Guest Check
Basic Operations
This section covers the basics of order entry and recall.
Begin a Guest Check
When a new check is started, a four-digit guest check number is assigned to
uniquely identify it. Depending on your programming options, employees may be
able to manually identify their checks by entering a name or table number.
Users who have properly signed into the MICROS e7 System will be presented
with the default transaction screen.
To begin a check:
1. Select the [Begin Check] key to open the main order screen.
Note
e7 USER’S MANUAL
Fast transaction employees will bypass this screen. On signin, the system will immediately present the main order screen.
For more information, refer to the Fast Transaction section
on page 3-19.
3-3
Basic Operations
Begin a Guest Check
Begin Check by Name
In addition to the check number, users may assign a customer name (Smith, Jones,
Bob, Fred) or other type of label (golfers, blue hat) to further identify the order.
A customer’s credit card can be swiped when beginning a check by name.
The customer’s name is extracted from Track 1 of the credit card and is
assigned as the guest check name.
To begin a check by name:
1. From the default
transaction
screen, select
the [Begin
Check by
Name] key. An
alphanumeric
touchscreen is
displayed.
2. Enter a name or label using the touch keys. Note: The check name could also
be entered by swiping a customer’s credit card.
3. Select [Ok]. When the main Order Entry screen is opened, the assigned name
is displayed in the [Chk Name] button at the top of the screen.
Note
e7 USER’S MANUAL
Check names do not have to be entered when the check is
started but may be added or modified whenever the check is
open. To do this, simply press the [Chk Name] button to bring
up the alphanumeric touchscreen, type in a new name, and
press [Ok] to accept.
3-4
Basic Operations
Begin a Guest Check
Begin Check by Numeric ID
To identify guest checks, users may substitute a numeric ID in place of the check
name.
Like check names, numeric IDs may be applied at the start of the check or at any
time that the check is open. Once a check ID is assigned, it may be changed an
unlimited number of times before the check is closed.
A customer’s credit card can be swiped when beginning a check by
numeric ID. The customer’s name is extracted from Track 1 of the credit
card and is assigned as the guest check name.
A check cannot have both a check name and a numeric ID.
Note
Numeric IDs should not be confused with check numbers, which
are sequential values, assigned automatically by the system.
To assign a numeric ID:
1. From the default transaction screen, begin a check by pressing the [Begin
Check by Numeric ID] key. A numeric keypad is displayed.
2. Use the touch keys to enter a numeric ID. When the main Order Entry
touchscreen is opened, this value will be displayed as the label on the [Chk
Name] button at the top of the screen.
3. To modify the ID number (or if the numeric ID was not assigned at the start of
the check), simply press the [Chk Name] button to reopen the numeric keypad
and type in a new entry.
e7 USER’S MANUAL
3-5
Basic Operations
Begin a Guest Check
Begin Check By Table
In many businesses, servers are assigned to a group of tables which are identified
by a table name. This name may be added to the guest check when it is opened.
To begin a check by table name:
1. From the default
transaction screen,
select the [Begin
Check by Table] key.
A graphic is displayed,
with a box for each of
the tables in the
system. Tables that are
already in use will be
greyed out and
unavailable for
selection.
2. Touch-select one of
the table names. The
image will change color to indicate that it has been selected.
3. Press [Ok]. When the main Order Entry screen is opened, the table name will
be displayed in the [Tbl] button at the top of the screen.
Note
Table names do not have to be entered when the check is started
but may be added after the check is opened. To do this, simply
press the [Tbl] button to bring up the table selection screen.
Select an available button and press [Ok]. The table name will
be assigned to the check and will display on the [Tbl] key at the
top of the check.
Unlike check numbers, table names may not be changed after
assignment. Pressing the [Tbl] key on a check with a table
name will cause an error message to display indicating that a
table name has already been assigned.
e7 USER’S MANUAL
3-6
Basic Operations
Ring Menu Items
Ring Menu Items
To ring up an order:
1. From the main order screen, select one of the Category buttons (e.g., Beers,
Entrées, Sides, etc.) at the bottom of the screen.
Touch keys are dynamically generated and displayed in the work space above
the Category keys. Scroll bars allow the user to view any items which may not
fit in the immediate viewing window. As an additional visual aid, the
generated keys are color-coded to match their parent Category.
2. Select a menu item. The quantity, item description, and price are added to the
check detail area. A running total displays in red below the check.
Tip
To view more check detail on the screen, touch-select anywhere
in the grey Totals block to hide the Subtotal, Tax, Service
Charges, and Payment lines. To redisplay these items, simply
touch the Totals Due line again.
3. Add more items by touching the menu item keys. To change the menu item
category, touch the appropriate button to generate another set of menu item
keys.
e7 USER’S MANUAL
3-7
Basic Operations
Ring Menu Items
Selecting Open-Price Menu Items
Open-price menu items have no fixed price, but prompt the user for an entry at the
time they are ordered.
Open pricing is used for menu items whose availability is based on current market
prices (e.g., Lobster, Catch-of-the-Day). It can also be used to price special orders
that are not on the menu, but which the restaurant agrees to sell (e.g., “Yes ma'am,
I'm sure the chef can make a peanut butter and jelly sandwich for your little
boy.”).
To ring an open-price menu item:
1. Press the menu item key. A dialog box
will be displayed, prompting for the
price of the menu item.
2. Specify an amount and press the
[Enter] key. The open menu item and
price are added to the check detail.
Alternatively, the user could:
1. Enter the menu item price, using the
touchscreen’s numeric key pad. Be
sure to enter the correct number of
digits and decimal places for the active
currency.
2. Press the open menu item key. In this
case, the dialog box is bypassed and the menu item description and price are
added to the check detail.
Note
Depending on the programming, users may be prompted for a
reference entry when adding an open-price menu item. If so, a
touchscreen keyboard will display so that the user can enter
the appropriate information.
For more information on Reference Entries, refer to the
section beginning on page 3-35
e7 USER’S MANUAL
3-8
Basic Operations
Ring Menu Items
Selecting Multiple Menu Items
Multiple quantities of a menu item can be ordered by pressing the same touch
screen key several times. A separate check detail line will be added each time the
key is pressed.
To save keystrokes, a quantity can be entered before the menu item is selected.
1. Enter a number from the numerical keypad in the lower left corner before
touching the menu item key. The quantity amount will be shown in the
information area at the top of the screen.
2. Select the menu item. The quantity (e.g., 2 Fries) will be displayed in front of
the menu item description in the check detail along with the adjusted price.
Using the [@/For] Key
The [@/For] function key provides another way to enter a quantity of the same
menu item. Typically, it is used with open-price menu items, which require the
user to enter a value when the item is ordered. For example, if a customer is
ordering 3 pounds of shrimp (an open-price menu item whose current market
price is $6.00/pound) the operator would use the following key sequence:
[3] [@/For] [$6.00] [Shrimp]
When the [Enter] key is pressed, the check detail records the menu item as:
3 Open Food
Shrimp
e7 USER’S MANUAL
$18.00
3-9
Basic Operations
Ring Menu Items
Choosing a Menu Item (Container) Size
When members of a menu item category are available in more than one size, a
row of Container tags (e.g., small, medium, large) is displayed above generated
menu item keys.
1. To specify a size (e.g., Pitcher Beer), select a
Container button.
Menu items not available in the selected size
will be darkened automatically and will not
respond to touch-selection.
2. Selecting the menu item. The size will be
added to the description in the check detail
and priced appropriately for the size selected.
Note
If no Container is selected, the default size will be entered.
Posting a Menu Item by Weight
Menu items sold by weight can be placed on a scale and weighed automatically or
a menu item’s weight can be manually entered by an employee using a weighed
menu item key.
Using a scale:
1. Place the menu item on the scale.
2. Press the menu item key. (Ex. [Lobster])
3. The item’s weight (less the tare weight), price, quantity, and name posts to the
check.
Entering weight manually:
1. Press a weighed menu item key. A dialog box displays, prompting the user for
the weight of the item.
2. Enter the gross weight of the item. The gross weight includes the weight of
both the container and the item itself. Partial units should be entered as
decimal values (e.g., 2 lbs, 8 oz. = 2.5 lbs).
3. Press [Enter]. The price is calculated and posted to the check detail. If a tare
weight was programmed for this item, the system automatically subtracts that
value from the entered weight before calculating the price.
e7 USER’S MANUAL
3-10
Basic Operations
Ring Menu Items
Scanning a Barcode
Menu item selections can be added to a check by scanning them with a barcode
reader. If the system is configured properly, the user simply runs the UPC barcode
label over the scanner device to post the item information to the check detail.
Occasionally, the system may have difficulty reading the label. When this
happens, the user can manually enter the barcode as follows:
1. Pick-up or begin a check.
2. Using the numeric touch keys, enter the barcode number printed on the menu
item.
3. Press the [Barcode] key to post the menu item information.
e7 USER’S MANUAL
3-11
Basic Operations
Apply Condiments
Apply Condiments
A condiment is an additional selection that an employee makes when ordering a
menu item. It describes to the kitchen or bar, exactly how the customer wants the
item prepared (e.g., medium rare, with mustard, no ice). Condiments are only
ordered after a regular menu item is selected.
There are two types of condiments in a POS System — attachments and
modifiers. Attachments are mandatory choices linked to the menu item. They may
or may not be included in the price of the main menu item.
Modifiers are optional items that usually result in an additional charge (e.g., $0.25
for extra cheese.)
Attachments
When a menu item with an attachment is selected, a condiment screen will be
displayed. Only those choices available for the selected menu item will be
included:
1. From the condiment screen, select one or more attachments from the buttons
provided. A secondary screen will be displayed if a sub-choice (e.g., type of
cheese) is required.
2. Select [Done] to return to the main Food screen.
e7 USER’S MANUAL
3-12
Basic Operations
Apply Condiments
Modifiers
Depending on your setup, the system may or may not prompt for modifiers when
a menu item is selected. If there are modifiers linked to the menu item, they will
be presented after the attachments are selected. The information bar in the upper
right-hand corner informs the user that a selection is optional.
1. Select a modifier. The item will be added to the check detail beneath the menu
item. If a price is associated with the selection, it will be added as well.
2. Once you are finished entering condiments, press the [Done] key to return to
the main Food screen.
Active Rules
Active rules refer to the prefixes used to qualify a condiment menu item selection.
Examples of these are [No], [Extra], [Side], and [Sub].
Prefix keys are displayed on the condiment screen and should be pressed before
the condiment selection to which it refers (e.g., [No] + [Tomato]). The prefix is
printed on the same line as the condiment item.
e7 USER’S MANUAL
3-13
Basic Operations
Apply Condiments
Min/Max Condiments
Occasionally, menu items are programmed to allow a range of condiment options.
The minimum value in this range represents the least number of condiments
needed to complete an entry. It allows a user to select less than the number of
attachments linked to the menu item.
For example, assume that the minimum set for all pizza menu items was 1
condiment. If a customer wanted a plain pizza but ordered the 2-topping Pizza
Special because it was on sale, the user would be able to enter a condiment
selection of [No Choice] to satisfy the minimum requirements for this order.
The maximum value places a limit on the number of items that may be added.
Again, it may or may not coincide with the number of attachments.
For example, assume the maximum number of items is set to 9 for all pizza items.
If a customer orders a 4-topping Pizza, but wants to add a few more toppings, the
system will prompt for 4 selections, but will allow up to 5 more items to be added.
A condiment charge may be added for each topping or (if the toppings are
included in the pizza menu item price) may be added for the extra toppings only.
Insert/Replace Condiments
During order entry, users may need to change or complete the condiment
selections of a menu item before service totaling the check. This can occur for
several reasons: 1) the user entered the wrong condiments, 2) the customer
changed his mind (e.g., wants mustard instead of mayo on his burger), or 3) the
customer forgot something (e.g., hold the eggs in the chef salad).
If the error is spotted after another menu item has been entered, the user can either
void the original menu item with its related condiments and start over (a timeconsuming process) or edit the menu item using one of two specialized condiment
function keys:
• [Insert Condiment] — Allows the user to add modifiers to a previously
entered menu item. (Attachments cannot be inserted.) The list of available
condiments will vary, depending on how the menu item has been programmed.
A condiment or condiment prefix can only be added if the menu item has been
programmed to accept it.
• [Replace Condiment] — Allows the user to highlight an entered condiment
(with or without prefix) and replace it with an alternate selection. Condiments
can be required (attachments) or allowed (modifiers). The list of replacement
condiments will vary, depending on how the menu item has been programmed.
A condiment or condiment prefix can only be substituted if the menu item has
been programmed to accept it.
e7 USER’S MANUAL
3-14
Basic Operations
Apply Condiments
Inserting Condiments
To insert a condiment:
1. Highlights the main menu item and press the [Insert Condiment] key. The
screens status is changed to Insert and a selection of allowed condiment
(modifier) keys is displayed.
In the check detail, a dotted line is inserted beneath the last condiment entry
for that menu item, indicating that the system is waiting for an additional
condiment selection.
2. Select the additional condiments, with or without prefixes. The condiments are
added to the check detail.
3. When finished adding condiments, press [Done] to turn off the insert function
and exit the condiment screen.
e7 USER’S MANUAL
3-15
Basic Operations
Apply Condiments
Replacing Condiments
To replace an existing condiment:
1. Highlights a condiment item and press the [Replace Condiment] key. The
screens status is changed to Replace and a selection of allowed condiment
(modifier) keys is displayed.
In the check detail, the highlighted condiment is replaced with a dotted line,
indicating that the system is waiting for a new condiment selection.
2. Select the replacement condiment, with or without prefix. The new selection is
added to the check detail. The replace function is turned off and the condiment
screen is closed automatically, returning the user to the previous screen.
e7 USER’S MANUAL
3-16
Basic Operations
Repeat Menu Items
Repeat Menu Items
Often, customers will want to reorder one or more items purchased in a previous
service round. Typically, this occurs with beverage orders where the server or
bartender is directed to ring up another round of drinks.
The functionality is not limited to beverage orders. In a quick service
environment, for example, customers may queue up to add their individual orders
on the same check. Customer A begins by ordering a meal with multiple side
items, condiments, or other special instructions. The cashier enters the selections,
only to have Customer B say, “I’ll have the same.”
Instead of entering each keystroke separately, users can save time by simply
opening an existing check, highlighting one or more items in the check detail, and
pressing the [Repeat Item] key.
e7 USER’S MANUAL
3-17
Basic Operations
Hold and Fire
Hold and Fire
The [Hold / Fire] key allow a server to control when menu items are sent to the
kitchen. With this key, servers can enter an entire order, send some to the kitchen,
and selectively place the rest of them on hold.
Suppose, for example, that a group of guests have placed an extensive order
consisting of drinks, appetizers, and entrées. In this situation, the drinks and
appetizers would be sent immediately to the bar/kitchen, but the entrées would be
held back until the appetizers are served. This prevents the entrées from being
prepared too quickly and either arriving with the appetizers or being served in a
less-than-fresh state.
When it’s time for the kitchen to prepare the remaining items, the server picks up
the check, clears the held items, and service totals the check to send those items to
the kitchen.
To use this feature:
1. Begin or pick up a check.
2. Enter one or more menu items.
3. Touch-select to highlight the items to be held
and press the [Hold/Fire] key. An “H” will be
added to the right of the seat number in the
check detail. If no items are highlighted, all
items will be held.
4. Press the [Service Total] key to send the nonheld items to the kitchen.
Firing the Held Items
5. When it is time to send additional items to the
kitchen, pick up the guest check. A warning
box will be displayed advising that there are
items on hold. Press [OK] to clear.
6. Highlight the held items to be fired and press the [Hold/Fire] key. The “H”
will be deleted next to these items. If no items are highlighted when the [Hold/
Fire] key is pressed, all remaining items will be released.
7. Press the [Service Total] key to send the non-held items to the kitchen.
Menu items can be held through multiple service rounds of a check. Additional
items can be added and held up until the check is closed. Any items still held
when a check is finally tendered will be automatically fired to the kitchen.
e7 USER’S MANUAL
3-18
Basic Operations
Service Total an Order
Service Total an Order
When all the menu item entries have been made for this service round, select the
[Service] button to send the order to the kitchen. The system will automatically
return to the default transaction screen and the order will be added to the list of
open checks.
Fast Transactions
A Fast Transaction is a sales transaction that is started by pressing a menu item
key instead of one of the [Begin Check] keys. This speeds up the transaction
process by eliminating the need to enter a check ID or table number.
The fast transaction option was designed for sales environments where purchases
are straightforward and the customer pays immediately. Examples of typical fast
transaction environments include a gift shop, a cash bar, or a carry-out counter.
Depending on the site, fast transaction employees may be allowed to service total
a check. If a fast transaction is service totalled, it can be picked up and service
totalled again, or picked up and closed, just like an ordinary guest check.
e7 USER’S MANUAL
3-19
Basic Operations
Pick Up a Check
Pick Up a Check
Open checks are held in a guest check file until they are paid in full. An open
check can be picked up from any workstation in the system. When a user signs in,
the system automatically displays all open checks belonging to that employee.
Note
Employees with the appropriate privileges will be able to see
all open checks in the system. This privilege is typically
reserved for managers.
To pick-up a check, touch-select from the list of open checks. The check detail
will be displayed in the main order screen. Once a check is opened, the user may
post additional sales, add another check to it, transfer ownership to another user,
or tender it.
Users looking for a specific check among a long list of entries may opt to pick up
a check:
• by check number
• by check name with credit card swipe
• by table name (numeric or alpha-numeric)
Additionally, a check may be picked up from a dialog that displays a key for each
open table. If multiple checks exist for a table, a specific check can be selected
from a check selection screen.
Pick Up Check by Check Number
1. From the default transaction screen, press the [Pick Up Check by Number]
key. A dialog box will be presented asking for the check number.
2. Using the numeric keypad, type in the check number and press [Enter] to open
the check in the main order screen.
If the check number is not found, an error message displays. Press [Ok] and
try again.
If the open check belongs to another employee and the current user does not
have access privileges, a message stating that the guest check is not found
displays. Press [Ok] and try again.
e7 USER’S MANUAL
3-20
Basic Operations
Pick Up a Check
Pick Up Check by Check Name with Credit Card Swipe
1. From the default transaction screen, swipe the customer’s credit card. The
customer name is extracted from Track 1 of the credit card.
If the check name is not found, an error message will be displayed. Press [Ok]
and try again.
If the open check belongs to another employee and the current user does not
have access privileges, a second prompt will be displayed requesting
manager’s authorization. Enter the appropriate manager’s ID and press
[Enter] to continue.
Pick Up Check by Table Name
1. From the default transaction screen, press the [Pick Up Check by Table] key.
A dialog box is presented asking for the table number.
2. Using the numeric or alphanumeric keypad, type in the table name and press
[Enter] to open the check in the main order screen.
If the table name is not found, an error message displays. Press [Ok] and try
again.
If the table belongs to another employee and the current user does not have
access privileges, a message stating that the guest check is not found displays.
Press [Ok] and try again.
If there are multiple checks available for the table, a check selection prompt
displays for the user to select a specific check. Select the desired check and
press [OK].
Pick Up Check by Table Name Dialog
1. From the default transaction screen, press the [Pick Up Check by Table] key.
A dialog box is presented with a touchscreen key for each table number.
If the current user is allowed to pick up other employee’s checks, a key for all
open checks is displayed.
2. Select the key for the desired table to open the check in the main order screen.
If no open checks are found, an error message is displayed. Press [Ok].
If there are multiple checks available for the table, a check selection prompt
displays for the user to select a specific check. Select the desired check and
press [OK].
e7 USER’S MANUAL
3-21
Basic Operations
Apply a Discount
Apply a Discount
Discounts come in a variety of shapes and sizes. They are used to promote daily
specials, provide employee meals, reward frequent diners, and compensate
unhappy guests. They can be applied to one or more menu items or to an entire
check. The size of the discount can be preset (e.g., 5% or $2.00 off) or it can be
calculated as a percentage of the price of the selected item(s) or of the entire
check.
To apply a discount:
1. With an open check in the main order screen, press the [Discount] key to
display the available discounts.
2. Select a discount key. For preset discounts,
the amount is posted automatically. If an
open discount is selected, a dialog box is
displayed.
3. At the prompt, enter the percentage or
dollar amount and select [Enter]. A new
line item will be added to the bottom of the
check detail and the amount will be
automatically deducted from the Total
Due.
Depending on the selection, the discount
will be calculated as follows:
e7 USER’S MANUAL
3-22
Basic Operations
Apply a Discount
• For Item Discounts — If a menu item is highlighted before the discount key
is pressed, the discount will be applied to the selected menu item. If no
menu item is selected, an error message will display.
• For Subtotal Discounts — The discount is calculated against all of the nondiscounted menu items at the time the discount was applied.
Note
e7 USER’S MANUAL
Discounts are not available for every item, but depend on the
items membership in a Discount Group, as defined during
setup.
3-23
Basic Operations
Add a Service Charge
Add a Service Charge
A Service Charge is an amount that is added to the sales transaction in exchange
for services rendered. Service charges can be either a flat fee (e.g., cover charge
$5.00) or a percentage (e.g., room charge 15%). They may be taxed like a menu
item. Typical service charges include auto gratuities, room service charges, and
entertainment cover charges.
To apply a service charge:
1. With an open check in the main order screen, press the [Svc Chrg] key to
display the available service charges.
2. Select a service charge button. If the
service charge is preset, the amount is
posted automatically. If an open service
charge is selected, a dialog box is
displayed.
3. At the prompt, enter the percentage or
dollar amount and select [Enter]. A new
line item will be added to the bottom of the
check detail and the amount will be
automatically added to the Service
Charge total and to the Total Due.
e7 USER’S MANUAL
3-24
Basic Operations
Add a Service Charge
Non-Revenue Service Charge
A non-revenue service charges records the receipt of funds without posting the
payment to the sales totals. Typically, this type of service charge is used to record
a deposit against goods or services, or to record the purchase of a gift card or gift
certificate. The actual sales are not recorded as such until the full amount is paid
or the certificate is redeemed.
The procedure for ringing up a non-revenue service charge is the same as for any
other service charge entry.
Auto Service Charge
This feature permits the user to automatically apply a service charge to all checks
once certain conditions are met. An auto service charge may be selectively or
automatically applied to every opened guest check. Privileged employees can
exempt specific guest checks from the auto service charge by selecting a function
key. A common use for auto service charges is to apply an auto-gratuity to certain
guest checks to ensure that the server is fairly compensated for their work.
The auto service charge can be turned on when a minimum party size threshold is
reached. The server will enter the party size when they begin the check and the
system will determine if auto-gratuity should be applied. The guest count can be
updated at any time by selecting the [Guest Count] key.
For example, suppose that the Mike Rose Cafe charges an 18% auto-gratuity for
large parties of 6 or more. Customer A arrives with a party of 10 for dinner. When
the server goes to enter their order they indicate the party size of 10 the system
will automatically register an 18% charge to Customer A’s total bill.
An auto service charge may be automatically applied to all guest checks. The auto
service charge feature can also be selectively applied to some guest checks.
Likewise, certain checks can be selectively exempted from being charged the auto
service charge.
The procedure for ringing up an auto service charge is different than with a
regular service charge.
e7 USER’S MANUAL
3-25
Basic Operations
Add a Service Charge
Add Auto Service Charge
1. With an open check in the main order screen, press the [Auto Service Charge]
key.
2. The auto service charge
percentage will automatically
be added to the Service
Charge total and to the Total
Due.
If auto service charge is
already in effect, a prompt will
appear informing you.
e7 USER’S MANUAL
3-26
Basic Operations
Add a Service Charge
Exempt Auto Service Charge
1. With an open check in the main order screen, press the [Exempt Auto Service
Charge] key.
If
Exempt
text will
appear at
the top
of the
screen
2. The auto service charge percentage will automatically be removed from the
Service Charge total and to the Total Due.
e7 USER’S MANUAL
3-27
Additional Check Functions
Guest Count
Additional Check Functions
This section describes additional features that are used to define a guest check.
Guest Count
A guest count refers to the number of guests included on a single check. With
guest counts, managers can assess productivity by tracking the total number of
customer served and calculating (among other things) the average sales per guest.
Guest counts are generally added when a check is opened, but may be entered or
revised at any point prior to payment. The current count is displayed on the
[Gst #] button at the top of the screen. If a guest count is not assigned, this value
will be 0.
To enter a guest count:
1. From the default transaction screen, begin or pick up a guest check.
2. If the system has been programmed to
require a guest count, a numeric dialog
box will display. Touch-select the number
of guests and press [Enter]. When the
check opens in the main order screen, the
[Gst #] button is updated to show the
entered count.
If the system is not programmed to require
a guest count, the check will open with a
default count of 0. To add a guest count,
press the [Gst #] key in the status bar at
the top of the screen. When the numeric
keypad displays, type in the number of
guests and press [Enter].
e7 USER’S MANUAL
3-28
Additional Check Functions
Seat Handling
Seat Handling
Seat numbers are used to identify individual guests on a check and to specify
which transaction items belong to each. Seat numbers can be used to facilitate the
coordination of food preparation and delivery. It also allows the customers to
review and total their own selections without splitting the order onto separate
checks.
When a check is started, the system automatically assigns a default seat number of
1. This number is posted to the right of each item in the transaction. The current
seat number is also displayed in the status bar at the top of the screen.
Users can increment seat numbers at any time during order entry. The new seat
number will be applied to items entered after the change.
Seat numbers can also be edited at any point (including previous service rounds)
before the check is paid.
Seat Handling Options
The seat feature uses three separate touch keys to assign numbers
during a transaction:
• Seat — Allows the user to set the current seat number
BEFORE transactions items are posted to the check. This key
does not change seat numbers on previously posted items.
• Increment Seat — Advances the seat number to the next number in the
sequence. If the current seat number is 3, pressing this key will change the seat
number to 4. This key does not change seat numbers on previously posted
items.
• Change Seat — Changes a transaction item’s seat number to the current seat
number setting. To work, items must be highlighted before this key is pressed.
Using the Feature
To assign seat numbers:
1. Begin or pick up a guest check. Note that the default seat number (shown on
the [Seat] button) is set to 1.
2. Enter one or more menu items. The current seat number will be posted to the
right of each item entered.
e7 USER’S MANUAL
3-29
Additional Check Functions
Seat Handling
3. To change the current seat number, go to the screen where the seat handling
function keys are displayed.
• Press [Inc Seat] to increase the number by one. This option will only
increment forward, one seat at a time.
To select a specific seat number or move the value backward.
• Press [Seat] to manually select the new number. A numeric keypad will
display. Type in a new number and press [Enter].
Items entered after the change will be automatically assigned the new
(current) seat number.
Note
The current seat numbers can also be changed by pressing the
[Seat #] button in the status bar at the top of any open check
screen. A numeric keypad will display. The user can then type
in the seat number and press [Ok] to accept.
4. To change a previously assigned seat number:
• Make sure that the current seat number (as shown in the status bar) is set to
the desired value. For example, if the assigned seat number is 1 and you
want to change it to 3, the system status must be set to “Seat 3.”
• Touch-select a transaction item from the check detail. Only one item may be
selected at a time.
• Press the [Change Seat] key. The seat number will be modified.
e7 USER’S MANUAL
3-30
Additional Check Functions
Order Types
Order Types
Order types are used to identify customer orders that require special handling
(e.g., carry out, room service), to determine the applicable tax rates, and to group
sales for reporting purposes. Up to 8 order types may be defined.
For example, an establishment may sell food and beverages to be consumed on or
off the premises. Preparation of carry out orders would involve placing the food in
containers and supplying plastic utensils, napkins, and pre-packaged condiments.
Dine-in orders would be placed on plates and served to a seated customer. In
addition, local laws may apply different tax rates to food and beverage items,
depending on whether they are consumed on site or taken out by the customer.
An order type must be selected before a check can be service totaled or paid out.
Depending on the system, a default order type may be programmed. Default order
types are specific to a workstation and apply only to new checks started from it.
Once a check is service totaled, it will retain the original order type assigned,
unless manually changed by a user.
This capability is limited to employees whose job type is programmed to use the
change order type functions.
To assign an order type:
1. Begin or pick up a guest check.
2. Note the default order type as shown in the status bar. (If this is a new check,
and the field is blank, a default order type has not been defined.)
3. To change the order type, press the status bar key to cycle through the
available selections until the correct order type is displayed. If transaction
items have been added to the check already, the system may recalculate the tax
totals to reflect the change.
Note
Users have the option of programming and placing individual
order type keys on a specific touchscreen. Typically, this would
be done to save time and keystrokes.
For example, suppose that a restaurant has eight order types
configured, with the default set to Eat In. Suppose also, that one
of the workstations is used for Carry Out orders. Rather than
cycle through all of the options each time a Carry Out order is
placed, the user may opt to have a [Carry Out] button placed
on the main transaction screen. This button can be pressed as
soon as the customer specifies that the order is for carry out.
e7 USER’S MANUAL
3-31
Additional Check Functions
Order Types
Order Type Override
Occasionally, a customer may want to order menu items that belong to different
order types (e.g., an Eat-In customer who requests extra items to go).
Traditionally, the only way to accommodate this customer was to create two
different guest checks (i.e., one for the Eat In order and a second one for the Carry
Out order).
The Order Type Override feature allows users to generate a single check with
menu items posted to different order types. To do this, an order type override key
is programmed and added to one of the transaction touchscreens. A separate
override key must be programmed for each change of order type. For example, if
the default order type is Eat In, the user may want to create a separate button for
Carry Out, Room Service, Banquet, etc.
This capability is limited to employees whose job type is programmed to use the
change order type functions.
Using the Feature
To change a menu item’s assigned order type:
1. Begin or pickup a guest check. The status button should indicate the default
order type (e.g., Eat In).
2. Ring in all of the required menu items.
3. Highlight the menu items that belong to a different order type.
e7 USER’S MANUAL
3-32
Additional Check Functions
Order Types
4. Press the appropriate Order Type Override button (e.g., Carry Out) to switch
the highlighted menu items to this new setting.
The message “Order Type Override: Carry Out” displays in the status block at
the top of the screen. The order type status button will not change. In the
check detail, the amended order type will be printed below each of the
affected menu items.
e7 USER’S MANUAL
3-33
Additional Check Functions
Menus
Menus
The Menu feature is used to control item availability and to determine the item
price, depending on when and where it is ordered.
For example, if the active menu is set to “Breakfast,” the food selection screen
would present only those menu items available during the breakfast hours (e.g.,
eggs, pancakes, waffles, omelets, etc.). When the active menu is changed to
“Dinner,” the touch keys for breakfast items would be replaced with dinner
options (e.g., steak, lobster, pastas).
Similarly, menus can be used to set the prices of menu items for promotional
purposes. In this case, beer, wine, and other alcohol-related products might be
priced lower when the active menu is “Happy Hour,” than it would be during
lunch or dinner. Or, the price of a drink may be less in the bar than it would be in
the restaurant during the same time period.
Using Menus
Menus are assigned by workstation. If the active menu is controlled by the
system, a default menu is applied and the name is displayed on the status bar at the
top of the screen.
During the day, as the service period changes (e.g., from happy hour to dinner),
the system will change the menu and update the status button automatically.
Privileged users may manually change the menu after sign in. This should be done
before beginning or picking up the guest check.
Changing the active menu only affects the current service round; it will not affect
items posted during the previous service round of an open check.
e7 USER’S MANUAL
3-34
Additional Check Functions
Reference Entries
Reference Entries
A Reference Entry is a string of numbers or characters that an employee may be
required to enter with a transaction item. Reference entries print and display as
additional information. They print on guest checks, customer receipts, remote
printers, journal printers, reports and validation chits.
A reference entry may be used to add an employee number, coupon number, or
name to the transaction item to provide greater control and audit capability. A
reference entry is used to record credit card numbers for credit card tendering keys
and also for banking operations.
Menu items, discounts, service charges, tender/media, and tax exemptions can all
be programmed to prompt the employee to enter a reference entry.
If a reference
entry is required,
the system will
automatically
display a
touchscreen
keyboard,
prompting the
user to enter the
required value.
Once this
information is
keyed in, the user presses [Enter] to post the menu item with the reference entry
in the check detail.
e7 USER’S MANUAL
3-35
Additional Check Functions
Combo Meals
Combo Meals
A Combo Meal consists of two or more menu items grouped together and sold to
the customer for a single price. Typically, combo meals are used to increase
business by packaging the most frequently requested menu item combinations
(e.g., hamburger, fries, and a drink) together and offering them for a lower price
than if the items were purchased à la carte.
Combo meals improve sales and streamline service by automating the ordertaking process. Using the combo meal feature, the system can prompt for
selections, promote sales through bundling of menu items, and provide a price
break for purchasing a pre-packaged meal.
Definitions
The following terms are relevant to a discussion of combo meals:
• Combo Meal – A combo meal consists of two or more menu items, grouped
together and sold to the customer for a single price.
• Combo Meal Main Item – A menu item that can be ordered à la carte, but is
also the central menu item in the combo meal. For example, for a Hamburger
Combo, the combo meal main item is the Hamburger menu item.
• Combo Item – A combo item is a menu item that is the component of a combo
meal (e.g. Cheeseburger). A combo item can be a regular menu item on its
own, or a menu item that is configured as a combo main or side item in a
combo group. Two or more combo items comprise a combo meal.
• Combo Group – A combo group consists of interchangeable menu items that
can be included in a combo group. All combo meal types can be assigned to a
single combo group. The combo group is used primarily for reporting
purposes.
• Combo Shell Item – A combo shell item is a menu item that is not a menu
item by itself, but a placeholder for the combo meal. A combo shell can have
menu combo groups, combo items, and combo side items as attachments.
e7 USER’S MANUAL
3-36
Additional Check Functions
Combo Meals
Using Combo Meals
This section provides basic instructions for using the combo meal feature. To
assist you, the process has been divided into the following parts.
• Making a Combo Meal Selection
• Substituting Items
• Upsizing a Selection
• Voiding a Selection
• Discounting an Item
• Pricing an Item
• Sizing an Item
Making a Combo Meal Selection
When a combo meal is rung on a guest
check the name of the combo meal will
appear along with the price as well as the
names of all accompanying menu items.
The appearance of the display may vary.
Operationally, there are five methods for
ordering a combo meal. Combo Meals
can be selected in the following ways:
• By Menu Item
This order method uses individual combo meal buttons to act as meal selection
keys. The user rings a [Combo Meal #1] and is prompted for condiments/prep
instructions and side items. In this scenario, each combo meal is accessible from
the touchscreen.
When a combo meal button is pressed, it triggers the order process. If there is a
choice of menu items (and no default item is configured) the available selections
are presented in an SLU display. If there is a default for a combo group, then the
default item will be rung without prompting. Based on the pricing method, the
combo meal price is posted automatically and updated as the selections are made.
To eliminate repetitive keystrokes, multiples of the same combo meal may be
ordered by pressing a quantity key before selecting the menu item
SLU.
e7 USER’S MANUAL
3-37
Additional Check Functions
Combo Meals
For combo meals that use multiple instances of the same combo group, the system
will track the number of pieces required to complete the order until all have been
entered. If the quantity entered exceeds the number allowed, an error message will
be displayed.
Follow these steps to order combo meals using the pre-configured combo meal
buttons:
1. Ring one of the combo menu items. The combo name will be listed on the
check and the composite price will be posted.
2. Select a main menu item from the list of options displayed (e.g., for a 3-pc
Chicken Combo, the system might display 3-pc Dark, 3-pc White, 3-pc
Custom).
3. Select the appropriate number of side menu items from the list displayed.
4. When the order is complete, service total or tender the check.
• By Combo Key
This order method uses the [Combo] function key to generate a combo meal
based on either the last menu item ordered or another highlighted item in the
check. The user rings a main item (e.g. cheeseburger) and then presses the
[Combo] function key to build a combo meal. The system adds the appropriate
side items (e.g., fries and prompts for a drink selection) and automatically adjusts
the price of the transaction. In this scenario, menu items are accessible from the
touchscreen along with the [Combo] function key.
If a combo meal can be built from the selected item, the selection is converted to a
combo meal listing and the price is adjusted accordingly. If a choice is required
from among the side items (i.e., no default item is configured) the available
selections are presented in a SLU display. The combo meal price is posted and
updated automatically as the selections are made.
This combo meal method is not allowed when a discount or service charge has
been applied to the selected menu item. Only menu items from the current round
will be considered.
Follow these steps to order combo meals using the [Combo] key:
1. Ring up multiple menu items as à la carte selections. Their individual prices
will be listed.
2. Highlight a main dish selection from the list. This is the item around which a
combo meal is built (e.g., Double Cheeseburger, Large Pizza, 3-pc White
Chicken).
e7 USER’S MANUAL
3-38
Additional Check Functions
Combo Meals
3. Click the [Combo] key. The system checks to ensure that a combo meal based
on the highlighted item exists and takes the following action, as required:
• If the menu item is a combo main item, the selection is converted to a combo
meal listing and the price is adjusted accordingly.
• If no existing item is highlighted, the system will try to build a combo meal
based on the last item ordered.
• If the [Combo] key is pressed when the last item or highlighted item is not a
combo main item, or the system cannot build a combo meal based on the
selection, an error message will be displayed.
• If the selected menu item is used in more than one combo meal, then the
system will build the one with the highest auto recognition priority.
• If the Auto combo recognition with combo key option on the Restaurant
form is enabled, pressing the [Combo] key will activate the Auto Combo
with Combo Key feature. That is, the system will first attempt to create a
combo meal from the menu items already entered. If not successful, the
system will then create a combo meal around the selected menu item.
4. Select the appropriate number of side items from the options displayed.
5. When the order is complete, service total or tender the check.
• By Sized Combo Meal
This order method uses a special [Size] function key along with a [Menu Item]
key to generate a combo meal based on the selected size. The user presses a [Size]
function key (e.g., [Regular], [Large]) before starting the combo meal itself. The
size key tags the combo meal and ensures that the combo main and side items are
displayed for the selected size only. In this scenario, each combo meal is
accessible from the touchscreen along with the [Size] function keys.
Follow these steps to order combo meals using the [Size] key:
1. Click on a [Size] key (e.g., [Regular], [Large]) before starting the combo
meal order. The system checks to ensure that the combo main and side items
are displayed for the selected size only. If the [Size] key is not pressed first, all
members of the combo groups will be shown.
• Sized combo meals can be upsized or downsized, but only as a unit. Combo
items within a sized combo meal cannot be upsized or downsized
individually. If any part of a sized combo meal is highlighted and a [Size]
key is pressed, the entire combo meal will be resized to the selected size.
e7 USER’S MANUAL
3-39
Additional Check Functions
Combo Meals
• The combo sizing feature can be used with both manual and auto combo
recognition. When building a combo meal from current detail, the system
will restrict combo item selections for a sized combo meal. That is, if the
combo meal to be created has the Enable Sized Combo Meal option set, the
system will only build that combo as a sized combo meal.
• If the check detail includes two combo items of the same size, the first item
that satisfies the sized combo meal requirement will be the one included in
the combo.
• If a sized combo meal is ordered, the default item in a combo group
attachment will be rung up automatically only if its size matches the
specified size. Otherwise, the user will be prompted with items of the
specified size in the combo group.
• To order multiple sized combos, the user needs to press the [Size] key first,
then the number of meals to order before selecting the combo meal menu
item. If the user enters the quantity first before pressing the [Size] key and
the combo meal menu item, the quantity will be ignored and only one sized
combo will be ordered.
2. Select the appropriate number of side items from the options displayed.
3. When the order is complete, service total or tender the check.
• By Manual Combo Recognition
The cashier rings all items in an order and then (within the same transaction
round) highlights all the menu items that constitute a combo meal and presses the
[Combo] function key. The system automatically groups the items together and
adjusts the pricing on the check. In this scenario, menu items are accessible from
the touchscreen along with the [Combo] function key.
The system will only generate complete meals from the selections, and list the
remaining items as à la carte. Combo meals will be recognized or matched based
on their auto recognition priority.
Combo meal selections can be from the current or previous service round. If the
Auto recognize previous round items option is enabled for the combo meal
being built, both current and previous round items are eligible. Otherwise only
current round items are eligible.
If a previous round item is used, the system will automatically void the à la carte
item and ring it up in the current round as part of the combo meal. If the user does
not have privilege to Auto recognize previous round items, the system will
prompt for an authorization code before allowing a manual combo to proceed.
e7 USER’S MANUAL
3-40
Additional Check Functions
Combo Meals
If the system is configured to require confirmation (i.e., the Do not confirm auto
combo recognition option is disabled on the Restaurant form), a dialog box will
be displayed when a match is found. This dialog box lists the menu items that will
be turned into a combo meal along with their à la carte prices. A comparison of
the two prices is provided, showing the amount saved by ordering the combo
meal.
The user will not be prompted for the number of combo meals to generate. Only
one combo meal will be created at a time.
The manual combo recognition is considered complete once a combo meal is
generated. The system will not present additional instances automatically. Instead,
the user must re-select the items and repeat the process until no more combo
meals can be generated.
This combo meal method is not allowed when a discount or service charge has
been applied to the selected menu item. Voided or returned menu items are
ignored. If a combo meal cannot be created, an error message will be displayed
indicating that no combo meal is possible.
Follow these steps to order combo meals using manual combo recognition:
1. Ring up multiple items as à la carte selections. Their individual prices will be
listed.
2. Highlight the ordered menu items. The user must select all of the items that
make up a combo meal (e.g., hamburger, side, and a drink). If no menu items
are highlighted, the system will try to build a combo meal based on the last
main menu item ordered.
3. Click the [Combo] key. The system attempts to build instances of combos
based on the menu items selected. Selected menu items are grouped under the
combo meal name and the price is adjusted accordingly. Menu items that
cannot be grouped, remain as à la carte listings.
4. When the order is complete, service total or tender the check.
• By Auto Combo Recognition
This order method uses a special [Auto Combo] function key to generate a
combo meal based on all items in the check. The user rings all items in an order
and then presses the [Auto Combo] function key. The system attempts to group
items together to create instances of combos. If any are found, a combo meal is
formed and the price of the menu items is adjusted accordingly. In this scenario,
menu items are accessible from the touchscreen along with the [Auto Combo]
function key.
e7 USER’S MANUAL
3-41
Additional Check Functions
Combo Meals
After the menu items are rung, the order can be converted from à la carte items to
combo meals through the use of the [Auto Combo] key. With this process, the
user is not required to specify which menu items are to be included in a combo
meal. Instead, the system automatically reviews the check detail and attempts to
build the appropriate combo meal packages.
This combo meal method is not allowed when a discount or service charge has
been applied to the selected menu item. Voided or returned menu items are
ignored. If a combo meal cannot be created, an error message will be displayed
indicating that no combo meal is possible.
Combo meal selections can be from the current or previous service round. If a
previous round item is used, the system will automatically void the à la carte item
and ring it up in the current round as part of the combo meal.
Auto combo recognition can be activated using one of the methods described
below:
• Using the Combo Key
The [Combo] function key includes a basic auto combo recognition capability.
With it, combo meals are generated one at a time, by selecting a menu item from
the current order and pressing the [Combo] key. If no item is highlighted, the
system will use the last item entered. It then scans the rest of the check and
attempts to create a combo meal from the menu already entered. Only current
round menu items are considered in this case.
The system cannot handle partial combo recognition. This may result in duplicate
side items, which will have to be deleted manually.
To activate this function, you must select the Auto combo recognition with
combo key option on the Restaurant form.
Follow these steps to order combo meals using the [Combo] key function to
activate auto combo recognition:
1. Ring up multiple menu items as à la carte selections. Their individual prices
will be listed.
2. Highlight a single main menu item from the list.
e7 USER’S MANUAL
3-42
Additional Check Functions
Combo Meals
3. Click the [Combo] key. The system attempts to create a combo meal for the
selected menu item or the last item entered.
• If all of the required side items are present, the items are grouped under the
combo meal name and the price is adjusted accordingly. Menu items that
cannot be grouped remain as à la carte listings.
• If all of the required components are not present, the system will create a
combo meal around the selected menu item, prompting for side item
selections or adding the default selections.
4. When the order is complete, service total or tender the check.
• Using the Auto Combo Key
The [Auto Combo] key provides the most direct method for creating combo
meals from a list of menu items. When the [Auto Combo] key is pressed, the
system scans the check detail and attempts to create instances of combo meals
from the selections.
If the system is configured to require confirmation (i.e., the Do not confirm auto
recognition option is disabled on the Restaurant | Descriptors tab), a dialog box
will be displayed. This dialog box lists the proposed combo meal and its price and
then lists the menu items that will be turned into a combo meal along with their à
la carte prices. A comparison of the two prices is displayed showing the amount
saved by ordering the combo meal.
e7 USER’S MANUAL
3-43
Additional Check Functions
Combo Meals
If approved, the check detail will be adjusted to reflect the newly created combo
meal.
If more than one type of combo meal can be created from the selection, the system
will always build the highest priority combo meals first. Menu items that cannot
be grouped remain as à la carte listings.
If the Auto recognize previous round items option is enabled for the combo
meal being built, both current round and previous round items are eligible for
selection. Otherwise only current round items are eligible.
If the combo meal is formed from current round items only, those items will be
automatically converted to a combo meal.
If the combo meal includes previous round items, and the user is privileged to
accept them, the combo meal will be generated.
If the combo meal includes previous round items, and the user is not privileged, a
manager authorization dialog will display. The server will be prompted for a valid
authorization code before the items can be converted to a combo meal.
After the first combo meal is posted, the system will continue to scan the detail,
presenting the next combo meal combination for approval. The process will be
repeated until no more combinations are found.
Follow these steps to order combo meals using auto combo recognition:
1. Ring up multiple menu items as à la carte selections. Their individual prices
will be listed.
2. Click the [Auto Combo] key. The system attempts to build instances of
combos based on the current check detail. If confirmation is required, a dialog
box is displayed with the proposed combo meal and associated savings.
Note
If more than one type of combo meal can be created from the
selection, the system will always build the highest priority
combo meals first.
3. Click OK to accept. Selected menu items are grouped under the combo meal
name and the price is adjusted accordingly. Menu items that cannot be
grouped remain as à la carte listings.
4. When the order is complete, service total or tender the check.
e7 USER’S MANUAL
3-44
Additional Check Functions
Combo Meals
• Using the Send Order Key
Auto combo recognition can be configured to run when a [Send Order] tender is
selected. This option provides the same functionality as the [Auto Combo] key
without requiring a separate touchscreen button. The process is assigned to send
order tenders by the Enable auto recognition option on the Tender form.
When a send order tender is enabled for auto recognition and the [Send Order]
key is pressed, the system scans the check detail and attempts to create instances
of combo meals from the selections. If the system is configured for confirmation,
a dialog box will be displayed. This dialog box lists the proposed combo meal and
its price and then lists the menu items that will be turned into a combo meal along
with their à la carte prices.
The customer display will show the new total due amount after the auto
recognition is accepted.
The combo meal auto recognition option can be enabled for the service total type
on the Tender form.
Follow these steps to order combo meals using [Send Order] tender key:
1. Ring up multiple menu items as à la carte selections. Their individual prices
will be listed.
2. Click the [Send Order] key. The system attempts to build instances of combos
based on the current check detail. If confirmation is required, a dialog box is
displayed with the proposed combo meal and associated savings.
Note
If more than one type of combo meal can be created from the
selection, the system will always build the highest priority
combo meals first.
3. Click Ok to accept. Selected menu items are grouped under the combo meal
name and the price is adjusted accordingly. Menu items that cannot be
grouped remain as à la carte listings.
4. When the order is complete, service total or tender the check.
e7 USER’S MANUAL
3-45
Additional Check Functions
Combo Meals
Substituting Items
Customers can change their minds. To accommodate the inevitable changes, the
combo meal feature includes the option to substitute combo main and side items.
After the menu items are rung, the user can substitute a menu item in a combo
meal with another menu item in the same combo group by selecting the menu
item and pressing the [Substitute] key. The available options will be displayed in
a SLU. After a substitute item is selected, the system updates the combo meal and
displays the new selections. A price change is posted, if applicable.
This function only works for menu items that are part of a combo meal. Attempts
to substitute à la carte items will result in an error message.
Substitute is not allowed when a discount or service charge has been applied to the
selected menu item. Both menu items from the current round or previous round
will be allowed for substitution.
If the original item was ordered as part of a sized combo meal, it can only be
substituted with another item of the same size in the same combo group.
Substitute is only allowed for combo group attachment type. Items that were
ordered as a menu item, menu item category or condiment group attachments
cannot be substituted.
Follow these steps to substitute an item in a combo meal:
1. If the item is in the previous round then highlight the menu item from the
combo meal portion of the check.
2. Click the [Substitute] key. The available options will be displayed in a SLU. If
no combo item is highlighted, the last combo item listed in the Guest Check
Detail will be replaced. If the item to be substituted is in a previous round you
must highlight the item and then press the [Substitute] key.
Note
If the [Substitute] key is pressed when the last item or
highlighted item is not a combo item, an error message will be
displayed.
3. Select a substitute item. The system updates the combo meal and displays the
new selection. A price change is posted, if applicable.
e7 USER’S MANUAL
3-46
Additional Check Functions
Combo Meals
Upsizing a Selection
Combo meals provide an additional function that allows the customer to change
the portion or size of the items that comprise a combo meal. In a quick service
environment, this is commonly referred to as Upsizing.
Sizing changes are made by selecting a menu item and pressing one of the size
keys (e.g., [Small], [Large]) added to the touchscreen. Resizing can be either
upward (smaller to larger) or downward (larger to smaller), applied to the entire
combo meal, or to items within the combo meal. Because size changes are linked
to menu item pricing, changes in the selection are automatically reflected in the
price of the combo meal as well as the check total.
Resizing is not allowed when a discount or service charge has been applied to the
selected menu item. Only menu items from the current round will be allowed for
resizing.
If the user selects a combo parent and presses the [Size] key, the entire combo
meal will be resized. If the user selects a regular combo item and presses the
[Size] key, only the selected item will be resized. If the user selects a sized combo
item and presses the [Size] key, the entire combo meal will be resized. Combo
items of a sized combo meal cannot be resized individually.
If the user presses the [Size] key without selecting a combo item, the last entry
area will display the combo order size in effect.
If the [Size] key is pressed when the selected item is not a combo item, an error
message will be displayed indicating the function key is not allowed for à la carte
items. If the selected combo item cannot be resized to the specified size, an error
message will be displayed indicating the specified size of the menu item is not
configured in the combo group.
Voiding a Selection
Combo meals can be voided from an open check as easily as any other menu item
selection. Voiding items can be done by any of the following:
• Void Last Item. While the combo meal is being built (i.e., the items are being
selected), the user can void the last selected component by pressing the [Void]
function key to remove the menu item from the check detail. The system will
roll back to the proper combo group in the combo meal selection process,
presenting the appropriate SLU for an alternate selection.
You may last item void through the entire combo until the combo meal itself is
deleted.
When multiple combo meals are being built using the [Combo] key, the user
can keep voiding the last item until the latest combo parent is voided, at which
point the combo state will be reset and the combo process will be terminated.
e7 USER’S MANUAL
3-47
Additional Check Functions
Combo Meals
The combo meals that have already been built will remain on the check, but
the system will not prompt for more combo meals.
• Void Entire Combo. Once the combo meal has been defined, you can remove
the entire combo by highlighting the combo meal (parent and all components)
and pressing the [Void] key. Menu items within a completed combo meal may
not be deleted individually.
Combo meals are viewed in the system as a single entity with multiple parts.
To qualify for the composite price, all elements of the combo meal must be
present. Once a combo meal has been created, it cannot be deconstructed to à
la carte menu items.
• System Voids. Previous round items that are voided as part of the auto combo
process are not considered true voids, because they are re-entered to complete
the combo package. To avoid distorting report totals, these voids are flagged in
the database.
Operationally, system voids behave the same way as regular voids.
Transaction Void and Return
Combo meals can be rung in transaction void or return mode.
• Transaction Void. The user can ring any combo meal items in transaction
void mode using the combo meal menu item keys.
In transaction void mode, the [Combo] key will work when only one combo
main item is selected.
The [Substitute] and [Size] keys will work in transaction void mode.
Manual combo and auto combo will not work in transaction void mode.
• Return. The user can ring any combo meal items in return mode using the
combo menu item keys.
In return mode, the [Combo] key will work when only one combo main item
is selected.
The [Substitute] and [Size] keys will work in return mode.
Manual combo and auto combo will not work in return mode.
e7 USER’S MANUAL
3-48
Additional Check Functions
Combo Meals
Discounting an Item
The following apply to combo meal and combo item discounts.
• Last Item Discount. Last item discounts cannot be applied to a combo meal.
Combo meals are typically listed as priced menu items, with the components
of the meal listed as either priced or non-priced line items beneath it. When a
last item discount is applied to a combo meal, the system will look for the last
item posted and may not be able to calculate a discount if the last combo item
is non-priced.
• Touch Item Discount. The user can touch-select a priced combo meal menu
item or a combo item and apply a discount. If the discount is an item discount,
the discount is listed after the selected item in the combo meal. If the discount
is not an item discount, the discount is listed after the last item in the check.
Touch item discount will work the same way for combo meals and combo
items as for regular menu items with condiments.
• Subtotal Discount. Subtotal discount can be applied to entire check for all
menu items associated with the discount group(s) in the discount. These
include the combo meal menu items and combo items. No items need to be
selected.
Pricing an Item
The system configures the combo meal price by using the following formula:
Combo Menu Item Price + Combo Group Item Price = Combo Meal Price
This formula works for all pricing scenarios.
The Combo Menu Item Price is the value assigned to the combo shell item in the
Configurator | Menu Item | Prices tab. The default value is $0.00.
The Combo Group Menu Item Price is the special price assigned to a member
of a combo group when the Configurator | Combo Item | Use this Price option is
selected. This value will override the regular menu price, even if it is assigned a
value of $0.00.
There are two ways to assign a price to a combo meal.
• Base Pricing – The combo meal shell carries the total cost of the combo meal.
The main and side items that make up the combo meal are priced at $0.00. The
user should enter the full price for the combo shell item and use price override
with the price of $0.00 for each combo item in the combo meal.
e7 USER’S MANUAL
3-49
Additional Check Functions
Combo Meals
• Roll-Up Pricing – Main and side items are assigned special combo group
prices that contribute to the final combo meal price. If the combo shell item is
priced as well, then the component prices are added to that price. The user
should enter $0.00 for the combo shell item, and use price override for each
combo item in the combo meal.
Information about configuring pricing for a combo meal is available in the
Configuring Combo Meals section.
Sizing an Item
Combo meals can be configured to certain size by using a [Size] function key. The
user would press the size key before selecting the combo meal itself. The size key
indicates that the combo meal item should be displayed for the selected size only.
e7 USER’S MANUAL
3-50
Order Assignment
Merge Checks
Order Assignment
This section discusses ways to change an order assignment by merging, splitting,
and transferring checks.
Merge Checks
Merging a check moves the transaction detail from one open check to another, and
closes the original to a zero balance. A merge is used to combine guest checks of
customers who want to pay on one check.
This function is limited to employees whose job type is programmed to allow split
and merge check functions.
To merge two checks:
1. From the list of open checks on the default transaction screen, select a check to
open in the main order screen. (When the merge is complete, this will become
the combined check.)
2. Select the [Merge Check] button. A list of open checks is displayed along
with the names of the employees assigned to them.
3. Highlight the check that is to be merged with the current check. A message box
is displayed.
e7 USER’S MANUAL
3-51
Order Assignment
Transfer a Check
4. Select [Yes] to add this check’s detail to the current check.
Transfer a Check
Transferring a check changes ownership of that check from one employee to
another. This may be done when guests move from one part of the restaurant to
another (e.g., from the bar to the dining room), or when an employee is leaving for
the day and another employee will be taking over his/her open checks.
To transfer a check:
1. From the default transaction screen, select the [Transfer Check] button. A list
of open checks is displayed along with the names of the employees assigned to
them.
2. Highlight the check that you want to transfer to yourself. A message box is
displayed.
3. Select [Yes] to transfer the check. The employee name is changed in the list
and the check is opened in default food screen.
e7 USER’S MANUAL
3-52
Order Assignment
Split a Check
Split a Check
The split check feature is used to transfer portions of the original guest check
detail to a separate new check which is then assigned its own check number. If
table numbers are used, the split check is also given a new group number.
For example, four people at a table all order the same cordial, priced at $5.00.
They each have a discount coupon for 15% off the cost of the cordial. A sales tax
of 5% is added, resulting in a total of $17.85 for this check.
If one of the customers requests a separate check, one of the cordials would be
split off onto a new check, along with its item discount and its share of the sales
tax. The original check would be adjusted to show the remaining 3 menu items
and discounts. The transaction is illustrated below:
Note
Percent discounts applied to a subtotal of eligible menu items
cannot be split between checks, even if the menu items themselves
are shareable.
For example, suppose the four people in the preceding example
ordered two bottles of wine at $15.00 per bottle. They also have a
discount coupon for 20% off the entire check. If the customers
then requested separate checks, the server would have to remove
the discount before splitting the check, and then apply the
discount to each check separately.
This function is limited to employees whose job type is programmed to allow split
and merge check functions.
e7 USER’S MANUAL
3-53
Order Assignment
Split a Check
Using the Feature
To split a check:
1. Pick up a guest check from the list of open checks.
2. Press the [Split Check] key to open the split check screen and display a new
(blank) check next to the original. If splitting to more than two check, press
the [New] key at the bottom of the window until the required number of
checks has been added.
3. In the original check detail, highlight the transaction items to be moved.
e7 USER’S MANUAL
3-54
Order Assignment
Split a Check
4. Touch-select the new check to move the highlighted items to it.
If the highlighted item is consolidated (e.g., 4 Cordials), the system will
display a numeric keypad and prompt for the number of items to be moved.
Select a number and press [Enter].
If the highlighted item is shared (e.g., a bottle of wine, an appetizer), press the
[Share] key to split the price between customers. A dialog window is
displayed with a list of the split check numbers. Select the checks that will
share this item and press [Enter].
Note
Open menu items entered using the [@/For] key, and menu
items with condiments, must be moved in their entirety.
5. Once an item is moved, the Subtotals, Taxes and Total Due field for each
check is changed to reflect the transfer.
6. When all the items have been transferred to the appropriate checks, press the
[Done] key to exit the split check window. A dialog box is displayed asking if
the user wants to exit and save the changes.
7. Press [Yes] to confirm. The system will:
• Save the newly split checks as separate open checks.
• Service total all of the checks and close the split check window.
e7 USER’S MANUAL
3-55
Payment Transactions
Cash Payments
Payment Transactions
This section discusses ways to tender an order and close the check. More than one
type of tender may be applied to the same check.
Cash Payments
To apply a cash payment to an open check:
1. Begin or pick up a guest check.
2. Complete all sales entries.
3. With the check open in the main order screen, press the [Tenders] button to
display the available payment keys.
Note
This step is only required if a [Cash] key has not been included
on the main Food screen.
4. To pay the exact amount, select the [Cash] button. The entire check total is
posted to cash, the check is closed, and the system automatically returns to the
default transaction screen.
5. To make a partial cash payment, select one of the preset amount keys (e.g.,
[$5.00]), or enter an amount (e.g., 18.00) and press [Cash]. A payment line
item is added to the check detail and to the Payment total. The amount is
automatically deducted from the Total Due.
e7 USER’S MANUAL
3-56
Payment Transactions
Credit Card Payments
6. Select additional tender keys, as necessary. The check will not be closed until
the entire amount is paid.
Note
If the user tenders an amount greater than the amount due, the
difference will be shown as a “Change Due (amount)” in the
check detail area of the screen.
Credit Card Payments
Credit card keys are used to close a guest check by charging payment to a
customer’s credit card account. A separate key may be programmed for each
credit card type (VISA, MasterCard, Discover, etc.) accepted by the
establishment, or the system may use generic credit auth/final keys to approve all
credit card transaction. The number and type of touch keys available will depend
on the system’s hardware setup. (For more on this subject, refer to Processing
Options on page 3-59.)
Credit card keys may be programmed to allow full or partial payment. More than
one credit card may be applied to a single check and a mix of cash and credit cards
is allowed. A charged tip may be added when the credit card is tendered.
A credit card payment may not exceed the total due on the guest check. However,
if an amount greater than the Total Due is entered, a prompt will display asking if
the difference represents a tip amount.
Credit card tenders may be programmed with a “ceiling” or limit on the maximum
amount that can be charged to a credit card account. When the amount tendered
exceeds the maximum charge listed, the system prompts for authorization to
exceed the maximum.
e7 USER’S MANUAL
3-57
Payment Transactions
Credit Card Payments
Definitions
The following is a list of common terms used throughout this section:
• Base Floor Limit — The minimum charge amount for which an authorization
is required. This programmable for each credit card tender.
• Credit Authorization (CA) — The process of requesting an authorization
from a credit card processor for a charge amount on a customer's credit card,
prior to accepting the card as payment.
• Credit Card Processor — Credit card authorization and charge handling
services are offered by various vendors. A credit card processor can be a credit
card vendor such as VISA/Mastercard, a bank, or a third-party processor.
• Credit Finalization — The process of closing a check to a previously
authorized credit card. Before a credit card payment is finalized, a credit card
voucher must be printed and signed by the customer. The finalized amount
includes the charged tip.
• Electronic Draft Capture (EDC) — The process of storing credit card
payments in files on the MICROS e7 POS System. These files are used in the
reconciliation and settlement processes.
• Initial Credit Authorization — A request for authorization before any sales
are posted to the guest check (i.e., permission to run a tab). The authorization
amount can be preset in the system, or it can be specified by the employee at
the time of the request.
• Reconciliation — The process of verifying electronic draft data before
transferring it to a credit card processor for reimbursement of customer credit
card payments.
• Secondary Authorization — An update of a previously authorized amount.
This is usually required during the credit finalization process, if the amount of
the actual payment exceeds the amount of previous authorizations.
Authorization limits (programmed in the MICROS e7 POS System) determine
if a secondary authorization is necessary.
• Secondary Floor Limit — The maximum amount that a tender may exceed
the previous authorization amount before requiring a secondary authorization.
• Settlement — The process of transferring electronic draft data to a credit card
processor for reimbursement of customer credit card payments.
• Voucher — A standardized form that is generated by the system when certain
credit card authorization keys are used. A credit card voucher may be printed
on a roll printer. Vouchers are presented to the customer for verification of the
charges, inclusion of a tip, and a signature approving the transaction totals.
e7 USER’S MANUAL
3-58
Payment Transactions
Credit Card Payments
Processing Options
There are two ways to handle credit card processing in the MICROS e7 System.
The first uses an external device with a communications link to the credit card
processor. With this method, requests for authorization and approval are handled
as separate, off-line transactions. The workstation has no direct communication
with the credit card processor, but simply records the appropriate tender type
along with the transaction amounts and charged tips. Credit card settlement is also
handled separately.
The second method initiates credit requests directly from the workstation terminal
to connect with the credit card processor. Once the credit request is started, the
workstation cannot be used for any other POS operation until a response is
received. Details of the credit transaction are saved to the database and can be
included in the final daily report and reconciliation routines. Credit card
settlement is also handled electronically via the system’s Credit Card Batch
Utility (see Chapter 5).
Using an External Device
Sites that use an external device to obtain credit authorization will do so
independent of the workstation before paying out the check. Once the approval is
received, the user can follow these steps to record the credit card payment and/or
close out the check:
1. Begin or pick up a guest check.
2. Complete all sales transactions.
3. Select the [Tenders] key to open the payment screen with all the available
credit card tenders.
e7 USER’S MANUAL
3-59
Payment Transactions
Credit Card Payments
4. Press the appropriate credit card key (e.g., [VISA], [Discover],
[AmExpress]).
5. If the system is configured to allow partial payment to a credit card, the user
will be prompted to “Enter (credit card) amount.” Enter the portion of the
check to be charged to this credit card and press [Enter].
Note
You may still enter a partial payment to a credit card, even if
the system was not programmed to prompt for an amount.
To post a partial payment to a credit card, enter the amount
BEFORE selecting the credit card key. Follow the prompts to
finish the transaction.
6. At the next prompt, the user is directed to “Enter Charged Tip Amount.” Use
the numeric touch keys to add a tip, if any. A value is required. If the customer
has not included a tip, a “0” should be used.
7. Press [Enter] to close the screen and continue. A touchscreen keyboard is
displayed with the prompt “Enter (credit card name) Reference.”
8. Using the touch keys, enter the appropriate credit card number or run the card
through the magnetic card reader. Press [Enter] to continue.
If the information is incorrect (i.e., wrong number of digits, invalid credit card
type), an error message is displayed and the credit card transaction (including
the charged tip) is cancelled.
If the information is accepted, the user may be prompted to “Enter Expiration
Date (MMYY).” Cards swiped through the magnetic card reader will not be
prompted to enter an expiration date, as this information will be read from the
card itself.
9. If required, use the numeric touch keys to enter the expiration date. Do not use
spaces or other separators between the month and year values. If the card
expires in September 2004, enter “0904.”
10. If the date is valid, the credit transaction is posted to the guest check. If the
amount entered represents the total due, the check will be closed as well.
If this is a partial payment, the portion of the check charged to the credit card
is subtracted from the check total. A line item is posted to the check detail,
indicating the card type and amount. The actual card number is masked except
for the last four digits. If a charged tip was included, it will be shown above
the credit card entry.
e7 USER’S MANUAL
3-60
Payment Transactions
Credit Card Payments
The system then returns to the payment screen and the check remains open,
allowing the user to post additional transactions, service total, or close to cash,
credit card, or other tender.
Using Integrated Credit Card Processing
Sites that have integrated credit card processing will initiate all transactions
directly from the workstation terminal.
In addition to using the credit card tenders, user may have access to several
function keys, including 3 authorization keys (Initial, Manual, and Credit Auth)
and a key to finalize the credit transaction (Credit Final).
Step-by-step instructions for using these functions keys are provided below.
Credit Authorization
The [Credit Auth] key can be used to store credit card information against the
current check, initiate a credit card authorization, or print/reprint a credit card
voucher. More than one credit card authorization may be applied to the same
check.
To authorize a credit transaction:
1. Begin or pick up a guest check.
2. Complete all sales transactions.
3. Select the payment screen where the credit card function keys are located.
e7 USER’S MANUAL
3-61
Payment Transactions
Credit Card Payments
4. Press the [Credit Auth] key. A numeric
dialog box is displayed, prompting the
user for the credit card number.
5. Run the customer’s credit card through the
magnetic card reader or, using the touch
keys, type in the appropriate credit card
number and press [Enter] to continue.
If the information is incorrect (i.e., wrong
number of digits, invalid credit card type),
an error message is displayed and the
credit card transaction is cancelled.
If the information is accepted, the user
may be prompted to “Enter Expiration
Date (MMYY).” Cards swiped through the magnetic card reader will not be
prompted for an expiration date, as this information will be read from the card
itself.
6. If required, use the numeric touch keys to enter the expiration date. Do not use
spaces or other separators between the month and year values. If the card
expires in September 2004, enter “0904.” Press [Enter] to continue. Wait as
the credit authorization request is submitted to the credit card processor.
7. If the credit card is accepted, the message “Transaction Approved” will be
displayed at the top of the screen. The check detail is updated to indicate the
credit card type, authorization code, and amount. For security, the credit card
number is masked except for the last four digits.
e7 USER’S MANUAL
3-62
Payment Transactions
Credit Card Payments
8. A voucher is printed for the customer to review, verify the charges, and add an
optional tip. When the voucher is signed and returned, the server can finalize
the credit card payment and close the check.
Authorizing Multiple Cards
Users may authorize more than one credit card for payment on the same guest
check. To do this, the server must produce a voucher for every customer who
wishes to pay by credit card, so that each can specify a payment amount and
charged tip.
To authorize multiple cards:
1. With the check open, navigate to the payment screen where the credit card
function keys are located.
2. Using the numeric keypad, enter an amount before pressing the [Credit Auth]
key. The amount entered does not have to be precise, but should be less than
the Total Due. A dialog box is displayed, prompting the user for the credit card
number.
Note
When more than one credit card is used, each should be
authorized for some portion of the check total. Otherwise, the
system may assume that the entire check is being charged to the
first credit card. This will leave a balance of zero to apply to
the rest of the credit cards. Credit cards may not be authorized
for a zero amount.
3. Run the customer’s credit card through the magnetic card reader or, using the
touch keys, type in the appropriate credit card number and press [Enter] to
continue.
If the information is incorrect (i.e., wrong number of digits, invalid credit card
type), an error message is displayed and the credit card transaction is
cancelled.
If the information is accepted, the user may be prompted to “Enter Expiration
Date (MMYY).” Cards swiped through the magnetic card reader will not be
prompted for an expiration date, as this information will be read from the card
itself.
4. If required, use the numeric touch keys to enter the expiration date. Do not use
spaces or other separators between the month and year values. If the card
expires in September 2004, enter “0904.” Press [Enter] to continue. Wait as
the credit authorization request is submitted to the credit card processor.
5. If the credit card is accepted, the message “Transaction Approved” will be
displayed at the top of the screen. The check detail is updated and the first
voucher is printed.
e7 USER’S MANUAL
3-63
Payment Transactions
Credit Card Payments
6. Press the [Credit Auth] key again. A
dialog box is displayed with a list of
the cards that have already been
authorized for this check.
7. Select New Account... and press [Ok]
to continue. The credit card entry
dialog box is displayed, prompting the
user for the new credit card number.
8. Repeat Steps 3 and 4 to enter the
second credit card number and
expiration date.
When the approval is received, the
authorization lines will be added to the check detail, along with the approved
amount. A second voucher will be printed.
9. When both vouchers are signed and returned, the server can finalize the credit
card payments, amending the payment amounts and adding the charged tip, if
any.
e7 USER’S MANUAL
3-64
Payment Transactions
Credit Card Payments
Initial Authorization
The [Initial Auth] key is used to pre-authorize and store a credit card charge
amount prior to posting sales to a guest check. The authorization amount can be
preset in the system or specified for each authorization request. The credit card
account number is also stored so that it can be recalled when the guest check is
paid.
If more than one guest will be paying the check, and both want to use a credit
card, both cards may be pre authorized. Depending on system programming, a
credit card voucher can be printed with each use of the [Initial Auth] key.
Additionally, the [Initial Auth/Store Customer Name] key can be used to extract
the customer’s credit card name from Track 1 and assign it as the check
name on the guest check along with performing an initial authorization.
To pre-authorize a credit card:
1. Begin or pick up a guest check.
2. Select the payment screen where the credit card function keys are located.
3. Press the [Initial Auth] key. A numeric dialog box is displayed, prompting the
user for the credit card number.
4. Using the touch keys, enter the appropriate credit card number or run the card
through the magnetic card reader. Press [Enter] to continue.
If the information is incorrect (i.e., wrong number of digits, invalid credit card
type), an error message is displayed and the credit card transaction is
cancelled.
If the information is accepted, the user may be prompted to “Enter Expiration
Date (MMYY).” Cards swiped through the magnetic card reader will not be
prompted for an expiration date, as this information will be read from the card
itself.
5. If required, use the numeric touch keys to enter the expiration date. Do not use
spaces or other separators between the month and year values. If the card
expires in September 2004, enter “0904.”
e7 USER’S MANUAL
3-65
Payment Transactions
Credit Card Payments
6. Press [Enter] to continue. A numeric
dialog box may be displayed prompting
for an initial authorization amount. Type in
an amount and press [Enter] to submit the
authorization request to the credit card
processor.
If an initial authorization amount was
programmed for this tender type, the
system will skip the prompt and
immediately submit the request to the
credit card processor.
7. If the request is accepted, the message
“Transaction Approved” will be displayed. The check detail will be updated to
indicate the credit card type, authorization code, and initial authorization
amount. For security, the credit card number will be masked, except for the
last four digits.
The system then returns to the payment screen and the check remains open,
allowing the user to post additional transactions, service total, or close to cash,
credit card, or other tender.
e7 USER’S MANUAL
3-66
Payment Transactions
Credit Card Payments
Pre-Authorizing Multiple Cards
Users can pre-authorize more than one credit card for payment to the same guest
check. To pre-authorize a second card, simply repeat the preceding steps for the
additional card. When the approval is received, the credit card information is
stored and the authorization lines are added to the check detail.
Manual (voice) Authorization
The [Manual Auth] key is used when the workstation (via the credit card server)
is unable to communicate with the credit card processor. Although the
communications link is inactive, the guest check cannot be closed without
confirmation that the charge payment will be accepted. To obtain confirmation,
the user will need to contact (via telephone) the credit card processor to secure
verbal approval of the charges. A manual authorization number will be provided.
To manually authorize a credit card:
1. Begin or pick up a guest check.
2. Complete all sales transactions.
3. Select the payment screen where the credit card function keys are located.
4. Press the [Manual Auth] key. A numeric
dialog box is displayed, prompting the
user for the credit card number.
5. Using the touch keys, enter the appropriate
credit card number or run the card through
the magnetic card reader. Press [Enter] to
continue.
If the information is incorrect (i.e., wrong
number of digits, invalid credit card type),
an error message is displayed and the
credit card transaction (including the
charged tip) is cancelled.
If the information is accepted, the user
may be prompted to “Enter Expiration Date (MMYY).” Cards swiped through
the magnetic card reader will not be prompted for an expiration date, as this
information will be read from the card itself.
6. If required, use the numeric touch keys to enter the expiration date. Do not use
spaces or other separators between the month and year values. If the card
expires in September 2004, enter “0904.” Press [Enter] to continue. A
touchscreen keyboard is displayed.
7. Enter the authorization code verbally provided by the credit card processor and
press [Ok] to continue. The message “Transaction Approved” will be
e7 USER’S MANUAL
3-67
Payment Transactions
Credit Card Payments
displayed. The check detail will be updated to indicate the credit card type,
authorization code, and amount. For security, the credit card number will be
masked except for the last four digits.
A voucher is printed for the customer to sign, verify the charges, and add an
optional tip.
Credit Finalize
The [Credit Final] key is used to close a guest check to a previously authorized
credit card. This transaction assumes that a credit card voucher has been printed
out and signed by the customer. More than one credit card payment may be
applied to the same guest check.
When finalizing a credit card payment, keep in mind that the sequence of steps
and prompts will depend on the configuration of the individual tenders. All credit
cards do not have to be programmed alike.
For example:
• Credit Card A is programmed to assume payment in full. During final tender,
the user enters a payment amount plus tip before the [Credit Final] key is
pressed. (This is the only way to accommodate partial payments and charged
tips.) Otherwise, the entire check total will be applied to the current tender.
The charged tip will be 0.
• Credit Card B is programmed to require a credit final amount entry. During
final tender, the user will always be prompted to enter the payment amount and
charged tip after the [Credit Final] key is pressed.
When finalizing a credit card transaction, a second authorization may be required
if the payment amount entered exceeds limits programmed for that tender. This
can occur, for example, if the check total is greater than the initial, pre-authorized
amount; or when the customer adds menu items to the check after the credit card
voucher has been printed.
Credit Card Assumes Full Payment
1. Pick up a guest check.
2. Select the payment screen where the credit card function keys are located.
3. (Optional) Enter a payment amount.
4. Press the [Credit Final] key. One of the following will occur:
• If an amount was not entered in Step 3, the system will apply the full amount
to the current credit card, with a charged tip of 0.00. A message box will
display requesting confirmation of the tip amount. Press [Yes] to accept.
e7 USER’S MANUAL
3-68
Payment Transactions
Credit Card Payments
• If the amount entered in Step 3 exceeds the Total Due, the system will
assume the difference to be the charge tip. A message box will display
asking for confirmation of the charged tip amount. Press [Yes] to accept.
• If the amount entered in Step 3 is less than the Total Due, a numeric keypad
will display with a prompt to enter a charged tip amount. Type in an amount
and press [Enter]. An entry is required. If the customer has not included a
tip, a “0” should be entered.
5. When the payment is accepted, the check is updated as follows:
• The payment transaction is included in the check detail.
• The payment amount is subtracted from the Total Due.
• The charged tip is added to the Service Charge subtotal.
If the Total Due is paid in full, the transaction is posted and the check is closed
automatically. The user is returned to the payment transaction screen.
If the Total Due represents a partial payment only, the check remains open
until the outstanding balance is tendered.
Credit Final Amount Required
1. Pick up a guest check.
2. Select the payment screen where the credit card function keys are located.
3. (Optional) Enter a payment amount and press the [Credit Final] key.
e7 USER’S MANUAL
3-69
Payment Transactions
Credit Card Payments
• If the amount entered in Step 3 exceeds the Total Due, the system will
assume the difference to be the charge tip. A message box will display
asking for confirmation of the charged tip amount. Press [Yes] to accept.
• If the amount entered is less than the Total Due, a numeric keypad will
display with a prompt to enter a charged tip amount. Type in an amount and
press [Enter].
If Step 3 is omitted:
4. Press the [Credit Final] key. A numeric keypad is displayed, prompting the
user for a payment entry.
• If the amount entered exceeds the Total Due, the system will assume the
difference to be the charge tip. A message box will display asking for
confirmation of the charged tip amount. Press [Yes] to accept.
• If the amount entered is less than the Total Due, a numeric keypad will
display with a prompt to enter a charged tip amount. Type in an amount and
press [Enter].
5. Once the payment is accepted, the check is updated as follows:
• The payment transaction is included in the check detail.
• The payment amount is subtracted from the Total Due.
• The charged tip is added to the Service Charge subtotal.
e7 USER’S MANUAL
3-70
Payment Transactions
Credit Card Payments
If the Total Due is paid in full, the transaction is posted and the check is closed
automatically. The user is returned to the payment transaction screen.
If the Total Due represents a partial payment only, the check remains open
until the outstanding balance is tendered.
e7 USER’S MANUAL
3-71
Payment Transactions
Credit Card Payments
Finalize Multiple Credit Card Payments
Although multiple credit card payments may be authorized for a single guest
check, each credit card payment is treated as a separate transaction. As such,
payment procedures will vary in accordance with the credit card’s programming.
This section describes, in general, the steps required to select and post a credit
card payment when more than one credit card was authorized.
1. Pick up a guest check.
2. Select the payment screen where the credit card function keys are located.
3. Press the [Credit Final] key. A
message box displays listing the
authorized credit cards.
4. Touch-select an entry and press [Ok]
to continue. A numeric keypad
displays, prompting the user for a
payment entry.
5. Enter the payment amount associated
with this credit card and press [Enter].
A second numeric keypad displays,
prompting the user for a charged tip
amount.
6. Enter the charged tip amount. A value is required. If the customer has not
included a tip, a “0” should be used. Press [Enter]. The credit card payment
and charged tip are posted to the current check.
7. Repeat Steps 3-6 to post payments to the remaining credit cards.
e7 USER’S MANUAL
3-72
Payment Transactions
Credit Card Payments
Using Credit Card Lookup
The [Credit Card Lookup] key allows a user to swipe a credit card or enter a
card number without selecting a specific credit card tender (i.e., AMEX, Visa,
etc.) first.
When an account number is entered or read by the magnetic card reader, the
system checks the first one to four digits (or preamble) of the credit card account
number to identify the credit card type. For example, all VISA account numbers
begin with 4 and American Express account numbers all begin with 37. When a
credit card number beginning with a 4 is entered, the system recognizes it as a
VISA card. If the establishment does not accept VISA credit cards, an error
message is displayed and the payment transaction is cancelled.
To use the credit card lookup:
1. Begin or pick up a guest check.
2. Complete all sales transactions.
3. When the check is ready to be tendered, locate the payment screen containing
the [Credit Card Lookup] key and press to activate. If only part of the check
is to be charged to the credit card, use the numeric touchscreen keys to enter
the charged amount before pressing the [Credit Card Lookup] key.
4. At the prompt, “Enter card number,” swipe the credit card or manually type in
the account number. Press [Enter] to continue.
5. At the next prompt, “Enter Charged Tip Amount,” enter the tip, if any. A value
is required. If the customer has not included a tip, a “0” should be used. Press
[Enter] to continue.
6. If the information is accepted, the user may be prompted to “Enter expiration
date (MMYY).” Cards swiped through the magnetic card reader will not be
prompted to enter an expiration date, as this information will be read from the
card itself.
If required, use the numeric touch keys to enter the expiration date. Do not use
spaces or other separators between the month and year values. If the card
expires in September 2004, enter “0904.”
Assuming that the date is valid, the credit transaction is posted to the guest check.
If the amount entered represents the total due, the check will be closed as well.
Otherwise, the amount charged to the credit card will be subtracted from the
check total. The system will return to the payment screen and the check will
remain open, allowing the user to post additional transactions, service total, or
close to cash, credit card, or other tender.
e7 USER’S MANUAL
3-73
Payment Transactions
Credit Card Payments
Reprinting a Credit Card Voucher
Occasionally, after obtaining a credit card authorization, a user will need to reprint
the credit card voucher. Usually, this is done if the original is unusable (e.g., the
printer malfunctioned) or if the voucher is lost, damaged, or ruined (e.g., the
customer made an entry error, or food/drink was spilled on it).
The system distinguishes an original voucher
from a reprinted one by including the word
“Reprint” in the header. All other information is
the same.
Voucher reprints only occur when the original
check is unaltered. Otherwise, the system will
resubmit the request as a secondary
authorization to the credit card processor.
To reprint a voucher:
1. Pick up a guest check.
2. Select the payment screen where the credit card function keys are located.
3. Press the [Credit Auth] key. A message
box displays listing the authorized
credit cards.
4. Touch-select the entry and press [Ok] to
continue. A numeric keypad displays
prompting for authorization to use
tender/media.
5. Enter an authorization code and press
[Enter]. A second numeric keypad
displays, prompting the user for
authorization to reprint the credit card
voucher.
6. Type in an authorization code and press [Enter] to clear the dialog box and
reprint the voucher.
Note
e7 USER’S MANUAL
Authorization codes (as described in Steps 4 and 5) are only
required if the employee is not privileged to use this function.
Otherwise, the system will approve the transaction and reprint
the voucher after the credit card is selected in Step 3.
3-74
Payment Transactions
Stored Value Cards
Stored Value Cards
The Stored Value Card (SVC) interface allows a site to create and manage guest
card payment and loyalty programs, and to issue SVCs that may be applied
toward future purchases.
The MICROS e7 POS can support multiple programs and accounts, and
customers may participate in more than one of them simultaneously. Note,
however, that sites offering SVCs are only responsible for selling, reloading,
redeeming, and cashing out cards provided to them by a third-party vendor. Rules
of participation are determined by the SVC provider. At this time, MICROS e7
only supports the use of the iCare gift cards, available from mymicros.net.
A separate key may be programmed for each SVC function. The number and type
of touch keys available depends on database configuration and the functionality
supported by the SVC provider.
All examples found in this section were created using a demo database. These
examples are meant to be demonstrative and may not reflect the database
configuration at your site. Each example assumes that the site is using the iCare
SVC provider. The prompts and available functions may differ if another SVC
provider is used.
Definitions
The following is a list of common terms used throughout this section:
• Stored Value Card is a generic term that refers to two types of customer
accounts:
• Gift Cards — An account with a monetary balance that can be tendered in
payment for products and/or services. Cards are purchased in advance by a
customer, then loaded with a specific amount which may be applied toward
future purchases.
• Loyalty Cards — An account that tracks customer purchases, assigns a
point value to them, and, when a sufficient number of points has accrued,
issues a reward in the form of a discount. Unlike gift cards, there is no direct
monetary value associated with a loyalty card.
e7 USER’S MANUAL
3-75
Payment Transactions
Stored Value Cards
Gift Card Processes
Gift card functions can be accessed in the following ways:
• Outside of an open guest check (e.g. Cash Out, Balance Inquiry).
In the example below, the gift card function keys are configured into the
Manager Sign In screen.
e7 USER’S MANUAL
3-76
Payment Transactions
Stored Value Cards
• Inside of an open guest check (e.g. Issue Account, Activate Account).
In the example below, the gift card function keys are configured into the Guest
Check Payment screen. Selecting the [SVC] key will bring the user to a list of
available gift card functions.
Follow these steps to access the Guest Check Payment screen:
1. Begin or pick up a guest check.
2. Select the [Pay] key to open the payment screen with all available tenders.
3. Select the [SVC] key inside of the payment screen.
4. A list of available gift card functions will appear. Select a gift card function
from the list demonstrated in the example below:
e7 USER’S MANUAL
3-77
Payment Transactions
Stored Value Cards
Issuing an Account
The Issue Account function activates a gift card for any amount specified by the
customer (e.g. $43, $75.50, $110). This function must be performed inside of an
open guest check.
Follow these steps to issue an account:
1. Begin or pick up a guest check.
2. Select the [Pay] key to open the payment screen with all available tenders.
3. Select the [SVC] key to open the SVC screen
and display all available gift card functions.
4. Select the [Issue Account] key. At the
prompt, enter an account number by either
swiping the gift card or by typing the numbers
manually.
5. The system will then prompt for an amount.
Enter the amount manually.
6. Once the gift card is issued, the transaction
will post to the guest check.
Activating an Account
The Activate Account function allows the user to activate a gift card for the
preset amount printed on the face of the card (e.g. $15, $25, $50). This function
must be performed inside of an open guest check.
Follow these steps to activate the gift card:
1. Begin or pick up a guest check.
2. Select the [Pay] key to open the payment screen with all available tenders.
3. Select the [SVC] key to open the SVC screen and display all available gift card
functions.
4. Select the [Activate Account] key. At the prompt, enter an account number by
either swiping the gift card or by typing the numbers manually.
5. The system will then prompt for an amount. Enter the amount manually.
6. Once the gift card is issued, the transaction will post to the guest check.
e7 USER’S MANUAL
3-78
Payment Transactions
Stored Value Cards
Reloading an Account
The Reload Account function allows the customer to add value to an existing gift
card. This function must be performed inside of an open guest check.
Follow these steps to reload an account:
1. Begin or pick up a guest check.
2. Select the [Pay] key to open the payment screen with all available tenders.
3. Select the [SVC] key to open the SVC screen and display all available gift card
functions.
4. Select the [Reload Account] key. At the prompt, enter an account number by
either swiping the gift card or by typing the numbers manually.
5. The system will then prompt for an amount. Enter the amount manually.
6. Once the gift card has been reloaded, the transaction will post to the guest
check.
Cashing Out
The Cash Out function pays out the remaining value of the gift card. To use this
feature, the guest check cannot be open.
Follow these steps to cash out a gift card:
1. To cash out a gift card go to the Manager Sign In screen.
2. Select the [SVC Cash Out] button. At the prompt, enter an account number by
swiping the gift card or by typing the numbers manually.
3. Once the transaction is complete, the printer will produce a chit indicating the
amount redeemed.
e7 USER’S MANUAL
3-79
Payment Transactions
Stored Value Cards
Enabling the Maximum Change Amount
Users can limit the amount of cash that a customer may receive back after the
guest check has been paid. This feature can be configured for any tender,
including gift cards.
For example, the Mike Rose Cafe accepts gift cards, but limits the cash back
amount to a maximum of $5.00. During lunch, a customer orders a $20.00 meal,
pays with a $50.00 gift card, and asks the server to cash out the remaining balance
($30.00). When the tender is entered, the system rejects the cash back request
because the value of the gift card exceeds the store’s configured maximum change
amount.
Follow these steps to configure this feature:
1. In Configurator, go to the Tender screen.
2. Highlight the tender type (e.g. SVC Cash Out) to be configured.
3. Select the Tender tab.
4. Check the Enable Maximum Change Amount option.
5. In the corresponding Amount box, enter the maximum amount of change that
a customer can be given back on a transaction for that tender type (e.g. $5.00).
6. Save all changes.
Balance Inquiry
The Balance Inquiry function allows the user to check the remaining balance on
a gift card. The inquiry can be initiated inside or outside of a guest check.
Follow these steps to perform a Balance Inquiry outside of an open guest check:
1. Go to the Manager Sign In screen.
2. Select the [Balance Inquiry] key. At the prompt, enter an account number by
either swiping the gift card or by typing the numbers manually.
3. Once the transaction is complete, the gift
card balance will appear on the screen.
The printer will produce a copy of the
balance information on a separate chit.
e7 USER’S MANUAL
3-80
Payment Transactions
Stored Value Cards
Follow these steps to perform a Balance Inquiry inside of an open guest check:
1. Begin or pick up a guest check.
2. Select the [Pay] key to open the payment screen with all available tenders.
3. Select the [SVC] key to open the SVC screen and display all available gift card
functions.
4. Select the [Balance Inquiry] key. At the prompt, enter an account number by
either swiping the gift card or by typing the numbers manually.
5. Once the transaction is complete, the gift card balance will appear on the
screen. The printer will produce a copy of the balance information on a
separate chit.
Balance Transfer
The Balance Transfer function allows the user to move the balance from one gift
card to another. This sequence can be initiated inside or outside of an open guest
check.
Follow these steps to perform a Balance Transfer outside of an open guest check:
1. Go to the [Manager Sign In] screen.
2. Select the [Balance Transfer] key. At the prompt, enter the account numbers
for both the new and old gift cards. Enter the account numbers by either
swiping the gift card or by typing the numbers manually.
3. A separate chit will print for the customer once the transaction is complete.
Follow these steps to perform a Balance Transfer inside of an open guest check:
1. Begin or pick up a guest check.
2. Select the [Pay] key to open the payment screen with all available tenders.
3. Select the [SVC] key to open the SVC screen and display all available gift card
functions.
4. Select the [Balance Transfer] key. At the prompt, enter the account numbers
for both the new and old gift cards. Enter the account numbers by either
swiping the gift card or by typing the numbers manually.
5. A separate chit will print for the customer once the transaction is complete.
Note
e7 USER’S MANUAL
When selecting this option, the customer must transfer the
entire balance of the old gift card onto the new gift card.
Dollar amounts less than the balance are not allowed.
3-81
Payment Transactions
Stored Value Cards
Redeem Account
The Redeem Account function is used when a customer would like to apply the
value of their gift card towards their purchase. This function must be performed
inside of an open guest check.
Follow these steps to redeem a gift card:
1. Begin or pick up a guest check.
2. Select the [Pay] key to open the payment screen
with all available tenders.
3. Select the [SVC] key to open the SVC screen and
display all available gift card functions.
4. Select the [Redeem Account] key. At the
prompt, enter an account number by either
swiping the gift card or by typing the numbers
manually.
5. The system will then prompt for an amount to be
redeemed. Enter the amount manually.
6. When the transaction is approved, the item will
post to the guest check as a tender.
Redeem Authorize
The Redeem Authorize function requests verification in order to apply a gift card
tender to an open guest check. This function must be performed inside of an open
guest check.
Follow these steps to use the Redeem Authorize function:
1. Begin or pick up a guest check.
2. Select the [Pay] key to open the payment screen with all available tenders.
3. Select the [SVC] key to open the SVC screen and display all available gift card
functions.
4. Select the [Redeem Authorize] key. At the prompt, enter an account number
by either swiping the gift card or by typing the numbers manually.
5. The system will then prompt for an amount to be redeemed. Enter the amount
manually.
6. Once approved, the system will post the transaction item to the guest check
and will print two authorization vouchers, one for the customer and one for the
merchant.
e7 USER’S MANUAL
3-82
Payment Transactions
Stored Value Cards
Manual Redeem
Occasionally, a communication error will occur between the site and the gift card
processor (e.g. iCare) when processing a transaction. When this occurs, the user
must manually contact the processor to obtain verbal confirmation that the
transaction has been completed and to obtain an authorization code. This function
must be performed inside of an open guest check.
Follow these steps to manually redeem a gift card after contacting the processor
for an authorization code:
1. Begin or pick up a guest check.
2. Select the [Pay] key to open the payment screen with all available tenders.
3. Select the [SVC] key to open the SVC screen and display all available gift card
functions.
4. Select the [Manual Redeem] key. At the prompt, enter an account number by
either swiping the gift card or by typing the numbers manually.
5. The system will then prompt for the amount to be redeemed. Enter the amount
manually.
6. The screen will prompt for the authorization code. Enter the authorization code
received from the SVC processor.
7. If the transaction is approved, the system will post the transaction to the guest
check and will print two authorization vouchers, one for the customer and one
for the merchant.
e7 USER’S MANUAL
3-83
Payment Transactions
Loyalty Card
Loyalty Card
Loyalty card functions can be accessed in the following ways:
• Outside of an open guest check (e.g. Points Inquiry).
In the example below, the loyalty card function keys are configured into the
Manager Sign In screen.
e7 USER’S MANUAL
3-84
Payment Transactions
Loyalty Card
• Inside of an open guest check (e.g. Issue Points, Accept Coupon).
In the example below an loyalty card function keys are configured inside of the
Guest Check Payment screen. Selecting the [SVC] key will bring the user to
a screen containing all of the available loyalty card functions.
Follow these steps to access the Guest Check Payment screen:
1. Begin or pick up a guest check.
2. Select the [Pay] key to open the payment screen with all available tenders.
3. Select the [SVC] key inside of the payment screen.
4. A list of available loyalty card functions will appear. The user can select a
loyalty card function from the list.
e7 USER’S MANUAL
3-85
Payment Transactions
Loyalty Card
Issuing Points
The Issue Points function allows the user to add bonus points to an existing
customer account based on eligible purchases of a certain amount or item type.
This function must be performed inside of an open guest check.
Follow these steps to issue points on a loyalty card:
1. Begin or pick up a guest check.
2. Select the [Pay] key to open the payment screen with
all available tenders.
3. Select the [SVC] key to open the SVC screen and
display all available loyalty card functions.
4. Select the [Issue Points] key. At the prompt, enter an
account number by either swiping the loyalty card or
by typing the numbers manually.
5. A point amount will be automatically assigned to the
card based on the amount or type of items purchased.
6. If approved, the item will post on the guest check
along with the point amount accrued.
Redeem Points
The Redeem Points function allows the customer to apply points accrued on their
loyalty card toward a discount amount or item type to an open check. If accepted,
the appropriate amount of points is automatically subtracted from the customer’s
loyalty account. This function must be performed inside of an open guest check.
Follow these steps to redeem points on a loyalty card:
1. Begin or pick up a guest check.
2. Select the [Pay] key to open the payment screen with all available tenders.
3. Select the [SVC] key to open the SVC screen and display all available loyalty
card functions.
4. Select the [Redeem Points] key. At the prompt, enter an account number by
either swiping the loyalty card or by typing the numbers manually.
5. The system will then prompt for the number of points to be redeemed. Enter
the amount manually.
6. If approved the transaction will post the item along with the amount of points
used on the guest check.
e7 USER’S MANUAL
3-86
Payment Transactions
Loyalty Card
Points Inquiry
The Points Inquiry function allows the customer to check the remaining balance
on their loyalty card. This feature can be performed inside or outside of an open
guest check.
Follow these steps to perform a Points Inquiry outside of an open guest check:
1. To perform a Points Inquiry go to the Manager Sign In screen.
2. Select the [Points Inquiry] key. At the prompt, enter an account number by
either swiping the loyalty card or by typing the numbers manually.
3. Once the inquiry is complete, the loyalty
card balance will appear on the screen. The
printer will produce a customer copy of the
balance information on a separate chit.
Follow these steps to perform a Points Inquiry inside of an open guest check:
1. Begin or pick up a guest check.
2. Select the [Pay] key to open the payment screen with all available tenders.
3. Select the [SVC] key to open the SVC screen and display all available loyalty
card functions.
4. Select the [Points Inquiry] key. At the prompt, enter an account number by
either swiping the loyalty card or by typing the numbers manually.
5. Once the inquiry is complete, the loyalty card balance will appear on the
screen. The printer will produce a customer copy of the balance information on
a separate chit.
Issue Coupon
The Issue Coupon function issues a coupon for discounted menu items or
currency amounts that can be applied toward future purchases. Coupons can only
be issued in conjunction with an open guest check.
Follow these steps to issue a coupon:
1. Begin or pick up a guest check.
2. Select the [Pay] key to open the payment screen with all available tenders.
3. Select the [SVC] key to open the SVC screen and display all available loyalty
card functions.
4. Select the [Issue Coupon] key. At the prompt, enter an account number by
either swiping the loyalty card or by typing the numbers manually.
e7 USER’S MANUAL
3-87
Payment Transactions
Loyalty Card
5. The user will then be prompted to enter the coupon code. Enter the code
manually.
6. The system will then prompt for an amount to be issued. Enter the amount
manually.
7. If approved, the coupon code and point value awarded will print on the guest
check.
Accept Coupon
The Accept Coupon feature applies a discount based on the coupon value
(amount or item type) to an open guest check. This function must be performed
inside of an open guest check.
Follow these steps to accept a coupon:
1. Begin or pick up a guest check.
2. If applicable, highlight the menu item(s) that the coupon will be applied to.
3. Select the [Pay] key to open the payment screen with all the available tenders.
4. Select the [SVC] key to open the SVC screen and display all available loyalty
card functions.
5. Select the [Accept Coupon] button. At the prompt, enter the coupon code to
validate the transaction. Enter the coupon code manually.
6. If approved, the transaction item will post to the guest check.
e7 USER’S MANUAL
3-88
Payment Transactions
SVC Report Changes
SVC Report Changes
For accounting purposes, sales of (or additions to) Stored Value Cards are
recorded in the system as non-revenue transaction items. This means that monies
collected from the sale (either as cash or credit) are not included in the balance
reports as income. Since a form of payment is accepted at the time of purchase,
the amount paid is included in the tender totals. However, the sale is not posted to
receipts (and is not realized as revenue) until the card is actually redeemed.
To account for differences in report totals, the System, Employee, and
Workstation Balance Reports contain a Non-Revenue Items line. This is where
revenue generated from the SVC Issue, Activate, and Reload functions is
recorded.
The following sample report illustrates how the sale of a $20 gift card would be
accounted for in the System Balance Report. Since the transaction was paid in
cash, the monies are included as part of the Non-Revenue Items line.
Notice that the gift card sale is not included in any of the following report totals:
• Net Sales
• Gross F and B Receipts
• (Job Code) Labor%
• (Order Types) Total Net Sales
Note
In the sample report, a tracking total is shown for the Issue Card
item. This change is not part of the standard report, but must be
added by the user.
MICROS recommends creating a line item for all SVC
transactions to the Default Tracking section of these reports.
e7 USER’S MANUAL
3-89
Payment Transactions
Sample Report with the Sale of a $20 Gift Card
The Gift Card
sale does not
add to Income
The increase in
Cash is, however;
noted and accounted
for in the
Non-Revenue items
The sale is also
reflected in the
Tracking Totals
e7 USER’S MANUAL
3-90
Payment Transactions
Tax Exempt Status
Tax Exempt Status
Depending on local laws, certain persons or groups (e.g., religious, educational, or
charitable organizations) may be eligible for exemption from some or all types of
sales taxes. A government-issued tax ID number is required.
There are 9 possible [Tax Exempt] keys that may be programmed for the
MICROS e7 System — one for each of the 8 tax rates (e.g., food tax, alcohol tax,
delivery tax) that may be defined, and one that exempts all taxes.
A [Tax Exempt] key may be applied at any time prior to payment of the guest
check. If applied in a previous round, any items added in the current round will
automatically be given the same tax exemption. Once a tax exemption has been
applied, it cannot be voided without cancelling the check and re-entering the
order.
To apply a tax exemption:
1. Begin or pick up a guest check.
2. Locate the [Tax Exempt] key (typically placed on a payment screen) and
press. A numeric keypad will be displayed.
3. Enter the customer’s government-issued ID number and press [Enter].
The dialog box closes. On the payment screen, the letters “Txex” are displayed in
red in the status bar above the check detail. The check’s Tax and Totals entries are
automatically recalculated to reflect the change in the applicable tax.
e7 USER’S MANUAL
3-91
Payment Transactions
Currency Conversion
Currency Conversion
Currency conversion lets employees accept and convert foreign currencies during
transactions. This feature is particularly useful in countries that share a common
border (e.g., U.S. and Canada or Mexico), or host a large number of foreign
visitors (e.g., Great Britain and Europe). Often, visitors will not have exchanged
their monies for the local currency at the time a service is rendered. Hotel and
restaurant operations near airport terminals, train stations, and resorts are most
likely to be affected.
The conversion feature allows a user to recalculate the check total by converting
from the system’s base currency to another currency (e.g., US$ to Euros) based on
predefined conversion rates. To do this, a separate conversion key must be defined
for each currency exchange. Up to 4 currency exchange keys are allowed.
In addition to the conversion key, a separate tender key may be programmed to
track payments made in a foreign currency.
To tender a check to a foreign currency:
1. Begin or pick up a guest check.
2. Complete all of the sales transactions.
3. Select the [Pay] key to open the payment screen.
4. Press the foreign conversion key (e.g., [Pounds£], [Canadian$], etc.). When
the key is pressed, the system converts the guest check total and displays the
results on the workstation screen, pole display, and/or printed check.
5. Tender the check as follows:
• For cash tenders, enter the amount in the units of the foreign currency and
press the [Other Cash] key.
• For credit card tenders, select the appropriate credit card key. Complete the
transaction, making sure to enter all amounts in the units of the foreign
currency.
e7 USER’S MANUAL
3-92
Order Adjustments
Cancel Order
Order Adjustments
This section describes ways to correct or adjust a guest check.
Note
Depending on the system configuration, users may need
privileges or manager approval to perform some types of order
adjustments.
Cancel Order
The Cancel feature allows a user to exit the current order without saving any of
the changes. For this reason, a [Cancel] button is usually included on all of the
forms in POS Operations.
When the [Cancel] button is pressed, a dialog
box is displayed.
Select [Yes] to discard the changes. The
system will automatically close the check and
return to the default transaction screen.
Void Items
Transaction items (menu, condiment, discount, service charge, etc.) may be
deleted from the check in both the current and previous service rounds. Current
round items have not been committed and may be simply deleted from the order.
Items from a previous service round have already been sent to the kitchen. As
such, their removal may require a privileged user or manager permissions.
Current Service Round
To delete an item from the current service round:
1. Select the [Void] key to delete the last item entered.
or
2. Select an item from the check detail area. Scroll through the order, if
necessary, to locate the entry.
Press the [Void] key to delete the item and recalculate the Total Due.
e7 USER’S MANUAL
3-93
Order Adjustments
Void Items
Previous Service Round
In addition to current round items, voids may be applied to transaction items
entered in the previous service round of an open, unpaid check or a reopened
closed check.
Users can void all or part of a selected order. Reasons for voiding a transaction
item include:
• user entered them incorrectly
• customer changed his/her mind
• items were not available
To void a previous round item:
1. Begin or pick up a guest check. (See the section Reopen Close Check on page
3-96 for more information on that topic.)
2. Select a transaction item from the check detail. Condiment and side items may
be individually selected. However, if a menu item with condiments or side
item is selected, the main item and all of its related items will be automatically
highlighted.
3. Select [Void] to remove the item(s) from the check detail.
If the user is not privileged to void menu
items, a dialog box will display asking for
the employee code of someone authorized
to void previous round items. This is
referred to as a Manager Void and is
tracked as such in the Employee Balance
Report.
To clear, the manager must swipe his
employee card or type in his authorization
code and press [Enter].
4. If programmed, a dialog box will display
with a list of reason for the void.
5. Select a reason and press [Enter]. The
item is removed from the check detail and the check total is adjusted.
e7 USER’S MANUAL
3-94
Order Adjustments
Return an Item
Return an Item
A Return item is one that was ordered and then rejected by the customer. For
example, a customer orders a pasta dinner, which is prepared and delivered, then
rejects it because the pasta is overcooked.
Return items are treated differently from Void items because inventory and
preparation costs are incurred when an item is prepared and not consumed or paid
for by the customer.
Only menu items may be posted as returns. If another type of transaction item is
selected during a return (e.g., discounts, service charges, or other tenders), the
error message “Return Not Allowed” will be displayed.
To return a menu item:
1. Pick up a guest check.
2. Press the [Return] key. A workstation status of Retn is displayed at the top
of the screen. It will remain there until a return item is entered.
3. .Press the menu key for the item to be returned.
4. If programmed, a dialog box will display with a list of reasons for the return.
5. Select a reason and press [Enter].
A return line item is posted as a negative entry
in the check detail, reducing the check total by
the item amount. To further identify the return
item, the letter “R” is printed to the right of the
item price.
If the return item includes several priced side
items, only the main item will be listed.
Note
e7 USER’S MANUAL
The numeric keypad may be used to return multiple instances of
the same menu item (e.g., 3 Fries). However, Steps 1-4 must be
repeated when returning different items (e.g., Fries, Side Salad)
on the same check.
3-95
Order Adjustments
Reopen a Closed Check
Reopen a Closed Check
The Reopen Closed Check feature is used to modify, add to, or reprint a
previously tendered check. With this feature, a closed check can be rolled back to
the last service total before tender, thereby voiding the taxes and tips applied to
the final bill.
In its newly reopened state, the user can perform any of the functions available on
an open check, including adding and deleting menu items, applying or amending
discounts and service charges, merging with another check, or even splitting the
current check.
Employees must be privileged to use this feature. In general, employees may only
access their own closed checks. Managers will have access to all closed checks.
Checks can only be reopened for the current business date. However, it is not
limited to the current employee shift. For reporting purposes, carry-over totals are
not affected when a check from a previous shift is re-opened. Also, the
outstanding total/counter always equals the carry-over total/counter on the next
shift.
To reopen a closed check:
1. From the main order screen,
press the [Reopen Closed
Check] key. A list of closed
checks is displayed.
2. Select a check from the list and
press [OK]. The check is
displayed in the default
transaction screen with a 0.00
balance due.
e7 USER’S MANUAL
3-96
Order Adjustments
Reopen a Closed Check
At this point, any new items added to the check will be appended to the
receipt but will not accumulate to the previous transaction. The taxes, services
charges, and totals due will accumulate for the new items only.
3. To fully reopen the check, highlight the final tender(s) and press the [Void]
key. The tender line item(s) will be removed from the check detail and the
Payment line and check totals will be adjusted as well.
4. Add, modify, or delete transaction items as usual. All entries and adjustments
made to this check will be handled as just another service round on an open
check.
e7 USER’S MANUAL
3-97
Order Adjustments
Refunds and Transaction Voids
Refunds and Transaction Voids
The Transaction Void feature is used to record refunds or to correct mishandled
transactions from a previous day. When the [Transaction Void] key is pressed, it
places the system in Void mode. Every item entered thereafter is considered a void
item.
Checks that include transaction voids cannot be service totalled. Checks must be
paid in full to a single tender. Partial payments or payments in excess of the total
due (i.e., to a preset cash tender) are not allowed.
An employee must be privileged to use this function.
To return a menu item:
1. Press the [Transaction Void] key.
2. If the current user is not privileged, a numeric dialog box is displayed,
requesting the authorization code of someone privileged to void transactions.
Enter a valid code to clear the screen.
3. Begin a check. A workstation status of Void is displayed at the top of the
screen. It will remain there until the check is paid.
4. Enter one or more transaction items. All prices are posted as negative values,
except for Discount line items. Since a discount represents a reduction in the
price, voiding a discount would increase the sales total by the amount of the
discount. In addition, each price is followed by the letter “V” to indicate that
the item is a void.
e7 USER’S MANUAL
3-98
Order Adjustments
Refunds and Transaction Voids
5. Close the check to one of the payment keys. If tendering to a credit card, a
charged tip amount may be included.
6. If the check total is a negative amount
when the payment key is pressed (i.e., no
positive menu items were rung to balance
out the voided items), a second dialog box
will be displayed asking for the
authorization to close to a negative
amount.
7. Enter a valid authorization code to clear
the screen. The negative payment is posted
and the check will be closed. The Total
Due for the refunded items is zero, as
shown in the reopened check below.
Note
Checks containing refund items can be reopened just like any
other closed check. The payment can be voided, additional
transaction items (both positive and negative) may be posted, and
the check closed again to the same or a different payment tender.
Under no circumstances can a negative transaction item be
voided from a reopened closed check.
e7 USER’S MANUAL
3-99
Tip Handling
Declare Tips
Tip Handling
Tip handling features keep track of the tips received in cash and credit card
charges from customers. Tips are included as part of an employee’s wages and
must be recorded for tax reporting purposes. This section describes user
procedures for voluntarily reporting tips. In most establishments, the system will
be programmed to prompt an employee to declare direct or indirect tips at clock
out.
Declare Tips
Employees who receive cash tips from customers are required to declare the
amount, usually before signing out at the end of the shift.
To declare tips:
1. From the main order screen, press the [Tips Declared] key. A dialog box is
displayed.
2. At the prompt, type in the tip amount (including decimal point) and press
[Enter]. A value is required. If no cash tips were received, enter 0.00.
Otherwise, the system will display the error message “Amount entry
required.”
3. Once the tip amount is entered, the employee will be prompted to “Confirm
Tip Amount X.XX?” Press [Yes] to confirm or [No] to cancel the transaction.
Indirect Tips
Indirect Tips are cash tips that are split among two or more employees. They are
generally used for employees who do not receive cash directly from the customer
(such as bus persons or kitchen staff) or in a busy environment where tips are
placed in a common jar until they can be divided equally among the workers.
Indirect tips are usually entered by the manager at the end of the shift.
To declare indirect tips:
1. From the main order screen, press the [Indirect Tip] key. A dialog box is
displayed.
2. At the prompt, enter the tip amount (including decimal point) and press
[Enter]. A value is required. If no cash tips were received, enter 0.00.
Otherwise, the system will display the error message “Amount entry
required.”
3. Once the tip amount is entered, the employee will be prompted to “Confirm
Tip Amount X.XX?” Press {Yes] to confirm or [No] to cancel the transaction.
e7 USER’S MANUAL
3-100
Receipt Printing
Automatic Verses On-Demand
Receipt Printing
The print function is used to provide customers with a hard (paper) copy of a
customer transaction. Depending on the programming, print-related tasks may be
handled with or without prompting from the end user.
Automatic Verses On-Demand
In most situations, the system will be configured to print the guest check each
time a tender key is pressed (e.g., at the end of every service round, or when the
check is paid).
In addition, the system can be programmed for on-demand printing. This function
allows a user to print a customer receipt by simply pressing a pre-configured print
key.
Guest Checks Versus Customer Receipts
At first glance, guest checks and a customer receipts seem very much alike. Both
provide a record of sales from the beginning of the order until the final payment is
received. Both include transaction details such as menu items, discounts, service
charges, guest counts, subtotals, and payments. The difference has to do with
when and how they are printed.
Guest checks are provided while the check is open, allowing the user to review the
transactions before final payment is tendered. Guest checks can include multiple
customers and span several service rounds. Corrections can be made to the check
at any point prior to final payment.
Customer receipts are printed after the check is paid. Discrepancies noted in the
receipt must be handled through the Refund process or by reopening the closed
check.
Customer receipts are typical of (but not limited to) fast transaction environments
(e.g., gift shops, cash bars, and carry-out counters) where purchases are
straightforward and the customer pays immediately. With fast transaction, not
every customer wants a receipt, so printing a guest check automatically would be
a waste of time and paper. In this situation, it makes more sense to print a receipt
only when the customer specifically requests one.
e7 USER’S MANUAL
3-101
Receipt Printing
On-Demand Print Keys
On-Demand Print Keys
To accommodate on-demand printing, the following print function keys are
available on the workstation touchscreens:
• Print Check — Use this key to print an open guest check during a service
round.
• Print Receipt — Use this key to print the last (closed) check on the system.
Once a new check is started, this print function is not allowed.
• Reprint Last Closed Check. This key will reprint the last closed check on the
system. This key can be selected while a transaction is in progress.
• Reprint Closed Check. Provides a list of closed checks for the current
business day. Select a check from the list of closed checks and press [Ok] to
reprint a closed check.
Enter a valid check number and then press this key to reprint a specific closed
check. This operation will not generate a list of closed checks.
This key can be selected while a transaction is in progress.
Note
e7 USER’S MANUAL
Cancelled closed checks cannot be reprinted.
3-102
CHAPTER 4
Manager Procedures
This chapter contains information on how to perform managerial functions within the
MICROS e7 POS System.
In This Chapter...
e7 USER’S MANUAL
• Introduction . . . . . . . . . . . . . . . . . . . . . . . . . . . . . . . . .
• Accessing Manager Procedures. . . . . . . . . . . . . . .
4-2
4-2
• Edit Employees . . . . . . . . . . . . . . . . . . . . . . . . . . . . . .
• Edit Employee ID . . . . . . . . . . . . . . . . . . . . . . . . .
• Increment Employee Shift . . . . . . . . . . . . . . . . . .
• Set Training Status . . . . . . . . . . . . . . . . . . . . . . . .
• Make Time Card Adjustment . . . . . . . . . . . . . . . .
4-3
4-3
4-6
4-7
4-8
• Edit Menu Items . . . . . . . . . . . . . . . . . . . . . . . . . . . . .
• Edit Menu Item Prices . . . . . . . . . . . . . . . . . . . . . .
• Edit Menu Item Access . . . . . . . . . . . . . . . . . . . . .
• Locate a Menu Item . . . . . . . . . . . . . . . . . . . . . . .
4-12
4-12
4-15
4-19
• Printers . . . . . . . . . . . . . . . . . . . . . . . . . . . . . . . . . . . .
• Redirect/Disable Printer . . . . . . . . . . . . . . . . . . . .
• Change Default Language . . . . . . . . . . . . . . . . . .
4-20
4-20
4-21
• Workstation Maintenance . . . . . . . . . . . . . . . . . . . . . .
• Workstation Shifts . . . . . . . . . . . . . . . . . . . . . . . .
• Set Communication Status . . . . . . . . . . . . . . . . . .
• Set Date and Time . . . . . . . . . . . . . . . . . . . . . . . .
• Retrieve Definitions . . . . . . . . . . . . . . . . . . . . . . .
• Retrieve Checks . . . . . . . . . . . . . . . . . . . . . . . . . .
4-22
4-22
4-24
4-25
4-26
4-27
4-1
Introduction
Accessing Manager Procedures
Introduction
Manager Procedures are used to perform tasks that modify (change or update) the
system’s database. For example, the manager can use this functionality to add,
edit, or delete records from employee and menu item files.
Although many of these procedures can be performed through the MICROS e7
Configurator, there are advantages to having a separate Manager Procedures
function:
• Security — Employees must be specifically privileged to use the [Manager
Procedures] key to access the forms. This is confirmed by the system on signin. If a non-privileged employee presses the key, the system will display an
error message stating “You do not have valid permissions to perform this
function.”
• Control — After accessing the Manager Procedure forms, an employee has a
limited range of actions and activities that may be affected. These include the
following areas:
•
•
•
•
Edit Employees
Edit Menu Items
Printer Control
Workstation Maintenance
• Ease of Use — Manager Procedures simplifies the configuration tasks relevant
to the manager. The process does not require programming experience or the
more in-depth training needed to setup the system through the MICROS e7
Configurator.
Accessing Manager Procedures
To open Manager Procedures:
1. Sign-in to the system.
2. Locate the [Manager Procedures] key (usually on the Functions screen) and
press. The main Manager Procedures form will be displayed.
3. Select one of the category buttons to continue. Up to four buttons may be
displayed.
Note
e7 USER’S MANUAL
Access to individual categories is limited to privileged
managers. For security purposes, the number and selection of
category buttons will vary depending on the user’s job
definition settings.
4-2
Edit Employees
Edit Employee ID
Edit Employees
This category provides access to the employee record. Managers cannot change
an employee’s personal data but may edit an employee identification number (ID),
increment the shift, set the training status, and make time card adjustments.
Edit Employee ID
Employee IDs are required to access the MICROS e7 System. On sign-in, the
system confirms the user identity and determines the job status and level of user
privileges allowed.
To edit the employee ID:
1. From the Manager Procedures main screen, press the [Employees] button. The
Employees form is opened, displaying a table listing all the employees currently in the system.
2. Select an employee from the list.
e7 USER’S MANUAL
4-3
Edit Employees
Edit Employee ID
3. Click the [Edit Employee ID] button to
open a dialog box.
4. Click the
beside the New ID
data entry field to open the numeric
keypad.
5. Swipe an employee ID card or use the
touch keys to enter a unique
identification number for this
employee. Up to 10 digits may be
entered.
6. Press [Enter] to close the keypad. The new number will be displayed in the
New ID field and the Confirm New ID field will be enabled.
7. Click the
beside the Confirm New ID data entry field to open the
numeric keypad.
8. Again, swipe the employee ID card or use the touch keys to enter the same
number. Press [Enter] to close the keypad and return to the Edit Employee ID
screen.
9. If the numbers in both the New ID and Confirm New ID are identical, press
[Save] to close the form and update the employee record. Press [Cancel] to
exit without changing the ID.
e7 USER’S MANUAL
4-4
Edit Employees
Edit Employee ID
Using the Search Feature
If the list of employees is long, the search feature can be used to find a
particular name more quickly.
To locate a specific employee:
1. Press the Find button at the bottom right of the screen. A search dialog box is
displayed.
2. Complete the fields to define the search criteria.
Users must specify which database field to search, enter the appropriate value,
and specify whether to locate an exact or partial match. In the sample graphic
above, the user has opted to search the Last Name field for an entry that
exactly matches “Jefferson”. The entry is not case-sensitive.
3. Once the value is defined, press [First] to locate the first record that satisfies
the criteria. When that record is located, the search process pauses, the list is
scrolled down, and employee name is highlighted in blue.
4. If this is not the correct employee name, press [Next] to continue the search.
When there are no more records that satisfy the criteria, a dialog box displays
indicating that no matches were found.
5. To clear the search box, press the [Cancel] button. The list will remain on the
last employee name located in the search.
e7 USER’S MANUAL
4-5
Edit Employees
Increment Employee Shift
Increment Employee Shift
An Employee Shift is a block of time used to measure and evaluate productivity
based on the totals that appear on employee reports. A shift begins when the
previous one is incremented, and ends when it is incremented again.
Suppose, for example, that an employee works 12:00-3:00 and 6:00-11:00. To get
a separate set of totals for both work periods, the manager would increment the
employee's shift at 3:00. This way, there will be one set of report totals for work
done before 3:00, and another set for work done after 3:00.
To manually increment an employee’s shift:
1. From the Manager Procedures main screen, press the [Employees] button. A
form is opened displaying a list of employees currently in the system.
2. Select an employee from the list.
3. Press the [Increment Employee Shift] button to
open a dialog box. The employee name and current
shift number are displayed.
4. Press the [Increment Shift] button.
5. The listed shift value is advanced to the next
number and the dialog box is closed automatically.
Shifts can be configured to automatically increment each time an employee logs
onto the system. This is done through the employee’s job definition (MICROS e7
Configurator | Jobs | Clock In).
Shifts can also be configured to automatically increment as part of an end-of-shift
or end-of-day autosequence.
e7 USER’S MANUAL
4-6
Edit Employees
Set Training Status
Set Training Status
Training mode allows an employee to enter sales information in a real-world
environment without affecting actual System totals. A separate set of training
totals is kept to assess the practice sessions of the training employee. In addition,
order output is disabled and guest checks are printed with a special header
indicating that the operator is in training.
To set the training status of the employee:
1. From the Manager Procedures main screen, press the [Employees] button. The
Employees form is opened, displaying a table listing all the employees currently in the system.
2. Select an employee from the list.
3. Click the [Edit Training Status] button
to open a dialog box.
4. In the radio selection box, specify the
employee’s status by selecting one of
the following:
• Not In Training
• In Training
5. Press [Save] to update the record. Press
[Cancel] to exit without updating the
record.
e7 USER’S MANUAL
4-7
Edit Employees
Make Time Card Adjustment
Make Time Card Adjustment
Time card adjustments are primarily used to correct an error in an employee’s
clock in/clock-out times. A drop-down list of Status entries allows the user to
describe the employee’s state during clock-in/clock-out. The options are defined
in the POS Configurator but generally include the following:
• Early
• Early From Break
• Inactive
• Inserted
• Late
• Late From Break
• Manager Clock Out
• Not Scheduled
• On Break
• On Paid Break
• On Time
Employees who have more than one function (e.g., Server, Bartender) may
mistakenly clock-in under the wrong job title. A drop-down list is provided in
Manager Procedures to correct that error. Only those jobs associated with the
employee will be included in the list.
Finally, a reasons field is supplied to describe the nature of any of these
adjustment. The reasons list contains options defined through POS Configurator.
Modify an Existing Record
To adjust an existing time card record:
1. From the Manager Procedures main screen, press the [Employees] button to
open the form and display a table listing all the employees currently in the system.
2. Select an employee from the list.
e7 USER’S MANUAL
4-8
Edit Employees
Make Time Card Adjustment
3. Click the [Time Card Adjustment] button to open the form.
4. Select a record from the list and press the Edit arrow at the bottom of the
screen. A dialog box is displayed asking, “Do you want to edit the Clock-Out
Time?”
5. Select either option (Yes/No) to clear this screen and open the time card
adjustment form. Selecting Yes will make all fields available for edit. If No
was selected, the Clock-Out Date and Time field will be disabled.
e7 USER’S MANUAL
4-9
Edit Employees
Make Time Card Adjustment
6. If the correct record was selected, adjust the time card as required. To modify
the Clock-In/Clock-Out times, highlight the relevant part(s) of the entry (e.g.,
mm/dd/yyyy or hh:mm:ss or AM/PM) and press the + / – buttons to adjust the
entry up or down. Pressing the Today button will reset the entire entry to the
current date/time on the system clock. If necessary, update the Clock-In/
Clock-Out Status and Job fields by selecting an entry from the drop-down
lists provided.
7. From the Reasons drop-down list, select an entry to provide an explanation for
the adjustment.
8. Press the Save arrow to update the record, or Cancel to close the form without
making any changes. To edit another record for this employee, press Previous
to return to the time card entry selection screen.
Add a New Record
Occasionally, an employee may forget to clock in/out during the shift and a new
time card record may need to be added after the fact.
To add a new time clock record:
1. From the Manager Procedures main screen, press the [Employees] button to
open the form and display a table listing all the employees currently in the system.
2. Select an employee from the list.
3. Click the [Time Card Adjustment] button to open the form.
4. Select a record from the list and press the Add button at the bottom of the
screen. A dialog box is displayed asking, “Are you sure you want to add a new
time clock entry?” Press Yes to confirm the entry or No to cancel the record.
5. If Yes was pressed, an add time card form is displayed, populated with data
from the last time card entry. The Clock-In/Clock-Out Status is changed to
Inserted to indicate that this is a new entry. A note will be added below the
date/time box, with the name of the person who made the last adjustment to
this employee’s record.
e7 USER’S MANUAL
4-10
Edit Employees
Make Time Card Adjustment
6. Modify the Clock-In/Clock-Out times by highlighting the relevant part(s) of
the entry (e.g., mm/dd/yyyy or hh:mm:ss or AM/PM) and pressing the + / –
buttons to adjust the entry up or down. Pressing the Today button will reset the
entire entry to the current date/time on the system clock.
7. Update the Clock-In/Clock-Out Status and Job fields by selecting an entry
from the drop-down lists provided.
8. From the Reasons drop-down list, select an entry to provide an explanation for
the adjustment.
9. Press the Save arrow to add the record, or Cancel to close the form without
making any changes. To edit another record for this employee, press Previous
to return to the time card entry selection screen.
e7 USER’S MANUAL
4-11
Edit Menu Items
Edit Menu Item Prices
Edit Menu Items
This category allows managers to update menu item pricing and availability.
Edit Menu Item Prices
The criteria for setting menu item prices is determined during setup through the
MICROS e7 Configurator. Prices can be defined as a single value under all
conditions, or they can vary depending on the size of the serving (Container), the
time it is served (Menu), or both (Container and Menu).
Manager Procedures allows a user to modify the price or prices associated with a
defined menu item. It does not allow a user to add new items or to change the
preprogrammed criteria for setting prices.
To change the price of a menu item:
1. From the Manager Procedures main screen, press the [Menu Item] button to
open the main form with a list of all the menu item currently in the system.
2. Select a menu item from the list and press the [Edit Menu Item Prices]
button.
e7 USER’S MANUAL
4-12
Edit Menu Items
Edit Menu Item Prices
3. Depending on the pricing criteria, the system will display data entry fields in
the appropriate format for entering or revising the prices. The display options
are:
• Menu — A single-row grid where each column represents the price associated with that time period or Menu.
• Containers — A two-column grid with a price listed for each serving size
associated with the menu item.
• Containers and Menu — A combination grid with prices listed by both
time and size of serving.
e7 USER’S MANUAL
4-13
Edit Menu Items
Edit Menu Item Prices
• One Price Only — A data-entry box that allows for a single price under all
circumstances.
4. Highlight the appropriate menu price and modify the entry. This can be done
from the attached keyboard or, by pressing the [Keypad] button to display one
on the screen.
5. Press [Save] to save the changes or [Cancel] to exit without updating the
record.
e7 USER’S MANUAL
4-14
Edit Menu Items
Edit Menu Item Access
Edit Menu Item Access
Menu item status controls when an item is available for sale to a customer.
Although the majority of menu items are always available, there are exceptions:
• Seasonal — These are items that are only available at certain times of the
years (e.g., soft-shell crabs in the summer; pumpkin and sweet potato pie in the
fall). Seasonal changes in the menu can be due to local harvests, regional
interests and customs, store promotions, sporting events, holiday or any other
short-term condition that affects the sale of menu items.
• Limited Quantity — These items are regularly available, but in short supply.
Examples of limited quantity items are lobster and caviar, vintage wines, and
retail items such as tee-shirts and mugs.
• Temporary — These are items which may or may not end up on the store’s
permanent menu, depending on the customer response. This might be a new
recipe or product line that the site is trying out.
Edit Display Status
Display Status determines whether or not a menu item is included on the daily
menu, and whether a touch key for that option will be shown on the display. This
options is set when a menu item is added to the database (through the MICROS e7
Configurator). It can be changed through Manager Procedures, depending on
current requirements.
The selectable options are:
• Active — The menu item is currently available. If this option is applied, a
touch key will be displayed for that item whenever menu item category is
selected. For example, if Shrimp Cocktail is designated as Active, a [Shrimp
Cocktail] touch key will be among the menu items shown when the [Entrées]
category is selected.
• Inactive — The menu item is not available at this time. The system will not
display a touch key for this item when its menu item category is selected.
• Check Date Range — The menu item is only available on specified dates.
When the menu item’s category is selected, the system will check to see if the
business date falls within this designated date range. If it is, a touch key for this
item will be displayed when the item’s category is selected. If not, the menu
item will be excluded.
e7 USER’S MANUAL
4-15
Edit Menu Items
Edit Menu Item Access
To change the display status of a menu item:
1. From the Manager Procedures main screen, press the [Menu Items] button to
open the menu item selection form, displaying a list of all the menu items currently in the system.
2. Select a menu item from the list.
3. On the right side of the form, click the [Edit Display Status] button to open
the change dialog box. The current status of the menu item is shown.
4. Click a non-selected radio button to change
the status of the menu item.
If the Check Date Range option is chosen,
set the appropriate From and To dates as
well. To do this, click in one of the date
fields. A date selection box is displayed.
Highlight the portion of the date to be
updated (e.g., month, day, year, AM/PM).
Use the + / – keys to change the selection.
Click outside of the box to save the selection.
5. Press [Save] to record the changes and return to the Menu Item selection form.
Press [Cancel] to exit without updating the record.
e7 USER’S MANUAL
4-16
Edit Menu Items
Edit Menu Item Access
Edit Availability Status
Availability refers to whether or not an active menu item is currently in stock.
This differs from the Display Status, which determines if and when a menu item is
part of the daily menu. For example, Shrimp Cocktail may be a standard part of
the menu (its display status is active), but the restaurant is unable to offer it
because the kitchen has run out of shrimp.
Because the lack of availability is a temporary condition, a touch key is still
displayed when the menu item category is selected during operations. Users are
alerted to a dwindling supply or an out-of-stock item through changes in the
appearance of the touch key itself.
Availability status (which can be changed in Manager Procedures) is reflected on
the touchscreen as follows:
• Currently Available — The menu item is active and may be ordered at any
time. The touch key is displayed as usual.
• Out of Menu Item — The menu item is active, but unavailable at
this time. The item’s touch key is still displayed with other
members of its menu item category, but with a red “X” is drawn
across it. If the user presses the key anyway, a message box pops up stating
that the menu item is out of stock.
• Limited Quantity — The menu item is active, but in short supply.
The current stock of menu items is listed in the Available Quantity
data entry box and is shown in the upper-left corner of the touch
key. This number decrements automatically whenever a menu item is ordered.
It can be manually increased through Manager Procedures or increased
automatically when stock is added through the POS Configurator.
Should the available supply falls to zero, the system will draw a red “X”
across the face of the key, just as it does when a menu item is manually
changed to “Not Available.” If the user presses the touch key in this state, an
error message will display, reporting that the selection item is out of stock.
e7 USER’S MANUAL
4-17
Edit Menu Items
Edit Menu Item Access
To change the display status of a menu item:
1. From the Manager Procedures main screen, press the [Menu Items] button to
open the menu item selection form, displaying a list of all the menu items currently in the system.
2. Select a menu item from the list.
3. On the right side of the form, click the [Edit Availability Status] button to
open the change dialog box. The current status of the menu item is shown.
4. Click a non-selected radio button to change
the status of the menu item.
If the Limited Quantity option is chosen,
enter the appropriate number of items in the
Available Quantity field.
5. Press [Save] to record the changes and
return to the Menu Item selection form.
Press [Cancel] to exit without updating the
record.
e7 USER’S MANUAL
4-18
Edit Menu Items
Locate a Menu Item
Locate a Menu Item
If the site has an extensive and complex database, the user may want to filter
the list before making a selection, or use the search function to locate a specific
menu item.
To filter the list, select a category from the Filter by
Menu Item Category drop-down list on the right-hand
side of the screen. The system will redisplay the menu
item table, listing only those items that belong to the
selected category.
To locate a specific menu item, press the Find button at
the bottom right of the screen. A search dialog box is
displayed.
Complete the fields to define the search criteria. Users must specify which
database field to search, enter the appropriate value, and specify whether to
locate an exact or partial match. In the sample graphic above, the user has
opted to search the Name field for an entry that includes the word “salad”.
The entry is not case-sensitive.
Once the value is defined, press [First] to locate the first record that satisfies
the criteria. When that record is located, the search process pauses, the list is
scrolled down, and menu item is highlighted in blue. If this is not the correct
menu item, press [Next] to continue the search. When there are no more
records that satisfy the criteria, a dialog box displays indicating that no
matches were found.
To clear the search box, press the [Cancel] button. The list will remain on the
last menu item located in the search.
e7 USER’S MANUAL
4-19
Printers
Redirect/Disable Printer
Printers
This category allows managers to control printer output.
Redirect/Disable Printer
Managers have the option of enabling/disabling a printer or redirecting its output
to another print device. Redirection usually occurs during slow periods to prevent
the system from sending orders to a prep station that is not being used.
If the redirect option is selected, the manager is presented with a list of defined
printers, including the current printer. A Status field indicates the current state of
printer functionality. The conditions are:
• Enabled — The printer is active.
• Disabled — The printer is not working. Disabled printers are further identified
by a red “X” through the printer icon.
• Redirected — Printer output has been sent to the printer listed. (A printer
cannot be redirected to itself.) A redirected printer is indicated by a blue arrow
on the icon.
To redirect or disable a printer:
1. From the Manager Procedures main screen, press the [Printers] button. The
Printers form is opened, displaying a list of available printers.
2. Select a printer from the list.
e7 USER’S MANUAL
4-20
Printers
Change Default Language
3. Press the [Change Status] button on
the right side of the form. A printer
dialog box is displayed.
4. Select one of the displayed radio
buttons. The options are:
• Enabled
• Disabled
• Redirect to (printer X) — In this
case, a separate radio button will be
added for every defined printer
except the current one.
5. Press [Save] to accept the changes. Press [Cancel] to close the form without
updating the record.
Change Default Language
Occasionally, staff changes may require that a manager change the language used
to print orders on a system printer. The option ensures that staff members are able
to receive information in the language in which they are most comfortable.
To change the printer’s output language:
1. From the Manager Procedures main screen, press the [Printers] button. The
Printers form is displayed.
2. Select a printer from the list. The Output Language field will indicate the
current language used at that printer.
3. Press the [Change Output Language] button
to open the language form.
4. Select one of the radio buttons to specify the
language that will be used when printing
orders on this device. The current output
language will be checked already.
5. Press [Save] to save the changes or [Cancel] to
exit without updating the record.
e7 USER’S MANUAL
4-21
Workstation Maintenance
Workstation Shifts
Workstation Maintenance
This category allows a manager to change the status of a workstation, set the
business date and time, and increment the shift.
Workstation Shifts
A Workstation Shift is a block of time used to measure and evaluate productivity
based on the totals that appear on system reports. A shift begins when the
workstation is incremented to a new number, and ends when it is incremented
again.
Suppose, for example, that workstation is active from 9:00 AM-1:00 PM and from
6:00-11:00 PM. To get a separate set of totals for both work periods, the manager
would increment the workstation's shift some time between 1:00 and 6:00 PM.
This way, there will be one set of report totals for activities completed before 1:00,
and another set for activities completed after 6:00.
At setup, a workstation’s shift number is set to 0. Each time the workstation shift
is incremented, the shift number is increased by 1.
Shifts can also be configured to automatically increment as part of an end-of-shift
or end-of-day autosequence.
Increment Shift
To increment the workstation’s shift:
1. From the Manager Procedures main screen, press the [Workstations] button to
open the form and display a list of workstations.
e7 USER’S MANUAL
4-22
Workstation Maintenance
Workstation Shifts
2. Select a workstation from the list. The current shift number is displayed in the
right-hand column of the grey list box.
Note
Shifts cannot be incremented on an inactive workstation or if
the workstation’s network status is inactive.
3. Press the [Increment Shift] key. A confirmation dialog box is displayed,
asking if the user is sure about incrementing the workstation shift.
4. Select Yes to clear the dialog box and update the Shift Number. Select No to
cancel the changes.
Reset Shift Number
Periodically, users may decide that the workstation shift number has increased
past the point of clarity. That is, changing the shift number from 2732 to 2733 is a
little less obvious to the end-user than changing the shift number from 1 to 2.
When this happens, the user has the option of resetting the numbering system to
zero and starting the shift sequence all over again.
To reset the shift numbers:
1. From the Manager Procedures main screen, press the [Workstations] button to
open the form and display a list of workstations.
2. Select a workstation from the list. The current shift number is displayed in the
right-hand column of the grey list box.
3. Press the [Reset Shift Number] key. A message box is displayed, asking if the
user wishes to reset the shift number for the current workstation.
4. Select Yes to reset the current shift number to 0. Select No to cancel the
change.
Note
e7 USER’S MANUAL
Do not reset the shift number more than once a day. Doing so
will cause two shifts to have the same shift number (e.g., 0, 1)
and will cause the totals for both shifts to be merged together.
4-23
Workstation Maintenance
Set Communication Status
Set Communication Status
Manager Procedures allows a user to view the current communications status of
every configured workstation on the network.
To change the status of a workstation:
1. From the Manager Procedures main screen, press the [Workstations] button.
A form is opened displaying the list of workstations.
2. Select a workstation from the list.
3. Press the [Set WS* Active/Inactive] to change the status.
Note
This button acts as a toggle switch. The exact name will
change, depending on the current status of the selected
workstation.
4. When the button is pressed, the status is changed and the record saved
automatically.
If the workstation is set to Inactive, a message dialog displays,
asking the user “Are you sure you want to set WSx to Inactive?
Press [Yes] to confirm. The workstation icon will be altered with a
large red “X”. The date and time when the status was changed will also be
posted.
e7 USER’S MANUAL
4-24
Workstation Maintenance
Set Date and Time
Set Date and Time
Manager Procedures allows the user to change the current business date and time
for the selected workstation.
To change the settings:
1. From the Manager Procedures main screen, press the [Workstations] button.
A form is opened displaying the list of workstations.
2. Select a workstation from the list.
3. Press the [Set Date and Time] button to open the
date change form. The current values are displayed.
4. Highlight a date or time segment (i.e., month, day,
year, hours, minutes, seconds, AM/PM).
5. Use the + / – keys to increase or decrease the current
value. If Today is pressed, the current date and time
will be inserted.
6. (Optional) Check the Update all workstations box
to apply the same values to all of the workstations
(active and inactive). If clear, the changes will only be applied to the selected
workstation.
7. Press [Update] to accept the changes. Press [Cancel] to close the form without
updating the records.
e7 USER’S MANUAL
4-25
Workstation Maintenance
Retrieve Definitions
Retrieve Definitions
Occasionally, a workstation that has been off-line or out of service will be
reactivated and brought back into the system. To ensure that the device’s
programming is consistent with the rest of the network, the user will need to
resynchronize its database. This is done through Manager’s Procedures using the
Retrieve Definitions function.
To resynchronize a workstations database:
1. Turn on the workstation where the database needs to be updated.
2. From the Manager Procedures main screen, press the [Workstations] button.
A form is opened displaying the list of workstations.
3. From the list, select the workstation whose files will be used to update the
current workstation’s database (i.e., the database source). The network and
device status for both workstations must be ACTIVE.
4. Press the [Retrive Definitions] button. A confirmation dialog box displays,
asking if you are sure you want to continue.
5. Select Yes to download the definitions. A status bar displays while the
workstation resynchronizes its database. The process will take a few minutes.
When the process is complete, the status bar will close automatically.
e7 USER’S MANUAL
4-26
Workstation Maintenance
Retrieve Checks
Retrieve Checks
During a shift, a workstation may malfunction or temporarily lose its network
connection. While the workstation is off-line, the rest of the workstations will
continue to add, update, and close checks. By the time this workstation recovers,
it will no longer have the current check status.
To get back in sync with the rest of the system, the user needs to update the
workstation’s check tables with all the latest changes. This is done through
Manager’s Procedures using the Retrieve Checks function.
To retrieve all checks:
1. Turn on the workstation where the database needs to be updated.
2. From the Manager Procedures main screen, press the [Workstations] button.
A form is opened displaying the list of workstations.
3. From the list, select the workstation whose files will be used to update the
current workstation’s database (i.e., the database source). The network and
device status for both workstations must be ACTIVE.
4. Press the [Retrive Checks] button. A confirmation dialog box displays, asking
if you are sure you want to continue.
5. Select Yes to download the checks. A status bar displays while the checks are
copied to the workstation database. The process will take a few minutes. When
the process is complete, the status bar will close automatically.
e7 USER’S MANUAL
4-27
CHAPTER 5
Credit Card Batch Utility
This chapter provides information on using the Credit Card Batch Utility to reconcile
and settle credit card payments.
In This Chapter...
e7 USER’S MANUAL
• About the Process. . . . . . . . . . . . . . . . . . . . . . . . . . . . .
• Electronic Draft Capture (EDC) . . . . . . . . . . . . . .
• Reconciliation and Settlement . . . . . . . . . . . . . . .
5-2
5-2
5-2
• About the Utility . . . . . . . . . . . . . . . . . . . . . . . . . . . . .
• Accessing the Utility . . . . . . . . . . . . . . . . . . . . . .
5-3
5-3
• Create . . . . . . . . . . . . . . . . . . . . . . . . . . . . . . . . . . . . .
5-4
• Edit . . . . . . . . . . . . . . . . . . . . . . . . . . . . . . . . . . . . . . .
5-6
• Settle . . . . . . . . . . . . . . . . . . . . . . . . . . . . . . . . . . . . . .
5-8
• Reports . . . . . . . . . . . . . . . . . . . . . . . . . . . . . . . . . . . .
• Batch Transfer Status Report. . . . . . . . . . . . . . . . .
• Batch Detail Report . . . . . . . . . . . . . . . . . . . . . . .
5-9
5-9
5-11
• Diagnostics . . . . . . . . . . . . . . . . . . . . . . . . . . . . . . . . .
5-13
5-1
About the Process
Electronic Draft Capture (EDC)
About the Process
The MICROS e7 System’s Credit Authorization and Electronic Draft Capture
(CA/EDC) feature allows merchants to accept credit cards from their customers as
an integrated part of the sales process. Credit authorization and processing
reduces fraud and allows the restaurant to be reimbursed for purchases charged to
a customer’s credit card account.
The activities that occur within the credit card processing cycle include Credit
Authorization, Electronic Draft Capture, Reconciliation, and Settlement. Credit
authorization takes place before the credit card payment is posted and the check is
closed. This is discussed at length in Chapter 3: User Operations, under the topic
Credit Card Payments (beginning on page 3-57).
The remaining activities — electronic draft capture, reconciliation, and settlement
— are more relevant to the payment process after the check is closed and the
accounts are balanced. This Chapter describes how the MICROS e7 System
organizes, verifies, and transfers the authorized payment records to the
appropriate Credit Card Processor, which then completes the tender transaction by
reimbursing the approved amounts.
Electronic Draft Capture (EDC)
The MICROS e7 System automatically stores data each time a credit card
payment transaction occurs. The process is referred to is Electronic Draft Capture
(EDC)
Credit card draft data may include the cardholder’s credit card account number,
the expiration date, purchase (payment) amount, and an authorization code.
Although a paper credit voucher may still be created for the customer’s signature,
electronic draft capture eliminates the need for the restaurant to submit the
voucher to the bank for payment.
Reconciliation and Settlement
At the end of each processing day, electronic draft data is verified (reconciled) and
transferred (settled) to the Credit Card Processor. During the reconciliation phase,
the MICROS e7 System creates a batch containing the transaction records that
will need to be paid. It is during settlement that the batch is actually sent to the
Credit Card Processor for payment against the customers credit card accounts.
The mechanism for creating, confirming, and transferring batch records is the
Credit Card Batch Utility.
e7 USER’S MANUAL
5-2
About the Utility
Accessing the Utility
About the Utility
The Credit Card Batch Utility provides an interface for creating, transferring, and
settling multiple credit card transactions. The interface is divided into five tabs,
covering the following activities:
•
•
•
•
•
Create
Edit
Settle
Reports
Diagnostics
Users must have a job that is privileged to use credit card applications.
Accessing the Utility
To open Credit Card Batch Utility:
1. Sign-in to the system.
2. Locate the [Batch Utility] key (usually on the Functions screen) and press.
The main form will be displayed.
3. Select one of the category buttons to continue.
e7 USER’S MANUAL
5-3
Create
Accessing the Utility
Create
To begin the settlement process, a batch consisting of all the credit card
transaction records must be created.
During the Create process, the system scans the database for closed guest checks
that include payments made by credit card using the integrated CA/EDC. For each
closed check record that is included in the batch, a flag is placed on the item in the
database. This prevents a payment from being placed in more than one batch.
Cancelled checks, or those created in demo or training mode, are not included in
this process.
The batch creation process can occur at any time throughout the operational/
business day. This provides flexibility for restaurants that batch at the end of each
shift. It also accommodates 24-hour operations.
The business date cannot be incremented until all the checks containing credit
cards payments have been batched.
Procedures
To create a batch:
1. Open the Credit Card Batch Utility and select the [Create] button.
2. In the right-hand column, click the [Create Batch] button to generate the
batch file.
e7 USER’S MANUAL
5-4
Create
Accessing the Utility
Each credit card batch is assigned a unique sequence number, starting with one
and counting upward. Within the batch, records are sorted by credit card tender
type and then by guest check number.
A given credit card batch will only contain records for a single EDC driver. If
multiple drivers are configured in the system, multiple batches will be created.
3. When the Create process is complete, the Last Action: status line at the
bottom of the screen will be updated, indicating the number of batches created,
along with the number of checks included.
e7 USER’S MANUAL
5-5
Edit
Accessing the Utility
Edit
The Edit category is used to alter (fix) credit card records that may not have made
it past the CA/EDC driver during the settlement procedure. Once the record is
corrected, another attempt can be made to transfer it to the Credit Card Processor.
There are two reasons for editing a record:
• Repair — The record contains invalid draft data, such as an incorrect credit
card number, authorization code, or authorized payment amount.
• Removal — The record is corrupted and the cause of the problem cannot be
found. These records are intentionally omitted from the batch transfer prior to
settlement. Users can omit a record by enabling the Omit Record flag. This
should always be considered as a last resort.
Procedures
To edit a record in a batch:
1. Open the Credit Card Batch Utility and select the [Edit] button.
2. In the right-hand column, Select a Batch from the drop-down list of entries.
These are listed by batch number and time of creation. Only unsettled batches
will be shown.
3. Once a batch is selected, the contents are listed in table format on the left.
e7 USER’S MANUAL
5-6
Edit
Accessing the Utility
4. Highlight a record from the list. The transaction details are listed in read-only
fields below the table.
5. Review the record.
If the card number and expiration date are masked, the user is not permitted to
edit these fields. If the card was swiped, these fields will not be editable.
Authorization codes can only be edited if the credit card was manually authorized. Authorization codes that were obtained electronically cannot be edited.
If the cause of the problem is not apparent, the record can be marked with the
Omit Record flag. An omitted record will be skipped during the batch settlement process.
6. Press the [Save Changes] button to save the amended batch file. It is not
necessary to save individually edited records.
e7 USER’S MANUAL
5-7
Settle
Accessing the Utility
Settle
Settlement is the transfer of credit card payment records from the MICROS e7
System to a designated Credit Card Processor. This is the last phase of the
reconciliation and settlement process. A batch must be created before it can be
settled.
Procedures
To settle a batch:
1. Open the Credit Card Batch Utility and select the [Settle] button.
2. In the right-hand column, Select a Batch from the drop-down list of entries, or
choose All to run all of the batches sequentially. If All is chosen, the batches
will be settled from oldest to newest. This ensures that a partially settled batch
will be the first one settled on the next attempt.
3. Press the [Settle Batch] button. During the settlement process, the results will
be continuously posted in the status box on the left. A progress bar is also
provided.
4. When the batch is complete, the Last Action: status line at the bottom of the
screen will be updated, indicating the number of batches settled.
The results of each settlement attempt are saved in the database and may be
printed as a Batch Transfer Status Report.
e7 USER’S MANUAL
5-8
Reports
Batch Transfer Status Report
Reports
The Reports category provides access to two credit card batch reports: the Batch
Transfer Status Report and the Batch Detail Report.
Batch Transfer Status Report
The Batch Transfer Status Report documents the results of the transfer. It can be
generated regardless of whether or not the transfer session was successfully
completed. Each report provides information about the number of records that
were transferred or excluded from being transferred.
To run this report:
1. Open the Credit Card Batch Utility and select the [Reports] button.
2. In the right-hand column, Select a Batch from the drop-down list of settled
entries.
3. Press the [Batch Transfer Report] button to run the report. The results will be
posted in the preview box on the left.
4. (Optional) Press [Print] to send the report to the 40-column printer.
e7 USER’S MANUAL
5-9
Reports
Batch Transfer Status Report
5. (Optional) Press [Print to PC] to send the report to a Windows supported PC
printer. A printer interface must be configured in the Configurator | Interfaces
form for the [Print to PC] button to appear on the Credit Card Batch Utility
Reports screen.
6. Press [Save] to store the report as a text file in the e7/etc. folder. When a report
is saved, it is automatically given the title BatchTransferReportX.rpt, where X
represents the batch number.
e7 USER’S MANUAL
5-10
Reports
Batch Detail Report
Batch Detail Report
The Batch Detail Report provides detailed information about each record in the
batch, including the guest check number and total due, server name, credit card
number (masked), payment and tip amount charged to this account, authorization
code, and the time of the transaction. It is commonly used to balance the site’s
bank statement.
The Batch Detail report can be printed before or after a batch is transferred.
To run this report:
1. Open the Credit Card Batch Utility and select the [Reports] button.
2. In the right-hand column, Select a Batch from the drop-down list of entries.
3. Press the [Batch Detail Report] button to run the report. The results will be
posted in the preview box on the left. Records are grouped by credit card type
and are listed sequentially by check number.
For each record in the report, up to two letters (representing status flags) may
printed after the credit card expiration date. The statuses are:
• S — Batch record has settled
• M — Card number was manually entered
A subtotal section is provided after each credit card group. A batch total section is printed at the end of the report, showing a total record count and total
amount.
4. (Optional) Press [Print] to send the report to a 40-column printer.
e7 USER’S MANUAL
5-11
Reports
Batch Detail Report
5. (Optional) Press [Print to PC] to send the report to a Windows supported PC
printer. A printer interface must be configured in the Configurator | Interfaces
form for the [Print to PC] button to appear on the Credit Card Batch Utility
Reports screen.
6. (Optional) Press [Save] to store the report as a text file in the e7/etc folder.
When a report is saved, it is automatically given the title
BatchDetailReportX.rpt, where X the batch number.
e7 USER’S MANUAL
5-12
Diagnostics
Batch Detail Report
Diagnostics
The Diagnostics category allows users to troubleshoot problems with the CA/
EDC driver. From Diagnostics form, the following options are available:
•
•
•
•
•
Display driver information
Display driver version information
Test authorization connections between driver and processor
Test settlement connections between driver and processor
Show specific user-defined information
Additionally, users can also determine the device number for TAPI devices.
Procedures
To run a test of the installed CA/EDC drivers:
1. Open the Credit Card Batch Utility and select the [Diagnostics] button.
2. In the right-hand column, Select a Driver from the drop-down list of installed
drivers.
3. Select a Diagnostic test from the drop-down list of entries. The list will vary
depending on the driver selected.
4. (Optional) For some drivers, an additional command may be allowed/required.
For example, certain drivers allow the user to request a specific batch number.
If necessary, enter this information in the Optional Diagnostic Data field.
5. Press the [Run Diagnostic] button to run the test. The results will be posted in
the status box on the left.
e7 USER’S MANUAL
5-13
Diagnostics
Batch Detail Report
To determine the device number for TAPI devices:
1. Open the Credit Card Batch Utility and select the [Diagnostics] button.
2. In the right-hand column, select the [Show Devices] button. The devices are
shown with their corresponding device number in the status box on the left.
e7 USER’S MANUAL
5-14
CHAPTER 6
Reports
This chapter contains information on running reports in the MICROS e7 POS System
In This Chapter...
• About Reports . . . . . . . . . . . . . . . . . . . . . . . . . . . . . . .
• Run a Standard Report. . . . . . . . . . . . . . . . . . . . . .
• Run an Autosequence . . . . . . . . . . . . . . . . . . . . . .
6-3
6-4
6-7
Standard Reports
e7 USER’S MANUAL
• System Reports . . . . . . . . . . . . . . . . . . . . . . . . . . . . . .
• System Balance . . . . . . . . . . . . . . . . . . . . . . . . . .
• System Tax . . . . . . . . . . . . . . . . . . . . . . . . . . . . . .
• System Tip. . . . . . . . . . . . . . . . . . . . . . . . . . . . . . .
• System Status Report . . . . . . . . . . . . . . . . . . . . . .
6-8
6-9
6-10
6-11
6-12
• Sales Reports . . . . . . . . . . . . . . . . . . . . . . . . . . . . . . . .
• Family Group Sales Detail . . . . . . . . . . . . . . . . . .
• Family Groups Sales . . . . . . . . . . . . . . . . . . . . . . .
• Major Group Sales Detail . . . . . . . . . . . . . . . . . . .
• Major Group Sales . . . . . . . . . . . . . . . . . . . . . . . .
• Menu Item Sales Details . . . . . . . . . . . . . . . . . . . .
• Menu Item Sales . . . . . . . . . . . . . . . . . . . . . . . . . .
• Menu Item Availability . . . . . . . . . . . . . . . . . . . . .
• Menu Item Price . . . . . . . . . . . . . . . . . . . . . . . . . .
• Menu Item Status. . . . . . . . . . . . . . . . . . . . . . . . . .
• Time Period Sales . . . . . . . . . . . . . . . . . . . . . . . . .
• Time Period Sales Detail . . . . . . . . . . . . . . . . . . . .
• Void . . . . . . . . . . . . . . . . . . . . . . . . . . . . . . . . . . . .
6-13
6-16
6-16
6-16
6-18
6-18
6-20
6-21
6-22
6-23
6-21
6-25
6-26
• Tender Reports . . . . . . . . . . . . . . . . . . . . . . . . . . . . . . .
• Tenders . . . . . . . . . . . . . . . . . . . . . . . . . . . . . . . . .
• Discounts . . . . . . . . . . . . . . . . . . . . . . . . . . . . . . . .
• Service Charges . . . . . . . . . . . . . . . . . . . . . . . . . . .
6-27
6-27
6-28
6-29
6-1
• Employee Reports . . . . . . . . . . . . . . . . . . . . . . . . . . . .
• Employee Balance . . . . . . . . . . . . . . . . . . . . . . . .
• Employee Shift . . . . . . . . . . . . . . . . . . . . . . . . . . .
• Employee Tip . . . . . . . . . . . . . . . . . . . . . . . . . . . .
• Employee Open Guest Checks . . . . . . . . . . . . . . .
• Employee Closed Guest Checks . . . . . . . . . . . . . .
• Employee Listing. . . . . . . . . . . . . . . . . . . . . . . . . .
6-30
6-31
6-32
6-33
6-34
6-35
6-36
• Labor Reports. . . . . . . . . . . . . . . . . . . . . . . . . . . . . . . .
• Clock-In Status . . . . . . . . . . . . . . . . . . . . . . . . . . .
• Time Clock Detail . . . . . . . . . . . . . . . . . . . . . . . .
• Job Code Labor . . . . . . . . . . . . . . . . . . . . . . . . . . .
• Labor Availability . . . . . . . . . . . . . . . . . . . . . . . . .
• Employee Job Code Labor . . . . . . . . . . . . . . . . . .
• Time Period Labor. . . . . . . . . . . . . . . . . . . . . . . . .
• Time Period Detail Labor . . . . . . . . . . . . . . . . . . .
6-37
6-37
6-38
6-39
6-40
6-41
6-42
6-43
• Workstation Reports. . . . . . . . . . . . . . . . . . . . . . . . . . .
• Workstation Balance . . . . . . . . . . . . . . . . . . . . . . .
• Workstation Shift. . . . . . . . . . . . . . . . . . . . . . . . . .
6-44
6-44
6-45
ReportsPlus
• About . . . . . . . . . . . . . . . . . . . . . . . . . . . . . . . . . . . . . .
6-47
• Running an HTML Report . . . . . . . . . . . . . . . . . . . . .
6-50
Reference
• Report Details . . . . . . . . . . . . . . . . . . . . . . . . . . . . . . .
e7 USER’S MANUAL
6-51
6-2
About Reports
About Reports
The MICROS e7 Reports module gives restaurant operators on-demand, real-time
reporting on all POS workstations. Reports can be run for an employee, a
workstation, or the entire restaurant, at any time from any POS terminal, or from
an optional PC system. The results can be displayed on screen, saved to a file, or
printed to one of the system roll printers.
With the MICROS e7 System, reports are available in two distinct formats:
• Standard Reports — Based on pre-defined 40-column report templates.
These can be viewed on the POS terminal, or printed on system roll printers.
• ReportsPlus — Based on flexible HTML-based templates. When reviewing
the report totals from the POS terminal, the user can take advantage of hyperlinked entries to drill-down into the data, ending up with a detailed view of the
items on each check.
The MICROS e7 System is capable of storing up to 60 days of historical totals
and up to 21 days of transaction detail, depending on the sales volume of the
restaurant. Check and totals history are stored on the 64 megabyte compact flash
of each Workstation 4. Optionally, a larger compact flash can be used to store
more days of history.
If an optional PC is added to an MICROS e7 System, totals and checks can be
stored for up to 1 year or more. The optional PC also provides the ability to export
totals to a text file where Microsoft Excel can be used to create custom reports.
e7 USER’S MANUAL
6-3
Standard Reports
Run a Standard Report
Standard Reports
Run a Standard Report
To run a report from a POS terminal:
1. From the default transaction screen, select the [Reports] key to open the main
Reports form.
2. Select a report from the list box on the left.
3. When a report is highlighted, the system prompts for additional selection
criteria required to run the report.
The display of data fields and check boxes will vary depending on the type of
report, but basically includes one or more of the following:
• Select Date Ranges — Filters the data by calendar dates. The selection
fields include a list of predefined ranges (e.g., Today, Yesterday, This
Week, etc.), and a pair of list boxes. The list boxes specify the start and end
dates for the report, based on the current system date. For example, if the
current date is 01/05/04, and the selected range is This Month, the start date
will be 01/01/04 and the end date will be 01/31/04.
e7 USER’S MANUAL
6-4
Standard Reports
Run a Standard Report
If the range option By Business Date is chosen, the From/To drop-down
boxes will contain identical lists of all the business dates for which data has
been collected. In this case, the user must select the starting business date
from the first box and the ending date from the second box. The report will
provide results based on all business dates between these two selections,
inclusively.
• Select Scope — Filters the data by workstation. A series of check boxes
allows the user to run a report for all workstations or only for the
workstations selected.
• Select Range — Specifies the range of items to be included in the report.
As with date ranges, duplicate Start/End list boxes of data values (e.g.,
employees, menu items, discounts, service charges, etc.) are used to specify
the range (first and last items, inclusive). By default, all items are included
in a report. To select a single entry (e.g., to run an employee report on a
single person), the same item should be chosen in both boxes.
4. Once the selections are made in the data field, press the [Preview] button The
system displays the results on the touchscreen, allowing the user to review the
data before printing.
If the criteria is incorrect, press [Reports] to return to the selection screen.
Correct the data entry fields and preview the report again.
e7 USER’S MANUAL
6-5
Standard Reports
Run a Standard Report
5. If the report is correctly defined, the user can:
• Press [Print] to print the report to the local slip printer.
• Press [File] to save the data to a file. The report is saved automatically to a
text file in the \CF\micros\e7\etc folder on the local hard drive. The
filename of the text file will be derived from the report title (e.g.,
Discounts.txt).
• Press [Export] to save the results in a comma-delimited text file, which can
then be imported into a third-party application. The report is automatically
stored in the \CF\micros\e7\DbExports folder on the local hard drive. The
file name of the text file will be derived from the report title (e.g.,
MajorGroupTotals.txt).
When the selected action is complete, the system returns automatically to the
list of reports where the user may continue to preview other reports or press
[Operations] to return to the POS default transaction screen.
e7 USER’S MANUAL
6-6
Standard Reports
Run an Autosequence
Run an Autosequence
An Autosequence is a predefined set of reports or other commands that can be
executed in a single key stroke (e.g., the [End of Day] or [End of Shift] buttons).
This saves managers' time during daily operations and reduces employee training
time.
An autosequence may be run while workstations are operating without interfering
with transactions. Autosequences can be programmed to perform functions such
as:
• Running system reports
• Performing credit card settlement functions
• Backing up the database
• Exporting reports
Autosequences that run MICROS e7 reports can be programmed to send the
report to:
• a disk file
• a system roll printer
• a Windows supported PC printer
Autosequences are programmed in the MICROS e7 Configurator and are
customized to meet the needs of the site.
An autosequence can be run from a
workstation by pressing the appropriate
POS key. A status window displays
while the autosequence is in progress,
allowing the user to track its progress.
Although the system does not prohibit
an employee from running an
autosequence, in practice, autosequence
buttons are usually placed on
touchscreens that are only accessible to
manager-level employees.
e7 USER’S MANUAL
6-7
System Reports
Run an Autosequence
System Reports
System reports provide detailed sales information about the enterprise for a
specific business date or date range.
The reports allow management to see how and where revenues were generated, to
view totals for the entire system or for a particular workstation.
The results can be used to determine successful products and policies, and
highlight areas for improvement.
e7 USER’S MANUAL
6-8
System Reports
System Balance Report
System Balance Report
This report provides detailed sales information for the entire enterprise, including
guest, check, and table totals and averages for each order type (e.g., Eat In, Carry
Out) in the system.
e7 USER’S MANUAL
6-9
System Reports
System Tax Report
System Tax Report
Tax reports provide a detailed listing of all federal, state, province, or city taxes
that may apply to menu items and service charges.
The MICROS e7 System supports the following tax types:
• Add-on and Inclusive taxes
• Florida Surcharge Tax
• European Value Added Tax (VAT)
• Australian GST
• Canadian GST
• Japanese
The System Tax report summarizes tax
collections by active tax rate for an
establishment.
e7 USER’S MANUAL
6-10
System Reports
System Tip Report
System Tip Report
Tip reports are used to ensure compliance with IRS requirements. They track tips
received by cash, charges, or automatic gratuities. A report may be generated for
the entire establishment or for one or more employees.
This report provides information about charge tips and cash tips declared for the
entire establishment.
e7 USER’S MANUAL
6-11
System Reports
System Status Report
System Status Report
This report describes the state of each of the workstations in the system and
provides information on the contents of the hard-drive or compact flash memory
cards.
Storage capacity is given for each active workstation and server PC unit, along the
amount of free space currently available to the MICROS e7 System. A breakdown
of the MICROS e7 Directories (with folder names and file sizes) is also provided.
========================================
Micros Cafe
Gateway Drive
System Status Report
Scope:
System
Taken From:
PC
Generated:
Tue 07/19/2005 08:04AM
========================================
========================================
1 CASHIER
========================================
Capacity:
62.22 MBytes
Free Space:
33.15 MBytes
e7 Directories:
Bin
8.69 MBytes
CFG
0.00 MBytes
db
0.72 MBytes
db\ClosedChecks
0.01 MBytes
db\OpenChecks
0.00 MBytes
db\ReportDetail
0.01 MBytes
db\ReportDetailUws4
0.00 MBytes
DbBackups
0.17 MBytes
DbExports
0.36 MBytes
DbSave
0.76 MBytes
ETC
1.84 MBytes
Help
3.33 MBytes
IBDB
1.21 MBytes
Images
0.69 MBytes
Report_Images
0.02 MBytes
Reports
0.02 MBytes
Samples
0.03 MBytes
temp
0.06 MBytes
========================================
2 COUNTER
========================================
Capacity:
e7 USER’S MANUAL
62.35 MBytes
6-12
Sales Reports
System Status Report
Sales Reports
Menu item sales reports provide detailed information about how revenues are
being generated in the establishment. They indicate which items are selling and
which need to be discontinued, advertised more, repriced, or sized differently.
These reports allow managers to determine the best price for the daily specials, or
evaluate the success of a menu change.
All menu item sales reports include totals. Reports can be organized by menu
items, major groups, or family groups.
Time period sales reports determine how effectively revenues were generated
during a specific time period. These reports include operational statistics such as
the average turnaround time and amount per table.
To analyze the flow of sales over time, time periods may be of varying lengths and
may overlap. For example, sales made between 5:00 PM and 6:00 PM may be
included in two period reports — Happy Hour (5:00–6:00 PM) and Dinner (5:00
to 11:00 PM).
Longer time periods may be used to analyze shifts, while short time periods may
help managers predict peak workload or peak demand times that can be used to
better allocate server resources or to schedule kitchen activity. Over time, a
comparison of these reports can help managers spot emerging trends or highlight
seasonal factors such as the weather, sporting events, or holiday activity.
Because time periods can overlap, these reports are generally not used to balance
cash drawers or banks.
NOTE:
Time periods must NOT be programmed to span the Business Day Start Time.
Void reports provide detailed information about the transaction activities
associated with voided items from each employee’s guest checks. A Void Count
and Void Amount is included for each check number that includes at least one
void. Once a check with voided items has been service totaled, the voided item is
included in the void count and void amount. When an item is voided prior to a
split or transfer check, the voided item remains with the original check or
employee.
e7 USER’S MANUAL
6-13
Sales Reports
System Status Report
The following are considered to be voids and appear on Void reports:
• Voiding a menu item entered in a previous service round.
• Voiding a service charge entered in a previous service round.
The following are NOT included on Void reports:
• Voided menu items returned in a previous service round.
• Voided menu items rung in the current service round.
• Voided menu items from a merged check.
• Voided menu items from a cancelled check.
• Voided menu items from a training check.
• Voided discounts from a previous service round.
• Voided tenders from a previous service round.
e7 USER’S MANUAL
6-14
Sales Reports
Family Group Sales Report
Family Group Sales Report
This report summarizes the quantities and net sales of family groups for a specific
business date or date range. Percentage information is included for each group. If
more than one day is covered, information for each day is presented separately.
e7 USER’S MANUAL
6-15
Sales Reports
Family Group Detail Sales Report
Family Group Detail Sales Report
This report provides detailed summary of sales quantities, returns, item discounts,
gross sales, and net sales of family groups on a specific business date or date
range. Percentage information is included for each group. If more than one day is
covered, information for each day is presented separately.
e7 USER’S MANUAL
6-16
Sales Reports
Major Group Sales Report
Major Group Sales Report
This report summarizes the quantities and net sales of major groups for a specific
business date or date range. Percentage information is included for each group. If
more than one day is covered, information for each day is presented separately.
e7 USER’S MANUAL
6-17
Sales Reports
Major Group Detail Sales Report
Major Group Detail Sales Report
This report provides detailed summary of sales quantities, returns, item discounts,
gross sales, and net sales of major groups on a specific business date or date
range. Percentage information is included for each group. If more than one day is
covered, information for each day is presented separately.
e7 USER’S MANUAL
6-18
Sales Reports
Menu Item Sales Report
Menu Item Sales Report
This report summarizes the quantities and net sales of selected menu items for a
specific business date or date range. Percentage information is included for each
of these categories. If more than one day is covered, information for each day is
presented separately.
e7 USER’S MANUAL
6-19
Sales Reports
Menu Item Detail Sales Report
Menu Item Detail Sales Report
This report provides detailed summary of sales quantities, returns, item discounts,
gross sales, and net sales of selected menu items on a specific business date or
date range. Percentage information is included for each of these categories. If
more than one day is covered, information for each day is presented separately.
Micros Cafe
Gateway Drive
Menu Item Detail Sales Report
Scope:
System
Business Date:
Fri 01/21/2005
Taken From:
WS1
Generated:
Thu 01/20/2005 09:53AM
========================================
5378 TOSCANA
Percent
Count
1
50.00%
Sales
4.95
49.75%
-Incl Taxes
0.50
49.44%
=Subtotal
4.45
49.44%
-Discounts
0.00
0.00%
=Sales
4.45
49.44%
0
0.00%
Returns
---------------------------------------5438 big Inc
Open bev
Percent
Count
1
50.00%
Sales
5.00
50.25%
-Incl Taxes
0.45
50.56%
=Subtotal
4.55
50.56%
-Discounts
0.00
0.00%
=Sales
4.55
50.56%
0
0.00%
Returns
---------------------------------------Total
Percent
Count
2
100.00%
Sales
9.95
100.00%
-Incl Taxes
0.95
100.00%
=Subtotal
9.00
100.00%
-Discounts
0.00
0.00%
=Sales
9.00
100.00%
0
0.00%
Returns
========================================
e7 USER’S MANUAL
6-20
Sales Reports
Menu Item Availability Report
Menu Item Availability Report
This report provides a listing of all limited quantity menu items with the
quantity remaining for each.
========================================
MICROS CAFE
7031 Columbia Rd
Menu Item Availability Report
Scope:
System
Business Date:
Sun 07/01/2035
Taken From:
MY PC
Generated:
Thu 05/05/2005 08:41AM
========================================
Menu Item
Available
---------
---------
ANTIPASTO
0
CANNOLI
0
EGGPLANT PARM
22
FRIED CALAMARI
9
========================================
e7 USER’S MANUAL
6-21
Sales Reports
Menu Item Price Report
Menu Item Price Report
This report presents a list of all menu items in the database with a price for
each. A range of menu items can be selected for printing by object number,
menu item name, or menu item category name. If multiple menu item
prices are defined for containers or menus, they are printed separately on
the Menu Item Price report.
MICROS CAFE
7031 Columbia Rd
Menu Item Price Report
Scope:
System
Business Date:
Sun 07/01/2035
Taken From:
MY PC
Generated:
Wed 05/18/2005 08:01AM
========================================
130 APPETIZERS
-------------ANTIPASTO
8.95
FRIED CALAMARI
7.95
FRIED ZUCCHINI
4.95
GARLIC BREAD
2.50
RED PEPPERS
4.50
TOMATO & MOZZ
6.95
TOMATO & ONION
4.50
WHITE BEANS
4.95
150 SOUP & SALAD
---------------CEASAR SALAD
7.95
CHIX CEASAR
9.95
GARDEN SALAD
3.95
MINESTRONE
7.95
PASTA FAGOLI
8.95
SALMON CEASAR
10.95
SHRIMP CEASAR
10.95
========================================
e7 USER’S MANUAL
6-22
Sales Reports
Menu Item Status Report
Menu Item Status Report
This report presents a list of all 86’d menu items. This includes all menu
items that are marked as “Out of Menu Item” or whose limited quantity is
zero.
========================================
MICROS CAFE
7031 Columbia Rd
Menu Item Status Report
Scope:
System
Business Date:
Sun 07/01/2035
Taken From:
MY PC
Generated:
Thu 05/05/2005 08:20AM
========================================
Menu Item
Status
---------
---------
ANTIPASTO
Out of Item
CANNOLI
Count Zero
========================================
e7 USER’S MANUAL
6-23
Sales Reports
Time Period Sales Report
Time Period Sales Report
This report provides a summary of sales information for a range of time periods.
The report includes net sales, voids, manager voids, and default tracking totals.
e7 USER’S MANUAL
6-24
Sales Reports
Time Period Detail Sales Report
Time Period Detail Sales Report
This report provides sales information for a specified time period. The report
includes net sales; turn time; and guest, check, and table averages. Default
tracking totals are also shown.
e7 USER’S MANUAL
6-25
Sales Reports
Void Report
Void Report
The Void report provides detailed information about the transaction activities
associated with voided items from each employee’s guest checks.
e7 USER’S MANUAL
6-26
Tender Reports
Tender Report
Tender Reports
Tender Reports provide sales information relevant to discounts, service charges,
and other tenders.
Tender Report
This report summarizes the quantities and net sales associated with selected tender
types for a specific business date or date range. Percentage information is
included for each group. If more than one day is covered, information for each
day is presented separately.
e7 USER’S MANUAL
6-27
Tender Reports
Discount Report
Discount Report
This report summarizes the quantities and net sales associated with the selected
discounts for a specific business date or date range. Percentage information is
included for each group. If more than one day is covered, information for each
day is presented separately.
e7 USER’S MANUAL
6-28
Tender Reports
Service Charge Report
Service Charge Report
This report summarizes the quantities and net sales associated with the selected
service charges for a specific business date or date range. Percentage information
is included for each group. If more than one day is covered, information for each
day is presented separately.
Micros Cafe
Gateway Drive
Service Charge Report
Scope:
System
Business Date:
Fri 01/21/2005
Taken From:
WS1
Generated:
Thu 01/20/2005 09:53AM
========================================
3 OPEN $ SVC CHG
Count
Percent
1
33.33%
Svc Chgs
5.00
66.93%
-Incl Taxes
0.45
65.75%
=Svc Chg Total
4.55
65.75%
6 1.00 SVC CHG
Count
Percent
1
33.33%
Svc Chgs
1.00
13.39%
-Incl Taxes
0.10
13.01%
=Svc Chg Total
0.90
13.01%
---------------------Subtotal
Count
Percent
2
66.67%
Svc Chgs
6.00
80.32%
-Incl Taxes
0.55
78.76%
=Svc Chg Total
5.45
78.76%
---------------------------------------1 CHARGED TIP
Count
Percent
1
33.33%
Svc Chgs
1.47
19.68%
-Incl Taxes
0.00
21.24%
=Svc Chg Total
1.47
21.24%
---------------------------------------Total
Count
e7 USER’S MANUAL
Percent
3
100.00%
Svc Chgs
7.47
100.00%
-Incl Taxes
0.55
100.00%
=Svc Chg Total
6.92
100.00%
6-29
Employee Reports
Service Charge Report
Employee Reports
Employee reports provide both financial and operational statistics for servers and
other employees. The employee balance reports include all sales-related
transactions (checks opened, service charges, discounts, etc.) that occurred on a
specific business date or date range. This information can be used to balance an
employee’s bank or cash drawer. It can also assist a manager in identifying
employees who could benefit from additional training.
e7 USER’S MANUAL
6-30
Employee Reports
Employee Balance Report
Employee Balance Report
This report provides detailed sales information by employee, including guest,
check, and table totals and averages for each order type (e.g., Eat In, Carry Out) in
the system.
e7 USER’S MANUAL
6-31
Employee Reports
Employee Shift Report
Employee Shift Report
This report provides detailed sales information categorized by shift and by
employee. Details include guest, check, and table totals and averages for each
order type (e.g., Eat In, Carry Out) in the system.
e7 USER’S MANUAL
6-32
Employee Reports
Employee Tip Report
Employee Tip Report
Tip reports are used to ensure compliance with IRS requirements. They track tips
received by cash, charges, or automatic gratuities. A report may be generated for
the entire establishment or for one or more employees.
This report provides information about charge tips and cash tips declared by
employees.
e7 USER’S MANUAL
6-33
Employee Reports
Employee Open Check Report
Employee Open Check Report
This report lists all checks that remain open at the time the report is generated. It is
used to identify the owner of open checks so that they may be closed. This report
is usually run prior to running autosequences, or as part of an autosequence that
handles end-of-day procedures.
e7 USER’S MANUAL
6-34
Employee Reports
Employee Closed Check Report
Employee Closed Check Report
This report lists all checks that were closed by an employee, including reopened
checks that were closed again, and memo tenders.
Checks are listed by number and include the date and time that the check was
opened and closed, the amount tendered, and how many times it was printed.
If a check was subjected to other procedures (e.g., split, merged, or transferred),
the entry is followed by a notation indicating the action taken. This information
can be used as an employee audit trail, and can be helpful if the hard-copy of the
check is lost.
Micros Cafe
Gateway Drive
Employee Closed Check Report
Scope:
System
Business Date:
Wed 12/10/2003
Generated:
Wed 12/10/2003 11:37AM
========================================
========================================
10 Bush, George
========================================
Check
Date
Time
Amount
---------------------------------------1006
12/10/2003 10:55AM
12/10/2003 10:55AM
12.00
0
Closed to Cash
1005
12/10/2003 10:54AM
12/10/2003 10:55AM
32.75
0
Closed to Cash
1004
12/10/2003 10:54AM
12/10/2003 10:54AM
12.85
0
Closed to Cash
1003
12/10/2003 10:54AM
12/10/2003 10:54AM
13.00
0
Closed to Room Charge
1002
12/10/2003 10:53AM
12/10/2003 10:54AM
30.48
0
Closed to Cash
1001
12/10/2003 10:53AM
12/10/2003 10:53AM
63.75
0
Closed to Cash
Total
e7 USER’S MANUAL
10
164.83
6-35
Employee Reports
Employee Listing Report
Employee Listing Report
This report lists all employees available on the local workstation where the report
is taken. The employees are sorted by job and the employee phone numbers may
optionally be included.
========================================
MICROS CAFE
7031 Columbia Rd
Employee Listing Report
Scope:
System
Taken From:
MY PC
Generated:
Fri 04/22/2005 07:31AM
========================================
999 MICROS
------------------------MICROS, MICROS
555-4321
1000 KITCHEN
------------------------SMITH, PETER
555-2222
JONES, SALLY
555-4444
1001 SERVER
------------------------Williams, BOB
555-5555
JOHNSON, WILLIAM
555-6666
1002 BAR
------------------------BROWN, TIM
555-8888
1004 MANAGER
------------------------ORTEGA, MICHAEL
555-1234
EDWARDS, STEVE
555-5678
e7 USER’S MANUAL
6-36
Labor Reports
Clock-In Status Report
Labor Reports
Time and attendance reports provide information on labor availability, an
accounting of gross wages, and an analysis of labor costs and net sales
percentages by job category or department.
Clock-In Status Report
This report indicates which employees are clocked in at the time the report is
generated. This information can be useful for a variety of reasons, such as
determining who is late at the start of a shift or determining who among the
currently signed-in employees can be sent home early. It can also be used to
ensure that no one is signed-in before running a labor report.
e7 USER’S MANUAL
6-37
Labor Reports
Time Clock Detail Report
Time Clock Detail Report
This report summarizes labor information by employee subject to the time
management system. It provides the dates and times that the employee clocked in/
out, the number of regular and overtime hours worked, and their accumulated pay.
Micros Cafe
Gateway Drive
Time Clock Detail Report
Scope:
System
Business Date:
Thu 01/20/2005
Taken From:
WS1
Generated:
Thu 01/20/2005 07:16PM
========================================
========================================
10003 SOZA
========================================
Job
Date
Time
---------------------------------------1
RUNNER
In
01/20/2005
11:05AM
Out
01/20/2005
07:15PM
-On Break
RUNNER
Hours
Pay
---------------------------------------Reg
8.160
51.00
Ovt
0.000
0.00
========================================
10009 BROWN, JOE
========================================
Job
Date
Time
---------------------------------------1
SERVER CAPT
In
01/20/2005
11:05AM
Out
01/20/2005
07:14PM
SERVER CAPT
Hours
Pay
----------------------------------------
e7 USER’S MANUAL
Reg
8.150
22.57
Ovt
0.000
0.00
6-38
Labor Reports
Job Code Labor Report
Job Code Labor Report
This report summarizes labor information by job, including the hours worked,
labor costs, and labor percentages.
e7 USER’S MANUAL
6-39
Labor Reports
Labor Availability Report
Labor Availability Report
This report provides a count of all employees (by job) who are clocked in
(including those on break) at the time the report is generated. This is particularly
useful for establishments that need a quick summary — by job — of the number
of employees that are currently active in the system. It also provides management
with an efficient way of confirming that the scheduled number of employees is
available.
e7 USER’S MANUAL
6-40
Labor Reports
Employee Job Code Labor Report
Employee Job Code Labor Report
This report summarizes labor information for each employee and includes the job
code, regular and overtime hours worked, and the pay information for each. At
run time, users can limit results by selecting the applicable employee(s) and date
range. This can be used to identify the employees and job types that are earning
overtime pay. Management can use this report to better understand their labor
costs.
e7 USER’S MANUAL
6-41
Labor Reports
Time Period Labor Report
Time Period Labor Report
This report summarizes labor information by specified time period, and includes
job title, job code, total number of hours worked for that job, total pay accrued,
Net Sales. This report also includes labor totals for all jobs worked during the
specified period including total number of hours worked, and total pay acrrued.
e7 USER’S MANUAL
6-42
Labor Reports
Time Period Detail Labor Report
Time Period Detail Labor Report
This report summarizes labor information by specified time period, and includes
job title, job code, total number of hours worked for that job, total pay accrued for
that job. This report also includes labor totals for individual employees working
during the specified time period including the number of hours worked, and total
pay acrrued. Employees are grouped by the job(s) worked during that period.
e7 USER’S MANUAL
6-43
Workstation Reports
Workstation Balance Report
Workstation Reports
Workstation Balance Report
This report provides detailed sales information by user workstation, including
guest, check, and table totals and averages for each workstation in the system.
e7 USER’S MANUAL
6-44
Workstation Reports
Workstation Shift Report
Workstation Shift Report
This report provides detailed sales information categorized by shift and user
workstation. Details include guest, check, and table totals and averages for each
workstation in the system.
e7 USER’S MANUAL
6-45
Workstation Reports
Consolidated Workstation Shift Report
Consolidated Workstation Shift Report
This report provides detailed sales information consolidated by user workstation.
Details include guest, check, and table totals and averages for each workstation in
the system.
========================================
Workstation Consolidated Shift Report
Scope:
System
Business Date:
Mon 06/13/2005
Taken From:
UWS1
Generated:
Mon 06/13/2005 08:35AM
========================================
========================================
1 PC_SERVER
Shift:
1
========================================
Net Sales
68.24
+Service Charges
0.00
+Tax Collected
6.83
=Total Revenue
75.07
---------------------------------------Cash
75.07
+Paid In
0.00
-Paid Out
0.00
=Cash Due
75.07
---------------------------------------Gross F and B Receipts
75.07
Charged Receipts
0.00
Service Charge Receipts
0.00
+Charged Tips
0.00
+Cash Tips Declared
0.00
+Indirect Tips
0.00
=Total Tips
0.00
Tips Percentage
0.00%
Tips Paid
0.00
Tips Due
0.00
---------------------------------------EAT IN
2
34.12
Checks, Avg
2
34.12
Tables, Avg
2
34.12
Turn Time (Mins)
e7 USER’S MANUAL
68.24
Guests, Avg
0.14
6-46
ReportsPlus
Consolidated Workstation Shift Report
ReportsPlus
ReportsPlus is a interactive tool for viewing and analyzing report totals from the
POS terminal. The feature is available through the Reports module as a
supplement to the standard 40-column reports.
ReportsPlus is built on an HTML-based framework. The report structure echoes
web sites, consisting of a home page — The Daily Operations Report — and
providing hyperlinks to additional report pages. These secondary pages drill
down into the database, narrowing the scope of the report (i.e., number of items
covered), while increasing the level of detail. Because pages are generated
dynamically, the user is assured of receiving up-to-the minute results at the
moment the report is displayed.
Report Levels
ReportsPlus pages can be divided into three levels, with results moving from a
broad overview of all report totals, to the contents of a specific check.
The first level is the Daily Operations Report. This is the first page displayed
when ReportsPlus is launched. It summarizes system totals for each of the major
report categories — Sales, Tenders, Service Charges, Adjustments, Taxes, Service
and Labor Totals. By default, the Daily Operations Report opens with totals for
the current business date. A selection box is provided that allows users to set the
date ranges and rerun the report.
e7 USER’S MANUAL
6-47
ReportsPlus
Consolidated Workstation Shift Report
From the Daily Operations Report, users can navigate to the second report level
by selecting one of the blue hyperlinked entries. At this level, report totals are
provided for groups of transaction items, from a general summary (e.g., major
groups, discounts, service charges, tenders, taxes), to an analysis by type (e.g.,
cash, checks, VISA, MasterCard, AMEX). Data presented here are comparable to
the results displayed in the 40-column standard reports.
Finally, second-level reports may include hyperlinks to a third level of detail — to
the transaction itself. This is where ReportsPlus differentiates itself, providing a
degree of information not otherwise available through the standard system report.
When a hyperlinked entry is selected (e.g., Senior Discounts or Cash Tenders), a
Check Report is produced, listing all the guest checks that posted the transaction
item during the report period. From this list, users can simply click on a
hyperlinked check number to view the complete check detail.
Report Flow Diagram
The following diagram provides a site map of the current ReportsPlus feature,
illustrates the flow of data from the general to the specific.
e7 USER’S MANUAL
6-48
ReportsPlus
Consolidated Workstation Shift Report
Navigating Back
As the user moves through the ReportsPlus site, a breadcrumb navigation trail
builds above the yellow title bar, marking the path taken to get to the current
page. Each step in the trail represents a hyperlink back to that preceding report
page.
To change the data set (e.g., to view discounts instead of tenders), the user must
return to the point in the path where discount reports were a selectable option. In
this case, the user must return to the Daily Operations Report to find the Discount
path.
Saving Data
ReportsPlus pages are view-only. The results displayed cannot be printed or saved
to disk.
e7 USER’S MANUAL
6-49
ReportsPlus
Running an HTML Report
Running an HTML Report
To run a report from a POS terminal:
1. Open the Reports module to select the [ReportsPlus] key and run the Daily
Operations Report.
By default the results for the current business date are posted.
2. To specify a particular date
or range of dates, press the
[Ranges] button in the top
left-hand corner of the
screen. A selection box is
displayed.
Use the drop-down boxes to select the date range values and press the [Run
Report] button. The totals will be adjusted accordingly.
3. To view transaction items in more detail, select one of the blue hyperlinks to
drill down into the database and display the next level of reports.
To return to a previous page, select one of the report hyperlinks in the
breadcrumb navigation trail, displayed above the yellow title bar.
e7 USER’S MANUAL
6-50
Report Details
Bank Loan
Report Details
This section provides a detailed explanation of the line items and columns of
information available throughout the MICROS e7 Reports. Not all items will be
available on all reports.
Items are listed alphabetically and contain a description of the field as well as an
explanation of how the results are calculated or derived. Where relevant,
programming information is provided for those fields where the user are able to
change the column header or label that will be printed on the report. These
changes are made in the MICROS e7 Configurator.
Bank Loan
The count and value amount of all monies added to the system for the report
period. This amount usually represents the starting balance “loaded” to the
workstations so that they can make change during the initial transactions.
Bank Pickup
The count and value amount of all monies removed from the system during the
report period. This amount represents a withdrawal of cash from a cash drawer to
buy supplies, pay vendors, or remove excess cash and reduce the probability of
theft or loss from a busy workstation.
Cancel Total
The count and value amount of entries that were cancelled using the [Transaction
Cancel] key.
Cash
The count and/or value amount of all cash transactions executed in the system
during the report period.
Cash Due
The value amount of cash monies expected at the end of the reporting period. This
amount is calculated as follows:
+ Cash
+ Paid In
– Paid Out
e7 USER’S MANUAL
6-51
Report Details
Cash Tips Declared
Cash Tips Declared
The value of cash tips declared by the employee using the [Declare Tips] key.
Change Grand Total
The total value of all sales activity in the system for the period of the report.
Change Grand Total is represented as an absolute value; it is always a positive
number.
Change Grand Total is calculated as follows:
+
+
+
+
+
Total Revenue
Total Discount
Return
Voids
Credit Total
This field is used in conjunction with Credit Total and Grand Total to verify
system accounting security. Change Grand Total is not used to balance revenue.
Charged Receipts
The total receipts recorded by [Tender] keys defined as charge keys (e.g., credit
cards and/or room charges) that are programmed to require a charged tip.
Only tenders that include a non-zero charged tip (less the tip) are included in this
total.
Charged Tips
The sum of all tips charged to credit cards or to room charges through a PMS
system when the tender key is programmed to automatically calculate any
overtendered amount as a charged tip. A charged tip can also be entered manually
through a [Charged Tip] key.
Checks, Avg
The average number of checks opened and service totalled, along with the average
revenue generated per check. This figure is calculated using the following
formula:
Avg Total Per Check = Total Net Sales / Checks
e7 USER’S MANUAL
6-52
Report Details
Checks Begun
Checks Begun
The count and value amount of checks, including fast transactions, begun during
the report period. These totals include checks created using split check and closed
check edit procedures. The value amount includes net sales, service charges, and
tax.
Checks Carried Over
The count and value amount of open checks carried over from the previous report
period. These totals include checks created using split check and closed check edit
procedures. The value amount includes net sales, service charges, and tax.
Checks Paid
The count and value amount of all checks (including fast transactions) closed by
tendering during the report period. Only closed checks will be included in the
count. The value amount includes net sales, service charges, and tax; and will
include any amount that has been tendered on a check, even if it wa a partial
tender.
Checks Paid by Others
The count and value amount of checks that were opened by one employee, but
picked up and paid out by another.
Checks Transferred In
The count and value amount of guest checks that were transferred to an employee
using the [Transfer Check] key. The value amount includes net sales, service
charges, and tax. The value of the check is determined at the time of the transfer.
Checks Transferred Out
The count and value amount of guest checks that were transferred away from an
employee using the [Transfer Check] key. The value amount includes net sales,
service charges, and tax. The value of the check is determined at the time of the
transfer.
Count
The total number and percentage of sales for transaction items in this particular
category. This figure can be calculated for menu items, major groups, or family
groups.
e7 USER’S MANUAL
6-53
Report Details
Credit Total
Credit Total
A total created when a round results in a negative balance.
If the negative balance was created by voiding a menu item, the tax associated
with the item is posted to Credit Total.
If the negative balance was created by a negative-value menu item, the entire
value of the menu item and any associated taxes is posted to Credit Total.
In either case, the amount posted to Credit Total cannot exceed the negative
balance of the round.
For example, a server voids two lobster dinners priced at $20 with $2 total tax for
a void total of $42. In the same round, the server orders several more menu items
with a total value (including tax) of $41. The transaction value of the round is -$1.
Since the round resulted in a negative balance, and the negative balance was
created by voiding menu items, the tax associated with those menu items ($2) will
post to Credit Total. However, the negative balance of the round is only $1; the
amount posted to Credit Total cannot exceed this amount. In this example, -$1 is
posted to Credit Total.
This field is used in conjunction with Change Grand Total and Grand Total to
verify system accounting security. Credit Total is not used to balance revenue.
Discounts
The total value amount and percentage of discounts in this particular category.
This figure can be calculated for menu items, major groups, or family groups.
Error Correct
The count and value amount of items that were voided in the current round. This
is considered an error correction, rather than a void.
Grand Total
The total value of all sales activity. Discounts, returns, voids, and credits are
included as positive numbers. This number is never reset; it always accumulates.
This field is used in conjunction with Change Grand Total and Credit Total to
verify system accounting security. Grand Total is not used to balance revenue.
Grand Total is calculated as follows:
+ previous Grand Total
+ Change Grand Total
e7 USER’S MANUAL
6-54
Report Details
Gross F and B Receipts
Gross F and B Receipts
The total receipts recorded by [Tender] keys that were programmed to add to this
total. Tax Collected can also be included. This figure does not include charged
tips.
Gross Sales
The total value amount and percentage of sales for items in this particular
category. This figure can be calculated for menu items, major groups, or family
groups. Inclusive taxes, add-on taxes, Florida surcharges, item discounts, and
subtotal discounts are not included.
Guests, Avg
The average number of guests served along with the average revenue generated by
each guest. This figure is calculated using the following formula:
Avg Total Per Guest = Total Net Sales / Guests
Hours, Regular
The total number of non-overtime hours worked in the period covered by the
report. The number of hours is reported to the nearest hundredth of an hour and is
represented as a decimal figure.
Hours, Overtime
The total number of overtime hours worked in the period covered by the report.
The number of hours is reported to the nearest hundredth of an hour and is
represented as a decimal figure.
Hours, Total
The total number of hours worked. This figure is calculated as follows:
Total = Regular [Hours] + Overtime [Hours]
Hours (% of Total)
The number of hours worked by employee or job code, expressed as a percentage
of the total number of hours worked by all employees.
% of Total = (Total [Hours]) / Total Hours for Job) x 100%
e7 USER’S MANUAL
6-55
Report Details
In Drawer
In Drawer
The sum of all cash transactions (by count and value amount) for the report
period. This figure is calculated as follows:
+ Cash
+ Bank Loan
– Bank Pickup
Indirect Tips
The sum of all tips declared through an [Indirect Tips] key so that they may be
shared between two or more employees.
Item Discount
The net value of discounts recorded through any discount keys programmed as
Item Discount keys. This figure is calculated as follows:
+ sum of all item discount entries
– all voids of item discount entries
Manager Voids
The count and value of the voids that required manager authorization.
Net Sales
The net sales total of all sales activity. All discounts, voids, returns, and any
inclusive tax associated with the sales activity have been subtracted.
The Net Sales total is calculated as follows:
+
–
–
+
–
+
sum of all menu item entries (less any included tax)
all voids of menu item entries
all discount entries
any voids of discount entries
all returns of menu item entries
any voids of returns of menu item entries
The report label for this field can be changed in Taxes | General | Taxable Sales
Name.
e7 USER’S MANUAL
6-56
Report Details
No Sale Count
No Sale Count
The number of times a transaction employee used the [No Sale] key to open the
cash drawer outside of a transaction. If the [No Sale] key was not used during the
reporting period, the count will be zero.
Outstanding
The count and current value of open checks. This is calculated as follows:
+
+
+
–
–
–
Check Carried Over
Checks Begun
Checks Transferred In
Checks Paid
Checks Paid by Others
Checks Transferred Out
Paid In
The sum of all cash paid into the system during the report period. This value
represents monies used to seed the cash drawer, not those received as the result of
a customer transaction.
Paid Out
The sum of all cash paid out by the system during the report period. This amount
represents the withdrawal of cash from a cash drawer for reasons such as payment
of petty cash to vendors or payouts of employee tips.
Pay, Regular
The gross wages earned for non-overtime hours worked in the period covered by
the report. The number of hours is reported to the nearest hundredth of an hour
and is represented as a decimal figure.
Default regular wage rates are programmed by job in the MICROS e7
Configurator.
Pay, Overtime
The gross wages earned for overtime hours worked in the period covered by the
report. The number of hours is reported to the nearest hundredth of an hour and is
represented as a decimal figure.
Default overtime wage rates are programmed by job in the MICROS e7
Configurator.
e7 USER’S MANUAL
6-57
Report Details
Pay, Total
Pay, Total
The total gross salary earned by employee for the period covered by this report.
This figure is calculated as follows:
Total = Regular [Pay] + Overtime [Pay]
Pay (% of Total)
The percentage of the total wages earned by all employees in this job. This figure
is calculated as follows:
% of Total = (Total [Pay]) / Total Pay for Job) x 100%
Returns
The Returns field includes two figures. The first is the number of items returned.
The second is the value of the returned items.
The number of returned items is calculated as follows:
+ number of return entries
– voids of return entries
The value of return items is calculated as follows:
+ value of return entries
– value of voids of return entries
Rounding Total
The difference between the rounded totals printed on guest checks as the amount
due and the actual totals (without rounding) posted to total revenue.
This field only prints if rounding is enabled.
Service Charges
The sum of all service charge entries as calculated by the sum of all service charge
keys plus the calculated value of any autogratuity. The Service Charge is
calculated as follows:
+ sum of all Service Charge key entries
– all voids of service charge entries
+ computed autogratuity
e7 USER’S MANUAL
6-58
Report Details
Service Charge Receipts
Service Charge Receipts
The total of all service charges except for charged tips.
Subtotal Discount
The net value of all subtotal discounts. A subtotal discount is any discount
recorded through a discount key that is not programmed as an item discount. This
figure is calculated as follows:
+ sum of all subtotal discount entries
– all voids of subtotal discount entries
Tables, Avg
The average number of tables served along with the average revenue generated by
each table. This figure is calculated using the following formula:
Avg Total Per Table = Total Net Sales / Tables
Taxable Sales
The value amount of sales that were subject to taxation.
Tax Collected
The net tax collected based on taxable menu item sales adjusted for taxable (or
non-taxable) discounts, taxable service charges, voids, and returns. The figure
includes any U.S. inclusive tax or add-on taxes.
Tax Collected is calculated as follows:
+
–
–
+
–
–
+
sum of tax from taxable menu item entries
tax from voids of menu item entries
tax from returns of menu item entries
tax from voids of returns of menu item entries
tax from voids of taxable service charge entries
tax from non-taxable discount entries
tax from voids of taxable discount entries
The report label for this field can be changed in Taxes | General | Tax Collected
Name.
Tax Exempt Sales
The value amount of all sales that were exempted from an applicable tax.
e7 USER’S MANUAL
6-59
Report Details
Tips Due
Tips Due
The value amount of charged tips to be paid to an employee. It is calculated using
the following formula:
Tips Due = Total Tips — Tips Paid
Tips Paid
The sum of all charged tips along with any service charges that are programmed to
add automatically to Tips Paid or are recorded manually through a [Tips Paid]
key. This figure should equal the sum of charged tips and service charge tips;
otherwise, the employees have not been paid all their tips.
Tips Percentage
The tip percentage is the value of total tips expressed as a percentage of gross
receipts. It is calculated using the following formula:
Tip% = (Total Tips / Gross Receipts) x 100%
Total Discounts
The sum of Item Discount and Subtotal Discount amounts.
Total Discount is calculated as follows:
+ Item Discount
+ Subtotal Discount
Total Net Sls
The net sales total of all sales activity. All discounts, voids, returns, and any
inclusive tax associated with the sales activity have been subtracted.
See also, Net Sales.
Total Revenue
The sum of Net Sales, Service Charge, and Tax Collected
The Total Revenue is calculated as follows:
+ Net Sales Total
+ Service Charges
+ Tax Collected
e7 USER’S MANUAL
6-60
Report Details
Total Tips
Total Tips
The sum of all tip amounts, calculated as follows:
+
+
+
+
Service Charge Receipts
Charged Tips
Cash Tips Declared
Indirect Tips
Training Total
The sum of all entries posted in the training mode. Training sales activity does not
add to any other values on the report.
This total is similar to Grand Total, but for training totals. This amount is always
positive, always accumulates, and is never reset.
Turn Time (Mins)
The average turn time of a table. A turn begins when a check is opened by table
number while no other checks are open for this table. A turn ends with the
tendering of a check that leaves no other checks open at the table. A turn is
counted only if it is less than four hours.
The average turn time is calculated as follows:
(Avg) Turn Time = Sum of all Turn Times / Tables
Voids
The Voids field includes two figures The first is the number of void items. The
second is the value of the void items.
The number of void items is calculated as follows:
+ number of voids of menu item entries
+ number of voids of service charge entries
– number of voids of void entries
The value of void items is calculated as follows:
+ value of void menu item entries
+ value of voids of service charge entries
– value of voids of void entries
e7 USER’S MANUAL
6-61
CHAPTER 7
Key Commands
This chapter describes the various types of key commands that are available and may
be included on the MICROS e7 user touchscreens.
Availability of key commands will depend on how the individual system was
programmed. If a key cannot be located, it may not have been programmed for use on
the system.
In addition, certain function keys (i.e., voids, transfers, refunds, and employee
assignments) may require a higher security level or a manager’s permission to use.
In This Chapter...
e7 USER’S MANUAL
• Key Categories. . . . . . . . . . . . . . . . . . . . . . . . . . . .
7-2
• Key Functions . . . . . . . . . . . . . . . . . . . . . . . . . . . .
7-3
7-1
Key Categories
Key Categories
Key command are grouped by function into seven categories:
• Check Access — Allows the user to create, open, and transfer checks within
the system.
• Check Operations — Encompasses all of the functions relevant to check
operations, including adding a name, table number, guest count, or order type.
• Inquiry — Allows the user to perform a PMS inquiry.
• Non-Sales — Allows the user to perform non-sales related functions such as
accessing the MICROS e7 POS system, making configuration changes, and
running reports.
• Numeric — Allows the user to enter numeric values.
• Seat — Allows the user to add, change, or increment seat numbers.
• Touchscreens — Allows the user to navigate between touchscreens.
• Transactions — Allows the user to generate an order and post sales transactions to it. Functions include adding and deleting menu items, discounts, and
service charges, as well as posting payments using a variety of tender/media.
e7 USER’S MANUAL
7-2
Key Functions
Key Functions
The following table provides an alphabetical listing of the available key types
along with a brief description of their functionality.
The actual names that appears on the touchscreen buttons will vary, depending on
the site’s programming preferences. In some instances, a generic entry (e.g., Menu
Item, Discount, Preset Tender) is used to represent an entire category of
selections. Where relevant, samples of the key type are listed in brackets (e.g.,
[ITEM]) beneath the main heading.
Key Type
Function
@/For
Allows an employee to order odd quantities of items that are
usually sold in fixed amounts (e.g., 3 donuts @ 4 for $1.00).
About MICROS e7 POS
Operations
Provides information on the current version of the
MICROS e7 System as well as the current business
date.
Add Table Number
Adds a table number to an open check.
Assign Cash Drawer
Assigns a cash drawer to a signed-in employee. Usually
requires manager-level permissions.
[CASH DRAWER 1]
[CASH DRAWER 2]
Auto Combo
Attempts to create a combo meal out of a la carte menu
items that have already been added to the guest check.
Autosequence
Runs a series of steps that generates reports. This is
usually done at the end of the day.
Backspace
Movement key. Takes the cursor back one character
space.
Barcode
Allows the user to order a menu item by manually
entering the barcode number.
Begin Check by Check
Number
Begins a check and automatically assigns the next
available check number.
Begin Check by Name
Begins a check and assigns a name to it. Opens a
dialog box for the user to enter the name or other
alphanumeric identifier. Automatically assigns the next
available check number as well.
Begin Check by Numeric ID
Begins a check and opens a numeric dialog box for the
user to assign a numeric identifier to it. Automatically
assigns the next available check number as well.
Begin Check by Table
Begins a check and assigns a table number to it. Opens
a dialog box for the user to select the table.
Automatically assigns the next available check number
as well.
e7 USER’S MANUAL
7-3
Key Functions
Key Type
Function
Cancel
Ends the current transaction without saving the
additions and changes. Usually linked to a numeric key
pad or system dialog box.
Change Customer Output
Language
Allows the user to specify the language used when
printing customer guest checks or when information is
shown on the pole display. This allows the customer to
receive information in the language in which they are
most comfortable. Up to 4 languages may be
programmed. Press to cycle through the language
options.
Change Language
Allows the user to change the language on the
workstation displays (check detail, touch keys, error
messages, etc.). Up to 4 languages may be
programmed. Press to cycle through the options.
Change Screen
Movement key. Takes the user to another screen for
additional selections.
Clear
Numeric key. Clears the entered values and allows the
user to start over.
Clock In/Out
Clocks the user into and out of the system.
Combo
This key initiates a combo meal selection or manual
combo recognition.
Condiment Modifier
Allows the user to modify a condiment selection. This
key is pressed before the condiment menu item (e.g.,
[EXTRA] [Onions]).
[EXTRA]
[NO]
[ON THE SIDE]
Configurator
Accesses the MICROS e7 Configuration utility. Usually
requires manager-level permissions.
Credit Authorize
Opens a dialog box that allows a user to request
authorization from a credit card processor for a charge
amount on a customer's credit card, before accepting
the card as payment.
Credit Card Lookup
Allows the user to request credit authorization without
pressing a specific credit card tender key. When the
credit card number is entered, verifies that the card type
is accepted by the establishment and then proceeds
with the authorization request.
Credit Finalize
Allows a user to close a check to a previously
authorized credit card. Before a credit card payment is
finalized, a credit card voucher must be printed and
signed by the customer. The finalized amount therefore
includes the charged tip.
e7 USER’S MANUAL
7-4
Key Functions
Key Type
Function
Currency Conversion
Allows the user to accept foreign currencies during a
transaction. A separate conversion key must be defined
for each currency exchange. When pressed, converts
the guest check totals to the selected currency (e.g.,
from US$to Euros) and displays the results on the
workstation screen, pole display, and/or printed
receipts.
Declare Tips
Allows the user to enter tips received during the current
shift.
Discount (Type of):
Applies a discount (in the amount indicated on the key)
to the current check. For “open amount” and “open
percent” discounts, prompts the user to enter a specific
amount or percentage before applying the discount to
the current check.
[$1.00 Off]
[5% Discount]
[Employee Meal]
Discount SLU
Links to a payment screen containing all of the
programmed discounts available to the user.
Done
Allows the user to exit the condiment screen before all
of the optional condiments have been selected. Also
used to indicate that all the allowed condiments have
been selected. Returns the user to the default
transaction screen.
Edit Seat
Allows the user to change the seat number associated
with a transaction item on an open check.
Exempt Auto Service Charge
Exempts the guest check from being charged the auto
service charge fee, when one is in effect.
Exit
Allows the user to close the MICROS e7 system. May
require manager-level permissions. (Use the
Configurator | Jobs | Privileges | Use database tools
option to define access to the Exit key.)
Guest Check ID
Adds a name or other alphanumeric identifier to an
open check.
Guest Check Numeric ID
Adds a numeric identifier to an open check.
Guest Count
Allows the user to add the number of guests covered by
a single check.
Hold and Fire
Allows the user to selectively hold and send menu items
to the kitchen. Held items are shown in the check detail
followed by the letter “H”.
Indirect Tip Declare
Allows the user to split cash tips between two or more
employees.
e7 USER’S MANUAL
7-5
Key Functions
Key Type
Function
Initial CC Auth (Customer
Name)
Allows the user to obtain authorization for a specific
amount before any sales are posted to the guest check
and assigns the customer name from Track 1 of the
credit card as the check name on the guest check. The
authorization amount can be preset using the Tender/
Media | Credit Auth | Initial Auth Amount field, or it can
be specified by the employee for each authorization.
Initial CC Authorize
Allows the user to obtain authorization for a specific
amount before any sales are posted to the guest check.
The authorization amount can be preset in the system,
or it can be specified by the employee for each
authorization.
Insert Condiment
Adds a condiment to the selected menu item.
Manager Procedures
Access the Manager Procedures screen. Usually
requires manager-level permissions.
Manual CC Authorize
Allows a user to manually enter the credit card
authorization received verbally over a phone line. This
button is used for call-in orders (i.e., card not present)
or as a backup when the electronic system is down.
Menu
Allows the system to change the price of a transaction
item depending on when it is ordered. Determines
which transaction items (menu items, service charges,
discounts) are available for selection.
[BREAKFAST]
[LUNCH]
[DINNER]
[HAPPY HOUR]
Menu Item
[HAMBURGER]
[FRIES]
[HOUSE SALAD]
[ICE TEA]
Adds a menu item to the check. A separate key is
provided for each menu item.
Merge Check
Combines two checks into a single total.
No Sale
Opens the cash drawer outside of a transaction.
Numeric
Includes all the keys associated with a numeric keypad.
[0] – [9]
[00]
[ . ] (decimal point)
Numeric Keypad
Displays a dialog box with a numeric keypad.
On Demand Receipt
Allows the user to print a customer receipt for the
previous order that was cashed out. This is valid until
the next transaction has been completed.
e7 USER’S MANUAL
7-6
Key Functions
Key Type
Function
Order Type
Specifies the order type for tax and reporting purposes.
[Dine In]
[Take Out]
[Delivery]
Order Type Override
[Dine In]
[Take Out]
[Delivery]
Allows the user to override the order type of the next
selected menu item.
Pickup Check by Check
Number
Allows the user to pick up a check by entering the check
number in a dialog box.
Pickup Check by Table
Opens a dialog box for the user to select one of their
open guest checks by table number. If the employee is
allowed to pick up other employee's checks, all open
checks are displayed. If more than one group exists on
the table, a screen displays so the desired check can be
selected.
Pickup Check by Table Numeric
Allows the user to pick up a check by entering the table
number in a dialog box. Use this key type when the
table numbers are all numeric.
Pickup Check by Table Alpha
Allows the user to pick up a check by entering the table
number in a dialog box. Use this key type when the
table numbers are alphanumeric.
PMS Inquiry
Sends an inquiry to an external Property Management
System (PMS) to determine if a guest check may be
charged to the customer's folio.
Preset Tender
Applies a preset cash amount to the current check.
[$1.00]
[$5.00]
[$10.00]
[$20.00]
Previous Screen
e7 USER’S MANUAL
Returns the user to the previous touchscreen.
7-7
Key Functions
Key Type
Function
Remote File Utilities
Allows a user to remotely manage (i.e., copy, transfer,
move, delete) files and directories and to remotely
execute applications on any workstation running
MICROS e7 software.
Reopen Closed Check
Reopens a previously closed check. Opens a dialog
box where the user selects the check to be reopened.
Repeat Item
Adds a duplicate of the highlighted item to the current
check. This button is useful for adding a second round
of menu items with multiple condiment selections.
Replace Condiment
Deletes the highlighted condiment and allows the user
to replace it with another.
Reports
Provides access to the Reports module. Usually
requires manager-level permissions to access.
Reprint Time Card
Allows a user to reprint an employee’s lost or damaged
time card. Usually requires manager-level permissions.
Return
Allows the user to post a returned item.
Seat Number
Assigns a seat number to transaction items on an open
check. Opens a dialog box for the user to specify which
seat number will be applied BEFORE the transaction
items are posted to the check.
Seat Number Increment
Advances the seat number to the next number in the
sequence. If the current seat number is “3”, pressing
this key will change the seat number to “4.”
Service Charge (Types of)
Applies a service charge (in the amount indicated on
the key) to the current check. For “open amount” and
“open percent” service charge, prompts the user to
enter a specific amount or percentage before applying
the service charge to the current check.
[$5.00 Cover]
[Autogratuity variable %]
[10% Delivery Charge]
[Open $ Svc Charge]
[Open % Svc Charge]
Service Charge SLU
Links to a payment screen containing all of the
programmed service charges available to the user.
Sign In
Verifies that the employee code entered by the user is
valid and then signs him/her into the system. Opens a
default transaction screen.
Sign Out
Ends the current session for the signed-in user and
returns to the main sign-in screen.
Split Check
Transfers a portion of the original guest check detail to
one or more new checks. Allows customers to divide
the order and pay separately.
Size
Allows the user to configure a combo meal to a certain
size.
e7 USER’S MANUAL
7-8
Key Functions
Key Type
Function
Substitute
Allows the user to replace a menu item in a combo meal
with another menu item from the same combo group.
The available options will be displayed in a SLU. After
a substitute item is selected, the system updates the
combo meal and displays the new selections.
Tax Exempt
Deletes one or more types of taxes applied to an order.
Customers must have a government-issued tax ID
number to be exempt from the relevant tax type.
Tender/Media (Types of)
Posts the flow of cash and the value of goods and
services rendered during a service round or transaction.
There are four types of tender/media keys:
[Cash], [VISA], [AMEX]
[Service Total]
[Media Loan]
[Media Pickup]
• Payment — Subtracts the amount entered from the
balance due. Includes Cash, Credit Card, and Check
keys. See also Preset Tender.
• Service Total — Ends the current transaction and
saves the check detail for future recall.
• Bank Loan — Records the addition of cash to a
cash drawer outside of a transaction. Typically used
at beginning of a shift to record the opening bank
amount.
• Bank Pickup — Records the amount of cash withdrawn from a cash drawer outside of a transaction.
Typically used during shift to remove excess cash
and make petty cash payments, or at end of shift to
balance out the drawer. Is also used to record payment of tips.
Tender/Media SLU
Links to a tender screen where the user selects a
payment type and amount to complete the order.
Transfer Check
Transfers ownership of a check from the current
employee to another employee. May require managerlevel permissions.
Transaction Cancel
Ends the current transaction without saving the
additions and changes.
Transaction Void
Places the system in a Void state. This allows a user to
quickly void a number of items — all items entered
while in this state are considered to be void items.
Used to record refunds or to correct a mishandled
check that was closed already.
Unassign Cash Drawer
Clears the assignment of the cash drawer to a signed-in
employee. Usually requires manager permissions.
Void
Deletes the last item entered in the check detail. Can
also be used to touch-void selected items.
e7 USER’S MANUAL
7-9
CHAPTER 8
TroubleShooting
This chapter contains suggestions for diagnosing and resolving problems in the
MICROS e7 POS System
In This Chapter...
e7 USER’S MANUAL
• Operator Prompts . . . . . . . . . . . . . . . . . . . . . . . . . . . . .
8-2
• Error Messages. . . . . . . . . . . . . . . . . . . . . . . . . . . . . . .
8-11
• Database Programming Errors . . . . . . . . . . . . . . . . . .
8-41
8-1
Operator Prompts
Assign cash drawer (***)?
Operator Prompts
Operator prompts are messages to the user indicating the next action required.
These messages are usually displayed in the yellow status lines at the top and
bottom of the screen. In some cases, they are included in a pop-up screen along
with a numeric key pad for entering a required value. For example, you may be
asked to specify an amount, provide an authorization code or employee ID, or
confirm a selection before the system proceeds. When a numeric dialog box is
displayed, enter the required value and press [Enter] to accept, [Clear] to erase
and start over, or [Cancel] to exit the transaction.
Operator prompts are listed in alphabetical order.
Assign cash drawer (***)?
This confirmation dialog displays when a user presses a function key for the
purposes of assigning a cash drawer, where (***) represents the cash drawer
number.
Changing the Screen Template will position some buttons out of the
Touchscreen area. These buttons will automatically be deleted. Do
you wish to continue?
The user tried to modify the layout of an existing touchscreen by selecting a new
Screen Template from the drop-down list. Select [Yes] to change the template or
[No] to cancel the change.
Charged tip amount is ***
During a credit card transaction, the system displays the amount of the charged tip
entered. Press [Ok] to confirm the amount or [Cancel] to abort the transaction.
Close Cash Drawer
The cash drawer is open.
Credit authorizations exist on this check. Are you sure you want to
use the <tender name> tender?
After authorizing a credit card, the user selected another tender type to pay out the
check (e.g., the customer decided to pay in cash). Select [No] to abort the tender
or select [Yes] to continue with the designated tender.
e7 USER’S MANUAL
8-2
Operator Prompts
Do you want to cancel this transaction
Do you want to cancel this transaction
The [Cancel] key was pressed during a transaction. Press [Yes] to exit without
saving the additions and changes made during the current service round. If this is
a new check, the system will return to the default transaction screen without
saving the record. If this was an existing check, the check will revert to the status
as of the previous service round.
Do you want to clock out?
This confirmation dialog displays when a clocked-in employee has pressed the
[Clock In/Out] button. Press [Ok] to clock out.
Clock out is only required if the employee is programmed to use the timekeeping
functions.
Do you want to combine this check with the open check?
After selecting the [Merge Check] key, the user specified the open checks to be
added. Press [Ok] to combine the two checks or [Cancel] to abort the process.
Do you want to transfer this check to yourself?
After pressing the [Transfer Check] key, the user selected from the list of open
checks currently in the system. Checks are identified by owner, amount, check
number, and table number and check name (if any). Only those checks belonging
to other users are available for transfer. Press [Yes] to accept ownership of the
check or [No] to cancel the process.
Employee is no longer a minor, but has an employee type that uses
minor break rules. Enter authorization to continue with clock in.
During clock-in, the system compared the current calendar date with the
employees’s birthdate and found an inconsistency in the wage-rate criteria. To
proceed, the employee’s record should be updated; otherwise, an authorization
code from a privileged employee is required.
Enter (***) amount
The selected transaction requires a user-defined amount to continue. A numeric
dialog box is shown, with a prompt that reads, “Enter *** amount,” where ***
refers to the transaction type, such as discount, service charge, tip, tender, or menu
item weight.
e7 USER’S MANUAL
8-3
Operator Prompts
Enter (***) percent
Enter (***) percent
The selected transaction key requires a percent value before attempting the
calculation. A numeric dialog box is displayed, with a prompt that may read,
“Enter discount percent,” or “Enter service charge.”
Enter (***) reference
The selected transaction requires a reference number before proceeding.
Enter auth code
This prompt displays when manual authorization of a credit card has been
requested. A touchscreen keyboard is provided. To proceed, enter the code
provided by the credit card processor and press [Ok].
Enter authorization to (***)
The user selected a function that he or she is not privileged to use.
Examples of privileged activities include (but are not limited to) canceling
transactions, assigning a cash drawer, clocking in early/late from a break, picking
up/transferring another employee’s guest checks, creating a negative balance due,
and reopening a closed check. To complete the action, a privileged employee
must authorize it by entering his/her own employee ID number.
Enter authorization to override check open on system.
WARNING! This may cause an out-of-balance totals situation.
The user tried to open a check that another employee has open and active on the
system. Because the system cannot allow two people to work on the same check
simultaneously, the new user must be privileged to override the previous owner.
However, if the first user is still posting items at the time the second user
overrides the ownership, it can prevent the system from recording totals correctly.
Enter check name
This prompt displays with a touchscreen keyboard when a [Check Name] key is
pressed. To proceed, type in an alphanumeric identifier for the current check and
press [Ok].
Enter credit card number
This prompt displays when a [Credit Card] key or the [Credit Card Lookup]
key is pressed. To proceed, swipe the customer’s credit card or manually enter the
credit card number.
e7 USER’S MANUAL
8-4
Operator Prompts
Enter expiration date (MMYY)
Enter expiration date (MMYY)
This prompts displays after a credit card is swiped or a credit card tender key is
pressed. Enter the four-digit date (month and year) that the card expires.
Enter guest check number
This prompt displays when the [Pick Up Check by Number] key is pressed.
Enter initial auth amount
This prompt displays when a credit card is being pre-authorized at the start of a
guest check (e.g., the customer has asked to run a tab). The amount entered
represents the maximum that the customer may charge to the current guest check
without requiring a secondary authorization from the credit card processor.
If the credit card tender was programmed with a initial authorization amount, this
prompt will not display. When the [Initial Auth] key is pressed, the system will
automatically submit a pre-authorization request for the programmed amount.
Enter item discount quantity
The user entered two or more discountable menu items and then pressed a
discount key that could be applied to any of them. For example, after ringing up 3
[Hamburger] items, the server presses a [$1.00 Off Burger] discount key. The
system needs to know how many of them are being discounted (e.g., how many
coupons the customer has presented).
This message will not display if the menu items were touch-selected BEFORE the
discount key was pressed.
Enter job code authorization
After clocking in, the user selected a job that requires an authorization code for
which he/she is not privileged. To proceed, a manager or other privileged
employee must provide authorization.
Enter meal employee
This prompt displays when an [Employee Meal] discount is applied to a check.
To clear, the user selects the employee from a list provided by the system.
Enter number
This prompt displays whenever a numeric value is required.
e7 USER’S MANUAL
8-5
Operator Prompts
Enter number of guests
Enter number of guests
This prompt displays when the [Guest Count] key is pressed.
Enter number to move
During a split check operation, this prompt displays if the user selects a menu
item with a quantity greater than one. Using the numeric keys, specify how many
of the items should be moved to the new check.
Enter optional (required) condiment
The selected menu item allows (requires) a condiment. The system will display
touch keys of the appropriate condiment items. The system will return to the main
menu item screen when the required number of condiments has been entered. For
optional condiments, the user must press the [Done] key to exit this screen.
Enter seat number
This prompt displays when the [Seat] key is pressed. Use the numeric keypad to
change the active seat.
Enter string
This prompt displays whenever a string value is required.
Enter tax exempt reference
This prompt displays when the [Tax Exempt] key is pressed. Using the
touchscreen keyboard, enter the customer’s tax exempt ID.
Enter tip employee
This prompt displays when the [Tips Paid] key is pressed. Enter the employee ID
of the person to whom the tips were paid.
The [Tips Paid] key must be configured as a Pickup-type tender. It is used to
account for money removed from the cash drawer to pay-out charged tips at the
end of a shift.
Enter your employee ID number to sign in (clock in/out)
The [Sign In] or [Clock In/Out] key was pressed before an employee ID number
was entered. To proceed, the user can either swipe his/her employee ID card or
manually enter the employee number.
e7 USER’S MANUAL
8-6
Operator Prompts
Exit and save changes?
Exit and save changes?
This confirmation box displays when changes are made to an existing record. For
example, after splitting a check, this message displays when the [Save] key is
pressed.
Guest Count = (***). Did you mean to enter more than 9 guests?
This confirmation box displays when the guest count entered is greater than 9.
Press [Yes] to accept the entry or [No] to void the transaction and start again.
Issue change in foreign currency (***)?
This prompt displays when the user has converted to another currency prior to
payment.
No beverages?
There were no beverage items on the check when the [Service Total] or
[Payment] key was pressed. This message will only display if the restaurant has
been programmed to use the beverage control feature.
Press [Ok] to close the prompt and service total the check. Press [Cancel] to
continue the service round and enter beverage items.
Only (***) beverage(s) for (***) guests?
The number of beverages ordered is less than the number of guests specified in
the guest count. This message only displays if the restaurant has been
programmed to use the beverage control feature AND the number of beverages
required is linked to the guest count.
Override guest check open on another workstation (***)? This may
cause an out-of-balance totals situation.
The check is already open on another workstation. Press [No] to avoid posting
duplicate or conflicting transaction items, or interfering with the calculation of
check totals.
On the other hand, if a workstation failed with a check open on the system, it
would be appropriate to pick up the check at another workstation, pressing [Yes]
to override the original workstation.
Please place the item on the scale.
This message displays when a zero weight is received from the scale after ringing
a weighed item.
e7 USER’S MANUAL
8-7
Operator Prompts
Print new checks?
Print new checks?
This message displays when the [Done] button is pressed after splitting a check.
Press [Yes] to have the system print out each of the new guest checks.
Processing Authorization
This message displays in the status box when a credit card authorization or
finalization is sent to the credit card processor for approval. It remains until a
response is returned.
Quit and lose changes?
This confirmation dialog displays whenever a [Cancel] button is pressed on the
split or share check screen.
Ready for your next entry
This prompt appears in the status box and indicates that the system is ready for the
next transaction item.
Select check to merge
When the user opens or picks up a check and then pressing the [Merge] button, a
list of open checks is presented. Once a check is selected and the [Ok] button
pressed, the system asks for confirmation that the checks are to be merged. Press
[Yes] to complete the transaction.
Select check to transfer
After the [Transfer] button is pressed, this message is displayed above a list of
open checks. Only those checks belonging to another server are listed.
Select checks to share
When splitting a check, if a menu item is highlighted and the [Share] key is
pressed, this message will be displayed above a list of the newly created checks.
Highlight the check numbers that will share the menu item(s) and press [Ok] to
split the costs equally between them.
Select closed check to be reopened
After the [Reopen Closed Check] button is pressed, this message is displayed
above a list of checks closed on the current business date.
e7 USER’S MANUAL
8-8
Operator Prompts
Select credit card account number
Select credit card account number
This message displays above a list of previously authorized credit card numbers.
It can occur when adding or updating a credit card authorization on a previously
authorized check, or when finalizing payment to one of the authorized credit
cards.
To authorize another credit card on the open check, select New Account... To
update or finalize a previously authorized credit card, select the credit card
number. Press [Ok] and follow the prompts to complete the transaction.
Select table
This prompt displays whenever a check is opened by table number or when a
table number is added to an open check. To assign a check to a table, press one of
the numbered keys and press [Ok].
Sign In, enter your ID number
This prompt displays below the customer or MICROS e7 logo graphic on the
system’s Clock In/Sign-In screen. It indicates that the workstation is not currently
in use. Authorized employees may clock into the system or sign in to begin a
transaction by entering their employee IDs and pressing either the [Clock In/Out]
or [Sign In] key.
This check has items on hold
This prompt displays when the user picks up a check that includes items held in
the previous service round. The items will remain on hold until manually released
by the user or until the check is tendered. Before closing, all held items are
automatically sent to the kitchen.
Tip amount is (***)?
This confirmation dialog displays when declaring tips (direct or indirect) at the
end of an employee’s shift. Enter the total amount of tips received during that
shift. This sum is considered taxable income and required for tax reporting
purposes.
Transaction Approved
This message displays in the status box to indicate that the credit card
authorization/payment request has been approved by the credit card processor.
e7 USER’S MANUAL
8-9
Operator Prompts
Unassign cash drawer (***)?
Unassign cash drawer (***)?
This confirmation dialog displays when a user presses a programmed function
key to terminate a cash drawer assignment, where (***) represents the number of
the assigned cash drawer.
Warning -- current business date setting is incorrect. Do you want to
continue?
The system’s business date does not match the current calendar date registered by
the workstation. Failure to reset the business date before preceding may affect the
way transactions are posted to the database. The prompt is displayed each time a
check is started or picked up.
Weighed entry required
The selected menu item is priced by weight. Enter the weight amount and press
[Enter] to continue.
e7 USER’S MANUAL
8-10
Error Messages
A check already exists for this table
Error Messages
An error message displays when you attempt an incorrect procedure or when a
condition exists that prevents the procedure from being completed. Error
messages are shown in dialog boxes in the middle of the current screen. The user
must clear this box before another action can be taken.
A check already exists for this table
The Restaurant programming restricts guest checks to one group per table. This
message is displayed when the user tries to begin a check or modify an existing
check by adding a table number that is already in use.
A check already exists with this name
Check ID must be unique. The user tried to begin a check or modify an existing
check by entering a name that is already in use.
This does not apply when reopening a closed check of the same name.
A check already exists with this number
While splitting a check, the user entered a number that was already in the
database records. This could be an open or closed check.
A condiment entry is required
During programming, user-defined menu item keys were placed on a touchscreen
used to display condiment selections. The error occurs if user tries to enter one of
these keys and it is the wrong type of item.
A condiment entry is required. Please select an item from the “X”
category (group)
After selecting a menu item with required condiments, the user pressed the
[Done] key before completing the entry.
Amount entered is not correctly rounded
The user tried to enter a payment amount that is not acceptable for the currently
configured rounding rules.
e7 USER’S MANUAL
8-11
Error Messages
Amount entry not allowed
Amount entry not allowed
When pre-authorizing a credit card, the user tried to enter an amount for a credit
card that was already preprogrammed with an initial authorization amount. Initial
authorization amounts cannot be overridden by the user.
Amount entry required
When presented with a numeric dialog box (e.g., for service charges or
discounts), the user pressed the [Enter] key without specifying an amount.
At/For already entered. Press clear to start over
The user pressed the [@/For] key too many times during the key sequence.
Typically, this error message displays when the key is pressed twice after the
second instance of the key sequence:
[3] [@/For] [4] [@/For] [@/For] ....... [1.00] [Donuts]
In other situations, pressing the [@/For] key twice will result in the error message
“Numeric entry required.”
Authorization Denied
The credit card processor denied the request for payment authorization.
Authorization Error
A problem was encountered during the authorization request. The request has
been terminated.
Authorization Failed - No Reason Given
The authorization request was rejected by the credit card processor. No reason
was supplied.
Authorization Failed -- Unsupported Response
The authorization request was rejected by the credit card processor. The system
did not understand the reason offered for the refusal.
Bad magnetic stripe data
The system was unable to read the track data from a swiped card.
e7 USER’S MANUAL
8-12
Error Messages
Barcode entry not found
Barcode entry not found
The system was unable to match the entered or scanned barcode to a menu item
record.
Cannot cancel transaction after check add
The user tried to cancel a transaction in which two checks were merged together.
Once the checks have been added, the only way to separate the line items again is
to use the split check function.
Cannot cancel transaction after check transfer
The user tried to cancel the transfer of a check. To return the check to its original
owner, the check must be transferred again.
Cannot cancel transaction after Credit Authorization
The user tried to reverse payment of a check after receiving credit authorization.
The system does not allow a completed credit card transaction to be voided after
the fact. To fix the problem, the user must generate a refund check, crediting the
check amount to the customer’s credit card account.
Cannot cancel transaction after interface posting
The user tried to cancel a transaction in which the guest check amount was posted
to the customer’s room number or account (via a Property Management System).
Cannot cancel transaction after reopen check
The user tried to cancel a reopened closed check.
Cannot combine a check with itself
After pressing the [Merge Check] key, the user selected (from the displayed list
of open checks) the number of the current check instead of the check that is being
added to it.
e7 USER’S MANUAL
8-13
Error Messages
Cannot create a new check at this workstation. All valid check numbers are in use
Cannot create a new check at this workstation. All valid check
numbers are in use
During setup, each worstation is programmed to assign check numbers within a
specified range (e.g., Workstation 1 uses check numbers 100-199, Workstation 2
uses check numbers 200-299, etc.). As checks are opened during the business day,
the system assigns the next available number in the sequence.
The error message displays when the user tries to start a new check on a
workstation where all of the numbers in the specified range are already in use.
The message only occurs when the checks are open. Closed check numbers are
returned to the pool of available values. When the system reaches the end of the
check number sequence, it returns to the beginning and assigns the first available
number.
Cannot create a new check for this table. All valid group numbers are
in use
During setup, the restaurant may be programmed to only allow one group per
table. The maximum number of open checks allowed per group (i.e., per table) is
99.
Cannot increment seat number past the maximum
The user exceeded the maximum number of seats allowed on a single check. To
continue seat assignments, you must begin another check.
Cannot locate the text file for the (x) language. Some text will be
displayed in the default language
The language conversion file is incomplete. Contact the system administrator to
correct this problem.
Cash drawer assignment is not allowed. This workstation uses a
shared cash drawer
The user tried to assign a cash drawer to an employee when the workstation
configuration allows all signed-in employees to access the cash drawers.
Cash Drawer X is not installed
When assigning a cash drawer to an employee, the user entered an invalid
number.
e7 USER’S MANUAL
8-14
Error Messages
Change due not allowed with non-revenue service charge
Change due not allowed with non-revenue service charge
The user pressed a preset cash tender whose amount exceeds the check total for
the non-revenue service charge. Non-revenue service charges are used to re-run a
credit card transaction that failed during settlement.
Clear the error and close the check to a cash or credit tender in the exact amount
shown.
Check is open on another workstation
After pressing one of the check keys, the user tried to pick up an open check by
entering the check number, table number, or name of a check that is already open
on another workstation.
Clock in record could not be found
A database error occurred during employee clock-in. Although the employee
status indicates he is clocked in, the system is unable to locate the clock-in record
in the time card detail
Clock in time is earlier than the previous clock out time
The employee’s status is listed as clocked out, but the new clock-in time precedes
the previously recorded clock-out entry. This error occurs if the system clock was
changed during a workday.
For example, suppose an employee worked from 8 am to 3 pm, and after clocking
out, the system time is rolled back to 2 pm. Any attempt by this person to clock
back in before the system time passes 3 pm again would be viewed as clocking in
before the previous clock-out time.
Clock out not allowed with open checks
The employee pressed the [Clock In/Out] key before closing or transferring all of
his/her outstanding checks. The exception to this is when the employee clocks out
on a break.
Clock out time is earlier than the previous clock in time
This error occurs if the system clock was changed during a workday.
For example, suppose an employee starts to work at 8 am. If, after clocking in, the
system clock is then rolled back to 6 am, then any attempt to clock out before the
system time passes 8 am again would be viewed as clocking out before the
previous clock in time.
e7 USER’S MANUAL
8-15
Error Messages
Combine checks not allowed after adding detail in the current round
Combine checks not allowed after adding detail in the current round
The employee pressed the [Merge Check] key after one or more transaction
items has been posted in the current round of the open check. This is not
permitted. The merge function must be the first action taken after opening a
check.
Condiment not allowed
A condiment was applied incorrectly. Examples of non-supported condiment use
are: a) pressing the [Add Condiment] key without selecting a menu item first; b)
exceeding the maximum number of condiments for the selected menu item; and c)
adding a condiment to a non-food item (e.g., discounts, service totals).
Credit Auth amount exceeds amount due
Before pressing the [Credit Auth] key, the user entered an amount greater than
the Total Due.
Credit Authorization entries cannot be voided
After authorizing a credit card payment, the user tried to touch-void the
authorization — usually because the customer changed his mind and decided to
pay in cash or use a different credit card. This is incorrect.
Authorization does not require a customer to pay using that credit card. Instead,
the customer can pay cash or use a different credit card. To accommodate the
change, the user simply authorizes the new card and then chooses it during the
credit final process. Alternatively, if the payment is to cash, the user presses [No]
when the prompt, “Credit authorizations exist on this check. Do you want to
cancel this (cash) payment?” is displayed.
Credit authorization not enabled
The user pressed a [Credit Auth] key, but the system is not properly configured
for integrated CA/EDC.
Credit Authorization not required for this type of card
The user tried to authorize a credit card that is not configured for CA/EDC.
Credit Authorization voucher cannot be voided
After finalizing a credit card payment and charged tip to guest check, the user
tried to void the transaction. This is not allowed.
e7 USER’S MANUAL
8-16
Error Messages
Credit card has already been tendered
Credit card has already been tendered
After authorizing and finalizing a credit card payment, the user tried to post a
second payment to the same guest check, using the same credit card account
number.
Credit card has expired
While entering credit card information, the user keyed in a 4-digit (MMYY)
credit card expiration date that precedes the current business date.
Credit Card Lookup is not allowed for tenders requiring Credit
Authorization
After pressing the [Credit Card Lookup] key, the user entered (or swiped) a
credit card type the requires a credit authorization before proceeding. The [Credit
Card Lookup] key only validates that the type of credit card is accepted at the
site; it does not require the operator to enter an amount at the time the credit card
is tendered.
Credit card type not found
The user has entered a number with an unrecognized credit card preamble during
a credit authorization/settlement or during a [Credit Card Lookup].
A credit card preamble comprises the first one to four digits of a credit card
account number and serves to identify the credit card type. For example, all VISA
account numbers begin with 4 and American Express account numbers all begin
with 37. When a credit card number beginning with a 4 is entered, the system
recognizes it as belonging to a VISA account.
Discount amount is greater than discountable sales
The user entered an open discount amount that exceeds the sum of the
discountable sales items. The net result would be a negative value, which is not
allowed.
Discount greater than 100% is not allowed.
When applying an open percent discount, the user entered an amount greater than
100%. This is not allowed.
Discount must be voided first
The user tried to void a discounted menu item before clearing the discount first.
e7 USER’S MANUAL
8-17
Error Messages
Discount not allowed
Discount not allowed
The user applied a discount to a transaction item (e.g., condiment, service charge,
partial tender, etc.).
Disk is full. No new transactions are permitted
The system has run out of hard-drive space for storing transaction totals. Notify
the system administrator to correct the problem.
Employee has no job assigned
The employee does not include a current job assignment. This error only occurs if
the employee is not required to clock-in at the beginning of a shift.
Employee has no valid job links
There are no job rates programmed for this employee. An employee can be paid
different rates, depending on the job assignment (e.g., Server, Bartender, Host).
However, without a job rate, the system has no way to determine what that job is.
This error only displays if the employee is required to clock in at the beginning of
a shift.
Employee has no status entry
A internal database error has occurred. Notify the system administrator to correct
the problem.
Employee is already clocked in
An employee who is already clocked into the system, tried to clock in again. This
might occur if two people, using the same employee ID, tried to clock in at the
same time on different workstations.
Employee is already signed in
A signed-in employee pressed the [Sign In] key or swiped an employee ID card
while in the middle of a transaction.
Employee is not allowed to sign in
The employee is not privileged to sign in on a workstation. This function is
linked to the employee’s job code. Cooks and bussers, for example, would have
no need to handle guest checks, so the sign-in function would be disabled through
the MICROS e7 Configurator for employees with these job codes.
e7 USER’S MANUAL
8-18
Error Messages
Employee not found
Employee not found
The employee ID number entered (manually or with an employee ID card) is not
recognized by the system. The user may have keyed the number incorrectly or the
record may have been deleted from the system.
Employee time clock information not found
A internal database error has occurred. Notify the system administrator to correct
the problem.
Employee time clock record is locked by another workstation
The employee record is open on another workstation. The system does not allow
two users to have the same record open at the same time.
End-of-day processing is in progress
The user tried to begin a transaction while the end-of-day autosequence was
running.
The end-of-day process marks the transition from one business day to the next,
providing a cut-off point for posting totals for system reports. As such, users
cannot start a new transaction until the process is complete and the business date
has been increment.
Enter amount first, then currency conversion, then tender key.
This error occurs if the check is converted to another currency before tendering a
partial payment to cash. For example, if the check is in Euros, and the user wanted
to apply a 5-pound note to the total, the incorrect key sequence would be:
[Currency] [5} [ . ] [00] [Cash]
The system does not know if the amount tendered is in the foreign currency or the
base. To make a partial tender in the foreign currency, the correct key sequence
would be:
[5} [ . ] [00] [Currency] [Cash]
Entry not allowed
The user entered a number before pressing a preset discount or service charge.
e7 USER’S MANUAL
8-19
Error Messages
Entry too large
Entry too large
The value entered exceeds the maximum allowed. For example, when used with
open percent discounts, entering a value greater than 100% would be considered
too large. The error is also displayed when the system prompts for a credit card
number and the user enters too many digits for the type of card presented.
Entry too small
The value entered is less than the minimum required. This error is displayed, for
example, when the number of digits entered for a credit card entry does not equal
the number required.
Error communicating to credit card server
A problem occurred in the communication link between the workstation and the
credit card server. The credit card transaction is cancelled.
Error reading mag stripe (track 2)
A problem was encountered with the magnetic stripe reader. The problem may be
with the card or with the card reader itself. Make sure the card is positioned
correctly relative to the card reader and swipe again. If the problem persists,
notify a manager.
Failure communicating to interface server
The user tried to perform an interface function (i.e. PMS inquiry or room charge
posting) and the MICROS e7 workstation or PC that hosts the interface is not
available. Note: It is recommended that you stop and restart the MICROS e7
system.
Failure communicating with scale
An error occurred while attempting to communicate with the scale. Make sure the
scale is connected to its power source and the RS-232 cable is working properly.
Failure updating combined check, operation cancelled
An error occurred while attempting to merge the check detail of two checks into
one. When the error message is cleared, the merge function is aborted and the
system restores the original (separate) check records.
e7 USER’S MANUAL
8-20
Error Messages
Fatal scale error [EEPROM Error]
Fatal scale error [EEPROM Error]
A fatal error has occurred with the scale. Power cycle the scale and try the action
again. If the power cycle does not correct the error, contact your service
technician about replacing the scale.
Fatal scale error [RAM Error]
A fatal error has occurred with the scale. Power cycle the scale and try the action
again. If the power cycle does not correct the error, contact your service
technician about replacing the scale.
Fatal scale error [ROM Error]
A fatal error has occurred with the scale. Power cycle the scale and try the action
again. If the power cycle does not correct the error, contact your service
technician about replacing the scale.
Faulty calibration
A fatal error has occurred with the scale due to a calibration problem. Contact
your service technician.
Guest check not found
When picking up a guest check by number or by name, the system was unable to
locate an open check that matched the entry provided by the user.
Inclusive tax cannot be exempted
The user applied a [Tax Exempt] key to a menu item whose price includes the
applicable tax(es). This action is not allowed. The system is not equipped to
calculate the portion of the menu item price allocated for taxes and deduct that
amount from the check totals.
Inquiry not allowed
The user tried to perform an inquiry function and the job of the currently signed in
employee is not privileged to perform inquiry functions.
Invalid amount entry
The system did not understand the key sequence. The entry includes too many
decimal points or text characters and symbols.
e7 USER’S MANUAL
8-21
Error Messages
Invalid barcode data format
Invalid barcode data format
The scanned or entered barcode does not match any system-recognized barcode
configuration.
Invalid Credit Card number
The credit card number does not match a type supported by the system. Credit
card types are determined by the preamble (the first 1-4 digits of the card, which
identifies the credit card company) and by the number of digits used.
Item cannot be replaced
The user highlighted an ineligible transaction item before pressing the [Replace
Condiment] key.
Item discount not allowed
The user applied an item discount to a transaction item (e.g., condiment, service
charge, partial tender, etc.).
Item has already been discounted
The user attempted to apply a second discount to a previously discounted item.
This error only applies to item discounts and only occurs if the system is
programmed to limit the number of discounts that may be applied to the same
menu item.
Item marked as INACTIVE
The user has selected a hard-coded menu item key for an item that is no longer
available or sold in the POS System.
Items from a previous round are not allowed
The user attempted to insert or replace a condiment item from a previous service
round.
Job not found
A job definition was deleted while still assigned to an employee. When the
employee tried to sign in, the system was unable to locate the record.
Last Item Void not allowed
After picking up a check, the user tried to void the last item in the previous
service round. To void previous round items, the user must highlight first and then
press the [Void] key.
e7 USER’S MANUAL
8-22
Error Messages
Magnetic card entry required
Magnetic card entry required
An employee’s ID card must be swiped before the transaction can continue.
Manual authorization required
The system is unable to communicate with the credit card processor. A manual
authorization of the credit card is required.
Menu item is not available in the selected container
When the user selects a [Container] key (e.g., the [Pitcher] key on the Beers
Menu), the system automatically filters out those menu items that are not sold
(i.e., priced) in that size. This is done by displaying the unavailable menu items
with a background color several shades darker. If the user presses one of these
darkened keys, the error message is displayed.
Menu item is not available on this menu
Although the system is designed to generate keys for all items linked to a
particular menu, users do have the option of manually adding menu items
anywhere a function key may be programmed. This error is generated when use
of the hard-coded key conflicts with the filtered selections presented by the
system.
Modifier not allowed
While entering condiments, the user incorrectly applied a modifier to a selection.
Typical modifiers are [No], [Extra], and [Side]. They are not meant to be used
with certain types of condiments such as pizza styles (pan, hand-tossed, or thin &
crispy) or meat temperatures (rare, medium, well).
Must print voucher
After obtaining an initial authorization for the guest check, the user tried to final
tender to the credit card without first obtaining a credit authorization for the Total
Due and presenting a voucher to the customer for signature and charged tip
amount (if any).
Must select at least two checks
When splitting a check, the user tried to share a menu item without selecting two
or more checks numbers.
Network communications error
The system was unable to connect to the network or to sustain a network
connection.
e7 USER’S MANUAL
8-23
Error Messages
No cash drawer is assigned to the current employee
No cash drawer is assigned to the current employee
The employee pressed a tender key (e.g., Cash, No Sale) that is configured to
open the cash drawer without having a cash drawer assigned. Typically, cash
drawers are assigned through Manager Procedures by a privileged employee, and
are only assigned for the duration of the employee’s shift.
No Backup Available. Print Job Failed
A backup printer was not defined. When the workstation encountered a problem
with the primary printer, the print job was aborted.
No discountable sales
A discount was applied to a check without any discountable menu items.
No items selected
The user selected a transaction key (e.g., item discounts, voids) without first
specifying the item to which it applies.
No item was selected for discount
The user pressed an item discount key without highlighting a menu item first.
Non-training check cannot be picked up in training mode
The training user tried to pickup a guest check that was started by a non-training
employee.
Non-training check cannot be transferred to an employee in training
mode
The training user tried to transfer to himself/herself a guest check that was started
by a non-training employee.
No previous authorizations found
The user pressed the [Credit Final] key on a check that had not been authorized
for payment by credit card. Credit card tenders must be authorized, and a voucher
presented and returned by the customer, before the payment can be finalized.
e7 USER’S MANUAL
8-24
Error Messages
No sales to service charge
No sales to service charge
A service charge key was pressed before an applicable menu item was posted.
Typically, this message applies to a percent-based service charge which is
calculated against the price of the menu item(s).
No valid items selected
One of the following operation was incorrectly applied to the selected items.
Discount
Edit Seat
Hold and Fire
Void
For example, the user highlighted an unpriced condiment before pressing an
[Item Discount] or the [Hold] key.
Not allowed after adding detail in the current round
The user tried to split a check after adding transaction in the current round.
Not allowed after making changes in a round
The user tried to perform a function after items have been added to a guest check.
For example, if the user adds a menu item to a guest check and then tries to split
the check, this message displays.
Not allowed during insert condiment
After pressing the [Insert Condiment] key, the user pressed a key other than a
condiment.
Not allowed during replace condiment
After pressing the [Replace Condiment] key, the user pressed a key other than a
condiment.
Not allowed in training mode
The signed-in employee has selected a function that is not available while the
system is in training mode.
Not allowed to merge training and non-training checks
The user tried to merge a training check with a non-training check.
e7 USER’S MANUAL
8-25
Error Messages
Not allowed with non-revenue service charge
Not allowed with non-revenue service charge
The user tried to add another transaction item to a check containing a non-revenue
service charge. Non-revenue service charges are used to re-run a credit card
transaction that failed to settle. As such, it is the only item allowed on the check.
Not allowed with transaction void
The user pressed the [Edit Seat] or [Service Total] key during a transaction void.
The [Transaction Void] function placing the system in Void mode for the entire
check. While the system is in this state, every item key pressed is considered a
void item. Under these circumstances, editing seats or service totalling the check
is not allowed.
Not allowed while a transaction is in progress
Certain system functions may not be accessed in the middle of an open check.
These include, reopening a closed check, accessing Manager Procedures, and
using the [No Sale] key to open the cash drawer.
Not allowed while the server PC is INACTIVE
The user tried to perform an action that requires the server PC and the server PC is
not active (i.e. not on the network or marked as inactive in Manager Procedures).
For example, the user may have tried to authorize a credit card while the server
PC is inactive.
Not a valid bank card
The user swiped a card that the system does not recognize.
Not a valid MICROS employee card
The user swiped an employee card that is not formatted correctly.
Number of guests must be entered
The user started a guest check by entering a menu item instead of the guest count.
The message only displays if the user has been programmed to require a cover
count for each check.
e7 USER’S MANUAL
8-26
Error Messages
Numeric entry required
Numeric entry required
The user has pressed a key that must be preceded by a numeric value. Examples
would include the [@/For] key, which is used with:
• Open pricing of multiple menu items (e.g., [3] [@/For] [1.00] [Donut] =
$3.00, where donuts are not pre-priced menu items), and
• Split pricing of menu items sold in bulk (e.g., [3] [@/For] [4] [@/For] [2.00]
[Donut] = $1.50).
In both cases, the user must specify the number of menu items affected before the
[@/For] key is pressed.
Only active from (date1) to (date2)
The menu item selected is out of season (i.e., outside of its defined effectivity
dates). For example, if crab cakes are only available from June to September, the
[Crab Cake] menu item key would display with all other entrée keys, but would
trigger this error message when selected in December.
Only one item may be selected when applying an item discount
The user highlighted more than one menu item before pressing an item discount
key. Item discounts must be applied individually.
Only some of the items could be shared
When splitting a check, the user highlighted several items, only some of which
were programmed to allow sharing.
Only (x) of this condiment may be ordered
When presented with condiment touch keys, the user entered a quantity that was
greater than the number allowed for this menu item. The error message indicates
the correct number of condiments that may be added.
For example, on a [2-topping Pizza] menu item, if the user presses [4]
[Pepperoni], the error message will read “Only 2 of this condiment may be
ordered.” Adjustments are made for previously selected condiments. If, in the
preceding example, the user had already selected [Cheese] as one of the 2
toppings, the error message would be “Only 1 of this condiment may be ordered.”
Only (x) remaining: (***)
When ordering a limited quantity menu item (e.g., Lobster), the user tried to enter
a quantity greater than the number of items in stock.
e7 USER’S MANUAL
8-27
Error Messages
Out of item: (x)
Out of item: (x)
The user selected a limited-availability menu item which is currently not in stock.
Limited-availability items are monitored by the system. When an order is
received, the number of available items increases. Each time one of these items is
ordered, the number is depleted. If the count of stock-on-hand is zero when the
item is ordered, this error message is displayed.
Overtender is not correctly rounded
The user tried to enter a payment amount that results in change due where the
change due amount is not acceptable for the currently configured rounding rules.
Partial payment is not allowed. There are too many items on this
check
The number of items posted to the check exceeds the system’s ability to handle
with partial payments. The number of items allowed is 400.
Partial payment is not allowed with non-revenue service charge
Non-revenue service charges must be tendered in full when the check is closed.
Payment amount must be greater than the tip
The user entered a credit payment amount that does not meet the requirements of
the credit card processor. American Express, for example, will not accept a credit
card record that contains a charged tip greater than the payment amount.
Payment in full is required. There are too many items on this check.
The user tried to add another menu item to a check that already contains the
maximum number allowed per check (400). The only allowable functions are
voids and payment in full.
Percent entry required
During a transaction requiring a percent value, the user entered a non-numeric
string (e.g., “fifty” instead of ‘50’).
e7 USER’S MANUAL
8-28
Error Messages
Price is already lower than discount limit
Price is already lower than discount limit
The discount amount entered was greater than the price of the menu item(s)
selected. This occurs when the discount is programmed with a “down to” price
limit, which means that the system discounts the menu item down to the entered
amount.
For example, if a [Cheeseburger] is priced at $4.00, and the user enters an [Open
$ Discount] amount of $3.00, the system will calculate the difference and post a
discount of $1.00 against that menu item. However, if the price is $4.00, and the
user enters $5.00 as the discount amount, the error will display because the price
of the Cheeseburger is already less than the discount limit.
Printer communication error
The workstation could not connect to the assigned printer.
Printer busy
The assigned printer is already in use. Workstation is unable to send print job.
Printer definition not found
The touch key is not linked to a defined printer.
Printer error
Unable to complete the print job due to unspecified error. Check the network and
printer connections and try again.
Print receipt not allowed
The system is unable to comply with the request to print an on-demand customer
receipt. This error occurs when the [Print Receipt] button is pressed and there are
no transaction items on the current check, or if the receipt has already been
printed.
Quantity entry is not allowed when voiding items with condiments
The user tried to partially void a multiple menu item selection (e.g., 2 out of 3
Steak Platters) that included condiment. To correct this problem, void the entire
entry and post again.
e7 USER’S MANUAL
8-29
Error Messages
Quantity entry is not allowed when voiding items with reference entries
Quantity entry is not allowed when voiding items with reference
entries
The user tried to partially void a multiple menu item selection (e.g., 2 out of 3
Mother’s Day Specials) that included a reference entry. To correct an overing of
referenced menu items, void the entire entry and post again.
Quantity entry is not allowed when voiding open price items
The user tried to partially void a multiple open-price menu item selection (e.g., 2
out of 3 Lobster Specials). To correct an overing of open-price menu items, void
the entire line item and post again.
Quantity entry is not allowed with currency conversion
The user entered a quantity followed by the [@/For] key before pressing a
currency key. Currency conversion is applied to the subtotal of the check. It
cannot be applied to partial entries or specific menu items on the check.
Quantity entry is not allowed with last item void
The user tried to void the last menu item by entering a quantity and pressing the
[Void] key. Last item void does not require a quantity value.
Furthermore, the system does not allow a user to void part of a multiple quantity
line item using last item void. If the last item entered was 3 Fries, the user cannot
reduce the quantity to 2 Fries by pressing [1] [Void]. To change the quantity, the
user must highlight the menu item first.
Quantity entry is not allowed with percent (discount/service charge)
The user entered a quantity followed by the [@/For] key before pressing a
percent discount or service charge key. To apply the discount/service charge to
multiple menu items, highlight one item at a time before pressing the appropriate
tender key.
Quantity entry is not allowed with Pickup/Loan
The user tried to enter multiple pickup/loan transactions using the [@/For] key.
An example of the key sequence would be:
[3] [@/For] [200.00] [Bank Loan]
Since the amount of the pickup/loan entry is set by the user, there is no need for a
quantity to be specified. In the above situation, the user would simply enter $600
as the Bank Loan amount.
e7 USER’S MANUAL
8-30
Error Messages
Quantity is greater than the quantity of the selected item
Quantity is greater than the quantity of the selected item
The user tried to void more items than was entered. For example, with the line
item 2 Fries highlighted, the user pressed [3] [Void].
Quantity entry not allowed
After highlighting multiple items, the user tried to void all of them by using the
quantity key. An example of the key sequence would be:
[3] [@/For] [Void]
This is unnecessary. To void multiple items, simply highlight and press [Void].
Quantity entry not allowed with this type of discount
The user tried to enter more than one of the selected discount by pressing a
quantity key first.
Quantity entry not allowed with weighed item
The user entered a quantity followed by the [@/For] key before ringing a
weighed menu item. Since weighed item is priced individually, a quantity key is
not allowed.
Repeat Item can only be used with menu items
The user highlighted a non-menu item (e.g., discount, service charge, tender)
before pressing the [Repeat] key.
Repeat Item cannot be used with (***)
This message is displayed when the user tries to repeat order ineligible menu
items. These include weighed and limited quantity menu items, condiments,
return (voided) items, and items that change price based on the current menu.
Return not allowed
After pressing the [Return] key to activate the function, the user pressed a
transaction key (service charge, discounts, guest count, etc.) instead of a menu
item.
Reprint failed
The user was unable to reprint a credit card voucher.
e7 USER’S MANUAL
8-31
Error Messages
Scale in motion
Scale in motion
The scale detected motion and returned back an error status when the request for
weight was initiated.
Scale overcapacity
The scale was over the programmed capacity when a request for weight was
initiated.
Scale under capacity
The scale was less than zero when a request for weight was initiated.
Seat number of a condiment cannot be changed
The user tried to change the seat assignment of a condiment without selecting the
parent menu item as well.
Seat number feature is not enabled
The user pressed one of the seat keys when the system was not programmed to
allow seat handling. Seat handling is enabled on the Restaurant form in the
MICROS e7 Configurator.
Sent to backup
The assigned printer is unavailable. Print job has been sent to the designated
backup printer.
Service charge must be voided first
The user tried to void items that were used to determine a percentage service
charge before clearing the service charge first.
Service Total is not allowed at this workstation
The workstation is not configured to allow checks to be service totaled. This
option is used in fast transaction environments.
e7 USER’S MANUAL
8-32
Error Messages
Split price entry not allowed with preset price item
Split price entry not allowed with preset price item
The [@/For] key was used with a fixed-price menu item. The system does not
calculate partial amounts for preset menu item prices.
Split pricing can only be used with open-price menu items. It allows a customer to
order odd quantities of items that are normally priced by bulk (e.g., donuts,
bagels) or items whose unit weight varies with selection (e.g., lobster). For
example, if Donuts are priced at 4 for a $2.00, and the customer wanted 3 Donuts,
the correct key sequence would be:
[3] [@/For] [4] [@/For] [2.00] [Donuts]
In this case, the split price for the entry would be 3 Donuts = $1.50.
Table entry required
The user rang up menu items on a new check without entering a table number
first. This error only occurs if the system was programmed to require a table
number.
Table not found
The table number entered is outside the range of values programmed for this
workstation. This message is displayed when a user begins a check by table
number or adds a table number to an open check.
Tender entry required
The user tried to perform an action (ring a menu item, service total a check, etc.)
other than a payment after a partial payment was made on a guest check where the
Property Management System (PMS) is configured to prorate itemizers.
Tender must be voided first
The user tried to split a check before clearing the tender first.
The authorizing employee does not have permission
After pressing a transaction key that requires authorization, the user entered an
employee ID or swiped the employee card of someone who is not privileged to
perform this function.
The closed check has already been reopened by another workstation
After pressing the [Reopen Closed] check key, the user selected a closed check
that is already active on another workstation.
e7 USER’S MANUAL
8-33
Error Messages
The current employee does not a have cash drawer assigned at this workstation
The current employee does not a have cash drawer assigned at this
workstation
The user pressed the [No Sale] key on this workstation without having an
assigned cash drawer.
The seat number of a condiment cannot be changed
The user touch-selected a condiment entry and pressed the [Edit Seat] key
without also selecting the parent menu item. Since a condiment cannot be
separated from its parent item, this action is not allowed.
The selected check has been closed by another workstation
The user attempted to pick up a check that was closed by another workstation.
This error message indicates that the workstations are not synchronized.
The selected item(s) cannot be shared.
When splitting a check, the user selected an item that is not programmed to allow
sharing.
The software license key cannot be found
The user tried to log onto a workstation running unlicensed software. Exit and
alert the system administrator.
The software license key cannot be found.
Grace period began: (date1)
Grace period will expire: (date1)
System is running demo software past the trial period. Licensed software is
required.
The software license key cannot be found.
Grace period expired: (date)
System is running demo software past the trial period. Licensed software is
required.
The system software is not installed properly. Missing or corrupt
license data
The user tried to log onto an improperly installed system workstation. Exit an
alert the system administrator.
e7 USER’S MANUAL
8-34
Error Messages
There is no employee signed in
There is no employee signed in
The user pressed one of the [Begin Check] key without signing in first.
There is a transaction in progress
The user tried to sign out, start a new check, pick-up another check, open the cash
drawer, or declare tips, while a check is still active on the workstation.
There is no transaction in progress
An employee on a fast transaction workstation tried to tender a check that has no
menu items entered. Since a fast transaction check is not started until the first item
is entered, there is no check to tender.
This check already has a table number
After beginning or picking up a check with a table number assigned, the user
pressed the [Add Table Number] key.
This check cannot be reopened. Its payment has already been
included in a credit card batch.
The user tried to reopened a check after the credit card payment has been settled
with the credit card processor.
This check cannot be reopened now. There was a communications
error trying to contact the PC.
When the user tried to reopen a guest check, the system was unable to connect to
the server PC.
When the system is configured for credit authorization and credit finalization
through an integrated server PC, all attempts to reopen a check must pass through
the server PC. This is true whether or not the check was paid to a credit card.
This check has items on hold
The user tried to tender a check with held items. These items must be either
voided or fired to the kitchen before the check can be paid.
This employee is not required to clock-in
This message displays when an employee who is not configured to use the
timekeeping functions, enters his/her ID number and presses the [Clock In/Out]
key.
e7 USER’S MANUAL
8-35
Error Messages
This function is only allowed on the server PC
This function is only allowed on the server PC
The user tried to access certain functions that are not available on the workstation.
For example, the Credit Card Batch Utility can only be run from the server PC.
This function is not allowed on the server PC
POS functions cannot be run from the server PC. Any attempt to begin, edit, or
close a guest check from this workstation will cause this error message to display.
This function is not allowed on the workstation
The user tried to access functions that are not available on the workstation. For
example, the [Minimize] key cannot be utilized on the workstation.
This tender does not allow currency conversion
After converting the currency, the user tried to pay using a tender key that is not
programmed to handle the exchange.
This workstation is currently set as INACTIVE
The user tried to begin a transaction on an inactive workstation. The workstation
can be activated by a privileged employee through Manager Procedures.
This workstation is not properly configured in the database
The current workstation has not been assigned a name in the MICROS e7
Configurator.
Timeout, the printer may be turned off
No response received from the assigned printer.
Too many checks
The user tried to split the current check too many times. During split check
operations, up to 10 checks are allowed.
Too many items selected
The system is unable to complete the transaction based on the number of items
highlighted. Typically, this message displays when the user highlight more than
one item before pressing the [Insert Condiment] or [Replace Condiment] keys,
or when used with some times of discounts.
e7 USER’S MANUAL
8-36
Error Messages
Training checks cannot be reopened
Training checks cannot be reopened
The user attempted to reopen a closed check generated by an employee in training
mode. Training checks are for instructional purposes only and are not included in
the system totals or on reports.
Transaction void is not allowed if the check already has items
The transaction void function is used to record refunds or to reverse transactions
items that were mishandled on a closed check. As such, a transaction void cannot
be added to an existing check.
Transfer not allowed. You already own this check.
After pressing the [Transfer Check] key, the user selected one of his/her own
checks from the list of open checks.
Unable to continue - interface [interface name] is hosted on [MICROS
e7 node] which is inactive.
The user tried to perform an interface function (i.e. PMS inquiry or room charge
posting) and the MICROS e7 workstation or PC that hosts the interface is either
off the network or marked as inactive in Manager Procedures.
Unable to read check - aborting transaction
After splitting a check, the system is unable to read one of the new guest checks
when the user tried to pick it up.
Unable to save original check - aborting split
After splitting a check, the system was unable to save the updated original check.
Therefore, the split check process has been cancelled.
Unable to save new split check
After splitting a check, the system was unable to save some (but not all) of the
new split checks.
Void items cannot be voided
Returned items are posted as negative entries or voids. Once the check has been
service totalled or closed, the voided items cannot be deleted from the reopened
check.
e7 USER’S MANUAL
8-37
Error Messages
Void is not allowed with percent (discount/service charge) entries.
Void is not allowed with percent (discount/service charge) entries.
During a transaction void, the user tried to enter a discount or service charge
entry. Discounts and service charges cannot be posted as negative entries.
Void of Credit Auth not allowed if there are no previous auths
During a transaction void, the user tried to perform a credit authorization. Credit
authorizations cannot be generated for negative amounts.
Void of a required condiment is not allowed
The user tried to touch-void a required condiment from the check detail. Unless
this is a last item void (which would allow the user to select a replacement
condiment), the required condiment cannot be removed without voiding the
parent menu item and all of its condiments.
Warning -- disk space low
The system is running out of available space for storing additional records. Notify
the system administrator for guidance.
Weight entry has too many digits after the decimal
The decimal length of the weight entry is incompatible with the system database.
Weight entry is less than the tare weight for this item
The weight of a menu item (as keyed in or measured by an attached scale device)
is less than its programmed tare weight (i.e., the weight of the packaging or
container that holds it).
Since the tare weight is subtracted before the menu item price is calculated, the
result would be a negative value. This is not allowed.
You are not allowed to (***) a guest check
The user pressed a guest check key (where *** indicates the selected function)
that he or she is not privileged to use. This includes the option to begin, pick-up,
transfer, or reopen a check.
Prohibited functions are linked to the employee’s job code. Cooks, for example,
would have no need to open and close guest checks, so the option to do so would
be disabled in the MICROS e7 Configurator.
e7 USER’S MANUAL
8-38
Error Messages
You are not allowed to use Tender or Media functions at this workstation
You are not allowed to use Tender or Media functions at this
workstation
The user tried to perform one of the following functions on a workstation to
which he/she was not assigned: a) service total or print a check, b) make
payments on a check, or c) add or remove cash from the cash drawer.
You do not have valid permissions to perform this operation
A non-privileged user tried to access the MICROS e7 Configurator, Manager
Procedures, or system Reports.
You must declare a bank amount before beginning a check
The starting balance for the cash drawer has not been provided. This message
only occurs if the employee is programmed to enter the amount of the bank (i.e.,
cash in the cash drawer) at the start of his/her shift. Typically, this employee is
responsible for the cash drawer, but self-banking servers may have this option
selected as well.
To proceed, press [Ok] to clear the message box. Select the [Bank Loan] key on
the payment screen. At the prompt, enter the starting balance for the cash drawer
and press [Enter].
You must select a job
During clock in, an employee with multiple job rates failed to select one from the
list provided. The system needs to know which type of job the employee will be
performing in order to apply the correct rates and privileges. Press [Ok] to clear
the error message and display the job list again.
You must select a clock out type
When presented with a list of clock out options (e.g., Clock Out, Clock Out on
Break, Clock Out on Paid Break), the user failed to select one before pressing
[Ok] to continue.
You must select an order type
The user failed to specify an order type (e.g., Eat In, Carry Out, Room Service)
before attempting to service total or pay out the check.
Workstation can be programmed to assign a default order type when a new check
is begun. This message only displays if the workstation was not programmed with
a default order type.
e7 USER’S MANUAL
8-39
Error Messages
You must select the condiment to be replaced
You must select the condiment to be replaced
The user pressed the [Replace Condiment] key without highlighting a condiment
selection first.
Zero credit auth amount not allowed
The user pressed the [Credit Auth] key on a guest check with a Total Due of 0.
Therefore, there is nothing to authorize. If this is a preauthorization of a credit
card, use the [Initial Auth] key instead.
Zero entry not allowed
The user entered “0” as the value of the discount or service charge entry. A nonzero number is required.
e7 USER’S MANUAL
8-40
Database Programming Errors
Database programming error.
Database Programming Errors
Programming errors alert the user to flaws in database configuration. The error
message occurs when an improperly defined function is attempted. In the event of
a programming error, alert the system administrator immediately. Press [Ok] to
clear the message box and return to the current transaction.
All programming errors begin with:
Database programming error.
followed by a description of the problem:
Barcode scanner is not configured correctly.
A system is unable to read the data submitted via the barcode scanner. A
configuration issue exists.
Charged Tip function key not allowed.
The charged tip function was enabled for a tender type that does not support
charged tips (e.g., Cash, Service Total, Bank Loans/Pickups).
Container (x) is not valid.
The touch key is linked to a container whose key sequence is outside the
acceptable range of values.
Credit card must be programmed as a payment key.
The credit card touch key is not configured for use as a payment key.
Currency definition not found.
The touch key is not linked to a defined currency.
Discount definition not found.
The touch key is not linked to a defined discount.
MICROS e7 is configured to use kilograms and the scale is configured to
use pounds.
The weight unit designated for the scale must match the weight unit defined with
the Restaurant | Descriptors | Weight unit is kilograms option.
e7 USER’S MANUAL
8-41
Database Programming Errors
Database programming error.
MICROS e7 is configured to use pounds and the scale is configured to
use kilograms.
The weight unit designated for the scale must match the weight unit defined with
the Restaurant | Descriptors | Weight unit is kilograms option.
Inclusive tax not allowed with service charge.
Service charges are not taxable items.
Interface cannot be the backup for itself.
An interface cannot be programmed to be its own backup. A second instance of
the interface must be programmed in the database to be used as a backup
interface.
Invalid Cash Drawer Number.
The touch key is linked to a Cash Drawer whose key sequence is outside the
acceptable range of values.
Invalid Condiment Touch Screen programmed.
The user signed in using a job type that does not have a valid condiment screen
assigned. Either the option was not set, or the previously selected screen has been
deleted from the system.
Invalid Default Touch Screen programmed.
The user signed in using a job type that does not have a valid default touchscreen
assigned. Either the option was not set, or the previously selected screen has been
deleted from the system.
Invalid Sign In Touch Screen programmed.
The workstation does not have a valid sign-in screen assigned. Either the option
was not set, or the previously selected screen has been deleted from the system.
Invalid Touch Screen programmed.
The user selected a function key that does not have a valid touch screen assigned.
Either the option was not set, or the previously selected screen has been deleted
from the system.
Invalid tender/media type programmed.
The options selected are incompatible with the type of tender/media key.
e7 USER’S MANUAL
8-42
Database Programming Errors
Database programming error.
Invalid Transaction Touch Screen programmed.
The user signed in using a job type that does not have a valid transaction screen
assigned. Either the option was not set, or the previously selected screen has been
deleted from the system.
Menu item definition not found.
The touch key is not linked to a defined menu item.
Menu item category definition not found.
The touch key is not linked to a menu item with a menu item category defined.
Menu item has no family group programmed. Reports will not balance.
The menu item family group must be selected.
Menu item has no major group programmed. Reports will not balance.
The menu item major group must be selected.
Menu item has no prices programmed.
At least one price is required.
Menu (x) is not valid.
The touch key is linked to a menu item whose key sequence is outside the
acceptable range of values.
Modifier (x) is not valid.
The touch key is linked to a modifier whose key sequence is outside the
acceptable range of values.
Non-revenue service charge must be programmed as an open amount,
non-tip Service Charge.
Too many incompatible options were checked for this service charge.
Only one inclusive tax rate is allowed.
The item entered can only have one inclusive tax rate applied to it.
Order type (x) does not exist.
The touch key is not linked to a defined order type.
e7 USER’S MANUAL
8-43
Database Programming Errors
Database programming error.
Order type (x) is not enabled.
The option to use this defined order type was not checked in MICROS e7
Configurator.
Preset tender amount must be greater than zero.
The preset tender is incorrectly defined. The value applied with against a check
for this tender must be greater than 0.
Preset tender definition not found.
The touch key is not linked to a defined preset tender.
Print Group definition not found.
The touch key is not linked to a defined Print Group.
Required attachments cannot have an open price.
At least one of the required side items or condiments attached to this menu item is
configured as an open-priced menu item.
Required attachments cannot have a reference entry.
At least one of the required side items or condiments attached to this menu item
includes a reference entry.
Service charge definition not found.
The touch key is not linked to a defined service charge.
Tax rate (x) has not been defined.
The touch key is not linked to a defined tax rate.
Tax rate (x) is not valid.
The touch key is linked to a tax rate whose key sequence is outside the acceptable
range of values.
Tender definition not found.
The touch key is not linked to a defined tender.
The bank declaration tender is not configured as a “Loan”.
The touch key is not linked to the appropriate tender type.
e7 USER’S MANUAL
8-44
Database Programming Errors
Database programming error.
The currency conversion rate cannot be zero.
The currency is incorrectly defined. The conversion rate must be greater than 0.
The default cash tender setting is not valid.
The cash tender key is incorrectly defined.
The default charged tip service charge is not programmed to be a
charged tip.
The tender key is linked to an incorrectly defined charged tip service charge. This
could occur if the wrong type of service charge was selected as the charged tip, or
if the charged tip service charge entry itself has been changed.
The device programmed as the scanner for this workstation cannot be
found or is not a scanner.
The scanner device assigned to this workstation is not properly configured.
The maximum count for one of this item’s required condiments is 0.
The condiment was configured to use maximum/minimum values. Maximum
value must be greater than 0.
The maximum count for one of this item’s required condiments is less
than it’s minimum count.
The condiment was configured to use maximum/minimum values. Maximum
value must be greater than minimum entered.
The required attachment generated the following error messages.
The system encountered a problem with the selected required side item or
condiment. The error message indicates the nature of the incompatibility.
There is no default bank declaration tender programmed.
The tender key is linked to a non-existent bank loan tender. Typically, this error
displays when programming changes are made without updating the existing
links.
There is no default charged tip service charge programmed.
The tender key is linked to a non-existent charged tip service charge. Typically,
this error displays when programming changes are made without updating the
existing links.
e7 USER’S MANUAL
8-45
Database Programming Errors
Database programming error.
This workstation has no device role programmed for a scanner.
The workstation is not configured to use a scanner.
Threshold discounts must not be item discounts.
The discount was incorrectly configured as both a threshold and an item discount.
Too many levels of required condiment nesting.
The number of sublevels programmed exceeds the maximum number allowed for
condiments. Only two sublevels are supported.
For example, suppose the user selected a [Steak] menu item with condiment
sides. The customer orders a baked potato (sublevel 1) and is presented with all
the condiment toppings available with the baked potato menu item (e.g., butter,
sour cream, chives, cheese). These toppings represent the sublevel 2. If the user
selects butter or sour cream, the selection is entered without comment. However,
the [Cheese] option is programmed to prompt for cheese type (cheddar, swiss,
provolone). This constitute a third sublevel, which is not allowed.
Workstation definition not found.
The workstation record has not been found. Either the record is incomplete or was
deleted from the system.
Workstation status file not found.
An internal database error has occurred. Unable to locate table entry for this
workstation.
e7 USER’S MANUAL
8-46
Index
Symbols
@/For
menu item quantities
3-9
A
Active Rules
Allowed Condiment. See Modifiers.
Architecture
peer-to-peer
Attachments
Autosequences
about
3-13
1-2
3-12
6-7
B
Bank Loan
Bank Pick-up
Barcodes
Begin a Guest Check
by check number
by name
by table name
fast transaction
Breaks
return from a scheduled break
take a scheduled break
2-5
2-5
3-11
3-3
3-4
3-6
3-19
2-8
2-8
C
Cancel Order
Cash Drawer
add cash amount to
assign/unassign employee
e7 USER’S MANUAL
3-60
remove cash amount from
2-5
types supported
1-4
using the No Sale key
2-6
Categories
key description
1-10
selecting
3-7
Check Number
3-3
Clock In
adjust time card record
4-8 to 4-11
at start of shift
2-3
from a scheduled break
2-8
with employee ID card
2-3
Clock Out
adjust time card record
4-8 to 4-11
at end of shift
2-9
on a scheduled break
2-8
Combo Meals
3-36 to 3-49
Making a Combo Meal Selection
3-37
Substituting Items
3-45
Upsizing a Selection
3-46
Voiding a Selection
3-47
Pricing an Item
3-48
Sizing an Item
3-49
Condiments
3-12 to 3-14
active rules
3-13
attachments
3-12
insert condiment
3-14
minimum/maximum values
3-14
modifiers
3-13
replace condiments
3-14
see also Menu Items
Containers
3-10
Credit Card Batch
about
1-11
2-5
2-4
IX-1
Index
Credit Card Batch Utility
about CA/EDC
accessing the utility
Batch Detail Report
Batch Transfer Status Report
create a batch
description
edit/omit a record
electronic draft capture (EDC)
reconciliation and settlement
run a diagnostic
settle a batch
Credit Cards
authorize multiple cards
authorize payment
basic terminology
credit card lookup
finalize payment
obtain verbal authorization
paying by
preauthorize amounts
process by external device
process via internal driver
processing options
reprinting a voucher
Currency Conversion
Customer receipt
on-demand printing
5-2
5-3
5-11
5-9
5-4
5-3
5-6
5-2
5-2
5-13
5-8
3-46
3-44
3-41
3-56
3-51
3-50
3-40
3-48
3-42
3-44
3-42
3-57
3-59
3-68
D
Discounts
apply to a guest check
item discounts
open amount or percentage
preset amount or percentage
subtotal
3-22
3-23
3-22
3-22
3-23
edit ID
employee ID cards
increment employee shift
return from a scheduled break
take a scheduled break
training status
4-3
2-3
4-6
2-8
2-8
4-7
F
Fast Transactions
print customer receipts
3-19
3-68
G
Generated Keys
Gift Cards
See Stored Value Cards
Guest Check
begin by check number
begin by name
begin by table name
discounts
guest count
merge checks
on-demand printing
payment
pick up by number
pick up by table name
pick up open
reopen a closed check
seat handling
service charges
split a check
transfer ownership
Guest Count
1-9
3-58
3-3
3-4
3-6
3-22
3-26
3-34
3-68
3-39
3-20
3-21
3-20
3-63
3-27
3-24
3-36
3-35
3-26
H
E
MICROS e7 Configurator
about
Employee
adjust time card
e7 USER’S MANUAL
Hold and Fire
3-18
1-10
4-8
IX-2
Index
K
Keys
functional descriptions
7-3
L
Languages
about
change from workstation default
change printer default
set for output devices
License key
Loyalty Cards
2-7
2-7
4-21
2-7
1-5
3-84
M
Magnetic Stripe Card
sign in/clock in
2-3
Magnetic Stripe Reader
description
1-4
Manager Procedures
about
1-10, 4-2
about workstation shifts
4-22
access the module
4-2
assign employee ID
4-3
change menu item price
4-12
edit employees
4-3
edit menu item availability status
4-17
edit menu item display status
4-15
edit menu items
4-12
edit workstation communication status 4-24
filter menu items
4-19
increment employee shift
4-6
increment workstation shift
4-22
menu item access
4-15
reset workstation shift
4-23
retrieve checks from another workstation 427
retrieve workstation definitions
4-26
search menu item list
4-19
set training status
4-7
set workstation date and time
4-25
time card adjustments
4-8
e7 USER’S MANUAL
Menu Item Access
about
4-15
edit availability status
4-17
edit display status
4-15
Menu Items
apply condiments
3-12 to 3-14
apply discounts
3-22
category keys
1-10
change price
4-12
edit access
4-15
edit thru Manager Procedures
4-12
filter by category
4-19
fire held items
3-18
hold items
3-18
limited availability
4-17
menu pricing
3-32
multiple quantities
3-9
open-priced
3-8
post to an order
3-7
price by weight
3-10
refunds
3-65
repeat an item
3-17
returns
3-62
select a container
3-10
split between checks
3-38
Menus
about
3-32
set the active menu
3-32
Modifiers
3-13
N
No Sale
2-6
O
Order Payment
types of
Order Types
about
assign a type
override default
3-39
3-29
3-29
3-30
IX-3
Index
P
Paid In
See Bank Loan
Paid Out
See Bank Pick-up
Payment Transactions
by cash
by credit card
Pick Up Guest Check
by number
by table name
Prefixes. See Active Rules.
Price
change by container
change by menu
change by menu and container
change single price setting
edit menu item
Printers
change default language
redirect or disable
Printing
guest checks and customer receipts
on demand
2-5
2-5
3-39
3-39
3-40
3-20
3-20
3-21
4-13
4-13
4-13
4-14
4-12
4-21
4-20
3-68
3-68
Q
Quantities
using the @/For function
3-9
R
Receipt Printer
about
types supported
Reference Entry
about
open-price menu items
Refunds
Reports
about
Batch Detail Report
Batch Transfer Status Report
e7 USER’S MANUAL
HTML-based
6-3
standard 40-column
6-3, 6-4
ReportsPlus
6-3, 6-44
Required Condiment. See Attachments.
Returns
3-62
S
Seats
assign a number
change an assigned seat
increment the number
split a check by
Service Charges
apply to a guest check
non-revenue
types of
Auto Service Charges
Service Round
void menu items in current
void menu items in previous
Service Total
Shift
about workstation shifts
increment employee shift
increment workstation shift
reset workstation shift
Sign In
with employee ID card
Sign Out
software modules
Credit Card Batch
Split Checks
Stored Value Cards
3-27
3-27
3-28
3-27
3-36
3-24
3-25
3-24
3-25
3-19
3-60
3-61
3-19
4-22
4-6
4-22
4-23
2-2
2-3
2-9
1-11
3-36
3-58
1-4
1-4
3-33
3-8
3-65
6-3
5-11
5-9
T
Table Name
assigning
Tax Exempt Sales
Time Cards
about
add a new record
3-6
3-58
4-8
4-10
IX-4
Index
modify an existing record
Tips
declare amount
indirect
Touchscreen
physical device description
Touchscreen layouts
basic
begin transaction
order entry
sign-in
Training Mode
set employee status
4-8
3-67
3-67
3-67
1-3
1-6
1-8
1-9
1-7
4-7
V
Void
current round menu items
manager voids
previous round menu items
transaction voids
3-60
3-61
3-61
3-65
W
Weighed Items
Workstation 4
customer display
description
Workstation Maintenance
about shifts
edit communication status
increment shift
reset shift number
retrieve checks from another wk
retrieve definitions
set date and time
e7 USER’S MANUAL
3-10
1-5
1-3
4-22
4-24
4-22
4-23
4-27
4-26
4-25
IX-5