1
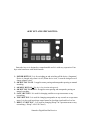
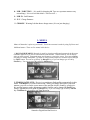
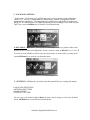
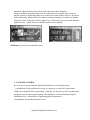
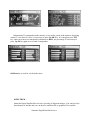
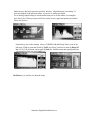
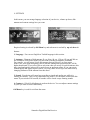
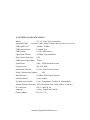
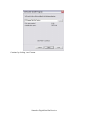
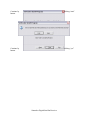
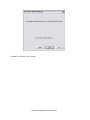
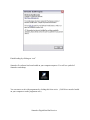
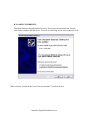
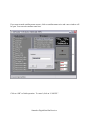
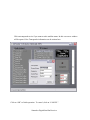
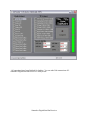
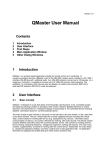
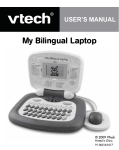
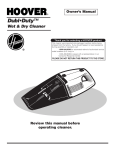
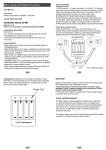
SATTRACKER DIGITAL SATELLITE RECEIVER
INDEX
1 . GENERAL INTRODUCTION
2. KEY SET AND SPECIALITIES
3. MENUS
4.GENERAL USAGE
5. MANUEL SATELLITE FINDER
6. SATELLITE FINDER
7. PACKAGE CONTROL
8. SPECTRUM
9. SETTINGS
10. CHARGE
11. TECHNICAL SPECIFICATIONS
12. PC CONNECTION AND SOFTWARE
A. CONNECTION OF PC PROGRAMMES
B. LOADING USB DRIVER
C. USAGE OF SATTRACKER PC SOFTWARE
Sattracker Digital Satellite Receiver
1. GENERAL INTRODUCTION
Sattracker Satellite Receiver is a satellite receiver that is prepared as appropriate for
conditions of Turkey. You can set up dish antenna as most sensitive and as fastest and you
can search for satellite automaticly or manuel by Sattracker.
While Sattracker is being designed, all requirements of user are considered and it is
integrated with quick charge system and durable batterries . It is possible to set up about
15-20 pcs. dish diennas in only one charge. By thinking that this is not enough,too. , quick
charge system is designed as it will make filling at most in 2 hours. Sattracker is equipped
with some warning systems .You can see battery status by battert status bar on the screen. If
the battery is reduced as it ca not be used , “Poor Battery” will write on the screen and then
vocal warning is heard.In this case, you must charge device till battery is full. Sattracker
remains at most 5 minutes on measurement menus. After five minutes, it returns to main
menu automatically and battery saving is supplied by this way . If there is something wrong
or short circuit on LNB or cable while measurement time, then “short circuit” is seen on
the screen and the device protects itself . So, any breaking of the device is prevented by this
way .
Sattracker Digital Satellite Receiver
1.KEY SET AND SPECIALITIES :
Sattracker key set is designed as comprehensible and it is with easy expression. Four
keys at the bottom are with multi fonction
1- POWER BUTTON : It is for switching on and switching off the device.( Important !
Device is charged only when it is off.) When device is on , It wont be charged even if
charge adaptor is tied .
2- OK BUTTON TO UP : It supplies menu passing and transponder passing on manuel
searching.
3- OK/MENU BUTTON : This key is for selection and approval.
4- OK BUTTON TO DOWN : It supplies menu passing and transponder passing on
manuel searching.
5- SAT/F1 BUTTON : It is used for changing satellite on a spectrum menu or any
researching.
6- TP/F2 BUTTON : It is used for changing transponder on any research or on spectrum
menu. It is also used in package control menu for checking signal and levels as bar.
7- DISEC / F3 BUTTON : : It is used for changing DiseqC on a spectrum menu or any
researching. ( DiseqC A-B-C-D Closed )
Sattracker Digital Satellite Receiver
8- LNB / F4 BUTTON : : It is used for changing lnb Type on a spectrum menu or any
researching. ( Universal Lnb-Mdu-Mdu2- C band and user )
9- LNB IN : Lnb Entrance
10- 12 V : Charge Entrance
11- CHARGE : Warning Led that shows charge status ( It is on just charging. )
3.. MENUS
Menus of Sattracker is quite easy and useful . Tour between menus is made by using Up-Down and
Ok/Menu buttons . There are five menus in this device.
1 . MANUAL RESEARCH : Research is made by selecting satellite and transponder in this menu.
Ok/Menu approval key is used to enter manual research menu . Satellite name is seen on the top
after you enter to menu. Transporder name and frequency seem on the screen . You can use Down
or Up keys to change transporder. Tp button is used for same purpose,too. Satellite can be changed
by Sat/F1 button. You can set up DiseqC by Diseq/F3 key or you can change type of Lnb by
Lnb/F4 key . You can go out of this menu by Ok/Menu key.
2- FINDING SATELLITE : Device is on position to find satellite automatically in this
menu. . Ok/Menu key is used to enter menu . When you change direction of your dish
antenna, you will see on the screen name of the satellite which is found by your device.
It is an ideal menu to make adjustment roughly.Satellite can be changed by Sat/F1 key,
DiseqC adjustment can be made by Diseq/F3 key or you can change type of Lnb by Lnb/F4
key. Ok/Menu key is used for exit from the menu.
Sattracker Digital Satellite Receiver
3 – PACKAGE CONTROL :
In this menu , All frequency of satellite that is set up is seen on the screen with quality
values as %. As first , 5 transponders are monitorized . Second 5 transponders can be
monitorized by up ok key ( 10 transponders are available for each satellite in memory of
the device. If it is necessary to see signal and quality not as percantage, if you want it as bar,
Tp/F2 key is used. Ok/Menu key is used for exit from the menu.
.
4- SPECTRUM : In this menu , all transponders in the satellite are seen as graphics.22khz can be
switched on and switched off by Tp/F2 key. DiseqC selection is made by Diseq/F3 key. 13/18 (V-H
) selection is made by Lnb key.Satellite name and signal quality is monitarized by pressing Sat/F1
button Ok/Menu key is used for exit from the menu.
5 – SETTINGS : Ok/Menu key is used to enter this menu.There are 4 setting sub-menus.
LANGUAGE SELECTION
ANTENNA SELECTION
SOUND ON/OFF
CONTRACT SETTING
You can come to sub menus By Up and Down ok buttons and fit settings are selected by Ok/Menu
button. Ok/Menu key is used for exit from the menu.
Sattracker Digital Satellite Receiver
4.GENERAL USAGE
It is easier to set up dish antenna by Sattracker. As an example of a basic setting type :
Firstly , set up dish antenna on an appropriate direction with satellite .Connect appropriate
LNB to antenna and connect Lnb cable of your Sattracker device to IN connector with F
connector. Switch on Sattracker system by pressing on-off key. Enter Manuel Search by pressing
Ok/Menu from main menu. Select satellite that you want to find in this menu.
Then, select Lnb type by Lnb/F4 .( System begins to run as standart on Universal Lnb )
You will need this menu only when you use another Lnb type .Please adjust DiseqC port if
Diseq/F3 is not affixed DiseqC.
Sattracker Digital Satellite Receiver
We selected satellite , we adjusted Lnb type , we setted up DiseqC and now turn is for
transponder selection.
Select one transponder by Up/Down Ok or Tp/F1 key.
Now time is to adjust dish antenna. Turn dish antenna right-left and up-down and bring to
the highest level of S and Q bars . When signal and level is higher and higher , sound of the
system will periodicly increase and make voiced announcement.When you set up signal and
level as the highest ,values on the left of the screen S:-40.8dBm 97% and Q:-01.23dBm
84% are important for us. On the side where Q:-01.23dBm 84% is written, your settings
will be as well as when dBm is close to zero . Continue setting operation with caring these
subjects and checking minimum first 4 transponders in the satellite.After these
opeariatons,it means that you finish dish antenna settings.
6. FINDING SATELLITE
Sattracker digital satellite receiver has function to find satellite automatically.Even amateur
users can set up antenna easily by this speciality.Enter “Find Satellite” in main menu . Turn
Sattracker Digital Satellite Receiver
antenna to right-left and up-down slowly with connection Lnb to Sattracker.
Name of satellite and signal-quality levels are monitarized if any signal comes from any
satellite. Related to signal and quality level, sound comes from speaker of device. By means
of this high quality signal sound, it can adjust according to intensity of sound even without
looking at screen . In the places where signal is low, sound comes once per second and when
signal increases , sound comes less and BİP sounds come frequently.
Ok/Menu key is used for exit from the menu
7. PACKAGE CONTROL
It is very easy to set up Sattracker Digital Satellite Receiver with Multisdwitch
( switchboard ) When switcboard is set up ,it is necessary to check all of upper band,
22Khz lower band and 22 Khz upper band . Generally ,it is necessary to show around menus
and look at each for checking these bands .This problem is solved on Sattracker Digital
Satellite Receiver . Information of Signal and quality information of
5 transponders are monitarized on the screen.
Sattracker Digital Satellite Receiver
Information of 5 transponders in the memory is seen on the screen in the entrance of packing
control. To see other five ones, it is necessary to press Up OK Key . It is enough to press T/F2
key when you want to see transponder information as BAR , not percentage. It is necessary to
press Up Ok key again to see second 5 transponders.
Ok/Menu key is used for exit from the menu
8.SPECTRUM :
Sattracker Digital Satellite Receiver has a speciality of Spectrum analyse .You can have idea
about density of satellite and you can observe satellite traffic as graphical. First satellite
Sattracker Digital Satellite Receiver
finders devices had only spectrum speciality. Because , all publications were analog 7-8
years ago.Signals in the spectrum menu, we can see as analog not digital.
To see analog signals belong to which satellite that you see in this menu ,it is enough to
press Sat/F1 key .When you press Sat/F1 key on the screen, signal and quality rate and ber
values will be seen.
Function keys are used to change values of 22KHZ,LNB and DiseqC that is seen on the
left menu .22khz is open and closed by Tp/F2 key.DiseqC selection is made by Diseq/F3
key.13/18 (V-H) selection can be made by Lnb key. Satellite name and signal quality rate
is monitarized when you press Sat/F1 key.
Ok/Menu key is used for exit from the menu
Sattracker Digital Satellite Receiver
9. SETTINGS
In this menu ,you can arrange language selection of your device, volume up-down, dish
antenna and contrast settings how you want.
Required setting is selected by Ok/Menu key and sub-menu is reached by up and down ok
buttons.
1- Language : You can use English or Turkish language in this section.
2- Antenna : Diameter of dish antenna 45 cm ,60cm ,90 cm , 120 cm,150 cm and 200 cm
are available.It is advised to make your selection according to diameter of antenna.
For example, you will set up 90 cm dish antenna ,but you select 45 cm from menu.
In this case, your signal and quality rates in satellite finding and spectrum menus ,will be
higher than normal. If you select 200 cm selection when you set up 90 cm dish antenna, this
time signal and quality values will be much lower on spectrum menus. If you can not see
wanted quality and signal In places where very long cables are used,you can make trial by
changing diameter of dish antenna from this menu.
3- Sound : Your device will sound out according to signal and quality rate while it is
looking for satellite . This is a big comfortness for setter. You can adjust volume from this
menu. If you switch off all sounds, all sounds will be closed except warning sounds.
4- Contrast : 128x64 Lcd Indicator is used on the device. You can adjust contrast settings
as your eyes look at screen comfortably.
Ok/Menu key is used for exit from the menu
Sattracker Digital Satellite Receiver
10 .CHARGE
You can charge battery by another adaptor with 12V 1.3 A Charge tool when acumulator
of your device finishes.You can charge your device comfortably
by a standart Power source ( 12 V 13A ) . Charge period is approximately 2 hours.
When you put device on charge, charge light on the front panel will be red. Light will be
yellow when it starts to be filled and at the end it is green. If the light on the front panel is
red , battery is free .If it is yellow or orange, battery is half-full. If it is green or a tone of
green ,battery is full. It is necessarry to make operation of charcing and using battery at
least 2-3 times for using it productive.This is necessary to have maximum performance by
full reaction of chemical inside accumulator.Because of this
You must keep it in charge at least 12 hours on the first time you buy.You can check
battery status by battery indicator in main menu.If battery is on a level that can not be
used , on the screen you will see message “Poor Battery” and got warning sound.You
must put battery on charge in this case
Entrance is place that 12 writes.
Sattracker Digital Satellite Receiver
11 .TECHNICAL SPECIFICATIONS :
Battery
Supported LNBs
12V 1.3 A Dry Type Accumulator
Üniversal , Mdu , Mdu2, C Band and user known 1 pcs. Lnb
LNB Signal Level
LNB Entrance Soket
-65dBm / -25dBm
F Female Type
LNB Feeding
13/18V, Max 600mA
Upper Band Selecter
0/22KHz 1Vpp modulation
Short Curcuit Protection
YES
LNB Entrance Empedance
75Ohm
Symbol Rate
2000 – 45000 Ksembol/Second
Frequency Gap
950-2150 MHz
Polarization Selection
13/18 V (LNB, DiseqC Switch)
DiseqC (Multiswitch) Support
YES
Band Selection
0/22KHz (LNB, DiseqC Switch)
Satellite Memory
16 pcs.satellite
Tp Number per satellite
10 pcs Transponders (Totally 160 Transponders)
Antenna Diameter Selection YES (45cm,60cm,90cm,120cm,150cm ve 200cm )
PC Connection
Usb 1.1 and Usb 2.0
Language
2 units ( English and Turkish )
Charge Adaptor
DC 12v 1.3 A
Sattracker Digital Satellite Receiver
PC CONNECTION AND SOFTWARE
Satellite and Transponder list can become current by help of computer inside Sattracker Digital
Satellite Receiver . You can describe new type Lnb values to Lnb menu. One Pc that has USB
connection and Sattracker are enough for PC loader software. Firstly , It is enough to load
Sattracker Pc Software to your computer.Then it is enough to load USB Drivers to computer.
A – LOADING OF PC PROGRAMME :
Put Sattracker Programme Cd on your computer .Start loading by clicking double on
Sattracker.exe programme.
Sattracker Digital Satellite Receiver
Continue by
clicking “next” button.
Sattracker Digital Satellite Receiver
Continue by clicking “next” button.
Sattracker Digital Satellite Receiver
Continue by
button.
clicking “start”
Continue by
button.
clicking “yes”
Sattracker Digital Satellite Receiver
Continue by clicking “next” button.
Sattracker Digital Satellite Receiver
Finish loading by clicking on “exit”
Sattracker Pc software has been loaded on your computer anymore. You will see symbol of
Sattracker on desktop.
You can start to work with programme by clicking this ickon twice. ( Usb Driver must be loaded
on your computer to make programme run.)
Sattracker Digital Satellite Receiver
B- LOADING USB DRIVER :
Switch on Sattracker Digital Satellite Receiver. Device must be on main menu. Put usb
cable on the computer and the device. You will see following screen when connection is ok.
Mark selection “Load from the list or from any location”” and click on next .
Sattracker Digital Satellite Receiver
Mark” Look for best driver in this situation” .Click on “Glance” button and mark
C:/Program Files/Sattracker file .Then click on “Ok” Buton.Then Click on “Next” and you
will see following screen.
Sattracker Digital Satellite Receiver
Click on “Continue” Button .Then wait for loading of driver.
Sattracker Digital Satellite Receiver
Driver will be load and following screen will be on monitor.
Sattracker Digital Satellite Receiver
Now,usb
driver is load and you can make it current by working on Sattracker programme.
C..SATT
RACKE
R
PC
YAZILI
MININ
KULLA
NIMI
Start
programm
by
clicking
twice on
Sattracker
ikon on
desktop .If
usd driver
loaded
rightly ,
e
is
Sattracker Digital Satellite Receiver
you will see “Connected Digital Satmeter” writing at the bottom part.
At the same time , if connection is ok , you will see “START” buton as active in the
programme . If there is something wrong or usb driver is not loaded, you will see “Not
Connected” message. ( In this case check your usb cable and switching on of your device.
Sattracker Digital Satellite Receiver
As you can see ont the figure , “Connected Digital Satmeter” and “Start” buttons are active.
Programme is ready to be used. “Satellite list” on the left side, “Transponder List” in the middle
“ New Lnb Type Add” is at te bottom.
Sattracker Digital Satellite Receiver
If you want to make satellate name current , clink on satellate name twice and a new window will
be open. You can write satellate name here.
Click on “OK” to finish operation . To cancel ,click on “CANCEL”.
Sattracker Digital Satellite Receiver
Click on transponder twice if you want to make satellate name .In this case a new window
will be opened. New Transponder information can be written here.
Click on “OK” to finish operation . To cancel ,click on “CANCEL”.
Sattracker Digital Satellite Receiver
When a new type LNB is in the market, you can define this to your Sattracker Digital Satellite
receiver . You must use “ Add new LNB type” to maket his operation
When you enter Local Oscillator information that is written on LNB, values on Lnb menu that
writes “USER” will be changed according to LNB.
Click on “start” button to load changes to Sattracker device after all these operations are ok.
You will see loading operation
on the left side of PC programme.
Sattracker Digital Satellite Receiver
Level bar on the left will be green when loading operation is finished.
Sattracker Digital Satellite Receiver
All operations have been finished for loading . You can take Usd connections off..
Sattracker Digital Satellite Receiver is ready to use.
Sattracker Digital Satellite Receiver