1
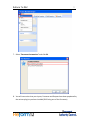
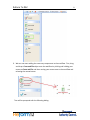
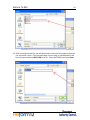
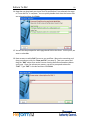
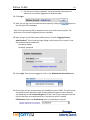
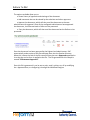
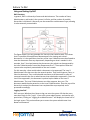
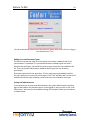
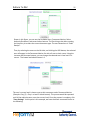
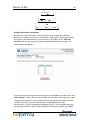
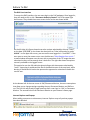
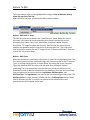
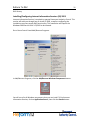
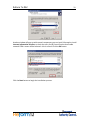
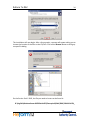
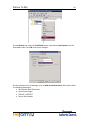
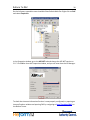
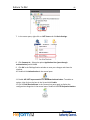
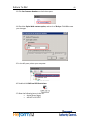
Reform To Document Authority Control (DAC)
10/30/2009
Reform To DAC
2
Table of Contents
What is Document Authority Control?............................................................................. 3
Benefits of Using Document Authority Control................................................................ 3
System Requirements ..................................................................................................... 3
Hardware Requirements ................................................................................................. 4
Installation ...................................................................................................................... 5
Plugin Registration and Licensing .................................................................................... 5
Sending your First Document to DAC............................................................................... 6
Using and Setting Up DAC ............................................................................................. 23
DAC Overview............................................................................................................. 23
Logging into DAC ........................................................................................................ 23
Adding Users and Document Types............................................................................. 24
Setting DAC Administrators ........................................................................................ 24
Setting Administrator Permissions .............................................................................. 26
The DAC User Interface............................................................................................... 28
Internet Explorer and Popups ..................................................................................... 28
Reform - DAC Send To Script....................................................................................... 29
Reform - DAC Forms ................................................................................................... 29
DAC Overview ............................................................................................................... 30
Introduction ............................................................................................................... 30
DAC Approval / Denial Tree ........................................................................................ 30
Processing the Document ........................................................................................... 31
Maintenance ................................................................................................................. 31
Installing/Configuring Internet Information Services (IIS) 2003...................................... 32
Configuring Internet Information Services (IIS) 7 ........................................................... 40
Troubleshooting ............................................................................................................ 44
Reform To DAC
3
What is Document Authority Control?
FabSoft’s Document Authority Control (DAC) provides business process automation
that enables organizations to achieve complete management and control over their
operations. There are many cases where documents need to be reviewed and
authorized by certain individuals or departments of an organization. Document
Authority Control simplifies this process by intelligently and automatically routing
documents to the required recipients for review or approval.
With Document Authority Control, users can set rules to determine where documents
should be routed, based on hierarchy. Routing can be configured to occur across
specific departments, to individuals with similar roles, within small work groups, etc.
Specific document types or documents processed by particular users can even
establish who the document should be delivered to. So a purchase order can be
intelligently routed to the finance department or a miscellaneous employee document
can be delivered to their particular department manager. When documents are
routed, it can occur at one level at a time - with routing to the next level not occurring
until approval is received from the previous level (similar to a ladder system), or it can
be performed simultaneously.
Benefits of Using Document Authority Control
•
•
•
•
•
With Document Authority Control, organizations can easily manage the flow
of their document operations and streamline the distribution of business
processes.
Document processes can be closely monitored, so unauthorized activities are
immediately detected and eliminated.
Documents are reliably being routed and reviewed by the appropriate people.
Routing rules can be assigned to specific users, document types, departments,
etc.
Increased sharing and access to information improves business productivity
and reliability.
System Requirements
• Reform 12 Enterprise or Reform 12 PDC
• Document Authority Control(DAC) Plugin
• FSMonitorDataSource ODBC connection (installed and set up automatically in
the Reform 12 installation)
• Internet Information Services (IIS) 5.0 or newer installed
• For Evaluation and Demonstration: Windows XP, Windows 2003 Server,
Windows Vista, Windows 7 or Windows 2008 Server (64 Bit Operating Systems are
Supported)
Reform To DAC
4
• For Production Systems: Windows 2003 Server or Windows 2008 Server (64 Bit
Operating Systems are Supported)
• Microsoft SQL Server (SQL Server Express will be automatically installed by the
DAC installer if it is not present on the current system)
• Microsoft .NET Framework 2.0 (installed automatically if not present on the
current system)
All required Reform software downloads can be found at www.fabsoft.com >>
Downloads section.
Hardware Requirements
• Production System Recommendation (These suggestions are only estimations.
High load environments may require multiple servers, or additional hardware.)
1. Pentium 4 Processor
2. 4 GB RAM
3. HDD Space 100 GB (Redundancy recommended)
4. Battery Backup (UPS)
5. Dedicated server, no other software products except for virus
and security programs.
• Minimum System Requirements for demonstration purposes only
1. Pentium 4 Processor
2. 2 GB RAM
3. HDD Space 30 GB
Hardware specifications depend greatly on the workload and throughput that is
required. Higher end processors and greater amounts of memory will increase the
amount of information and data that Reform can process thus improving overall
system throughput. For load balancing or failover, multiple servers can also be used.
(Note: A license for Reform and each plug-in is required for each server running the
software.) Before obtaining the server that you plan on utilizing for Reform, please
check the plug-ins’ user manuals for System Requirements as well as they may require
additional hardware. For production systems, we also recommend redundant hard
drives utilizing the mirroring features of RAID (Redundant Array of Independent Disks)
to minimize data loss and expedite system recovery in the event of a hardware failure.
Battery backups are also suggested to maintain system uptime and reliability in case of
power failures.
Reform To DAC
5
Installation
To install Document Authority Control, start by downloading and running the DAC
installer.
Note: if you are running DAC on Windows Server 2003, please see the
Installing/Configuring Internet Information Services (IIS) 2003 section of this manual
before continuing.
If you are running DAC on Windows Server 2008, please see the Configuring Internet
Information Services (IIS) 7 section of this manual before continuing.
If SQL Server Express is not installed on your system, it will be automatically installed.
This typically takes between 10-20 minutes between downloading the application and
installing it. If the Microsoft .NET Framework 2.0 is not already installed on your
system, it will be automatically downloaded and installed.
Step through the prompts, accept the License Agreement, and the installation will
begin. Allow the installation to finish and then continue onto the next section.
Plugin Registration and Licensing
When evaluating Reform 12, the plugins will also be in an evaluation mode for that
period of time. Once Reform has been purchased and licensed, the required plugins
must also be licensed in order to continue functioning correctly.
Please see the “Reform 12 Licensing and Registration” section of the Reform 12 User
Manual for more information on how to license Reform 12 Plug-ins. After the license
is entered, the Reform Spooler will need to be restarted to refresh the licenses. More
information regarding the Reform Spooler Service can be found in the Reform 12 User
Manual.
Reform To DAC
6
Sending your First Document to DAC
In this example, we are going to be creating a new form in the Reform Designer and
walking through a typical submitting and approving workflow. To configure the DAC
workflow, we will be using the Workflow Designer which is a visually enhanced
method of designing a workflow. The Workflow Designer will allow us to use the
form we are about to create and make the necessary changes to that form and
subsequent forms in order to fulfill the DAC workflow.
First, the Reform Designer must be started. To open it, go to
Start>Programs>Reform…>Designer.
1. For the example, we will be creating a new form with an existing template. Go to
File>New>New. Select the DAC template and click OK.
2. When it asks if you would like to open a text/ASCII file for designing, select No.
3. Next, go to File>Save to save your form. Name it DAC.FOM.
4. You can now close the Reform Designer since we have our form which we will be
using alongside the Workflow Designer to route the document.
*Now that we have our form, we can begin to create the desired DAC workflow using
the Workflow Designer. First, the Workflow Designer must be started.
5. To open it, go to Start>Programs>Reform…> Workflow Designer.
6. Once open, we must go to File > New…
Reform To DAC
7
7. Select “Document Automation” and click Ok.
8. You will now notice that your Inputs, Processes and Outputs have been populated by
the various plug-ins you have installed (DAC being one of the Processes)
Reform To DAC
9. We can now start adding the necessary components to the workflow. First, drag
and drop a Form and File object onto the workflow by clicking and holding your
mouse on Form and File and then moving your mouse over to the workflow and
releasing the mouse button.
*You will be prompted with the following dialog:
8
Reform To DAC
9
10. Enter a description for the object you just added. This is done by typing in the
provided box. Type “DAC Demo” and click Finish. This will take you back to your
workflow.
11. Now we are ready to configure the “DAC” form and input file. To do so, right click
on the newly added object and select “Configuration…” or simply double-click on
it.
12. You are now presented with the Input Setup window. First, we want to select the
TextFile or data stream that our form will be using. To do so, you can simply begin
typing in the box, or you can browse to find it. We want to select the DAC.out file.
Click the small folder icon to bring up a window which will let us choose that file.
Select the file and click Open.
Reform To DAC
10
13. After choosing the text file, you are taken back to the Input Setup page so that you
can now select a form. Click the small folder icon to bring up a window which will
let us choose the desired DAC.FOM form file. Select the FOM file and click Open.
Reform To DAC
11
14. Now that you have both your Input Text File and Reform Form selected, the setup
of “Form and File” is complete. You can quickly double check that the correct files
are selected and then click Finish.
15. You will also be prompted to add a page-break field to the forms. At this point, we
want to select No.
16. Next we want to add a DAC Process to our workflow. We use the same drag and
drop procedure as with the “Form and File” (see step 9). Take your mouse and
drag the “DAC” object from under Process onto the workflow somewhere below
your Input. Once you release your mouse, you will be prompted to describe
“DAC”. Type “DAC” in the box and then click Finish.
Reform To DAC
12
17. Once you click Finish, you are taken back to your workflow. DAC will have a Red
Caption because it is not yet configured. To configure DAC, you must first connect
the Form and File object titled “DAC Demo”. To do so, first select the “Add
Connector” button from the menu bar. Next, drag your mouse from the small “x”
underneath “DAC Demo” to the small “x” above “DAC” as pictured below. When
the connection is complete, the connecter will turn black (if red, connection has
not been made correctly, try again) and the “DAC Demo” caption will turn green.
18. You will be prompted to configure DAC upon completing the connection. Click Yes.
If you click No, you can also double click on the DAC object or rightclick on the
object and select “Configuration…” to continue the configuration at a later time.
This will bring up the following window asking for the Document Type. Type
CCStatement in the provided field and click Next.
19. Enter Demo as the “Submitter’s UserName”. Click Next.
Reform To DAC
13
20. For the Description, we would like to choose variable data from the data stream.
To do so, we first must click the “Click here to select variable information” button.
*Note-After doing so, we see that a list will appear with the different fields that
you can choose for your variable data. If you want to go back to static input mode,
you can do so by clicking the appropriate button for static information and then
you will be able type static information.
21. Select the dynamic object StatementNum as the “Description” to display in DAC.
You will have to scroll down to see it. After selecting it, click Finish.
Reform To DAC
14
22. You have completed configuring the DAC Process. Now we will setup the output of
the DAC Process which is where the document will go once approved. We want to
send our approved document to an available printer. First we must drag a Printer
object onto the workflow underneath DAC. After dragging the Printer, you are
prompted to describe the object. Type “Printer 1” in the description and click
Finish.
23. Next you have to make a connection from DAC to Printer 1. To do so, first select
the “Add Connector” button from the menu bar and then drag your mouse from
Reform To DAC
15
the small “x” on DAC to the one on Printer 1. Once the connection is complete, the
connector will turn black and DAC will turn green.
24. You will be prompted to configure Printer 1. Click Yes. You can also configure by
double clicking on the Printer 1 object. To select a printer, click the “Printer…”
button to retrieve a list of printers.
25. Select a printer from the list and click OK.
26. Verify that the correct printer is selected and click Finish.
Reform To DAC
16
27. You have completing configuring your DAC workflow. Your 3 objects (“DAC Demo”,
“DAC” and “Printer 1”) should all be green meaning they have been successfully
configured and the workflow is ready to be created.
28. To make all the appropriate forms and changes, the workflow must be executed.
on the menu bar. After
This is done by clicking the “Execute” button
execution, you will be notified of the configuration that has taken place. Click OK.
Reform To DAC
17
29. Your approved form has been created with the name CCStatement-Approved.FOM
in your forms folder. This is the form that DAC will use once approved. A backup
of your original DAC.FOM form has been copied up to the “Workflow Designer
Original Forms” folder in forms directory. Any permanent form changes should be
made to this original form as it is used throughout the form configuration process
as a template. If changes are made to this template, you will have to execute
your workflow again to see the changes in the forms.
30. You can save your workflow by going to File>Save but it is not required. You can
now close the Workflow Designer.
31. The Spooler Application must now be started by clicking
Start>Programs>Reform…Spooler. Once it is open, press the Start button. It should
now say Start in the lower left corner.
a. If it was already running, it will need to be stopped and restarted so that
it recognizes the new forms that were created by the wizard.
32. Navigate to your \Reform\Backups\ directory. Select the DAC.out file, Right Click,
and select Copy
Reform To DAC
18
33. Navigate to your \Reform\Spooler\ directory. Right Click on the white background
of the window, and select Paste. (Pasting the data stream to this folder simulates
printing from Windows, AS400, Unix, etc.)
a. When the Spooler Application begins processing the file, you will notice
the file name change to something similar to the image below.
34. After the document is processed by the Spooler, your next step is to set permissions
in the DAC interface that will allow us to moderate the document we sent from the
user ‘demo’.
35. Open DAC by opening an Internet Explorer window and navigating to
http://localhost/DAC on the Reform Server.
Reform To DAC
19
a. If it asks you for login credentials, enter the account information of
which you are currently logged on to Windows under.
36. Click Login.
37. Now, you can log out of the administration panel by clicking the
the top-right of the webpage.
button at
Note: This Login and Log Out is required to enter your name into the system. The
permissions can now be configured for your username.
38. Now, to log in as the DAC system administrator, Click the “Logging On As an
Administrator?” link to show the login dialog on the bottom of the screen. Enter
these administrative credentials:
User Name: admin
Password: password
39. Press Login. Once you have logged in, click on the Administrator Permissions tab.
40. On this tab, you can set permissions for the different users of DAC. The permissions
are specific to each document type. As many document types can be created as
you would like on the Document Types tab in DAC, but for our example we will use
only the one that we created earlier on in the tutorial, which is named
CCStatement. Select the CCStatement entry in the document type list.
Reform To DAC
20
41. Now, we need to assign the user that will have permissions to either approve or
deny files posted under this document type. Click on your current user name in the
left list box, and then move the name to the Document Admins section by clicking
the Add button.
42. Now you need to give yourself an administrative level. It is on this panel where
hierarchical levels of administrators can come be configured, but for our simple
example, we only have one person. After you have moved your username over the
Document Admins list, click on your name in the list to select it, and then Increase
the administration level to 1. Next, click the Save Settings button.
43. Next, select your username, and click the Edit User Control button to bring up the
User Control Permissions window.
Reform To DAC
21
44. Check the box next to the “Demo” username. Click Save Settings to save your
permission configuration. Then, close the User Control Permissions window. Then,
click Save Settings in the Administrator Permissions panel.
The configuration that was just completed will place your username in control of all
documents of type “CCStatement” that are submitted by the user ‘Demo’.
45. Now, you can log out of the administration panel by clicking the
the top-right of the administration panel.
button at
When you get back to the main logon screen, click Login.
46. Now you can see the main DAC interface. In the middle it has a list of all documents
that you have authoritative control over. As you can see, you have several options
that allow you to control the document that was submitted.
Note: Approving the document will send it to the printer you selected earlier during
the configuration.
Reform To DAC
22
The options available allow you to:
• View a history of approvals and viewings of the document
• Add comments that can be viewed by the submitter and other approvers
• Approve the document, which will then send the document to the next
administrators for approval. Once all the configured administrators have approved
the document, it will be sent back to Reform to be processed.
• Deny the document, which will then send the document back to Reform to be
processed
Once the document has been approved by the highest level administrator, DAC
automatically makes copies of the files and puts them into the Spooler directory.
When this is done, the end of the file name will have the text -Approved appended to
it so that the correct form is applied to the file. The file generated for this sample is
named “CCStatement-Approved”.
Once this file is generated, it can be set to print, email, archive, etc, all by modifying
the –Approved form, or configuring it through the Workflow Designer.
Reform To DAC
23
Using and Setting Up DAC
DAC Overview
In general, DAC is a hierarchy of users and administrators. The number of Users,
Administrators, and Levels in the system is infinite, and the number of possible
hierarchies is unlimited. A hierarchy can be created for each document type, allowing
it to be extremely customizable.
The figure above is just one example of a hierarchy that could be used. This shows
that it is possible to keep different departments from viewing each other’s
documents. It is also possible to have any of the Level 1 Administrators be allowed to
view the documents from any department, depending on what is needed. In this
example, User 5 is unique because the documents they submit can be approved by
the Level 1 Administrator from either Department B or C. These options allow the
system to be completely customizable to the user’s needs.
For this example, a User would submit a document to be approved. The Level 1
Administrators for that user then has several options. They could: Approve, Deny, or
View the document. They could also add comments to the document in order to
communicate with the user or administrator that submitted or approved it. Once the
Level 1 has approved it, the document is pushed up the ladder to the Level 2
Administrator. The Level 2 Administrator can either approve, deny, etc. The
document would then be passed on to the Level 3 Administrator. Once the top of the
hierarchy is reached, the document has completed the steps required, and is
processed accordingly.
Logging into DAC
DAC uses your Windows User Name to log you onto the system. All that the users
must do to login is click “Login”. If you are a system administrator, and need to edit
permissions, clicking on “Logging on as Administrator?” will display the lower half of
the login screen. This portion allows you to enter the system administrator User
Name and Password.
Reform To DAC
24
The red-bordered area shown on the bottom will only appear when a user clicks the “Logging
on as Administrator?” link.
Adding Users and Document Types
The first time a new user logs on to the system, their name is added to the list of
stored names. For example, if a system administrator needed to give Joe Level 1
administrator privileges, Joe would first have to login to have his name added to the
list. Then, the system administrator would be able to give him the necessary
permissions.
Document types work in the same way. To have a document type added to the list,
the user simply has to send a file of that type to DAC. DAC will then add it to the list of
available Document types, allowing a new hierarchy to be created for that type.
Setting DAC Administrators
To set permissions for users and administrators, the system administrator must first
login as described in the previous section. Once logged in, they can click on the “DAC
Permissions” tab to access the available settings. An example of what you should see
is shown below:
Reform To DAC
25
Shown in this figure, you can see the Available Users, Document Admins, Select
Authority Document, and several other buttons. The first thing to do when creating
the hierarchy is to select the correct document type. The one shown here is “Sales
Receipt”.
Then, by selecting the users on the left side, and clicking the ADD button, the selected
user will appear in the Document Admins list with a 0 next to their name. Using the
Increase and Decrease buttons, you can change the selected user’s level until it is
correct. The lowest level administrator is 1.
The user’s current level is shown next to their username under Document Admins
(Example: Gary (2) - Gary is a Level 2 Administrator). This process would be repeated
until all the administrators are at the correct level. Once the process is complete, click
“Save Settings”. At this point in this example, we have the levels structured similar to
the following:
Reform To DAC
26
Setting Administrator Permissions
Now that the Levels have been correctly created, we must give administrators
permission to approve specific user’s documents. By doing this, we can break down
the hierarchy into departments or groups of users. By clicking on the “Edit User
Control” button shown previously, you can edit the selected user’s settings. The
window below will appear:
As shown, we are accessing the permissions for the user Gary for the Document Type
“Sales Receipt”. There is also a list of available users that Gary can be given the rights
to approve documents for. Here we show that he can approve documents for Mike
and Ruth since Gary is a level 2 administrator and Mike/Ruth are level 1
administrators. He also can approve documents from Chl, John and Matt once they
are approved by Mike or Ruth. Once the desired settings are complete, click “Save
Reform To DAC
27
Settings”. This process is repeated for Mike and Ruth so that they are able to approve
documents for the rest of the users (Chl,John and Matt). For our example, we will give
Ruth permission to approve documents from Matt and Chl. Also, Mike will be given
permission to approve documents from John. Our final hierarchy example is shown
below:
Reform To DAC
28
The DAC User Interface
To access the DAC interface, the user must login to the DAC webpage. Once logged in,
they will need to click on the “Document Authority Control” link in the upper right
hand corner. They should then see a screen similar to the one shown below.
On the left side, this figure shows three sales receipts submitted by the user “marci”,
on the date 5/28/2008. It also shows the description as “Sales information for order
######”. In the upper left corner, you can see the user logged in is “chrisl2007”. If the
user were to move the mouse cursor over the blue text “Sales Receipts from marci…”
a small window will appear over the text with a screenshot of the TIF image that was
submitted so they can see exactly what it looks like. The right side shows the options
currently available to the logged in user.
This particular user has full administrative privileges with documents submitted by
“marci”. Approving it would send the file to the administrator of the next level, while
denying it would send it back to the person who approved or submitted it below the
current user.
At the bottom-left of the user screen in DAC/Document Monitor, there are two options
that allow you to change settings regarding the way Document Monitor and DAC are
run. The first link will set which page opens up after a user logs in—DAC, or Document
Monitor. The second link will set Document Monitor as your browser’s home page.
Internet Explorer and Popups
When adding comments to a document, Internet Explorer may tell you that popups
have been blocked.
Reform To DAC
29
To fix this problem, click on the highlighted bar and go to Pop-up Blocked> Always
Allow Pop-ups from This Site…
After refreshing the page, you should be able to add comments.
Reform - DAC Send To Script
The DAC.fbs script can be found in the “SendToScripts” folder. When this script is
executed, it first takes all the corresponding information from the file, such as:
Document Form Name, Date, Time, Attachment, Submitter’s Name, Spooler,
Description, TIF image file name and directory. DAC.fbs uses this information to
populate the database with the information to be used with DAC. The script is also
used to move the spooler file and TIF image into the “FSMonitor\DACJobs\” directory
so that DAC can process them.
Reform - DAC Forms
When the document is submitted to the system, it opens the corresponding form. This
form would simply have the submitted image, and it would use DAC as the “Transport
Type” in the Page Setup options, as shown below. By setting DAC as the Transport
Type, this allows the DAC.fbs script to be executed after the page is finished
processing. The script would then move the files into the correct directory to be
processed, as well as add the information to the database. There are also three fields
that are required to be used in the form: LoginName, DACDescription, and
DACFormType. The LoginName is the name of the user submitting the file to DAC. The
DACDescription is a short summary of what the file is. DACFormType tells DAC what
kind of document the file is, so that it can determine the administrators and
permissions for the file based on the type.
Reform To DAC
30
DAC Overview
Introduction
To start the process, a user must submit a document into the system that would need
authorization. For this explanation, we will be scanning a form that someone would
submit if they were returning from a business trip and needed to be reimbursed.
Because it is a fairly large price for the company to pay, it must be authorized before
the finance department could reimburse you for the money spent on the flight, hotel,
meals, etc.
DAC Approval / Denial Tree
At this point in the example, we will take the place of Matt in the tree. To
demonstrate how documents can be approved and denied until they are processed.
Consider the figure shown below. (From page 25).
The user that submitted the current document is Matt. Now, DAC sends the
document to Ruth. She can Approve, Deny, or Add a Comment. If she is not sure what
Reform To DAC
31
the receipts Matt is trying to be reimbursed for, they can use the comments to
communicate until everyone understands what is being approved. Once Ruth
approves the document, Gary has the same options as before. Let say for some
reason after Gary communicates with Ruth through the commenting system, and he
feels that the receipts are unreasonable, he clicks Deny. This would then send the
document back to Ruth. Ruth would then communicate with Matt, where they would
make the necessary changes, and resubmit it for approval. Satisfied with the changes,
Ruth approves, and then Gary approves the document. Here, we have reached the
highest point on the hierarchy, so the document is then sent to be processed.
Processing the Document
Once the document has been approved by the highest level administrator, DAC
automatically makes a copy of the files and puts them into the Spooler directory.
When it does this, at the end of the file name, it will add the text “-Approved” so that
the correct form is applied to the file. DAC also keeps a copy of the file in the
“FSMonitor\DACJobs” directory for company records.
The spooler would immediately recognize the file and apply the appropriate forms. At
this point, the document can be emailed, faxed, archived, printed, etc.
Maintenance
There are certain directories and SQL tables that need to be monitored for growth
along with the DAC plugin for Reform 12. As a system processes more and more jobs,
the size of these directories and SQL tables can grow very quickly. Overall system
performance can be affected by the large amounts of space that the files may take up.
Also, there exists a 4GB database limit if using the Microsoft SQL Server Express 2005
supplied with this installation. Obsolete files/database entries should be deleted
according to your needs and file retention specifications. It is recommended to
monitor the following directories and SQL tables for growth:
Directories:
C:\Program Files\Reform…\Backups
C:\Program Files\Reform…\Spooler\ImageQueue
C:\Program Files\Reform…\Plugins\DAC\Website\DACJobs\
C:\Program Files\Reform…\Plugins\DAC\Website\DACJobs\ImageQueue
SQL Tables:
DAC-Comments
DAC-Documents
Reform To DAC
32
DAC-History
Installing/Configuring Internet Information Services (IIS) 2003
Internet Information Services is required to operate Document Authority Control. This
section will walk you through how to install IIS 2003, as well as configuring the
installation to ensure proper DAC functionality. This installation will require the
Windows 2003 Service Pack 2 CD/DVD to be inserted.
Go to Start>Control Panel>Add/Remove Programs.
In Add/Remove Programs, click the Add/Remove Windows Components button.
You will see a list of Windows components that you can install. To find Internet
Information Services, click on Application Server, then click the Details button.
Reform To DAC
33
Another window will pop up with several components you can install. We need to install
Internet Information Services, so check the entry for IIS. You will notice that Enable
network COM+ access will be selected—this is normal. Click the OK button.
Click the Next button to begin the installation process.
Reform To DAC
34
The installation will now begin. After a few seconds, a prompt will appear asking you to
choose the location of the files on the CD/DVD. Click on the Browse button to bring up
an open file dialog.
On the Service Pack 2 DVD, the file you need to locate can be found in:
D:\English\WindowsServer2003R2withSP2\Enterprise\32bit\i386\ CONVLOG.EX_
Reform To DAC
35
After you select the file, click OK to close the open file dialog, then click Retry in the
Copy Error prompt. The installation will resume.
After the installation is complete, you can close out of Add/Remove Programs. At this
point, you should install DAC, and then return back to this section afterwards for
configuring Internet Information Services to allow DAC to function properly.
After you have installed Document Authority Control:
We are going to change some IIS settings that will allow DAC to run in a Windows 2003
environment.
Go to Start>Administrative Tools>Internet Information Services (IIS).
Expand the tree-view on the left panel under SystemName>Application Pools. Rightclick DefaultAppPool and select Properties.
Reform To DAC
36
On the Identity tab, select the Predefined option, and choose Local System from the
drop-down menu. Click OK to save your changes.
On the left pane in the IIS Manager, click on Web Service Extensions. We need to allow
the following extensions:
• All Unknown ISAPI Extensions
• Active Server Pages
• ASP.NET v2.0.50727
• Server Side Includes
Reform To DAC
37
Right-click each of these entries and click Allow. If a warning appears, ignore it and click
Yes.
Repeat these steps until all 4 of the aforementioned extensions have Allowed status, as
shown below.
The last thing we have to do is double-check that the correct version of ASP.NET is being
used.
Reform To DAC
38
On the left pane, expand the tree-view Web Sites>Default Web Site. Right-click on DAC
and select Properties.
In the Properties window, go to the ASP.NET tab and change the ASP.NET version to
2.0.*. Click OK to close the Properties window, and you can now close the IIS Manager.
To check that Internet Information Services is now properly configured, try opening an
Internet Explorer window and opening DAC by navigating to http://localhost/DAC on
the Reform Server.
Reform To DAC
If you are presented with the main login screen, you have correctly configured IIS to
properly operate Document Authority Control.
39
Reform To DAC
40
Configuring Internet Information Services (IIS) 7
This section will walk you through configuring DAC/DeviceViewer with IIS 7 in a
Windows Server 2008 environment.
1. Go to Start>Administrative Tools>Internet Information Services (IIS) Manager.
2. Click on Application Pools in the Connections pane.
3. In the Application Pools list, right-click on DAC / DeviceViewer and click
Advanced Settings.
4. Set the following Properties:
a. .NET Framework Version = v2.0
b. Enable 32-Bit Applications = True
c. Managed Pipeline Mode = Classic
d. Identity = Local System
5. Click OK to save your changes.
6. In the Connections pane, expand Sites, expand Default Web Site, and select
DAC/DeviceViewer.
Reform To DAC
41
7. In the center pane, right-click on .NET Users and click Basic Settings.
8. Click Connect As… Select the option Application User (pass-through
authentication) and click OK.
9. Click OK in the Edit Application window to save your changes and close the
window.
10. Double-click Authentication in the central pane.
11. Enable ASP .NET Impersonation and Windows Authentication. To enable an
option, right-click on the item in the list and click Enable.
12. Click on DAC/DeviceViewer in the Connections pane again to display the
configuration categories in the central pane. Double-click HTTP Response Headers.
Reform To DAC
13. Click Set Common Headers on the Actions pane.
14. Check the Expire Web content option, and set it to 30 days. Click OK to save
your changes.
15. In the left pane, select your computer.
16. Double-click ISAPI and CGI Restrictions.
17. Allow the following items in the list:
•
Active Server Pages
•
ASP.NET v2.0.50727
42
Reform To DAC
43
18. You are finished configuring Internet Information Services 7. The Microsoft .NET
Framework 3.5 SP1 may be required to be installed on the server.
Reform To DAC
44
Troubleshooting
Q: I receive the error “Failed to access IIS metabase” in the Device Viewer and/or DAC.
A: If this error is received in DAC, you need to perform a repair of the .NET Framework.
1. Go to Start>Control Panel.
2. Open Add/Remove Programs.
3. Search the list of programs for Microsoft .NET Framework 2.0.
4. Select the entry and click the Change button.
5. Select Repair and step through the prompts.
6. After the Repair completes, go to Start>Run and type iisreset. Press OK.
After IIS is restarted, try navigating to http://localhost/DAC. You should no longer
receive the error.