1
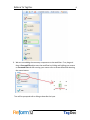
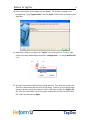
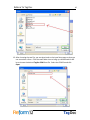
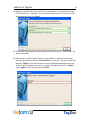
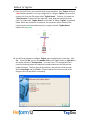
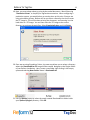
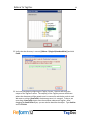
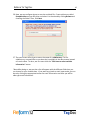
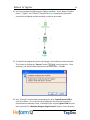
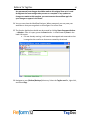
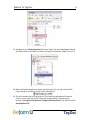
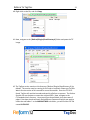
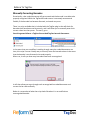
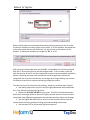
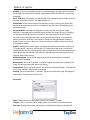
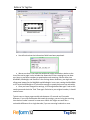
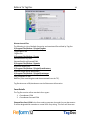
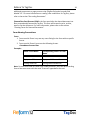
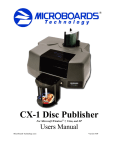
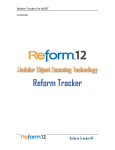
Reform To Tag Doc
11/12/2009
Reform To Tag Doc
2
Table of Contents
What is TagDoc?.............................................................................................................. 3
Benefits of Implementing TagDoc.................................................................................... 3
System Requirements ..................................................................................................... 3
Hardware Requirements ................................................................................................. 4
Installation ...................................................................................................................... 5
Plugin Registration and Licensing .................................................................................... 5
Setting up your First TagDoc-Enabled Form .................................................................. 6
Tag Doc Watch Service .................................................................................................. 23
Maintenance ................................................................................................................. 24
Manually Correcting Barcodes....................................................................................... 26
TagDoc Barcode Utility .................................................................................................. 28
Basic Functions ........................................................................................................... 28
Troubleshooting Barcode Scanning Problems ............................................................. 33
How Tag Doc Works ...................................................................................................... 33
Phase I........................................................................................................................ 33
Phase II....................................................................................................................... 33
Phase III...................................................................................................................... 35
Advanced TagDoc Information ...................................................................................... 35
Configuring the Data Source Name [DSN] ................................................................... 35
Directories and Files ................................................................................................... 38
Form Details............................................................................................................. 38
Form Naming Conventions ......................................................................................... 39
Forms....................................................................................................................... 39
Reform To Tag Doc
3
What is TagDoc?
FabSoft's Tag Doc is a complete document management solution for file indexing,
distribution, search and retrieval. Hand-filing and manually searching for documents are
cumbersome and time consuming processes—processes that most organizations would
like to eliminate. Tag Doc eliminates frustrating problems associated with cumbersome
paperwork operations. Tag Doc efficiently automates the archival of document sets by
combining barcode tagging with the scanning utility of any MFP or scanner. When barcoded documents are printed, Tag Doc stores the text information and assigns a
barcode to the document. When the document is scanned back into the system, Tag
Doc will read the barcode and use the associated stored information to automatically
route it to printers, fax, email or archive.
Tag Doc is 100% accurate and replaces OCR or Zonal OCR type processes, which have
limitations to their accuracy. Tag Doc removes the possibility of errors due to manually
filing documents and it enables file content to be fully searchable, which frees up time
and allows business productivity levels to rise.
Benefits of Implementing TagDoc
•
•
•
Tag Doc stores the actual content of your documents allowing you to have
accurate, reliable search results and quick, easy document retrieval. Many
document imaging solutions rely solely on scanning and unreliable OCR
(Optical Character Recognition); which has many disadvantages:
• OCR is not guaranteed to accurately recognize characters.
• Document appearance is vital to OCR, and errors could easily be caused
due to issues such as an unrecognized or colored font, or when the image
is faint or misaligned due to a variety of scanning issues.
• When inaccuracies occur, they must be thoroughly examined and altered,
which takes up large amounts of time.
Elimination of manual filing and searching leads to reduced departmental
workload and operational costs.
Tag Doc provides you with the ability to distribute important document
information with ease. Digital files can be sent to any device in the
department or company. Examples include servers, e-mail systems, fax
systems etc.
System Requirements
• Reform 12 Enterprise or Reform 12 PDC
• Tag Doc Plugin
• For Evaluation and Demonstration: Windows XP, Windows 2003 Server,
Windows Vista, Windows 7 or Windows 2008 Server (64 Bit Operating Systems are
Supported)
Reform To Tag Doc
• For Production Systems: Windows 2003 Server or Windows 2008 Server (64 Bit
Operating Systems are Supported)
• MS SQL 2000, 2005 Client or Server, or MS SQL 2005 Express (the TagDoc
installation will automatically download and install SQL Express 2005)
• Microsoft .NET Framework 2.0 (the TagDoc installation will automatically
download and install the .NET Framework 2.0 if it is not already present on the
current system)
All required Reform software downloads can be found at www.fabsoft.com >>
Downloads section.
Hardware Requirements
• Production System Recommendation (These suggestions are only estimations.
High load environments may require multiple servers, or additional
hardware.)
1. Pentium 4 Processor
2. 4 GB RAM
3. HDD Space 100 GB (Redundancy recommended)
4. Battery Backup (UPS)
5. Dedicated server, no other software products except for virus
and security programs.
• Minimum System Requirements for demonstration purposes only
1. Pentium 4 Processor
2. 2 GB RAM
3. HDD Space 30 GB
Hardware specifications depend greatly on the workload and throughput that is
required. Higher end processors and greater amounts of memory will increase the
amount of information and data that Reform can process thus improving overall
system throughput. For load balancing or failover, multiple servers can also be used.
(Note: A license for Reform and each plug-in is required for each server running the
software.) Before obtaining the server that you plan on utilizing for Reform, please
check the plug-ins’ user manuals for System Requirements as well as they may require
additional hardware. For production systems, we also recommend redundant hard
drives utilizing the mirroring features of RAID (Redundant Array of Independent Disks)
to minimize data loss and expedite system recovery in the event of a hardware failure.
Battery backups are also suggested to maintain system uptime and reliability in case of
power failures.
4
Reform To Tag Doc
Installation
To install the TagDoc plug-in to your existing Reform 12 installation, download and run
the TagDoc executable.
The installer will launch. Click Next. If you do not have the .NET Framework 2.0 or SQL
Express 2005 installed already, the installer will download and install these for you
prior to the TagDoc plug-in being installed.
After all of the installations complete, click Finish. The TagDoc plug-in is now installed.
Plugin Registration and Licensing
When evaluating Reform 12, the plugins will also be in an evaluation mode for that
period of time. Once Reform has been purchased and licensed, the required plugins
must also be licensed in order to continue functioning correctly.
Please see the “Reform 12 Licensing and Registration” section of the Reform 12 User
Manual for more information on how to license Reform 12 Plug-ins. After the license
is entered, the Reform Spooler will need to be restarted to refresh the licenses. More
information regarding the Reform Spooler Service can be found in the Reform 12 User
Manual.
5
Reform To Tag Doc
6
Setting up your First TagDoc-Enabled Form
To add TagDoc to an existing form, we will be using the Workflow Designer which is a
visually enhanced method of designing a workflow. The Workflow Designer will allow
us to configure the form we are about to create (from a template) and automatically
generate and configure a “Scanned” form which will be used when the bar coded
document is scanned.
First, the Reform Designer must be started. To open it, go to
Start>Programs>Reform…>Designer.
1. For the example, we will be creating a new form with an existing template. Go to
File>New>New. Select the TagDoc template and click OK.
2. When it asks if you would like to open a text file for designing, select No.
3. Next, go to File>Save to save your form. Name it TagDoc.FOM.
4. You can now close the Reform Designer since we have our form which we will be
using alongside the Workflow Designer to route the document.
*Now that we have our form, we can begin to create the desired TagDoc workflow using
the Workflow Designer. First, the Workflow Designer must be started.
5. To open it, go to Start>Programs>Reform…>Workflow Designer.
6. Once open, we must go to File > New…
Reform To Tag Doc
7
7. Select “Document Automation” and click Ok.
8. You will now notice that your Inputs, Processes and Outputs have been populated by
the various plugins you have installed (TagDoc being one of the Processes)
Reform To Tag Doc
9. We can start adding the necessary components to the workflow. First, drag and
drop a Form and File object onto the workflow by clicking and holding your mouse
on Form and File and then moving your mouse over to the workflow and releasing
the mouse button.
*You will be prompted with a dialog to describe the input.
8
Reform To Tag Doc
10. Enter a description for the object you just added. This is done by typing in the
provided box. Type “TagDoc Demo” and click Finish. This will take you back to your
workflow.
11. Now we are ready to configure the “TagDoc” form and input file. To do so, right
click on the newly added object and select “Configuration…” or simply double-click
on it.
12. You are now presented with the Input Setup window. First, we want to select the
TextFile or data stream that our form will be using. To do so, you can simply begin
typing in the box, or you can browse to find it. We want to select the TagDoc.out
file. Click the small folder icon to bring up a window which will let us choose that
file. Select the file and click Open.
9
Reform To Tag Doc
10
13. After choosing the text file, you are taken back to the Input Setup page so that you
can now select a form. Click the small folder icon to bring up a window which will
let us choose the desired TagDoc.FOM form file. Select the FOM file and click
Open.
Reform To Tag Doc
11
14. Now that you have both your Input Text File and Reform Form selected, the setup
of “Form and File” is complete. You can quickly double check that the correct files
are selected and then click Finish.
15. You will also be prompted to add a page-break field to the forms. At this point, we
want to select No.
16. Next we want to add a TagDoc Process to our workflow. We use the same drag
and drop procedure as with the “Form and File” (see step 9). Take your mouse and
drag the “TagDoc” from under Process onto the workflow somewhere below your
Input. Once you release your mouse, you will be prompted to describe “TagDoc”.
Type “TagDoc” in the box and then click Finish.
Reform To Tag Doc
12
17. Once you click Finish, you are taken back to your workflow. Your TagDoc will have
a Red Caption because it is not yet configured. To configure TagDoc, you must first
connect the Form and File object titled “TagDoc Demo”. To do so, first select the
“Add Connector” button from the menu bar. Next, drag your mouse from the
small “x” underneath “TagDoc Demo” to the small “x” above “TagDoc” as pictured
below. When the connection is complete, the connecter will turn black (if red,
connection has not been made correctly, try again) and the “TagDoc Demo”
caption will turn green.
18. You will be prompted to configure TagDoc upon completing the connection. Click
Yes. If you click No, you can also double click on the TagDoc object or rightclick on
the object and select “Configuration…” at a later time. This configuration will
consist of choosing where to embed the barcode and what to do with the barcoded document. The first piece of information is the position of the barcode.
Select Lower Right and click Finish. (The barcode can be moved around in the
Designer after the workflow is executed).
Reform To Tag Doc
13
19. Next, you must select where to print the bar-coded document. We will be using
“Simulation Printer” to simplify the TagDoc demonstration. When configuring a
production system, you would select an actual printer at this point. Since we are
using a simulation printer, Reform will let you select a directory that it will create
the TIF image in. This will simulate printing the document, and scanning it to the
hard drive as a TIF image. You can then move the TIF image to the correct
directory to continue the workflow. Select SimulationPrinter and click Finish.
20. Since we are using Simulation Printer, the next step allows you to select a directory
where the SimulatedPrint.TIF image will be created. Navigate to the Plugins folder
of your Reform installation. Here, create a new folder right clicking in the empty
space and selecting New>Folder. Name it SimulatedPrint
21. Use the Browse button to select the newly created SimulatedPrint folder inside
your \Reform\Plugins\ directory. Click OK.
Reform To Tag Doc
14
22. Verify that the directory is correct (\Reform…\Plugins\SimulatedPrint\) and click
Finish.
23. You have completed configuring the TagDoc Process. Now we will setup the
output of the TagDoc Process. The output(s) of the TagDoc process will dictate
where the document will be routed once it is scanned in and the bar code is read.
We want to archive (SaveToFile) the document once it is scanned. To do so, we
must drag a SaveToFile object onto the workflow underneath TagDoc. After
dragging the SaveToFile object, you are asked to describe the object. Type Archive
and click Finish.
Reform To Tag Doc
15
24. Next you have to make a connection from TagDoc to Archive. To do so, first select
the “Add Connector” button from the menu bar and then drag your mouse from
the small “x” on TagDoc to the one on Archive. Once the connection is complete,
the connector will turn black and TagDoc will turn green.
25. Upon completing the connection, you will be prompted to configure Archive. Click
Yes. You can also configure Archive by double clicking on it. The first prompt is the
type of file you want to save. Select “PDF File” and click Next.
Reform To Tag Doc
16
26. Now, we can configure where to save the archived file. Create a directory called
SampleArchive on your C:\ drive and select it in the wizard by clicking Browse and
choosing the folder. Then, click Next.
27. The next screen will ask you to enter the name of a subdirectory. For this
subdirectory, we would like to use data that is available in the data stream instead
of a static value. To do so, we first must click the “Click here to select variable
information” button.
*Note-After doing so, we see that a list will appear with the different fields that you
can choose for your variable data. If you want to go back to static input mode, you can
do so by clicking the appropriate button for static information and then you will be
able type static information.
Reform To Tag Doc
28. We now want to select the dynamic object CustomerID for “Folder 1” as the
variable data source. Select CustomerID from the list and click Next.
29. It will ask you to enter a value for Folder2. We do not wish to create any more
subfolders so click Stop Looping.
17
Reform To Tag Doc
18
30. Next, we will do the same thing for Filename. We want to use variable data for the
FileName of the archived document. To do so, first click “Click here to select
variable information”. Then the list of variable data will appear. From this list,
select InvoiceNo (you will have to scroll down). Click Finish.
Reform To Tag Doc
31. You have completed configuring your TagDoc workflow. Your 3 objects (“TagDoc
Demo”, “TagDoc” and “Archive”) should all be green meaning they have been
successfully configured and the workflow is ready to be created.
32. To make all the appropriate forms and changes, the workflow must be executed.
This is done by clicking the “Execute” button
on the menu bar. After
execution, you will be notified about what has taken place. Click OK.
33. Your “Scanned” form has been created with the name TagDocScanned.FOM in
your forms folder. This is the form that TagDoc will use once the document is
scanned and the barcode is read. A backup of your original TagDoc.FOM form has
been copied to the “Workflow Designer Original Forms” folder in forms directory.
19
Reform To Tag Doc
20
Any permanent form changes should be made to this original form as it is used
throughout the form configuration process as a template. If any updates or
changes are made to this template, you must execute the workflow again for
your changes to appear in the forms.
34. You can now close the Workflow Designer. When prompted, you may save your
workflow so that you can go back to reconfigure it at a later time.
35. The Spooler Application should now be started by clicking Start>Programs>Reform
…>Spooler. Once it is open, press the Start button. It should now say Start in the
lower left corner.
a. If it was already running, it will need to be stopped and restarted so that
it recognizes the new forms that were created by the wizard.
36. Navigate to your \Reform\Backups\ directory. Select the TagDoc.out file, right-click,
and select Copy.
Reform To Tag Doc
21
37. Navigate to your \Reform\Spooler\ directory. Right-click and select Paste. (Pasting
the data stream to this folder simulates printing from Windows, AS400, Unix, etc.)
38. When the Spooler Application begins processing the file, you will notice the file
name change to something similar to the image below.
39. This will complete the printing process. Since we have selected the Simulation
Printer, we can now use the TIF image that was generated. Navigate to the
directory C:\Program Files\Reform…\Plugins\SimulatedPrint\. You will see the file
SimulatedPrint.TIF.
Reform To Tag Doc
22
40. Right-click on the file, and click Copy.
41. Now, navigate to the \Reform\Plugins\ScanDirectory1\ folder and paste the TIF
image.
42. The TagDoc service monitors this directory (\Reform\Plugins\ScanDirectory1\) by
default. The service must be running for this task to complete. Please see Tag Doc
Watch Service section of this manual for more information. Once the TIF file is
found, TagDoc will read the barcode and send it to Reform to process. The Reform
Spooler will use the data to create the archived PDFs. Now, navigate to the
C:\SampleArchive\ directory. Here you will see three folders since there were 3
pages in the data sample and each had a different CustomerID which was used to
create the sub folders. In the AARONFIT0001 sub folder, you will find the PDF file
named IVC28.PDF.
Reform To Tag Doc
Tag Doc Watch Service
There is one basic service which is installed with Tag Doc. It is called the “TagDoc
Watch” Service. This service monitors the ScanDirectory1 folder located in
C:\Program Files\Reform…\Plugins for TIF files. Once it finds a TIF file (when a
document is scanned in), it carries out a script which attempts to read the barcode on
the image. Once it recognizes the barcode, it then knows all the information from the
original data stream and where to route it. Knowing this, it creates a spooler file to
finish carrying out the Tag Doc workflow.
To view currently installed services, go to Start>Control Panel>Administrative Tools >
Services.
By default, the service is installed as a Network Service. Depending on your
environment, this service may or may not have enough permission to accomplish its
23
Reform To Tag Doc
24
task. To ensure that your files get processed properly, it is recommended to run the
service as a local administrative account. To do so, right click on the service and go to
Properties. Next, click on the Log On tab.
Here you can browse for your administrative account and enter the credentials. Click
OK when complete. After doing so, the service must be stopped and restarted.
Maintenance
There are certain directories and SQL tables that need to be monitored for growth
along with the Tag Doc plugin for Reform 12. As a system processes more and more
jobs, the size of these directories and SQL tables can grow very quickly. Overall system
performance can be affected by the large amounts of space that the files may take up.
Also, there exists a 4GB database limit if using the Microsoft SQL Server 2005 supplied
with this installation. Obsolete files/database entries should be deleted according to
your needs and file retention specifications. It is recommended to monitor the
following directories and SQL tables for growth:
Directories:
C:\Program Files\Reform…\Backups
C:\Program Files\Reform…\Spooler\ImageQueue
C:\Program Files\Reform…\Plugins\ScanImages
C:\Program Files\Reform…\Plugins\ScanDirectory1\Unrecognized
Reform To Tag Doc
SQL Tables:
Transactions
25
Reform To Tag Doc
26
Manually Correcting Barcodes
Occasionally, a bar-coded document will get scanned and the barcode is not able to be
properly recognized. While the TagDoc barcode scanner is extremely accurate and
flexible, if the barcode has become distorted, a misread may occur.
There is a script available that is included with the TagDoc plug-in that will check for
barcodes that have been read incorrectly, and it will allow you to manually enter their
correct values into the system. The use it, go to
Start>Programs>Reform…>TagDoc>Correct bad Tag Doc barcode Documents
In the event that your workflow is sending through many bar-coded documents at a
time, this script is a user friendly way to correctly enter the barcode values in the event
that the barcode is too distorted to be read properly.
When run, it tells you how many barcodes have been unrecognized:
It will then allow you to go through each unrecognized bar coded document and
correct the bar code manually.
Below is a screenshot of what the script looks like when it is run and finds an
unrecognized barcode:
Reform To Tag Doc
27
Above, the barcode was intentionally distorted by inserting some text over it so that
the scanner could not correctly figure out the value. To fix this problem, we would look
at the value under the barcode, and enter it in the text box on the bottom of the
window. In the below example, we change the “W” to an “S”.
After you enter the barcode value and click OK. It will update the .bar file associated
with the TIF and move them into the ScanImages folder. It also creates a spool file
with the location of the TIF and the original data stream to be processed by the Reform
Spooler. Assuming you have more scanned bar-coded images that could not be
recognized; the script will continuously run through each image, allowing you to enter
the value so that they can resume processing through the system.
To avoid any kind of incorrect barcode readings, always try to follow these 3 points:
• Use quality paper when you print out the original document with the barcode
on it. This will help to avoid scanning issues.
• Always use AT LEAST 300 DPI for your scans. This will increase the document
dimensions and image-quality to allow the TagDoc barcode scanner to have an easier
and quicker time differentiating between the barcode and other objects on the page.
• Use the TagDoc Barcode Utility to zone in on the barcode and test that the
system doesn’t have any problems finding and understanding the barcode.
• Use the same DPI for all scanned Tag Doc documents
Reform To Tag Doc
28
TagDoc Barcode Utility
The Barcode Utility is an application included with the TagDoc installation. It can be run
by going to Start>Programs>Reform…>TagDoc>Analyze Tag Doc Barcodes
The Barcode Utility is used to test how well a barcode is able to be read by the TagDoc
barcode scanner. It is also used to diagnose and identify the barcode recognition
problem. Barcode Utility allows you to tweak different settings and change how
TagDoc scans for barcodes in your TagDoc-enabled workflow, which can solve barcode
readability issues, as well as improve the rate that the scanner finds barcodes.
On the right side of the TagDoc Barcode Utility, you will see that there are many
settings that you can change to modify the barcode scanning process. For instance, if
your bar-coded documents are scanned and TagDoc is having a problem reading the
barcode (or the barcode scanning process is taking too long), you can load the image
into the Barcode Utility and test out different settings to see if it finds the barcode.
Basic Functions
Reform To Tag Doc
29
The main controls to load images and scan for barcodes are located at the top of the
program window. The text box is the path to the current TIF image that is loaded. To
load a different image, click the
button to display the open file dialog. This will
allow you to choose a TIF file to open, and then it will display the TIF under the
‘Source’ tab.
Refreshes the currently loaded TIF image.
Starts the process of scanning the TIF image for the barcode. The
results will be displayed on the bottom of the window. If the barcode is found, the
dimensions of the barcode will also be displayed.
Settings Pane
If TagDoc is having trouble reading barcodes, or the reading process is taking too long,
changing some preferences in the Settings pane can improve the barcode scanning
process and make it more accurate.
Load your saved barcode-scanning settings from an INI file.
Save the current settings to an INI file.
Options
MinWidth: The minimum width of the barcode in relation to the size of the page (in
percentage).
MinHeight: The minimum height of the barcode in relation to the size of the page (in
percentage).
Reform To Tag Doc
30
MinGap: If there are multiple barcodes on a scanned page, you specify the minimum
percentage that should be considered a gap between the barcodes (this is usually left
as default).
Noise Tolerance: This number can be changed if the scanned image is choppy over the
barcode (expressed in pixels). The default value is 2.
AutoDeskew: If the scanned page is not perfectly straight, selecting this option will
automatically rotate the picture if it is skewed by any more than the degrees set for
MinDeskewAngle.
RecognizeMode: Scanning the image for barcodes involves rotating the image.
However, if the pages are consistently being scanned in a certain direction, changing
this option will limit the amount of rotations that must be performed to find the
barcode, hence making the barcode scanning process much faster. If the pages are
always scanned in vertically or horizontally, change the RecognizeMode setting to
either rmHorz or rmVert. However, if they are scanned in different directions, leave
this setting as rmBoth.
MaxDPI: Making this number higher will change how the barcode reader rescales the
TIF image before it scans for the barcode. If it makes the image larger, the barcode
reading may be less error prone, but this will also slow down the process depending on
how high you put the number. 160-200 DPI is a good range and should work for the
majority of barcode scanning.
MinDeskewAngle: The minimum degrees that will be automatically corrected if
AutoDeskew is enabled.
AutoContrast: Set to off by default. If enabled, TagDoc will adjust the contrast of the
image if a barcode cannot be read on the first try.
ContrastLevel: This is the level to which the contrast is adjusted (Range is 1-20, default
is 14). Only applies if AutoContrast is enabled.
AutoFlip: Set to off by default. If enabled, TagDoc will rotate the image 180 degrees if
a barcode cannot be read on the first try.
View Pane
Zoom: Change the percentage of the zoom on the loaded TIF image.
Fit Page: If this is checked, the TIF image will be constrained to size of the window.
Info pane: Displays some useful information, including the dimensions and the DPI.
Reform To Tag Doc
31
When you use cropping on the TIF image, the info pane will display the dimensions of
the crop box, and the width and height percentages. These values can be used in the
settings to make barcode scanning quicker by limiting how many different
combinations it will use to find the barcode.
Cropping
To crop an area in the TagDoc Barcode Utility, you must first load a TIF image. Once it
is displayed in the Source tab, you can click and drag a box over the image. You can
then resize the box, or drag the box around the image by clicking on it and moving it
around. Cropping will allow you to get 3 values that you can use to make the barcode
scanning process more efficient.
Let’s say you are scanning bar-coded invoices that all have uniform barcode
placement, but they are taking too long to scan for the barcodes. To greatly improve
the speed, you can use cropping to set the location of where the barcode is located.
• First, let’s check the current reading speed of this particular page.
• Load the TIF into the Barcode Utility, and click Recognize Barcode. You will
notice in the bottom pane that it displays the scanning results. Look at the number of
milliseconds next to ‘Total Time (ms):’. We are now going to crop the barcode to see if
we can bring the scanning time down.
• Pan around the image until you find the barcode.
• Next, click and drag a box around the edge of the barcode, but be sure to leave
some extra room on the sides. In the event that a barcode is slightly shifted during the
scanning process, we want to be sure that the scanner doesn’t overlook it if the
barcode runs over the edge of the crop line.
Reform To Tag Doc
32
• You will notice that the Information fields have been populated:
• We can see that it has made the width and height calculations relative to the
size of the entire page. It also includes the dimensions of the cropping box you drew
out. Now, to use these numbers to speed up barcode scanning, transfer them into
MinWidth, MinHeight, and ScanDim in the settings above. However, you might want to
allow some leeway for the MinWidth and MinHeight. In our case, setting the MinWidth
at 15% and the MinHeight at 5% should be enough to speed the process up noticeably.
• Once you have changed the settings, click Recognize Barcode again. Look at the
results pane and check the Total Time again. Relative to your original number, it should
now be lower.
Typical scans on larger pages usually take between 1.5 seconds and 3 seconds.
However, if you crop the barcode and tweak the settings, you can bring the scanning
time down to under a second in some cases. While this might not seem like a
noticeable difference for a single barcode, if you are scanning hundreds or even
Reform To Tag Doc
33
thousands of images in a typical day, this time will add up, and using the cropping
feature can save a considerable amount of time.
Troubleshooting Barcode Scanning Problems
If you are having repeated problems reading barcodes from scanned pages, there may
be a problem with the quality of the pages you are scanning. While the TagDoc
Barcode Reader is versatile, problems can still occur when pages are repeatedly
processed and scanned. If you have tried working with the TagDoc Barcode Utility and
were not able to successfully fix barcode reading problems, you may want to try to
follow the advice outlined below.
If scanned pages are too light in color, it may be troublesome to pinpoint the location
of the barcode. To decrease the chance of a barcode misread, try raising the contrast
on your scanner so that the lines appear darker. This will make it much easier for the
barcode reader to perform the scanning process and will lessen the chance of an
incorrect read.
How Tag Doc Works
Phase I
A document is bar-coded in Reform using Workflow Designer.
The bar-coded document is then printed. Upon printing, Tag Doc will do the
following:
1. Enter the barcode number as the ID of document into the database
2. Register the contents of each page into database
3. Generate a new form name using the current form name plus the word
"Scanned" and enter it into the database
Once printed, the bar-coded documents can be dispersed as needed. For instance, if
the documents are purchase orders that require signatures, the purchase orders will
be given to the appropriate person for signing. Once signed, the second phase of
TagDoc can begin.
Phase II
Once the form has been signed, the document will need to be processed. The user
must scan the document using a MFP or scanner. The resulting TIF file is stored in a
hot folder or application drop directory. In our example, this folder is the
ScanDirectory. For more information on the directory structure and files, please refer
to the section "Directories and Files".
Reform To Tag Doc
34
A: The user scans the documents (which have been signed or written on) using a MFP
or scanner. Once scanned, the document pages will be saved as one TIF file. The TIF
file is dropped into a specified ScanDirectory. For instance, if location 1 is set for
ScanDirectory1, all scanned images from location 1 will be saved in the
ScanDirectory1 folder.
B: The Tag Doc Watch service will pick up and split the large TIF file into two parts: TIF
and BAR files. The BAR files will contain the barcode data from the corresponding TIF
file. There will be one TIF and one BAR for each page in the large TIF file. The TIF and
BAR files will be placed into the ScanImages directory.
C: The Tag Doc Watch service picks up the BAR file and extracts the document
barcode data. The barcode data is the ID of the document (in a string format). Using
the ID, Tag Doc Watch will query the database and retrieve the ASCII or text contents
of the report page. Once the content has been retrieved, Tag Doc Watch will mark the
record as "Processed" to indicate that the document has been returned to the
system.
Reform To Tag Doc
35
D: Tag Doc Watch will retrieve the directory path of the TIF file associated with the
page contents obtained in part C. The TIF file path and page contents are then
matched and stored into a Spooler file.
E: The Tag Doc Watch service will repeat C and D until all BAR and TIF files are
processed and appended to the Spooler file. The completed Reform Spooler file is
saved into the Spooler directory.
Phase III
The Spooler file produced in Phase II is used to create forms for printing, archiving,
emailing and faxing.
A: User creates forms based on output files produced in Phase II. The forms are
prepared for printing, archiving, emailing or faxing (based on user needs).
B: When the user processes the new form, Reform Spooler will match the TIF file and
Form with the Spooler file. The Spooler will then push the file through to the intended
technology.
C: Any combination of Printers, Archive systems, Emails or Fax machines will receive
the form based on your configurations.
Advanced TagDoc Information
Configuring the Data Source Name [DSN]
Once Tag Doc has completed installing, you may want to configure the Data Source
Name, or DSN (the DSN was automatically added as a System DSN during the Tag Doc
Reform To Tag Doc
36
installation). The Tag Doc process relies on information stored within the SQL
database.
To configure the DSN, access your Control Panel by navigating through your Start
menu. The following is the default pathway: Start > Settings > Control Panel.
Once the Control Panel window opens, find and click on
on
. Next, click
. You will be presented with the following window:
Click on the System DSN tab. Click on FSMonitorDataSource in the list, and then click
on the Configure button.
At the source, make sure it says (local)\FSMonitor. Click on Next to continue.
Reform To Tag Doc
37
Select With Windows NT authentication using the network login ID and check the
option Connect to SQL Server to obtain default settings for the additional
configuration options. Click on Next to continue.
Select FSMonitor, then click Next button to continue. Accept the defaults on the next
screen and click on Next to continue. When prompted with the connection test
option, click on TEST CONNECTION to test the settings then click on OK to finish the
configuration.
Reform To Tag Doc
38
Directories and Files
The following is a list of default directories and associated files utilized by Tag Doc:
C:\Program Files\Reform…\Plugins\TagDoc
-TagDocWatch.fbs
-TagDoc.fbs
C:\Program Files\Reform…\Forms
[NameofYourForm].FOM
[NameofYourForm]Scanned.FOM
C:\Program Files\Reform…\Spooler
All spooler output files
C:\Program Files\Reform…\Plugins\ScanDirectory
Scanned images will be placed here
C:\Program Files\Reform…\Plugins\ScanImages
Post processed TIF files
BAR files (files containing barcode data extracted from the TIF).
Tag Doc also uses a SQL database to track all document information.
Form Details
The Tag Doc service utilizes two basic form types:
1. <FormName>.FOM
2. <FormName>Scanned.FOM
[NameofYourForm].FOM is the form used to generate a barcode for your documents.
It will be designed and created as a normal form for printing. This form will have two
Reform To Tag Doc
39
additional components: a page-process script (TagDoc.fbs) and a barcode field
labeled "ID". For more information on creating a bar-coded form for Tag Doc, please
refer to the section "Bar-coding Documents"
[NameofYourForm]Scanned.FOM is the form used after the altered document has
been scanned and processed by Tag Doc. This form will be used to print, archive,
email or fax the document. For more information, please refer to the section
"Creating Forms for Scanned Documents".
Form Naming Conventions
Forms
1. Forms used in Phase I may use any name fitting for the form with no specific
format.
2. Forms used in Phase III must use the following format:
<FormName>Scanned.fom
Examples:
Phase I Form Name
Corresponding Phase III Form
Name
ServiceWorkOrder.fom
ServiceWorkOrderScanned.fom
EquipmentPO.fom
EquipmentPOScanned.fom
PickingTicket.fom
PickingTicketScanned.fom
Note: For each form used to create a bar-coded document, there will be a matching
form of the same name with the word "Scanned" appended at the end.