1
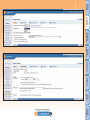
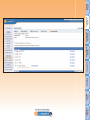
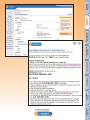
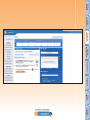
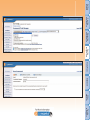
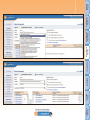
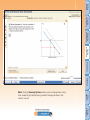
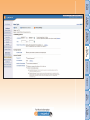
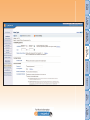
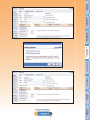
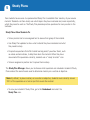
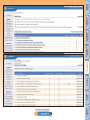
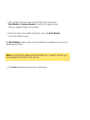
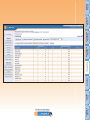
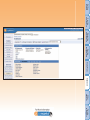
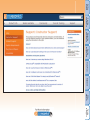
INSTRUCTOR USE R GUIDE
®
Get Ahead of the Curve. The Getting Started Guide for MyEconLab.
myeconlab.com
Getting
Started
Creating
Your Course
INSTRUCTOR USE R GUIDE
ZOOM
Click the magnifying glass once to zoom in,
and again to zoom out.
Training
& Support
LINKS
Click any underscored copy to go directly to
that feature in the guide or on the mylab website.
Other
Features
VIDEO
Click any of the “Show Me” buttons
to view live video.
Gradebook
TABBED SECTIONS
Click any of the tabs on the right
to go directly to that section in the guide.
Study Plans
TABLE OF CONTENTS
Click the icon in the lower left corner of the screen
for an overall thumbnail view of the entireTOC.
Creating
Assignments
Some helpful tips for using your online guide.
Navigating
Your Course
®
1
Getting Started with MyEconLab
If you do not already have a MyEconLab account, you must register as an instructor to create a
unique login name and password.
Getting Registered
Go to myeconlab.com.
• Click on Instructor under the Register heading.
• If you have an access code, choose I have an access code and I am ready to register.
Follow the on-screen instructions to create your account.
• If you don’t have an access code, click I need help getting access. Follow the steps
on screen to request an access code.
Logging In
Go to myeconlab.com and enter your login name and password and click Log In.
Note: Instructors using the CourseCompass version of MyEconLab login at coursecompass.com.
A welcome screen will open; please click Enter MyEconLab. This will open MyEconLab in a new
window.
• When you log in, you will come to the My Courses homepage. This page allows you
to access your existing courses or create new courses. If you have previously created
a course, you will be brought into one of your existing courses.
Note: If you use a pop-up blocker you will be asked to allow myeconlab.com.
System Requirements
For current System Requirements please go to:
http://myeconlab.com/support/system-requirements.
Getting
Started
Creating
Your Course
Navigating
Your Course
Creating
Assignments
Study Plans
Gradebook
Other
Features
Note: Make sure you register as an instructor. If you need an
Instructor Access Code or help getting registered, please contact
your Pearson Sales Rep: pearsonhighered.com/educator/replocator
or Pearson MyEconLab Tech Support at 1-888-762-7032.
Training
& Support
2
Creating Your MyEconLab Course
The first time you log in, you will be taken to the My Courses page. From this page you will link to
the course wizard.
After your initial login, you can access the course wizard in two ways:
• After you log in, click Create or copy a course at the top right of your welcome page
or
• From the Course Manager, click Create or copy a course at the top of the
Course Manager page.
Step 1: Start
In Step 1 of the wizard, you define your course and decide whether to create a new course, create a
preloaded course or copy an existing course.
• A new course will have a full Study Plan for your students but no pre-made
assignments. You can create assignments in your HW & Test Manager.
See Creating Assignments for more information.
• A preloaded course comes with a full Study Plan and pre-made assignments
based on the chapters you are teaching. Assignment due dates will be spaced
evenly throughout the length of the course. Assignments can be used as is or
edited in any way.
Course Type—Select the type of course you want to create or copy:
• Standard courses are standalone courses that are not associated with any
other course. Changes made to a standard course do not affect any other
course. Choose this course type when you are teaching only one section
of a specific course.
Getting
Started
Creating
Your Course
Navigating
Your Course
Creating
Assignments
Study Plans
Gradebook
Other
Features
Training
& Support
• Coordinator and Member courses make up a course group. The Coordinator course
is the template for its Member courses, and all changes made in the Coordinator
course will appear in all Member courses. You would use a Coordinator course to
manage multiple sections.
Enter the name of your course.
• Choose the text you are using from the drop-down menu.
• Select the Create a new course option.
• Click Next.
Step 2: Availability
In Step 2 of the wizard, set the start and end dates of your course. Students can’t enroll until
the start date and can’t access your course after the end date.
Note: If you are creating a Coordinator course, the availability dates will be grayed out
since students never enroll in the Coordinator course.
• To select the start date, click the calendar icon and choose the date on which
you want students to be able to enroll in your course.
• To select the end date, click the calendar icon and choose the last date
on which you want students to access your course.
• To select your time zone, click the arrow next to Time Zone to see the
drop-down menu options.
Note: Make sure you set the time zone for your course. Notify students in online sections
of which time zone you have selected because this is the time zone in which their assignments
will be due.
• Click Next.
Getting
Started
Creating
Your Course
Navigating
Your Course
Creating
Assignments
Study Plans
Gradebook
Other
Features
Training
& Support
Step 3: Course Access
If you plan to add section instructors (teaching assistants, graduate assistants) to your
course, you can set their level of access.
If you will not have any section instructors, you can use the default settings.
• Click Next.
Step 4: Coverage
In Step 4 of the wizard, you choose what parts of the textbook you want to include in
your course. By default, all the content available for your textbook is selected.
You can remove any chapter or section you do not want to include in your course by
removing either the entire chapter or sections within the chapter.
Note: Chapters that are removed from your course will not appear in Study Plans or
assignment sections for students, however, course content can always be modified
at a later date if necessary.
• To see all the content available, click Expand All.
You can also look at the chapters individually by clicking on the ( + ) sign next to each
chapter.
If you find chapters or sections you do not want included in your course, click the box
next to this content to remove the check mark.
• Click Next once you have completed your selections.
Getting
Started
Creating
Your Course
Navigating
Your Course
Creating
Assignments
Study Plans
Gradebook
Other
Features
Training
& Support
Step 5: Learning Aids
In Step 5 of the wizard, select learning aids for your students. Learning aids are available to your
students when they are working in the Study Plan. Most instructors will leave all learning aids
available so their students can benefit from the tutorial. By default, no learning aids are available
for tests.
• Click View Sample to see an example of the learning aid.
To exclude learning aids, uncheck the box next to the learning aids you want to remove from
assignments and the Study Plan.
Note: You will also have the option of turning individual learning aids on and off when you
create specific assignments.
The Ask Your Instructor learning aid allows students to email the course instructor while
working on exercises.
• Click Edit Email Address if you wish to change the address where student
emails are sent.
Note: You can update or remove your email address or other learning aids at any time by
accessing the Course Settings. Please see Step 6: Course Settings Summary for further
details.
• Click Save.
Step 6: Course Settings Summary
You are now on the Course Settings Summary page. This page lets you view and edit the
settings for your course. You can return here at any time via the Course Manager if you wish to
change your course settings.
Getting
Started
Creating
Your Course
Navigating
Your Course
Creating
Assignments
Study Plans
Gradebook
Other
Features
Training
& Support
Take Note of the Course ID:
When you create a course, a Course ID is generated. Your students will need this
Course ID to register and enroll in your course.
If this is a Standard or Member course, you can click on the Course ID to pull up and
print registration directions for your students. You may wish to highlight the text on this
screen and copy (Ctrl + C) and paste (Ctrl + V) it into your syllabus or email.
Note: Do not give out the Course ID for your coordinator course.
To Create Member Courses:
If you created a Coordinator course, you are now ready to create the Member
courses, one for each section. The easiest way to do this is to copy the Coordinator
course.
• Click on Course Manager and then choose Copy from the Actions menu for the
Coordinator course.
Note: If you are teaching multiple sections and plan to create Coordinator and
Member courses, keep in mind that courses cannot be edited to become
“Members”. You can create Member courses only by copying an existing
Coordinator course.
• Click the name of your course to enter it.
Getting
Started
Creating
Your Course
Navigating
Your Course
Creating
Assignments
Study Plans
Gradebook
Other
Features
Training
& Support
3
Navigating Your MyEconLab Course
Using the Course Menu
The course menu appears on the left side of the course window.
The My Courses button opens the My Courses page. This page lists the courses you are teaching.
It also contains links to create and manage courses, and/or offers help and support information.
Beneath the My Courses button, the menu is divided into two sections: one for students and
one for instructors.
Student Buttons
These buttons are visible to both students and instructors.
• Course Home opens the Course Home page, where your students view class
announcements and can link to upcoming assignments.
• Economic News contains various current event articles and discussion questions.
• Quizzes & Tests lists students’ tests and quizzes. Students go to an assignment
by clicking its name.
• Study Plan identifies the sections where students need extra study and provides
practice exercises for their review.
• Homework lists students’ assigned homework. Students go to an assignment by
clicking its name.
• Results lets students see their results on assigned work as well as their overall score.
They can also review assignments from this page.
• Calendar allows students to see when assignments are posted and due. They can
click a homework, test or quiz link in the calendar to go directly to that assignment.
• Textbook Resources contains a searchable multimedia library. For each chapter you
will also find items such as the eText, lecture notes, learning objectives, eStudy Guide,
and flashcards (items vary by book).
• Student Center is where students can find a standalone graphing tool as well as
purchase options for the eText and discounted printed version of the text.
Getting
Started
Creating
Your Course
Navigating
Your Course
Creating
Assignments
Study Plans
Gradebook
Other
Features
Training
& Support
Instructor Buttons
These buttons, which give you access to instructor tools and pages, are not visible to
students who view the course menu:
• Course Manager opens the Course Manager page, where you can create
courses, change course settings, and upload course materials.
• HW & Test Manager opens the Homework/Test Manager page, where
you can create and manage assignments for your course.
• Study Plan Manager opens the Study Plan Manager page, where you
can choose what questions are included in students’ Study Plans and
specify the overall score used to determine mastery.
• Experiments Manager opens the Experiments Manager, where you
can assign experiments as well as pre- and post-experiment
assignments.
• Gradebook opens the Gradebook, where you can view and manage
student results and class averages.
• Home Page Manager opens the Home Page Manager, where you
can create announcements and show/hide elements of the homepage,
including calendar, results graph, and default announcement.
• Instructor Resources opens a page that provides information on
online supplements and other MyEconLab information.
Getting
Started
Creating
Your Course
Navigating
Your Course
Creating
Assignments
Study Plans
Gradebook
Other
Features
Training
& Support
4
Creating Assignments
From the HW & Test Manager page you will be able to create the following types of assignments:
• Homework—MyEconLab homework provides instant feedback to your students.
The default setting allows your students access to tutorial information in the
form of learning aids, where they will also have the option to rework the assignment.
Their scores are determined by their latest attempt. The results are automatically
entered into your Gradebook.
• Tests—Tests are designed to be taken in one sitting (no saving work). Students
will receive feedback at the instructor’s discretion. The results are automatically
entered into your Gradebook.
• Quizzes—Quizzes are designed to be taken in one sitting (no saving work).
Students will receive feedback at the instructor’s discretion. The results are
automatically entered into your Gradebook.
Note: Tests and quizzes are in different categories as a convenience for instructors, but there is
no other difference between them.
• Media Assignment—Media learning aids such as videos, animations, and ebook
pages are assignable as homework, quizzes or tests. These media assignments
can be selected as prerequisites to other assignments. For example, you can
require your students to watch a video or animation before completing a
related assignment.
Getting
Started
Creating
Your Course
Navigating
Your Course
Creating
Assignments
Study Plans
Gradebook
Other
Features
Training
& Support
Step 1: Defining Your Assignment
In Step 1 of the wizard, define your assignment by selecting the Gradebook category and entering
the name of your assignment.
• From the Create Assignment button, select one of the following:
o Create Homework
o Create Test
o Create Quiz
o Create Media Assignment
You are now in the Assignment Creation wizard, which allows you to create new homework,
quizzes, and tests.
• Enter a name for your chosen assignment type.
Note: Students will see the assignment name in their homework section; using a descriptive
name is beneficial to both you and your students.
• Click Next to continue to Step 2.
Step 2: Adding and Removing Content from Your Assignment
Defining Your Content
In Step 2 of the wizard, you can select questions to add to your assignment.
At the top of the new homework page, you will see the name of the active assignment you are
working on, and the book that is being used for this assignment.
• Click the arrow next to Chapter.
From here you will view a drop-down menu where you can select the chapter in which you want to
add your content. You can further filter the available questions by section or by questions that are, or
are not, available in the Study Plan.
Getting
Started
Creating
Your Course
Navigating
Your Course
Creating
Assignments
Study Plans
Gradebook
Other
Features
Training
& Support
• To the right of the drop-down lists are the Question Source options:
o Show publisher questions displays all the pre-made questions available
for the textbook chapter and/or section you selected. These questions
are a mix of end-of-chapter questions from your book and original
questions written specifically for this book’s MyEconLab course.
o Show additional test bank questions displays questions that come
from the TestGen test bank. These questions have been converted
to run in MyEconLab.
• Click the box to add a check mark next to the Question Sources you
want to include.
Note: Show Publisher Questions is checked by default.
The questions associated with all your selections are then displayed in the Available Questions
list on the left side of the page. With each option you change, the questions automatically
update to reflect your choices.
Note: Questions are added to your assignment one chapter at a time. To create assignments
that include questions from multiple chapters, select a chapter, add questions from that
chapter, then select and add questions from a new chapter.
Viewing and Adding Questions to Your Assignment
The questions you can choose are listed in the Available Questions table on the left and are
based on your selected options in Step 2; the questions you add to your assignment will be
listed in the My Selections table on the right.
Getting
Started
Creating
Your Course
Navigating
Your Course
Creating
Assignments
Study Plans
Gradebook
Other
Features
Training
& Support
Note: Icons help to identify certain types of questions and will be displayed next to the
question: paper icon ( ) for essay questions, graph icon ( ) for graphing questions, (tb) for
questions from the TestGen test bank, and so on.
• Click the box next to the individual questions you want to include in your
assignment
or
• Click the All box to select all the questions in the list.
• When you have selected your questions, click Add to move them to the
My Selections list for your assignment.
Note: You may remove any unwanted questions by checking their boxes in the Selections
table and clicking Remove.
To Preview Questions Before Adding Them:
• Select one or more of the questions in the Available Question list.
• Click Preview & Add at the bottom left of the screen.
Note: If none of the questions in the Available Questions list are selected, you can click this
button to preview the entire list; otherwise, check only the questions you want to preview
before clicking Preview & Add.
• At the bottom left of the screen you also have the option to Show the
completed problem or Select to work the problem as a student
to see and work through the problem as your students will.
Note: When you are previewing a question with algorithmic values, you can click Reload to
generate a new version of the question with different values.
Getting
Started
Creating
Your Course
Navigating
Your Course
Creating
Assignments
Study Plans
Gradebook
Other
Features
Training
& Support
When you are adding questions, you can change the number of points students can earn in the
Question points box on the bottom right of the screen.
Note: You can also change the question points on your My Selections list.
• Click Add to add the question to your homework or, if you do not want to add
the question, click Next to move on to the next question.
• When you have finished previewing all your questions, click Close. The questions
that you added will appear in the My Selections list.
• Click Next at the bottom right of the screen when you are finished selecting
and organizing your questions.
Step 3: Choose Your Assignment Settings
Homework Assignment Options
These are the assignment options for homework only. Click here for more information on Test and
Quiz options.
Availability Options
Set options that determine when students can access the assignment:
• Available and Due—These set the date and time when the assignment becomes
available to students and when the assignment is due. Beyond the due date,
students can review the assignment but can do additional work for credit
only if you allow them to.
o Click the calendar icon next to the date box to select a date. Enter a time
in the format hh:mm, for instance, 3:00, and choose AM or PM from
the drop-down list.
Getting
Started
Creating
Your Course
Navigating
Your Course
Creating
Assignments
Study Plans
Gradebook
Other
Features
Note: Clicking Scoring Options allows you to change how many
tries students get before being marked wrong and shown the
correct answer.
Training
& Support
• Time Zone—Time zone settings affect when students can access homework
assignments. For example, if you set 5:00 PM as the time an assignment is due
using Eastern Time settings, a student in California cannot access the assignment
after 2:00 PM Pacific Time.
o Click Change and then select a new time zone from the drop-down
list that appears in a pop-up window. The time zone you choose
is applied to the entire course. Click Save to save the new setting
for your course.
• Scoring Options—Gives you the ability to let students work on the assignment
after the due date. You can require a password, set an absolute due date, and
impose a penalty for late work.
Getting
Started
Creating
Your Course
Navigating
Your Course
Creating
Assignments
Study Plans
Gradebook
Other
Features
Training
& Support
Access Controls
Allow students conditional access to the assignment:
• Prerequisite—Specify a prerequisite assignment if you want students
to complete another assignment before starting this one. You also
can specify the minimum score that students must get on the
prerequisite assignment.
• Attempts Per Question—Check this option to specify how many times
students complete a homework question. After the student completes
a question, a Similar Exercise or Try Again button appears that allows
them to generate the question again. The Similar Exercise button
generates the same question with different values; Try Again refreshes
the same version of the question. For example, if you specify two
attempts, students can work the question twice; then, the Similar
Exercise or Try Again button is no longer available.
o If the Attempts Per Question option is unchecked, students
can generate a new version of the question as many times
as they want.
• Tries within a Question: You can choose the number of times students can
work on each answer field within a question, changing the default from three
tries to any number between 1 and 99. You can do this either at the question
level from the Preview & Add or Remove window, or at the assignment level
from the View Question Details section.
Getting
Started
Creating
Your Course
Navigating
Your Course
Creating
Assignments
Study Plans
Gradebook
Other
Features
Note: When you limit the number of attempts, students see a warning about
the limit on the Homework Overview page before and after they work on the
assignment. They also see a warning before their last attempt at the question.
Training
& Support
Presentation Options
Select options that determine how questions are shown to students:
• Save Values—Check this option if you want to preserve question
values and student answers so that each time the student returns
to the assignment, either to continue work or review it, the values
and answers are saved. The question values change only when the
student decides to try again with a similar question. Students can
also print the assignment and return to it later to enter the answers
online.
Note: If you uncheck this option, then each time students return to a question they will see
new, algorithmically generated question values. Unchecking this option will save the students’
scores, but not their work. This means that you will be able to view their score, but not their
work on the assignment, when reviewing the Gradebook.
• Printing—Check this option to allow students to print this assignment.
• Learning Aids—Click Change to open a window where you can
uncheck any learning aids that you want to hide from students.
The available learning aids are determined by the course settings.
o Check Show in Review mode only to make the
selected learning aids appear only when students
are reviewing their work on the assignment.
Getting
Started
Creating
Your Course
Navigating
Your Course
Creating
Assignments
Study Plans
Gradebook
Other
Features
Training
& Support
Learning Aids
You have the option to provide students with access to learning aids to use while working
on an assignment or in the study plan. The inclusion of the learning aids is at your discretion.
They are typically available on homework, but not for quizzes and tests. The learning aids
available may differ by text and question type.
• Assigned Media opens up any multimedia aids you have assigned.
• View Instructor Tip shows a tip that was manually added by you.
• Help Me Solve This or Guided Solution provides step-by-step assistance
for solving a problem similar to the one your students are working on.
• Grapher launches the Grapher tool so students can draw graphs to help them
work out the answers to certain questions.
• Video opens a video.
• Textbook Pages opens the online textbook to the section students are working on.
Students can then scroll to the information they need.
• Ask My Instructor lets students send an email to their instructor about the question
they are working on and includes a link to the current question in progress.
• Print…lets students print their current problem.
Getting
Started
Creating
Your Course
Navigating
Your Course
Creating
Assignments
Study Plans
Gradebook
Other
Features
Training
& Support
Scoring Options
Uncheck Partial Credit to disallow partial credit on multi-part questions. When unchecked, students
get a zero score on a multi-part question when they answer any part incorrectly. This option is not
available for TestGen tests and in some older courses.
Other
Check the Importing option to allow other instructors to import this assignment.
When you have finished your assignment settings, click Save to save the assignment or Save &
Assign to save the assignment and make it available to students.
Assignment Settings for Tests and Quizzes
These are the assignment options for Tests and Quizzes only. Click here for more information on
Homework options.
Availability Options
Set options that determine when students can access the test:
• Available and Due—The date and time when the test or quiz becomes available to
students and when students can no longer access or continue taking the test or quiz.
o Click the calendar icon next to the date box to select a date. Enter a time
in the format hh:mm, for instance, 3:00, and choose AM or PM from the
drop-down list.
• Time Zone—Time zone settings affect when students can access tests. For example,
if you set 5:00 PM as the time a test is due using Eastern Time settings, a student
in California cannot access the test after 2:00 PM Pacific Time.
o Click Change and then select a new time zone from the drop-down list
that appears in a pop-up window. The time zone you choose is applied
to the entire course. Click Save to save the new setting for your course.
Getting
Started
Creating
Your Course
Navigating
Your Course
Creating
Assignments
Study Plans
Gradebook
Other
Features
Training
& Support
Access Controls
Set options for how and when students can access the test:
• Password—Check this option if you want to require students to enter a password
to gain access to the test. Specify the password in the text box provided. This
option is useful when tests are taken in a proctored setting.
• Prerequisite—Specify a prerequisite assignment if you want students to complete
another assignment before starting this test. You also can specify a minimum
score for the prerequisite assignment.
• Number of Attempts—Check this option if you want to limit the number of times
students can take this test before the due date. Then enter the number of test
attempts you want to allow. If you do not check the option, students can take the
test an unlimited number of times before the due date.
• Incomplete Attempt—This option determines how students can resume an
interrupted test:
o Students can access and continue—Select this option if you
want students to resume taking the test on their own.
o Instructor must enable access—Select this option if you want
more control over student access to the interrupted test. Then,
select one of these two additional options:
- Restricted Access requires students to get your permission
to re-enter the test.
- Blocked Access prevents students from accessing any
other assignments or questions in the course while
taking the test. If the test is interrupted, you must
explicitly permit students to re-enter the test. Until
you allow them back into the test, students have no
access to any other assignments or questions.
Getting
Started
Creating
Your Course
Navigating
Your Course
Creating
Assignments
Study Plans
Gradebook
Other
Features
Training
& Support
Presentation Options
Select options that determine whether the test is timed and how questions are shown to
students:
• Time Limit—Check this option and specify the time limit in minutes if you
want to limit the amount of time students have to complete the test.
o Show time remaining during test—If you set a time limit,
you can also check this option if you want the elapsed time
to be displayed in the test player during the test.
• Question Display—Select this option to scramble the question order
for each student each time the test is taken.
• Learning Aids—Select the learning aids you want to be available to
students when they work on the test or quiz. Click Change to open
a window where you can select any learning aid that you want to
display to students. The available learning aids are determined by
the course settings.
Check Show in Review mode only to make the selected learning aids appear only
when students are reviewing their work on the assignment.
Power User Tip: Turn on the learning aids for a quiz, but check Show in Review Mode
only so students can benefit from the learning aids when reviewing assignments.
Getting
Started
Creating
Your Course
Navigating
Your Course
Creating
Assignments
Study Plans
Gradebook
Other
Features
Training
& Support
Review Options
Select conditions for test review. When students review a test, they see the correct answer and
their answer choice.
• Reviewing Test—Select one of these reviewing options:
o Student can review test any time after submitting lets students
review the test any time after they take it.
o Student can review test only immediately after submitting
lets students review the test immediately after taking it. Students
cannot review the test again at a later time.
o Student can review submitted test any time after due date
lets students review the test after it is no longer available for
them to take.
o Student can never review submitted test prevents students
from reviewing the test at any time.
• Print—Check this option if you want to allow students to print the test questions
and answers when reviewing. (This option is not available in certain courses.)
Scoring Options
Uncheck Partial Credit to disallow partial credit on multi-part questions. When this option is
unchecked, students get a zero score on a multi-part question when they answer any part
incorrectly.
Other
Check Importing to allow other instructors to import this assignment.
When you have finished your assignment settings, click Save to save the assignment or Save &
Assign to save the assignment and make it available to students.
Getting
Started
Creating
Your Course
Navigating
Your Course
Creating
Assignments
Study Plans
Gradebook
Other
Features
Training
& Support
Question Pooling
To ensure that every student taking your course is receiving different quiz and/or test questions,
you can use Question Pooling to select several different questions covering each learning
objective. Every student will receive only one question from that selection.
This is particularly useful when you are assigning questions from the Test Bank, since these
questions tend to be multiple choice and are static.
• Click on Test/Quiz Manager to create a new Test or Quiz.
• Click the Create Assignment drop-down menu. Select Create Quiz.
• Enter an appropriate name for the quiz into the Quiz Name text box. Click Next.
• Choose the appropriate Chapter, Section, and Question Source as you normally would
when creating a quiz.
• Click on the link Pooling Options near the center of the page
• In the pop-up box, click the circle next to Enable Question Pooling. Click OK.
There should now be two new buttons Pool and Unpool.
• To Pool questions in the quiz, determine which questions are similar enough or cover
the same objective by looking at the Test Bank or clicking on the question. Filtering by
section might be helpful. Then select all the similar questions. Click Pool.
Only one of these pooled questions will be given to each student as Question 1 of the quiz.
To pool more questions, simply follow the steps above again for each desired question.
• Click Next to continue to Settings and assign the quiz.
For further information on how to create an assignment click here.
Getting
Started
Creating
Your Course
Navigating
Your Course
Creating
Assignments
Study Plans
Gradebook
Other
Features
Training
& Support
5
Study Plans
Your students have access to a personalized Study Plan to establish their mastery of your course
material. Students can then clearly see which topics they have mastered and, more importantly,
which they need to work on. The Study Plan provides practice questions for every section in the
textbook.
Study Plans Allow Students To:
• Take a practice test or an assigned test to assess their grasp of the material.
• Use Study Plan updates to show what material they have mastered and what
they need to study.
• Do practice questions that offer tutorial learning aids (if you allow them), such
as videos and animations, to help them learn the material. When they have
answered all the questions correctly, students see a “ready to retest” icon.
• Take an assigned or practice test to prove their mastery.
The Study Plan Manager allows you to choose which questions are included in students’ Study
Plans and set the overall score used to determine mastery on a section or objective.
Note: By default, to prove mastery on a section or objective, students must correctly answer
100% of the questions on a test or quiz that covers the material.
• To view your students’ Study Plans, go to the Gradebook and select the
Study Plan view.
Getting
Started
Creating
Your Course
Navigating
Your Course
Creating
Assignments
Study Plans
Gradebook
Other
Features
Training
& Support
• Click a student’s name to view his or her Study Plan. You can click
Next Student or Previous Student at the top of the page to move
from one student’s Study Plan to another.
• To send an email to the student about their work, click Email Student
next to the student’s name.
The Email Student window opens with the student’s email address and your email
address already filled in.
Note: You can edit these addresses and the subject line, if needed, and then type
your message to the student in the text box.
• Click Send to send the email and see a confirmation.
Getting
Started
Creating
Your Course
Navigating
Your Course
Creating
Assignments
Study Plans
Gradebook
Other
Features
Training
& Support
6
Gradebook
The Gradebook lets you view student results on your assignments. You can view results for the whole
class and for individual students.
Gradebook Views
The Gradebook Views area of the page lets you choose how to view your students’ results:
• All Assignments—Shows you students’ results on all assignments. Click
the name of a category (for example, Tests) to view students’ results only
for assignments of this type. To change the name of the Other category,
click Rename this category.
• Overview by Student—Shows each student’s average score on assignments
and Study Plan work.
• Study Plan—Shows each student’s results for all the Study Plan questions
in a selected chapter or in the whole course.
• Performance by Chapter—Shows class scores on assignments and Study
Plan work for a specific chapter or section of the course.
Accessing Gradebook Functions
The toolbar at the top of the page gives you access to the following functionality:
• Export Data—Export information from the Gradebook to a .csv file that can
be read by a spreadsheet application such as Microsoft® Excel. You can choose:
o Quick Exports—Takes you to the Quick Exports page where you
can generate quick reports on assignment categories (homework,
tests, and so on) or student averages.
Getting
Started
Creating
Your Course
Navigating
Your Course
Creating
Assignments
Study Plans
Gradebook
Other
Features
Training
& Support
o Advanced Exports—Takes you to the Advanced Exports page, where
you can generate complex reports that can include raw scores in points,
Study Plan results, time spent on assignments, the date worked, the
last login dates, and so on. You also can export data for all categories
at once. Because advanced exports can take some time to generate,
they are compiled offline and you are emailed when they are ready to
download.
o Retrieve Advanced Exports—Takes you to the Retrieve Advanced
Exports page, where you can download advanced exports when
they are ready.
• Manage Incompletes—Submit a score of zero for assignments that students
have not completed. This should be done at least once at the end of the semester.
Managing your incompletes is also important to allow students to review
assignments they never completed.
• Change Weights—Choose whether calculations of overall scores are based
on weighted Gradebook categories or on individual assignments. Edit this
page to reflect how your students’ grades will be calculated.
• Edit Roster—Change a student’s status in the course and add student IDs.
• More Gradebook Tools—This drop-down menu provides additional Gradebook
options:
o Add Offline Items—Create Gradebook entries for work that students
do offline.
o Enable Access to Incompletes—Allow students to resume work
on a restricted test when the test-taking session has been interrupted.
Getting
Started
Creating
Your Course
Navigating
Your Course
Creating
Assignments
Study Plans
Gradebook
Other
Features
Training
& Support
o Delete Results—Delete all students’ results for one or more assignments.
o Drop Lowest Scores—Omit one or more lowest scores on assignments for your
entire class.
o Omit Assignment Results—Omit all students’ results for one or more assignments,
or include results you omitted earlier.
o Import Previous Results—Transfer a student’s results from one course to another.
o Manage Offline Items—Edit the Gradebook entries for work that students do offline.
o Clear Study Plan—Delete a student’s Study Plan and sample test results.
o Add/Edit Student IDs—Enter, upload or edit student IDs that appear in your
Gradebook and class roster.
o Search/Email by Criteria—Send email to all students in your class or use
performance criteria to search for selected students (for example, those with
averages of less than 70%) and email only these students. This function supports
attachments.
o Set Scoring Options—Set options for how scores and averages are calculated
and displayed. The default scoring is set to count the best score for quizzes
and tests with more than one attempt. You can change it to count average
score, most recent score or all scores.
o Show/Hide Assignments—Hide selected assignments in the Assignments
view of the Gradebook or show assignments that you hid earlier.
Getting
Started
Creating
Your Course
Navigating
Your Course
Creating
Assignments
Study Plans
Gradebook
Other
Features
Training
& Support
Viewing Results for Individual Students
The Results page shows a student’s results on his or her assignments. Students can view their
own Results page, and you can view all students’ Results pages to track their performance in the
course.
You view a student’s Results page from the Gradebook by clicking the student’s name. In addition
to the information that appears on the student view of the Results page, the instructor view of the
page displays:
• Next Student and Previous Student controls at the top of the page so you can
easily move from one student’s results to another’s.
• Email Student opens the Email Student window, with the student’s email address
and your email address already filled in. You can edit these addresses and the
subject line, if needed, and then type your message to the student in the text box.
Click Send to send the email and see a confirmation.
• Overall Score shows the student’s overall score. Students must explicitly request this
calculation. Click the Show details link to open the student’s Overall Score page.
• All Assignments shows all of the student’s assignments, even if the student has
no results for his or her assignments. For tests and quizzes, you see a separate row
for each attempt.
o Assignments are listed by the date and time shown in the Date Worked
column, in descending order. Assignments the student has not yet started
and offline items without scores appear at the end of the list in the same
order as they appear in the Homework/Test Manager.
Getting
Started
Creating
Your Course
Navigating
Your Course
Creating
Assignments
Study Plans
Gradebook
Other
Features
Training
& Support
If the score for the assignment was omitted when you dropped lowest scores, you will see “low
score” beneath the score in the Score column. You can put your mouse pointer over it to see
when you last dropped lowest scores.
Assignments with no score show this information in the Score column:
o (--) Appears when there is no score.
If there is no score and the due date has not arrived, nothing will appear in
the Date Worked column. Otherwise, “past due” appears in the Date Worked
column after the due date has passed.
o ( ) Appears when there is no score and the assignment has an unmet
prerequisite. Position your mouse pointer over the flag to view information
about the prerequisite.
o (*) Appears when the score was submitted or changed by an instructor.
Position your mouse pointer over the asterisk to see what type of change
was made and when.
o (incomplete) Appears as soon as a student starts working on a test or quiz
and remains until the assignment is submitted.
Each assignment has an Actions drop-down menu. Depending on the assignment and the
results, the following options are available:
• Email Student—Lets you email a student about the assignment.
• Review—Lets you review the student’s work and comment on individual questions.
Available for online assignments with completed and partial results.
Getting
Started
Creating
Your Course
Navigating
Your Course
Creating
Assignments
Study Plans
Gradebook
Other
Features
Training
& Support
• Item Analysis—Opens the Item Analysis window, where you can view how the
student did on each question in the assignment. (This option does not appear for media
assignments.)
• Settings Per Student—Allows you to change the assignment settings (such as time
limit or due date) only for this student. (This option is not available in Coordinator
courses.)
• Enable Access—Allows the student to resume taking a test or quiz when the
assignment is restricted or access is blocked. (This option is available for tests and
quizzes marked “needs access.”)
• Dismiss Prereq/Reapply Prereq—Lets the student do the assignment without
satisfying its prerequisite. You can later reapply the prerequisite. Available for
assignments with unmet prerequisites.
• Grade Essay—The assignments that require grading show ( ! ) in the Score column. In
courses with essay questions in tests, this option lets you review the student’s essays
and grade them.
• Change Score—Lets you change the student’s score. Available for all assignments with
scores.
• Submit Score—Lets you submit a score. Available for assignments with no results or
incomplete results.
• Print—Lets you print the assignment with the student’s answers and the correct
answers. Available for online assignments with results in some courses.
• Omit/Include—Lets you omit the student’s results so they do not count toward his or
her average. You can later include the results again.
• Delete—Allows you to permanently delete the student’s results. Available for
assignments with results and those marked “incomplete.”
Getting
Started
Creating
Your Course
Navigating
Your Course
Creating
Assignments
Study Plans
Gradebook
Other
Features
Training
& Support
7
Other Commonly Used Features
These are some of the more commonly used features in MyEconLab.
Settings Per Student
The Individual Student Settings page lets you change the assignment settings for one or more
specific students. No other students in the class are affected by the change.
For example, if one of your students has fallen behind because of a commitment to a sports
team, you can change the due date for this student. Or if you have students with learning
disabilities, you can remove or change the time limit on a test for these students.
To Access the Individual Student Settings Page:
• In the Homework/Test Manager, locate the assignment.
• From the Actions menu for the assignment, select Settings Per Student
and click Go.
• Click Add/Remove Students from List to open a window where you can
select students whose settings you want to personalize.
The options available in each column of the table depend on whether you are changing the
settings for a homework assignment or for a test or quiz.
To Upload Course Documents:
You can upload course documents like your syllabus into your course.
• Go to the Course Manager and select Upload Course Documents.
Getting
Started
Creating
Your Course
Navigating
Your Course
Creating
Assignments
Study Plans
Gradebook
Other
Features
Training
& Support
Item Analysis
The assignment view of the Item Analysis page lets you analyze how your class performed on
each question in a selected online assignment.
To View the Item Analysis Page for an Assignment:
• From the Assignments view of the Gradebook, click (
) beside the class average score.
• If you choose a test or quiz, select the attempt you want to view:
o All attempts for all students.
o One attempt per student based on the Best Score attempt.
o One attempt per student based on the Most Recent attempt.
Drop Lowest Scores
The Drop Lowest Scores page lets you omit the lowest scores for assignments in any
Gradebook category for your entire class. You can choose to drop up to five of the lowest
scores for each Gradebook category.
The best time to drop the lowest scores is after your course ends. Lowest scores are based on
student results at the time you drop the scores. Future scores are not considered until you drop
lowest scores again. If you drop lowest scores more than once in a semester, any previously
dropped scores that are no longer the lowest will be restored.
To access the Drop Lowest Scores page, go to your Gradebook and select Drop Lowest
Scores from the More Gradebook Tools drop-down list.
Getting
Started
Creating
Your Course
Navigating
Your Course
Creating
Assignments
Study Plans
Gradebook
Other
Features
Training
& Support
8
MyEconLab Training and Support
MyEconLab Frequently Asked Questions
How can I help students that are experiencing problems logging into MyEconLab?
If students have forgotten their login information, they can select Forgot your Login/Password? on
the MyEconLab login page and follow the prompts. If they are still experiencing problems, they can
contact technical support at http://247pearsoned.custhelp.com/.
How do I add a TA to my course?
You will need a Student Access Code so that your TA can enroll in your course as a student. Then,
change their settings to “TA” via the Edit Roster tab in the Gradebook.
Can my students take two MyEconLab courses at the same time?
Yes, they will just need to have an additional access code, create another username and password,
and keep their existing email address.
My Pearson account has expired—what do I do?
You must re-register for MyEconLab with a new Instructor Access Code. See page 3 of this guide.
My student is enrolled in the incorrect course or would like to change from one course to
another in MyEconLab—can they do that?
Students will need to enroll in another course. First, they will need the correct course ID (not an
additional access code). Then, on the student's course listing page, they can select Enroll in a
Course. Once they have enrolled in the correct MyEconLab course, they will be automatically
un-enrolled from the other course.
If a student has already completed assignments in the incorrect course, how can I add those
results to the correct course?
On the Gradebook page, select Import Previous Results from the More Gradebook Tools drop-down
menu. Then, select Import Results next to the student's name.
How do I request additional Student Access Codes?
You can send an email to [email protected] with your name and the reason for your
request. All requests go through an approval process.
Getting
Started
Navigating
Your Course
Creating
Assignments
I do not understand the “incomplete test” setting in MyEconLab—can you explain?
To allow students to continue a test after an Internet disruption or another issue, select Students
can access and continue on his or her own. The system will save their answers up to the point of
disruption and they can re-enter the test on their own. If you want more control over student access to
an interrupted test, select Instructor must enable access and one of two options: restricted access
or blocked access. For more information on the incomplete test setting go to: Creating Quizzes and
Tests in MyEconLab.
Creating
Your Course
How do I report a content error in MyEconLab?
The easiest way for an instructor to report a content error in MyEconLab is to access the question with
the error and click the Ask the Publisher button. Complete the form and click Submit. For more on
reporting a content error, watch this quick video tutorial: Reporting a Content Error in MyEconLab.
How do I remove a question from an assignment that a student has already started?
Once students have accessed the assignment, instructors are prevented from editing the questions in
the assignment. You can either delete all results associated with the assignment and then edit the assignment, or copy the assignment, edit the questions, and assign the new assignment to your students.
Study Plans
How do I assign experiments in MyEconLab?
Click on the Experiment Manager in MyEconLab, and use the drop-down menu to select Create
Experiment Assignment and follow the prompts. You can choose between single- or multi-player. For
more information about experiments, go to: MyEconLab Experiments.
Gradebook
Other
Features
Training
& Support
Online Documentation
The most complete set of documentation on MyEconLab can be found inside your course.
At the top of every page, you will find links to Home, Help, Support, Browser Check, and Log
Out. Much of this user’s manual was taken from this searchable and indexed help system.
Technical Support
The Support button found at the top of the page will bring you to the instructor support section of
MyEconLab. Here you will find information about contacting our support team.
Support options include:
- Instructor Phone Support
- 24/7 Chat
- Email
Live, Online Training!
Please visit myeconlab.com/training for a complete list of online training sessions. Training is
frequently peer-led so you can get answers to program questions and also share tips and best
practices with experienced faculty. Each online training session is small (typically no more than six
attendees) to allow for full participation.
Self-Paced Training
If you can’t attend one of our live, online training sessions, please visit myeconlab.com for selfpaced training materials, such as video modules and brief tours.
We strive to make your experience with Pearson and MyEconLab the best it can be.
Please contact the MyEconLab Customer Experience Team any time you have suggestions:
[email protected]
Getting
Started
Creating
Your Course
Navigating
Your Course
Creating
Assignments
Study Plans
Gradebook
Other
Features
Training
& Support