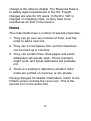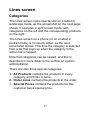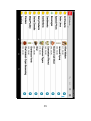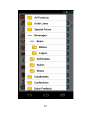
1
sales manager Guidebook For Android phones and tablets Copyright © 2015 Vanguard Software Ltd. All rights reserved. Edition 1.0 Sales Manager is a trademark and property of Vanguard Software. All other marks and trademarks are properties of their respective owners. The content of this guidebook may differ in some details from the software. For best results, make sure you’re running the latest version of the app. To check, go to the About page. This guidebook refers only to the Android app. The iOS app has many similar features, but it is not dealt with here. All information in this guidebook is subject to change without notice. For online help and support, visit www.vanware.co.uk. For the latest news, follow @VangSoft on Twitter. 2 Table of contents Getting started ................................................ 6 Installing the app ....................................... 6 Orders screen............................................. 7 Navigation drawer ..................................... 9 Orientation .............................................. 10 Swiping ................................................... 10 Web Views............................................... 12 Printing .................................................... 13 Barcode scanning .................................... 14 Getting help ............................................. 15 Managing your data ..................................... 16 Tasks involved ......................................... 16 Store screen ............................................. 17 Server settings ......................................... 18 Downloads screen ................................... 20 Dropbox screen ....................................... 21 Installing the product images .................. 23 Database screen ....................................... 25 Taking an Order ........................................... 27 Introduction ............................................. 27 Customer map ......................................... 27 3 Searching lists ......................................... 30 Customer screen ...................................... 31 Order screen ............................................ 34 Header screen .......................................... 35 Lines screen............................................. 37 Settings......................................................... 45 Introduction .................................................. 47 Hosting service ............................................ 48 Web app ................................................... 48 Uploading CSV file ................................. 49 Sage support ............................................ 51 Admin database............................................ 52 Introduction ............................................. 52 Installation ............................................... 52 VBA module ........................................... 53 Switchboard ............................................ 54 Linked database....................................... 55 Macro security......................................... 57 SQLite databases.......................................... 59 SQLite Studio .......................................... 59 Structure .................................................. 60 Types of database .................................... 61 Self-Hosting ................................................. 62 4 Introduction ............................................. 62 Testing ..................................................... 63 Business model ............................................ 64 Sales tax ....................................................... 65 Categories .................................................... 66 Database rules .............................................. 67 Proprietary format ........................................ 68 FAQs ............................................................ 69 Sample Invoice ............................................ 70 Invoice ..................................................... 70 Schema ......................................................... 72 Record Layouts ............................................ 73 Categories................................................ 73 Custom .................................................... 73 Customers................................................ 74 Employees ............................................... 77 Order Details ........................................... 77 Orders ...................................................... 79 Products ................................................... 81 Shippers ................................................... 82 Special Prices .......................................... 83 Tax Rates ................................................. 83 5 Getting started Installing the app The app can be installed directly from Google Play. Users who do not have access to Google Play can download the apk file from Vanguard Software. The first time that the app is launched, it asks you whether you wants to install some sample data. If you are trying out the app for the first time, you should do so, as this will give you a much better impression of what the app will look like when it is being used for real. Trying to use it with no data at all is tedious and confusing. After the sample data has been installed, the app displays the Orders screen. This is the home screen for the app, and it displays a list all the orders stored on the mobile device. 6 Orders screen The Orders screen lists all the orders in the database. The icons on the left indicate the type of transaction: C for a credit note, I for an invoice and Q for a quote. Once an order has been sent to any destination (the customer, head office, a printer or the web server), it can no longer be changed in any way. Such orders are shown in a lighter font on the Orders screen. The tabs at the top of the screen allow the user to list all the orders, only the fresh ones that have not been sent anywhere, or only the ones that have been sent. 7 The action bar at the top of the Orders screen contains three icons as follows: 1. Add allows the user to select a customer, and create a new order for him. 2. Totals displays the total sales for various periods. This is a server side query, and only orders that have been sent to the web server are included in the totals. 3. Remove removes all the orders that have been sent. The Orders screen cannot be used to create orders for new customers, or to select an existing customer from a map. If the user wants to do this, he should go to the Customers screen instead. 8 Navigation drawer A navigation drawer is a drop down menu, which is displayed by tapping the home icon in the action bar. The horizontal bars to the left of the home icon indicate that a navigation drawer is present. Navigation drawers make it much easier to get from one screen to another, and is a radical improvement on a traditional hierarchical menu. Navigation drawers scroll vertically. The one in the Sales app is longer than the screen on a Nexus 4, and only the top part is shown on the right. Users of the Sales app should familiarise themselves with the options on the navigation drawer. 9 Orientation Every screen in the Sales app can be viewed in either landscape or portrait orientation. Some screens operate in split screen mode on a tablet landscape mode. Swiping Some screens that display individual records can be swiped right to left, to move to the next or previous 10 record in a sequence. Because of this, swiping left to right does not open the navigation drawer, as it does on other systems. 11 Web Views Some of the screens that you see in the Sales app are not generated by Android at all, but are actually the output of queries run on the web server. A typical example is the History screen for customers, shown above. This screen does not look like an Android screen, because it is not. It is actually an HTML document, which has been created on the server, downloaded to the Android device and rendered in a web view. Note that the dialog also takes place on the server. In the above example, if you click on one of the View buttons, the server will respond by displaying the invoice. All that the app does is to show the output. 12 Printing It would be nice to be able to print out an invoice on site, and present it to the user. But in practice, printing from an Android device to a local printer presents considerable technical difficulties. The Android Bluetooth stack is primitive, and does not support the BPP protocol for printers. Peer to peer Wi-Fi connections are not well supported, and infra-red is not supported at all. Printing is really only feasible on scenarios such as showrooms and trade shows, where there is a Wi-Fi router connected to the internet. A truly portable solution is not available. The Sales app only supports printing using HP ePrinting and Google Cloud Printing. In both cases an HTML document is sent to a remote server, where it is rendered and sent back as a print job. The Sales app only supports printing on A4 and US Letter sized stationery. Due to the scenarios in which it is likely to be used, there is really no point in supporting other formats. 13 Barcode scanning The Sales app can scan barcodes either using an external Bluetooth or USB scanner, or using the builtin camera on a mobile device. Camera scanning uses the built-in camera on a phone or tablet to scan barcodes. It works surprisingly well on Android devices. For ergonomic reasons, it is probably more suited to phones than to tablets. If you want to check how camera scanning will work on your particular device, you can download a free app called Barcode Scanner, from Google Play. This is the app that Sales app actually uses to scan barcodes, and if it is not installed, the Sales app will ask you to do so. The main problem with camera scanning from a UI design perspective is that it takes over the display, and so interrupts the dialog with the user. This is something that we are still working on. External scanners have to support the HID protocol. The scanner works like an external keyboard. This can cause problems with the focus, and with Android thinking that it actually is a keyboard. 14 Getting help Help is available through several channels: 1. Download the latest version of this manual from our web site. 2. Visit our company blog for news articles and FAQs about the Sales Manager. 3. Tweet us on @VangSoft. This is the fastest way to contact us. 4. Email us on [email protected]. We try to answer all messages within 24 hours. The last two of these options are available on the navigation drawer. 15 Managing your data Tasks involved Your first task as a user is to manage your data. This involves: 1. 2. 3. 4. Downloading your data from a web server. Installing your product images. Checking the status of your data. Backing up your database. Downloading product images, and backing up the database, both require a Dropbox account. Dropbox accounts with a storage limit of 2GB are free, and these are perfectly adequate for use with the Sales app. Backing up the database also requires an in-app purchase. 16 Store screen There are five individual options, and you can save money by purchasing a bundle. Prices are displayed in your local currency, based on the prices in GBP shown here. The options only have to be purchased once, and they can be restored onto any Android device using the same Google Play account. This is done by tapping the Restore button in the action bar. The purchases are managed by Google Play, and payments are made by credit card. Users often find that their cards are declined for no apparent reason, but that is something over which we have no control. 17 Server settings The server settings allow the app to identify the web server being used. This will either be a virtual server on our hosting service, or a real server hosted by your organisation. If you are running the app without a web server should set the type to None. Setting it to Demo Company will allow you to download the sample data, but little else. The login details are used to identify you to the server, and to identify your company to the hosting service. Self-hosted servers usually ignore the company id. The last section is for self-hosted servers only. It allows the app to build a precise URL for each transaction. Each mobile device, and it also contains the registration key. Each mobile device has a unique key, which must be purchased from Vanguard 18 Software. 19 Downloads screen The first set of options downloads data for one of the main tables. Downloading a table will remove any changes that you might have made. The process is extremely fast. The last two options are slightly different, and are covered in depth below, in the section on system administration. If you have product images, will find that the thumbnails disappear whenever the products table is downloaded. To restore them, they should go to the Dropbox screen, and run the Create Thumbnails option. 20 Dropbox screen The options on the Dropbox screen are divided into four pairs as follows: 1. Backing up the database These options require an in-app purchase, which is recommended for all users. 2. Managing product images Downloading images does not remove the images for products that are no longer being sold. 3. Managing thumbnails Creating thumbnails does not remove the thumbnails for products that no longer have images. 21 4. Additional options Copy Demo Images copies the images for the demo data. Reset Account allows you to use a different Dropbox account. The first time that this screen is loaded, the app has to obtain permission from Dropbox to use an account, and to use an app folder. This process sometimes takes more than one attempt to complete successfully. All the Dropbox files that the Sales app uses are contained in a folder called Sales Manager, in the Apps directory. Usually it will contain be just two files: 1. A backup copy of the database, called vanguard.db. 2. A file containing all the product images, called images.zip. On the Android device, the product images are contained in a dedicated folder in the file storage area, and the thumbnails are stored in the products table. 22 Installing the product images Product images are pictures of your products, in JPEG format. They should not be too large - around 50KB is ideal. Camera shots are far too large. Each product image has a file name which is the same as the id of the corresponding product, and an extension of “.jpg”. For instance, the image for product 004 would be 004.jpg. The product images should be stored in a zip file called images.zip, and placed in the Sales Manager application folder in the Dropbox account. The Dropbox screen has a shortcut for getting hold of the images for the sample data, which copies the file from one of our own Dropbox accounts. Alternatively, you can: 1. Download the images from our web site. 2. Create your own images.zip file. 3. Upload the file to the Sales Manager folder in your Dropbox account. That takes longer, but it gives you a better idea of how to create your own product images. Once you have the images.zip file in the Sales Manager folder of your Dropbox account, you are 23 ready to install them on your mobile device. Go to the Dropbox screen, and: 1. 2. 3. 4. Tap on Delete Images (optional). Tap on Download Images. Tap on Delete Images (optional). Tap on Create Thumbnails. To make the process easier, these options are arranges sequentially on the Dropbox screen. 24 Database screen The Database screen displays four blocks of information to help the user manage his data: 1. Rows in Tables This gives the number of rows in each of the main tables in the database. Except for the customers table, these should match the counts on the web server (some customer records are only downloaded by one user). 2. Bytes of Data This gives the amount of storage used by the SQLite database, and by the product images. 25 3. Customer Locations This shows how many customer records have values for latitude and longitude. This may be of concern if you sometimes use the customer map to locate customers. 4. Images and Thumbnails This information tells you whether your product images and thumbnails are up to date. 26 Taking an Order Introduction This chapter will take the form of a walkthrough. Using the sample data that we have just installed, we will create a new order for an existing customer, and add a few products. Then we will send the order, to complete the process. The customer that we will visit is called B's Beverages, and she will order some items from the Beverages category. Since the fictitious address of this customer happens to be near to where we live, we will be able to demonstrate the use of maps to locate a customer. Customer map We will start by displaying the customer map: 1. Tap the home icon. 2. In the navigation drawer, select the Customers option. 3. In the action bar, tap the overflow indicator. 4. From the drop down menu, choose Map. This will display a map of all customers within a range of 20km or so, as shown on the following page. The 27 current location of the user is shown with a blue pin. The other pins are for customers, and can be green, red or purple. The overflow indicator is the icon consisting of three vertical dots, on the right hand side of the action bar. When tapped, it displays a menu of actions whose icons would not fit on the action bar. If you are using a tablet, or you are holding your phone in landscape mode, the map icon will probably appear on the action bar anyway. By default, the app uses GPS as the location provider. This is slow, but accurate. The other location provider that Android uses is network location, which is faster but less accurate. Location providers are discussed in a later chapter. Having got our customer map, we can now tap on the pins until we find the customer we are looking for. The map should now look like the screenshot on the next page. Unless you are in London yourself, you will not actually find B's Beverages, and you will have to choose some other customer instead. 28 map 29 Now if we tap on the snippet for our selected customer, the app will take us to the detail view for that customer. But let us backtrack, and see how we would locate a customer on the customer list instead. Searching lists The customer list shares number of features with other the other main lists in the Sales app. In particular, it uses the same method to search for records. The first two icons in the action bar are always the same. The first one opens a search bar, and the second one changes the sort order. The list can be sorted and searched either by name or by id. To demonstrate this, tap on the search icon, and type the letters “be”. The list now only shows the four customers whose names contain our target. Note that 30 the target can appear anywhere in the list, and the search is not case sensitive. Select our target customer B's Beverages, and we will look at the Customer Screen. Customer screen The customer screen displays the details of the customer, and gives the user various ways to communicate with him. The action bar contains three icons. The first one creates a new order for the customer, and we will be using that shortly. The other two show drop down menus. The contact menu gives various ways in which the customer can be contacted. Some of the options may not be available, especially if you are using a tablet instead of a mobile phone. The route map sends the current location and the customer address to Google Maps, and asks it to show the route. 31 map 32 The overflow menu contains the options one would expect, to edit or delete the customer record. The History option displays a list of past orders for the customer, and once again this is a server side query. It only shows orders that have been uploaded to the web server. The Customer Edit screen is as one would expect, but the action bar contains some interesting icons that are worth discussing: 1. Locate This uses geocoding rather than GPS. In other words, it sends the customer address to Google Maps, and asks it where that is. 2. Upload This uploads the customer record to the web server, which adds it to the customer table, or replaces the existing record. 3. Import This allows the user to import a contact from the Contacts app. Save your prospects as contacts until they are ready to place an order. You will find a detailed description of all the fields in the customer record in the appendix. Now we are 33 ready to create our first order, so tap on the Order icon on the Customer screen. Order screen The app stores each record as one header record and a number of detail records, one for each line in the order. The order screen displays all the header information, plus some totals for the detail lines. Detailed layouts for both record types can be found in the appendix. The order is processed to produce an HTML document called an invoice. This can be viewed locally on your mobile device, emailed to people, or sent to a printer. Most printers can handle HTML jobs, and the invoice is specially designed for printing on A4 or US Letter stationery. No other sizes are supported. A sample invoice can be found in the appendix. The icons in the action bar reflect the structure of the data. The first one is for editing the header data, and the second one is for adding, changing and removing detail lines. If the order has been sent, these icons will both be hidden. 34 The overflow menu contains more important options: 1. View Displays the invoice locally in a web browser. 2. Send Sends the order or invoice to various destinations. 3. Copy Copies the order. 4. Delete Deletes the order. Both the header record and the detail records are removed from the device. The web server is not affected. The first thing that you will want to do when you have created a new invoice is to check the header information, to see whether anything needs changing. So on the order screen, tap the first icon in the action bar. That is the one that one that looks like a pencil. Header screen The Header screen contains much of the dame information as you see on the Order screen, except this time you can edit it. The first information that you will probably want to 35 change is the delivery details. The Required Date is to satisfy legal requirements in the US. Freight charges are also for US users. In the EU, VAT is charged on shipping costs, so they have to be included as an item in the invoice. Notes The notes fields have a number of special properties: 1. They can go over any number of lines. Just tap enter to add a new one. 2. They use a monospace font, so that characters can be lined up in columns. 3. They can contain links. Web pages and email addresses will usually work. Phone numbers might work, and street addresses will probably not. 4. There is a setting to determine whether order notes are printed on invoices, or are private. Having changed he header information, return to the Orders screen and tap the Lines icon. This is the second icon in the action bar. 36 Lines screen Categories The Lines screen looks spectacular on a tablet in landscape mode, as the screenshot on the next page shows. It operates in split screen mode, with categories on the left and the corresponding products on the right. The Lines screen on a phone (or on a tablet in portrait mode) is no slouch either, as the next screenshot shows. This time the category is selected from a list that pops up when the category in the action bar is tapped. Note that categories can be nested, and this is described in more detail in the section on system administration. There are also three special categories: 1. All Products contains the products in every category, and those in none. 2. Order Lines contains the products in the order. 3. Special Prices contains the products for this customer has a special price. 37 38 39 40 ning 41 Gallery The third screenshot is of the Gallery screen. Here, you can choose products visually. Products that have been added to the order are shown with a red border. Tapping on the image of a product has the same effect as selecting it on the Lines screen. The category is the one in effect when the Gallery option is selected on the Lines screen. Barcodes The fourth screenshot shows the panel used for scanning barcodes. It is activated when the Scan option is selected on the Lines screen. The screenshot shows the panel just after a product has been scanned. The sample data does not have any barcodes, so we had to cheat and edit our data manually. The Sales app supports external barcode scanners using the HID protocol. They must be configured with no prefix, and a suffix of either CR (carriage return) or LF (line feed). This is the default for most scanners. 42 Adding Lines There are two ways to add products to the order from the Lines screen: 1. Tapping on the + (plus sign) increases the quantity by one. 2. Tapping anywhere else displays a screen which allows the user to change the quantity, price, discount and tax rate, and to view the product notes. To finish off the walkthrough, add one bottle of Chartreuse Verte and one bottle of Côte de Blaye to the order. Then return to the Order screen and select the View option. The screen should now look like the one in the appendix. The order is ready to send, except that we have not set up any destinations yet, so that will be one of our tasks in the next chapter. To sum up the order taking process, the next page has a diagram showing the relationships between all the main screens involved. 43 Illustration 43: Taking an order 44 Settings The Sales app has five pages of settings: 1. Profile This allows you to take orders for more than one company, by swapping the databases. Since the settings are also stored in the database, all you have to do is swap them and you are good to go. 2. Server This is for setting up the web server. It has already been discussed in the chapter on managing your data. 3. Hardware This is for setting up your printer, barcode scanner and location service. The settings are all straightforward. The one you may want to play around with is the location provider. GPS is slow, and you may want to go with network location even though you have a GPS receiver. 45 4. Invoices This contains various options for printing invoices. Again, most of the settings are straightforward. HTML headers and footers are tricky, and you may prefer to stick with plain text. 5. Gmail For security reasons, you should create a Gmail account specifically for use with this app. The most common mistake that people make is to enter the email address instead of just the name of the account. 46 Introduction The Sales Manager is designed as a multi-user cloud based system, with a client that runs on both the Android and iOS platforms, and on both phones and tablets. The Sales app can be used to take orders without being connected to the internet. It only needs an internet connection in order to download customer and product data, and to upload sales orders. Companies can choose whether to host their own web server, or to use our hosting service. In either case, the total cost is about the same, and this should not be a determining factor in choosing between the two. Individual users can also choose to use the Sales app without a web server at all. Such users should bear in mind that some of the options in the app are server side queries, which require a web server. 47 Hosting service The hosting service provides each subscriber with a virtual web server. As far as the mobile user is concerned, this functions in just the same way as a real web server. Subscribers pay a monthly or annual fee, and the cost depends on the number of users. Details can be found on our web site. Web app Subscribers manage their virtual web servers using a web app, which can be run on any PC with a web browser. Files to be uploaded by the hosting service must be in CSV format, have a header row, and include the fields in the primary key. All other fields are optional. Sample files can be downloaded from our web site. Orders are downloaded in denormalised form, with each detail record joined to the corresponding header record. 48 Uploading CSV file The only complex form that the hosting service has is the one used to upload CSV files. 1. At the top of the form is a drop down list to select the table to be uploaded. 2. Then comes a control to select the file to be uploaded. 3. The encoding can depend on the operating system you are using, and the country you live in. On a Windows PC, the simplest way to find out is to open the file with notepad, and the save it. 49 4. There are three options at the bottom of the form: a) Convent case will convert each field according to its type. b) Trim spaces will remove leading and trailing spaces from all fields. c) Delete existing rows clears down the table before populating it. All three options are on by default. The last one allows tables to be uploaded in stages. This is important, because there is the usual 2MB limit on the size of files that can be uploaded. 50 Sage support The hosting service for the Sales Manager allows subscriber to export orders from his company database into Sage Instant or Sage 50 Accounts, using the WebXel Order Importer for Sage. This is a third party product which currently costs £100 per annum. Once you have installed the Order Importer, you have to configure it to use the hosting service as a data source. In particular, you have to give it two URLs: 1. The import URL is http://www.vanware.co.uk/admin/sage1.php?comp anyId=nnn&password=xxxxxxxx 2. The notification URL is http://www.vanware.co.uk/admin/sage2.php?comp anyId=nnn&password=xxxxxxxx Here nnn is the id of your company, and xxxxxxxx is the password. The first script returns an XML file, according to specifications made by WebXeL, and the second one resets the corresponding change flags. 51 Admin database Introduction The Admin Database is a Microsoft Access application that can sync with a company database on the hosting service. This is a great option if you are familiar with Microsoft Access, and you want to use it to build your own back end services. This chapter assumes that you are familiar with Microsoft Access, and uses some of its key concepts without explanation. Installation To install the Admin database, just download the admin.zip file from our web site, and unzip it into your documents folder. The admin folder contains: 1. Admin.mdb is the application. It contains all the Microsoft Access objects, but no data. 2. Blank.mdb and Sample.mdb are databases that Admin.mdb can link to. They contain 52 data, but no Microsoft Access objects. 3. logo.ico is just the icon file for Admin.mdb. All the files have to remain in the same folder. There is no formal installation procedure, but it is easy enough to add a link to the admin.mdb file to your Start menu. VBA module The VBA code for the admin database was specifically designed with portability in mind, and it should run on any version of Windows and Microsoft Access. There are no library references, and all objects are weakly typed. You may want to change this if you are writing your own VBA procedures. The code uses DAO whenever it can. However it uses ADO to update the linked tables, as this is the only way to get an updatable recordset. Every procedure begins with the lines Option Compare Database Option Explicit 53 This ensures that all variables are declared, and makes string comparisons case insensitive. These are fairly standard VBA conventions. Switchboard The admin database uses a minimal switchboard, with just five options. The last two are convenience functions to open the navigation pane and the login screen for the web app, respectively. The switchboard uses a custom form, and only has one page. To edit the switchboard, you will have to install the switchboard manager, which is not installed by default. 54 Linked database The admin database follows the standard design practice of storing the Microsoft Access objects and the tables in separate databases. This makes it easier to manage the data, and to upgrade the application. The Parameters form specifies where the app should look for its linked tables. The profiles are contained in the Profiles table. To add or remove profiles, edit the table directly. The profile points to the database that contains the tables that the application links to, and this depends on the type of database being used. For Microsoft Access databases, the profile is the name of the mdb file, which must be contained in the same folder as admin.mdb. If it does not exist, it will be created. For other types of database, the profile is the name of 55 a user DSN. DSNs (Data Source Names) are pointers to ODBC databases, and are created by the ODBC Data Source Administrator. This is an applet in the Administration Tools section of the Control Panel. For ODBC databases, the database must be created manually. For SQL Server databases, the easiest way to do this is to open the blank.mdb database, and use the SQL Server migration tool in the toolbar. The main advantage of using an SQL Server database instead of a Microsoft Access one is that it works better in a multi-user environment. You can pit the database on a server and have more than one user work with it at the same time. Once you have set up your database, you will be able to use the forms provided to upload and download data, in the same way as you can with the web app for the hosting service. But you will also be able to add additional features to suit your particular business needs. 56 Macro security No discussion of Microsoft Access would be complete without mentioning its nemesis, which was macro security. When the first malware arrived in the year 2000, Microsoft was caught out by the sudden need to tighten up the security of its Office suite of applications. Its reaction was to effectively ban Office documents that contained VBA code. For Word documents and Excel spreadsheets that was a reasonable response, but for Access databases it was catastrophic. It means that when you open the admin database for the first time, you will probably encounter an error message, saying that there has been a macro security violation. This has nothing to do with Access macros. It is actually referring to the VBA project. For other Office documents, this typically contains macros. In the long run, the only way to get any work done is to turn off Macro Security for Microsoft Access databases. 57 To do this: 1. Open any Microsoft Access database. 2. Click on File > Options > Trust Center > Trust Center Settings. 3. On the Trust Center form, click on Macro Settings >Enable all macros. 4. Close the database. 58 SQLite databases SQLite Studio Users often ask us how they can edit an SQLite database on the desktop. Our recommendation is SQLite Studio, which is by far the best tool available. It ticks all the right boxes: 1. 2. 3. 4. 5. 6. 7. Tables can be imported and exported. Tables can be edited directly. It can handle notes and other blob fields. It is well documented. It is still being updated. The web site is still active. It is free. What more could you want? 59 Structure Every SQLite table has a primary key called _id. This is integer typed and it is autoincremental. In other words, its value is assigned when a row is inserted in the table, and it can never be changed. We adopted the Android convention of using Camel case for both table names and column names, e.g. taxRates and taxCode. IOS has similar conventions. As mentioned earlier, we use a restricted range of data types. All the strings have a maximum length of 255 bytes, and none of the fields are nullable. The Android and SQLite databases use the same schema, and are designed to be interchangeable. However, iOS is currently using an older version of SQLite than Android, and it seems that the SQLite databases can no longer be swapped. 60 Types of database To summarise: 1. The Android and iPhone databases both use an SQLite database. Currently they are at different levels, and are not interchangeable. 2. The hosting service uses a MySQL database, though this is transparent to the user. 3. Self-hosted databases can use either MySQL or SQL Server. 4. The admin database is a Microsoft Access application, which can store its data in any database with an OSBC driver. Usually this is either a Microsoft Access or an SQL Server database. 61 Self-Hosting Introduction For companies that wish to host their own web servers, we supply basic scripts to set up a server in both the PHP/MySQL and ASP.Net/SQL Server platforms. Classic ASP is no longer supported. Companies running their own web servers should have some familiarity with the platform they are using. This is especially true when it comes to ASP.Net, where our own experience is limited. Self-hosting companies pay a fixed fee per mobile device. Details can be found on our web site. Installation 1. 2. 3. 4. 5. 6. 7. Download the scripts from our web site. Unzip the archive. Open the folder for your platform (php or aspx). Run the script called sql.txt. Open the server folder. Change the parameters in the dbparams script. Upload the server folder to the tour HTML folder. 62 Testing You can test your server by entering a transaction in the address bar of your browser, e.g. http://.../server/products2.php?employeeId= 1&password=password Replace the ellipses with the address of your web server, and change the php suffix to ask if you are using the ASP platform. If everything is correct, the browser will display the number 0, followed by the data for the transaction. If you do not have any data to hand, you can populate your database with the sample data on our web site. That contains data in CSV format that you can use to fill your tables. 63 Business model The Sales Manager has a flexible business model that should suit most users in the US and the EU, and will work for many users in other countries as well. 1. All sales are in a single currency, which is the one for the current locale. 2. There are multiple rates of sales tax, which can be specified per customer or per product. 3. Each customer is charged according to one of five price lists. 4. A separate discount can be applied to each order line. 5. Some customers are charged special prices for certain products. 6. Prices and tax rates can vary over time, and products cab become obsolete. 7. Once an order has been placed, it cannot be changed. 64 Sales tax The Sales app uses a complex set of rules to determine the sales tax for a given detail line: 1. The customer, product, order header and order detail records each has a field for the tax code. Each of these fields in optional. 2. There is also a separate table for tax rates. These are arranged in a sequence, and the first one in the sequence determines the default rate. 3. When an order is created, if the customer has a tax code, it is copied into the order header. 4. When a product is added to an order: a) If the order header has a tax code, it is copied into the order detail record, and the tax code on the product record is ignored (!). b) If the order header does not have a tax code but the product does, it is copied into the order detail record. c) If neither the order header nor the product has a tax code, the default one is used. 65 Categories Categories can be arranged in a hierarchy using a simple breadcrumb structure. The example on the right shows the categories in the sample data, being edited by the app. The rules are simple: 1. The names of categories and their subcategories are separated by > signs. 2. Categories can either have subcategories or products, but not both. 3. Categories that have subcategories have names that end with a > sign. In this example, Beverages> is a category, and Beverages>Wines is a subcategory. 66 Database rules The Sales Manager database has a number of simple rules, designed to make it more portable across platforms: 1. Nulls are never used. All strings default to empty strings, and all numeric fields default to zero. 2. Binary values are encoded as integers, following the usual convention that zero is false, and any other value is true. 3. Dates are encoded as strings in ISO format, e.g. “2015-01-21”. 4. All decimal numbers are -stored in floating point format. Decimal format is not used. 5. Percentages are stored as ratios, e.g. 15% is 0.15. 6. Tables are related, but referential integrity is never enforced. The Sales app handles situations in which data is missing, and takes the best available course of action. 67 Proprietary format 00 10 20 30 40 50 60 70 31 31 65 53 43 36 2e 01 01 2d 72 71 32 01 32 31 36 32 61 75 41 30 01 01 01 31 67 61 20 33 01 30 42 01 65 72 31 39 02 01 53 01 73 65 41 01 36 53 42 01 01 01 47 31 01 01 45 30 46 4c 01 38 30 30 56 01 69 6f 55 01 33 2e 01 42 6e 6e 4b 31 38 32 32 27 73 64 01 01 01 01 30 73 62 6f 01 30 32 01 31 20 75 6e 01 01 36 02 35 42 72 01 30 53 33 2d 65 79 01 01 01 2e 30 76 20 45 02 30 35 1.6.BSBEV.2015-0 1-21...0.B's Bev erages.Finsbury Square.London..E C2A 1AG.UK...0.. 6.039.18.1.0.S.0 .2...6.038.263.5 .1.0.S.0.2... The Sales app uses a proprietary format to send data to and from the web server. This is a variant of TSV (Tan Separated Variables), which itself is a variant of the ubiquitous CSV. TSV improves on CSV by using tabs as field separators instead of commas, which avoids all the hassle generally associated with CSV. Parsing a TSV file is trivial. Just split on linefeed characters to break the data down into individual records, and then split each record on tabs, to obtain the individual fields. Our format is similar to TSV, except that we use hex 01 and hex 02 instead of tabs and linefeeds, which allows us to include these characters in text. 68 FAQs Below is a copy of the FAQ index in the company blog. Each entry is a link to the corresponding article on the support site. Adding a logo to the invoice header What time zone is used in CSV files? What decimal separators are used in CSV files? How do I get my Google Play/App Store purchases back? How can I add a new order? How does banding work? What are special prices? Negative prices in US dollars Can I share my purchases with another user? Why is not my customer map not working? How do I change the currency? Can a customer record be downloaded by more than one user? How can I download my data to my mobile device? My purchases have disappeared Can purchases be transferred? 69 Sample Invoice Invoice Northwind Trading Tooting High Street London SW17 8LN Tel: (2) 555-3563 Order Id 2 Order Date 25/09/2013 Customer Id BSBEV Required Date Shipper Bill To Ship To B's Beverages B's Beverages Finsbury Square Finsbury Square London London EC2A 1AG EC2A 1AG UK UK Ref Description Price 70 Qty Disc Total 039 Chartreuse Verte 038 Côte de Blaye £18.00 1 0% £18.00 £263.50 1 5% £250.32 Net £268.32 Tax £53.66 Freight £0.00 Total £321.99 Thank you for your order! 71 Schema The diagram above shows the logical relationship between the tables in the database. The arrows show one-many relationships. 72 Record Layouts These are complete; layouts for all the tables in the web server. The layouts for the mobile database are similar, except that there is no Employees table, and no employeeId field in the Customers and Orders tables. Categories Name Type Description category Text name of category. uses a breadcrumb format. Custom Name Type Description section Integer section number: 0=order header, 1=detail line. seq order in which control appears within section. Integer 73 Name Type type control type: 0=header, Integer 1=spinner, 2=checkbox, 3=text. name Text the name of the control, as shown to the user. Text any additional values. For spinners, this is a list of options, separated by commas. vals Description Customers Name Type Description customerId Text unique id of customer. employeeId Long employee who sells to customer. if zero, any employee can sell to customer. 74 Name Type Description priceList Byte price list for orders. integer between 0 and 4 taxCode Text tax code for orders. if blank, customer uses tax codes on product records. name Text name of customer. address Text street address. city Text region Text postalCode Text country Text post code or zip code. latitude Long in degrees multiplied by 10^6. zero if location is not known. longitude Long in degrees multiplied 75 Name Type Description by 10^6. zero if location is not known. contact Text name of contact. contactTitle Text job title of contact. phone Text phone number. email Text email address. notes Memo notes about the order. discount Double default value for new orders.*new colour Integer 0=red, 1=yellow, 2=orange, 3=green.*new dirty set when record is Boolean uploaded by a mobile device. 76 Employees Name Type Description employeeId Long unique id of employee. name Text name of employee, for use by system administrator. password Text password for web server. restricted if set, user cannot Boolean change any company data. Order Details Name Type Description unique id employee who created order. part of primary key. employeeId Long 77 Name Type Description orderId Long unique id of order. part of primary key. productId Text unique id of product. part of primary key. unitPrice Currency unit price. copied in case price changes. quantity Double discount Double taxCode Text tax code. taxRate Double tax rate. copied in case rate changes. custom Text data for custom fields on Edit Line screen. 78 Orders Name Type Description employeeId Long unique id employee who created order. part of primary key. orderId Long unique id of order. part of primary key. customerId Text unique id of customer. orderDate Text date of order. requiredDate Text date when order is required. shipper Text delivery method. freight Currency delivery charge. shipName Text name of recipient. 79 Name Type Description shipAddress Text delivery address. shipCity Text shipRegion Text shipPostalCode Text shipCountry Text notes Memo stamp Text timestamp set by server when order was uploaded. custom Text data for custom fields on Edt Header screen. type Integer 0=invoice, 1=credit note, 2=quote.*new dirty Boolean set when record is 80 Name Type Description uploaded by a mobile device. Products Name Type Description productId Text unique id of product. name Text name of product. category Text product category. barcode Text price Currency price1 Currency price2 Currency price3 Currency price4 Currency 81 price shown on Products screen. Name Type Description taxCode Text tax code. can be overridden by tax code on order. if true, product is not shoen on Pick Lines screen. discontinued Byte notes Memo banding Text price banding, e.g. 110-100. stock Double current stock level. Shippers Name Type Description shipper Text name of shipping method. 82 Special Prices Name Type Description customerId Text unique id of customer. productId Text unique id of product. price Double special price. description Text reason for awarding special price. Tax Rates Name Type Description code Text code printed on invoices. description Text description of tax rate. rate Double rate as percentage. seq Long sequence in which rate appears. 83