1
Maximizing Print/Cut Accuracy with Multiple Copies
Maximizing Print/Cut Accuracy with Multiple Copies
It is no mystery that the longer a print and cut job is, the less accurate the cut alignment becomes. Here’s a little VersaWorks tip to help
improve workflow and cut accuracy on jobs that call for multiple copies, using the CustomCUT feature within VersaWorks.
Typical Setup
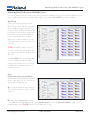
First let’s look at a typical job setup in VersaWorks. The figure on the right shows a standard
job in VersaWorks. This job contains 30 copies
of a specific object. All 30 decals will be printed
first and then cut automatically in a single routine.
In the case of some materials, this will drive the
printer to travel a long distance, resulting in
displacement or a slight mismatch between the
printed object and its cut contour over the course
of the job.
Tech Tip: VersaWorks sends the cut portion of
the job to the printer upon “end of page”. In this
case the page contains all of the decals requested,
30 copies.
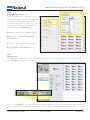
The CustomCUT feature in VersaWorks allows
the user to subdivide the page into multiple
segments, instructing the printer to print and cut
in smaller segments resulting in great print cut
registration accuracy.
Step 1
Choosing how many rows to print and cut
With this workflow, VersaWorks will subdivide the
job into multiple pages to process. Here are the
steps to create a smaller page size.
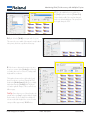
A. First, make all the desired settings for the job.
This would include number of copies, size, quality
settings, etc.
B. Navigate back to [Layout] and record the
current width of the material in the printer. This is in the [Media Settings] area. Select the [Get Media Width] to get the current
media width and record it. (Tech Tip: Right click on the width and select copy).
Roland Support Document
Date: 01/13/09
Revision 3.0