1
Maximizing Print/Cut Accuracy with Multiple Copies
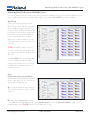
C. Once the width has been recorded, select
the [Size] drop down and select [Custom Cut].
Notice that the width of the setup has changed
back to the default width (max of the printer) and
the height changed to 104”.
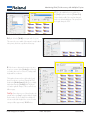
D. Right click in the [Width] area again and select paste.
This enters the correct width of the material currently loaded
in the printer, which was copied from the last step.
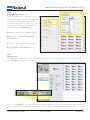
E. Now it’s time to determine how many rows are to
be process at a time. In the [Scaling] area of the layout window, there are four selections. Scaling, width,
height and fit to media size.
The height in this area refers to the height of each
decal, or in this case, each row. Change the 104”
height in the [Media Settings] field to be just slightly
larger than that in the [Scaling] field. The job preview at the right will change to reflect each row as a
different page.
Tech Tip: If more than one row of decals needs to be
printed and cut per “page”, simply multiply the height
by the number of rows needed. In this example, if 2
rows are needed, the height of the custom cut media
setting would be approximately 12.20 inches.
Roland Support Document
Date: 01/13/09
Revision 3.0