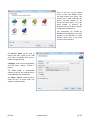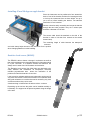
1
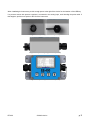
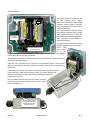
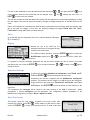
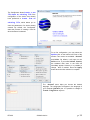
EE-400 User Manual Event Encoder © Maid Labs Inc. Last Revision February 2013 Registration Thank you for purchasing the EE-400. Please complete and return the registration form. The internal software for the products manufactured by Maid Labs Technologies can be updated easily. By registering this software you will be able to enjoy the majority of upgrades we will make over the years in firmware, provided that your hardware is compatible. To access the updates, you must provide the following information (make a photocopy of this page) fill the form below and then return it to us via mail or fax, or simply fill out the registration section on our website www.maidlabs.com Our services and guarantees are only available for registered products. If you have several, please register them all. Name: Email : Organization : Address : City : Province/State : Postal Code: Name of Product : Serial Number : Date of purchase : EE-400 © Maid Labs Inc. p. 2 Warranty Municipal And Industrial Data Labs inc. (hereinafter called "MAID Labs") states the following express warranty for any new Maid Labs product, sold by an authorized Maid Labs representative. MAID Labs guarantees that this product is free, under normal use and maintenance, of all manufacturing defects and is subject to the following terms and conditions: 1. To obtain warranty service: (a) The product registration was made within 7 (seven) days from the date of purchase. (b) The registration form must be completed. (c) The product must be shipped to Maid Labs or to an approved maintenance and repair service center for maintenance. Shipping is at customer's expense. 2. Limitations: This warranty does not apply to: (a) Repair or replacement of all cabinets, batteries, connecting wires, antennas and accessories. (b) Any defect or repair as a result of abuse, neglect, inadequate care and/or misuse. (c) Any defect or repair due to failure to follow the recommendations in the user manual. (d) Any modification, adjustment or repair to Maid Labs products by any other company other than Maid Labs authorized maintenance and repair centers. (e) All Maid Labs products, whose serial number has been damaged, altered or removed. (f) The maintenance, cleaning or periodic verifications. (g) All Maid Labs products that are not the property of the original owner. (h) Products purchased from a bankrupt, insolvent or non-approved representative. (i) Any damages caused by fire, flood, lightning, power surges or other events beyond the control of Maid Labs (acts of God). (j) The warranty does not cover the elimination of static or electrical interference, adjustments or costs of labor associated with removal or reinstallation of the unit for repair. (k) The warranty does not cover damage caused by high humidity, water or leaking batteries. 3. If a Maid Labs product is defective under applied conditions, necessary repairs will be performed, at no additional cost, for parts and labor when Maid Labs recognizes that such defects are caused by materials or manufacturing. 4. This warranty constitutes the entire express warranty given by Maid Labs for Maid Labs products. No representative or service maintenance employee is authorized to extend this warranty on behalf of Maid Labs 5. Since each installation may incorporate malfunctions, preventing Maid Labs from ensuring the smooth operation of its devices in all circumstances, Maid Labs will not refund nor exchange the instruments that were caused by connections to any problematic installation. 6. The warranty period is one year on parts and labor from the date of purchase. 7. LIMITATION OF DAMAGES: To the extent permitted by applicable law, under no circumstances is MAID Labs or its affiliates liable to you, to a user or a third party for any indirect, special, consequential, or punitive damages of any kind whether in contract or civil, including but not limited to, personal injury, loss of revenue, loss of goodwill, loss of business opportunities, loss of data, whatever may have been the predictability of such damages. And in no case may the total responsibility of Maid Labs or its affiliates exceed the equipment purchase price received from you, from a user or from a third party, regardless of the laws by which the cause of action was brought. The foregoing does not affect your territory’s statutory rights. At Maid Labs Technologies, we have made every effort to write a user manual that is easy to use and understand. However, it is possible that errors may occur in spite of our efforts, or that recent hardware or software upgrades might not be in this manual. We strongly suggest verifying if a new version of the manual and firmware are available on our website www.maidlabs.com EE-400 © Maid Labs Inc. p. 3 Table of content REGISTRATION ..................................................................................................................................................................... 2 WARRANTY .......................................................................................................................................................................... 3 TABLE OF CONTENT ............................................................................................................................................................. 4 CONTACTS............................................................................................................................................................................ 5 PRODUCT APPLICATION ....................................................................................................................................................... 5 PRODUCT DESCRIPTION ....................................................................................................................................................... 5 OPTIONS / ACCESSORIES ..................................................................................................................................................... 6 USE AND MAINTENANCE ..................................................................................................................................................... 6 ENVIRONMENTAL CONDITIONS ........................................................................................................................................................ 6 CLEANING ................................................................................................................................................................................... 6 ELECTRICAL CONDITIONS ................................................................................................................................................................ 6 POWER AND BATTERIES .................................................................................................................................................................. 6 OPERATING TIME ON BATTERIES ....................................................................................................................................................... 6 INSTALLATION ...................................................................................................................................................................... 6 DIMENSIONS ....................................................................................................................................................................... 7 CONNECTIONS ..................................................................................................................................................................... 9 120VAC/12 VDC EXTERNAL POWER ............................................................................................................................................. 10 DIGITAL INPUT ............................................................................................................................................................................ 10 INSTRUMENT START UP ..................................................................................................................................................... 10 TO TURN ON THE SCREEN OF A BATTERY-OPERATED DEVICE .................................................................................................................. 10 THE MENUS ....................................................................................................................................................................... 10 THE CONTEXTUAL MENU............................................................................................................................................................... 10 MAIN SCREEN .................................................................................................................................................................... 10 MENU .......................................................................................................................................................................... 11 INSTRUMENT SETUP .......................................................................................................................................................... 11 DATE & TIME SETUP .................................................................................................................................................................... 11 UNITS ....................................................................................................................................................................................... 12 DISPLAY .................................................................................................................................................................................... 12 DOWNLOAD SETTINGS ................................................................................................................................................................. 12 RESET TOTAL EVENTS ................................................................................................................................................................... 12 SOFTWARE UPDATE ..................................................................................................................................................................... 13 LANGUAGE ................................................................................................................................................................................ 13 LOCK SCREEN PASSWORD SETUP ..................................................................................................................................................... 13 TECHNICIAN ............................................................................................................................................................................... 13 FACTORY RESET .......................................................................................................................................................................... 13 EE-400 © Maid Labs Inc. p. 4 ERASE FILES ............................................................................................................................................................................... 13 SD CARD INFO ........................................................................................................................................................................... 14 COPY MANUAL FROM USB .......................................................................................................................................................... 14 COPY APP FROM USB ................................................................................................................................................................. 14 DEVICE INFO ...................................................................................................................................................................... 14 LOCKING THE SCREEN ........................................................................................................................................................ 14 SHUTDOWN DEVICE........................................................................................................................................................... 14 INFO ............................................................................................................................................................................ 15 USB .............................................................................................................................................................................. 15 MONTHLY REPORT ...................................................................................................................................................................... 15 COPY USER MANUAL................................................................................................................................................................... 16 MERMAID DATA......................................................................................................................................................................... 17 RAW DATA ................................................................................................................................................................................. 17 MAIDDEVICES CONFIGURATOR SOFTWARE ....................................................................................................................... 17 ACCESSORIES ..................................................................................................................................................................... 21 STAINLESS STEEL BRACKET FOR MAID LABS DEVICES (90 ANGLE) (MLSUP90) ........................................................................................ 21 STAINLESS STEEL BRACKET FOR MAID LABS DEVICES (45 ANGLE) (MLSUP45) ........................................................................................ 21 INSTALLING 45 AND 90 DEGREES ANGLE BRACKET.............................................................................................................................. 22 RESISTIVE LEVEL SENSOR (MLSNR) ................................................................................................................................................ 22 CHECK VALVE OPEN SENSOR ......................................................................................................................................................... 23 INDEX ................................................................................................................................................................................ 24 Contacts MAID Labs inc. 944, André-Liné, Granby, Quebec, Canada, J2J 1N2, T 450-375-2144 Web site : www.maidlabs.com Email : [email protected] Product Application Unless otherwise specified, this manual contains the information required to install, properly operate and maintain the EE-400 device and its accessories. Product Description The EE-400 is an event encoder that can run on batteries for several months. Each digital recording is time stamped. The unit can store several million enteries over a period of several years The download is via a USB key that can be used to change the device settings or to update its internal software. The backlit display lets you view each current event as well as stored events. EE-400 © Maid Labs Inc. p. 5 Options / Accessories Power supply 120V - 12 VDC 2A (MLPS2) Resistive Level sensor (MLSNR) Check Valve Open sensor (MLDOC) Use and Maintenance Environmental Conditions It is the user’s responsibility to ensure that this product is not exposed to an environment for which it is not designed. These conditions may include a range of extreme operating temperatures, extreme humidity, vibration or abnormal shock, extended submersion or potentially explosive atmospheres. Cleaning If the sensor measurements are not what they should be, this can be caused by fouling of the sensors. Periodic cleaning is recommended. It is important to follow the sensors’ manufacturer's recommendations. Electrical Conditions Each Maid Labs product is designed to operate correctly in a specific range of electrical conditions. The product label identifies the main parameters of connection. All entries are designed to resist reverse polarity, as well as higher voltage to a certain extent. It is the user’s responsibility to ensure that all electrical connections are made to the products in accordance with the recommendations of MAID Labs and the local electrical code. The user should read this manual before connecting the device. Power and Batteries This product can work with internal alkaline batteries size C and a 12 to 24 VDC power supply. The version of EE400 with touch buttons and the blue screen (serial number 120XXX (where XXX represents the serial numbers) use standard non-rechargeable batteries. Rechargeable batteries are required with an external power supply for the EE-400 with a capacitive keyboard (not touch) and black LCD screen with serial number beginning with 111XXX (where XXX represents the serial numbers). DO NOT INSTALL NON RECHARGEABLE BATTERIES INTO A DEVICE THAT CHARGES BATTERIES, AN EXPLOSION MAY RESULT. All types of batteries may leak, and this could cause damage not covered by warranty. The serial number label indicates if external power or rechargeable batteries are required. Operating time on batteries The instrument will work several days on batteries, allowing the user to download its data and calibrate the instrument. Each time the device is activated by the user, whether to access the menus, transfer the data to the USB or update the internal software of the instrument, the energy required can reach up to 400 times the normal energy consumption. These actions quickly deplete the life of the batteries. Installation The EE-400 is not waterproof. Avoid placing it in locations where liquids could fall on it or condensation could occur. Damage caused by water or excessive humidity voids the warranty. EE-400 © Maid Labs Inc. p. 6 A desiccant bag is placed inside the instrument in order to minimize or delay damage related to humidity which may affect all electronic products. When you open the case to change the batteries, be sure to replace the desiccant bag. If you think it is inefficient, you can order additional ones from MAID Labs. The instrument must be placed in a location where there is no risk of being hit or dropped. Dimensions Do not use this image as a template EE-400 © Maid Labs Inc. p. 7 When installating the instrument, provide enough space at the right of the device for the insertion of the USB key. If a pressure sensor with pressure regulator is connected to the analog input, avoid bending the probe cable. If this happens, provide more space to the left of the instrument. Height 2.19 in. (5.5 cm), Width 3.5 in. (8.9 cm) Length 6.5 in. (16.7 cm), Height 2.19 in. (5.5 cm) Length 6.5 in. (16.7 cm), Width 3.5 in. (8.9 cm) EE-400 © Maid Labs Inc. p. 8 Connections In the latest version of the EE-400, the 12 VDC external power supply, batteries, the connection with the USB connector and the sensor connector (float or otherwise) are all on the PCB 6 layers tropicalized. USB Connector The water-resistant connector keeps its protective properties when a single cable passes through it. To keep the box sealed when using the external 12 VDC, remember to add silicone or other similar product. Plug the sensor here The digital input is commonly used for installing a digital sensor, like a float, a check valve Plug the optional 12 VDC power supply here open sensor or a rain gauge. If an external 12 VDC power is used, make sure you connect the negative connection to the far right of the connector. The USB connector cable is relatively short and is well maintained. Avoid unnecessary force when changing batteries. Open the case of EE-400 as you can see it in the following picture. Due to limited space, do not allow the protective sheath of the sensor cable to enter the housing of the EE-400. If the external 12 VDC is used, make sure that the wires of the sensor and the power does not overlap when closing the case. The space between the batteries and the bottom of the case has been calculated to allow the height of only one wire. Place a folded desiccant bag near the sensor connector before closing the case and make sure the seal is clean before closing the lid. Place the desiccant bag folded in half between the batteries and the waterresistant connector EE-400 © Maid Labs Inc. p. 9 120VAC/12 VDC external power Use an external power supply MLPS2 (120VAC/12VDC 2A) only on EE-400 designed to operate with external power (see Power and Batteries, p. 6). Check the polarity of wires before connecting it. Digital input The digital input is in a dry contact format. Meaning that the contact provided by the sensor must be closed or open, but without current, i.e. Relay contacts or float switch. The instrument generates low voltage in one of the two connection wires while the other is the return. When the instrument detects its own power, the contact is closed. Sensors can be floats, opening valve sensors, relays or any type of equipment generating a dry contact, provided that the input frequency does not exceed 10 cycles per second (10 Hz). Instrument start up When the instrument is powered by adequately charged batteries or external power, the instrument automatically saves its input state changes or values, even if the display is off. If the unit runs on batteries only, the display power downs to minimize the energy consumed by the device. The backlight turns on when the keyboard is activated and turns off after a few seconds of inactivity (see Display p.12), independently or whether the device is battery powered or AC powered. To turn on the screen of a battery-operated device If 1234 appears at the bottom of the screen, with a bare finger, press them one at a time in order to unlock the screen. If the instrument is "asleep", press any button for 2 seconds to wake it up. The menus The contextual menu The keys of the instrument use a tactile keyboard. Do not press more than one key at a time and let ½ seconds between each action, except to turn on the screen. Usage of the buttons depends on the displayed screen. Main screen Total Events shows the number of state changes of the digital input, such as the number of events. Since DDMMYY indicates the date of the first event recorded since the last cumulative reset. Last DDMMYY and Last HH:MM:SS displays when the last event started and its duration. Batt. 97% EE-400 Represents the remaining energy in the batteries assuming that 100% would be for new alkaline batteries providing a combined voltage of 3 volts or more. © Maid Labs Inc. p. 10 If the instrument is a model with an external power 12 VDC supply and rechargeable batteries (different than the one working only on non-rechargeable batteries), the battery indicator will change to indicate an external power supply, when it is plugged into 120 VAC. C 23 is the temperature of the device with ± 3°C precision Date: 16/05/12 Hour: 09:42:30 The date and time displayed should be correct when the instrument is awake. If this is not the case, press the key to access MENU / Configuration / Date & Time setup, and then follow the instructions in this section (see p.11). The MENU button provides access to a menu to configure the instrument or get information on the device. The INFO button displays on-screen details of recorded events. The USB key allows you to create on the USB drive various files including one Excel™ compatible file in CSV format containing the monthly report. MENU The MENU key displays four options, which includes configuration of the device, display information about the hardware and the software of the instrument, and to display the lock screen function and the shutdown device function. Instrument Setup From the main screen, press the MENU ENTER key to access the menu and then to reach the configuration menu. This allows you to change all the items listed below. Browse the menu with keys and then press ENTER to take action. Once the action is completed, press BACK to return to the Setup menu. The list of submenus is longer than what is displayed on the screen. You can use the MaidDevices Configurator software supplied with the instrument for configuration. It facilitates and speeds up the configuration (see MaidDevices Configuration Software p.17Erreur ! Signet non défini.). Date & Time setup This menu displays the time, date, and the difference with Universal Time (UTC), also known as Greenwich Mean Time (GMT). EE-400 © Maid Labs Inc. p. 11 For time or date modification, select the desired field with the arrows or cursor appears under the first number that can be changed. Keys NEXT , then press the ENTER and key. A changes the value and / or to move to the next variable. The data are recorded in Greenwich Mean Time (GMT) and then adjusted to local time when displaying, creating files and reports. This prevents data loss caused by changes in daylight savings time to standard time and vice versa. Date or time changes can cause data loss when the time or date entered is turned back. When this happens, data will be lost after the change. In this case, the following message will appear Data may be lost. Continue? Editing (GMT) does not cause data loss. Units In the EE-400 only the temperature unit can be selected between Fahrenheit (F) or Celsius (C). Display Besides the use of the USB key, the backlight of the screen is the largest energy consumer of the instrument. For maximum battery operation, press the ENTER brightness setting, then increments and again or button to select the to vary from 0% (off) to 100%, 20% to accept choice. It is possible to close the backlight (brightness off) and the screen (display off) after a number of seconds specified by the user. Press the ENTER accept the choice. key to accept the selection, or to change it, then again to Download Settings To read the file created by MaidDevices Configurator, select Read conf. file and ENTER . Follow the instructions on the screen. Parameters can also be configured from the MaidDevices Configurator software. This software can be copied to a USB drive from the instrument. Simply select from the setup menu, Download settings, then Copy software, then ENTER . You will be asked to insert USB key in the instrument. The compressed file Config.zip will be copied in the main directory of the USB. A double-click should decompress it. Clicking Config.exe runs the application. The configuration software explanation of the MaidDevices Configurator is on page 17Erreur ! Signet non défini.. Reset Total events This function resets the total events selecting this function, press YES screen or CANCEL EE-400 contained in the main screen. After to confirm deletion of data from the main to return to the previous screen. To reset all the total © Maid Labs Inc. p. 12 events of the instrument, go to the Factory Reset operation located on page 13Erreur ! Signet non défini.. Software update MAID Labs is constantly improving its products, especially its instruments’ internal software, whether because improvements are suggested or bugs have been found, despite all the tests that have been performed on the instrument. The latest version of firmware can be obtained from the website www.maidlabs.com for devices that have been registered. Make sure of the reliability of the power source before beginning the start up of the instrument. If it runs on batteries and that have a capacity of less than 60%, replace them with new batteries before the start up. If the unit is operating on external power, there should be no power interruption during the update. To reduce this risk, make sure that rechargeable batteries have a minimum capacity of 60%. This can be checked on the main display by disconnecting the instrument from the external source. Never use alkaline batteries in an instrument made to work with rechargeable batteries. They could cause damage to the instrument and people. After selecting Software Update, insert a USB key that contains the file EE400.hex in the root directory. As soon as this file is detected, the program begins. The software is first copied into the permanent memory inside the instrument, then the update itself begins. A percentage indicates the progress of each of these steps. The instrument reboots when everything is finished. Language The instrument can operate in either English or French. Press select the language and APPLY or to to accept the displayed language. Lock screen password setup By default, if no lock screen password has been set, simply press 1234 to have full access to the menus. To create a custom lock screen password, press EDIT and enter a 5 digit code between 1 and 4. Technician The technician menu allows to perform operations and access functions that are normally reserved for an experienced technician. Attention, in this menu, there are functions that could completely erase the memory of the instrument. Factory Reset This resets the device to ther factory default settings. If this is what you want, press in order the keys and . The memory will be empty after execution. This is equivalent to formating the drive of a computer. EE-400 © Maid Labs Inc. p. 13 Erase Files This feature allows you to select the file to delete from MicroSD card. Assert is a file for tracking bugs if necessary. Digital, TempBatt and Analog files are explained in the Raw Data section (see p. 17). When the file for delete is selected, press ENTER screen, then OK to access the next to confirm. SD Card Info This function verifies the amount of memory contained in the internal memory and the available space. With 2 GB of memory, it would be very surprising to run out of memory during the life of the instrument, which is more than 10 years. Copy Manual From USB This feature allows you to update the PDF user manual recorded in the internal memory of the instrument, which could be necessary when major updates of the firmware occur. Copy App From USB This feature allows you to update the application MaidDevices Configurator in the internal memory of the instrument, which is necessary when major updates of the firmware occur. Device Info From the main screen, press the MENU and ENTER key to access the menu, the arrow to display the product information. Locking the screen From the main menu, you can allow restricted access to the device. By default, if no lock screen password has been set, simply press 1234 to have full access to the menus. If the lock screen password has been configured (see Lock screen password setup, p. 13), you just enter this password with the device keys. The unit automatically locks the screen after 30 seconds, or as defined by the user. Shutdown device This procedure is recommended when maintenance is done on the device for example battery change. This avoids the possibility of recent data loss that would have not yet been stored in the device. This function causes a complete shutdown of the unit. To return to normal operation, simply remove the power supply including batteries and reconnect after a few seconds. EE-400 © Maid Labs Inc. p. 14 EE-400 © Maid Labs Inc. p. 15 INFO From the main screen, press on key INFO automatically preselected. Press MONTH month or year to change, and then . The current month is or YEAR and to select the to vary among months and years for which data are recorded, and press ENTER . The next window shows, for the desired month, the amount and duration of events each day of the month. To view details of each event of the selected month, choose a day by pressing the arrow keys ENTER and then press to display the detailed report. The detailed report shows the date and time the event started, followed by the period of the event (Dur.) in Hour: Minute: Second. If no day is selected, the first event of the month will be displayed, as well as the following events. In all cases, press events of the selected month. and to scroll through all the USB To copy event reports, user manual, data for the MerMaid software, raw data, or technician data, on the USB key, from the main screen, press the USB button. Use a USB key formatted in FAT16 or FAT32. The amount of files on the key influences the time to copy files. It is ideal to reserve a USB key for the downloads of Maid Labs devices. Insert a USB key when the following message appears. When the transfer is complete, a message that you can remove the key will be displayed. Monthly report The monthly events report will be on the USB, in the subdirectory Monthly Reports, found under the directory with the name given to the instrument or its serial number in the root directory. See Device name on page 17. A file is created for each month of operation of the instrument, unless all data have been deleted using the Technician menu (see p. 13). Monthly reports are compatible with Excel in CSV format. If Excel is installed on the computer, the monthly reports will load automatically. The filename is composed of an identifier or the name (see p.17) or the serial number, year and month for which it is created. In the example of the monthly report on the next page, column width has been adjusted and titles centered. If the EE-400 is not installed on the first day of the month, N/A appears on the lines related to these dates. EE-400 © Maid Labs Inc. p. 16 For the current month, the dates following the creation of the monthly report are not posted. This and the file creation date are two ways of knowing when the monthly report was made. Each event detail is shown starting from line 36 of the report when Excel is opened. Copy User Manual This will copy the PDF version of the user manual recorded in the internal memory of the instrument to a USB key. This may be necessary for major updates of the internal software. EE-400 © Maid Labs Inc. p. 17 MerMaid Data This data is added to the subfolder named MLDATA. This contains the monthly files of the device (serial #-MMYY.mldata) visible to the MerMaid software only. Files already present on the key will not be copied except the file for the current month. Raw data Raw data is stored in a simple format within a text file. For each selection, the entire file may be copied the last week or the last month. The recorded data are in Universal Time (UTC). Date & Time setup section (see p. 11) explains how to see the difference with the local time (GMT). All in the menu allows to copy the digital data, battery voltage, temperature of the instrument and the analog input on the USB. By selecting Digital the Digital.txt file will be created. This is the list of all events recorded in the following digital format: 2011-02-10 15:57:44.666 1. The last "1" means that the contact is open and "0" as the contact is closed. You can see more than one 1 or 0 because the input state is saved when starting the instrument, as well as batteries changed. By selecting Batt. & temp., TempBatt.txt file is created. It contains a record of temperatures and batteries capacities stored every 2 seconds in the following format: 2011-02-10 14:36:11 26.50 2.86. "26.50 " represents the temperature as "2.86 " represents the battery voltage in volts. MaidDevices Configurator Software Read the Download Settings section on page 12 to learn how to copy the configuration software to a USB key. MaidDevices Configurator allows the setup of the following instruments: EE-400 Event encoder FlowMaid level monitor and open chanel flowmeter PressureMaid tap water pressure monitor LevelMaid level monitor through Internet SensorMaid standard datalogger Volucalc volumetric lift station flowmeter & energy analyzer At any time, in the configuration software, three actions are permitted: Returns to the previous window without saving the values of the current window. Allows you to continue with the configuration to the next window. Closes the MaidDevices configuration software. EE-400 © Maid Labs Inc. p. 18 The Configurator allows Create a new file, Open an existing file if the configuration of the device has already been performed or Create from an existing file, which allows you to enter the parameters of a device already created. By default, the Configurator starts the process of creating a new file when the button is selected. For a first configuration, you may select the Options link on the bottom left corner of the window. Two menus are available: General and Units. By default, it will open on the Units menu. If you select United States, the standard units seen in the USA will immediatly appear. However, it is possible to change them if needed. Press the Apply button when the units selection is complete. The General menu helps you choose the desired language. The configurator will appear in the language of your computer (Default) but it is possible to change to French or English at any time. EE-400 © Maid Labs Inc. p. 19 Click on the icon of the desired device. In this case "EE400". Enter the serial number of the device. This number is on a label underneath the device and also appears on the Device Info screen (see p. 14). If the serial number is incorrect, the instrument will not be able to read the configuration intended for it. The configuration file created by MaidDevices Configurator in the main directory of the USB drive is called EExxxx, where xxxx is the serial number of the instrument. The Device Name: will be used to identify data files copied to the USB drive. This is necessary when a key is used for multiple devices. Language: is the one for the operation and the device display. English. French or The Time zone: is automatically adjusted to that of the computer that is running MaidDevices Configurator. The Power Source section allows to select the type of device power: AC adapter or external battery. EE-400 © Maid Labs Inc. p. 20 The Display (backlight) can be adjusted between 0% and 100% of brightness in increments of 20%. The default value is 20%. To maximize the operating time on the battery, the Time before backlight close function can be selected: where the choices are 0, 10 and 30 seconds, while those for the Time before screen close function: are 10, 30, 60 or 300 seconds. Creating a lock screen password is also possible at this point in the software. Just create a code of 5 numbers between 1 and 4, as explained in the Lock screen password setup section (p. 13). Choose a destination folder and press to complete the configuration of the device. For the unit to read the configuration file, the .mlcfg must be in the root directory of the USB key and the file name should not change. EE-400 © Maid Labs Inc. p. 21 Accessories Stainless steel bracket for Maid Labs Devices (90 angle) (MLSUP90) The stainless steel bracket with a 90 degree angle is ideal for installation in manhole, where a vertical view is desired. Holes on the sides of the mounting plate are used to attach the probe, without straining the sealed thread clamp. If it becomes necessary to remove the instrument from its base, simply remove the bolts (not screwed), then slide the instrument a few inches. Stainless steel bracket for Maid Labs Devices (45 angle) (MLSUP45) Sometimes it is not possible to place the instrument at eye level. The stainless steel bracket with a 45 degree angle is best used when the position of the instrument is too low to permit easy reading. Holes on the sides of the mounting plate are used to attach the probe, without straining the sealed thread clamp. If it becomes necessary to remove the instrument from its base, simply remove the bolts (not screwed), then slide the instrument a few inches EE-400 © Maid Labs Inc. p. 22 Installing 45 and 90 degrees angle bracket Since the instrument can be positioned to face toward the back or front of the bracket, the holes for inserting the bolts to lock up the instrument have not been drilled. It's up to you to do so before installing the bracket. Two stainless steel bolts 1/4" are included. Choose a location easily accessible and secure the bracket through the two holes provided. They are 7 inches apart and have a diameter of 0.25 inch. The sensor cable should be attached to the side of the bracket in order to limit the force exerted on the sealed thread clamp. The remaining length of cable between the waterproof connector and cable clamp helps removal of the instrument from it position when changing batteries or other handling. Resistive Level sensor (MLSNR) The EE-400 is able to detect a change in resistance as small as that produced between two electrodes placed in clean water which is a poor conductor. It is therefore evident that detection will always work in water found in lift stations and manholes. The Resistive Level sensor from Maid Labs was designed to be easily installed and maintained. Its transparent, extremely resistant polycarbonate tube allows the verification of the products seal and the detection of corrosion. Large corrosive resistant stainless steel electrodes can be used in very toxic enviroments. Good size electrodes are of stainless steel with good resistance to corrosion that can be caused by very toxic environment where they can be used. A desiccant bag is inserted into the tube to reduce moisture. Depending on the end use the probe can be installed vertically or horizontally. The support can be placed anywhere along the length of the tube EE-400 © Maid Labs Inc. p. 23 Check Valve Open sensor The submersible check valve open sensor allows transmission of a dry contact to an event recorder such as the EE-400. Easy to install, the mercury free system generates a contact change of state with only two degrees of tilt. EE-400 Operation : -40° to 99°C and submersible. Capacity : 100,000,000 state changes. A tilt change of 2 degrees is sufficient for a state change. Dry contact type C of 1.0A Max. Maximum voltage: 6-24Vdc. Contact resistance: 3 Ohms Max. at 10° tilt Standard submersible cable of 7.6 meters/25 feet (longer on demand). Can withstand a drop of 2 meters. Dimensions : diameter of 3.6’’ x 1.5’’ of height Weight without cable : 0.3 lb 1 year warranty © Maid Labs Inc. p. 24 Index 45 degree bracket ........................................................... 21 Accessoires ..................................................................... 21 Accessories .......................................................................6 Analog ............................................................................. 14 Assert .............................................................................. 14 Batteries .................................................................... 10, 11 Bugs ................................................................................ 13 Carte MicroSD ................................................................. 13 Celsius ............................................................................ 12 Check valve open sensor .................................. 6, 9, 10, 23 Cleaning ............................................................................6 Config.zip ........................................................................ 12 Contacts ............................................................................5 Contextual menu ............................................................. 10 Copy software ................................................................. 12 Copy user manual ........................................................... 16 Create a new file ............................................................. 18 Create from an existing file .............................................. 18 CSV ................................................................................. 15 Date................................................................................. 11 Date & Time setup ........................................................... 11 Dessicant Bag ...................................................................7 Device Name ................................................................... 19 Digital .............................................................................. 14 Digital input ..................................................................... 10 Digital.txt ......................................................................... 17 Dimensions ................................................................... 7, 8 Display ............................................................................ 12 Display Report ................................................................. 15 Download ..........................................................................5 Download Setting ............................................................ 12 Download settings ........................................................... 12 EE-400 ............................................................................ 17 Electrical Conditions ..........................................................6 Environmental conditions ..................................................6 Erase Files ...................................................................... 13 Excel ............................................................................... 15 External power ...................................................... 9, 10, 13 Factory Reset .................................................................. 13 Fahrenheit ....................................................................... 12 Float ............................................................................ 9, 10 FlowMaid ......................................................................... 17 GMT ................................................................................ 11 Guarantees .......................................................................2 Humidity ............................................................................6 Info ............................................................................ 11, 15 Info de l’appareil .............................................................. 14 Installation .........................................................................6 Installing angle bracket.................................................... 22 Instrument setup ............................................................. 11 Instrument start up .......................................................... 10 language ......................................................................... 18 Language ........................................................................ 13 LevelMaid ........................................................................ 17 EE-400 Lock screen ............................................................... 13, 14 MaidDevices Configurator ......................................... 12, 17 Main screen .................................................................... 10 Maintenance...................................................................... 6 Memory ........................................................................... 14 Menu ......................................................................... 10, 11 MerMaid Data.................................................................. 17 MLSNR ........................................................................... 22 MLSUP45 ........................................................................ 21 Monthly report ................................................................. 15 Open an existing file........................................................ 18 Operating time on batteries ............................................... 6 Options ........................................................................ 6, 18 Power and Batteries .......................................................... 6 Power Source.................................................................. 19 Power supply..................................................................... 6 Pressure ............................................................................ 8 PressureMaid .................................................................. 17 Product Application ........................................................... 5 Product description ........................................................... 5 Rain gauge ........................................................................ 9 Raw data ......................................................................... 17 Read conf. file ................................................................. 12 Rechargeable batteries ..................................................... 6 Recording .......................................................................... 5 Registration ....................................................................... 2 Reset Total events........................................................... 12 Resistive level sensor ....................................................... 6 Resistive Level sensor .................................................... 22 SD Card Info ................................................................... 14 Seal ................................................................................... 9 SensorMaid ..................................................................... 17 serial number .................................................................. 19 Services ............................................................................ 2 Shutdown device ............................................................. 14 Software update .............................................................. 13 Table of content ................................................................. 4 Technician ....................................................................... 13 TempBatt ......................................................................... 14 Temperature .................................................................... 11 Time ................................................................................ 11 Time zone ....................................................................... 19 Total Events .................................................................... 10 Turn on the screen .......................................................... 10 Units .......................................................................... 12, 18 USB........................................................................... 11, 15 USB key ............................................................................ 5 Use.................................................................................... 6 Version ............................................................................ 13 Volucalc ........................................................................... 17 Warranty............................................................................ 3 Waterproof ........................................................................ 6 Web................................................................................... 3 © Maid Labs Inc. p. 25